
The standard dialogs described in Lesson 8 make it easy to perform typical chores such as picking files, folders, colors, and fonts. Those dialogs can get you pretty far, but sometimes you may want a dialog that is customized for your application.
For example, you might want to display a dialog in which the user can enter a new customer's contact information (name, address, phone number, hat size, and so on). It's unlikely that any predefined standard dialog exists for that exact situation.
Fortunately, it's easy to build custom dialogs. All you need to do is build a new form as described in Lesson 9, add a few buttons, and set a few properties.
In this lesson you learn how to build custom dialogs and make them as easy to use as the standard dialogs that come with Visual Basic.
Building a custom dialog is pretty easy. Simply add a new form to your project as described in Lesson 9 and give it whatever controls you need.
To allow the user to finish using the dialog, add one or more buttons. Some dialogs have a single OK button. Others have OK and Cancel buttons, or some other combination of buttons. Because you're creating the dialog, you can give it whatever buttons you like.

By convention, the buttons go at the bottom of the dialog in the right corner. Figure 10-1 shows a very simple dialog that contains a single textbox where the user can enter a name.
To make using the dialog easier, you can set the form's AcceptButton and CancelButton properties. These determine which button is triggered if the user presses [Enter] and [Esc], respectively. Typically the AcceptButton triggers the dialog's OK or Yes button, and the CancelButton triggers the Cancel or No button.
Note
Often dialogs set other properties to make them behave more like standard dialogs. Some of these include the following:
Setting
FormBorderStyletoFixedDialogso the user cannot resize the dialogSetting
MinimumSizeandMaximumSizeto keep the dialog a reasonable sizeSetting
MinimizeBoxandMaximizeBoxtoFalseso the user cannot maximize or minimize the dialogSetting
ShowInTaskbartoFalseso the dialog doesn't clutter up the taskbar
You can make the dialog even easier to use if you set the tab order so the focus starts at the top of the form and works its way down. For example, if the dialog contains Name, Street, City, State, and ZIP textboxes, the focus should move through them in that order.
A program uses the ShowDialog method to display a dialog. This method returns a value that indicates which button the user clicked. As explained in Lesson 8, the program can check that return value to see what it should do with the dialog's results. The examples in Lesson 8 checked that ShowDialog returned the value DialogResult.OK before processing the user's selections.
A form's DialogResult property determines what value the call to ShowDialog returns. For example, you could use the following code to make the dialog's OK Button set the form's DialogResult property to DialogResult.OK to tell the calling program that the user clicked the OK button:
' Return OK to ShowDialog.
Private Sub btnOk_Click() Handles btnOk.Click
    Me.DialogResult = DialogResult.OK
End Sub
Setting the form's DialogResult property not only determines the return result, but also closes the dialog so the call to ShowDialog returns and the calling code can continue.
That means you can set the dialog's return result and close the dialog in a single line of code. Typing one line of code should be no real hardship, but believe it or not there's an even easier way to close the dialog.
If you set a Button's DialogResult property, the Button automatically sets the form's DialogResult property when it is clicked. For example, suppose you set the btnCancel's DialogResult property to DialogResult.Cancel. When the user clicks the Button, it automatically sets the form's DialogResult property to DialogResult.Cancel so the form automatically closes. That enables you to set the return value and close the form without typing any code at all.
If you think setting one Button property is still too much work, you can even avoid that, at least for the Cancel button. When you set a form's CancelButton property, Visual Basic automatically sets that Button's DialogResult property to DialogResult.Cancel.
Note that when you set the form's AcceptButton property, Visual Basic does not automatically set the Button's DialogResult property. The assumption is that the OK Button might need to validate the data on the form before it decides whether to close the dialog. For example, if the user doesn't fill in all required fields, the OK Button might display a message asking the user to fill in the remaining fields instead of closing the dialog.
If you don't want to perform any validation, you can simply set the OK Button's DialogResult property to DialogResult.OK yourself in the Properties window.
A program uses a custom dialog in exactly the same way that it uses a standard dialog. It creates, initializes, and displays the dialog. It checks the return result and takes whatever action is appropriate.
There's a slight difference in how the program creates the dialog because you can add standard dialogs to a form at run time, something you can't do with custom dialogs. To use a custom dialog, the code needs to create a new instance of the dialog's form as described in Lesson 9.
The following code shows how a program might display a new customer dialog:
' Display the new customer form.
Private Sub btnNew_Click() Handles btnNew.Click
    ' Create and display a NewCustomerForm dialog.
    Dim dlgNewCustomer As New NewCustomerForm()

    If (dlgNewCustomer.ShowDialog() = DialogResult.OK) Then
        ' ... Create the new customer here ...
    End If
End Sub
The code declares a variable to refer to the dialog and makes a new dialog. It displays the dialog by using its ShowDialog method and checks the return result. If the user clicks OK, the program takes whatever steps are needed to create the new customer, such as adding a record to a database.
In this Try It, you build and use a simple custom dialog. The dialog lets you enter a name. If you enter a nonblank value and click OK, the main form adds the name you entered to a ListBox.
This Try It also gives you a little practice using the ListBox control, showing how to add and remove items.
Note
You can download the code and resources for this Try It from the book's web page at www.wrox.com or www.vb-helper.com/24hourvb.html. You can find them in the Lesson10 folder in the download.
In this lesson:
Create the main form shown on the upper left in Figure 10-2. Make the New Comedian
Buttonbe the form'sAcceptButtonand the Delete ComedianButtonbe the form'sCancelButton.Create the dialog shown on the lower right in Figure 10-2. Set the
AcceptButtonandCancelButtonproperties in the obvious way.Make the New Comedian
Buttondisplay the dialog. If the dialog returnsDialogResult.OK, add the new comedian's name to theListBox.Make the Delete Comedian
Buttonremove the currently selected comedian from theListBox.When the user clicks the dialog's Cancel button, close the form and return
DialogResult.Cancel.When the user clicks the dialog's OK
Button, check the entered name's length. If the length is 0, display a message asking the user to enter a name. If the length is greater than 0, close the form and returnDialogResult.OK.

Use the
ListBox'sItems.Addmethod to add a new item.Use the
ListBox'sItems.Removemethod to remove the selected item (identified by theSelectedItemproperty).Check
txtName.Text.Length = 0to see whether the name entered on the dialog is blank. You can use code similar to the following to take one action if the length is 0 and another if it is not. Notice the newElsepart of theIfstatement. If the condition is true, then the statements after theIfclause are executed. If the condition is false, then the statements after theElseclause are executed. (Lesson 18 coversIfandElsein more detail.)If (txtName.Text = "") Then ' ... Display a message here ... Else ' ... Return DialogResult.OK here ... End If
Create the main form shown on the upper left in Figure 10-2. Make the New Comedian
Buttonbe the form'sAcceptButtonand the Delete ComedianButtonbe the form'sCancelButton.Start a new project and build a form similar to the one shown in Figure 10-2.
Set the form's
AcceptButtonproperty to the New ComedianButton. Set itsCancelButtonproperty to the Delete ComedianButton.
Create the dialog shown on the lower right in Figure 10-2. Set the
AcceptButtonandCancelButtonproperties in the obvious way.Add a new form and make it look roughly as shown in Figure 10-2.
Set the form's
AcceptButtonproperty to the OKButton. Set itsCancelButtonproperty to the CancelButton.
Make the New Comedian
Buttondisplay the dialog. If the dialog returnsDialogResult.OK, add the new comedian's name to theListBox.Create an event handler for the New Comedian
Button. Use code similar to the following:' Make a new comedian entry. Private Sub btnNewComedian_Click() Handles btnNewComedian.Click Dim dlgNewComedian As New NewComedianForm() If (dlgNewComedian.ShowDialog() = DialogResult.OK) Then lstComedians.Items.Add(dlgNewComedian.txtName.Text) End If End Sub
Make the Delete Comedian
Buttonremove the currently selected comedian from theListBox.Create an event handler for the Delete Comedian
Button. Use code similar to the following:' Delete the selected comedian. Private Sub btnDeleteComedian_Click() _ Handles btnDeleteComedian.Click lstComedians.Items.Remove(lstComedians.SelectedItem) End SubThis makes the
ListBoxremove the currently selected item. Fortunately, if there is no selected item, theListBoxdoes nothing instead of crashing.
When the user clicks the dialog's Cancel button, close the form and return
DialogResult.Cancel.You don't need to do anything else to make this work. When you set the dialog's
CancelButtonproperty to thisButton, Visual Basic sets theButton'sDialogResultproperty toDialogResult.Cancelso the button automatically sets the return result and closes the dialog.
When the user clicks the dialog's OK
Button, check the entered name's length. If the length is 0, display a message asking the user to enter a name. If the length is greater than 0, close the form and returnDialogResult.OK.Create an event handler for the dialog's OK
Button. Use code similar to the following:' The user clicked OK. Private Sub btnOk_Click() Handles btnOk.Click If (txtName.Text = "") Then MessageBox.Show("Please enter a name") Else Me.DialogResult = DialogResult.OK End If End Sub
Note
Please select Lesson 10 on the DVD to view the video that accompanies this lesson.
Make a program that has First Name, Last Name, Street, City, State, and ZIP
Labelsas shown on the Contact Information form in Figure 10-3. When the user clicks the EditButton, the program should display the Edit Contact Information dialog shown in Figure 10-3 to let the user change the values. If the user clicks OK, the program copies the new values back into the main form'sLabels.Hint: As you would with a standard dialog, initialize the custom dialog before you display it.
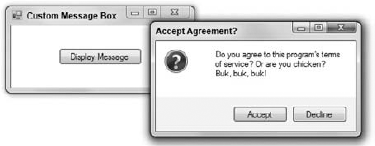
Sometimes the standard message box provided by
MessageBox.Showis adequate but you'd like to change the buttons' text. Create a program that defines the message dialog shown in Figure 10-4.The main program should set the
Label's text, the dialog's title, and the buttons' text. Make the AcceptButtonreturnDialogResult.OKand make the DeclineButtonreturnDialogResult.Cancel. Make the main form display different messages depending on whether the user clicked Accept or Decline.Hints:
The light gray area around the buttons at the bottom of Figure 10-4 is a blank label with
AutoSize = FalseandDock = Bottom. It's just for decoration.The question mark image is displayed in a
PictureBox.
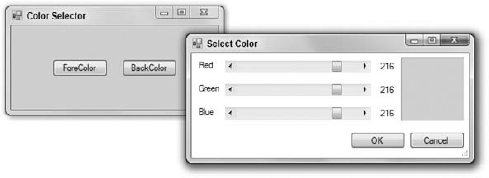
Create a color selection dialog like the one shown in Figure 10-5. The main program's
Buttonsshould display the same dialog to let the user select foreground and background colors. Update the main form's colors only if the user clicks OK. Don't worry about initializing the dialog to show the current values before displaying it. (Hint: You built a program that lets the user select colors with scrollbars for Lesson 4's Try It.)Make a background selection dialog like the one shown in Figure 10-6. When the user clicks the main form's Select Background
Button, the form displays the dialog. When the user clicks one of the thumbnail images, the dialog displays a border around that image'sPictureBox. If the user clicks OK, the dialog closes and the main form displays the selected image at full scale.Hints:
When the user clicks an image, set the
BorderStyleproperty toFixed3Dfor thatPictureBoxandNonefor the others.To remember which image was selected, place a hidden
PictureBoxon the dialog and set itsImageproperty equal to that of the clickedPictureBox.Use a single event handler for all four
PictureBoxes.


Note
You can find solutions to this lesson's exercises in the Lesson10 folder inside the download available on the book's web site at www.wrox.com or www.vb-helper.com/24hourvb.html.