
You have seen many great examples of Office Business Applications throughout this book. You have seen how simple it is to leverage the power of the Office platform to create rich applications for your customers and users. Now you will see how straightforward it is to deploy these applications in your enterprise. Getting it to work on your machine is only half the battle. Now you must deploy your OBA into the wild. In the first half of this chapter, you will see how VSTO and ClickOnce make it easy to publish and update your client VSTO solutions. In the second half, we will focus on the server side of the application and look at some ways to package and deploy your Web parts, Web services, and workflows into your SharePoint environment.
VSTO deployment has made the biggest advancements since version 2.0. ClickOnce is now the technology used to deploy your OBAs on the client. This means that your applications can be published, installed, updated, rolled back, and uninstalled using the ClickOnce technology. The ClickOnce cache also provides offline support for your applications, freeing your users to continue working even when not connected to the network. The ClickOnce security model based on inclusion lists is now used over the computer access security (CAS POL) model of .NET, which was used in previous VSTO releases. This greatly simplifies the security model and gives your OBAs a version-resilient security model.
After you develop your application, publish the version to a publish location. Users then install the application from the publish location. The developer can publish an updated version to the same publish location. Users who have the old version installed will get the new version automatically, or based on the interval specified by the publisher. New users will install the new version. If a problem is discovered the publisher can roll back easily to a previous version. Uninstallation is as simple as running the uninstall from the Add or Remove Programs dialog box as with any other Windows application.
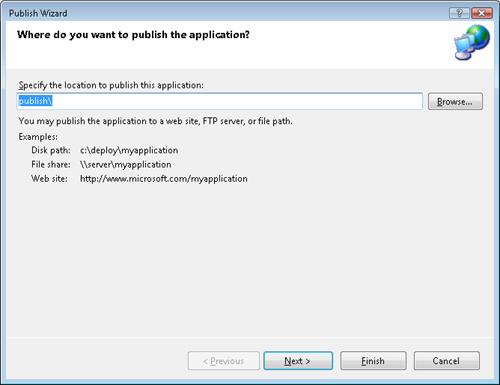
In Chapter 2, you created an Outlook add-in project called OutlookAddinProject. You will deploy this project to an end user using the Publish Wizard. Open the OutlookAddinProject that you created in Chapter 2 or use a new Outlook project. The first page of the Publish Wizard dialog box, seen in Figure 8-1, asks you to provide a publish location. This is the location that all of the files needed to install and run the solution will be copied to. By default, it is a relative path to a folder called "publish." This will be created under your project folder. You can also specify a server location either to a UNC folder, an FTP server, or a Web server. The wizard provides some examples of valid locations. Click Next to proceed.
The next page in the wizard, seen in Figure 8-2, asks you to specify the location that the user will be installing the application from. The publish location in the previous step was about where you want to copy the files to, and this page is asking where the user will install the files from. These may be the same location, but many times they are different. For example, you may publish the files to an FTP location, but the user will install the files using an HTTP location. The installation location is optional. You should only enter the value if you know the final installation location. You should also leave it blank or choose the From a CD-ROM or DVD-ROM option if users will be installing from a CD, DVD, or USB drive. You or the administrator can easily change this later. You will see how to do this later in the chapter. Click Next to proceed.
The last step of the wizard, shown in Figure 8-3, is to verify that you have entered the correct information before you click Finish to publish. Clicking on Finish will copy the solution files to the publish location and create the required ClickOnce manifests and setup files required. You will see these in more detail later in the chapter. Click Finish to publish the solution.


Once you have published the solution it is ready to be installed. Open the publish folder, or wherever the location is that you published to. You will see that there are two files in the root of the publish folder: setup.exe and OutlookAddInProject.vsto. The setup.exe project is the setup program that will install the solution and check for prerequisites. OutlookAddInProject .vsto is a ClickOnce deployment manifest for the solution. If you have already installed the VSTO Runtime, which also installs a handler for the .vsto extension, you will be able to double-click on the .vsto file to install the solution. In general, it is better for users to use the setup.exe, as this will check the machine for requirements and is the common way users install applications. The setup.exe installs the OutlookAddInProject.vsto deployment manifest. This deployment manifest file is an XML file that, among other things, has a pointer to the ClickOnce application manifest. The Application manifest is created in the Application Files subdirectory of the publish location. In the Application Files folder is one version-specific folder for each published version of the application. In this example, there is one subdirectory called OutlookAddInProject_1_0_0_0. The naming format of the OutlookAddInProject_1_0_0_0 subdirectory contains two parts. The first part of the subdirectory name is the name of the application, and the second part is the four-part version number: major, minor, build, and revision. Open this folder to see the version 1.0.0.0 files. This folder also includes a copy of the OutlookAddInProject.vsto deployment manifest. This is useful for rollback, which we will explore in the next section. Another interesting thing that the publish process does is that it adds the .deploy extension to all of your files, such as .dll and .mdb. This is a ClickOnce feature that enables the solution to be installed from an IIS Server. Without adding the extension, many file extensions are blocked on a hardened IIS server. By adding the .deploy extension, IIS allows the files to download to the client. The ClickOnce installer strips off the .deploy extension before caching the files so that the solution will work correctly.
Double-click on the setup.exe in the publish folder to begin the installation. Be sure to clean the VSTO project before installing if you are installing on the same box on which you are developing. To clean the project, right-click on the project and choose Clean from the context menu. This will uninstall the add-in, which is installed when you build the project. The first setup screen you will see is in Figure 8-4, although this may only flash briefly. This screen tells you information about the solution you are installing.

The next screen you will likely see is the trust prompt. You will be prompted to trust the add-in if the add-in is not signed with a valid or trusted certificate or the add-in is not in the inclusion list. At this point, you should verify the install location, add-in name, and publisher and make a trust decision to install the add-in.

After you choose to trust the installation, you will see the installation progress screen, as seen in Figure 8-6.

The VSTO add-in is now installed and ready to use. Open Outlook to verify that the add-in was correctly installed. Also at this point you can unplug and go offline. The add-in has also been installed into the ClickOnce cache. The confirmation dialog in Figure 8-7 tells you that the customization was successsfully installed.
You can verify that the add-in was installed correctly from the Outlook Trust Center. In Figure 8-8, you can see the add-in in the list of Active Application Add-ins. Selecting the add-in will show you detailed information. For example, you can see the path to the publish manifest as the location property.


One of the biggest benefits of using VSTO and ClickOnce in your enterprise is the ability to automatically update all of the clients using the solution. This is impossible to do with VBA, which embeds the VBA inside of the document. VSTO solutions separate the document or application from the code. This simple difference allows for greater security and updating. In this scenario, you have deployed your VSTO application to your enterprise users and would like to add a new feature to your solution. Open the OutlookAddinProject that you published in the previous section. In order to demonstrate a simple change, open the Ribbon1.vb file and change the name of the OBA tab to OBA v2. Publish the solution again using the Publish Wizard, accepting all of the default values. When you open Outlook again, you will see that the new version has been installed automatically. So if you are following along with this, you actually will not see the latest changes. This is because by default the check for updates interval is set to seven days. If you wait for seven days and then open Outlook, you will see the changes. This was a choice to balance the network traffic and add a slight delay to check for updates with a reasonable default value. If you are developing and testing the deployment feature of your application, you want to change the value to check every time the application is opened. We will explore how to do this later in this chapter in the Publish Page section. For now, you can simulate this behavior by double-clicking on the OutlookAddinProject.vsto deployment manifest file in the root of the publish location.

Rollback provides the ability to back out of changes and revert to a previous version. You discover that the OBA v2 change that you deployed has a security bug. You need to take immediate action to fix the issue. You do not have time to find, fix, and test a solution. The only option you have is to revert to the previous version until you can fix the problem. Within each version-specific folder of the published solution, there is a copy of the deployment manifest for that version. Copy the deployment manifest from the version-specific folder you would like to rollback into the publish location folder, pasting it over the existing OutlookAddinProject.vsto file. Now when the application checks if it has the latest version, it will see that it does not and will install the 1.0.0.0 version again. Open Outlook to see that the OBA tab is now called just OBA again. Using this technique you can roll back or roll forward to any version that you have published. You can also change the deployment manifest to roll to another server.
In the past, it was difficult to manage your Office add-ins. There was limited visibility into what was installed and where it was installed. The work done by the Office, VSTO, and ClickOnce teams comes together now to make it easy to manage your add-ins. You saw in Figure 8-8 how Office shows you a unified list of all of the add-ins that are running and that Office knows about. This list is really a read-only view of the add-ins. To remove or unload the add-in, you can select COM Add-ins in the manage drop-down near the bottom of the Trust Center dialog box. Click Go to open the COM Add-ins dialog box (Figure 8-10). The COM Add-ins dialog box shows you a checked list of the installed add-ins. The checked items are items that are loaded and running currently. You can temporarily disable and prevent an item from loading by de-selecting the check box for that item. Or you can remove the add-in by selecting the item to remove and clicking the Remove button. This removes the add-in from Office, but this is not the recommended way to uninstall VSTO add-ins.

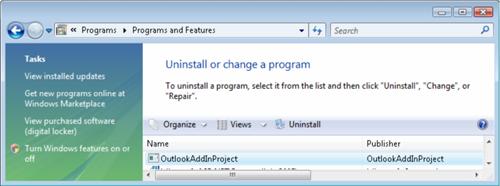
The recommended way to uninstall the add-in is to use the Windows add and remove programs dialog box, seen in Figure 8-11. This is the standard way to uninstall programs in Windows, and now VSTO add-ins surface in this dialog as well. To uninstall, select the item and click Uninstall. This will start the uninstall process, which will completely remove the add-in.
Document projects in VSTO such as Word, Excel, and InfoPath also use ClickOnce to deploy the solution. Document solutions have an additional way to install the application. Opening the document will install the ClickOnce solution just as it did if you double-clicked on the .vsto deployment manifest. With document solutions, just like with double-clicking the .vsto file, you must have all of the VSTO prerequisites installed first, such as the .NET Framework 3.5 and the VSTO version 3.0 runtime. The VSTO publish process adds a copy of the document to the publish location and to each version-specific folder. Open the WordDocumentProject project that you created in Chapter 2. Publish the project just as you did for an add-in project by right-clicking on the project and choosing Publish. Locate the publish folder and open WordDocumentProject.docx. This will open the document and install the document solution associated with this document. Since the process is the same as installing add-ins, you will see the same prompts, such as the Trust Center dialog box and the progress dialog box. Figure 8-12 shows version 1 of the document solution with 10 buttons in the action pane.

You will now update the code shown in Example 8-1 to show only five buttons in the action pane. Open the ThisDocument.vb code-behind file for the WordDocumentProject. Modify the LINQ query in the CreateCustomTaskPane subroutine with the code in Example 8-1.
Example 8-1. Change CreateCustomTaskPane Linq query to take five items.
'get the customer emails from the SharePoint list
Dim CTPItems = (From contact In _
    SPListXElement.Elements("SPListItem") _
    Where contact.Element("Email").Value IsNot Nothing _
    Select New System.Windows.Controls.Button With { _
      .Style = u.GetStyle("BlackGlassButton"), _
      .Content = contact.Element("Title").Value _
      }).Take(5)
Republish the solution and open the document again to verify that the solution has been automatically updated with the new version. Again, as we mentioned in the previous section, you may not see the changes because the default setting is to check only every seven days. In the next section, we will explore how to have more control over these publish parameters.
SharePoint is where you keep all of your documents in the enterprise, and this includes VSTO documents. You saw in the previous section how to publish a VSTO document solution to a file system. Now you will see how to use a VSTO document as a document template for a SharePoint library. There are a few basic steps required.
Publish your VSTO document to a file share.
Create a SharePoint document library with your VSTO document as the template.
Trust the SharePoint document library.
Although there are many details to each step, if you understand the VSTO deployment model discussed in Chapter 2 and the basic SharePoint library features, then this is very straightforward. The only new piece to this is that you need to explicitly trust the document using the Trusted Locations features of Office. The only factor that makes this difficult is that HTTP paths are disabled by default. But you will see all of the steps to configure this correctly.
The first step is to publish a VSTO document. You can use the WordDocumentProject that you created in Chapter 2. This must be published to a UNC or standard HTTP location. You cannot publish this to a SharePoint document library, but you can create a normal HTTP path on the same machine.
Next, you will add a new SharePoint document library called VSTOLibrary and specify a custom template using the WordDocumentProject file. Specifying a custom template will make your WordDocumentProject.docx the default template when a user creates a new library document. In the Actions menu, select Open with Windows Explorer. Copy the WordDocumentProject.docx into the Forms subfolder. Close the Windows Explorer window and open the document library settings from the Settings menu. Click on Advanced Settings and set the path of the template URL to VSTOLibrary/Forms/WordDocument.docx and click OK. At this point, you will be able to click the new document action from the VSTOLibrary to open the document. It should fail to load the customization because you need to trust the library location.
The last step is to trust the SharePoint library folder location. In order to set the Trusted Location to an HTTP location, such as to your SharePoint server, you may need to modify the group policy objects. You can download the 2007 Office system administrative template files from the Microsoft Download Center and search for "2007 Office system Administrative Template files (ADM, ADMX, ADML) and Office Customization Tool version 2.0." For Windows Vista, copy all .admx files to the c:windowsPolicyDefinitions folder. You should also copy all of the corresponding language pack .adml files to the en-us subfolder. Now start the group policy editor from the Run menu by typing gpedit.msc. You must first allow Word to trust a location not on this computer. To do this, expand the User Configuration, Administrative Templates, Microsoft Office Word 2007, Word Options, Security, Trust Center, and Trusted Locations, and then set Allow Trusted Locations not on the computer to Enabled. With this group policy setting enabled, open Word, then select the Office menu, then Word Options, Trust Center, and then click the Trust Center Settings button. Select the Trusted Locations tab on the left, and then click Add New Location. In the dialog box that opens, enter the http://servername/library/ path and click OK. Also select the option to trust subfolders as well. This is important, as the document template will open from the form subfolder located under the library path.
You can now use the document library just as you would use any SharePoint library. The only difference is that you now have full VSTO solutions backing these documents. All of the other VSTO deployment features discussed in Chapter 2, such as automatic updates and rollback, still apply.
The publish page is a property page of the project, which contains all of the available properties for publishing the project. Right-click on the project and choose Properties from the context menu. Figure 8-13 shows the Publish tab of the Project Properties window. The Publish Now button will publish the application without starting the Publish Wizard. The Publish Wizard will use these property settings as well.
The publish location contains two properties. The first is the publish folder. The publish folder is the location to which VSTO will copy the published files. This corresponds to the first page of the Publish Wizard, seen earlier in Figure 8-1. The second property is the installation folder. This is the location from which the application will install the add-in. This can be a UNC folder, an HTTP or HTTPS Web site, or a relative path. This is the same property of the second page of the Publish Wizard seen in Figure 8-2. If you are installing from a CD/DVD or are not sure of the final installation location, you should leave this property blank.

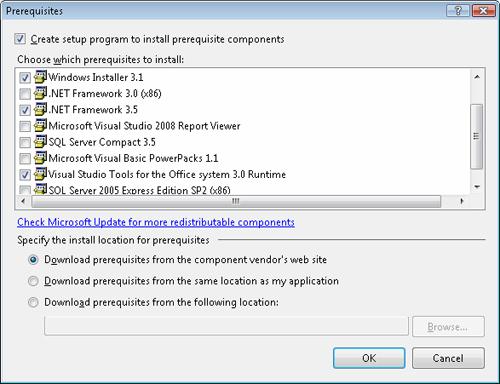
The install settings section contains two properties. The first is a dialog box to set the prerequisites required by your application. Clicking on the Prerequisites button opens the Prerequisites dialog box seen in Figure 8-14. By default, the VSTO project sets three prerequisites: Windows Installer 3.1, .NET Framework 3.5, and Visual Studio Tools for the Office system 3.0 Runtime. You can set additional items if your application requires them. These will be built in the setup.exe when it is created. You can read more about how to add your own custom prerequisites to this list in the Visual Studio SDK.
The second property in the settings section is the Updates behavior button. Clicking on this will open the Customization Updates dialog box seen in Figure 8-15. There are three basic options: always check, never check, and check at a specific interval. The default value is set to check every seven days. This value tries to strike a balance between performance and timely updates. During development, you should set this value to check every time the customization runs so that you can see your changes as they are updated automatically.

The publish language drop-down list box allows you to select the language for the install UI. This setting only affects the setup program and not the add-in itself.
The publish version is the version of your published application. The revision number automatically increases each time you publish if the automatically increment checkbox is checked. In a real application you should control the publish version number manually. The publish version number is different from the application version. When you publish an application, you specify a publish version number. This is the version that represents all of the components that are published together. Each individual component has its own version number, which you can see by clicking on the application tab and then the Assembly Information button. The Assembly Information dialog box, in Figure 8-16, allows you to specify the assembly version number and the file version number. Imagine you have an add-in that contains three assemblies, A, B, and C. All of these assemblies are at version 1.0.0.0. You publish version 1.0.0.0 of your application. In this case, the version numbers are the same as the publish version number. You make some changes to assembly A and give it a version of 2.0.0.0. B and C remain at version 1.0.0.0. You publish the application and give it a version of 1.5.0.0. (Since only assembly A was updated, you feel this should only be a point release.) Now your component versions are all different from the publish version. The publish version is the version label for a group of components at a specific version.

It is common for a developer to not know the application installation location in the production environment during development. As a developer, you create the code, then install it on a test server, and then hand the code off to an administrator to deploy to a production server. The administrator needs a way to set the final installation location without republishing the application. The installation path can be changed using the setup.exe itself. Open a command window and run the following command.
Setup.exe /url="\NewServerNewInstallationPath"
The URL switch of the setup.exe takes the same path that you would enter in the Publish Wizard, a relative, UNC, or HTTP path. This is the path to the deployment manifest from the user perspective during installation.
Document projects also require that you change the _AssemblyLocation custom property dialog box (see Figure 8-17). To open the Custom property dialog box, click the Office button, Prepare, and then Properties, and then choose Custom properties from the drop-down list. The _AssemblyLocation property is a multi-value field delimited with a | (pipe) character. The first part is the location path and the second part is the GUID of the solution identifier for the document solution. You should change the location path only and not the solution identifier GUID.

The ClickOnce update options give you a wide range that should meet most of your needs. But what if you want to separate the check from the update? For example, you just want to notify the user that there is an update and let the user choose when it is appropriate to install the update. Maybe the update is large and the user will want to install it later. You could also have more complex rules for updates like making some updates mandatory and some optional. Or you could allow the user a period of time to install the updates. You might also have a scenario where you want to log on a server that indicates which version each user has and when it was last updated. All of these are excellent scenarios that are not supported out of the box. But you can enable these scenarios programmatically using the System.Deployment namespace. The following is a simple example of how to create a manual update feature for your OBA. This will create a Ribbon button that allows the user to update the application. If there are updates pending, it will install the new update. If the application is currently up to date, it will display the current version. Open the WordDocumentProject project that you created in Chapter 2. The first thing you need to do is add a Ribbon designer item to the project. Now add a button to a Ribbon tab, like the add-ins tab. Set the text of the button to be "Check for Updates." Double-click on the button to add an event handler. Add a reference to the System.Deployment assembly. Add the following imports statement to the top of the class file.
Imports System.Deployment.Application
Create a subroutine called UpdateNow, like in Example 8-2. This will be called from the button1 click event.
Example 8-2. Manually check for application updates.
Private Sub UpdateNow()

   'Check if this application is deployed using ClickOnce
   If (ApplicationDeployment.IsNetworkDeployed) Then

      'Create an Deployment object
      Dim AppDeployment As ApplicationDeployment
      AppDeployment = ApplicationDeployment.CurrentDeployment

      If (AppDeployment.CheckForUpdate) Then
         'an update is available do you want to update now
         Dim updateItNow As DialogResult
         updateItNow = MessageBox.Show("A new version is available. " _
                                       & "Would you like to update the application now?", _
                                       "New Version Available", _
                                       MessageBoxButtons.OKCancel)

         If (updateItNow = DialogResult.OK) Then
            AppDeployment.Update()
            MsgBox("The application has been updated. Please restart the document.")
         End If

      Else
         MsgBox("The Application is running the latest version. " & _
                AppDeployment.CurrentVersion.ToString)
      End If
   Else
      MsgBox("The application is not deployed")
   End If

End Sub
The UpdateNow subroutine starts by checking if this is a ClickOnce deployed application by calling the static method IsNetworkDeployed on the ApplicationDeployment class in the System.Deployment.Application namespace. This method will return true if the application is a ClickOnce application. Next you get a reference to the ApplicationDeployment object by calling the static method CurrentDeployment. Once you have a reference to the current ApplicationDeployment object you can call the CheckForUpdate method. This method returns a Boolean value of true if there is an update available. An update is defined as the current version does not match the deployment manifest version, which means that rollbacks are also considered updates. There is also another method called CheckForDetailedUpdate UpdateCheckInfo object. The UpdateCheckInfo object contains more details about the update, such as the version number and size of the update. You use the details from the UpdateCheckInfo object to make more complex scenarios, such as the ones mentioned earlier. If there is an update available, you prompt the user to install the update. If the user agrees, call the Update method on the current ApplicationDeployment object. Once the update is complete, the user will need to restart the application in order to see the new version. Example 8-3 shows that the last step is to call the UpdateNow subroutine from the button1 click event.