In this chapter
| Introduction |
| Security framework overview |
| Develop security artifacts |
| Validate security artifacts |
| Create extensible data security policies |
| Security coding |
| Licensing and configuration |
Microsoft Dynamics AX 2012 introduces a new security framework that is based on a model of role-based security. This framework is designed to make maintaining security easier as the security needs of organizations evolve. It also simplifies the process of implementing base-level security.
System administrators and developers each manage parts of the new security system. Developers create and define the security artifacts that provide access to securable objects. System administrators manage security for users on an ongoing basis.
This chapter describes how the Microsoft Dynamics AX run time implements security, licensing, and configuration, and explains how they determine the portions of interface that the user sees and the data that the user can access. You can use the security framework to create security artifacts that control access to forms, reports, menus, and menu items. Microsoft Dynamics AX 2012 also introduces a new extensible data security framework that lets you restrict access to sensitive data at a granular level so that users see only the data they need to perform their jobs. The licensing and configuration frameworks give you the option to license application modules, thus providing access to various application areas. You can also enable and disable functionality independently of licensing by using configuration keys.
The Microsoft Dynamics AX security framework consists of three layers: authentication, authorization, and data security. Figure 11-1 provides a high-level overview of the security architecture of Microsoft Dynamics AX. The following sections describe each layer in detail.

Authentication is the process of establishing the user’s identity. Microsoft Dynamics AX users can be authenticated in two ways. The first way is through the use of Integrated Windows Authentication to authenticate Active Directory users. This can be accomplished by either making a specific Windows user a Microsoft Dynamics AX user, or by making an entire Active Directory group a user within Microsoft Dynamics AX. After the Active Directory group is added as a user within Microsoft Dynamics AX, any user who belongs to that Active Directory group can access Microsoft Dynamics AX. The ability to add an Active Directory group as a user within Microsoft Dynamics AX is new for Microsoft Dynamics AX 2012.
The second way of authenticating a user is called flexible authentication, which is also new in Microsoft Dynamics AX 2012. With flexible authentication, a user can be authenticated to use the Microsoft Dynamics AX Enterprise Portal web client without requiring Active Directory credentials. Flexible authentication uses claims-based authentication to verify users in Enterprise Portal. For more information, see the white paper “Flexible Authentication in Microsoft Dynamics AX 2012,” at http://www.microsoft.com/en-us/download/details.aspx?id=29050.
After a user connects to Microsoft Dynamics AX, the user’s authorization within the system is determined. Authorization is discussed in the next section.
Authorization, also referred to as access control, determines whether a user is permitted to perform a given action. In the Microsoft Dynamics AX application, security permissions are used to control access to individual elements of the application: menus, menu items, action and command buttons, reports, service operations, web URL menu items, web controls, and fields in both the Microsoft Dynamics AX 2012 Windows client and in Enterprise Portal.
In Microsoft Dynamics AX 2012, the new security model follows the principles of role-based access control. This security model is hierarchical; each element in the hierarchy represents a different level of detail, starting with permissions, which are at the bottom:
Permissions represent access to individual securable objects, such as menu items and tables.
Privileges are composed of permissions and represent access to tasks, such as canceling payments or processing deposits.
Duties are composed of privileges and represent parts of a business process, such as maintaining bank transactions.
Roles are composed of duties (and sometimes) privileges that determine a user’s access to Microsoft Dynamics AX. These roles correspond to roles within an organization, such as an accountant or human resources manager.
Figure 11-2 shows the elements of role-based security and their relationships.

The following sections explain the elements of the security model in more detail.
In the Microsoft Dynamics AX security model, permissions group together the securable objects and access levels that are required to run a function. These include any tables, fields, forms, or server-side methods that are accessed through an entry point. Menu items, web content items, and service operations are referred to collectively as entry points. Each function in Microsoft Dynamics AX, such as a form or a service, is accessed through an entry point.
Only developers can create or modify permissions. The section Develop security artifacts later in this chapter explains in detail how to modify permissions.
A privilege specifies the level of access that is required to perform a job, solve a problem, or complete an assignment. Privileges can be assigned directly to roles. However, for easier maintenance, it is recommended that only duties be assigned to roles.
A privilege contains permissions to individual application objects, such as user interface elements and tables. For example, the Cancel payments privilege contains permissions to the menu items, fields, and tables that are required to cancel payments.
By default, privileges are provided for all features in Microsoft Dynamics AX. A system administrator can modify the permissions that are associated with a privilege or create new privileges.
A duty is a group of privileges—or tasks—that corresponds to part of a business process. A system administrator assigns duties to security roles. A duty can be assigned to more than one role.
In the security model for Microsoft Dynamics AX, duties contain privileges. For example, the duty Maintain bank transactions contains the privileges Generate deposit slips and Cancel payments. Although both duties and privileges can be assigned to security roles, it is recommended that you use duties to grant access to Microsoft Dynamics AX. By doing so, you can use the segregation of duties functionality explained in the next paragraph.
Security or policies might require that specific tasks be performed by different users. For example, an organization might not want the same person both to acknowledge the receipt of goods and to process payment to the vendor. This concept is called segregation of duties. Segregation of duties helps organizations reduce the risk of fraud, and it also helps detect errors or irregularities. By segregating duties, an organization can better comply with regulatory requirements, such as those from Sarbanes-Oxley (SOX), International Financial Reporting Standards (IFRS), and the U.S. Food and Drug Administration (FDA).
In Microsoft Dynamics AX 2012, segregation of duties lets a system administrator specify the duties that should always be segregated and should not overlap for a given user.
Microsoft Dynamics AX includes default duties. However, a system administrator can modify the privileges that are associated with a duty or create new duties. For more information, see the section Set up segregation of duties rules, later in this chapter.
A business process is a coordinated set of activities in which one or more participants consume, produce, and use economic resources to achieve organizational goals. In the context of the security model, business processes are called process cycles. To help the system administrator locate the duties that must be assigned to roles, duties are organized by the business processes that they belong to. For example, in the accounting process cycle, you may find the Maintain ledgers and Maintain bank transactions duties. Process cycles are used for organization only.
Microsoft Dynamics AX 2012 uses role-based access control. In other words, access is not granted to individual users; it is granted only to security roles. The security roles that are assigned to a user determine the duties that the user can perform and the parts of the user interface that the user can view.
Microsoft Dynamics AX 2012 provides the capability to track date-effective data by using valid time state tables. A system administrator can also specify the level of access that the users in a security role have to current, past, and future records on such tables.
By managing access through security roles, system administrators save time because they do not have to manage access separately for each user. Security roles are defined once for all organizations.
A user can be assigned to a security role in several ways. One method is to assign a user to a security role directly. A second method is by assigning an Active Directory group to a role, which assigns all members of the Active Directory group to that role. In addition, users can be assigned to security roles automatically based on business data. For example, a system administrator can set up a rule that associates a human resources position with a security role. Any time that a user is assigned to that position, the user is automatically added to the appropriate security role. This functionality is called dynamic role assignment. Typically, a system administrator assigns users to security roles.
Security roles can be organized into a hierarchy so that security roles can be defined as combinations of other security roles. For example, the Sales manager security role can be defined as a combination of the Manager security role and the Salesperson security role. Instead of each security role being defined individually, in a security role hierarchy, security roles can inherit the permissions from other security roles and reuse them.
In the security model for Microsoft Dynamics AX, duties and privileges are used to grant access to the program. For example, the sales manager role can be assigned the Maintain revenue policies and Review sales orders duties.
By default, sample security roles are provided. All functionality in Microsoft Dynamics AX is associated with at least one sample security role. A system administrator can assign users to the sample security roles, modify the sample security roles to fit the needs of the business, or create new security roles.
As mentioned earlier, Microsoft Dynamics AX 2012 introduces a new extensible data security framework (XDS) that you can use to control access to transactional data by assigning data security policies to security roles. Data security policies can restrict access to data, based either on the effective date or on user data, such as the sales territory or the organization that a user is assigned to.
Note
Data security is separate from functional security, which is achieved by using role-based security.
In addition to the XDS, you can use record-level security to limit access to data that is based on a query. However, because the record-level security feature is being deprecated in a future release of Microsoft Dynamics AX, it is recommended that you use the XDS instead.
Additionally, Microsoft Dynamics AX has a table permissions framework to protect data. The table permissions framework allows enforcement of data security for specific tables by the Application Object Server (AOS). Explicit authorization checks are performed when a user tries to access data related to tables protected by the table permissions framework.
Access to a securable object within Microsoft Dynamics AX is controlled through various security artifacts such as permissions, privileges, duties, roles, and policies. You can create and manage these artifacts by using the Application Object Tree (AOT), as shown in Figure 11-3.
You build security from the ground up, beginning at the form level. The first step is to control access to the data in a form. When you save a form in the AOT, Microsoft Dynamics AX automatically discovers all of the tables and other items that the form accesses. This functionality is called auto-inference. Auto-inference simplifies configuring table permissions. Based on tables that are used in the form, create, read, update, and delete (CRUD) permissions are set automatically for that form. The system automatically adds or updates the Read, Update, Create, and Delete nodes in the AOT under AOTForms<FormName>Permissions.

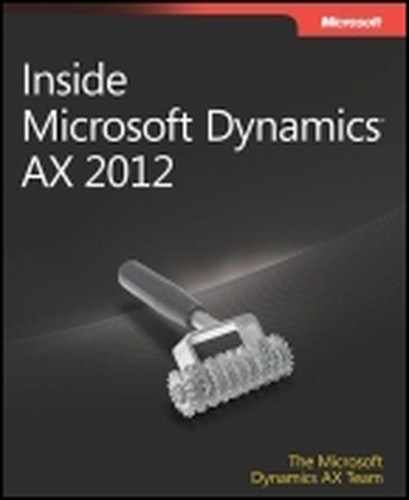
Figure 11-4 illustrates the set of permissions for the AgreementClassification form.

While auto-inference automatically sets the permissions properties for the data sources, you can also set the permissions for a data source manually.
For example, in the Read permissions shown in Figure 11-4, the properties for the AgreementClassification table are set by auto-inference, as shown in Figure 11-5.
The SystemManaged property is set to Yes. However, you can change the EffectiveAccess property to something other than Read. In that case, the SystemManaged property changes to No. This indicates to the security framework that you have chosen to override manually the value set by auto-inference, as shown in Figure 11-6.

So far, this section has discussed individual permissions under the Tables node. However, you can also set permissions for additional nodes, such as Controls, Server Methods, and Associated Forms.
Note that in the same manner that you set up permissions for forms, you can set permissions to read and write data under the Permissions node of several AOT elements, including the following:
Forms/<FormName>
Parts/Info Parts/<InfoPartName>
Reports/<ReportName>
WebWeb FilesWeb Controls<WebControlName>
Services<ServiceName>Operations<OperationName>
An associated form comes into play when the parent form—in this example, the AgreementClassification form—contains a button that opens another form. In such cases, you should add permissions so that the associated form is accessible to users of the parent form. You can accomplish this by referencing the associated form under the Associated Forms node.
When a user has access to a form, by default, the user has access to all of the controls on the form. You can override the default settings by adding permissions nodes for individual controls. You can do this by using the Controls node.
If a server method is tagged with the attribute SysEntryPointAttribute, users must have explicit access to that method. If such a server method is invoked through a form, you can control access by adding the method to the Server Methods node and explicitly setting the permission to invoke. Any role that provides access to that form through the appropriate permission—in this example, read—also grants permission to the server method.
When you develop a form, Microsoft Dynamics AX provides the ability to add controls to the form as securable objects. These can either be data-bound to the form or unbound. All data-bound controls are configured automatically with security, whereas unbound controls can be managed through code. Security in an unbound control, such as a menu function button, is linked to the referenced object and visibility is controlled through permissions on the referenced object.
After you specify permissions, the next step is to create privileges. As mentioned earlier, a privilege is a set of permissions that provides access to securable objects. By using auto-inferred table permissions and securing menu items with privileges, you control access to the data in a form. The following example (Figure 11-7) links the entry point to the form with the associated permissions.

In this example, the privilege AccountDistCustFreeInvoiceMaintain contains an entry point, AccountingDistCustFreeInvoice. This is a menu item that, in turn, points to a form. Note that in the properties, AccessLevel is set to Delete. This implies that when a user accesses the form through this particular menu item, the Microsoft Dynamics AX security framework will look under the PermissionsDelete node for that form and grant access to the tables that are listed under that node. This example illustrates how the system ties together the privileges, entry points, and permissions and determines the access that the user should have if he or she has access to that privilege through a security role.
A menu item provides an entry point for opening a form. Security properties on the menu item control which sets of form permissions are available to select when privileges are assigned to the menu item.
Each menu item has the following security properties:
These properties refer to the nodes under AOTForms<FormName>Permissions. For example, the UpdatePermissions property refers to the node AOTForms<FormName>PermissionsUpdate.
Table 11-1 describes the values for these permission properties.
Table 11-1. Property values for create, update, read, and delete.
For example, if the ReadPermisssions property on a menu item is set to No, the menu item will not pick up the ReadPermissions property from the form that the menu item references. You can use this method to add a permission to a menu item without affecting the permissions to securable objects that are available through that menu item. This helps restrict the permissions that a system administrator can issue for the menu item when assigning it to a privilege.
In some situations, a menu item points to a class or a service operation directly. In this case, you would need to link to a class, which itself is not associated with any permissions. In such cases, you need to use a code permission. A code permission is a group of permissions that are associated with a menu item or a service operation. If you want to run code directly through a menu item, you must set a code permission for it. Code permissions are also represented as a node within the AOT. When a security role grants access to a menu item, the role also has access to other AOT items that are listed within the code permission for the menu item. The access level is controlled by the permissions that are set under the Code Permissions node.
Microsoft Dynamics AX uses the concept of a permission union. If multiple permissions are specified for the same object through multiple privileges and roles, the access on the object is the result of the union of those permissions. For example, if one privilege provides read access to a table and another privilege provides delete access to the same table, and both of them belong to a security role, a user who is assigned to the security role will get delete access to the table.
After you generate permissions for the various securable objects, you grant access to those securable objects through security roles. The first step is to create privileges, as described in the previous section. You can then either incorporate these privileges into duties or directly assign them to security roles.
In Figure 11-8, the privilege AccountingDisCustFreeInvoiceMaintain contains the entry point AccountingDisCustFreeInvoiceMaintain.

The entry point is associated with an access level that is specified in the properties (Figure 11-9). Note that in this case, the access level is set to Delete. This implies that when the user accesses the entry point, the system will look in the PermissionsDelete node for the form that the entry point launches.

While it is not mandatory that a privilege be assigned to a security role through a duty, doing so lets the system administrator maintain the privileges through a higher level of abstraction and also lets the system administrator use segregation of duties to meet segregation of duties requirements.
In Figure 11-10, the CustInvoiceCustomerInvoiceTransMaintain duty contains the AccountingDisCustFreeInvoiceMaintain privilege.

Continuing with the example, notice how the CustInvoiceCustomerInvoiceTransMaintain duty is present within the CustInvoiceAccountsReceivableClerk role in Figure 11-11.

Note
For more information about security, see “Role-based security in the AOT for Developers,” at http://msdn.microsoft.com/en-us/library/gg847971.
A valid time state table helps you simplify the maintenance of data for which changes must be tracked at different points in time. For example, the interest rate on a loan might be 5 percent for the first year, and 6 percent for the second year. During the second year, you still want to know that the rate was 5 percent during the previous year.
You can set the ValidTimeStateFieldType property on a table in the AOT to make the table a valid time state table. Setting this property causes the system to automatically add ValidFrom and ValidTo columns, which track a date range in each row. The system guarantees that the values in these date or date-time fields remain valid by automatically preventing overlap among date ranges. Data tracked by this type of table is referred to as date effective.
Properties on security roles control access to date-effective tables. In the AOT, you can set the properties PastDataAccess, CurrentDataAccess, and FutureDataAccess. By default, these properties are set to Delete, which, in effect, means that the tables are not date effective. However, if one of these properties is set to a value other than Delete, the property specifies the level of data access for the tables with date-effective fields that are secured by the security role. For example, if a table normally has edit access within the security role and you set the PastDataAccess property to View, the user can edit current and future data but can only view past data.
After you implement data security, you’ll want to make sure that the changes are accurate. The testing process consists of the following steps:
After you complete the steps in this section, start the Microsoft Dynamics AX client as a test user assigned to the appropriate security role (or roles) and ensure that the functional security scenarios work as expected.
Microsoft Dynamics AX users are either internal employees of your organization or external customers and vendors who require access to Microsoft Dynamics AX for their jobs. Any individual who must access Microsoft Dynamics AX must be added to the list of Microsoft Dynamics AX users in the Users form (System Administration > Common > Users > Users).
Among other options on the form, there is a field called Account Type. You must select whether the user or group is authenticated by Active Directory or by a claims-based authentication provider. For Active Directory, the choices are between adding an individual Active Directory user or an Active Directory group as a user.
After you create a user within the system, you can assign the user to a security role, either manually or automatically.
You can set up rules for automatic role assignment to guarantee that role membership is based on current business data. If you use automatic role assignment, permissions are updated automatically when people change jobs in an organization. Rules for automatic role assignment run at a fixed interval by using the batch framework. As part of setting up the rule, you specify a query from the list of queries in the AOT to use as a basis for the rule. For more information, see Chapter 18.
You can assign roles manually when role membership cannot be based on data in Microsoft Dynamics AX. For example, you can assign roles manually if an employee goes on vacation and another employee must perform that employee’s duties temporarily. Users who are assigned to security roles manually must also be removed manually by the system administrator. These users are not removed from roles by rules for automatic role assignment.
As mentioned earlier, security or policies might require that specific tasks be performed by different users.
In Microsoft Dynamics AX, when two duties in the same role conflict, or when a user is assigned to two roles that contain conflicting duties, the conflict is logged. You must approve or reject each assignment that causes a conflict. For more information, see “Identify and resolve conflicts in segregation of duties,” at http://technet.microsoft.com/en-us/library/hh556858.aspx.
Within any enterprise, some users are restricted from working with certain sensitive data because of confidentiality, legal obligations, or company policy. In Microsoft Dynamics AX 2012, authorization for access to sensitive data is managed through the XDS.
By using the XDS, you can secure data in tables so that users can access only the subset of rows in a table that is allowed by a given policy.
Common uses of extensible data security include the following:
Allowing sales clerks to see only the accounts they manage.
Prohibiting financial data from appearing on forms or reports for a specific security role.
Prohibiting account details or account IDs from appearing on forms or reports for a specific security role.
Extensible data security is an evolution of the record-level security (RLS) that was available in earlier versions of Microsoft Dynamics AX.
Data security policies are enforced on the server tier. This means that extensible data security policies, when deployed, are enforced, regardless of whether data is being accessed through the Microsoft Dynamics AX client forms, Enterprise Portal webpages, Microsoft SQL Server Reporting Services (SSRS) reports, or .NET services.
Additionally, by using the new framework, you can create data security policies that are based on data that is contained in a different table.
Before developing a data security policy, you need to become familiar with several concepts, such as constrained tables, primary tables, policy queries, and context. This section outlines these concepts. Subsequent sections use these concepts to illustrate how they work together to provide a rich policy framework.
A constrained table is a table (or tables) in a security policy from which data is filtered or secured, based on the associated policy query. For example, in a policy that secures all sales orders based on the customer group, the SalesOrder table would be the constrained table. Constrained tables are always explicitly related to the primary table in a policy.
A primary table is used to secure the content of the related constrained table. For example, in a policy that secures all sales orders based on the customer group, the Customer table would be the primary table. The primary table can also be the constrained table.
A policy query is used to secure the constrained tables specified in an extensible data security policy. This query returns data from a primary table that is then used to secure the contents of the constrained table.
A policy context is a piece of information that controls the circumstances under which a given policy is applicable. If this context is not set, the policy, even if enabled, is not enforced.
Policy contexts can be of two types: role contexts and application contexts. A role context enables the policy to be applied based on the role or roles to which the user is assigned. An application context enables a policy to be applied based on information set by the application.
Developing an extensible data security policy involves the following steps:
Modeling the query on the primary table.
Creating the data security policy artifact in the AOT.
Adding the constrained tables and views.
Setting the policy context.
Figure 11-12 shows how the VendProfileAccount policy is represented within the AOT. Security policies appear under the SecurityPolicies node.

Figure 11-13 shows the properties for this policy.

Note how the following properties are set on the policy in Figure 11-13:
The PrimaryTable property is set to VendTable.
The Query property is set to VendProfileAccountPolicy. A policy query is defined in the AOT and can use all of the functionality provided by AOT queries. You model the query with the primary table as the first data source and add more data sources as required. In this example, the additional data sources are defined by the Vendor data model.
The Operation property is set to Select. A policy query could be added to the WHERE clause (or ON clause) on all SELECT, UPDATE, DELETE, and INSERT operations involving the specified constrained tables. In this case, the policy will be enforced only on SELECT statements.
The PolicyGroup property is set to Vendor Self Service. You use this property to identify groups of related policies. There is no run-time usage of this property.
The ConstrainedTable property is set to Yes, which indicates that the primary table is to be secured using this policy. This means that the table from which data is filtered or secured is the same table specified in the PrimaryTable property. If this property is set to No, the policy is not enforced on the primary table. You can specify other constrained tables can be specified for the policy, independent of this property.
The Enabled property is set to Yes, indicating that the policy will be enforced at runtime.
The ContextType property is set to RoleProperty, indicating that the policy is to be applied only if the user is a member of one of a set of roles that have the ContextString property set to the same value. In this example, the ContextString property value is set to PolicyForVendorRoles. If any security roles in the AOT have their ContextString property set to PolicyForVendorRoles, the policy will be applied if a user belongs to those roles. Besides RoleProperty, the ContextType property can also be set to ContextString or RoleName. ContextString indicates that you have to specify a value for the ContextString property. The security policy uses a specific application context for the policy. The RoleName property indicates that the security policy applies only to the user assigned to the value of RoleName.
Complex and normalized data models can lead to queries with a large number of joins, which can affect performance. However, in many cases, a significant portion of the policy query retrieves static data, such as the legal entities for the user and the departments to which the user belongs. The XDS provides a way by which this static data can be retrieved less frequently (ranging from once each time the table is accessed to once for each client session) and then reused in subsequent policy applications. This mechanism is called extensible data security constructs.
Extensible data security constructs are tables of type TempDB that are populated according to the RefreshFrequency system enumeration value of that table (PerSession or PerInvocation). They exist in the AOT under the Data DictionaryTables node.
Figure 11-14 shows an example of an extensible data security construct.

The temporary table that is used for the extensible data security construct is written by using a table method named XDS. You can use this method to write X++ logic to populate the temporary table. In Figure 11-14, MyLegalEntitiesForRole is the extensible data construct that is populated by using the XDS method. The logic within the method populates the table with the legal entities that a given user has access to in the context of a role. The HcmXdsApplicantLegalEntity query is an example of a policy query that uses the MyLegalEntitiesForRole construct. The HcmXdsApplicantLegalEntity query involves joins among four data sources. The fourth data source is the MyLegalEntitiesforRole construct, which encapsulates several joins. If this XDS method sets the frequency to PerSession, this TempDB table will be populated the first time this table is referenced in any query at run time. If an extensible data security construct were not used, this query would have involved joins across four more tables on every policy application—a significant performance overhead.
In this scenario, using an extensible data security construct converts a policy query with seven or more joins into a policy query with four joins—a significant performance gain.
One of the common issues reported when a customer deploys a new extensible data security policy is that an unexpected number of rows are returned from a constrained table.
The XDS provides a method for debugging problems such as this. The X++ select query has been extended with the generateonly command, which instructs the underlying data access framework to generate the SQL query without actually executing it. You can retrieve the generated query by using simple method calls.
The following job runs a select query on the SalesTable table with a generateonly command. It then calls the getSQLStatement method on the SalesTable table and generates the output by using the info method.
static void VerifySalesQuery(Args _args)
{
SalesTable salesTable;
XDSServices xdsServices = new XDSServices();
xdsServices.setXDSContext(1, ''),
//Only generate SQL statement for custGroup table
select generateonly forceLiterals CustAccount, DeliveryDate from salesTable;
//Print SQL statement to infolog
info(salesTable.getSQLStatement());
xdsServices.setXDSContext(2, ''),
}
The XDS further eases the process of advanced debugging by storing the query in a human-readable form. This query and others on a constrained table in a policy can be retrieved by using the following Transact-SQL (T-SQL) query on the database in the development environment (AXBDEV in this example):
SELECT [PRIMARYTABLEAOTNAME], [QUERYOBJECTAOTNAME],
[CONSTRAINEDTABLE], [MODELEDQUERYDEBUGINFO],
[CONTEXTTYPE],[CONTEXTSTRING],
[ISENABLED], [ISMODELED]
FROM [AXDBDEV].[dbo].[ModelSecPolRuntimeEx]
The query results are shown in Figure 11-15.

As you can see in Figure 11-15, the query that will be appended to the WHERE clause of any query to the AssetBook table is available for debugging. Other metadata, such as LayerId, is also available if needed.
When developing policies, keep the following principles in mind:
Follow standard best practices of developing efficient queries. For example, create indexes on join conditions.
Reduce the number of joins in the query. Complex and normalized data models can lead to queries with a large number of joins. Consider changing the data model or adopting patterns such as extensible data security constructs to reduce the number of joins at run time.
Note that when multiple policies apply to a table, the results of the policies are concatenated with AND operators.
This section covers the Trustworthy Computing features of Microsoft Dynamics AX, focusing on how they affect security coding. This section describes the table permissions framework, code access security (CAS), and the best practice rules for ensuring that the code avoids a few common pitfalls related to security.
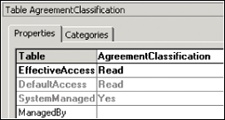
The table permissions framework provides security for tables that are located in the database and available through the AOT. The AOSAuthorization property on a table (Figure 11-16) specifies the operations that must undergo authorization checks when a given user accesses the table.
The AOSAuthorization property is an enumeration. Table 11-2 lists its possible values.
Table 11-2. AOSAuthorization property values.
Value | Description |
|---|---|
None | No AOS authorization validation is performed (default value). |
CreateDelete | Create and delete authorization validation is performed on the AOS. |
UpdateDelete | Update and delete authorization validation is performed on the AOS. |
CreateUpdateDelete | Create, update, and delete authorization validation is performed on the AOS. |
CreateReadUpdateDelete | All operations are validated on the AOS. |
In addition to the AOSAuthorization property, you can add additional rules for validation by using the following table methods:
aosValidateDelete
aosValidateInsert
aosValidateRead
aosValidateUpdate
Note
These methods affect performance. All database operations are downgraded to row-by-row when these methods are used.
Microsoft Dynamics AX 2012 also introduces a new class for authorization checks. Use the SysEntryPointAttribute class to indicate which authorization checks are performed for a method that is called on the server. When you use this attribute to decorate a method, an authorization check occurs when the class method executes on the server tier.
Additionally, you can add further checking on the basis of the value used in the constructor of the SysEntryPointAttribute class, as described in Table 11-3.
Table 11-3. SysEntryPointAttribute constructor values.
Setting | Description |
|---|---|
[SysEntryPointAttribute(true)] | Indicates that authorization checks are performed on the caller for all tables accessed by the method. The AOSAuthorization property does not have to be set on these tables in order for these checks to be performed. |
[SysEntryPointAttribute(false)] | Indicates that authorization checks are not performed on any tables that are accessed by the method. |
Microsoft Dynamics AX 2012 also provides the capability to do server-side trimming. On tables whose AOSAuthorization property is set to CreateReadUpdateDelete, the AOSAuthorization property on individual fields can be set to Yes or No. The default value of this property is No. A value of Yes indicates that authorization checks are performed on read and write operations on the field.
If the AOSAuthorization property is set to Yes for a field and the user does not have access to the field, the value of the field is not returned to the user. This enforces server-side trimming of the data.
The code access security (CAS) framework provides methods that can secure application programming interfaces (APIs) against invocation attempts by untrusted code (code that doesn’t originate in the AOT). You can make an API more secure by extending the CodeAccessPermission class. A class that is derived from the CodeAccessPermission class determines whether code accessing an API is trusted by checking for the appropriate permission.
To secure a class that executes on the server tier, follow these steps:
Either derive a class from the CodeAccessPermission class, or use one of the following derived classes that are included with Microsoft Dynamics AX and skip to step 6:
Create a method that returns the class parameters.
Create a constructor for all of the class parameters that store permission data.
To determine whether the permissions required to invoke the API that you are securing exist, override the CodeAccessPermission.isSubsetOf method to compare the derived permission class to CodeAccessPermission. The following code example shows how to override the CodeAccessPermission.isSubsetOf method to determine whether permissions stored in the current object exist in _target:
public boolean isSubsetOf(CodeAccessPermission _target)

{

    SysTestCodeAccessPermission sysTarget = _target;

    return this.handle() == _target.handle();

}
Override the CodeAccessPermission.copy method to return a copy of an instance of the class created in step 1. This helps to prevent the class object from being modified and passed to the API being secured.
Call the CodeAccessPermission.demand method before executing the API functionality that you are securing. The method checks the call stack to determine whether the permission that is required to invoke the API has been granted to the calling code.
When you secure an API by using this procedure, you must call the assert method in the derived class prior to invoking the API. Otherwise, the exception::CodeAccessSecurity exception is thrown.
The Best Practices tool can help you validate your application logic and ensure that it complies with the Trustworthy Computing initiatives. The rules that apply to Trustworthy Computing are grouped under General ChecksTrustworthy Computing in the Best Practice Parameters dialog box, as shown in Figure 11-17. The Best Practice Parameters dialog box is accessible from the Development Workspace: On the Tools menu, point to Options > Development, and then click Best Practices.

For more information about the Best Practices tool, see Chapter 2.
To assist with debugging security constructs, shortcut menus are available in the AOT on some security nodes to help you find objects and roles that are related to a particular security construct. Depending upon where you are looking in the security hierarchy (Figure 11-2), you have the option to view items up or down the hierarchy. For example, for a given duty, you can see all of the roles that the duty belongs to and all of the related privileges and other security objects that are contained within the duty. You can use this information to debug issues related to access levels of various securable objects.
Here is an example of how you can use this feature for a duty:
In the AOT, expand SecurityDuties.
Right-click any duty node, point to Add-Ins > Security Tools, and then click either View Related Security Objects or View Related Security Roles.
Examine the rows in the grid control on the form that is displayed. Figure 11-18 shows an example of the form that is displayed when you click View Related Security Objects for a node under AOTSecurityRoles.

Note that when you view the related security objects for a role, you also have the option to view the effective access (as highlighted in Figure 11-18) that the role provides to the objects that the role is securing. For example, if the role grants read access to a table through one privilege and delete access through another, the effective access on the table is delete. Therefore, the View Effective Access Results would list that table with delete permissions.
Table 11-4 lists the menu options that are available for various AOT artifacts. The left column of the table lists the nodes that appear in the AOT. The other columns list the menu options.
Table 11-4. Menu options for security artifacts.
Artifact name | View Related Security Objects | View Related Security Roles |
|---|---|---|
SecurityRole | Available | Not available |
Security/Role<RoleName>Sub Roles | Available | Not available |
SecurityDuty | Available | Available |
SecurityPrivilege | Available | Available |
Data DictionaryTables | Not available | Available |
Forms | Not available | Available |
Menu Items (Display, Output, Action) | Available | Available |
WebWeb Menu Items (URLs, Actions) | Available | Available |
WebWeb ContentManaged | Available | Available |
Data DictionaryViews | Not available | Available |
PartsInfo Parts | Not available | Available |
SSRSReports<Reportname>Design | Not available | Available |
WebWeb FilesWeb controls | Not available | Available |
Services<ServiceName>Operations<Anyoperation> | Available | Available |
SecurityCode Permissions | Not available | Available |
You can debug standard X++ code in the X++ debugger if you are a member of the System Administrator role in Microsoft Dynamics AX. However, you cannot debug issues related to security roles when running Microsoft Dynamics AX as a system administrator because starting the Microsoft Dynamics AX client as a system administrator does not limit the functional security to the security role that you are attempting to debug.
To work through a scenario like this, choose a user who is a member of the System Administrator role, assign the role that you want to debug (such as Accountant) to that user, and then follow these steps:
Close all instances of Microsoft Dynamics AX.
Open the Microsoft Dynamics AX Development Workspace.
Open another instance of the Microsoft Dynamics AX client.
Add the role that you want to test to your Microsoft Dynamics AX user ID:
In System Administration, point to Common > Users > Users.
Double-click your Microsoft Dynamics AX user ID to open the details page about your account.
Assign the security role that you want to test to your Microsoft Dynamics user ID.
Close Microsoft Dynamics AX.
In the Development Workspace, set breakpoints in the X++ code that you want to debug.
Create a job, add the following line, and then execute the job:
SecurityUtil::sysAdminMode(false);
In the Development Workspace, press Ctrl+W to open the application workspace.
You have now opened the client with the permissions of the security role that you want to test and can debug the X++ code.
Note
This procedure works for the Microsoft Dynamics AX client, but not for Enterprise Portal or for code executed by using the X++ RunAs API.
To set your environment back to the System Administrator role, update the job you created in step 7 with the value set to true:
SecurityUtil::sysAdminMode(true);
By using these steps, you can debug the application while starting it in a mode that simulates its functionality for the role that you want to debug.
Microsoft Dynamics AX 2012 introduces a new licensing model called Named User license. This licensing model provides a simplified way for an organization to license Microsoft Dynamics AX. In Microsoft Dynamics AX 2009, business-ready, module-based, and concurrent user licensing models were available for customers. These licensing models no longer apply to Microsoft Dynamics AX 2012. Instead, the following models have been introduced:
Server license Includes one AOS instance. Additional AOS instances are available by purchasing additional server licenses.
User Client Access License (CAL) Gives a named user access rights to certain capabilities from any number of devices. There are four types of CALs (see the section Types of CALs later in this chapter). You can view the user licenses used in the product through a report in System Administration > Reports > Licensing > Named User License Counts.
Note
The intention of this section is to give you a solid overview of the concepts of license keys, configuration keys, and client access license types for development purposes. For more information about pricing and licensing requirements, see the Microsoft Dynamics AX 2012 Licensing Guide at http://www.microsoft.com/en-us/download/details.aspx?id=29859.
Even though the software no longer uses module-based licensing, it is still locked with license codes (sometimes referred to as license keys or activation codes). License codes are used to activate the Microsoft Dynamics AX 2012 software and feature sets that are available in the product. License codes are different from license entitlements (what you are entitled to run and use is based on the Named User licenses that you have acquired). When you acquire a license file for activating the software through Microsoft or a partner, license keys for all feature sets are provided by default. However, the number of users who are allowed to use the product and the type of access that those users are entitled to are based on Named User licenses.
Unlocking a license code is the first step in configuring Microsoft Dynamics AX, because the license code references the configuration key that unlocks a feature set. You can enter the license code by using the License Information form, shown in Figure 11-19, which you access from System Administration > Setup > Licensing > License Information.

You enter the license codes manually or import them by clicking Load License File. Microsoft supplies all license codes and license files that are available for a particular release.
License codes are validated individually based on the license holder name, the serial number, the expiration date, and the license code being entered or imported. The validation process either accepts the license code (and updates the status field with counts, names, or OK) or displays an error in the Infolog form.
Note
Standard customer licenses do not contain an expiration date. Licenses for other uses, such as evaluation, independent software vendor projects, education, and training, do include an expiration date. When a license reaches its expiration date, the system changes execution mode and becomes a restricted demo product.
License codes are divided into five groups—System, Access Licenses, Feature Sets, Partner Feature Sets, and Languages—each based on the type of functionality it represents, as shown in Figure 11-19. The license codes are created in the AOT and the grouping is determined by a license code property. The Partner Feature Sets tab lets partners include licensed partner modules. The licensing framework can also track dependencies among various license codes. A license code can have up to five prerequisites. Adding a prerequisite for a license code prevents users from removing license codes and disabling feature sets that another feature depends on.
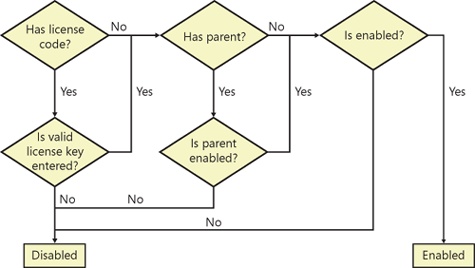
License codes are at the top of the configuration hierarchy, which is the entry point for working with the configuration system that surrounds all of the application modules and system elements that are available within Microsoft Dynamics AX. The configuration system is based on approximately 300 configuration keys that enable and disable functionality in the application for the entire deployment. Each configuration key controls access to a specific set of functions; when a configuration key is disabled, its functionality is removed automatically from the user interface (note that the database schema is not modified, unlike in Microsoft Dynamics AX 2009). The Microsoft Dynamics AX run time renders presentation controls only for items that are associated with the active configuration key or items that are not associated with any configuration key.
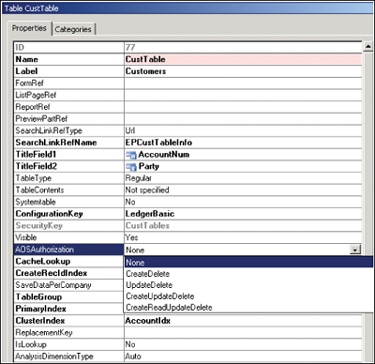
The relationship between license codes, configuration keys, and feature sets is hierarchical. An individual license code not only enables a variety of configuration keys, but it also hides configuration keys and their functions throughout the entire system if the associated license code is not valid or not provided. Hiding configuration keys with unavailable license codes reduces the configuration complexity. For example, if a license code is not entered or not valid in the License Information form, the Configuration form hides configuration keys associated with it and displays only the valid license codes and the configuration keys that depend on them. Figure 11-20 shows a typical configuration hierarchy for implementations.
The application modules and the underlying business logic that license codes and configuration keys enable are available when Microsoft Dynamics AX is deployed. By default, all license codes are enabled; however, only minimal sets of configuration keys are enabled. During setup, system administrators should enable additional configuration keys as required. Within the product, everything from forms, reports, and menus to the Data Dictionary are always present, existing in a temporary state until those feature sets are enabled.
When you enable a configuration key, the feature set associated with that configuration key is enabled. This means that appropriate menu items, submenu items, tables, buttons, and fields are enabled when the configuration key is enabled. A user has access only to those areas that the system administrator has granted access to through security roles and that has been enabled by the configuration key. The parent configuration keys shown in Figure 11-20 are associated with a license code. Removing the license code disables those parent and child configuration keys. If the license code is not disabled, system administrators can enable or disable child configuration keys, thus enabling or disabling the feature sets that they represent.
Note
Parent configuration keys can exist without an attached license code. These are available for a system administrator to enable or disable at all times from within the Configuration form (Figure 11-21). However, parent configuration keys that are associated with a license code can only be disabled from the License Information form.

As a more detailed example, consider a company that wants most of the functionality in the Trade feature set, but it doesn’t do business with other countries/regions. The company, therefore, chooses to not enable the Foreign Trade configuration key, which is a child of the Trade configuration key.
By using the configuration key flowchart shown in Figure 11-22, a system administrator can determine whether a configuration key is enabled, and if not, what it would take to enable it, which depends on the configuration key’s parent.
An important part of the application development process is mapping extensions to configuration keys that integrate the extensions into the complete solution. Correctly using configuration keys throughout the system can make enterprise-wide deployments flexible and economical, with divisions, regions, or sites all using the same deployment platform and customizing local deployments by using configuration keys rather than by developing specific customizations for each installation. You can’t entirely avoid individualized development, however, because of the nature of businesses and their development needs.
Configuration keys affect the Data Dictionary, the presentation, and the navigation infrastructure directly, meaning that you can reference a configuration key property on all relevant elements. Table 11-5 lists the elements that can be directly affected by configuration keys.
Table 11-5. Configuration key references.
Grouping | Element types |
|---|---|
Data Dictionary | Tables, including fields and indexes Maps Views Extended data types Base enumerations Configuration keys |
Windows presentation and navigation | Menus Display: Menu items Output: Menu items |
Web presentation and navigation | URL: Web menu items Action: Web menu items Display: Web content Output: Web content Web menus Weblets |
Other | Workflow Approvals Workflow Tasks Workflow Automated Tasks Workflow Types Resources |
The new licensing model, Named User license, provides customers with the ability to use all of the feature sets but provides pricing that is based on the number of users who are using a particular feature instead of pricing that is based on whether a particular module is enabled. In this licensing model, there are four tiers of CALs. Customers are required to comply with Microsoft’s licensing terms based on the access rights granted to each user. The following four tiers (user types) are available, listed from highest to lowest level of access (with sample activities):
Enterprise Drives the business and manages processes across the organization
Functional Manages a business cycle within a division or business unit
Task Performs tasks to support a business process or cycle
Self-serve Manages his or her own personal data within the system
All predefined security roles that are included with Microsoft Dynamics AX 2012 belong to one of these four user types, thus giving you the flexibility to license users based on how they are likely to use and derive value from the solution.
The CAL (or user type)-to-security-role mapping is accomplished by first setting the menu item properties ViewUserLicense and MaintainUserLicense with appropriate user type enumeration. Then, through the security hierarchy, the highest level of user type is evaluated, which essentially becomes the effective user type for the role, as shown in Figure 11-23.

Note
Typically, only Microsoft uses Named User licenses in Microsoft Dynamics AX 2012 to determine the licensing requirements for a customer. This section provides developers with insights into the potential impact that customization might bring to licensing. It is recommended that partners and customers do not modify these values.
As shown in Figure 11-23, Microsoft Dynamics AX 2012 maps a set of menu items to predefined roles by using the security hierarchy. The properties of those menu items are also set with one of the four user-type values. Each user-type value provides the rights to perform actions that only that user type can do. The user type that is required for a given user is determined by the highest level of types among menu items to which that individual has access. For example, to add new workers (access the HcmWorkerNewWorker menu item), the Functional user license is required. Thus, the privilege HCMWorkerEdit has an effective user type of Functional, even though it contains the menu item HcmWorker, which is of type Task. Similarly, the highest level of user type flows through the security hierarchy and eventually becomes the effective user type for the role. In this example, the Functional user type is the highest type within the Human Resource Assistant role, so the user assigned to the role requires a Functional user license. That user also has license rights to perform actions that are designated to lower user types (such as Task or Self-serve).
Given that Microsoft Dynamics AX 2012 uses a security hierarchy and menu items to determine licensing requirements, there are several situations in which customization might affect these requirements.
Each menu item that is included with Microsoft Dynamics AX 2012 is tagged with the appropriate user type. Changing these properties in a higher development layer is intentionally disabled. However, you are free to customize privileges or roles where menu items appear. When a predefined menu item is moved to a different role, that role might require a higher user type. For example, if a menu item tagged with the Enterprise user type is moved into a role that previously only required a Functional user type; the role would require an Enterprise user type going forward. If the menu item is moved into a role requiring an equal or higher user type, there is no impact.
Similarly, if privileges, duties, or roles containing menu items with different user types are moved from one security role to another, the user type for the role might be affected. If a privilege that previously had menu items with up to the Functional user type is moved into a role with the Task user type, then the customized role will now require a Functional user type license.
Note
When adding new menu items in independent software vendor (ISV) development layers or higher, the system allows you to change the ViewUserLicense and MaintainUserLicense properties of the menu item. Be aware that specifying license types in custom menu items might affect licensing requirements for customers. It is recommended that customers and partners not assign any license values to these properties. Also, changing menu item properties to a lower user type is intentionally disabled, if the menu item was previously created in the lower development layers.