In this chapter
| Introduction |
| Layers |
| Models |
| Element IDs |
| Create a model |
| Prepare a model for publication |
| Upgrade a model |
| Move a model from test to production |
| Model store API |
Microsoft Dynamics AX 2012 introduces a new era for managing metadata artifacts.
In previous versions of the product, metadata artifacts were stored in Application Object Data (AOD) files. These files served two purposes. First, they acted as the deployment vehicle for metadata; for example, you could copy an AOD file from the source system to the target system. Second, they provided runtime storage for model elements. The AOD file provided the physical storage for a native indexed sequential access method (ISAM) database that contained the metadata, and the runtime read model elements from this storage.
This method of managing metadata artifacts was not optimal. From a deployment perspective, AOD files didn’t allow side-by-side installation of metadata in the same layer, didn’t contain any structured information about their contents, and couldn’t be digitally signed. From a runtime perspective, the AOD format supported only one table and provided no capability for adding or changing columns. To support the evolution of runtime scenarios, the product had to move toward a relationally correct schema.
In Microsoft Dynamics AX 2012, metadata is stored in the Microsoft SQL Server database along with business data. The tables containing the metadata are called the model store. This change removes all obstacles to providing a relationally correct schema. Elements, such as classes, tables, forms, methods, and controls, in the model store are grouped into models. Each model can be exported to a file-based format with the extension .axmodel. These files are managed assemblies and therefore, support digital signing, which makes them tamper-proof. Model files are the primary deployment vehicle for model elements in Microsoft Dynamics AX 2012.
In previous versions of Microsoft Dynamics AX, independent software vendors (ISVs) sometimes delivered textual source code files (in XPO format) to customers. Releasing source code files is an undesirable practice, but it was used to overcome restrictions on element IDs for combining multiple solutions in the same layer. With Microsoft Dynamics AX 2012, you no longer need to release source code files to customers. Model files do not contain element IDs, you can install multiple models in the same layer, and each model file contains a manifest that describes the model.
Note
XPO files are still fully supported in Microsoft Dynamics AX 2012. Developers primarily use them to exchange source code and for storage in a version control system.
In previous versions of Microsoft Dynamics AX, a complete set of AOD files could be deployed in one operation, typically when a solution was moved from a staging system to a production system. The primary concern in this scenario is to reduce downtime. Copying all AOD files in one operation reduced downtime because there was no need to regenerate the Application Object Index (AOI) file or to recompile the application code. To satisfy the same need in Microsoft Dynamics AX 2012, you can export an entire model store in a binary file with the extension .axmodelstore. This file can be imported into the target system, and the system’s downtime is restricted to the time it takes to restart the Application Object Server (AOS).
The Microsoft Dynamics AX 2012 runtime executes a program defined in the MorphX development environment. The program itself is defined as elements.
Unlike most systems, Microsoft Dynamics AX can contain multiple definitions of each element; for example, multiple implementations of the same method. These element definitions are stacked in layers. The Microsoft Dynamic AX runtime uses the element definitions from the highest layer in which they are found. For example, a method defined in the SYS layer (the lowest layer) is not used if another definition of the same method exists in any other layer.
This layered development approach provides several benefits, the most important being the ability to customize the program shipped by Microsoft, Microsoft partners, and ISVs without editing the original source code.
Note
The layer metaphor is also used for graphical drawing tools. With layering, you can draw on top of an existing image without touching the original image underneath. Layers in Microsoft Dynamics AX work the same way, but with code and properties instead of pixels, shapes, and shades.
When you start Microsoft Dynamics AX 2012, you specify which layer you want to start in. By default, you start in the USR layer. Any element you create or edit is stored in that layer. If you edit an element that exists in a lower layer, a copy of the element with your edits is moved to your layer. This process is known as over-layering.
Other benefits of layers include the ability to revert to the original definition of an element by deleting the over-layering version. You can also compare versions of an element; for example, to see which lines of code you have inserted. This is particularly useful during upgrade.
Caution
Develop your solution one layer at a time, from the bottom up. Working in multiple layers at the same time on the same AOS is highly discouraged—even for different users. For more information see the Microsoft Dynamics AX 2012 white paper “Developing Solutions in a Shared AOS Development Environment” (http://www.microsoft.com/download/en/details.aspx?id=26919).
The process of editing an element from a higher layer than the current layer is known as under-layering. By design, these edits are routed to the higher layer.
Microsoft Dynamics AX 2012 has 16 metadata layers, each with its own purpose. Table 21-1 describes these layers in alphabetical order.
Table 21-1. Metadata layers.
Name | Description |
|---|---|
USP (topmost) | Patch layer for the USR layer. |
USR | User layer. This layer is intended for minor final customizations by power users of the system. These might include simple changes to the layout of a form and new security roles and tasks defined for the company. |
CUP | Patch layer for the CUS layer. |
CUS | Customer layer. This layer enables customer-specific customizations and extensions to the solution. This layer is typically developed by a Microsoft partner or an in-house development team. |
VAP | Patch layer for the VAR layer. |
VAR | Value-added retailer layer. Microsoft partners use this later to deliver customizations and extensions that typically are installed by multiple customers. |
ISP | Patch layer for the ISV layer. |
ISV | Independent Software Vendor layer. Registered Microsoft Dynamics AX ISVs can deliver solutions in this layer. |
SLP | Patch layer for the SLN layer. |
SLN | Solution layer. This layer contains vertical solutions provided by Microsoft partners. |
FPP | Patch layer for the FPK layer. |
FPK | Feature pack layer. This layer contains industry solutions provided by Microsoft. Public sector, Process industries, Retail, and Service industries are available in this layer. |
GLP | Patch layer for the GLS layer. |
GLS | Global solution layer. This layer contains regional extensions to the horizontal solution provided in the SYS layer. |
SYP | Patch layer for the SYS layer. |
SYS (Lowest) | System layer. Microsoft platform and foundation layer. This contains the horizontal application developed by Microsoft. |
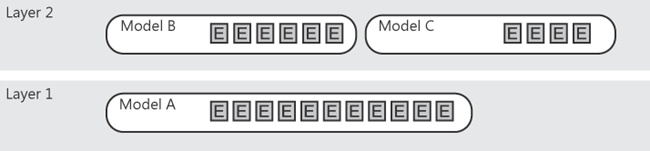
Within a layer, metadata elements are grouped into models. Models are covered in the following section.
A model is a logical container of metadata elements, such as forms, tables, reports, and methods. For more information about element types, see Chapter 1.
The model store can contain as many models as you want. Figure 21-1 shows the relationship between layers, models, and elements.
Note
The term model was selected for several reasons. First, any solution built in Microsoft Dynamics AX is a model of a real-life business. Second, a model is irreducible—even a part of a model is a model, so the term covers stand-alone solutions, extensions, customizations, patches, and so on. And finally; the term is simple and catchy—it will quickly become a part of your Microsoft Dynamics AX vocabulary.
You can have as many models in each layer as you want. This means you can segment your layer into as many models as you like. Here are some development scenarios where this can be useful:
When you deliver more than one solution You can have a model for each solution you are working on. This enables you to work on them simultaneously.
When your solution is getting too large You can segment your solution into several models and have each team or team member work on a different one. A model can be either self-contained or have dependencies on other models. This enables you to clearly define responsibilities between the model clearly, define the application programming interfaces (APIs) between the models clearly, build the models individually, and so on.
When you write unit tests You can have a model for your production code and a model for your unit tests. These enable you to import all your unit tests, run them, and remove them from the system easily.
You can get a model in two ways: you can either create one on your own, or you can receive one from someone else. Because you can have as many models as you want in each layer, you can deploy models from several sources in the same layer.
Suppose you are a customer and want to install two ISV solutions that are available in the ISV layer. In previous versions, you would have had a tough choice to make. Either you picked your favorite solution and learned to live without the other one, or you invested in having the two solutions merged into one layer. This merge was technically challenging and costly if updates to either solution were released. In Microsoft Dynamics AX 2012, you just download the two models and then use AXUtil, a command-line utility that is available when you install Microsoft Dynamics AX, to import them. When a new version of either model is released, you simply use AXUtil to update the model.
The layer model element containment hierarchy has one restraint: an element can be defined only once per layer. In other words, you cannot install two models containing a definition of the same element in the same layer on the same system. Here are some examples:
Two models that contain a class named MyClass cannot be installed side by side in the same layer.
Two elements of the same type under the same parent element (or without a parent) cannot coexist in the same layer if they have same name or the same ID. For example, a table cannot have two fields with the same name or two fields with the same ID, and you cannot have two display menu items with the same name in the same layer.
This limitation enables the Microsoft Dynamics AX runtime to select the right version of an element to execute based on the layer in which it’s contained.
You can encounter this limitation in two ways:
You create an element and accidentally give it a name that is being used for another element in another model. A good way to avoid this is to prefix your new elements with a short string that uniquely identifies you, your company, or your solution. This practice is widely used.
You customize an existing element that also has been customized by someone else in another model. There are various ways to limit the number of customized elements, such as by using events, but in some situations this is unavoidable.
All element types have names, and a few element types also have an integer-based ID. The ID is a 32-bit integer and is assigned at installation time. This means that the same element might have a different ID on two different systems.
Note
In previous versions of Microsoft Dynamics AX, IDs were 16-bit integers that were assigned at creation time from a pool of IDs for each layer. This could result in running out of IDs and ID collisions when installing solutions developed independently.
Two new properties have been introduced to support scenarios in which elements are upgraded or renamed:
The LegacyID property has been added to the few element types that have an element ID. This property enables elements to keep their IDs from the AOD files when imported as a model file to a model store.
The Origin property is a globally unique identifier (GUID) that uniquely identifies the element and eliminates the risk of a collision. The Origin property has been added to all root element types and element types with IDs. This property enables AXUtil (and other components) to recognize renamed elements during import.
AXUtil assigns element IDs when a model is imported, based on the following rules:
If an element already exists with the same Origin, replace the element and reuse its ID, else proceed to step 2.
If an element already exists with the same Type, Name, and ParentID, replace the element and reuse its ID, else proceed to step 3.
If the imported element has a LegacyID, and the LegacyID is available on the target system, add the element setting the ID to equal the LegacyID, else proceed to step 4.
Assign a new installation-specific ID that does not collide with any LegacyIDs (greater than 60,000 for fields, and greater than 1,000,000 for all other element types).
This algorithm ensures that IDs are maintained in simple and advanced import scenarios. Consider a scenario where you have delivered several variations of the same solution to multiple customers as AOD or XPO files in Microsoft Dynamics AX 2009. This means that you probably maintain a copy of the source code for each of your customers in order to service them. As the number of customers grows, so does the incentive to consolidate the variations into one common solution. Step 2 in the algorithm ensures that IDs are maintained on the customer’s installation when the customer upgrades from a specialized solution to a common solution.
During regular development, the system maintains IDs, and you do not need to be concerned with them. However, you still need to pay attention to IDs in two situations: when upgrading a model and when moving from test to production. These two situations are covered in the following sections.
Note
The data export/import functionality available under System administration automatically adjusts element ID references in the imported business data to match the element IDs on the target system. This adjustment skips all unstructured data. If you need to reference an element in a persisted container, for example, it is a best practice to reference the element by name.
Before you implement your solution, you need to create a new model. You can create a model in several ways. You can do so in MorphX through Tools > Model Management > Create model, you can use Windows PowerShell from the Microsoft Dynamics AX 2012 Management Shell, or you can use AXUtil. The examples in this chapter use the latter.
AXUtil create /model:"My Model" /Layer:USR
Notice that you have to specify which layer the model belongs to. A model cannot span layers.
Note
Each layer has a system-defined model. If you don’t create your own model, the system-defined model is used. The system-defined model has certain deployment restrictions because its manifest is read-only. It is highly recommended that you create your own models.
After creating the model, you need to select it. In the status bar in MorphX, you can see the current model. You can change the model by clicking it. All elements that you create in the AOT are contained in the current model.
You can easily see which model an element belongs to by inspecting the element’s properties. You can also enable a model indicator in the AOT on each element in Tools > Options > Development. You can move an element between models in the same layer by right-clicking the element, and then clicking Move to model.
Now that you have your model, you are ready to implement your solution.
When your implementation is complete, it is time to prepare the model for publication. But before you do, you may want to create a MorphX project that contains the elements in your model. You can create the project by using Tools > Model Management > Create project. This allows you to ensure that the model contains what you expect before you publish it. You can also use AXUtil to list the elements in a model.
AXUtil view /model:"My Model" /verbose
Preparing your model for publication consists of the following steps:
A model is the container for your solution. You can describe your model in the model manifest. Table 21-2 contains a description of the properties of the model manifest. When you export your model, the exported file contains the manifest. The manifest helps consumers of your model understand its contents before installing it.
The simplest way to edit a manifest is to use XML notation:
AXUtil manifest /model:"My Model" /xml >MyManifest.xml
notepad MyManifest.xml
AXUtil edit /model: "My Model" @MyManifest.xml
Table 21-2. Model manifest properties.
When the manifest of the model is populated it is time to export the model to disk so that you can share it outside your organization:
AXUtil export /model:"My Model" /file:MyModel.axmodel
The extension .axmodel is used for model files. The model file contains all of the elements in the model, plus the model manifest. Model files are element ID–agnostic. When the elements in the model file are imported into a target system, they are assigned new installation-specific IDs. XPO files handle element IDs similarly.
Tip
Under the covers, a model file is a managed assembly. This means you can use assembly reflection tools, like ildasm, to inspect the contents.
You can verify the model file contents using AXUtil:
AXUtil view /file:MyModel.axmodel /verbose
Note
AXUtil is a powerful tool, and, for a command-line tool, also quite user friendly. Notice that some commands, like view and manifest, can be used either on a model in the model store and on a model file on disk. The most frequently used parameter is the /model parameter. In the examples in this chapter, the name of the models are provided when using this parameter, but you can also specify the model ID (which typically is much shorter, and thus more convenient to write), or the model’s manifest XML file. This latter option is particular useful when writing command scripts, such as build scripts for version control. All commands also supports a /verbose parameter, which displays additional details about the command execution. For a complete list of commands and options, try AXUtil /?.
The model file is now ready to be shared. However, you should consider one more thing before making it publicly available. The model file contains binary code, and as such, this code can potentially harm a system, especially if the code is tampered with after it leaves your hands. To ensure that the customers who receive your model file can trust the file—or at least be able to tell that the model comes from a trustworthy source—you can add a digital signature to the model file.
When a signed model is imported, you are guaranteed the model file hasn’t been tampered with since it was exported. If it has been tampered with, the import process fails. Microsoft Dynamics AX 2012 supports two ways of signing a model: strong name signing and Authenticode signing.
To strong name sign a model, you need to use the .NET Framework Strong Name Tool, SN.exe, to generate a key/pair file. When you export your model to an .axmodel file, you specify the key to sign the model with.
SN -k mykey.snk
AXUtil export /model:"My Model" /file:MyModel.axmodel /key:mykey.snk
If you are a publisher of models, such as an ISV that provides models for download, consider Authenticode signing your model. If you do, your customers are guaranteed that the file hasn’t been tampered with and that you created the model.
When an Authenticode signed model is imported, the model’s publisher is authenticated. This means the model file can be traced to you.
To Authenticode sign a model file, first export it by using AXUtil. Then you use the SignTool to perform the actual signing:
signtool sign /f mycertprivate.pfx /p password MyModel.axmodel
If you have received or downloaded a model file, you can import it by using AXUtil. The model file is always imported into the layer it was exported from. It is a best practice to stop the AOS before importing model files.
AXUtil import /file:SomeModel.axmodel
Note
You don’t have to specify file extensions when using AXUtil. The tool automatically adds the right extension if it is omitted. In this book, extensions are included for clarity.
Figure 21-2 shows a model that has been successfully imported into a layer in which a model already exists.

The import operation will be cancelled if one or more elements from the model file are already defined in the layer into which the model is being imported. If you rerun the import operation with the /verbose option, you will get a list of conflicting elements.
AXUtil import /file:SomeModel.axmodel /verbose
You have two options for proceeding with the import: overwrite and push.
You can decide to overwrite existing conflicting elements with the new definitions of the model element from the model file. You do so by specifying the /conflict:overwrite option on the import command:
AXUtil import /file:SomeModel.axmodel /conflict:overwrite
Figure 21-3 shows the result of a successful import using the /conflict:overwrite option. The imported model and the existing model that contained conflicting elements are linked after this operation. The models are linked because the existing model now is partial. The linkage prevents the imported model from being uninstalled unless the existing model is also uninstalled. This option is primarily used when delivering cumulative patches or service packs.

The most typical solution to solve conflicts is the /conflict:push option. This option creates a new virtual model in a higher layer containing the conflicting elements:
AXUtil import /file:SomeModel.axmodel /conflict:push
Figure 21-4 shows the result of a successful import operation using the /conflict:push option. The elements in the virtual model are identical to those imported. In other words, existing models are not affected. After importing the model, log in to the layer containing the virtual model to resolve the conflict. You can use the compare functionality in the AOT to compare the conflicting versions of each element and resolve the conflict.

If you resolve all conflicts in the same layer, there is no risk of running out of layers when using the /conflict:push option. However, you may need to move the resolved elements into the same layer manually. For example, if you import a third model that conflicts with elements in the virtual model in Figure 21-4, the resulting virtual model will be created in Layer 3. After you resolve the conflicts in Layer 3, move the elements in Layer 3 to Layer 2. The easiest way to accomplish this is by exporting the elements from Layer 3 to an XPO file, deleting them, and importing them into Layer 2.
By default, the virtual model is created in the layer just above the layer the model is imported into. If you don’t have developer access to that layer, you can force AXUtil to create the virtual model in a different layer (for example the USR layer) by using the /targetlayer option, as shown in the following example:
AXUtil import /file:SomeModel.axmodel /conflict:push /targetlayer:USR
When you receive a newer version of a model and you want to replace the older version in the model store, it is important that you import the new model on top of the existing model. AXUtil automatically detects that the model already exists in the model store and performs the actions that are required to ensure the consistency of the model store:
AXUtil import /file:NewerModel.axmodel
By default, AXUtil import enters upgrade mode when a model with the same name and publisher already exists. Sometimes a model might be renamed or replaced by multiple new models (as the result of segmentation work, for example), or multiple models might be merged into one consolidated model. AXUtil supports upgrading existing models with new models. You can force AXUtil to use this mode by listing the files and models to upgrade, separated by a comma:
AXUtil import /file:f1,f2,f3 /replace:m1,m2,m3,m4,m5
Caution
You might be tempted to uninstall an existing model before importing a newer version of the model, but if you do so, AXUtil does not enter upgrade mode and it assigns new element IDs to all elements being imported. This results in data corruption because business data contains the original element IDs. All references to elements in the uninstalled model will break. For more information, see the Element IDs section earlier in this chapter.
It is a good practice to have a test or staging environment where changes to the system are prepared and tested before being deployed to a live production environment.
The model store provides features that you can use to export all model store metadata to a binary file and import it into a target system. Doing this creates a binary, identical copy of metadata between the two systems, including element IDs. Model store files have the extension .axmodelstore. Besides the metadata, the model store files also contain the compiled pcode and common intermediate language (CIL) code. This means that you do not have to compile the target system.
Note
The size of model store files depend on the contents of the model store. A model store file for the standard installation of Microsoft Dynamics AX 2012 is about 2 GB. Model store files compress well, typically over 80 percent, and thus can be used as a simple backup.
Figure 21-5 shows the cleanest way of creating and preparing a test environment and deploying it to production. Variations and post-setup tasks to this process exist. For a thorough description, see the Microsoft Dynamics AX 2012 white paper “Deploying Customizations Across Microsoft Dynamics AX 2012 Environments” (http://www.microsoft.com/download/en/details.aspx?id=26571).

Note
XPO files are not used in the process of deploying a system from test to production. They are mentioned in Figure 21-5 to show the scenarios that the three file formats should be used in. XPO files should be used for sharing source code between developers.
The goal of creating a test environment is to ensure that the metadata in the model store is identical to the metadata in the model store in the production environment. The simplest way to achieve the goal is to create a new installation of Microsoft Dynamics AX, and then move the metadata from production to test. To move the metadata, you first need to export the model store from the production environment:
AXUtil exportstore /file:ProductionStore.axmodelstore
On the test system, you stop the AOS and then import the model store file:
Net stop AOS60$01
AXUtil importstore /file:ProductionStore.axmodelstore
Net start AOS60$01
The goal of preparing the test environment is to update the system with new metadata, typically by installing new models or upgrading existing models. You import or upgrade models as explained earlier in this chapter.
After you import the models, start the Microsoft Dynamics AX client and complete the installation checklist. The most important steps are the compilation to pcode and CIL, because the products of these steps are part of the model store.
Extensive validation of the system is also recommended. Ensure that you validate both that the new functionality behaves as expected and that existing functionality hasn’t regressed.
The goal of deploying to production is to ensure that the metadata on the production system is updated with the metadata from the test environment. To move the metadata, you first need to export the model store from the test environment:
AXUtil exportstore /file:TestStore.axmodelstore
Import the model store file on the production system. To minimize downtime, AXUtil supports a two-phase import process. The first phase imports the metadata to a new schema in the database. This takes a few minutes and can occur while the production system is still live. The second phase replaces the model store metadata with the imported metadata from the schema. The takes a few seconds and must occur while the AOS is stopped.
Create a new schema:
AXUtil schema /schemaname:TransferSchema
Import the model store file into the new schema:
AXUtil importstore /file:TestStore.axmodelstore /schema:TransferSchema
When all users are logged off, stop the AOS:
Net stop AOS60$01
Apply the changes to the model store to move the new schema to the active schema:
AXUtil importstore /apply:TransferSchema /backupschema:dbo_backup
Restart the AOS:
Net start AOS60$01
Note
Notice the use of the /backupschema option in the example. With this option, you can quickly revert to the original metadata if unexpected issues arise. When you no longer need the backup schema, you can delete it by using the AXUtil schema/drop:<schemaname> command.
At this stage, the metadata in the production environment is identical to the metadata in the test environment. A few more tasks must be performed before the system is ready for users. These include synchronizing the database, creating role centers, deploying web content, setting up workflows, deploying cubes, importing integration ports, and deploying reports. For more information about these tasks, see the white paper “Deploying Customizations Across Microsoft Dynamics AX 2012 Environments” (http://www.microsoft.com/download/en/details.aspx?id=26571).
Business data references metadata element IDs. The process outlined in the previous sections ensures that the element IDs in the production system remain unchanged, and thus ensures the integrity of the business data.
This is achieved by only exchanging metadata between test and production through model store files, which maintains the element IDs. For example, if the element IDs in the test environment and production environment are unsynchronized because XPO files or model files have been imported into both systems, you must rebuild the test environment.
The importstore command has a built-in safety mechanism. The command ensures that element IDs in the target system are identical to the element IDs in the file. If any conflicts are detected, the import operation stops. You can use the /verbose option to get a list of the conflicts, and the /idconflict:overwrite option to continue with the import operation anyway. Use the latter option only on a system where you don’t care about the data—never in a production environment.
For more information, see the Element IDs section earlier in this chapter.
The AXUtil utility used in all examples in this chapter provides a command-line interface to the model store commands offered by the model store API. A PowerShell interface is also available from the Microsoft Dynamics AX 2012 Management Shell.
Both these interface implementations use the managed assembly file AXUtilLib.dll. You can also use this assembly if you want to automate any model store operations. The assembly is referenced in X++, so you can easily access the model store API from X++. Some of the most common commands are available from the SysModelStore class.
The model store API also contains a method to generate license keys for a license code in the AOT based on the license holder name and serial number. The following example shows how to invoke this method from a managed website in an automated license purchasing scenario. For more information about how to protect your solution with a license code, see Chapter 14.
using Microsoft.Dynamics.MorphX;
using Microsoft.Dynamics.AX.Framework.Tools.ModelManagement;

protected void Submit_Click(object sender, EventArgs e)
{
    string certPath = @"c:LicensesMyCertPrivate.pfx";
    string licensePath = @"c:Licenses" + Customer.Text + "-license.txt";
    string licenseCodeNameInAot = "MyLicenseCode";
    string certificatePassword = "password";  //TODO: Move to secure storage
    AXUtilContext context = new AXUtilContext();
    AXUtilConfiguration config = new AXUtilConfiguration();

    LicenseInfo licenseInfo = new LicenseInfo(licensePath, certPath,
                    licenseCodeNameInAot, Customer.Text, Serial.Text,
                    null, certificatePassword);
   config.LicenseInfo = licenseInfo;
   AXUtil AXUtil = new AXUtil(context, config);
   if (AXUtil.GenerateLicense())
   {
       Response.AddHeader("Content-Disposition",
                          "attachment;filename=license.txt");
       Response.TransmitFile(licensePath);
       Response.Flush();
       Response.End();
   }
}