IN THIS CHAPTER
Windows 7, although filled with enhancements and new features, does not take long to get used to. This chapter helps you master the improved interface changes, navigate around your desktop, use shortcuts to work faster, make configuration changes, learn how to search for items, and work with libraries.
You won’t find the Windows 7 desktop indecipherable. Instead, if you are already familiar with Windows XP or (especially) Vista, you will be right at home (see Figure 1.1).

We have the desktop. We have the Recycle Bin. We have the taskbar at the bottom. We have a notification tray to the right, along with our clock and other notification items that we can hide or display. In the lower-left corner of the Windows XP desktop, we have a Start button. In the lower-left corner of the Windows 7 desktop, we have a Start orb.
Note
Developers actually call the Start orb a jewel (or even a pearl), but we laymen like to call it an orb. Can you continue to call it a button? Sure!
Everyone needs a starting point, and the Windows 7 desktop might as well be it for this book. After all, you probably already feel a little bit better about Windows 7 because the desktop actually looks familiar to you. Let’s leverage that reassurance and jump right into Windows 7.
Windows XP had no gadgets, whereas Windows Vista had too many. The Windows 7 approach is “just right.” You can have them on your desktop if you want them there, but you don’t have to snap them to a sidebar.
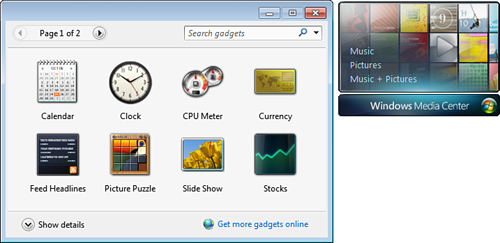
What are these gadgets? They are mini applications, and sometimes you just want a few handy. Perhaps you need to know the time, you need a calendar or a calculator, or you want to know the weather. To add gadgets to the desktop, just right-click the desktop and choose Gadgets. Figure 1.2 shows the various options that will display. This figure also shows a Media Center gadget on the desktop.
After you choose a gadget, it will appear on your desktop. If you place your cursor over the gadget, three options will appear: an X to close it, a wrench to make adjustments to it, and a little footpad for moving it around your desktop.
If you right-click the gadget, you will see additional options (such as Opacity, which enables you to make the gadget appear more transparent by choosing the percentage level of opacity you prefer).
Shortcuts divide the masses. Some people love clicking their way around an interface, others love their keyboard. A couple of quick keystrokes can accomplish quite a bit...if you know what buttons to push.
You probably already know that you press the Windows Logo key (referred to in this book as the Windows key) to bring up the Start menu. In addition, however, you have a bunch of standard Windows shortcuts.
Here are some favorites:
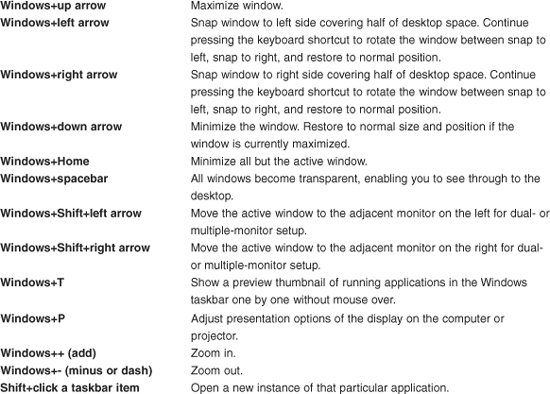
Other popular keyboard hotkeys already used in Windows Vista include the following:

Note
The “Coolest Shortcut” award goes to Windows+number.
Press the Windows key, and then press a number key along with it. This number will connect with an application located on the taskbar. Assume, for example, that your Internet Explorer is the fourth icon on the taskbar (counting from the left). You can launch that application by just pressing Windows+4.
If you want to increase or decrease the size of your desktop icons, an easy shortcut-like way to do that is to hold down your Ctrl key and use the mouse scroll wheel to go larger or smaller.
Although the initial look of Windows 7 is similar to every operating system we have received from Microsoft since Windows 95 (which is a good thing in terms of comfortability), there are still some significant changes to how things work.
For example, the taskbar is a little taller. There is a new Show Preview glass sliver to the right (and small enough to miss if not pointed out), which we discuss shortly. The taskbar has always been a place where icons for open documents and applications are displayed and can be controlled. With Windows 7, however, you can now mix and match shortcuts for applications, folders, file objects, and so forth all on the same bar.
You will note that icons look different depending on whether they are for an open application or for a shortcut. Icons for open applications and windows have a visible border, whereas shortcuts for favorite programs and such have no border.
Note
One of the coolest aspects of the taskbar in Windows 7 is your ability to drag and drop buttons wherever you like. Folks have been asking for this for years, and finally we can do this without going to an outside source for a third-party solution. Don’t believe me? Just drag and drop. Now try that in XP or Vista and you will see that it really is new. The first time I thought, “But we must have had this before now, right?” Wrong.
As you move your cursor over buttons, you will see different previews of the underlying program or file beneath. If you hover for any length of time, the preview will display full screen. There is also a new feature called a jump list, which we discuss later in this chapter.
In terms of Start menu changes, at first glance you won’t see all the goodies in Windows 7. What you will find with some toying around in Windows 7 is that there are libraries, which we discuss shortly, that you can show as items in the Navigation pane for your Start menu. So, whereas before you would have seen Documents and Music and so forth (and under XP you would have seen My Documents), you wouldn’t really know why (other than the assumption that this is how Microsoft wants it) those were in your Start menu. Now, with Windows 7, you know, in the sense that you can now push libraries to the Navigation pane.
Note
If you want to see this in action, just click the Start orb, and then right-click something like Documents in the Navigation pane. Note the option Don’t Show in Navigation Pane, and then click Properties. This shows you that the Documents “folder” is actually a library that can be made up of multiple-location folders. Down in the Attributes section, you can see the Shown in Navigation Pane check box.
In Windows XP, the taskbar and Start menu properties were somewhat simple, with two tabs and few options. To access these in XP, and in Windows 7, too, you just right-click the taskbar and choose Properties. You can also find the Taskbar and Start Menu applet within the Control Panel. There is also a new Notification Area Icons applet that you can select from within the Control Panel.
However you choose to access these properties for your Start menu and taskbar, you will note three tabs (there were four in Vista and only two in XP): Taskbar, Start Menu, and Toolbars.
On the Taskbar tab (see Figure 1.3), you can select or deselect the following taskbar appearance options:
• Lock the Taskbar
• Auto-hide the Taskbar
• Use Small Icons
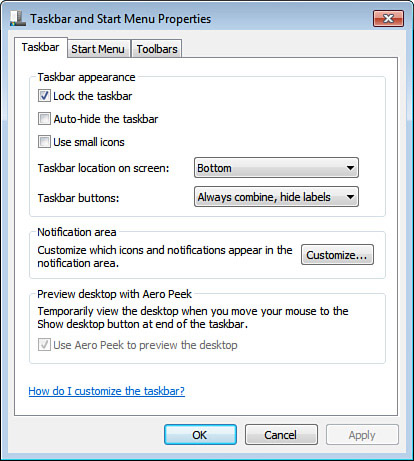
You can also determine the location of the taskbar on the screen (Bottom, Top, Left, and Right), although most users leave it at the bottom. And you can determine how taskbar buttons will appear, which is a new feature in Windows 7. A taskbar button represents an open program or document on your system. As you open more and more of these, you may begin to clutter up your taskbar. To deal with this potential clutter, you can choose from among the following options: Always Combine, Hide Labels; Combine When Taskbar Is Full; and Never Combine.
On the same Taskbar tab, you have the Notification Area section, where you can choose to customize your notification area. Basically, you can tell Windows 7 to hide certain icons from your notification tray. Sometimes you have icons that you just don’t want or need. Get rid of them for good, have them show permanently, or hide them only when they are inactive.
Initially, you will see these options: Show Icon and Notifications, Hide Icon and Notifications, and Only Show Notifications. However, if you want to see system icons (such as Clock, Volume, Network, Power, and Action Center), you can turn these items on or off via a link at that bottom of the applet (see Figure 1.4).

Note
The default behavior of the notification area (a.k.a. system tray) in XP and Vista is for icons of applications to just jump in and keep that tray growing to the point of annoyance. Windows 7 locks things down a bit by allowing only the five “stock” items (Action Center, Power, Network, Volume, and Clock). As you add new applications, both their icons and notifications are hidden by default unless you make adjustments to show them.
Another check box on the Taskbar tab is Use Desktop Preview, which you can select if you want to Temporarily Minimize Open Window When You Place Your Mouse on the Far End of the Taskbar. Note the little sliver at the end of your taskbar, beyond the system/notification tray; that is for the Desktop Preview feature.
Note
The Desktop Preview/Show Desktop feature is a new one that we didn’t have before Windows 7. In Windows XP and Vista, we had a Show Desktop icon that we could select from the Quick Launch toolbar off of our taskbar. However, the new Show Desktop panel enables you to take a peek at your desktop by making other windows transparent if you hover your cursor over it.
On the Start Menu tab (see Figure 1.5), you cannot (as in times past) easily switch between the new view and the classic view. However, you can select Customize, and then make various changes to the way certain items display (for example, as a link, as a menu, or not at all).

Note
You can feel more in control of Windows 7 by using the customization options. For example, you can customize Administrative Tools and Control Panel to not only be on the Start menu (Control Panel is by default) but to also expand out as a menu themselves.
On the Start Menu tab, you can assign the following actions to your Power button: Sleep, Shut Down, Hibernate, Restart, Lock, Log Off, or Switch User. You can also establish privacy settings to allow/deny showing of recently opened programs and files.
On the Toolbars tab, you can add one or more toolbars to the taskbar for frequently used features (such as an Address bar or Links bar). The Desktop option adds icons to your taskbar (for example, Computer or Documents) that normally appear on the desktop.
Typically, date and time options are discussed in a Control Panel context because you find those settings there. However, your clock is part of your initial desktop settings, and in Windows 7, you can take advantage of some cool options.
For example, you can actually set up multiple time zone clocks to be displayed for your personal or business needs. That’s right: Never be late for a conference call with another time zone!
To simply see the time and current month calendar, click the Time/Date option in your system tray (a.k.a. notification tray). To go a step further, select Change Date and Time Settings. You will then see the following tabs:
• Date and Time: Where you can configure your date, time, and time zone settings
• Additional Clocks: Where you can click Show This Clock for up to two additional time zone clock displays
• Internet Time: Where you can synchronize with a time server on the Internet (typically already configured)
The next time you hover your cursor over your time display, you will see the other time zones you have configured (see Figure 1.6). This is a great tool for travelers who like to call home and for business employees who have offices and clients in other time zones.
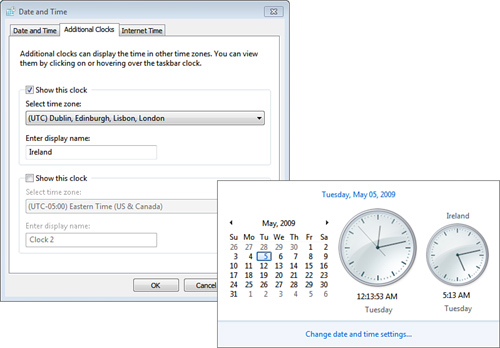
Of course, you could also set up gadgets to show the time in multiple time zones, but this way is cooler.
I change a couple of things on a computer the second I get it booted (if it’s my computer, that is): the background and screen resolution, if necessary.
If you want to make changes of that sort, go to Control Panel (click Start, Control Panel) and use the new Display applet (for display settings) and the Personalization applet (for background/screensaver settings). A quicker way is to right-click empty space on the desktop and select Personalize. If you just want to go directly to Screen Resolution, however, you can use a new shortcut when you right-click for just that.
The new Screen Resolution settings (see Figure 1.7) are easy to change. You can choose your display and resolution. You can click the Detect button to locate attached monitors/projectors, and you can click the Identify button to display a number for the display you are looking at. With that information, you can choose the monitor and the display and resolution settings for that particular monitor (which proves especially helpful in a multiple-monitor situation).

If you click the Make Text and Other Items Larger or Smaller link, a simple screen will display, on which you can change the size to smaller, medium, or larger (with a Preview screen). You can make other changes, too, by just clicking the links to the left; for example, you could select the Set Custom Text Size (DPI) option.
From within the custom DPI settings, you can scale to a percentage of normal size (with the default scale at 96 pixels per inch, which might be too small). The second option of 125% is 120 pixels per inch, which might be too large. You can use the slider to change the size to something that suits your specific needs.
As for Personalization settings (see Figure 1.8), Windows 7 supports different styles. Styles combine a background color or image, a glass or window theme, a sound scheme, and a screensaver of your choosing. These are all packaged so that if you want to share them with others you can share them as a whole, not just in pieces. These are similar to what you might remember in earlier Windows versions as themes.

These styles (or themes) are all configurable. You can choose preconfigured ones or click the Get More Themes Online link. You can alter desktop icons, mouse pointers, and so forth.
Note that some themes relate to landscapes and nature and so on, but there are also regional themes that depend on the language of the operating system. So, you might have a United States theme or a German theme depending on the language of the operating system.
One of the more exciting features of the taskbar is the addition of jump lists. To see a jump list, right-click an icon on the taskbar (or left-click the icon and push upward to slide the jump list into view). Jump lists include commonly used actions associated with the application you are selecting.
In Figure 1.9, for example, you can see that Internet Explorer includes pages that you can “pin” to the jump list for quick access. In addition, items you frequently visit are retained. There are also tasks such as InPrivate (for private viewing, which we discuss further in Chapter 4, “Internet Explorer 8.0”) and New Tab.

Obviously, Windows-savvy applications will be designed to work a little better with jump lists than legacy applications, but that doesn’t mean that legacy applications will not receive jump lists. They just will not be as populated with application-specific functionality.
Note, too, that Start menu items will sometimes have arrows that indicate a jump list for items on the menu, as you can see with the Getting Started option in Figure 1.10.

You might note that Windows Explorer has changed slightly from Windows Vista (and it has certainly changed from XP). The Address bar at the top is not a static location showing where you are in the file system. Instead, it displays drop-down arrows that enable you to move forward in the structure (if there are more folders to delve into) or backward, all the way to the drive letter source for the folder you are currently in. That is why it is also known as a breadcrumb bar.
An Organize button resides at the top of the Explorer window. If you click this button and go down to Layout, you will see several different panes (and a menu bar, which may make Windows XP users feel a little more comfortable, for backward-compatibility purposes):
• The Navigation pane appears on the right and provides a list of drives and libraries to choose from in a hierarchical structure.
• The Library pane shows you the documents located within a library. A library is like a folder, but it doesn’t officially hold content; instead, it shows a view of content that has been aggregated within the library by pointing off to multiple sources.
• The Details pane is at the bottom and shows the metadata behind a selected document or folder. If you select an AVI file, you will be shown information like the length of that file, the size, the title, and so forth.
• The Preview pane is turned off by default. When it is turned on, you can select an item and see a preview of it in the right corner.
Figure 1.11 shows Windows Explorer with all the panes and the menu bar on. Note in the upper-right corner of Explorer that you have options to change the view of icons. In Windows Vista, there is a View button, but this has been changed to a simple drop-down menu. There is also an on/off button for the Preview pane. The blue circle with the white question mark is your Help option. It looks like a blue panic button and is obvious in every window.
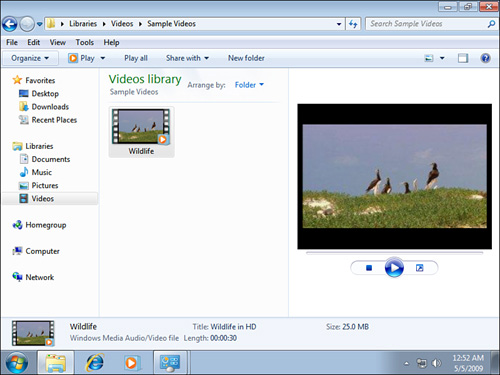
Depending on the type of file chosen, you can play it (as in this case) or select the down arrow and choose a different application (other than Media Player) to play it in. You can Play All, Share With, or Create a New Folder. If it is a document, you can click an Open button or select a down arrow to choose a different application to open it (other than the default application for opening a document).
Note
The ability to create a new folder with a single click off the Explorer window may seem like a simple time saver, and it is (but one that was badly needed and a welcome detail). It’s not a “feature” per se, but a detail. In Windows Vista, you had to click Organize first and then choose New Folder, or right-click in the working pane and click New Folder.
Beginning with Windows Vista, we were given some tremendous search features, to such a degree that Search was actually removed from the Start menu, because you no longer had to “ask” for it; it was pinned to almost every window. Windows Search 4.0 enhanced the search features even further, but Windows 7, along with desktop search, introduces Federated Search, as well.
Click the Start orb to display the Search Programs and Files option at the bottom of the menu. You can use this option to instantly search programs, files, email, and so forth. Open any window, however, and in the upper-right corner you have a Search dialog box. This is true even for working elements like Administrative Tools or Control Panel.
From within a standard folder, however, if you select your starting location from the Navigation pane to the right (or use the Address bar, a.k.a. the breadcrumb bar up top) to locate your starting folder or drive, you can type the file name in the Search dialog.
Note
The more commonly trafficked document repositories such as Documents, Pictures, and so forth are indexed by default. Other areas are not. If you attempt to search an area that isn’t indexed, you will be given a dialog that says “Searches might be slow in non-indexed locations...,” and you can add that location to the index if you choose.
If you select the Search dialog, as shown in Figure 1.12, you can choose to add a filter to the search depending on what filters will apply in the particular search you are making. A video file, for example, will have a length filter.

As mentioned previously, Search has also been extended with Federated Search. This extends the scope of your search capabilities within Explorer beyond the desktop and out to remote repositories through “search connectors.”
Federated Search is based on OpenSearch (an open standard) and the RSS format. So, you can download search connectors for Twitter, YouTube, Flickr, and others, and then you can search for items through your Explorer.
Note
Keep in mind that this isn’t entirely new as a feature. Internet Explorer and SharePoint Search both have these features. It’s a new search feature to Explorer, however.
Currently, connectors are being built and can be searched for on and downloaded from throughout the Internet. Famous Internet blogger Long Zheng (www.istartedsomething.com) has one for Flickr. As you can see in Figure 1.13, this has more than a coolness factor for those who work with these various sites often.
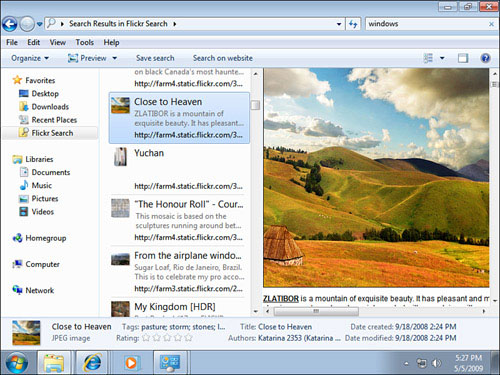
Long Zheng says, “Imagine the possibilities. Searching the files on your remote Windows Home Server, searching your documents on Google Docs, finding music on Pandora, finding videos on YouTube, finding PDFs from your library. Basically anywhere with a repository of files.”
Libraries do not replace folders per se. Rather, while you still have folders that hold documents on the traditional side of your system, some of your main locations (like Documents) have been changed into libraries. A library enables you to see more than one folder’s worth of content in one location. So, for example, the Documents library says it contains two locations (by default). You can click the link to see the Document Library Locations dialog, which will show that you have My Documents (C:Users<username>Documents) and Public Documents (C:UsersPublicDocuments), as you can see in Figure 1.14.

Default libraries are created for Contacts, Documents, Downloads, Music, Pictures, and Video. In the case of those libraries that are created by the operating system, content styles are programmed in. What that means is that the library is designed to provide you with a style appropriate to the supposed content. For example, the Downloads library will list the URL that the downloaded files came from. The Contacts library will show you email addresses and phone numbers.
Note
On the one hand, this feature isn’t entirely new to Windows 7. You could perform saved searches and create virtual folders in Explorer within Vista. However, libraries enable you to write to these “saved searches,” something you couldn’t do before. Each library has a save location specified that allows you to save a file to the library, and it will go to that saved location. (If you need a file to go elsewhere, you must save it to the specific folder you choose.)
To create a new library in Explorer, click the Libraries link in the Navigation pane. A New Library option will then appear on your toolbar. When you click the button, you are asked to provide a name for your library. Initially, that is all you have to do. You will have a “library” with no folder connecting points.
Double-click the library link, and it will show you that the library is empty and you need to Include a Folder by clicking the button. After you click this button, you can browse your folder structure and add whichever folders you want to be part of that particular library.
Note
You can delete a library you have created without any fear of deleting the folders that make up that library. The library is more of a view of aggregated data from multiple locations. It is not the “folder” itself, but a view of the content within that folder aggregated together with data contained in other folders too.
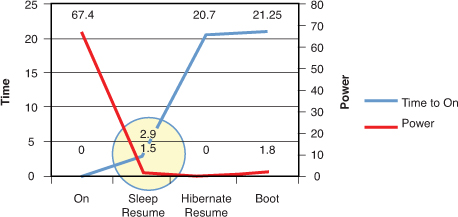
In XP, when you decide to turn off your computer, you get three options: Stand By, Turn Off, and Restart. If you know how, and most likely if you’ve been working with XP for more than a day you do, you can hold Shift down and get the Hibernate option. You probably understand that Stand By is the fastest to recover from but still requires power from your battery (if you are using a laptop) or power supply. If you hibernate, you freeze your system, and you can leave all your applications up, but it takes longer to come back to life from Hibernate than from Stand By. The benefit is that you don’t use battery life.
Sleep mode was introduced in Windows Vista, and it gives you the best of both worlds. It is actually the default way to shut down your system, both desktops and laptops. When you click the Start orb, the default button is Sleep. You can change the button shown by going to your taskbar and Start menu properties page. On the Start Menu tab, you’ll find a Power Button Action drop-down. The default is Sleep.
Sleep, when using a desktop, means your system state will be written from RAM to Hiberil.sys, and then your system will go into Stand By mode. This provides a quick return from sleep when you sit back down at your computer, but also ensures recovery in cases of emergency (for example, if the power goes out). The system is actually still drawing power for things such as the CPU, the RAM, and a few chipset features. Note that desktops will, by default, also go into hybrid Sleep mode if you leave your system for an extended period of time. Microsoft says this will save huge amounts of energy, thus assisting the environment with global warming issues.
On laptops, it works slightly differently. Initially, when the system is put in Sleep mode (by closing the lid, leaving the system idle for any extended period of time, or telling it to sleep), your system state is only put in Stand By mode, without writing to the hard disk, and Windows 7 uses a really low power mode (better than in XP or Vista) to keep the state alive. Power is being drawn from the battery as in Stand By mode, but not as much. Still, though, given enough time, you will run low on power. Before that happens, thanks to monitoring by the system, your system wakes up and does a hibernate and then shuts off.
When you turn a system on from Sleep mode (either a laptop or a desktop), if it hasn’t “hibernated” it should return quickly and restore your system and applications instantaneously, as from Stand By mode. If it has hibernated, it will pretty much come back to life the same way a hibernated system does in XP.
Note the chart (granted, it was made by Microsoft) in Figure 1.15. It shows how Sleep mode uses a little more power than Hibernate mode, but it is the fastest time to on.