
The Control Panel, although considered scary to some, is really just the location of applications that you can use to make configuration changes or access tools that help you to either configure the functionality of your system to better suit your needs or adjust security and networking options to help the system perform properly. The many tools provided within are discussed in this chapter.
The Control Panel has been an integral part of Windows since the very beginning. Starting with Windows 95, however, the Control Panel took on its modern form as a folder with shortcuts toward applications (called applets in the Control Panel).
You might recall that the Control Panel used to have different views to work with. A Classic view showed all your applet shortcuts, and a default Home view showed categories of options. Starting with Windows Vista, you could use the Search bar to help you locate what you needed.
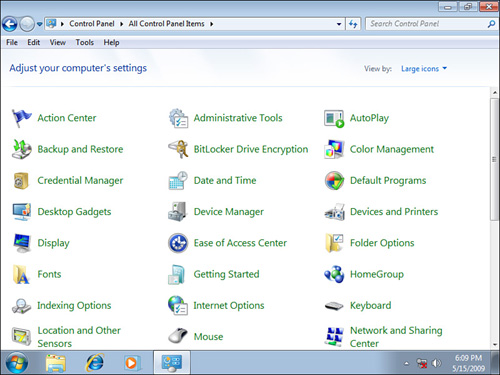
In Windows 7, the Control Panel offers your computer adjustment tools in a Category view to start with (see Figure 7.1). However, you can select the down-arrow link in the upper-right corner for View By, and then select Large or Small Icons (see Figure 7.2).

One thing you might want to do is have your Control Panel options expand off the Start menu to help you work a bit faster. To do this, right-click the Start orb and choose Properties. Doing so puts you on the Start Menu tab of the Taskbar and Start Menu Properties dialog box. Click the Customize button and locate Control Panel. Change the radio button from Display as a Link to Display as a Menu to allow Control Panel to expand out as a menu.
Perhaps you have heard the expression “the more things change, the more they stay the same.” Well, typically, when transitioning from one OS to another, too much change is not necessarily a good thing (especially if the changes are simply name changes or moving items around to confuse people without giving them a monumental reason for their confusion).
If you are looking at the Control Panel in Windows 7 and you are a Windows XP user, you will note a lot of change. If you are a Windows Vista user, you will note some change, but not too much. Let’s take a look at each applet and note some details about each one.
Note
In some cases, an applet has already been discussed (or will be discussed in a later chapter). That will be mentioned when we discuss the applet here.
Discussed in Chapter 5, “Security Features,” the Action Center replaces the Security Center for XP and Vista users as the one-stop location for your security (and now) maintenance dashboards.
This is less of an applet and more of a shortcut to Administrative Tools that you may need to use, such as Computer Management, Event Viewer, and Services (all of which we discuss in greater detail later).
Change default settings for CDs, DVDs, and devices so that you can have the system play music, movies, view pictures, and so forth, automatically and according to your specifications.
This applet gives you a single location to determine the desired result you want when putting in different types of media (see Figure 7.3). You can configure a DVD to automatically play within Windows Media Center or some other application if you like. Or, you can determine that pictures or audio files use specific options.
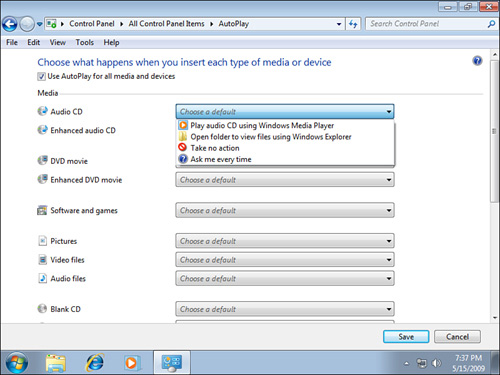
In XP, the AutoPlay options were set by default to automatically run a disc’s AutoPlay program. In Vista, the default is for it to ask you every time, but you can change this by going into your AutoPlay settings and changing the setting for Software and Games to Install or Run Program.
Note
The AutoPlay options include settings for enhanced audio CDs and for enhanced DVD movies. What are these? Well, sometimes artists include additional items on their CDs, such as music videos and so forth. Basically, these CDs or DVDs have different format types on them and require additional settings.
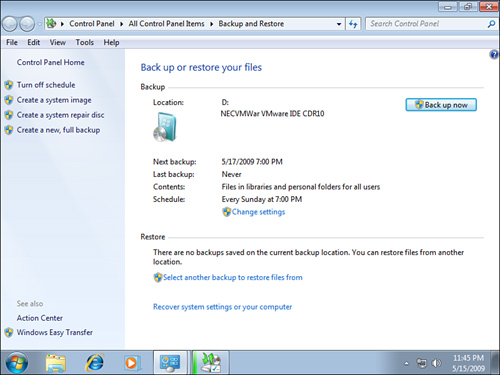
Backup and Restore is a tool for backing up and restoring your files/system. Windows Vista introduced a Backup and Restore Center tool for performing your own backup, but Windows 7 builds on that. We cover this in greater detail in Chapter 9, “Performance and Troubleshooting Tools,” but you can see in Figure 7.4 that the new Backup and Restore application is a bit more intense and “work oriented” than in Windows Vista.
We discussed this in Chapter 5. This applet helps you to configure BitLocker encryption for your entire system or with the new BitLocker to Go option to encrypt USB drives.
The Color Management applet was introduced within Vista, but was also available as a downloadable XP PowerToy. This tool is designed to establish a better screen-to-print match, and provide support for more reliable printing with today’s powerful color devices such as digital cameras and modern printers.
Keep in mind that from the scanner/camera to the computer to the printer you are dealing with different devices that have different characteristics and capabilities with colors. Beyond the hardware, even programs have different capabilities. For example, the same picture, opened by two different photo-viewing applications, might produce different results to the viewer.
Color Management maintains consistency between different devices and applications to produce a more uniform appearance. It’s a tool that will mostly appeal to digital photographers who are serious hobbyists or experts in the field.
Credential Manager is a new tool in Windows 7 that enables you to save your credentials (such as your usernames and passwords) for websites you log into and other resources you connect to (such as other systems). These credentials are saved in the Windows Vault (see Figure 7.5). One of the coolest features here is that you can back up/restore the vault.
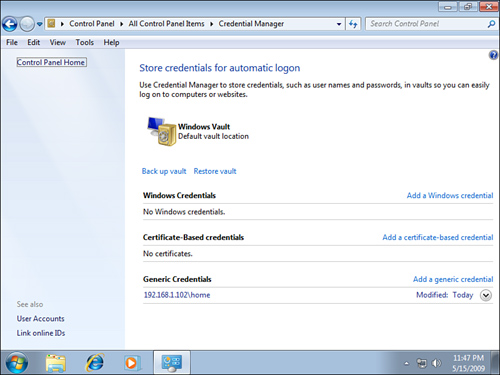
On first glance, this might look like you can use this feature for all your website login information (Gmail, Twitter, Facebook, and so on). In actuality, however, it works only with sites that can interact with Credential Manager and the Windows Vault.
As mentioned in Chapter 1, “Getting Comfortable with the Windows 7 Interface,” the Date and Time applet is used to (obviously) configure the date and time on the Date and Time tab. Here you can configure the date, time, and time zone for your system. However, it is the Additional Clocks feature (introduced in Windows Vista) that is really helpful. You can configure two additional clocks with their own time zones. When you hover your cursor over the time, you will see the time in these other locations.
The Default Programs applet is a quick place to find your default program associations and file-to-program associations. For example, if you are tired of your MP3 files opening with Media Player and want them to open with WinAmp or some other player, you can make the changes here.
There are four options when you open up the Default Programs applet. (Keep in mind you can also open the Default Programs applet by clicking the Start orb and then choosing Default Programs.)
• Set Your Default Programs: Need to choose between Firefox and IE as your default browser? Here is where you can tell Windows 7 which one is your go-to application. Same is true for your email, contact management information, media files, and photos.
• Associate a File Type or Protocol with a Program: For an expanded view of all file types and protocols and their associated applications, you can select this option to ensure all the file types you have can be opened by the application you prefer.
• Change AutoPlay Settings: Opens the AutoPlay applet discussed previously.
• Set Program Access and Computer Defaults: Yet another way to specify which programs access certain information. You can choose the following: Computer Manufacturer (if a manufacturer established preconfigured settings), Microsoft Windows (for an all Microsoft default world), Non-Microsoft (allows you to use only non-Microsoft programs and access to those programs will be removed unless you select Custom), and Custom (for a mix of applications; the most logical choice for most of us).
As already discussed in Chapter 1, the Desktop Gadgets applet opens your Desktop Gadgets dialog box, which shows options you currently have to use as gadgets and a link to download additional ones.
We first encountered Device Manager back in Windows 95, and it has moved around a bit from one version of the OS to another until, starting with Windows Vista, it was given an applet within the Control Panel (although you can still access it from the Computer Management tool). It’s one of the best tools to use when you have a hardware issue because you can see quickly which devices or drivers are not functioning properly.
With Device Manager, you can see which devices are installed and functioning properly. You can right-click the system and choose one of two options:
• Scan for Hardware Changes: Checks for the plug-and-play (PnP) hardware already installed. A good use for this is in troubleshooting devices. Sometimes you might right-click a device and actually delete it from Device Manager. But, because it is still physically connected, the scan will find that device again and ask you to supply drivers for it. Sometimes this can help you to find out the source of a hardware problem.
• Add Legacy Hardware: If you select this option, the Hardware applet runs asking you to choose between the option to search for the drivers or allow you to choose your own.
You can also update drivers by right-clicking an item and choosing Update Driver Software. You can modify settings from within the Properties of the hardware devices. Then you can use the following:
• Driver Rollback: From the properties sheet of any given device, you can go to the Drivers tab. There is an option here to roll back the driver. When you have a problem with a device after you have installed an updated driver, you can select this driver to roll it back to its previous version.
• Device Conflicts: Sometimes two hardware devices require the same resources from your system and battle back and forth over these resources, causing a hardware conflict. You can use Device Manager to disable devices you do not need or want, or to resolve the conflict by going into the properties sheet of a device and to the Resources tab for a manual resolution to the problem.
Note
Now for the Signature Verification Tool (sigverif.exe). Windows 7, like XP and Vista, uses a driver-signing process to make sure drivers have been certified through Microsoft to work correctly. Sometimes we purposely choose to install devices that have not been verified. Other times, perhaps we didn’t know. If you type sigverif.exe, the Start menu will perform a scan of your system for any unsigned drivers. Not to say that all of these are bad drivers, but when you are troubleshooting a problem, it helps to have all the facts.
From within the Devices and Printers folder, you can see all the devices connected to a PC. Depending on the device, you can see items related to that device. For example, in Figure 7.6, you can see your devices, printers, and faxes; and by selecting the XPS Document Writer, you can see some options, such as See What’s Printing and Print Server Properties.

Where Devices and Printers really shines is in its interaction with Device Stage. This is a new way to interact with items you plug into your computer, like your phone, digital camera, printer, or portable media player. It works for USB devices, but also for Bluetooth and WiFi devices.
When you first plug a device in, drivers are loaded (if Windows 7 has them) and your device will be up and running. If a driver isn’t found, Device Stage searches on Windows Update. Device Stage shows you all the applications, services, and information for a device. The manufacturer can create a device that supports Device Stage so that it appears on the taskbar with the correct image of the device and offers jump list displays for things you can do with the device.
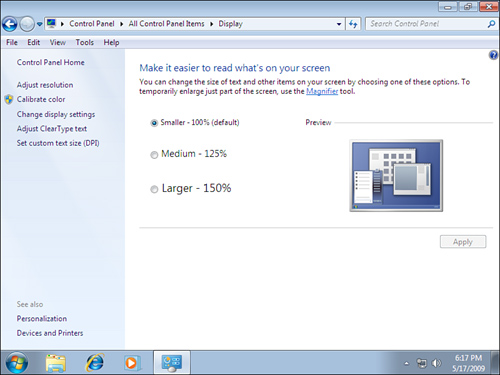
Display settings were discussed in Chapter 1, and they are accessible through both the Control Panel and by right-clicking your desktop and choosing Display. The initial screen shows you how to change the size of text and other items on your screen with radio buttons (see Figure 7.7). You can also see in Figure 7.7, to the left, that there are links for the following options: Adjust Resolution, Calibrate Color, Change Display Settings, Adjust ClearType Text, and Set Custom Text Size (DPI).
In Windows XP, the Ease of Access Center was called Accessibility Options. This applet was given a new name in Windows Vista but the retained the same mission: to enhance the functionality for users with limited vision, hearing, or manual dexterity. Microsoft has made some excellent efforts in these areas. We applaud their efforts, and for those of us who have loved ones who require these settings, there is nothing better than seeing them succeed as a result of these features.
When you open up the Ease of Access Center, you see immediately that it’s not just one tool (see Figure 7.8), but many that you can configure. To start with, let’s discuss the questionnaire that might steer you in the right direction from the start.

Right from the moment you open the center, you can see that it offers different ways to configure your options:
• Quick Access to Common Tools: Four common tools are Magnifier, Narrator, On-Screen Keyboard, and High Contrast. You can turn them on with a mouse click, or you can hear the options read out loud to you (which is what happens by default), and you can click the spacebar to choose one of these options. Any options you choose stay with you until you log off. If you want a more permanent set of options, you have to go to the options in Explore All Settings.
• Recommendations: The former Accessibility Wizard is gone and has been replaced by this questionnaire. Instead of a user having to become an expert on what features are offered, they just explain what considerations they need and the OS will make the recommendations.
• Explore All Settings: There are seven categories you can configure. Unlike the Quick Access options, these settings remain configured when you log off and log back in.
For the most part, the options in Folder Options remain the same as in Windows Vista. This consists of three tabs: General, View, and Search.
On the General tab, you can configure who you want to browse folders, and you can configure how you want to open items (single- or double-click). There are two new check boxes under a section called Navigation pane worth noting. By default, Windows 7 navigation, when you are working with Explorer, shows you important items, but not all the items that you may be used to. If you select Show All Folders, you will see them all. You can also select the option Automatically Expand to Current Folder.
The View tab has a variety of options to choose from, and they are pretty straightforward. Because many people do not know these options even exist, however, we recommend they scan through the options. The Search tab has a few different groups of settings, such as What to Search, How to Search, and When Searching Non-Indexed Locations.
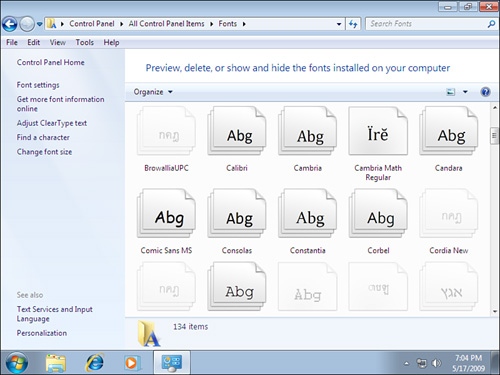
Displays all the fonts installed on the computer. Windows 7 has made some improvements to the Fonts dialog by showing you previews. Each thumbnail for the font shows three characters of the alphabet on the icon (see Figure 7.9). In addition, fonts of a combined set will no longer take up different slots. They will appear as one font that you can double-click to view other options. You can also toggle fonts on or off if you prefer (a.k.a. hiding fonts). By default, Windows 7 does this based on regional settings, but you can also manually hide them.
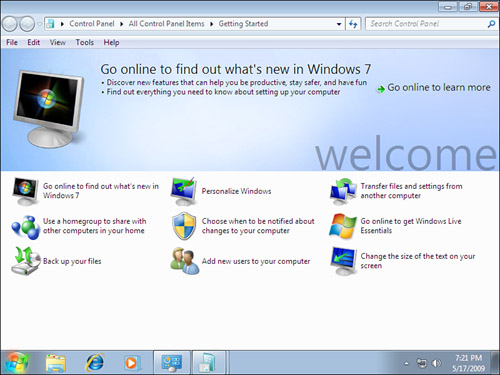
The Getting Started Center was previously called the Welcome Center in Windows Vista, and it is easy to locate in Windows 7 either through the Control Panel or (initially) through the Start menu. You can see in Figure 7.10 that the Getting Started Center shows you new features in Windows 7 and offers a grouping of links to either tools or online information. PC vendors may use this area to personalize the welcome information to their particular needs.
Discussed in detail in Chapter 6, “Networking Made Easier,” the HomeGroup settings enable you to configure a smaller set of networked Windows 7 systems to share files (documents, pictures, music, videos) and printers, as well as stream media to and from devices. All of these features are new in Windows 7 and greatly facilitate home networking and sharing.
To speed up searches, an indexing feature in Windows 7 is turned on by default. In addition, predefined locations are indexed by default, such as Internet Explorer History, Offline Files, Start menu, Users folder, and Windows Live Mail.
If you open the Indexing Options applet and click Modify, you will be able to quickly add locations to the index. Keep in mind, however, that adding to the indexing (and thus keeping those areas up-to-date) increases the workload on Windows 7. However, it makes for faster searches when you are looking for something that isn’t on the standard index path.
Through Advanced Options, you can indicate if you want to index encrypted files, rebuild the index (if it is giving you problems), and the location of the index file. You can also determine file types to include or exclude.
Basically, these are your IE 8 settings (not really your Internet Options). You can configure them from within IE by going to Tools, Internet Options, or you can configure them here. Obviously, if you use another browser like Firefox or Safari, these settings will not apply at all to your other browsers.
Nothing new to report here. You can use the Speed tab of the Keyboard Properties dialog that appears when you select this applet, to configure the character repeat settings and cursor blink rate. You can access hardware information and properties by going to the Hardware tab.
This is where you can configure your Windows-based sensors that can detect your location and the orientation of your system. So, essentially, Windows 7 supports both hardware and software sensors that can be designed for systems. Examples of hardware sensors include a GPS, microphone, accelerometer, and a motion detector. Software sensors might be based on information coming through the network or Internet.
One simple use for these types of features is the support of ambient light sensors (ALS) that enable a system to control the brightness based on the available ambient brightness detected.
Much like Keyboard, there is not much new to report. One item to take note of is ClickLock (which isn’t new; it’s been around since Windows Millennium Edition [Me]), which is located on the Buttons tab. Let’s say you have a hard time holding the mouse button down to move items and highlight text easily; this will help you. The other point to take note of is the fact that Windows 7 supports enhanced wheel support. On the Wheel tab of the Mouse applet, you can configure horizontal scrolling.
As discussed in detail in Chapter 6, the Network and Sharing Center is your one-stop location for all your network configuration options.
As discussed in Chapter 1, this option enables you to configure the settings for your notification area (a.k.a. system tray) to show or hide certain icons or notifications.
As discussed in Chapter 3, “Media Improvements,” parental controls were made available to us in Windows Vista, but the newer version excludes the onboard activity logging and the Internet settings (because those items have been moved over to the Windows Live download features). However, the Parental Controls applet still enables you to set times that persons can use the computer, as well as the games and programs they can use.
Discussed in greater detail in Chapter 9, this option takes you to your Windows Experience Index, where you can see an assessment of your system components on a scale of 1.0 to 7.9. You are also shown links to all sorts of performance-oriented settings that can help to improve the performance of your system, including adjusting visual effects, indexing options, power settings, and more.
As discussed in Chapter 1, the personalization settings can be accessed via the Control Panel, and from the desktop by right-clicking and choosing Personalize. Here you can select a theme to quickly change the desktop background, window color, sounds, and screensaver all at once. Or you can make changes to these items individually if you choose.
There are also links to other settings, such as Change Desktop Icons, Change Mouse Pointers, and Change Your Account Picture.
Remember how annoying the Location Information dialog used to be? It would come up when you chose Phone and Modem Options, and wouldn’t budge until you put in an area code. Well, that’s one thing that hasn’t changed in Windows 7: same annoying dialog. The settings themselves haven’t changed, and include the country/region you are in, the area code, the carrier code, and an outside line number; and the phone system uses tone or pulse dialing.
These settings are always under scrutiny and constantly improving to meet the needs of a “Green IT” effort. Reducing wasted power will save the environment unnecessary harm and will save a company budget unnecessary spending. You can see in Figure 7.11 that there are different power plans to choose from, including Balanced (recommended), Power Saver, and High Performance.

These power plans are designed to configure hardware and system settings to either maximize energy (the one called Power Saver), maximize performance (the one called High Performance), or a balance of both (called Balanced). If you are used to earlier power options, these power plans aren’t new; they used to be called schemes. The difference is that now you can easily select one of three default options, unless you want to get more involved.
You can configure the options in any one of those default plans or configure your own personal plan that suits you. By clicking the initial link to edit settings, you will be providing the options as to when to Turn Off the Display and when to Put the Computer to Sleep. If you select Change Advanced Power Settings, you are taken to a much more involved dialog, with all sorts of options for password settings, when to turn the hard disk off, adapter settings, and much more.
If you are coming over to Windows 7 from XP, you might still be looking for the Add/Remove Programs applet. It was removed in Windows Vista and replaced with the Programs and Features applet. We mentioned it briefly in Chapter 3 because it enables you to turn Windows features on or off (including things such as Internet Explorer 8 and Media Player) and to uninstall or make changes or repairs to installed applications.
A new location for your System Restore options, you can use the Recovery applet to resolve many system problems (as discussed further in Chapter 9) by going back to a point in time where you can undo recent system changes and more.
This tool has changed only slightly between from XP, to Vista, and now to Windows 7. There are four tabs to work with, and you can configure the following:
• Formats: Configure the default way your computer renders number, currency, date, and time. You can choose a specific format, based on a country in the world, and the options will adjust toward that country. You can also choose to customize that format.
• Location: Easy setting to assist with some programs that provide local news and weather.
• Keyboards and Languages: You can configure an input language and a display language. An input language involves changing the keyboard layout to support other keyboard layouts. You can read and edit documents in multiple languages by selecting the proper keyboard layout. You can even try different U.S. keyboard layouts, like the Dvorak keyboard, for improved type speed. You can change the display language, too, from this tab. The display language is the language you see in wizards, dialog boxes, and menus.
• Administrative: For the welcome screen and new user accounts, you can view and copy your international settings. You can also configure the language for non-Unicode programs.
This is a new Control Panel feature that you can use to access programs/desktops (remote computers or virtual systems) that have been made available by your network administrator. This feature is connected also with the new Windows Server 2008 R2 features for RemoteApp and Desktop Connections, where RAD feeds provide a set of resources, and these feeds are presented through this tool in Vista.
You can configure different sounds as part of your personalization settings. You can also configure sound and recording options depending on the sound devices you have installed. The Playback, Recording, and Sounds tabs are all the same as in Windows Vista. However, a new Communications tab helps Windows to automatically adjust the volume of different sounds when you are using your PC to place or receive telephone calls. You can mute all other sounds, reduce the volume by 80% or 50%, or you can do nothing.
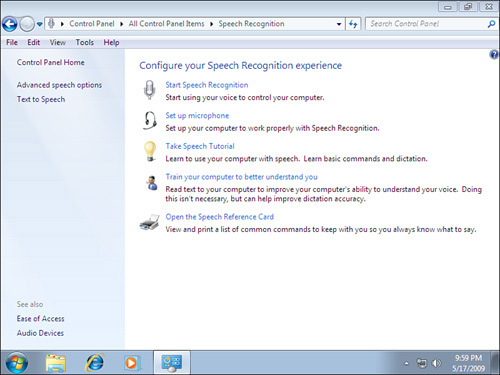
Windows Speech Recognition has two primary functions. One is to allow the user to control the computer by giving specific voice commands. The other is to allow you to dictate text (or have text read back to you in a Text-to-Speech [TTS] manner). The speech-recognition tools (see Figure 7.12) enable you to train your computer to work with your voice, or simply train yourself to use the right commands to operate your computer.
Note
One nice improvement to Windows 7 speech-recognition features over what Windows Vista provides is that they allow operators to interact with applications not specifically written with speech recognition in mind. If you are using a Microsoft product such as Word, the tools work flawlessly (for a speech-to-text application, that is). With other applications that are not compatible, a separate text box opens, and you can speak into it and then insert the text to your application afterward.
We are a synchronizing generation, syncing our desktop to our server, digital cameras, email, cell phones, portable media players, camcorders, PDAs, laptops, and so forth. We sync everything. Now you have a single applet that helps you know how you’re doing: how in-sync you really are.
Note
If you were looking for your Offline Files applet, this is actually where it has been moved. Whereas many tools have been added to Control Panel for easy access, this one has been buried one level deeper into the Sync Center. Open the Sync Center and look for the Manage Offline Files link on the left.
Through the Sync Center, you establish “sync partnerships” with devices you use, and then you have a behind-the-scenes relationship with your device that allows the center to display information (such as a progress bar and a report of any problems or conflicts).
Another nice thing about the Sync Center is that you can schedule your synchronization. So, for Offline Files, although you normally sync, then go on a business trip, then re-sync (perhaps manually doing the syncs), you can now use Sync Center to work more on a schedule.
The System applet, discussed in greater detail in Chapter 8, “Management Options in Windows 7,” shows you basic information about your system to begin with. It is more of a portal to other information. For example, from here you can change settings regarding your computer name, domain, and workgroup. You can also access the Device Manager, remote settings, system protection, and more advanced system settings.
We discussed this applet in great detail in Chapter 1. This applet gives you control over the appearance and working behavior of the taskbar and Start menu.
We discuss this new Windows 7 dialog, shown in Figure 7.13, in greater detail in Chapter 9. The tool provides links that relate to common troubleshooting tasks.

Obviously, if you are working on a system that is connected to a network domain, you may not have a need for this applet, because your user accounts are configured by an administrator for you. However, on home systems or systems that do not connect to a domain (and in the event you need additional accounts configured on a system that has a domain authentication but still requires local login accounts configured), you can use the User Accounts applet to help you create new accounts and configure various aspects of those accounts.
Explaining the concept of digital identities with the average computer user is so difficult. We have different forms of personal identity (for example, a passport, a driver’s license, a credit card, a Social Security card, a birth certificate, and so forth). Each one of these is used in different situations, and some can be used in multiple situations, such as when buying items with a credit card. We must protect all our different forms of personal identity.
Your online identities (digital identities) need to be protected, too, and we have no shortage of these. The problem arises because we have a variety of digital identities provided by a myriad of sources, and there will never be a way to control all of that. So, instead of trying to control it, Microsoft has decided that what is really needed is an “identity metasystem.” Microsoft and others have been working together to create this metasystem to define the standards necessary to make this work. The end result is CardSpace. Microsoft says its goal in promoting this system and encouraging vendors and others to use it is to “let people on any machine, running any operating system, use digital identities as easily, as effectively, and as securely as they today use their identities in the physical world.”
Think of it like a wallet. Your wallet contains a variety of identifications you use in the real world. The wallet isn’t a new form of identity, it just holds the identifiers. CardSpace allows you to choose from a portfolio of digital identities. Some you perhaps created yourself, and others you can obtain from merchants, banks, and so forth. This is a new technology, so it might take a while to catch on. Keep in mind that this will work only if the site requests a card.
Discussed in detail in Chapter 5, Windows Defender provides protection from spyware and malware in real time on your system. You can configure it to run quick scans or full scans, either on a schedule or manually.
Discussed in detail in Chapter 5, Windows Firewall helps to protect your system from unwanted access, both from the outside world trying to come into your computer, and even from nonapproved applications that may be running on your system that you don’t want to allow out from your computer.
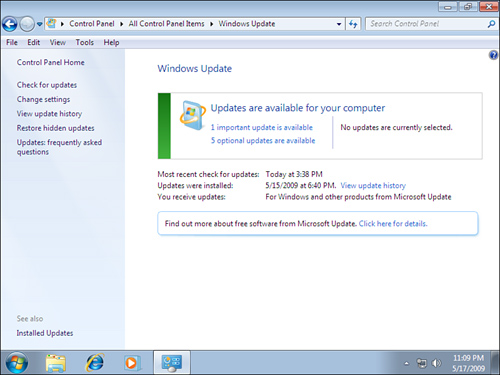
Windows Update (see Figure 7.14) is a way to connect to a Microsoft database that has drivers, patches, security fixes, and so forth to keep your OS installation current.
For a home system, you can configure your Windows Update setting to connect to Microsoft and update your system, or you can do it manually. If you are a network admin, consider the idea of using group policies to configure these settings for your workplace. And, if you have a large enough environment and a small enough network connection to the Internet, you may want to consider setting up a Windows Update server. This will go out and download updates, and then your network systems will check in with the server and download from the internal system. It’s a great way to ensure that all your systems are protected with the latest security patches and fixes.
With Windows Update, you configure your system to work on a schedule of your choosing (or none at all, if you prefer to handle checking for updates manually, which is not recommended). What many disliked about Windows Update in the past was that updates often required reboots, and these reboots would push a request box at the user every 10 minutes until the user complied with the request. Now the user can choose longer time intervals for that dialog box (up to 4 hours), and the dialog is not as intrusive.