IN THIS CHAPTER
Networking might be considered many things, but rarely is it known as easy. Windows 7 helps to change that by providing simple methods for home users to connect to each other through HomeGroups. Media sharing is made simpler as well. This chapter explains both facets of Windows 7 networking, while also discussing the Network and Sharing Center console and Remote Desktop connections.
Setting up a home network has never been astronomically difficult, but it’s frustrating enough to novice users that they often give up or pay someone to come in and fix their network. It’s not the physical side that is causing them pain. Walk into any store that sells computer equipment and you can pick up a wireless router or whatever else you need that will connect your home physically in a matter of minutes. But “sharing” your documents, printers, media, and so forth is a bit more challenging if you do not know how (and even more so if you have a hodgepodge of system types, some systems running XP and others running Vista).
With Windows 7, this pain point is removed by a feature called a HomeGroup (which will work only between systems running Windows 7).
Note
Let’s be honest. If you are reading this, you are either the person who calls someone for help or the person who gets called for help. So, in either case, this feature is a benefit to you. The idea is to make “sharing” easy enough to do without calling in the resident network guru.
When you perform an installation of Windows 7, you can configure a HomeGroup at that time. But if you decided not to, you can use the HomeGroup applet found in Control Panel to get you started. You will initially see a dialog that explains what a HomeGroup is for, and you can click the Create a HomeGroup button to see the simple dialog shown in Figure 6.1.

After you have made your choices about what you want to share, click Next. Keep in mind that you can always go back and make changes from the HomeGroup settings through the Control Panel.
Once the HomeGroup is set up, you receive a password (see Figure 6.2). This password is provided by default. You can write it down and share it with others in the family so that they can access shared items (as long as they have Windows 7 on their systems) or you can change the password to something you prefer.

Note
Some have asked why we can’t just create our own password right from the start. Apparently, in testing, the Windows development team discovered that people initially used passwords they use for private information because they weren’t fully aware that they needed to give this password out. So, it was better to generate a starter password and let people decide whether they wanted to use that or create their own.
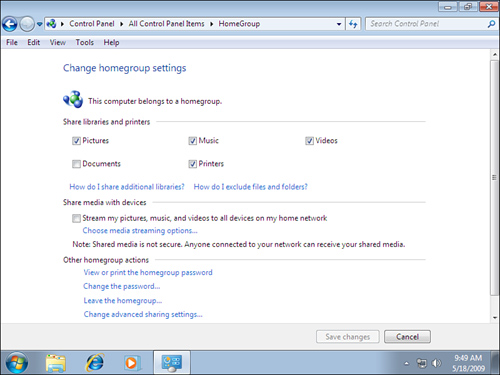
After your HomeGroup is up and running, you can revisit your settings in the Control Panel and make additional changes, such as adjustments to your media streaming options (see Figure 6.3).
Every system in a HomeGroup is considered a peer, an equal. Persons can enter or leave the group if they choose using the password, much like the use of a key to a home. Once in the group, they can access whatever is shared.
One of the best parts to this is the use of libraries. You may recall we discussed libraries in Chapter 1, “Getting Comfortable with the Windows 7 Interface.” A folder like Pictures is no longer a folder, but a library that can include multiple folders from multiple locations. You can control the addition of locations if you choose, but if Pictures is shared out, others will quickly be able to view those new locations without having to find a new way to connect to it. It will all come under the library.
When it comes to sharing documents, the content is shared as “read-only” so that you do not have to fear items being changed without additional thought (although you can change this selectively, on a document basis, in Explorer).
Another interesting aspect of the HomeGroup approach is relates to computers that are typically connected to a domain at work (like a company laptop), but when you are home you still want to access the home network. This is possible, too. You can join a HomeGroup and see the items in the home, but others will not be able to see back into your system, so your data is safe.
As you saw with HomeGroup settings, sharing has become much easier to implement and configure, and certainly this was needed in the area of media sharing. The features introduced in Windows Vista were appreciated but somewhat difficult to work with at times. Now, from within the HomeGroup, you can just enable a Stream My Pictures, Music and Videos to All Devices on My Home Network check box. If you want to make changes to your media streaming options, you can click the link to be taken to the first options screen for media sharing.
The Choose Media Streaming Options for Computers and Devices dialog allows you to configure some basic settings (see Figure 6.4).
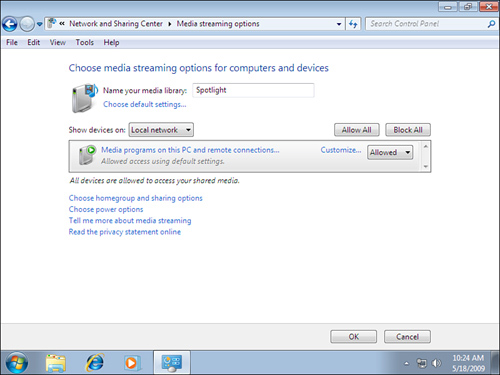
One thing you will note is that you can choose to allow or block certain media on the PC. You can quickly click the Allow All or Block All buttons, or you can select the device and click the Allow or Block option.
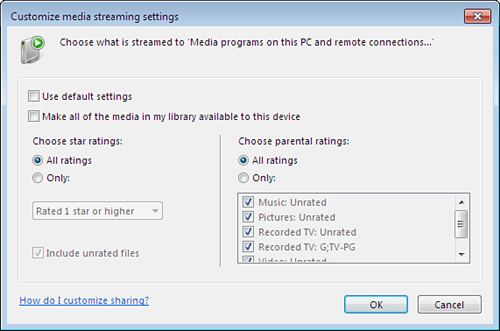
In addition, you can filter the items that are shared either by establishing default settings or by customizing it on an individual settings basis. Note in Figure 6.5 (which is the dialog that appears if you select the Customize link shown in Figure 6.4) that you can use star ratings to determine what is streamed (and you can even decide whether you want to share unrated files). You can also choose parental ratings.
Note
Media sharing may evoke different sentiments in different people. Parents working on two different systems in the home may see it as an opportunity to each be able to access the family photo album. However, the fear that certain media on your system may be inappropriate for the whole family to view (for example, perhaps you don’t want your kids listening to Pearl Jam just yet, but it is part of your Music settings) may make you wince at the idea of being so open. So, using star ratings or parental settings can help to keep some of those things in check. Share what you want, without moving Pearl Jam to another folder that isn’t in the Music library (although that is another option if you do not want to work with star or parental settings).
The Network and Sharing Center was first introduced in Windows Vista, and it has been slightly streamlined in Windows 7 (see Figure 6.6).
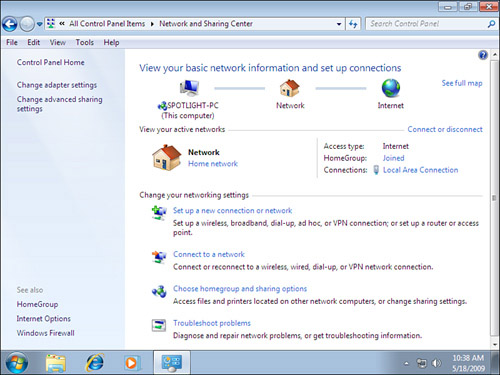
The main panel displays a compressed view of the network map, information about existing network connections, and any resources the user can locate on the network. You have links at the bottom of the center for the following:
• Set Up a New Connection or Network: Set up a wireless, broadband, dial-up, ad hoc, or virtual private network (VPN) connection; or set up a router or access point.
• Connect to a Network: Connect or reconnect to a wireless, wired, dial-up, or VPN network connection.
• Choose HomeGroup and Sharing Options: Access files and printers located on other network computers, or change sharing settings.
• Troubleshoot Problems: Diagnose and repair network problems or get troubleshooting information.
On the left side, you have a Change Adapter Settings link and a Change Advanced Sharing Settings link. Note: If you have a wireless card, a Manage Wireless Networks link appears as well.
The Network Connectivity Status Indicator (NCSI), a feature implemented originally in Windows Vista, is the little networking icon that sits in your taskbar notification area. It has four different states, and you can use these to quickly see whether a problem exists:
• No Connectivity, with a little red X
• Connectivity Problem, which has a little warning caution sign over it
• Local Connectivity, which has only the computers
• Internet Connectivity, which has a globe on top of it indicating that you have access to the Internet
In earlier versions of Windows, if you have a notebook computer with a network card built in and a wireless network card, you have two network status icons. One might appear broken all the time, because you don’t usually have both plugged in and available. With Windows 7 (actually starting with Vista), one of the benefits with the new NCSI icon is that it consolidates all your network connections into the one icon. Therefore, if something is going on with one of them, and you hover over the icon, you’ll see the two distinct network connections listed there individually.
You might have noticed at the top of the Network and Sharing Center a mini map of your connection to the Internet with a connecting router in between. If you select the option to View Full Map, you will get an expanded view of your computer and everything your computer is connected to, including network connections (wired and wireless), computer-to-computer connections (called ad hoc), and connections to the Internet. The map will show you problems between connections, too. Therefore, you can begin diagnosing connectivity issues visually before you make corrections physically.
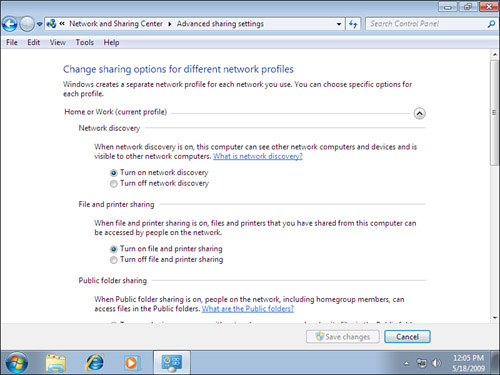
Selecting the Advanced Sharing Settings option brings you to the options for different network profiles (see Figure 6.7). Here you can choose the Home or Work profiles or the Public profile. Then you can set the following options:
• Network Discovery: When Network Discovery is on, this computer can see other network computers and devices and is visible to other network computers.
• File and Printer Sharing: When File and Printer Sharing is on, files and printers that you have shared from this computer can be accessed by people on the network.
• Public Folder Sharing: When Public Folder Sharing is on, people on the network, including HomeGroup members, can access files in the Public folders.
• Media Streaming: When Media Streaming is on, people and devices on the network can access pictures, music, and videos on this computer. This computer can also find media on the network.
• File Sharing Connections: Windows 7 uses 128-bit encryption to help protect file-sharing connections. Some devices don’t support 128-bit encryption and must use 40- or 56-bit encryption.
• Password Protected Sharing: When Password Protected Sharing is on, only people have a user account and a password on this computer can access shared files, printers attached to this computer, and the Public folders. To give other people access, you must turn off Password Protected Sharing.
If you click the Troubleshoot Problems link in the Network and Sharing Center, this tool initially searches for troubleshooting packs and then presents them to you for both network and Internet options (see Figure 6.8).
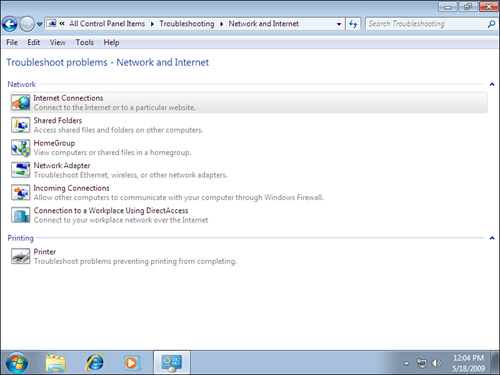
Selecting any one of the options provided will open a troubleshooting tool that is designed to specifically detect problems related to your choice. The benefit here is that you no longer need to search for every type of problem in the universe if your connection is giving you trouble, especially if you know that the problem is coming from the network adapter specifically or the Internet side of your network connection.
The network diagnostics will automatically run a set of troubleshooting tools that analyze all elements of the network or Internet item you’ve chosen and provide a systematic diagnosis of connectivity problems. It can then automatically resolve the problems it finds or at least provide simple solutions to walk you through. Furthermore, the network diagnostics data is saved in an event log to help you resolve these issues.
Windows has an included application that enables you to make a desktop connection to remote systems. You have the ability to connect to a remote machine and work on it as if you were sitting at it. This can be helpful if you have important documents at work and want to connect to your work machine from another location. It can also be a good solution if you need to connect to another system to provide support or perform diagnostics. To start the Remote Desktop client, you can type in the name in the Instant Search dialog off the Start Menu.
The Remote Desktop Connection client that comes with Windows 7 is equipped with new and enhanced features, as well as the new Remote Desktop Protocol (RDP) version 7. Enhancements to the Remote Desktop tool include the following:
• Windows 7 Aero support
• Direct 2D and Direct 3D 10.1 application support
• True multimonitor support
• RDP core performance improvements
• Multimedia enhancements
• DirectShow support
• Low-latency audio playback support
• Bidirectional audio support
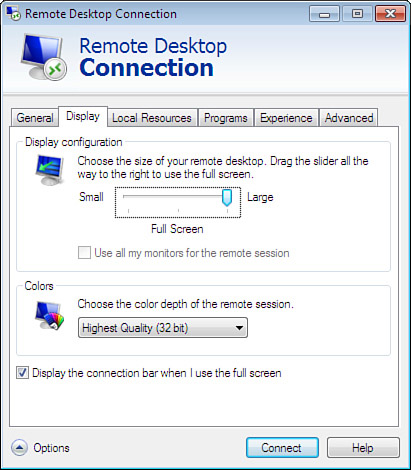
You can see in Figure 6.9 that you can choose a new option: Use All My Monitors for the Remote Session.