
Moving toward more advanced aspects of operating system management, this chapter helps you become familiar with Administrative Tools, System Properties, and Local Group Policy objects. While you might not be an IT guru, knowing how to manage your own system using the tools provided by Microsoft helps you feel in greater control of your own computing environment.
The Control Panel contains a shortcut to Administrative Tools. This shortcut takes you to a list of other shortcuts (see Figure 8.1).

You may be familiar with many of these already, and there are only slight changes from Windows Vista. However, we will review all of them at this time and focus on the more important aspects that you may have missed in Vista.
Component Services is not a new feature in Windows 7. In fact, it has existed for some time. However, typical users will never (ever) need to use this feature. It is used to configure and administer your COM (Component Object Model) objects.
Computer Management is a one-stop spot for multiple tools. Computer Management is a super console of sorts (see Figure 8.2). Users can find everything they need to monitor system events, manage shared folders, view services, view storage devices and settings, and much more.

This allows you to add, delete, or configure data sources with DSNs (data source names) for the current system and user. Again, not something the everyday user (or even administrator) might ever work with.
Event Viewer has been around for a while, but it received a facelift in Vista and had some tremendous improvements added. It became a real troubleshooting tool (as opposed to simply being an informational go-to utility on what might be wrong with your system).
Event Viewer (see Figure 8.3) enables you to see more than the standard Windows logs (Application, System, and Security logs). There are Applications and Services logs, which include diagnostic logs and logs for specific applications within Windows 7 (for example, IE logs). In the past, you had to hunt to find logs for certain applications, but Microsoft has tried to bring them all together here.
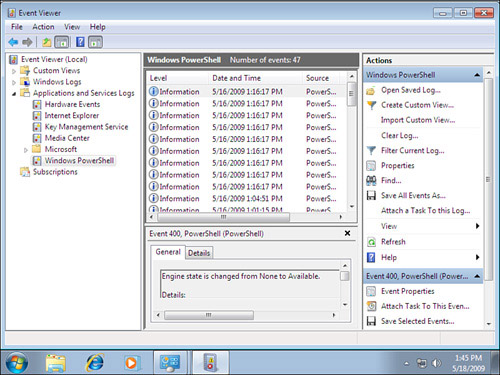
In addition to the design enhancements, features were added that assist in locating and eliminating system issues. One is the ability to create custom views.
So many events come into the Event Viewer that it’s almost impossible to track down the problem you are investigating without some form of filter. Views allow you to create filters that not only filter the events of one log, but also allow you to select multiple logs to view. To create a custom view, select a log, and then from the Action pane choose Create Custom View or Import Custom View. Keep in mind that you can still use filters, but custom views can be retained (as you see in Figure 8.3) and quickly selected from the navigation section.
After you have located the events related to your problem, what can you do next to automate a response? Another nice feature in Event Viewer is the ability to attach a task to an event. This features works with Task Scheduler in assigning events as triggers that require actions. First, find the event you want, right-click it, and then choose Attach Task to This Event (or you can find this option in the Action panel). You then create a basic task (for example, start a program, send and email, or display a message).
Initially, the iSCSI Initiator was an applet in the Control Panel in Windows Vista, but it was appropriately moved in Windows 7 to the Administrative Tools section. Internet Small Computer System Interface (iSCSI) uses TCP/IP for its data transfer over a common ethernet network. However, you need iSCSI devices to make it work, and the OS needs an initiator to communicate with the iSCSI devices. iSCSI devices are disks, tape drives, DVD/CD drives, and other storage devices that you can connect to. In the relationship with the other device, your computer is the initiator, and the device is the target.
In Windows 7 (as in Vista), the initiator is included. However, you can download the initiator from Microsoft for 2000 (SP3), XP, and Server 2003. The shortcut under Administrative Tools lets you configure and control the interaction between your system and the device.
Although typically a security policy is something you configure on a network domain, you may sometimes want to create password policies, account lockout policies, and so forth on your Windows 7 standalone systems, and Local Security Policy is the place to do so. You may be deploying Windows 7 in a school, a library, as a kiosk system, or even at home, and you can adjust these security settings to ensure they are enforced.
Performance Monitor is a tool that enables you to see how your system is performing in both real time, through a series of tests, and over a period of time. We discuss this tool in greater detail in Chapter 9, “Performance and Troubleshooting Tools.”
Although you might not think of using your computer as a “print server,” it is a possibility. If you have multiple print devices connected to your Windows 7 machine and you have people in the office printing through that system to your print devices, you may want to work with the Print Management tools to help you see your printers, printers with jobs, and so forth. You can view how the printers are doing and make adjustments and manage those printers from this console.
Services are the underlying core OS features that handle any number of things on your system, from web service to print services and so forth. You’ve no doubt seen the Services console before in XP or Windows Vista.
The Services structure hasn’t changed much in Windows 7. You might notice a few more services in Windows 7 depending on what you are comparing it to. (From XP to Windows 7, there are new services to note.) You will quickly be able to see some new ones, however, in Windows 7 (for example, BranchCache).
From within Services, you can do the following:
• Stop, start, pause, resume, or disable a service. You can also see the description of what each service does and which other services rely on it to work.
• Configure recovery actions in the event of a service failure (for example, restart the service).
• Configure a service to run under the security context of a user account that differs from the logged-on user or the computer account.
• Configure hardware profiles that use different services enabled or disabled.
• Export your services information to a TXT or CSV file.
• Monitor the status of each service.
You can access the System Configuration tool via Administrative Tools, or just click the Start orb and then type msconfig in the Instant Search box and press Enter.
You will see five tabs:
• General: The General tab has one heading, Startup Selection, and three options to choose from: Normal, Diagnostic, and Selective (where you can choose items to load, such as services or startup items).
• Boot: On the Boot tab, you can configure boot options, including timeout settings and advanced settings. Boot options include Safe Boot, No GUI Boot, Boot Log, Base Video, and OS Boot Information (which shows you the drivers during the boot process).
• Services: The Services tab lists all the services that start with the computer when it boots. You can see the current status of these services (running or not), and you can enable or disable them from here. You can also deselect the check box to prevent that service from starting up the next time you boot the system. You can also select the Hide All Microsoft Services option to show you only the services from third parties.
• Startup: The Startup tab lists applications that start up with the boot. You can see the name of the application, the manufacturer, the location of the executable, and the Registry key for the startup application. You can also see a date when you might have disabled the application. From here, you can deselect the check box to stop the application from running on the next boot. If you think that a problem exists with a specific application, you can also confirm from here the location of the application.
• Tools: The Tools tab lists different diagnostic and informational tools and shows the location of these tools. From within this tab, you can literally “launch” a tool. Or, you can note the location or name of the tool itself.
Note
Between Windows Vista and Windows 7, the System Configuration tool has remained somewhat the same. The only noticeable change is the removal of the Tools option to Enable or Disable UAC. With Windows 7, this is no longer a necessary tool because we can now use the slider to accomplish this (and it doesn’t require a reboot like it did in Windows Vista to turn UAC on or off). The slider can be located by going to Control Panel, Action Center and then selecting the Change User Account Control Settings link.
Task Scheduler is not a new feature to the Windows OS, but the enhancements introduced with Vista and carried into Windows 7 sure make this a tool to reconsider. In the past, under earlier versions of Windows, you could use Task Scheduler to launch tasks at a specific time, or in response to a minimal set of conditions that might occur with the system. There was no way to maintain a task history or configure multiple actions to occur. Still a great tool, but limited, and therefore it forced admins to find other software to fulfill their needs.
Within Windows 7, you can configure the Task Scheduler to perform tasks on a timed basis, but also respond to situations that occur on a variety of levels. The response system can even restart a service that has failed or send an email to the admin when a certain event occurs.
The Task Scheduler is integrated with Event Viewer now so that it can react to situations based on events that occur. There is also a way to view the task history. You can see which tasks are running, have run, or are scheduled to run.
In addition, there is an entire Task Scheduler library that has preconfigured tasks for you to work with (see Figure 8.4).

A trigger is what causes the task to run, and an action is what you have configured to occur if the trigger goes off. Some triggers are schedules that you put into effect. For example, if you say every day at 1 p.m. a specific action should occur, the trigger is the scheduled time. However, a trigger can also be when a user logs in, when the system starts up, when a specific event occurs, and so forth. An action can include running a program, sending an email, or even displaying a preconfigured message. There is a variety of possible actions to take, including running scripts with the cscript.exe application, copying a file with robocopy (which is a very powerful command-line tool for copying files, directories and/or directory trees, with very unique capabilities), starting and stopping services, shutting down the system, and a host of others.
You can schedule tasks in different ways. First, from the console, through the Actions pane, you can choose Create Basic Task. Doing so walks you through the following options:
• Create a Basic Task: Start with a name and description.
• Trigger: You can work from a schedule (daily, weekly, monthly, one time), where you set time parameters for the triggered event. You can also select When the Computer Starts, or When I Log On, or When a Specific Event Is Logged. With that last one, you can choose the log, the source, and even the event ID that triggers the next step.
• Action: You can start a program (and choose which program that is), send an email (with the information for the email), or display a message (and write the message you want displayed).
• Finish: You can review your new task and tell it to open the properties of the task. When this happens, you can see a much more complicated tabbed view of a task. These options help you go beyond the basic task. You can create and manage your tasks in this way, or you can create a task from the more complicated tabs to start with.
To create a more advanced task, select the Create Task option from the Actions pane. This offers a dialog box with five tabs to configure your tasks, as follows:
• General: From the General tab, you can configure the name and description, which user account it should run under, and whether it should run only when that user is logged in or not.
• Triggers: Here you can schedule an extensive list of triggers (starting with the time triggers you can set up). If you change the Begin the Task options, the settings will change. The most complex of the triggers involve events.
• Actions: The actions you can perform are no different here than they are in the basic settings. You can configure a program to run, send an email, or display a message. Or you can do all three if you like. That is the advantage of using the advanced-tabbed task creator. You can configure different actions to occur from here.
• Conditions: The Conditions tab allows you to specify conditions for your task. For example, you may want certain tasks to run only if the system is idle. Depending on the whether the computer is running on AC power or battery (or if it is or isn’t connected to a certain network), you might not want the task to run.
• Settings: From the Settings tab, you can indicate to start the task manually, what to do if your task can’t run on schedule, and what to do in the event a task is running too long.
Discussed in greater detail in Chapter 5, “Security Features,” this shortcut brings you to the advanced settings for your firewall. There are the simple settings that are easy to use, and then there are more intense options that can help you really control what comes in and out of your system.
Memory Diagnostics runs in the background (if it discovers a problem, it will run diagnostic tests, which will be added to the event logs), but you can kick start it if you think you are having memory issues. You can run the tool from Administrative Tools or from a command prompt: MdSched.exe.
You will be asked if you want to run the tool now or the next time you start your computer. You’ll have to restart the computer for the test to be run, so make sure you save your work before the test.
Using this shortcut is one of the ways you can open a PowerShell window, which includes all the available commands from optional modules and snap-ins, including those that aren’t added by default. The modules run in a separate session to avoid name conflicts, and these modules enable you to organize your scripts and functions independent of one another. The modules also run under the Administrator account.
We discuss PowerShell in greater detail in Chapter 10, “What’s PowerShell?”
You can access System Properties in a few different ways. One way is to right-click Computer on the Start menu and then click Properties. Another way is to go through the shortcut in Control Panel. The initial screen, shown in Figure 8.5, shows basic information about your computer (including your Windows Experience Index score, which we discuss in greater detail in Chapter 9) and provides important links to the “real” System Properties dialog.

Clicking the Change Settings link also takes you to the System Properties dialog, first to the Computer Name tab. Technically, there are very few noticeable differences in any of these settings from Windows Vista; however, if you need a review of these important items, you can find that here.
There are five tabs, as discussed in the following subsections.
On the Computer Name tab, you can change the description for your computer. If you want to join a domain (or workgroup), click Network ID button. Doing so starts an easy-to-use wizard that guides you through the process. If you don’t need or want help, click the Change button and just answer the questions for switching back and forth between a domain and a workgroup.
From the Change options, you can also change your computer name. And you can configure a DNS suffix for the system (which you don’t have to worry about unless you are part of a domain, and even then it’s rare) or change the NetBIOS name for the computer.
The Hardware tab contains only two options: Device Manager, discussed in Chapter 7, “A New Control Panel”; and Device Installation Settings, which is a new option in Windows 7 System Properties.
If you click the Device Installation Settings button, you are asked if you want Windows to download driver software and realistic icons for your devices.
On the Advanced tab, you have options to enhance the way your OS performs. For an admin, this is like a candy store of options. Let’s start with performance.
You have three tabs.
• Visual Effects: First of all, you can choose to adjust for best appearance (which turns all options on) or performance (which turns all options off). Or you can go through all the options and make adjustments personally that will give you what you need. If your system is sluggish, your best option is to turn some of these off and see whether performance improves, without losing all your favorite effects.
• Advanced: You can change the processor scheduling to either programs or background services, and you can configure your virtual memory.
Processor scheduling relates to how your processor (which can handle only so much work at a time) divides its attention among multiple applications. If you leave the setting to Programs, the processor will devote the majority of its time to the program running in the foreground (that’s whatever program you are currently working in). If you choose Background Services, the processor will equally devote time to all applications.
What is virtual memory? Well, it’s something you generally don’t have to worry about. If you open this setting, you can see that the option at the top makes you feel good; it tells Windows 7 to handle it without your help.
However, here’s how it works. Think of your computer like an office. Your hard disk is your filing cabinet, and your desktop is your, well, desktop. Every time you want a file or folder, you have to get up and go to the filing cabinet. That slows your workday down. But, you have a set of folders on your desktop that can hold the latest work. That is your RAM. In addition, you have a little spot right in front of you for the stuff you need immediately. That’s your cache. You can start to see how it all comes together for your workflow. Your virtual memory involves a situation where your computer is working hard, moving files back and forth between the RAM, but finds that it needs more space. There is no more RAM, it doesn’t want to put it back in the large filing cabinet of a hard disk. What can it do? Instead, a pagefile is created (also called a swap file). This is on the hard disk (back in the filing cabinet), but it’s really an extension of the RAM itself, so that RAM can access what it needs quickly. So, even though it is on the hard drive, it’s called virtual memory. Got all that?
Note
Even though you have the option to let Microsoft handle it, the fact is there are some best practices that only you can adjust manually. If you have multiple drives, you can divide the pagefile among all the drives you have (drives, not partitions). The more drives the better. You should also try to get the pagefile off of your system file drive (C: drive). If you have any drives that are fault tolerant (discussed later), you want to keep the pagefile off these drives.
• Data Execution Prevention: This is the final tab under Performance. DEP monitors your system to make sure programs use system memory properly. Although DEP is a software-based protection feature, some processors are also DEP enabled for hardware protection. You have two options to choose from: Turn On DEP for Essential Windows Programs and Services Only, or Turn On DEP for All Programs and Services Except Those I Select. Then you can configure which programs you don’t need monitored.
Profiles are your likes and dislikes for your desktop and other settings. You can delete profiles on the system from here. You can also copy profiles to give to other user accounts. You can also configure roaming or local user profiles if you have a profile configured as roaming.
The Startup and Recovery options haven’t changed from XP or Vista (see Figure 8.6).

In the System Startup section, you can choose which OS you want to boot (important only if you have multiple operating systems on the same machine) and a boot time. You can also configure startup to show the recovery options automatically for a period of time (instead of pressing F8) during boot.
The recovery options are for those special “blue screen of death” moments that occur in all of our lives. Sometimes you want the system to reboot and get it over with. Other times you want to see the blue screen, see what’s happening. In addition, you can configure the extent of the memory dump that occurs, the location of the dump file, and so forth.
The System Protection feature enables you to create restore points so that you can quickly jump back to a point in time when your system was working perfectly. This feature affects only the system. It does not undo files, photos, and so forth that you have created on your system.
So, for example, if you’ve installed a program or new driver and the system cannot handle it, you can try to uninstall the problem. If that doesn’t work, you can use a restore point to jump back.
System Restore is an option from Programs, Accessories, System Tools. You can also open System Restore from within the Recovery options of Control Panel. You can run this wizard when you want to restore a previously created point. But, it’s from your System Properties that you create the points. Restore points are automatically created every day and when you install new applications and drivers. You can also go into your System Properties, to your System Protection tab, and click the Create button to take a snapshot of the system as it is at that moment.
Restore points require at least 300MB of space on any given hard disk where they are turned on.
Here is where you find your settings for Remote Assistance and Remote Desktop. The Remote Assistance feature is more helpful than most people give it credit for. I cannot even count how many times family members have called asking for assistance and I just had them send me an invitation so that I could see what they were doing and either take over or walk them through the changes.
Click Advanced for the Remote Assistance Settings dialog. The settings are simple. You can set Remote Assistance to make connections that allow desktop control. You can also determine the length of time for the invitations to be valid. To invite others to use your system or accept invitations, you go to the Windows Help and Support dialog and look for the Windows Remote Assistance options.
Remote Desktop enables you to connect to another computer as if you were sitting at it. So, for example, you can access your work computer from home (if your work computer is on, configured to use Remote Desktop, and the firewall allows the connections).
Of the options to choose from, you can select one of the following:
• Don’t Allow Connections to This Computer
• Allow Connections from Computers Running Any Version of Remote Desktop (Less Secure)
• Allow Connections Only from Computers Running Remote Desktop with Network Level Authentication (More Secure)
To connect to a system, you use the Remote Desktop Connection tool under Programs, Accessories. This tool is discussed in more detail in Chapter 6, “Networking Made Easier.”
Local Group Policy settings have existed since the introduction of Windows 2000. From a network perspective, policies help administrators to control groups of computers and users. On a local level, however, you can still use a policy (the local policy) to control persons who log on to that machine.
These settings control items that are typically left open for changes. For example, one user might log in and change their desktop background to red. Another user might log in and change their desktop background to green. Both users have separate profiles connected to their login accounts. It is okay for them to be different. However, as an administrator over the system, I might feel that blue is the color I want users to have for their background. I might also feel I don’t want them to even access the options for changing their background. To accomplish that level of control, I would need to use a policy.
There are local policies and domain policies. If the computer is attached to a domain, then an IT professional can create policies that apply to the computer or to the user account when that user logs in. However, if the person logs in to the system itself (not to the domain), then a policy can still be applied.
One of the features introduced in Windows Vista is the ability to have more than one local policy. Multiple group policy objects can be created to control the computer or users who log on. So, you can create a policy that affects an individual user or a policy that affects all standard users (called non-administrators when configuring the policy). It’s up to you.
You need to start from the Microsoft Management Console (type mmc in the Instant Search box and press Enter) and add the Group Policy Object Editor snap-in. Note that this isn’t the same as opening the policy with gpedit.msc, because that will open the actual local policy itself. You are looking to configure a different policy. When you add the GPOE snap-in, the Group Policy Wizard will begin.
If you select Browse, you will go to the dual-tabbed Computers/Users dialog, where you can select individual users to configure or the administrators/non-administrators policies (see Figure 8.7).
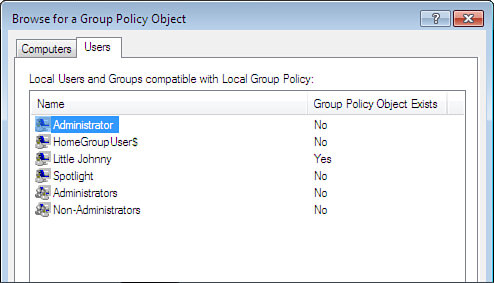
You might notice in Figure 8.7 that user Little Johnny (an account I created at an earlier time for use with Parental Controls) already has a policy configured. That was odd at first because I didn’t remember creating one. However, when I set up Parental Controls for that user, an individual user policy object was created behind the scenes.
You can select the user or group (admin or nonadmin) to work with, and then you will have the MMC console with user configuration options that you can configure.