
IN THIS CHAPTER
Improvements have been made to certain applications in Windows 7, while others might be completely new. This chapter helps to unveil the new application enhancements and show you how to download and use the Windows Live applications available online.
After years of an application looking one way, it is nice to see a dramatic interface change to match what we have seen with the new ribbon interface, which was introduced in Office 2007. WordPad and Paint give us such a changed interface. For the most part, however, the actual feature set is the same with these applications.
Starting with WordPad, you will note in Figure 2.1 that there is a Home ribbon and a View ribbon. Just like in Office 2007, you can double-click the ribbon tab heading to entirely shrink the ribbon from view and thus regain some working real estate.
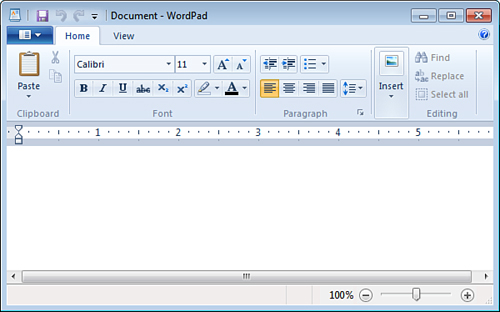
Note at the top of the ribbon is the Quick Access toolbar, which you can customize by clicking the down-arrow to the right of your options and choosing to add features. You can also determine the location of the toolbar to be below the ribbon if that’s what you want.
You’ll note an easier way to zoom, via the zoom bar in the lower-right corner, and the ability to insert a picture via Paint (and doing so connects you directly with Paint for the picture creation).
Next to the Home tab to the right, you have the View tab, which places on the ribbon items (such as word-wrap settings) that were initially located in Options in earlier versions.
When you click the little document to the left of the Home tab, you will see your New, Open, Save, Save As, Print, Page Setup, Send in Email, Exit, and About WordPad options. Of these, I found Save As interesting because it enables you to save documents as Rich Text Format (RTF), OOXML, ODF Text, Text, Text MS-DOS Format, and Unicode text. These are some new options not available in earlier versions.
The new Paint has the ribbon interface, too (see Figure 2.2). Again, with only the Home and View tabs, this tool now presents a more modern look than we have had for many years.

One thing I noticed about Paint is that sometimes an item being on the ribbon or being more visible makes you think that it is a new feature. For example, clicking the Document button and then seeing the Properties option made me think this was new, whereas in earlier versions of Paint we just accessed it via Image, Attributes. So, just because you might think that something is new (perhaps because you’re seeing something for the first time), it may just be repackaged to be more visible, and therefore usable.
The brushes available on the Home ribbon impress me (a nice watercolor brush, an oil brush, and others). Paint also offers more shapes to choose from than in earlier versions.
Note
My only negative comment about Paint is that I’ve been waiting for a certain feature for many years, and I’m still waiting: the ability to have more than one picture open at a time. When you begin to work with a new picture, Paint asks what you want to do with the existing one. I’m not sure why we cannot have multiple versions open. The same is true in Notepad and in WordPad, but this restriction affects me the most in Paint.
What could be so interesting about a calculator that it warrants mention? Well, when you first open the calculator application, you will note that it looks like the standard calculator we know and love, with perhaps a few buttons moved around. If you want the scientific version, just click Mode and change the type (as we could do in XP and Vista). But now, choose Programmer or Statistics from the Mode menu, and watch the calculator change your desired type.
Now, open the Options menu and choose one of the following options (Basic is default):
• Unit Conversion: You can choose a unit type (area, energy, length, power, and so forth) and have it converted from one format to another.
• Date Calculation: You can calculate the difference between two dates in days, weeks, months, and years.
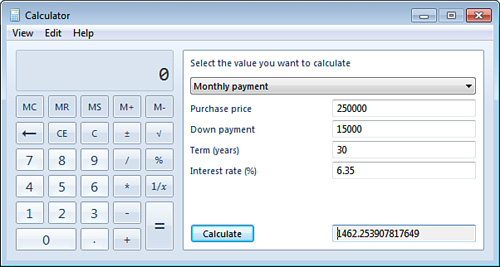
• Worksheets: You can make mortgage calculations, determine vehicle lease costs, and calculate fuel economy (mpg and L/100km), as you can see in Figure 2.3.
The only way to obtain screenshots used to be either the Print Screen method, or we had to find and download tools that enabled us to take a screenshot of certain parts of our systems (especially true for those who developed presentations). Vista included a Snipping tool that enables you to perform a few different types of screen snips, and this useful tool is also available in Windows 7.
You can find the Snipping tool either via Start, All Programs, Accessories, Snipping Tool or by entering Snip into the Instant Search box. You can capture the entire screen, the active windows, a rectangular location of your choosing, or (my favorite) a freestyle selection (see Figure 2.4). You can then save the capture as HTML, JPG, GIF, or PNG. And you can even email the file.
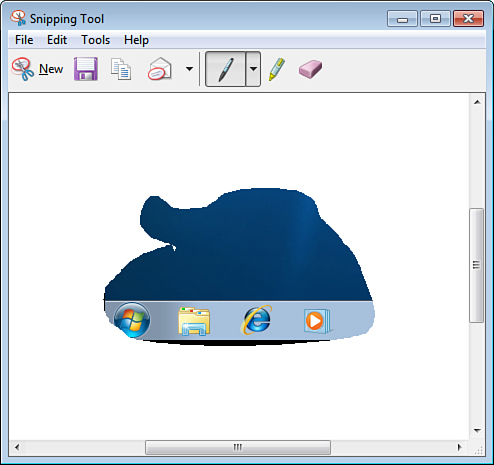
Beyond just capturing and saving part of your screen, you can annotate or highlight parts of the capture with the pen and highlighting tools.
Note
The Snipping tool version for Windows 7 is 6.1 (it was 6.0 in Vista SP1), but you won’t find any significant difference between these iterations. I have spotted one missing option (to display a Snipping tool icon in the Quick Launch toolbar) missing from this tool. But, perhaps that’s because Windows 7 doesn’t have a Quick Launch toolbar.
If you open a command prompt in Windows XP, you will see that it says Version 5.1.2600 at the top, with a 1985-2001 copyright attached (depending on upgrades); you’ve probably never noticed this before. With Vista, the version is 6.0.6001. And with the beta and RC of Windows 7, it is 6.1.7000 and 6.1.7100, respectively. Interesting trivia for a geek party that you probably should be leaving right about now. However, one interesting aspect about the command-line application with Windows 7 (which was first introduced in Windows Vista) is that there is a standard user mode and an administrator mode.
The reason for this distinction is that the command line can be hazardous; you can significantly change the system via the command line, and such changes could prove dangerous to a system, especially on a network.
To open a standard command prompt, type cmd or command in the Instant Search box off the Start menu; you will then be shown the option to select. You will also be shown PowerShell v2, which you may want to work with rather than the command prompt. We will discuss this in greater detail in Chapter 10, “What’s PowerShell?”
You can also select Start, All Programs, Accessories to locate the standard command prompt. To open an Administrator command prompt, you can open the Start menu, right-click Command Prompt, and choose Run as Administrator. When the Windows Security dialog appears, enter your credentials (or just click OK if you are currently logged in as an administrator). You will now have the Administrator command prompt (if you have permission to open it on your system, which might not be the case).
Another way to open an Administrator command prompt is to type cmd in the Instant Search box and then press Ctrl+Shift+Enter. The Windows Security dialog will appear.
How do you know you are working with one command prompt rather than another? Microsoft has cleverly positioned the word Administrator at the top of the window.
If you have worked with Windows 7 for more than five minutes, you might have noticed something missing: applications! Where is your Windows Mail, Calendar, and so forth? Now if you are a Windows XP user, you might have noticed only a few missing pieces, but Vista users expect a bit more to start with, like Movie Maker and Windows Mail. Well, those have been moved off the OS and made available for download.
To download the missing applications, perform the following. Click the Start orb and type Live Essentials in the Instant Search box. You will be given an easy link to click that will bring you to the Live Download site (http://download.live.com), where you can perform one Windows Live Essentials download to install an Instant Messaging app, your email, blogging, photos and movies apps, and more.
Locate the Download button and then download (the file should be wlsetup-web.exe) and run the application. The User Account Control dialog may display asking for permission to continue. Click Yes.
Note
Note at the bottom of the Download screen a “SmartScreen Filter checked this download and did not report any threats” comment. In a later chapter, we discuss IE 8 security options. But, just so that you’re aware of it at this point, this is a new feature in IE8 to help protect you from unsecure downloads.
You will now be asked which applications you want to install (see Figure 2.5).

Applications include the following:
• Messenger: Send instant messages to contacts or groups, play games, share pictures as you chat, and see what’s new with people you know.
• Mail: With Windows Live Mail on your desktop, you can access multiple email accounts via one program, plus your calendar, newsgroups, and feeds. And it’s part of Windows Live, so you can view your calendar online, and see when Messenger contacts are available to chat.
• Photo Gallery: Easily edit, view, organize, and share your favorite photos. You can also tag people in photos, stitch photos together into panoramas, and more.
• Toolbar: Add Windows Live Toolbar to Windows Internet Explorer and get quick, at-a-glance access to your Windows Live Hotmail, calendar, photos, and more.
• Writer: Create great-looking blog posts, including photos, videos, maps, events, and tags and publish them to almost any blog service (Windows Live, WordPress, Blogger, Live Journal, TypePad, and many more).
• Family Safety: Helps keep your kids safer online. With Family Safety, you decide how your kids experience the Internet. You can block or allow certain websites and contacts, and monitor where your kids go online.
• Silverlight: Enhance your experience with photos and videos on Windows Live and MSN, including rich slideshows and high-definition video. In addition, enjoy a superior browsing experience across many popular news, sports, and entertainment sites powered by Microsoft Silverlight technology.
• Movie Maker: Add and arrange video clips and photos, add a soundtrack, preview your movie, and then publish it to one of several popular video sites.
You can choose which ones you want to install, and then they will install for you, enhancing your Windows experience. Finally, you will answer a few questions regarding the setting of your search provider (the hope is to let Live Search handle your search needs), setting your home page (the hope is for MSN to be your browser home page), and being a part of the process by allowing Microsoft to collect information about how your system performs and how you use its software, including websites you visit. You choose what to agree with and then click Continue. You can then sign up for a Windows Live ID if you don’t already have one or click Close to finish.
Note
You do not have to be running Windows 7 to enjoy the Live Applications we just discussed. You can download them to a system running Windows XP SP2 (32-bit only) and Windows Vista (32- or 64-bit). With the exception of Movie Maker, which will not run on XP, the applications work the same. You may require additional components be installed in some cases, so be sure to review the system requirements on the Live download site.
When the process is complete, you can locate your new applications under the Windows Live folder via Start, Programs. They are called Windows Live Call, Windows Live Mail, and so forth.
Without going into every last detail about these applications, let’s take a look at what they do and what they look like.
Windows Live Messenger is the latest version of MSN Messenger (which you may already be familiar with). Live Messenger includes some great features (beyond the obvious IM functionality), including the following:
• PC-to-phone calling: This is a feature supported through Windows Live Call (discussed in more detail later).
• Interoperability: Live Messenger can work with several different types of clients, including Yahoo!, Google Talk, AOL, ICQ, and XMPP.
• Games: You can play free games or games you subscribe and pay for with persons you have in your contacts list.
• Exchange pictures: You can drag photos into the conversation window to show others while you are chatting. Persons can save those photos on their systems.
• Contact updates: When a contact of yours does something new like post to a blog or add photos, you can see it through the Live Messenger window under a What’s New dialog.
• Send mobile text messages: You can text a phone from Live Messenger to keep your conversation going even if the other person has to leave his or her computer.
Figure 2.6 provides a look at Windows Live Messenger and the new Windows Live Call.
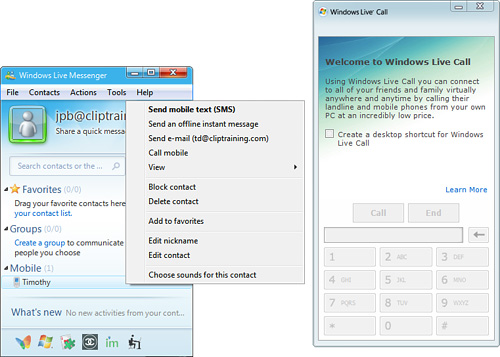
You must be logged in to Windows Live Messenger to use Windows Live Call. It is basically the Microsoft version of Skype and enables you to make calls in one of three ways:
• Computer calls: A free PC-to-PC voice call to other persons using Windows Live Messenger.
• Video calls: Free PC-to-PC video calls.
• Phone calls: From your PC to landline and wireless phones (for a fee).
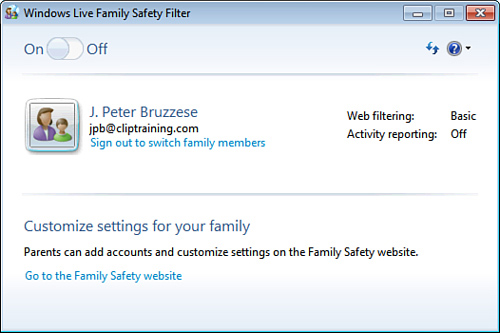
When you first open Windows Live Family Safety, you are asked to provide a Live ID to get started. This will be your primary account for the settings you choose.
Once you log in, you can turn the Family Safety Filter on or off with a simple slider (see Figure 2.7). When you log in to the Family Safety site, you can do the following:
• Categorize and block unwanted web content for yourself and your family.
• Create your own list of allowed or blocked sites.
• Monitor Family Safety users’ Internet activity.
To start protecting your family with Family Safety, you must do the following:
-
Install Family Safety on all computers your children use in your home. Install Family Safety from the Microsoft Windows Live Family Safety website (http://fss.live.com).
-
Create user settings and set up reporting. Configure custom user settings for each family member at the Windows Live Family Safety website (see Figure 2.8) by designating which content types and sites users can access. Customize reports to keep an eye on what your children are viewing online.
-
Respond to requests. When your children want to see blocked content, they will send you a request. You can then alter their blocked list if you decide you want to let them see it.

Note
One thing I really like about the new Family Safety site is that you can now handle requests from anywhere. So, if you are at work and your child makes a request, you can deal with that request remotely. You can also remotely view the activity log to monitor where they are going and what they are doing. My only negative on this is that it requires so much attachment to the Live accounts, which are free to create but still a bit too much of a tie.
From Outlook Express in XP to Windows Mail in Vista, we have now graduated to Windows Live Mail. If you compare the three, Windows Live Mail has a much more polished look to it than the others. It’s smooth and soothing, as you can see in Figure 2.9.
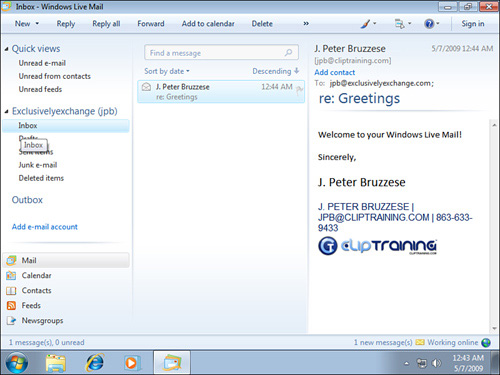
Windows Live Mail makes it easy to configure delivery from multiple email accounts (Gmail, Hotmail, and Yahoo!) to just one location. Windows Live Mail also offers enhanced security, such as spam filters (as in the past, but now with a much better way for you to decide whether something is truly dangerous) and easy-to-use delete/block functionality.
You might already be familiar with calendar features available in Windows Mail in Vista. If so, you may be pleased about an update to Windows Live Mail: Now you can have a personal calendar on your system and use the Windows Live account to sync with Live Calendar. So, if you are offline, you can edit your calendar and when you come back online, your calendar will sync with Windows Live at calendar.live.com. The great part about this feature is that you can check, edit, and update your Live Calendar from any browser (so you’re not tied to a specific system; you can use it from anywhere you have online access).
Movie Maker was a quirky but fun tool in Windows XP, and then received some needed enhancements in Vista. But, this was still before many even began to notice it. After all, so many tools on the market today enable users to merge photos, video, and sound and produce them into videos for instruction or sharing.
Live Movie Maker, shown in Figure 2.10, includes the new ribbon interface and a streamlined look.
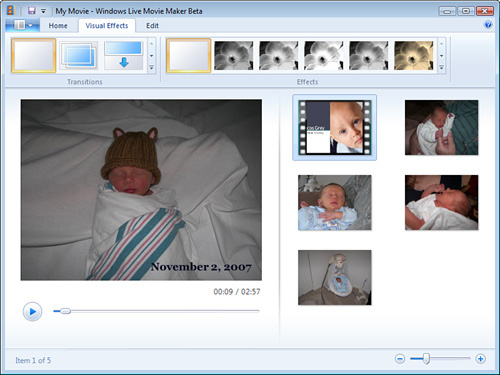
You can publish your completed movies to the web through the Publish option, and it will post to Soapbox on MSN video. Again, you need that Live ID to do this. There is also an “Add a plug-in” option under the Publish menu. This allows the reader to install plug-ins that they can use to publish their videos to Flickr and YouTube, to name a few.
You can quickly create a new video in WMV format for both high-quality or portable mobile players. Overall, the Movie Maker has a long way to go before reaching the quality level of some third-party tools, but it is free, easy to use, and works well for what it does.
In this era of digital cameras, people are suddenly amassing thousands of photos. It’s so different from the days of the traditional camera, when we had to go down to turn over our film (sometimes months old) to the developer and then wait to see the photographs. Now, we just push those pictures to the desktop and start archiving memories, with video and sound included. Amazing. And disorganized (usually).
Live Photo Gallery (see Figure 2.11) is the next version of the Photo Gallery tool released in Windows Vista. Just like its predecessor, Live Photo Gallery enables you to organize your photos via tagging (you can add metadata to those photos one at a time or in bulk) and searching capabilities.
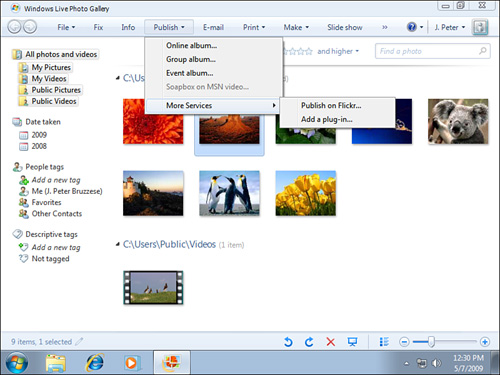
Sharing is made easier because you can upload photos to Live Spaces or Flickr (perhaps others in the future) directly from the Photo Gallery. Videos can be published to Soapbox (as mentioned earlier when discussing Movie Maker).
The following features are new in Photo Gallery:
• An improved import tool for tagging photos
• Tools to adjust a photo’s color histogram with shadow and highlight adjustment or sharpness
• Panoramic stitching to put multiple pictures together into a panorama
• Batch resizing of photos and rotation of videos
• QuickTime 7 support for playing videos
• Support for Live Sync, where you can synchronize the photo library you are using between two systems with Photo Gallery that use the same Live ID
Windows Live Writer is a new tool that we haven’t worked with before as part of an OS release, but it was first released for download in late 2007. This latest is enhanced. Live Writer is a blog-publishing application that enables you to blog (obviously), add photos and videos, and then publish to popular blogging services such as Windows Live Spaces, Blogger, WordPress, and TypePad.
After you configure your blog location, Live Writer opens a very simple WYSYWIG screen, from which you can blog and choose whether to insert pictures, videos, maps, hyperlinks, tables, and more (see Figure 2.12).
