
Chapter 1
Getting on the Internet
In This Chapter
![]() Selecting an Internet service provider
Selecting an Internet service provider
![]() Understanding how your Mac gets on the Internet
Understanding how your Mac gets on the Internet
![]() Setting up your Internet connection
Setting up your Internet connection
![]() Creating a personal hotspot
Creating a personal hotspot
I’ll be honest — the Internet is a terribly complex monster of a network. If you tried to fathom all the data that’s exchanged on the Internet and everything that takes place when you check your email for Aunty Joan’s fruitcake recipe, your brain would probably melt like a chocolate bar in the Sahara Desert. A shoebox full of archaic things is tucked under the Internet: communications protocols, routing addresses, packets, servers, and other hoo-hah that are beyond the grasp of just about everyone on the planet.
Luckily for regular folks like you and me, OS X Yosemite closes the trapdoor on all these details, keeping them hidden (as they should be). You don’t have to worry about them, and the obscure information that you need to establish an Internet connection is kept to a minimum. The happiest computer owners I’ve met think that the Internet is a little blinking light on their DSL or cable modem: If the light blinks in the proper manner, all is well. (I don’t argue with them.)
In this chapter, I provide help and advice to those who don’t already have a working Internet connection and are prepared to play games, download music, and chat with their friends — and I lead you through the procedure of adding an Internet connection under OS X. (In other words, you’ll get your light blinking properly.)
Shopping for an ISP
Before you can connect to the Internet, you must sign up for Internet access. (You may be able to find a location with free wireless Internet in your area, but this certainly won’t satisfy your long-term need for Internet access in your home.) If you already have an ISP (acronym-speak for an Internet service provider) or your company or school provides Internet access, smile quietly to yourself and skip to the next section. Otherwise, hang around while I discuss what to look for in an ISP and how to locate one in your local area.
An ISP is simply the company you contract with so you can connect to the Internet, including cable companies, such as Comcast, Bright House, or Mediacom, or your local telephone provider (like AT&T). Virtually all local ISPs, phone companies, and cable companies now offer digital subscriber line (DSL) or cable modem access. Collectively, these connections are called broadband because they offer the fastest method of transferring information to and from the Internet.
- Quality technical support: A 24-hour/7-day telephone support line is a godsend for the Internet novice; don’t settle for voice support during business hours. Forget email and web-based support, too; your email and web browser applications will be dead and gone if your Internet connection gives you problems. (Sound of your palm whacking your forehead.)
- Static IP addresses: A static IP address — the unique number that identifies your computer on the Internet — allows you to set up a professional web server or File Transfer Protocol (FTP) server. Most ISPs charge an additional amount for a static IP address (considering it as a business account instead of a residential account), so it’s not a good idea for a typical Mac owner at home. Suffice it to say, however, that a business or commercial organization running a web server or FTP server will benefit from using a static IP address.
- Email accounts: Investigate how many individual accounts you receive with various ISPs. Also, find out whether you can maintain them yourself through a website. If so, that’s a good sign. Additionally, if the prospective ISP provides a website where you can read and send email messages, you can stay on top of your email even while you’re on the road or vacationing halfway across the globe.
- Domain name service: Finally, the better class of ISP also offers a domain name service, which allows you to register something like yournamehere.com. For the most professional appearance, you can usually pay a yearly fee, and the ISP takes care of all the details in setting up your own .com or .org domain name.
Investigating Various Types of Connections
Consider the types of connections that are available under Yosemite to link your Mac to an ISP (see the preceding section for more about ISPs). You can choose among five pathways to digital freedom:
- A dial-up connection: Old-fashioned, yes. Slow as an arthritic burro, indeed. However, an analog (or telephone modem) connection is still a viable method for reaching the Internet for those computer owners who simply check email and visit an occasional web page. It’s the cheapest method available, and all you need for this type of connection is a standard telephone jack and a modem. Apple used to include a modem with every computer, but no longer. These days, you’ll have to buy an external USB modem to make the dial-up connection. (Any OS X Yosemite–compatible USB modem will work fine.)
- A broadband connection: Be it through DSL (which uses a typical telephone line) or cable (which uses your cable TV wiring), broadband Internet access is many times faster than a dial-up connection. Plus, both these technologies are always on, meaning that your computer is automatically connected to the Internet when you turn it on and that connection stays active. With DSL or cable, no squeaky, screeching whine accompanies your modem while it makes a connection each time you want to check your movie listings website. Both DSL and cable require a special piece of hardware (commonly called a modem, but it really isn’t); this box is usually thrown in as part of your ISP charge. Broadband connections usually require a professional installation, too.
- A cellular connection: If you own a cellphone, you may already be using the Internet on your phone over a 3G/4G/LTE connection. That same type of Internet connection is available for your desktop or laptop Mac from the major cellular providers. Sure, 3G and 4G connections are pricey compared to a typical broadband connection, but if you’re a road warrior with a laptop — or if you can’t get cable or DSL service in your area — cellular Internet may be the option for you.
- A satellite connection: If you’re really out there — miles and miles away from any cable or DSL phone service, and even out of the range of a 3G/4G/LTE cellular network — you can still get high-speed Internet access. The price for a satellite connection is usually much steeper than a standard DSL or cable connection, but it’s available anywhere you can plant your antenna dish with a clear view of the sky. Plus, a satellite connection is faster than other types of broadband access. Older satellite technologies required you to also use a dial-up connection — and the antenna could only receive, not send — but most ISPs that can handle satellite connections now offer satellite systems that both send and receive through the dish.
- A network connection: The last type of connection concerns those Macs that are part of a local area network (LAN) either at the office or in your home. If your Mac is connected to a LAN that already has Internet access, you don’t need an ISP and no other hardware is required: Simply contact your network administrator, buy that important person a steak dinner, and ask to be connected to the Internet. On the other hand, if your network currently has no Internet access, you’re back to square one: You need one of the previous four types of connections.
 After you connect one of your computers on your network to the Internet, you can use an Internet sharing device to allow all the computers to share that Internet connection. Book VI, Chapter 4, goes into all the details on sharing an Internet connection on a network.
Setting Up Your Internet Connection
Okay, so you sign up for Internet access, and your ISP sends you a sheet of paper covered with indecipherable stuff that looks like Egyptian hieroglyphics. Don’t worry; those are the settings that you need to connect to your ISP. After you get them in OS X, you should be surfing the web like an old pro.
Before you jump into this configuration, make sure that you’re logged in using an Administrator account.
Using an external dial-up modem
Follow these steps to set up your Internet connection if you’re using an external USB dial-up modem:
- Click the System Preferences icon on the Dock, and choose Network.
- Select External modem from the list at the left side of the pane.
Note that the External modem entry won’t appear in the list unless your USB modem is connected to your Mac and turned on.
- Enter the settings for the type of connection that your ISP provides:
- If your ISP tells you to use PPP (Point-to-Point Protocol): Click the Configure IPv4 pop-up menu, and choose Using PPP. If your ISP provided you with DNS Server or Search Domain addresses, type them now in the corresponding boxes.
- If you’re using AOL: Click the Configure IPv4 pop-up menu, and choose AOL Dial-up. If AOL provided you with DNS Server or Search Domain addresses, click in the corresponding boxes and type them now.
- If you’re using a manual connection: Click the Configure IPv4 pop-up menu, and choose Manually. Then click in the IP Address, DNS Servers, and Search Domains fields, and enter the respective settings provided by your ISP.
- If you need to enter PPP settings, click the Advanced button and enter the settings provided by your ISP.
- In their respective fields, enter the account name, password, telephone number, (optionally) the service provider name, and an alternative telephone number provided by your ISP.
Most folks prefer to set OS X to connect automatically when using a dial-up modem. (I hate excess pointer movements as much as the next techno-wizard.) To automate your dial-up connection (allowing Yosemite to call your ISP whenever your system needs the Internet), select the Connect Automatically When Needed check box.
- Press
 +Q to exit System Preferences and save your changes.
 Your external USB modem must use a 64-bit driver to work with Yosemite, so make sure the modem you buy is listed as specifically supporting OS X Yosemite (10.10).
Using broadband or network hardware
Follow these steps to set up your Internet connection if you’re using a network, cable modem, or DSL connection:
- Click the System Preferences icon on the Dock, and choose Network.
- Select Ethernet from the list on the left of the pane to display the settings that you see in Figure 1-1.
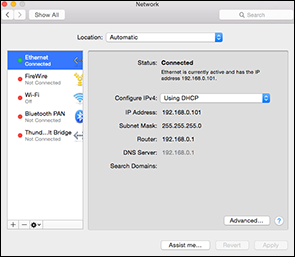
Figure 1-1: The Network settings for an Ethernet Internet connection.
- Enter the settings for the type of connection that your ISP provides:
- If your ISP tells you to use Dynamic Host Configuration Protocol (DHCP): Choose Using DHCP from the Configure IPv4 pop-up menu, and your ISP can automatically set up virtually all the TCP/IP settings for you! (No wonder DHCP is so popular these days.)
- If you won’t be using DHCP: Choose Manually from the Configure IPv4 pop-up menu. Then enter the settings provided by your ISP in the IP Address, Subnet Mask, Router, and DNS Servers fields.
- If your ISP uses PPPoE (Point-to-Point Protocol over Ethernet), click the Configure IPv4 pop-up menu and choose Create PPPoE Service.
- Type an identifying name for the PPPoE service.
- Click Done.
- Enter the password for your PPPoE connection.
- Press +Q to exit System Preferences and save your changes.
Yosemite can get down-and-dirty in the configuration trenches as well! To launch an assistant to help with the configuration process, click the Assist Me button and then click Assistant.
Using Your Cellular Personal Hotspot
Yosemite includes yet another method of connecting your Mac to that Internet thing — this time, you use your iPhone or iPad’s cellular (4G/LTE) service, using the new Personal Hotspot feature! (I know, another somewhat racy-sounding term.)
Here’s the scenario: You’re on the road with your MacBook, and you need to check your email and share a few photos on your website, but there’s no Wi-Fi service in range. If you don’t have a cellular connection for your Mac, you’re up a creek (at least until you pull into the next hotel, convenience store, or restaurant that offers free Wi-Fi).
Ah, but Yosemite has you covered, even in the absence of Wi-Fi. If your iPhone (or 4G/LTE iPad) is running iOS 8 or later and has an active 4G or LTE signal, your Mac can “piggyback” on that cellular signal, with no complex setup required! Make sure your iPhone or iPad is turned on, and click the Wi-Fi icon in the Yosemite Finder menu — your iPhone or iPad should appear in the list of available connections (complete with a battery indicator and a relative signal strength meter). Click the iOS device entry, and a secure connection is automatically made. Now your MacBook has an Internet connection, and you have scored points as a high-tech Mac power user. (And, like a good family member, your Mac automatically disconnects from the Personal Hotspot whenever you’re not using the Internet, just to save you from draining your phone’s data allowance.)