
Chapter 3
Staying in Touch with Messages and FaceTime
In This Chapter
![]() Setting up Messages
Setting up Messages
![]() Changing modes in Messages
Changing modes in Messages
![]() Adding buddies
Adding buddies
![]() Chatting with others
Chatting with others
![]() Sending and receiving SMS and MMS texts
Sending and receiving SMS and MMS texts
![]() Sharing screens with another person
Sharing screens with another person
![]() Sending and receiving files through Messages
Sending and receiving files through Messages
![]() Ignoring those who deserve to be shunned
Ignoring those who deserve to be shunned
![]() Adding visual pizzazz with video backgrounds and effects
Adding visual pizzazz with video backgrounds and effects
![]() Chatting face-to-face with FaceTime
Chatting face-to-face with FaceTime
![]() Taking and making iPhone calls on your Mac
Taking and making iPhone calls on your Mac
Throughout humankind’s history, our drive has been toward communication, from the earliest cave paintings, through written language, to the telegraph, telephone, and now the ultimate in human interaction: the text message. Ah, technological rapture! Of course, the very same text messages that your family craves can also send your cell phone bill through the roof. (The classic Catch-22 quandary.)
Ah, but wait. Here are Apple and Yosemite to the rescue, so forget that silly cellular phone and your complicated calling plan! As long as you have Mac OS X and an Internet connection, you can instantly chat with your friends and family whether they’re within shouting distance or halfway across the world. You can text anyone with a Mac or an iOS 5 or later device (such as an iPhone, iPad, or iPod touch) absolutely free. You can send and receive SMS and MMS text messages with anyone (no matter what kind of device they’re using). And, by golly, if the two of you have a FaceTime HD camera, Mac-compatible web camera, or digital video (DV) camcorder connected to your computers, you’ll see each other in glorious, full-color video! These modern marvels are made possible by Messages and FaceTime, and they fulfill the decades-old promise of the video telephone quite well, thank you.
In this chapter, I show you how to gab with folks using other Macs, iOS devices, and even other types of cell phones — as well as how to make and answer iPhone calls using your Mac!
Configuring Messages
The first time you run Messages (click the Messages icon on the Dock or in Launchpad), you’re prompted to sign in by entering your Apple ID (which you created while setting up Yosemite, or through the Mac App Store as I demonstrate in Book I, Chapter 3). You use your iMessage account to send and receive free messages to others using either a Mac or an iOS 5 (or later) device such as an iPhone, iPod touch, or iPad. By default, Messages also prompts you to select which phone numbers (for an iPhone) and email addresses (for a Mac, an iPhone, an iPod touch, or an iPad) you want to use with this account.
 An instant message (IM, like those exchanged on AOL Instant Messenger [AIM] and Google Talk) is different from an iMessage (which can be exchanged only with others using Macs or iOS devices). Messages can send and receive both types. With the arrival of Yosemite, Messages can now read and send standard SMS and MMS text messages as well, which I discuss later in this chapter.
If you’re already using AOL, Jabber, Yahoo!, or Google Talk and you want to use your existing IM account, choose File⇒Add Account, choose the correct type, and click Continue. Messages prompts you to enter your existing account information.
 To enter information for a Jabber account, click the Other Messages Account radio button, click Continue, click the Account Type pop-up list box, and choose Jabber.
You can also choose to set up Bonjour messaging. Think of Bonjour as plug-and-play IM for your local network. In Messages, Bonjour allows you to see (and yak with) anyone on your local network without having to know his account information, because Bonjour automatically announces all the Messages users who are available on your network. If you have others using Messages, iChat, Jabber, Yahoo!, or AOL on your local network, go for this option; if you’re not connected to a local network, however, Bonjour messaging isn’t necessary. Also, if you’re on a public Wi-Fi network or if you’re connecting to the Internet with an external modem through dial-up, I recommend disabling Bonjour messaging. (For all that’s cool about Wi-Fi, see Book VI, Chapter 3.) To turn on Bonjour messaging, choose Messages⇒Preferences, click the Accounts tab, click the Bonjour account in the list to the left to select it, and select the Enable Bonjour Instant Messaging check box.
Working with Messages
After you finish these configuration necessities, Messages displays the window that you see in Figure 3-1. Time for introductions all around!
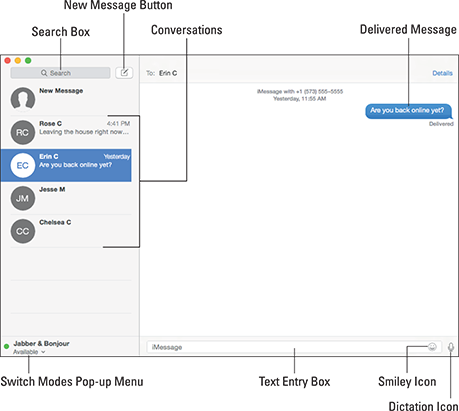
Figure 3-1: Messages means instant messaging at its finest!
If you want to send an iMessage to other Mac owners — or owners of iOS 5 (or later) devices — use the Messages window. If you already have an iPhone, iPod touch, or iPad running iOS 5 or later, you’ll probably immediately recognize the Conversation list on the left, which displays each individual with whom you’ve recently exchanged iMessages. Click an individual in the list to review past conversations (and optionally continue them). The right side of the Messages window contains the iMessages sent back and forth, which I cover later in the chapter.
Only folks using either a Mac running OS X Mountain Lion (or later) or an iOS 5 (or later) device can send and receive iMessages.
You can display the Buddies window (shown in Figure 3-2) at any time by pressing ![]() +1 or by choosing Window⇒Buddies from the Messages menu bar. Use the Buddies window to invite others to chat using an instant- messaging program (such as AOL, Google Talk, and Jabber).
+1 or by choosing Window⇒Buddies from the Messages menu bar. Use the Buddies window to invite others to chat using an instant- messaging program (such as AOL, Google Talk, and Jabber).
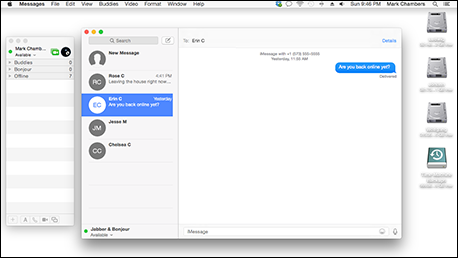
Figure 3-2: The Buddies window in Messages.
A few things to note here about these two windows in Messages:
- If you don’t like your picture, don’t panic. By default, Messages uses the thumbnail image from your Contacts card as your visual persona. However, you can add a picture to your Messages by dragging an image to the circular well next to your name at the top of the Buddies window. If necessary, Messages asks you to position and size the image so it fits in the (admittedly limited) space. This picture is then sent along with your words when you chat. In the figures for this chapter, I borrow the somewhat dour expression of a screech owl.
Click your image to display your recent thumbnails. This way, you can even use a different thumbnail image for each of your many moods. (Geez.) Also, you can click Camera from the pop-up menu and capture a new thumbnail with your FaceTime HD camera. Other sources for The Perfect Image include your Photo Stream, your Faces collection in Photos or iPhoto, and linked photos from your Internet accounts.
- Check out the buttons along the bottom of the Buddies window. In order, these buttons allow you to do these things:
- Add a New Buddy: Covered in the following section
- Start a Text Chat: Plain, old-fashioned chatting via the keyboard
- Start an Audio Chat: Chatting with your voice, using microphones
- Start a Video Chat: The ultimate chat, where the parties can both see and hear each other
- Start Screen Sharing: Where you can view — or even remotely control — a buddy’s computer
Using these buttons can handle about 90 percent of the commands that you need to give while using Messages, so use ’em!
- Hey, look, there’s a Messages menu bar icon! When you’re running Messages, you can add a balloon icon in the menu bar (in the upper-right corner of your screen). Click it to display the options you see in Figure 3-3. You can send a new message, change your online/offline status, immediately invite a buddy for a chat, or display the Buddies list (which I discuss later in the section, “Will You Be My Buddy?”). If you don’t see the Messages icon on your menu bar, click Messages in the menu, choose Preferences, click the General tab in the Preference dialog, and enable the Show Status in Menu Bar check box.

Figure 3-3: The Messages menu bar icon leaps into action.
The Messages menu bar icon can even launch the application! Click the Messages icon in the menu bar, and choose New Message at the bottom of the menu; Yosemite launches Messages automatically.
Changing Modes in Messages
Here’s an important note: Just because Messages is running doesn’t mean you’re ready to converse! For those not familiar with the terms online and offline, here’s the scoop: When you’re online, folks can invite you to chat and communicate with you. When you’re offline, you’re disconnected: Messages isn’t active, you can’t be paged, you can’t chat, and that is that. Your status applies only to IM and IM chat — iMessages and SMS/MMS text messages can be sent and received at any time.
Switching modes is easy, and you can do it in several different ways:
- Choose Available or Offline from the friendly Messages “speech bubble” menu bar icon.
- If the Messages window is visible, open the Mode pop-up menu at the lower left of the window.
- If the Buddies window is visible, open the Mode pop-up menu under your name at the upper left of the window.
- If the Buddies window is visible, you can also click a buddy’s name directly, which automatically switches Messages to online mode and starts a conversation with that buddy.
You can use Away mode whenever Messages is running and you’re still online but not available. For example, if I’m away from my Mac for a few minutes, I leave Messages running, but I switch myself to Away mode. My buddies get a message saying that I’m away, so they won’t bother trying to contact me. When I return to my computer, I simply move my mouse, and Messages intelligently inquires as to whether I’d like to return to Available mode. You can also use the menu bar icon to switch from Away to Available.
Messages also includes an invisible mode, which is a bit sneaky: Click the Messages menu bar icon, and choose Invisible, and your status appears to others as offline (even though you’re still online). This is a great feature for those who like to monitor who’s online and available without being bothered by others.
Messages can even display which iTunes song you’re listening to. Choose Current iTunes Song from the menu, and impress your friends with your digital audio techno-powers.
Speaking of modes, you, too, can create a custom mode — like Twiddling My Thumbs, Bored stiff!, or Listening to the Pointy-Haired Boss — and use it instead of the somewhat mundane choices of Available and Away. You can create your mode from the Messages or Buddies window: Open Mode pop-up menu in either window, and click Custom Available or Custom Away to create your new mode. An edit box appears in which you can type the new mode; press Return to automatically add the newcomer to your mode list.
To choose an existing mode, click it; modes with a green bullet are online modes, and red bullet modes are offline modes.
If you decide your status list is getting a bit too lengthy with all those custom messages, open the Mode pop-up menu in either window and choose Edit Status Menu. Both the Available and Away list boxes have a Delete button (a minus sign). Just click the offending status message to select it, and then click the Delete button to take care of business.
Will You Be My Buddy?
I know that asking whether you’ll be my buddy sounds a little personal, but in Messages, a buddy is anyone with whom you want to chat using instant messaging, whether the topic is work-related or your personal life. Messages keeps track of your buddies in the Buddies list. You can also add them to your Contacts application or use the Instant Message field in a Contacts card to generate a new buddy identity.
To add a new buddy, follow these steps:
- With the Buddies window visible, choose Buddies⇒Add Buddy.
Alternatively, click the Add a New Buddy button at the bottom of the Buddies window and choose Add Buddy from the pop-up menu, or press
 +Shift+A.
Messages displays a sheet where you can enter the instant-messaging account information for your new buddy.
- To create a buddy entry from a Contacts card that has an IM username, click the down-arrow button next to the Last Name box to display the Contacts list. Click the entry to select it.
As a shortcut, you can also click in the First Name box and type the person’s first name, or you can click in the Account Name box and type the person’s IM account name.
- To add a new person who’s not already in your Contacts database, type the person’s IM account name.
- Click Add to save the buddy’s information.
Even when you add a new buddy and that name appears in the Buddies list, don’t be surprised if the name appears dimmed after a few seconds. The dimming indicates that the person is offline and unavailable. You can also tell when a person is available if his or her name appears with a green bullet in the Buddies list.
Click the Address Card button on the Info dialog to enter or edit the person’s info and digits:
- Real first and last names
- Nickname
- Email address
- Phone number
- Instant-messaging address
- Buddy picture
The View menu offers a number of neat options to help you organize and customize your Buddies list. You can sort your Buddies list by first name, last name, or availability, and you can choose to display full names, short names (your Yosemite account name), or handles (nicknames). You can also toggle the display of offline buddies.
Chat! Chat, I Say!
Turn your attention to getting the attention of others — through inviting others to chat. Good chatting etiquette implies inviting someone to a conversation rather than barging in unannounced. Note that you don’t have to invite someone to start an iMessage conversation in the Messages window. I’m talking either an IM chat or an existing IM chat room here.
If you want to join a chat already in progress, choose File⇒Go to Chat Room (or press ![]() +Control+G). Depending on the service being used, you might have to specify both the type of chat and the specific chat room name.
+Control+G). Depending on the service being used, you might have to specify both the type of chat and the specific chat room name.
At this point, it’s time to draw your attention to the green phone and video icons next to each person in your Buddies list (as well as next to your own name at the top of the list). If the green phone icon appears next to both your name and your buddy’s name, you can enjoy a two-way audio (or voice) chat. If both you and your buddy (or buddies) are lucky enough to have FaceTime HD, USB webcams, or DV cameras connected to your Macs, you can jump into a real-time, two-way video chat room, complete with audio. Time for a very important Mark’s Maxim that’s violated a surprising number of times:
 Always wear a shirt while chatting with video, no matter your impressive physique. Always.
If your Mac has a microphone or video camera hooked up but you don’t see these icons, click the Video menu and make sure that the Audio Chat Enabled and Video Chat Enabled menu items are selected.
To invite someone to a simple text-only IM chat, click the desired buddy from the Buddies list, click Buddies, and choose Start New Chat. (Using the mouse, right-click the buddy in the list and choose Send Instant Message.)
To invite someone to an IM audio chat, choose Buddies⇒Invite to Audio Chat. To invite a buddy to an IM video chat, choose Buddies⇒Invite to Video Chat. You can also click directly on the phone or camera icon next to the person’s name in your Buddies list.
If you’re ready to video-chat with a FaceTime-compatible Mac, iPhone, iPad, or iPod touch owner, check out the complete discussion of FaceTime at the end of this chapter. Unlike an IM video chat, you start a FaceTime conversation in one of two ways: Click the FaceTime icon on the Dock, or click the FaceTime icon at the top right of the Messages window. Both methods launch the FaceTime application.
The recipient of your IM audio or video chat invitation can decline or accept your chat invitation. You’re notified (as delicately as possible) if the chat has been declined. After you invite someone to chat (or you opt to simply send an IM), the action switches to the Messages window (for text chats) or to a separate window (for audio and video chats). For text chats, simply type in the text box at the bottom of the Messages window and press Return to send the message.
Messages displays what type of conversation you’re having in two spots — at the top of the window and in the text box — making it easier to differentiate among IM, iMessage, and SMS/MMS conversations. For example, in Figure 3-4, you can see the word iMessage displayed at the top of the conversation and in the text box.
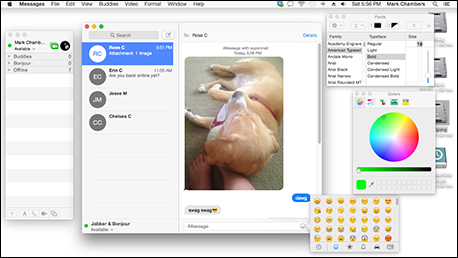
Figure 3-4: Fonts, colors, and smileys — oh my!
If you’d like to add a smiley (often called an “emoticon”) to your message, click the Smileys drop-down menu at the right of the text box (as shown in Figure 3-4) and choose just the right symbol. (You can also choose Edit⇒Insert Smiley.)
While text chatting, you don’t have to alternate sending messages back and forth between participants because everyone in a chat can compose and send messages at the same time. Me, I like to alternate when I’m chatting one-on-one.
If someone invites you to an audio or a video chat, you get the opposite side of the coin: A prompt dialog appears, and you can choose to accept or decline the invitation. (If it’s a video chat, you even get a video preview of the person inviting you.)
You can also change fonts and colors while composing a line of text. Simply select the text, and choose Format⇒Show Fonts or Format⇒Show Colors. (Press ![]() +T or
+T or ![]() +Shift+C to display the Font panel and Color Picker, respectively.) These windows can be resized and moved wherever you like, as shown earlier in Figure 3-4.
+Shift+C to display the Font panel and Color Picker, respectively.) These windows can be resized and moved wherever you like, as shown earlier in Figure 3-4.
Messages doesn’t limit you to just a chat between computers! You can also choose to ship off an email message from Messages. Click a person in the Buddies list, then click the Buddies menu, and choose Send Email to automatically launch Apple Mail (or your default email application).
When the Messages window is active, you can make a number of display choices from the View menu. Click the Messages item in the View menu to display these options:
- Show as Text: Each line you write and receive in a chat can be displayed in balloons (just like your favorite comic) or as simple text. You can also choose to display text lines in the more traditional boxes or as compact text (allowing more room for more characters in the Messages window).
- Show Names and Pictures: Each line can be displayed with the individual’s picture, just the name, or both the name and picture.
Curious about the capabilities of your Mac hardware in Messages? Choose Video⇒Connection Doctor, where you can view statistics and information about your current chat, display the features of Messages that are supported by your Mac and your connection, and view the status of your network connection.
If you’re holding multiple conversations in the Messages window, you can switch between windows by clicking the desired conversation in the Conversation list to make it active. To close an IM chat or an iMessage conversation, click a conversation in the list to select it and then click the Close button that appears (it bears an X symbol).
Conversing with iMessages
So you’d like to send and receive those free iMessages I mention earlier with your sister in Poughkeepsie? As long as she has a Mac of her own (or a snazzy Apple device running iOS 5 or later) and a network, Wi-Fi, or 3G/4G/LTE connection, you’re ready to go.
Click the Compose New Message icon at the top of the Messages window (next to the Search box) to start a new conversation. The cursor appears in the To field, and you can make these choices:
- Do things manually. Type the person’s name, email address, or telephone number directly in the To field. The information you enter depends on whether that person has a card in your Contacts application that already has the required information.
- Choose a contact or buddy. Click the blue plus sign to display a pop-up menu, where you can select a buddy from your list or a person from your Contacts database. To search for a specific person, click in the Search box and type a portion of the name.
From this point on, an iMessage conversation is similar to an IM chat; Figure 3-5 illustrates an iMessage conversation in progress. Type the desired text in the box at the bottom of the window, and press Return to send your iMessage. To close a conversation, right-click the offending conversation in the list and choose Close Conversation. (To delete a conversation entirely, hover your pointer on the conversation and click the X button that appears at the right of the conversation entry. You can also right-click the conversation entry and choose Delete Conversation from the pop-up menu.)

Figure 3-5: An iMessage conversation between a Mac and an iPhone.
Click the Details button at the top right of the iMessage window during an iMessage chat, and you can display the person’s location, add them to your Contacts database, and even initiate a Screen Sharing session or switch to a FaceTime audio or video chat!
Sending and Receiving SMS and MMS Texts
In previous versions of Messages, Mac owners were limited to sending instant messages and iMessages (and only to other Apple computers and devices). With the advent of Yosemite, however, your Mac is now capable of using your iPhone’s cellular texting plan to send and receive standard SMS (Short Message Service) and MMS (Multimedia Message Service) text messages with all sorts of devices! Apple calls this feature Handoff — I call it downright magical, especially since all the complexity of transferring cellular data between iPhone and Mac is automatic. (Handoff even allows you to make and answer iPhone calls from your Mac, as I cover at the end of this chapter.)
Naturally, there are requirements — aren’t there always? In order to send SMS/MMS texts, you need the following:
- An iPhone with a cellular plan that allows texting: Essentially, your Mac “piggybacks” through your iPhone to send and receive texts. (Remember, an iPhone is required only for SMS/MMS texts. You don’t need an iPhone to send and receive instant messages and iMessages.) The iPhone must be using the same Apple ID as your Mac, and it must be running iOS 8 or later.
- A wireless network: Both your Mac and the iPhone must have access to the same wireless network.
- Bluetooth enabled: Both your Mac and the iPhone must have Bluetooth enabled (turned on), so they can detect each other’s presence when they get in range (within 10 to 30 feet, depending on your physical surroundings). Enable Bluetooth on the Mac in the Bluetooth pane of System Preferences; enable Bluetooth on the iPhone in the Settings app’s Bluetooth screen or in the Control Center.
- Handoff support: Click the System Preferences icon on the Dock, click the General tab, and then click the Allow Handoff Between This Mac and Your iCloud Devices check box to enable it. On the iPhone, go to the Settings app, tap General, tap Handoff & Suggested Apps, and be sure the Handoff switch is set to On.
In order to use Handoff, you’ll need iOS 8 running on an iPhone 5 (or later), a fourth-generation iPad (or later), any iPad mini, or a fifth-generation iPod touch (or later). On the Mac side, you must have a 2012 model Mac (or later) running OS X Yosemite.
- An enabled iMessage account: Click the Accounts tab within Preferences, and click the iMessage account. If the account isn’t already enabled, click the Enable This Account check box to select it. Also, click the Start New Conversations From pop-up menu at the bottom of the Preferences dialog, and choose your iPhone’s telephone number.
After everything is configured properly, sending and receiving SMS/MMS text messages works just like sending and receiving iMessages. (As I’ve said many times before in my books, I like easy.) SMS/MMS texts sent to your iPhone’s telephone number appear as conversations at the left side of the Messages window. To start a new conversation using SMS/MMS, type a telephone number directly into the To field or choose a contact that includes a telephone number.
Sharing Screens with Aplomb
How often have you wanted to show someone a neat new application or lead your Aunt Mildred through the paces of setting up an Apple TV connection on her system? That’s the idea behind the ultimate collaboration tool Sharing Screens, where you can watch (or even remotely control) the display on another person’s Mac, across any broadband Internet or local network connection.
Screen Sharing must be turned on for you to send or receive sharing invites. Choose Video⇒Screen Sharing Enabled. A check mark appears next to the menu item when the feature is enabled.
If a buddy invites you to share a screen, you receive a prompt that you accept or decline. (You can also request to share a buddy’s screen by choosing Buddies⇒Ask to Share Screen.) If you accept the sharing invitation, Messages automatically initiates an audio chat (so you can gab away to each other while things are happening onscreen). Suddenly, you’re seeing the Desktop and applications that your buddy is running, and you can both control the pointer and left- or right-click.
Throughout the screen-sharing session, Messages maintains a translucent panel on your screen that has three buttons:
- End the Shared Screen Session: Click this button to exit shared screen mode.
- Switch Desktops: Click this button to swap between your Mac’s screen and the remote Mac’s screen. (Those Mac owners who have enabled Fast User Switching will recognize the cool screen swap animation.)
- Mute Audio: Click this button to mute the audio during the screen-sharing session.
To invite a buddy to share your screen, choose Buddies⇒Share My Screen.
 Okay, if sharing a screen with someone you don’t absolutely know and trust doesn’t set off alarm bells in your cranium, it should. Remember, anyone with shared screen access to you computer can perform most of the same actions on your Mac as you can, just as if that person were sitting in front of your Mac. Granted, most of the truly devastating things would require you to type your admin password, but a malicious individual could still delete files or wreak havoc any number of ways on your system. Be careful with whom you share your screen!
Sending Files with Messages
To send a file to a Buddy via instant messaging, click the desired entry in the Buddy list and choose Buddies⇒Send File. Alternatively, you can do any of these:
- Use the +Option+F keyboard shortcut, and choose a file from the Open dialog.
- Right-click the buddy in the list, click Send a File, and choose a file from the Open dialog.
- Drag the file from a Finder window to the person’s entry in the Buddies list.
- Drag the file into the text-typing window.
How’s that for convenience? No matter how you start the transfer, a dialog appears to indicate that the recipient is being offered a file transfer request. If the file transfer request is accepted by your buddy, the transfer begins and is saved where the recipient specifies on his or her system.
If a buddy sends you a file, the Incoming File Request pane appears. You can then either click the Decline button (to decline the file transfer) or the Save File button (to save the incoming file to any spot on your system).
To send a file during an iMessage or MMS conversation, choose Buddies⇒Send File, use the ![]() +Option+F keyboard shortcut, or drag the file from a Finder window and drop it into the text box in the Messages window.
+Option+F keyboard shortcut, or drag the file from a Finder window and drop it into the text box in the Messages window.
Always check any files you receive from Messages with your antivirus scanning software before you run them!
If you’re looking for another easy method of sending files between Mac computers running Yosemite, don’t forget to check out AirDrop. I discuss this feature in Book VI, Chapter 2. Messages does, however, have two important advantages over AirDrop: The two computers don’t have to be within Wi-Fi range of each other, and Messages can transfer files with a wider range of computers (PCs running Windows, Macs running older versions of OS X, and PCs running Linux).
Eliminating the Riffraff
Here I need to explain something that I hope you won’t have to use — what I like to call the Turkey Filter. Messages is a little more subtle. You just ignore people.
To ignore someone in a chat group, click the person’s name in the list and choose Buddies⇒Ignore person. When someone is ignored in a chat group, you don’t see anything that person types and you don’t have to respond to any file transfer requests from that person.
If only it were that easy to ignore someone when he or she is standing close to you.
Anyway, if the person becomes a royal pain, you can also choose to block that person entirely. That way, the offensive cur doesn’t even know that you’re online and can’t reach you at all. Click the person in the list, and choose Buddies⇒Block person — the deed is done.
Adding Visual Effects
Our esteemed Apple software developers decided to bring a little Hollywood special effects flash to Messages with video backdrops. You can also use many of the special effects filters provided by Photo Booth to keep your video chat room laughing!
To add a video backdrop to your video feed, choose Video⇒Video Preview to display your stunning self in a live video feed; then choose Video⇒Show Video Effects. Use the scroll buttons to move to the backdrop thumbnails toward the end of the Effects library. When you click one, Messages prompts you to leave the frame for a few seconds so the plain background behind you can be correctly masked (just like those blockbuster special effects used in today’s films). When your background has been captured and masked, Messages prompts you to return to your spot, and you’ll see that your new static or animated backdrop is in place. Just plain cool!
The plainer the background behind you, the better Messages can process and mask your background. A plain wall painted a single color works best.
“But, Mark, I want my own movies and photos for backgrounds!” No problem. Messages provides eight user-defined backdrop slots for your own selections at the end of the Video Effects collection. (Click the right scroll arrow in the Video Effects window until you reach the last page.) To add your own visuals, you can do any of these:
- Drag a video from iMovie to an empty user backdrop well in the Video Effects window.
- Drag a photo from iPhoto to an empty user backdrop well in the Video Effects window.
- Drag a video or photo from a Finder window to an empty user backdrop well in the Video Effects window.
As long as an item can be displayed in Quick Look, it can be used as a video background. Think of the possibilities!
To try out a Photo Booth effect in Messages, choose Video⇒Video Preview to display your live video feed; then choose Video⇒Show Video Effects (or press ![]() +Shift+E). Figure 3-6 illustrates the Video Preview and Video Effects windows; click a video effect thumbnail to see how it looks on you in the Preview window! Effects range from simple Black & White to a Thermal Camera look, an Andy Warhol–style Pop Art display, and a number of really cool optical distortions (such as Twirl and Light Tunnel).
+Shift+E). Figure 3-6 illustrates the Video Preview and Video Effects windows; click a video effect thumbnail to see how it looks on you in the Preview window! Effects range from simple Black & White to a Thermal Camera look, an Andy Warhol–style Pop Art display, and a number of really cool optical distortions (such as Twirl and Light Tunnel).

Figure 3-6: Andy Warhol would be impressed by my Messages video effect!
After you find just the right video effect, close the two windows and start chatting. If you decide you’d rather return your video persona to something more conventional, display the Video Effects window again and click the Original thumbnail (which appears in the center of each screen of thumbnails).
Conversing with FaceTime
Although Messages’ standard video chat is downright nifty, it has limits: You’re confined to your IM buddies, and those folks may not have the necessary video hardware. With Apple’s FaceTime technology, however, you can audio-chat and video-chat with owners of iOS devices and Macs without the constraints of instant-messaging accounts — and if they can run FaceTime, they’re guaranteed to have the right video hardware.
At the time of this writing, these devices are FaceTime-compatible:
- Macs running Lion or later
Mac owners running Snow Leopard 10.6.6 or later can also buy the FaceTime application from the Mac App Store.
- An iPhone 4 or 4s (running iOS 4.1 or later) or later
- A second-generation iPad (or later) or an iPad mini running iOS 4.1 or later
- A fourth-generation or later iPod touch running iOS 4.1 or later
If you’re running a device under iOS 6 or later, you can use FaceTime over network, Wi-Fi, and 3G/4G connections. If you’re using a device running iOS 5 or earlier, however, you need a Wi-Fi connection to use FaceTime with a mobile device; a 3G/4G cellular connection does not work. A Mac requires either a wired or Wi-Fi connection to the Internet to use FaceTime.
To launch FaceTime, click the jaunty-looking video camera icon on the Dock. The first time you use the application, you must enter your Apple ID and your email address. The folks you chat with on the other end use that same email address to call you via FaceTime. (iPhone owners can be called using their telephone numbers as well.)
To change the email address that other FaceTime users use to call you, choose FaceTime⇒Preferences and click the Email link under the heading You Can Be Reached for FaceTime At.
To initiate a call with any contact, click in the familiar Search box and begin typing the contact’s first or last name, and FaceTime displays the matching entries — alternately, click the plus sign icon at the right of the Search box to display your Contacts list. You can also enter an email address or phone number for a contact directly into the Search box. Click the camera icon for a video call, or click the telephone icon for an audio call, and the connection process begins. To return to the Contacts list and choose another person, click the X button that appears at the right side of the Search box.
Apple isn’t satisfied with a mere Contacts list, however. You can use two other methods of selecting someone to call:
- Recent Calls: Click an entry in the Recents list to choose a contact that you’ve called (or attempted to call) in the recent past.
- Groups: If you’ve set up one or more groups in your Contacts application, you can display them by clicking the plus icon at the right side of the Search box. For example, if you’ve created a Contacts group containing all those fellow employees in your company, you can easily locate and call a specific person without wading through all your friends and family as well.
When the call is accepted, you’ll see a large video window with a smaller picture-in-picture display (you can drag the smaller display to any desired spot in the window). The video from the other person fills the large window, and the video you’re sending to them appears in the small display, as shown in Figure 3-7.

Figure 3-7: The FaceTime window in action.
Move your pointer into the FaceTime window, and you’ll see the window controls appear, as well as three icons at the bottom of the window:
- Mute: Click the mute icon to turn off the sound coming from your Mac. FaceTime displays a reminder that mute is enabled. (You’ll continue to hear the audio from the other person.) To restore your audio feed, click the mute icon again.
- End: Click this icon to end the FaceTime call.
- Full screen: Click the full-screen icon (or press +Shift+F) to switch FaceTime into full-screen display mode. To return to window mode, press +Shift+F again, or move your mouse and click the full-screen icon again.
To switch FaceTime into landscape mode and take advantage of your Mac’s widescreen display, choose Video⇒Use Landscape, or press ![]() +R. (Why let the iPhone, iPod touch, and iPad owners have all the landscape fun?)
+R. (Why let the iPhone, iPod touch, and iPad owners have all the landscape fun?)
You can switch between audio and calling using the Video and Audio buttons at the top of the FaceTime window — the Audio button allows you to search and call those folks who don’t have video cameras connected to their computers. (In my opinion, FaceTime audio calls offer better sound quality than a standard cell phone.)
Contacts who have FaceTime video hardware can also make and accept FaceTime audio calls.
Using Your Mac as, Well, a Telephone
Another new Yosemite feature that’s caused quite a stir is the capability to make and answer telephone calls on your Mac, again using your iPhone as a “bridge” between your iPhone’s cellular service and your computer. (Insert standing ovation here!)
Like SMS/MMS texting, the Handoff feature makes sending and receiving calls a simple process, but Yosemite must be configured correctly (as I describe earlier in this chapter in the section titled, “Sending and Receiving SMS and MMS Texts”). Your iPhone must be connected to the same Wi-Fi network as your Mac, and it must be running iOS 8 or later. Both the iPhone and Mac must have Bluetooth enabled. Finally, your iPhone must use the same Apple ID as your Mac.
Incoming calls to your iPhone appear as Notification Center alerts on your Yosemite Desktop (complete with the caller’s photos from Contacts, if she has one), allowing you to accept or decline the call. If you’re busy and can’t answer, you can optionally send the caller an iMessage or SMS text instead by clicking the down-arrow icon next to the Decline button. If you accept the call, you’ll see a call dialog appear onscreen that tracks the length of the call and allows you to mute the audio if necessary. To hang up, click the End button.
If the person you’re conversing with has the capability for FaceTime video chatting, you can click the FaceTime video icon and switch directly into a FaceTime video call! (Dick Tracy would’ve loved this stuff.)
To place a call, click a phone number in Contacts, Calendar, or a web page in Safari, and Yosemite prompts you for confirmation before calling the number. If the person you’re calling answers, you’ll see the call dialog appear on your Desktop.
I discuss Handoff’s other features in Book V, Chapter 4.