
Lesson 27
Using Interfaces
In .NET programming, an interface is like a contract. It defines the public properties, methods, and events that a class must provide to satisfy the contract. It doesn't indicate how the class must provide these features, however. That's left up to the class's code. It only defines an interface that the class must show to the rest of the world.
In this lesson, you learn how to implement interfaces that are predefined by the .NET Framework. You also learn how to define your own interfaces to make your code safer and more efficient.
Interface Advantages
The following sections discuss two of the most important advantages provided by interfaces: multiple inheritance and code generalization.
Multiple Inheritance
Suppose you define a Vehicle class with properties such as NumberOfPassengers, MilesPerGallon, and NumberOfCupHolders. From this class you can derive other classes such as Car, PickupTruck, and Unicycle.
Suppose you also define a Domicile class that has properties such as SquareFeet, NumberOfBedrooms, and HasAnnoyingNeighbor. From this class you can derive Apartment, Condo, and VacationHome.
Next you might like to derive the MotorHome class from both Vehicle and Domicile so it has the properties and methods of both parent classes. Unfortunately you can't do that in C#. In C#, a class can inherit from only a single parent class.
Although a class can have only one parent, it can implement any number of interfaces. For example, if you turn the Domicile class into the IDomicile interface, the MotorHome class can inherit from Vehicle and implement IDomicile. The interface doesn't provide the code needed to implement such features as the HasAnnoyingNeighbor property, but at least it defines that property so code that uses a MotorHome object knows the property is available.
Defining a property such as SquareFeet but not implementing it may not seem very useful, but it lets your code treat all IDomicile objects in a uniform way. Instead of writing separate methods to work with Duplex, RusticCabin, and HouseBoat objects, you can write a single method that manipulates objects that implement IDomicile.
That brings us to the second big advantage provided by interfaces: code generalization.
Code Generalization
Interfaces can make your code more general while still providing type checking. They let you treat objects that have common features as if they were of the interface type rather than their true individual types.
For example, suppose you write the following method that displays an array of strings in a ListBox:
private void DisplayValues(string[] items, ListBox listbox)
{
    listbox.Items.Clear();
    foreach (string value in items)
        listbox.Items.Add(value);
}
This method works reasonably well, but suppose you later decide that you need to display the items that are in a List<string> instead of an array. You could write a new version of the method that was nearly identical to this one but that works with a list instead of an array, as in the following code:
private void DisplayValues(List<string> items, ListBox listbox)
{
    listbox.Items.Clear();
    foreach (string value in items)
        listbox.Items.Add(value);
}
If you compare these two methods, you'll see that they are practically identical, so you must write, debug, and maintain two pieces of code that do almost exactly the same thing.
This is where interfaces can help.
Look again at the two methods. They differ only in their parameter definitions and the rest of their code is the same. The reason is that the methods don't really care that the parameters are arrays or lists. All they really care about is that you can use a foreach loop to iterate through them.
The IEnumerable<> interface requires that a class provide an enumerator that a program can use to loop through the items in the object. In particular, the enumerator supports foreach loops.
This is a generic interface so you must provide a type parameter for it to indicate the type of the items over which the interface can loop.
Both string[] and List<string> implement IEnumerable<string>, so you can combine and generalize the methods by making the items parameter have the type IEnumerable<string> instead of string[] or List<string>. The following code shows the new version of the method:
private void DisplayValues(IEnumerable<string> items, ListBox listbox)
{
    listbox.Items.Clear();
    foreach (string value in items)
        listbox.Items.Add(value);
}
This version can display the items in a string[], List<string>, or any other object that implements IEnumerable<string> such as LinkedList<string>, Stack<string>, or SortedSet<string>.
Implementing Interfaces
To make a class that implements an interface, add the interface name in the class's declaration as if the class were inheriting from the interface. For example, the following code shows the declaration for a Person class that implements IComparable:
class Person : IComparable
{
    ...
}
You can include a class and multiple interfaces in the inheritance list. For example, the Manager class could inherit from Person and implement the interfaces IComparable and IDisposable.
The only other thing you need to do is implement the properties, methods, and events defined by the interface. For example, the IComparable interface defines a CompareTo method that takes an object as a parameter and returns an integer that is less than, equal to, or greater than zero to indicate whether the object should be considered less than, equal to, or greater than the parameter.
Many interfaces come in generic versions. For example, the IComparable<Person> interface requires a class to define a CompareTo<Person> method.
For a concrete example, suppose the Person class defines FirstName and LastName properties. The following code implements a version of CompareTo<Person> that orders Person objects according to their last names first:
class Person : IComparable<Person>
{
    ...
    // Compare this Person to another Person.
    public int CompareTo(Person other)
    {
        // If other is null, it comes first.
        if (other == null) return 1;
        // If our last name comes first, we come first.
        if (LastName.CompareTo(other.LastName) < 0) return -1;
        // If our last name comes second, we come second.
        if (LastName.CompareTo(other.LastName) > 0) return 1;
        // If our last names are the same, compare first names.
        return FirstName.CompareTo(other.FirstName);
    }
    ...
}
First, if the other Person object is null, the method returns 1 to indicate that the current Person should come after it. (By convention, null values come before non-null values.)
Next, the method compares the two objects' LastName values. If the values are not the same, the code returns –1 or 1 to indicate that the current Person comes before or after the other.
Finally, if the two LastName values are the same, the code uses the CompareTo method provided by the string class to compare the two FirstName values and returns the result.
You can write the code to implement an interface yourself, but it's easier to let Visual Studio build a default implementation for you. Write the class declaration including the interface. Then hover the mouse over the interface's name in the class declaration and look for the change suggestion lightbulb to appear. You can see it under the word “class” in Figure 27.1.

Click the lightbulb and select the Implement Interface command from the dropdown list, as shown in Figure 27.2.

When you select that command, Visual Studio adds placeholder code to satisfy the interface. The following code shows the placeholder method for the ICompare<Person> interface:
public int CompareTo(Person other)
{
    throw new NotImplementedException();
}
Now you can fill in the code you want to use.
You can learn more about what an interface is for and what it does in several ways. You can always search the online help. You can also right-click the interface's name and select Go To Definition to see information, as shown in Figure 27.3. Click the plus signs on the left to view detailed comments describing the purposes of the pieces of code.

Finally, you can open the Object Browser (use the View menu's Object Browser command) and search for the interface's name (without the generic parameters). Select the interface in the browser's left panel. Click an item in the upper-right panel for more details, as shown in Figure 27.4.

Defining Interfaces
The preceding sections give examples that implement predefined interfaces. This section explains how you can define your own.
Defining an interface is a lot like defining a class, with two main differences:
- First, you use the keyword
interfaceinstead ofclassin the declaration. (You can use the Project menu's Add Class command and then change the keywordclasstointerface.) - Second, you don't provide any code for the properties, methods, and events that you declare in the interface.
The following code shows a simple IDrawable interface. The code includes a using System.Graphics directive at the top of the file to make working with Brush, Pen, and Graphics objects easier.
interface IDrawable
{
    int X { get; set; }
    int Y { get; set; }
    Brush Background { get; set; }
    Pen Foreground { get; set; }
    void Draw(Graphics gr);
}
A class that implements IDrawable must provide X, Y, Background, and Foreground properties and a Draw method.
You cannot provide an accessibility modifier such as private to the items defined by an interface because they are always assumed to be public. That means a class that implements the interface must declare these items as public.
The declarations for the properties look like they are providing a default implementation, but they actually only indicate which accessors are required. For example, you could omit the set accessor to require a read-only property.
A class that implements IDrawable must still provide its own implementations, although you can use auto-implemented properties if you like. For example, the following code shows how the DrawableCircle class might implement its X property:
public int X { get; set; }Try It
In this Try It, you build the Vehicle class and the IDomicile interface described earlier in this lesson. You then make a MotorHome class that inherits from the first and implements the second. Finally, you create an instance of the derived class.
Lesson Requirements
In this lesson, you:
- Start a new project. Create a
Vehicleclass with the propertiesNumberOfPassengers,MilesPerGallon, andNumberOfCupHolders. Give it an initializing constructor and override itsToStringmethod so it returns the object's property values separated by the escape sequence - Make an
IDomicileinterface that defines the propertiesSquareFeet,NumberOfBedrooms, andNumberOfBathrooms. Also make it define aToStringmethod that returns a string as usual. - Derive the
MotorHomeclass fromVehicle, making it implementIDomicile. Give it an initializing constructor and override itsToStringmethod so it returns all of the object's property values separated by the escape sequence - Create an instance of the
MotorHomeclass. Then use itsToStringmethod to display its properties in a textbox.
Hints
- Don't forget to make the
MotorHomeclass's constructor invoke the base class's constructor. If you don't remember how, see the section “Invoking Other Constructors” in Lesson 24. - You can save a little work by making the
MotorHomeclass'sToStringmethod call theVehicleclass's version.
Step-by-Step
- Start a new project. Create a
Vehicleclass with the propertiesNumberOfPassengers,MilesPerGallon, andNumberOfCupHolders. Give it a constructor to make it easy to initialize a new object's properties. Override itsToStringmethod so it returns the object's property values separated by the escape sequence- Use code similar to the following:
class Vehicle
{
    // Properties.
    public int NumberOfPassengers { get; set; }
    public double MilesPerGallon { get; set; }
    public int NumberOfCupHolders { get; set; }
    // Initializing constructor.
    public Vehicle(int numberOfPassengers, double milesPerGallon,
        int numberOfCupHolders)
    {
        NumberOfPassengers = numberOfPassengers;
        MilesPerGallon = milesPerGallon;
        NumberOfCupHolders = numberOfCupHolders;
    }
    // Return the object's properties.
    public override string ToString()
    {
        return
            "NumberOfPassengers: " + NumberOfPassengers +
            "
MilesPerGallon : " + MilesPerGallon +
            "
NumberOfCupHolders: " + NumberOfCupHolders;
    }
}
- Use code similar to the following:
- Make an
IDomicileinterface that defines the propertiesSquareFeet,NumberOfBedrooms, andNumberOfBathrooms. Also make it define aToStringmethod that returns a string as usual.- Use code similar to the following:
interface IDomicile
{
    int SquareFeet { get; set; }
    int NumberOfBedrooms { get; set; }
    double NumberOfBathrooms { get; set; }
    string ToString();
}
- Use code similar to the following:
- Derive the
MotorHomeclass fromVehicle, making it implementIDomicile. Give it a constructor to make it easy to initialize a new object's properties. Override itsToStringmethod so it returns the object's property values separated by the escape sequence- Use code similar to the following:
class MotorHome : Vehicle, IDomicile
{
    // IDomicile methods.
    public int SquareFeet { get; set; }
    public int NumberOfBedrooms { get; set; }
    public double NumberOfBathrooms { get; set; }
    // Initializing constructor.
    public MotorHome(int numberOfPassengers, double milesPerGallon,
        int numberOfCupHolders, int squareFeet,
        int numberOfBedrooms, double numberOfBathrooms)
        : base(numberOfPassengers, milesPerGallon,
        numberOfCupHolders)
    {
        SquareFeet = squareFeet;
        NumberOfBedrooms = numberOfBedrooms;
        NumberOfBathrooms = numberOfBathrooms;
    }
    // Return the object's properties.
    public override string ToString()
    {
        return base.ToString() +
            "
SquareFeet: " + SquareFeet +
            "
NumberOfBedrooms: " + NumberOfBedrooms +
            "
NumberOfBathrooms: " + NumberOfBathrooms;
    }
}
- Use code similar to the following:
- Create an instance of the
MotorHomeclass. Then use itsToStringmethod to display its properties in a textbox.- The following code creates an instance of the
MotorHomeclass and displays its properties inresultTextBox:private void Form1_Load(object sender, EventArgs e) { // Make a MotorHome. MotorHome motorHome = new MotorHome(6, 8.25, 32, 150, 3, 0.5); // Display its properties. resultTextBox.Text = motorHome.ToString(); }
- The following code creates an instance of the
Exercises
- Build a program that defines the
IDrawableinterface described earlier in this lesson. Make theDrawableCircleandDrawableRectangleclasses implement the interface.Hints: Give
DrawableCirclean additionalRadiusproperty and giveDrawableRectangleadditionalWidthandHeightproperties. Use code similar to the following to draw the circle centered at the point (X, Y):// Draw the circle centered at (X, Y). public void Draw(Graphics gr) { gr.FillEllipse(Background, X - Radius, Y - Radius, 2 * Radius, 2 * Radius); gr.DrawEllipse(Foreground, X - Radius, Y - Radius, 2 * Radius, 2 * Radius); }Use code similar to the following to draw the rectangle with upper-left corner (X, Y):
// Draw the rectangle.
public void Draw(Graphics gr)
{
    gr.FillRectangle(Background, X, Y, Width, Height);
    gr.DrawRectangle(Foreground, X, Y, Width, Height);
}
(For bonus points, make a
DrawableStarclass that has aNumberOfPointsproperty and draws a star with that number of points.) - [Hard] An array's
Sortmethod can take as a parameter an object that implements the genericIComparerinterface. Because this interface is generic, you can tell it what kinds of objects the class can compare. For example,IComparer<Car>means the class can compareCarobjects.Build a
Carclass with the propertiesName,MaxSpeed,Horsepower, andPrice. Override theToStringmethod to display the object's properties formatted with fixed column widths so the values for differentCarsin aListBoxwill line up nicely, as shown in Figure 27.5. (TheListBoxuses the fixed-width font Courier New so all of the letters have the same width.)
Build a
CarComparerclass that implementsIComparer<Car>. Give it the followingSortTypeenumeration:// Different kinds of sorts. public enum SortType { ByName, ByMaxSpeed, ByHorsepower, ByPrice, }Next give
CarCompareraSortproperty that has typeSortType.Finally, give the
CarCompareraComparemethod to satisfy theIComparer<Car>interface. Use aswitchstatement to make the method return a value that depends on theSortvalue. For example, ifSortisByPrice, then compare the twoCars' prices. Make the method sort theMaxSpeed,Horsepower, andPricevalues in decreasing order.Now create and initialize a class-level list of
Carobjects. When the user clicks aRadioButton, follow these steps:- Set the
ListBoxcontrol'sDataSourceproperty tonull. - Create a
CarComparerwith the appropriateSortType. - Call the
Carlist'sSortmethod, passing it the comparer. - Set the
ListBoxcontrol'sDataSourceproperty to theCarlist.
- Set the
- [Hard] If you set a
ListViewcontrol'sListViewItemSorterproperty equal to an object that implements theSystem.Collections.IComparerinterface, then theListViewuses that object to sort its rows. To sort the rows, the control calls the object'sComparemethod, passing it twoListViewItemobjects. (Unfortunately theListViewcontrol'sListViewItemSorterproperty is a non-genericIComparer, so it works with non-specificobjects instead of something more concrete likeListViewItems.)For this exercise, make a program with a
ListViewcontrol similar to the one shown in Figure 27.6. At design time, edit theListView'sColumnscollection to define the columns. Edit itsItemscollection to define the data and set the control'sViewproperty toDetails.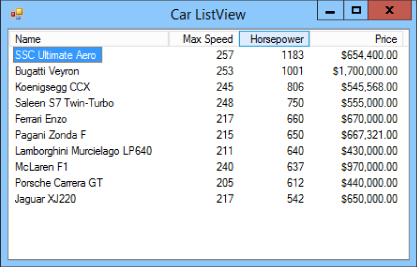
Next, make a
ListViewComparerclass that implementsSystem.Collections.IComparer. Give it aColumnNumberproperty that indicates the number of the column in theListViewthat the object should use when sorting.Finally, give the
ListViewaColumnClickevent handler. The event handler should create a newListViewComparerobject to sort on the clicked column and then set theListViewcontrol'sListViewItemSorterproperty to that object. - The
IEquatableinterface requires a class to provide anEqualsmethod that returnstrueif two objects should be regarded as equal. Some classes, such asList, can use that interface. For example, if you fill aListwith objects that implementIEquatable, then the list'sContainsmethod can tell if the list contains an object that is equivalent to another object.Make a
Personclass that has the propertiesFirstNameandLastNameand that implementsIEquatable<Person>. Then build a program similar to the one shown in Figure 27.7 to let the user add and removePersonobjects in a list. If the user tries to add a duplicatePersonor tries to remove aPersonthat isn't in the list, display an error message.
Hints
- Store the
Personobjects in aList<Person>namedPeople. (Unfortunately, theListBoxcontrol'sItemscollection doesn't assume its contents implementIEquatableso you can't just store thePersonobjects there.) - After modifying the list, make the
ListBoxdisplay the list of people by setting theListBox'sDataSourceproperty tonulland then setting it equal toPeople.
- Store the
- It's always better to prevent the user from making a mistake than it is to display an error message. Copy the program you wrote for Exercise 27.4 and make the following changes:
- Remove the previous error messages.
- Enable the Add button only if both
TextBoxes have non-blank text and the list doesn't already contain a person with those first and last names. - Enable the Remove button only if both
TextBoxes have non-blank text and the list contains a person with those first and last names.
- Make a program that defines the following classes and interfaces:
- An
IWolfinterface withPackNameandRankproperties, and aWolfInfomethod that returns a string. (In classes that implementIWolf, make this method return the person's name and pack name.) - A
Personclass withFirstNameandLastNameproperties and an overriddenToStringmethod. - An
Employeeclass that inherits fromPerson, adds a newEmployeeIdproperty, and makesToStringincludeEmployeeId. - A
Werewolfclass derived fromPersonandIWolf. - A
WereEmployeeclass derived fromEmployeeandIWolf.
Create instances of the
Person,Employee,Werewolf, andWereEmployeeclasses. Place them all in aList<Person>and place those that you can in aList<IWolf>. Loop through the lists and display the objects' information in twoListBoxes. - An
- Copy the program you built for Exercise 27.6 and modify it so
WereEmployeeinherits fromWerewolf. What are the advantages and disadvantages to this approach? Which approach seems better? (Look at the comments in theWereEmployeeclass in the download to see my thoughts.)