
Chapter 9
Using Source Control: GIT
WHAT'S IN THIS CHAPTER?
- Sharing your project to source control
- Using Git on the command line
- Third-party tools for Git
- Android Studio Git integration
Whether you are using Git or something else, the source control system is an important part of the software development lifecycle. Whether you are working in a team or on your own, source control systems provide a full history of what you have been doing and ease the management of changes to and versioning of the code.
Popular source control systems, both free or paid and open source or vendor-based, have been around for quite a while. CVS was one of the early popular source control systems that many developers have been familiar with since the early 2000s. Later, SVN became a popular and widely used source control system, mostly replacing CVS thanks to its transactional commits. Commercial source control systems also emerged, such as IBM's ClearCase and Microsoft's SourceSafe.
However, the search for better source control did not end. Mercurial and Git became available around the same time, both addressing the same issue: distributed source control. From its introduction, Git has been widely accepted by many large open source projects, such as Linux and Eclipse. With the help of GitHub, which hosts many open source projects, Git has been the de facto standard for source control.
This book covers Git because it is currently the most widely accepted source control system among Android developers, and it has built-in support for Android Studio.
INTRODUCTION TO GIT
The idea behind source control is simple. Source control systems save changes as patches (commits). This provides an easy way to revert to or compare points in the development timeline. This history of changes not only provides insight based on what has happened in this project but also provides a great way to integrate different development efforts.
Changes are performed locally and committed to a central server, which acts as the version control server. This architecture does not allow developers to work offline and relies on a persistent connection between the local source files and the version control system. However, Git is different; it is distributed. Unlike other systems that just watch changes in the file system and commit changes to the version control server, Git runs on a client computer and changes need to be committed locally first. This way, a developer can revert any change/branch or version locally through Git. The local Git can push the set of changes committed to network Git servers. All changes are kept both locally and on any number of servers, as shown in Figure 9.1, which makes Git very flexible and powerful. You can create any combination of branches for teams.
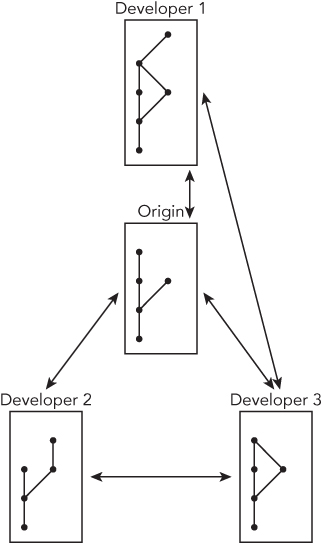
Figure 9.1 Distributed version control using Git
Understanding Git
The basic idea of source control is to keep a stable version of the code, usually called the master branch. Ideally, any development effort should be performed in a separate branch so you don't break the master. Changes are committed in patches to the branch as they are completed. The commit patches include a bunch of changes, which are wrapped in an atomic transaction. Therefore, a change is either accepted or rolled back as a whole. Once the development purpose of the branch is complete and tested, it is merged with the master. The process is shown in Figure 9.2.

Figure 9.2 Git branch
Ideally, a branch, consisting of a batch of commits, is merged to the master smoothly by a triggered pull request. However, in the real world, that is not the case most of the time. Some other development branch might have been merged before your branch or a critical bug might have been patched and merged into the master. Because the entire idea behind version control is to enable teams to work in harmony, this should not be an issue.
Figure 9.3 shows that branch B has been merged before branch A. Ideally, this merge happens smoothly without any conflict, provided that the two development branches were different files or different parts of the same file without creating a conflict. However, once again this is not often the case in the real world. Other developers may need to patch a critical bug, or they may be developing a feature that overlaps with the code fragment you are working on, which creates a conflict. Figure 9.4 shows a conflict scenario.

Figure 9.3 Merging a non-conflicting branch

Figure 9.4 Merging conflicting branch
A conflict happens when there's a change in a line or the same segment of code in two or more parallel but different timelines. When it is time to combine these changes, manual action is required because, although both were meaningful when the branchout occurred, one might become obsolete or create a need for additional change in the other. To resolve this conflict, one or more developers who have an understanding of both braches need to compare both versions of the code to perform a manual merge of those and then merge the merged code into the master. Of course, this is a simplified description of this operation and there are other process flows you may choose to follow.
You can use Git either while starting the project or at a later stage in development. This chapter covers both options, but sharing your project to Git from the start is definitely the preferred way.
Installing Git
Android Studio comes with Git support. However, you may still need to install Git to be able to use it through the command line. You can install Git as follows, depending on your OS.
- MacOsX—A binary Git installer for Mac OS X is available at
http://git-scm.com/download/mac. An alternative way to install Git is to install GitHub Client for Mac OS X, which also offers a simplified user interface for Git athttp://mac.github.com/(see Figure 9.5).
Figure 9.5 GitHub page
- Linux—Popular package managers all support binary Git installation. To install Git on Debian-based systems (such as Ubuntu), use the following command:
sudo apt-get install git-allAlternatively, you can install Git via yum with this command:
sudo yum install git-all - Windows—Just like Mac OS, there is a binary installer for Windows. It's available at
http://git-scm.com/download/win. You may prefer to install GitHub client for Windows, which comes with a simplified user interface. It's available athttp://windows.github.com/.
Once the installation is complete, you need to create your identity. To set your name and email address, execute the following commands directly from the terminal.
$ git config --global user.name "John Doe"
$ git config --global user.email [email protected]That's it: You installed Git and are now ready to create a project.
USING GIT
Let's start from scratch by sharing a project to Git via the command line:
- Navigate to your target project's folder from the terminal with the following command.
$ cd /path/to/projectfolder - Create a new folder to hold the source files and share them to Git.
$ mkdir git-project - Next, you need to add this folder to Git. Start by initializing Git:
$ git init

Figure 9.6 Git configuration output
That's it! This folder is registered as a Git root. Now you can add folders and files. However, do not forget that Git does not just track the file system. Adding files to this directory does not mean anything unless the files are also added to Git. Create a read.me file for your git-project folder and run the following command to add that file to Git.
$ git add read.meThe file is added to Git and is being tracked. However, to start versioning, you need to commit changes to Git. The addition of the file is an initial commit.
$ git commit -m 'initial commit'That's it! Edit the file, make some changes, and perform another commit. Use the following command to check the file's status. This command will list uncommitted changes if there are any.
$ git statusBut wait a minute! You are still performing all the versioning on your local machine, so another developer cannot access your source file. Worse, what if something happens to your computer? To push the changes to a remote Git repository, you first need to find a Git host. GitHub is a popular Git service, and you will use it in this chapter. GitHub offers free unlimited repositories for open source projects and it has reasonable pricing options if you want private repositories.
If you do not have a GitHub account, visit http://www.github.com and create an account before proceeding to the next section.
USING THE GITHUB CLIENT
GitHub is a popular Git-based project-hosting site that offers free hosting for public repositories. One reason for GitHub's popularity is the available easy-to-use tools for Git. The tools proved to be so successful at being simple and easy to use that some people even organized their weddings with GitHub.
GitHub provides tools for all major operating systems. To get installers or the application binary, navigate to https://desktop.github.com/. When you are there, it will recognize your operating system. If you are using Mac OS X, it will download a zip file named GitHub Desktop 220.zip (220 is the version number).
Mac OS X installation is easy; just extract the zip file and copy GitHub Desktop.app to your application's directory and installation is done.
If you are using Windows, the website recognizes that and will download the GitHubSetup.exe file. To start installation, launch that file.
When the security notification shown in Figure 9.7 appears, click Install.

Figure 9.7 GitHub Desktop Application Install – Security Warning window
As shown in Figure 9.8, the installer downloads the GitHub Desktop application files.

Figure 9.8 GitHub Desktop installation process
When the installation finishes, the Welcome window shown in Figure 9.9 comes up. (This figure shows the Windows version of this screen.)

Figure 9.9 GitHub Desktop start screen
After installing GitHub Desktop on Mac OS X, start the application to see a window with the same functionality as in Windows. Figure 9.10 shows this screen.

Figure 9.10 GitHub Desktop welcome screen
Clicking Skip Setup takes you to the main screen. If you click Continue, you will need to enter your GitHub username and password, as shown in Figure 9.11. GitHub Desktop can work without GitHub and even with other Git hosting sites. However, completing your GitHub account setup will bring up all the GitHub repositories you previously created with that account.
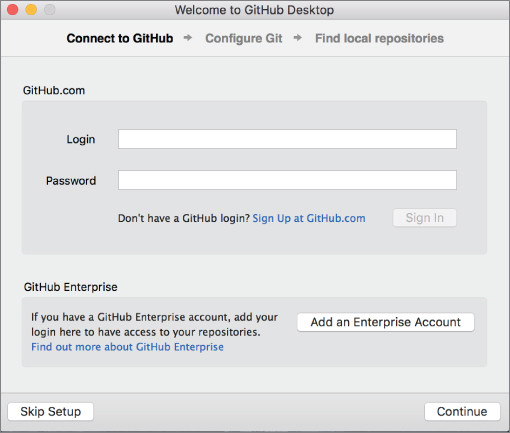
Figure 9.11 Connecting to GitHub
A typical setup with no repositories will look like Figure 9.12. This screen will differ depending on the specific local repositories or GitHub repositories added with your setup.

Figure 9.12 GitHub repositories list
Next, let's focus on how to add existing repositories or create new ones using GitHub Desktop. Let's start with creating a new repository. Select New Repository from the File menu or click the plus (+) sign in the upper-left corner (see Figure 9.13).

Figure 9.13 Creating a new repository with GitHub Desktop
You will be asked for the parent directory where you want your local repository, as shown in Figure 9.14. By default, this directory is the GitHub folder in your home directory. You may continue with the default selection or enter your desired folder's name.

Figure 9.14 Repository path selection
GitHub Desktop Client will create and initialize your folder and add it to the Other projects tab on the left. The project is listed under Other because it is not a GitHub project, as shown in Figure 9.15.

Figure 9.15 Other projects list
Now that you've initialized your project, it is time to make and track some changes. Copy the read .me file you previously placed in your git-project folder to your new Git repository. The GitHub Desktop Client will immediately show untracked changes, as shown in Figure 9.16.

Figure 9.16 Untracked changes shown on the GitHub Client
The tracked and untracked changes to files are listed in the middle section of the github-project window. As shown in Figure 9.17, if you highlight a file, the change details are shown in the right pane. Lines that start with a plus (+) sign and are highlighted with green are newly added lines. Lines that start with the minus (–) sign and are highlighted with red are deleted lines. To commit this change, type a meaningful description and click the Commit to master button (refer to Figure 9.16). Since this is the initial commit, as the description, type initial commit.

Figure 9.17 List of changes on GitHub Desktop
You've created a new project and committed some changes through GitHub Client, but now let's work with your existing Git repositories via GitHub Desktop Client. This time, let's import your first git-project.
You can add any existing local or remote Git project. Click the + sign in the top-left corner and select Add, as shown in Figure 9.18.

Figure 9.18 Importing a project
Next, type the path to your local folder or browse and navigate to the root folder of your Git project, as shown in Figure 9.19.

Figure 9.19 Git project path
Once the project is added, the whole history as well as all remote repository settings will be shown inside the GitHub client. You can continue working from the GitHub client or from the command line, or even switch back and forth.
You have created Git projects from both the command line and the GitHub client, and then made some changes and committed them, but no Git project is complete without a remote repository. By adding a remote repository, you enable other developers to work on the same project, and most importantly, you ensure the project is not saved on a local hard drive. To add a remote repository on GitHub, click the Publish button at the top-right corner. If you have not yet completed your GitHub sign-in, the warning shown in Figure 9.20 appears.

Figure 9.20 Sign-in warning
Click OK to open a new screen where you enter your GitHub username and password, as displayed in Figure 9.21.

Figure 9.21 Sign-in screen
When you have completed the sign-in process, you are asked for the name and description of a repository. After you've entered that information, click the Publish Repository button, as shown in Figure 9.22.

Figure 9.22 Entering the repository name and description
It's done! Your project is shared and hosted in a repository on GitHub. You can confirm that the project is now listed under GitHub projects in the left pane, as displayed in Figure 9.23.

Figure 9.23 GitHub project display
We have covered the difference between committing and pushing. The Sync button, shown in Figure 9.24, pushes local changes while pulling remote changes, if any, to your remote repository and keeps the changes synced.
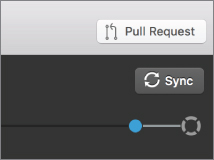
Figure 9.24 The Sync button on GitHub
You have seen using Git both from the command line and via the GitHub client to create and share projects. Now let's move to Android Studio and see how it is integrated with Git.
USING GIT IN ANDROID STUDIO
This chapter has covered how to create a Git repository, add files to it, and perform commits. However, you need to know how to do much more than that for daily development tasks, including branching, merging, resolving conflicts, ignoring untracked files, and so on. This section covers Git using Android Studio, as well as switching to the command line and using third-party tools when needed.
You can always choose to use Git via the command line or a third-party tool, but having integrated support in your IDE may simplify your job. Indeed, Murat's favorite Git tool during his early days was e-git, which is actually just a Git integration plugin written for Eclipse. There is nothing wrong with using whichever tool works best for you.
In this section, you begin by moving an Android project to Git. To do this, you will create a new project, as shown in Figure 9.25, but you can use any Android project you have worked on as long as it hasn't been shared to Git before. The project you are going to follow has phone/tablet and wear modules with empty default activities.

Figure 9.25 Creating a new project
You will be using the com.expertandroid.git package name. Also, feel free to choose different SDK versions or a different number of modules (see Figure 9.26) because this chapter focuses only on the Git flow of the project.

Figure 9.26 Selecting modules and an SDK version
Once the project is created, highlight it and select Enable Version Control Integration from the VCS (version control system) menu, as shown in Figure 9.27.

Figure 9.27 Enabling version control integration in Android Studio
A popup dialog box will ask which version control system you want to integrate; choose Git. Android Studio has support for all major VCSs such as CVS, Subversion, and Mercurial, as you can see in the list in Figure 9.28.
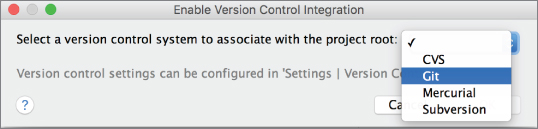
Figure 9.28 List of version control systems available for Android Studio
Alternatively, you may use the options shown when you click the Import into Version Control item from the VCS menu (refer to Figure 9.27) to enable Git or another version tracking system (see Figure 9.29).

Figure 9.29 Import into Version Control options
Now your module is a Git repository. However, this does not mean all your files are tracked. Android Studio warns about this by marking the untracked filenames with red, as shown in Figure 9.30.

Figure 9.30 Untracked changes in Android Studio
As you remember from what you have done previously via the command line or the GitHub client, initializing a Git repository is only the first step. After the initialization, you need to add the files you want to track and then perform an initial commit. So now let's add your files to your repository. Select the module and right-click to display actions. Select Add from the Git option, as shown in Figure 9.31. Alternatively, you can press Shift+Command+A (Ctrl+Alt+A on Windows).

Figure 9.31 Adding items to the Git repository
This operation can be performed on files, packages, modules, or even the whole project. After they've been added (as shown in Figure 9.32), the filenames change from red to bright green in Android Studio's Project View.

Figure 9.32 Added changes to Git in Android Project View
You are almost there: You've initialized your repository, added your files, and now it is time to commit your changes. Once again, highlight your module, then right-click and select Commit Directory from the Git option, as displayed in Figure 9.33.

Figure 9.33 Commit action in Android Studio
This should bring up a commit wizard to help you choose multiple files and commit options as well as the commit message, as shown in Figure 9.34.

Figure 9.34 Android Studio Commit Changes wizard
This wizard window has three main components. The top-left window displays the file tree and enables you to choose multiple files to include in the commit. Do not worry about the icons on top for now; we will cover them in the following section. The bottom-left window has a multiline text entry field for the commit message. Composing a meaningful and self-explanatory commit message is not only a good practice but also necessary if you want your Git history to be browseable and meaningful. Because this is the initial commit, a simple initial commit message should be sufficient.
The right part of the commit wizard offers the following options:
- Author—The name of the author of the commit.
- Amend Commit—This option enables you to add changes to your previous commit (if, for example, you need to fix something in it). Unlike most other VCSs, this option allows you to change the contents of the previous transaction without rolling back the full commit.
- Reformat Code—Android Studio offers great code formatting options, which we covered in Chapter 4. By selecting this checkbox, you are asking Android Studio to reformat each applicable file before the commit.
- Rearrange Code—Works just like the Reformat Code option. Rearranges code before the commit.
- Optimize Imports—Removes unnecessary imports from the source file before the commit. While the unused imports are harmless and will be removed by the compiler, this option results in a shorter and relatively easy-to-read source file. On the other hand, this might be handy only when you read the source code in a simple text editor because Android Studio already hides imports.
- Perform Code Analysis—Analyzes the code and runs
lintwith given options. This option greatly helps to eliminate poorly written and problematic code, preventing it from being committed into the written history of the project. - Check TODO—Just like the previous option, the Check TODO option helps prevent committing unfinished code into your repository. Although technically any code that is committed needs to be complete, that doesn't mean the code should always be TODO free. One may have added a TODO for a feature task, which would be the subject of another commit.
- Cleanup—Works pretty much like Reformat Code. This option runs cleanup rules before the commit.
- Update Copyright—Although it may seem not important, this is a very handy option, especially if you are working on a corporate or an open source project that relies heavily on properly placed copyright licenses. This option lets Android Studio update copyright licenses in each committed file.
Now that you've learned about all of the options, let's try a commit.
Clicking the Commit button reveals the options shown in Figure 9.35. You may choose to Commit, Commit and Push, or Create a Patch from changes. Click Commit to perform just a commit.

Figure 9.35 The Commit button in Android Studio
Because the generated code in the project introduces TODOs and warnings, your commit should pause with a warning, as shown in Figure 9.36.

Figure 9.36 Code Analysis warning window
If you select Review, Android Studio will display all warnings, TODOs, and potential problems. Typically, it is good practice to click Review and go over all items to ensure they will not introduce any future problems. However, because the project currently contains only generated code, go ahead and click Commit. That is it; all source files in your project should have turned black from green when the commit is completed.
That's it; you have completed your init, change, and commit in your repository. This was simple, right? Well, of course, in real life you would face conflicts and merge problems. The next section discusses how to handle those.
GIT FLOW
During the development lifecycle, developers work on tasks that may or may not target the same delivery. In addition, multiple developers need to work on the same file or resources and make changes to the same or different parts. To avoid collisions among those changes and enable only completed tasks while keeping not completed, ongoing tasks out, you need to implement a strategy. There are different strategies to solve this problem, but because covering all of them would turn the rest of this book into a Git book, let's focus on only the most popular approach, the branch/merge (pull request) Git flow.
Let's assume you have hired some other developers to work on your project. You are all working on different changes, but as you have learned so far, you do not want to include unfinished changes in your master branch. To protect your development environment, let's start by branching out the current master code.
- Right click the module and select Git ⇨ Repository ⇨ Branches, as shown in Figure 9.37.

Figure 9.37 Branch menu item
This will bring up the Git Branches window. Because you are on the one and only branch in your project, there is nothing else to display.
- Click New Branch, as in Figure 9.38.

Figure 9.38 New Branch selection
Another popup window will ask the branch name, as shown in Figure 9.39. Although you can enter any name in this text field, there are generally accepted conventions for naming a branch in Git.

Figure 9.39 Branch naming
- Start with a simple naming convention for this example. Type your name and a feature name for your new branch, as shown in Figure 9.39.
You have created and moved your workspace to the new branch. Now it is time to make some changes and commit.
- Open the
MainActivityclass in the mobile module and find the stringMyActioninsetActionin theonCreatemethod. - To keep things simple, let's make a small change and delete
My, leaving the action string as"Action", as shown in Figure 9.40.
Figure 9.40 Simple change in code
Once again,
MainActivitydisplays in blue, which indicates that there are some uncommitted changes, as shown in Figure 9.41.
Figure 9.41 Uncommitted changes indicated in Android Studio
- Now select Commit File under Git, as shown in Figure 9.42.

Figure 9.42 Commit the file changes
Now let's focus on some other properties and options of the commit window shown in Figure 9.44.

Figure 9.43 Commit changes window
The following list describes the eight icons on top of the file tree:
- Show Diff—This is one of the most important features of the commit window. This option displays the Diff between the last commit and the current commit candidate. This tool helps you to review what has changed, as shown in Figure 9.45.
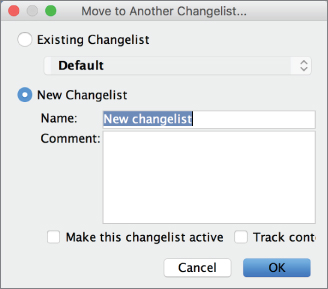
Figure 9.44 Diff tool output
- Move to Another Changelist—Moves current changes into another changelist. Changelists are a group of files with changes. By default, every change is preserved in the default changelist; however, with this option, you can move these changes to another changelist for better and more logical organization, as shown in Figure 9.43.

Figure 9.45 Changelist window
- Refresh Changes—Forces a refresh on the contents of the file.
- Revert—Rolls back the current highlighted change to the previous commit.
- Jump to Source—Closes the current commit window and focuses on the currently highlighted change in the IDE.
- Group by Directory—Groups changed files in packages. If this option is not selected, all files will be listed in a flat list that is not dependent on where they are located. In most cases, Group by Directory gives you a better overview of the changed files.
- Expand All—Expands all packages.
- Collapse All—Collapses all packages.
That's it for the icons; now let's focus on the Commit window's other features and options.
Click Details on the bottom of Figure 9.44 to expand the rest of the commit window. The Details pane offers a fast, simple diff preview, which we previously covered under the Show Diff feature. Similarly, the quick diff highlights differences between the latest version and previous commit side by side.
Now that we've covered every detail in this window, it is time to perform the commit.
- Write a commit message and click Commit. Let's assume this was everything you wanted to do. Therefore, it is time to merge and bring those changes from the branch to the head.
- Right-click the project and select Git ⇨ Repository ⇨ Merge Changes, as shown in Figure 9.46.Next, the Merge Branches window, shown in Figure 9.47, appears. Just under the Git root, which is the root of your project, the current branch and other available branches for merge are displayed.

Figure 9.46 Merging changes

Figure 9.47 Branch merge
Because you have only one branch other than the master, it is the only available choice to merge with the master. Just below the branches is a drop-down box to select your merge strategy. Because you currently are the only developer who has performed any change, the strategy you choose is not trivial. However, in real life, you cannot be sure there will not be any conflicts. Go ahead and click Merge.
Well done—you did it! You branched out from the master branch, made a change, and merged the change back. But what really happened? To visualize, we will use an open source tool called GitUp.
We started by branching out from the master, as shown in Figure 9.48. We were on our newly created branch when we took this screenshot. Because it was our focus branch, a red solid line is used. This graph also shows that we have branched out from the master. As we performed our commit and moved back to the master, once again the master has become our focus, as shown in Figure 9.49.

Figure 9.48 Master branch visualization from GitUp

Figure 9.49 Branch visualization from GitUp
Notice that the dashed branch line is now a solid line, which shows that it has merged back to that master. Because there were no changes in the master when we branched out and merged back in, we merge back at the same location, thus going back and forth on the same line.
The last commit/merge was very smooth. Now it is time to take it a step further and create some conflicts. Once again, go back to the beginning of this section and create a new branch. This time, change the setAction string to "Action" from "My Action" in MainActivity and perform a commit as you did last time. Switch back to the master branch but do not merge yet.
Now it is time to simulate an already merged change into the master after you branched out. Find the line you just changed and this time change the first string "Replace" to "Replacing". Once again, perform a commit with a proper commit message.
You are ready to merge. This time, your branch, which has one new commit, needs to merge into the master but your branch is missing the last change to the master. Because both the master and your branch introduce changes, the changes should be merged so that they don't break or override each other.
Now select Merge as shown in Figure 9.46. This time, Git will complain about a conflict and inform you that the file merged with a conflict, as shown in Figure 9.50.

Figure 9.50 Merge conflict warning
You should see both changes that have been added to MainActivity but identified with the branch name they belong to.
<<<<<<< HEAD marks the beginning of changes in the target branch on which the merge is performed, which is the master in this case. ======= marks the end of the first change and start of the second change. Finally, >>>>>>> branchNamemyener/string-changes in this case. The warning window offers three options:
- Accept Yours—Keeps the first change marked with
HEADand discards the second. - Accept Theirs—Keeps the second change and discards the first one.
- Merge—Gives you the opportunity to merge both changes.
If those two changes occurred in separate lines, you would not need to perform a manual merge. Instead, Git would automatically bring each new part into the file and create a genuine new version. However, both changes targeted the same line and they are likely to affect each other. In this case, Git allows a manual merge. Click Merge to open the new merge window shown in Figure 9.51.

Figure 9.51 Merge Revisions window
This window consists of three panes. The left pane shows the current branch you are on, which is the part marked with HEAD in the commit. The right pane displays the change in the branch, which you want to merge with the master. Finally, the middle pane shows a proposed merge from both parties. Git usually does a smart job merging conflicts. There are four buttons at the bottom of the screen: You can choose to Accept Left and discard the change in right pane, choose to Accept Right and override the change in the left pane, click Abort to not perform anything now, or click to Accept the proposed merge in the middle pane.
But wait a minute. What if you are not happy with the proposed change because it doesn't reflect both of the changes because of the conflict between them? Well, if conflicts occur, you can always solve them manually. To help with that, the middle pane is editable. Click the red highlighted part and change Replace to Replacing and My Action to Action. You are even free to add new changes. Let's add a comment to remind you that you made the manual merge shown in Figure 9.52.

Figure 9.52 Manual merge
As you finish typing, a green popup will appear with a link to save changes and finish merging, as shown in Figure 9.53.

Figure 9.53 Saving changes notification
Because the result of the merge is actually another change, you need to commit this change in your current branch. The commit message automatically included the merge and conflict info, as shown in Figure 9.54. We strongly suggest that you keep this message because it is a standard way to understand what has happened.
Let's see what happened. Once again, we use GitUp to visualize what happened, as shown in Figure 9.55. We originally created a new branch from the master named myener/string-changes. Then we performed a commit on the branch. Meanwhile, a separate change was also committed on the master, as indicated by a small white dot on the red line after we branched out. Finally, we merged those two changes, graphically shown as our branch brought back to the master.

Figure 9.54 Updated commit message
As a final step, let's add a remote to our local repository as you previously did from the command line and GitHub client. This time, select Push from the Git menu. Because you have not yet declared a remote repository, Android Studio will display the Define Remote option in the Push Commits window, as shown in Figure 9.56.

Figure 9.55 GitUp visualization after conflict resolution

Figure 9.56 Defining a remote in the Push Commit window
Clicking the Define remote link opens a new window that asks for the URL of your remote repository, as shown in Figure 9.57. Because you created a local repository in Android Studio, you need to register a new repository on GitHub and enter the URL.

Figure 9.57 Remote repository definition
Once you enter the URL, Android Studio will display all commits included in this push, as shown in Figure 9.58. Clicking Push will publish all your changes to the remote repository.

Figure 9.58 Push commit summary
SUMMARY
This chapter covered version control systems and focused on the most popular one, Git. You started by creating a Git repository and performing commits from the command line. Next, the chapter covered the popular Git repository, GitHub, and showed you how to use GitHub Desktop Client.
Finally, the chapter moved to Android Studio to create a new Android project. We covered how to create branches and work on them. We also covered Git flow by branching out and merging the changes back to the master branch as well as showing you how to manage conflicts and resolve them.