
Chapter 4
Android Studio In Depth
WHAT'S IN THIS CHAPTER?
- Android Studio menu
- Android Studio shortcuts
- Android Studio tool views
- Editors
- Android Studio live templates
- Code refactoring in Android Studio
- Updating existing code
- Signing key for Android application in Android Studio
- Building APKs in Android Studio
The previous three chapters provided an introduction to environment setup and how to start a new project with Android Studio. This chapter dives into Android Studio's tools and best practices before digging into application development with Android Studio.
A good introduction to Android Studio tools will help you develop applications efficiently and enable you to take advantage of Android Studio as an IDE to ease the development process and optimize your application.
Throughout the chapter, we will review the Android Studio menu items and tools and answer questions you might have about why and when to use or access them. The chapter begins with menu items and then tackles shortcuts and tools used in Android Studio. Then you look at code refactoring with Android Studio and Live Templates. The chapter concludes with a focus on Android Studio's APK building utilities.
ANDROID STUDIO MENU ITEMS
If you are used to developing Android applications with Eclipse-based ADT, it may take a while to get to know Android Studio menu items.
Figure 4.1 shows all the menus: Android Studio (only in the Mac version), File, Edit, View, Navigate, Code, Analyze, Refactor, Build, Run, Tools, VCS, Window, and Help. The figure shows the Mac OS X version of Android Studio but the menus don't change much by OS.

Figure 4.1 Menus on Mac OS X
Familiarize yourself with the menu items within a desktop application so that you can easily utilize the application in a way that meets your specific needs and enables you to find a solution within the IDE itself for such tasks as adding a new file to your project, enabling additional application windows, configuring the application or checking for updates, and so on. The following sections examine Android Studio's menu items in more detail.
Android Studio
The Android Studio menu lists the main menu items, which provide access to updates and window management, along with the hide, quit, and show options, as shown in Figure 4.1.
The most important item in this menu is Preferences (Settings in Windows and Linux), which you may need to access many times to configure Android Studio.
The Preferences window gives you access to all the detailed Android Studio configurations: Appearance & Behavior, Keymap, Editor, Plugins, Version Control, Build, Execution, Deployment, Languages & Frameworks, and Tools, as shown in Figure 4.2.

Figure 4.2 Preferences window
File
The File menu gives you access to file operations such as saving a file, adding a new file, selecting templates, opening existing files, and closing a project folder, as shown in Figure 4.3. It also includes file operations including setting the style of files in Android Studio, exporting any file as HTML, and setting Line Separators for the corresponding operating system to make a file readable by other operating systems.

Figure 4.3 File operations menu
In addition to the File menu giving access to file settings, it also has a New submenu (see Figure 4.4) with actions to create a new project and to import a project from local sources or from a version control system. Adding and importing a new module is also done from the New menu. Finally, can add a new file, directory, C++ Class, C/C++ Source or Header file with the actions defined in the New menu.

Figure 4.4 New menu action items
In addition to file operations, you can access the Project Structure window shown in Figure 4.5 from the File menu. The Project Structure window includes options for configuring the project, such as the Android SDK, NDK, and Java path, and developer services provided by Google, such as Google Sign-In authentication service configurations.

Figure 4.5 Project Structure window
Edit
The Edit menu includes text operations such as copy, paste, and cut functionality, and so on, as shown in Figure 4.6. The following list provides a quick reference to the operations for copying and pasting during coding.
- Copy Path—Copies the full path of a recently opened file
- Copy as Plain Text—Copies any text without formatting.
- Copy Reference—Copies the reference to the file in the system. For example, if you select Copy Reference for a Java file, it will copy only the name of the Java class.
- Paste from History—Lists previously copied texts and so you can select from the history to paste them.
- Paste Simple—Pastes the last copied text without formatting.

Figure 4.6 Edit menu items
The Edit menu options are not limited to basic copy and paste; there are more complex functions for searching and selecting under the Find submenu such as Find in Path and Replace in Path, Find, Duplicate Line, and Join Lines (see Figure 4.7).

Figure 4.7 Find menu items
There is also a Macros submenu that is used to save keystrokes to a macro for reuse.
In summary, this menu provides access to text editor functions available in most text editors. These items simplify the process of writing code and editing files. We recommend that you become familiar with shortcuts listed in the menu to make these functions easier to use.
View
The View menu, shown in Figure 4.8, provides easy access to functions for working with windows, configuring the editor spacing, adding line numbers, accessing the compare tool, and other similar functionalities of Android Studio.

Figure 4.8 View menu items
Through the View menu, you can change the current view of Android Studio as well as enable or disable the Tool buttons, Toolbar, Status Bar, and Navigation Bar. In summary, this menu will help you change or customize the view of Android Studio's windows.
Navigate
The Navigate menu, shown in Figure 4.9, lists the actions you can take to navigate between files in the current open project. Practice with the navigation functions will make it easy to handle large projects with many files, classes, and long files.

Figure 4.9 Navigate menu items
You can add bookmarks to file lines so you can directly jump there during development, or navigate to a superclass by pressing Command+U on Mac or Ctrl+U in Windows. As shown in Figure 4.10, you can also see all the implementations of a superclass to enable you to navigate to a subclass.

Figure 4.10 Implementation of the superclass BroadcastReceiver
All functionality provided in the Navigation menu will help you manage and find related files, folders, classes, declarations, and inherited classes easily and to understand the architecture of the software and avoid wasting time looking for a superclass's definition. Developing familiarity with these functions will definitely increase how much you like the IDE.
Code
The Code menu, shown in Figure 4.11, provides access to functions to easily generate code snippets, arrange code lines, add block comments, access Live Templates, add getters and setters, and similar activities.

Figure 4.11 Code menu items
Most of the functions are usable if you are in a Java file, but not if you are not in a Java file.
Let's look at two of this menu's options. Click Override Methods (Control+O on Mac or Ctrl+O in Windows) while in a Java class to open a new window that shows the methods you can override from inherited classes. If you want to re-indent your code, click the Auto-Indent Lines option (Control+Option+I on Mac or Ctrl+Alt+I in Windows).
Familiarizing yourself with the shortcuts on this menu will enable you to efficiently develop your code. For example, if you just inherited an interface, navigate to the Code menu and press the indicated shortcut for the Implement Methods option to see the list of methods you should implement for the current class. This saves the time that would otherwise be spent on documentation or navigating between superclasses.
Analyze
Analyzing your code with Android Studio is fun. Analysis gives you many insights into what to do next to improve the quality and stability of your code. Figure 4.12 shows the Analyze menu.

Figure 4.12 Analyze menu items
From the Analyze menu, let's inspect the UniversalMusicPlayer's MediaNotificationManager.java file. With the file open, select Inspect Code. This will open a new window at the bottom of the main editor and project pane to show the code maturity, possible bugs, and spelling and declaration suggestions, as you can see in Figure 4.13.

Figure 4.13 Inspection window
Refactor
Refactor menu tools provide developers easy access to certain refactoring operations, as shown in Figure 4.14.

Figure 4.14 Refactor menu items
To start refactoring, select a piece of the code in the file and then press Control+T on Mac or Ctrl+Alt+Shift+T in Windows to display the refactoring options, as shown in Figure 4.15.

Figure 4.15 Refactor options
Refactoring a large project might be difficult, but Android Studio's refactoring tools, when appropriate for your purpose, leads you to the right standards-compliant approach. The section “Code Refactoring with Android Studio” later in this chapter provides additional information on refactoring.
Build
The Build menu lists the commands to build the application and related configuration functions. These commands include APK generation of Android applications, signing APK files, editing dependencies, configuring build types, and selecting SDK versions, as you can see in Figure 4.16.

Figure 4.16 Build menu items
The Clean Project and Rebuild Project options are straightforward. They start clean and build functions as in other IDEs. Other options in this menu are mostly related to the output APK file configuration. We will cover these in greater detail in the APK generation and signing APK sections, later in the chapter.
Run
The Run menu provides options for managing application processing such as running in debug mode or not, or accessing APK release configuration while running/debugging the application.
You can see all the shortcuts related to running and debugging your application from the menu. It will give you fast access during debugging. If your application is not in debugging mode, most of the menu items are disabled.
Tools
The Tools menu provides some tools not directly related to Android application development. You can create tasks to follow up with your development, generate JavaDoc, and create new scratch files to test some code snippets directly inside the project instead of creating a new Java or Android project, This menu is shown in Figure 4.17.
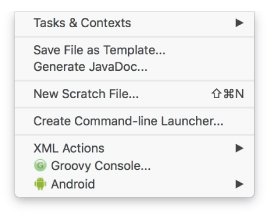
Figure 4.17 Android Studio Tools menu
Finally, from the Tools menu you can launch the Android SDK Manager, AVD Manager, and Android Device Monitor.
Version Control System
The VCS (Version Control System) menu, shown in Figure 4.18, gives access to tools related to source control management. Android Studio helps developers to locally control the source code history, integrate with a selected version control system, and check out the source code from the remote repository.

Figure 4.18 VCS menu items
Chapter 9 explores the use of Android Studio's version control system in greater detail.
Window and Help Menu
The Window menu helps you manage tabs and windows, including the management of each tool window's visibility type, such as docked, floating, and so on. You can also navigate between Android Studio windows if multiple Android Studio windows are open.
The Help menu gives you access to the Android Studio documentation, where you can easily search for an action. If you want to look for the refactor or block comment shortcut, go to the Help menu and click Find Action (Shift+Command+A on Mac or Ctrl+Shift+A in Windows) to search for a specific action in Android Studio.
ANDROID STUDIO SHORTCUTS
IDE shortcuts are important for any developer because an efficient use of an IDE starts with knowing how to easily refactor code, find any file or text in the project, or navigate to a required file by pressing a combination of keys on the keyboard. It is like living in a country and knowing all the public transportation alternatives or driving routes without spending any time searching the web. It can save you a lot of time.
Actually, you have seen many shortcuts for some operations in the figures in the previous sections. However, the menu items do not provide a comprehensive list of shortcuts—there are more than a hundred shortcut key mappings in Android Studio. You can see them all in the Keymap page of the Preferences window, as shown in Figure 4.19.

Figure 4.19 Keymap window
The Keymap window is useful not only for viewing the list of shortcuts, but also for editing, deleting, or adding shortcuts. It is always possible that existing mappings are not sufficient or not useful for you, so you can just edit them how you feel comfortable.
The following actions are available in Keymap:
-
Adding Shortcut—Go to an empty action and right-click on it or click the pencil button above the list of Editor Actions in the Preferences window; then select between Add Keyboard Shortcut, Add Mouse Shortcut, or Add Abbreviation for the action.
To try this, select an action, and either from the right-click menu or after clicking the pencil button, select Add Keyboard Shortcut to open the window shown in Figure 4.20. With the cursor in the First Stroke area, press the key combination you want to assign to the action you selected. If the key combination is already assigned, you will see the conflict in the Conflicts area.

Figure 4.20 Enter Keyboard Shortcut window
- Deleting a shortcut—When you want to delete the shortcut for an action, find the action in the Keymap list, right-click on the item and select Remove. Alternatively, you can click the pencil button again to see the options.
- Editing shortcut—In order to edit a shortcut, you should click on the Add Keyboard Shortcut option as discussed earlier in this list and edit the stroke, as shown in Figure 4.17.
ANDROID STUDIO TOOL VIEWS
Android Studio provides a number of useful tools that help you take control and monitor the application development process efficiently. These tools are available from the Tool Windows option on the View menu. Figure 4.21 shows the list of tools: Messages, Project, Favorites, Run, Debug, Android Monitor, Structure, Version Control, Android Model, Build Variants, Capture Analysis, Capture Tool, Captures, Designer, Event Log, Gradle, Gradle Console, Maven Projects, Palette, Terminal, and TODO.

Figure 4.21 Tools Window items
Notice that in Figure 4.21 some of the tools are disabled. These tools will be available when the development context is available for the use of the tool. For example, Designer and Palette get active when you start designing user interfaces. When you start debugging your application, the Debug option will be available to open the Debug window.
A quick way to see all active views is to move the mouse pointer to the bottom-left corner of the main Android Studio window and hover over the square icon. That opens the Tools list shown in Figure 4.22 so you can select and open the tool you need.

Figure 4.22 Accessing the tools shortcuts
Available tools are displayed at the edges of the Android Studio window. You can activate them either from the list or by clicking on the buttons on the window's edges. Figure 4.23 shows that the Project and Terminal tools are activated. When active, their background color is darker.

Figure 4.23 Activated tools
It is essential for a developer to know both programming and the IDE—in detail—to solve development issues immediately and create a stable application. We see these tools as an essential part of the Android development process.
The following subsections cover the details of the tools mentioned to this point. To help clarify the discussions of the tools that follow, let's open the UniversalMusicPlayer sample project to better show the options. (Opening a sample application was covered in Chapter 2.)
Messages
The Messages tool, shown in Figure 4.24, is available by default; it will get active when there is a need to show messages to the developer such as errors, warnings, information, notes, and generic information about the build process, as shown in Figure 4.24.

Figure 4.24 Messages tool window
In Figure 4.24, the Messages window shows the output messages from a Gradle build. If you opened the sample application as suggested in the previous section, it may automatically start the build process and show the output from the Messages window.
The Messages tool helps you follow what other tools are doing. In showing the errors, information, and warnings for the process in the window, the tool reveals what is going on in the background. Otherwise, it would be hard to follow up with ongoing processes.
The Messages tool has additional features to export messages in a text file to share with your team, get help, and resolve issues quickly.
The buttons on the left-hand side of the window let you easily navigate between messages. That can be difficult because there will often be more than the ten lines of messages shown in Figure 4.24; you may encounter thousands of lines. The buttons help you to expand or filter the list, and even go to the source of the error when necessary.
Android Studio Project Structure
Android Studio's Project tool is responsible for listing your project's files. It helps you directly browse the files and folders of your project in a tree structure from within Android Studio.
Android view shows files and folders grouped under Android modules and scripts. Each Android Module's Java source, test, manifest, and resource files will be grouped under the module name. Scripts will be under a different group named Gradle Scripts as shown in Figure 4.25.

Figure 4.25 Project view options
The file and folder view options shown in Figure 4.25 are useful for creating a custom view for developers working on separate parts of the project because they enable the developer to focus on the context of his or her area of development. Compared to Eclipse IDE, this feature helps you filter to a simplified view of the project instead of forcing you to see all the files; it eliminates most auto-generated files, which you generally don't need to view. You can interpret this as a simple separation of concerns by Android Studio.
The view options change the file and folder listings as follows:
- Project—Lists all files and folders located in the Android application's project folder, which select while you are populating the project. This view option also lists the external libraries used in the project.
- Packages—Lists the files with package classification. XML files, menu files, layout files, drawable files, and Java source files are classified under a list of folders to ease direct access to the package you are working on.
- Scratches—Shows the list of scratch files created and used.
- Android —Shows only an application's related files. Applications are shown as modules—mobile, wear, library, and so on. This view enables fast access to your application.
- Project Files—Presents the build, license, and source control management–related project files. These include the
.gitignoreandlocal.propertiesfiles, and the.googleand.idefolders. - Problems—Shows only files with problems. To test this feature, delete a semicolon from a line in a Java file. The file will then be shown in this view to direct you to the problem.
- Production—Shows the folders related to the production of the application, such as the build output folder and the configuration folder, as well as the final source files which affect the production version of the application.
- Tests—Shows test-related results.
- Android Instrumentation Tests—Presents the Android Instrumentation test files.
Favorites
The Favorites tool, shown in Figure 4.26, provides fast access to your favorite folders and files, to bookmarked locations in files, and to toggled break points in the project.

Figure 4.26 Favorites window
Adding a favorite is easy, just right-click a file in Project view or right-click an opened file's tab in the editor; then click Add to Favorites. The first time you do this, you will see only one group to add your file to in the favorites list. If you are following our example, it is UniversalMusicPlayer. You can also generate your own favorite group to classify your favorites under different lists.
Adding a new bookmark is also easy: Press F3 or F11 in Windows or use the Navigate menu's Bookmark option. A bookmark will be added to a line you select and the bookmark will be listed in the Bookmarks list in the Favorites window.
You can navigate between bookmarks by selecting the Show Bookmarks option from the Navigate ⇨ Bookmarks menu, or just press Command+F3 on Mac or Shift+F11 in Windows.
Breakpoints are added as favorites in the same way as Bookmarks. After you add a breakpoint in a file, it is listed in the Favorites window. In Figure 4.26, you can see that we added two bookmarks and one breakpoint to the sample project randomly.
Android Monitor
While developing your application, you will use the Android Monitor extensively (see Figure 4.27). With this tool, you can start and stop tools that monitor the use of resources on the Android device. The Android Monitor monitors the application during debugging or when it's running on the device. Processes monitored include GPU, memory, CPU, and network utilization.

Figure 4.27 Android Monitor window
The Android Monitor includes Android's logger tool, the Logcat utility. Figure 4.27 shows a typical log output.
Chapter 8 covers Android Monitor tools in detail.
Structure
The Structure window lists the components of structured files such as Java, XML, and Gradle. Using this view, you can see all the methods, fields, and tags of XML files, and inherited members of a Java class. Instead of scrolling up and down, you can directly access a member of the file and work on it.
In our sample application, let's open a more complex class named MediaNotificationManager, placed under java sources, inside the com.example.android.uamp package. MediaNotificationManager inherits members from BroadcastReceiver to be able to list the details of the Java class, as shown in Figure 4.28.

Figure 4.28 Structure view of a Java class
In this window you can see the members that are inherited from BroadcastReceiver or Java's object class itself. Constant (final) or static members are identified by a lock symbol. In addition, (m) indicates the methods, (f) indicates the fields of the class, (C) shows the classes, (I) shows the interfaces, (p) indicates properties of class. This helps you understand any Java classes' design and architecture and assists with analyzing existing code. For example if you are navigating in a large project to understand the design of the classes, you can see the structures easily to understand how they were created.
You can also open XML files to see the details and relationship of the tags to each other.
Android Model
The Android Model view provides an easy access to an Android application member's initial values. These values do not contain the Java class members; the model includes the project build members, folder locations, compilation configurations, build type initializations, APK signing options, and so on.
The list is very long so it is hard to remember all the required fields to configure. Having this tool, which lets you see and review all the configuration's constant values, is very valuable. As shown in Figure 4.29, you can see all initializations.

Figure 4.29 Android Model view for mobile applications
This example shows only a single mobile application; if you have multiple modules in your project, the tool will show related configuration parameter values.
Gradle and Gradle Console
The Gradle and Gradle Console window tools show Gradle tasks in your project. When you open the Gradle window, you can execute any task independently and remove or add a new Gradle task to your project.
Gradle Console connects to Gradle builds, and this window shows whether the Gradle build tasks are successful or not. It is a simple console that shows only the output text.
We don't do any more changes to the default Gradle configuration and tasks in this chapter, because we will cover Gradle and Gradle Console in more detail in Chapter 6, which discusses the Gradle build system.
Run
The Run window is enabled when you run the application (as shown in Chapter 3) on a remote Android device or emulator. It lists the process and commands launched during the run phase such as APK installation on the device and the process ID of the application.
As shown in Figure 4.30, we launched the UniversalMusicPlayer application from our development machine to a remote Android phone.

Figure 4.30 Run window
This tool also gives you the ability to stop, run, or re-run the application with the buttons shown at the left.
Debug
The Debug window is inactive by default and activated when you start debugging your application. After you click the debug button at the top of the Android Studio window or press Control+D on Mac or Shift+F9 in Windows to launch the application in debug mode, the Debug window appears at the bottom, as shown in Figure 4.31.

Figure 4.31 Debug window
In short, this window enables you to run an application step by step and see the variables. It also provides all required debugging ability to analyze and find the vulnerabilities of the application. (Detailed debugging properties are investigated in Chapter 8.)
Event Logs
The Event Logs tool prints events such as the Gradle build's start date and when you started an application's run session. It also prints errors or warnings that have occurred. The best feature of the Event Log tool is that it notifies users about these events and their start and finish times. Event logs help you understand the history of your development.
Terminal
The Terminal allows you to interact with the operating system's shell. It helps you do the required configuration and file manipulation, such as deleting, moving, and renaming files and folders in the current project directory without changing your context.
There are tools provided with Android SDK that do not have GUI support, so they are accessed via the command line.
As shown in Figure 4.32, when you open the Terminal window, you enter the current user's project's root folder.

Figure 4.32 Android Studio Terminal
ANDROID STUDIO EDITOR
Android Studio comes with powerful and context-aware editors. Depending on what file format you are working with, Android Studio highlights, formats, indents, offers auto completion, uses color and text formatting, provides smart navigation, and, of course, includes all mandatory editing tools.
Code Assist
The killer feature of Android Studio editors is code completion assist. This feature has been a standard in similar IDEs such as Eclipse, Visual Studio, and NetBeans; however, Android Studio brings the assist to a completely new level.
For basic code completion, you can use Control+space on Mac or Ctrl+space in Windows. Although this works pretty much like the code completion offered by other IDEs, it is case-sensitive. For example, typing Na after hitting Control+space will list all methods that have that substring, such as getName and setName; typing get will list each method that starts with the string get and methods where the string get occurs somewhere in the method name.
Another great feature offered by Android Studio is Smart Type Completion. If you press Control+Shift+space on Mac or Ctrl+Shift+space in Windows for completion assist, Android Studio will filter the suggested item list with compatible return types. This offers smart and context aware code completion. If you hit Control+Shift+space after typing Na, which would be assigned to a String variable, you get only getName but not setName.
Commenting Out Code Blocks
Commenting out a piece of code might be the most used feature of an IDE. The key combinations Control+Shift+/ on Mac or Ctrl+Shift+/ in Windows will comment out the selected portion of the code with the proper syntax.
Moving Code Blocks
Moving code blocks without cut and paste can be very effective and helpful. Android Studio supports the following commands to help you to move the code around in the editor without cut and paste:
- Move line up: Command+Shift+ up arrow on Mac (Ctrl+Shift+up arrow in Windows)—Because the editor is context aware, if the line is broken into several lines, all related lines are moved.
- Move line down: Command+Shift+ down arrow on Mac (Ctrl+Shift+ down arrow in Windows)—Because the editor is context aware, if the line is broken into several lines, all related lines will be replaced.
- Move line to the top: Command+Shift+ up arrow on Mac (Ctrl+Shift+ up arrow in Windows)—Because the editor is context aware, it will not move a variable or method above the class declaration.
- Move line to the bottom: Command+Shift+ down arrow on Mac (Ctrl+Shift+ down arrow in Windows)—Because the editor is context aware, it will not move a variable or method outside the class parenthesis.
All options also work with selected blocks of code, enabling you to move large pieces of code blocks.
Navigating Inside the Editor
The capability to jump to the right place in the file you are editing can greatly reduce the time you spend navigating. Android Studio is very helpful and offers the following flexible options:
- Move cursor to the last editing position: Command+Shift+Delete on Mac (Ctrl+Shift+Backspace in Windows)
- Move cursor to the start of the current code block: Command+Option+[ on Mac (Ctrl+Shift+[ in Windows)
- Move cursor to the end of the current code block: Command+Option+] on Mac (Ctrl+Shift+] in Windows)
- Move cursor to the previous word: Option+left arrow on Mac (Ctrl+left arrow in Windows)
- Move cursor to the next word: Option+right arrow on Mac (Ctrl+right arrow in Windows)
- Select and move cursor to the previous word: Option+Shift+left arrow on Mac (Ctrl+Shift+left arrow in Windows)
- Select and move cursor to the next word: Option+Shift+right arrow on Mac (Ctrl+Shift+right arrow in Windows)
Refactoring
Refactoring is another area where Android Studio shines. From changing a variable or method name to extracting a block of code to a method, Android Studio offers many powerful refactoring options; they are covered later in this chapter, in the section “Code Refactoring in Android Studio.”
Refactoring in Android Studio also checks other types of resources and performs string name checking to make sure the refactoring does not cause any compilations or runtime problems.
ANDROID STUDIO LIVE TEMPLATES
Live Templates are predefined code snippets that you can easily add to your code so you don't have to write the same code over and over. Live Templates are very useful when it comes to repeating a specific type of code block such as loops. For example, you may need to use a simple for loop many times in your code so adding a template would ease that process.
Live Templates may also be very useful if you want to create coding standards for your company. When you have a new developer in your company or team, you can just encourage him or her to use the predefined templates you already created while they work on new projects.
There are many predefined Live Templates already in Android Studio. In order to see, add, or remove Live Templates, navigate to Preferences, expand to Editor, and then click Live Template.
You will see an expandable list of names for the Live Template group, which includes the Live Templates shown in Figure 4.33.

Figure 4.33 Live Template window
Live Templates are available for a wide variety of uses, such as comments for code, generic tags for Android XML, and so on. You can also customize them as needed during development.
Lists of Live Templates are available by expanding all the groups. As you may notice, Live Templates are very common code snippets with a high number of reuses at any point of your Java code. For example, fori is a predefined Live Template that creates a code snippet to create a basic for loop.
Inserting a Live Template
When you want to add any of the templates to your code, just type the name of the Live Template in the editor. It will auto-complete to easily add it to your code. Figure 4.34 shows the auto-complete drop-down for the fori Live Template.

Figure 4.34 Auto complete for a Live Template
After you add the fori Live Template to your Java code, it will highlight the variables you need to edit to implement your own custom for loop, as shown in Figure 4.35. When you type your own variable name and press Enter or Tab, the cursor will automatically move to the next variable to edit and so on. This action makes it very easy to customize a Live Template.

Figure 4.35 Cursor highlight in a Live Template
This is not the only way to add Live Templates to your code. You can also navigate to code from the Android Studio menu and click Insert Live Template or just use the shortcut (Command+J in Mac or Ctrl+J in Windows) to list all available Live Templates for the current context, as shown in Figure 4.36.

Figure 4.36 Insert Live Template
Another way to add a Live Template is to surround your code selection with the Live Template. After you select the code, navigate to the Code menu and then select Surround with Live Template or just press Option+Command+J on Mac Alt+Ctrl+J on other OSes to surround the selected code block with the code snippet, as shown in Figure 4.37.

Figure 4.37 Surrounding Live Templates
We discussed Live Templates Java code in this section but they are available for all the structured files editable on Android Studio. If you navigate to HTML/XML, you can see the templates for HTML and XML files. If you expand the Android group, you will see around 18 (this number can change for the new versions of Android Studio) preconfigured live templates on the list. Toast Live Template is a good example for that. You can type Toast into your activity class and create a Toast object easily with Live Template.
We suggested expanding all the groups and exploring all the predefined templates. Try to use them in your application to get in the habit of using the templates. Keep in mind that there are pre-implemented code templates to launch activities, such as the starter template. If you need to define a constant (final) Java variable, just typing const, it will get the const Live Template and write a final variable for you.
Creating Live Templates
According to your applications, habits, or code practices you may need additional templates to speed your application development. In that case, you need to create your own template to share with your team to increase code reusability.
Creating a Live Template
In this section you create basic Live Template. In the first example, you create a function template to get the absolute value of a given variable.
Before starting to create a new template, we should navigate back to the Editor tab of Live Templates section of Preferences window (refer to Figure 4.33).
- Select a group from the Live Template group list, click the + button and click Live Template as shown in Figure 4.38 to start adding a live template.

Figure 4.38 Add template button
- Select other to add our absolute value template.
When you select a Live Template, you will see the window shown in Figure 4.39, where you customize the Live Template.
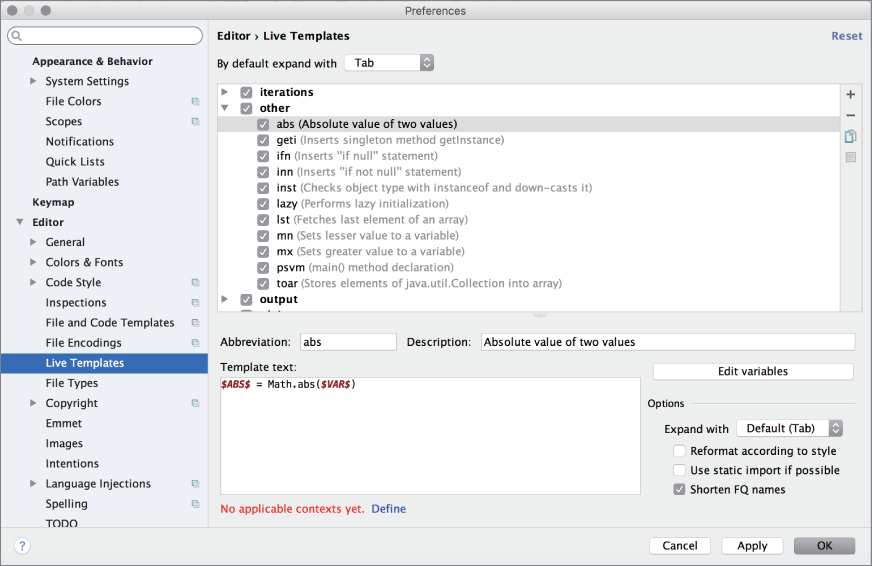
Figure 4.39 Adding a Live Template
- Type an abbreviation, and make it short and easy to remember. We named our Live Template
abs. Write the description.Listing 4.1 shows the necessary code to create the template. Type this code in the Template text area shown in Figure 4.39.
Variables are defined as shown in Listing 4.1, starting and ending with the
$sign. You can also configure variables by clicking the Edit variables button, which opens the window shown in Figure 4.40.
Figure 4.40 Edit Template Variables window
- Select the context you would like to apply this template. You will see a blue text link named Define, as shown in Figure 4.39. After you click it, it will prompt the possible contexts to select from, as shown in Figure 4.41.
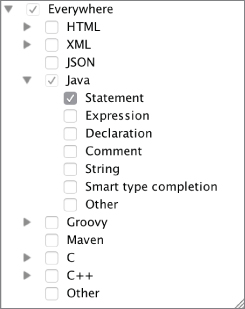
Figure 4.41 Live Template context list
In this example, we selected Java because it uses Java's Math library. As you can see in Figure 4.41, you are able to select the type of text: Comment, String, Expression. and so on.
Create a Surrounding Template
The Live Templates that are able to surround selected text appear under the surround group, as shown in Figure 4.42.

Figure 4.42 Surrounding Live Template
Let's create a template to surround selected code text with an if statement that checks whether a variable is null.
The process is the same as adding a template but you also need to define where in the template the selected text will be placed. You do that by defining the $SELECTION$ variable. You can see the sample template IFS, shown in Figure 4.42.
You can also add live templates to surround selected code with block comments. If it is easier for you to remember Live Template shortcuts than the Android Studio block comment key combination (Option + Command + /), it might be easier for you to create a live template with a synonym to add a block comment.
CODE REFACTORING IN ANDROID STUDIO
We visited the refactoring tools briefly in the “Android Studio Menu Items” section. This section dives into the details of what you can do with the code refactoring tools.
Having efficient refactoring tools can be a lifesaver in many situations. For example, you may change your mind a lot during development, or there may be a change in the software design, or you may want to change your naming conventions or function signatures or variable naming, and you want to change everything all at once. For these situations, Android Studio provides tools and GUI helpers to identify what you are doing.
You can see refactoring options in Figures 4.14 and 4.15, which appeared earlier in this chapter, after pressing Control+T on Mac or Ctrl+Alt+Shift+T in Windows, or you can also access refactoring options when you right-click on a Java file, as shown in Figure 4.43. The easiest method is to use the shortcut Control+T to see all the refactoring options.

Figure 4.43 Refactoring options right-click menu
Some popular refactoring options are discussed in the following list:
-
Rename—You may need to rename a file, class name, or variable name. If you're changing a file or class name, you will need to look for all references to it and rename them as well. This is a mainstream tool almost all IDEs provide.
To do this, go to your code file and select a variable or any method, field, or even class name; right-click it or press Shift+F6 or Control+T (Ctrl + Alt + Shift + T for Windows/Linux) to select the rename option. This will highlight the selection and when you finish renaming, all related references will be updated.
-
Pull/Push Members Up/Down—This option helps you manage inheritance of recently developed methods in your current class. Pull Members Up will send the selected methods up to the super class or interface. Push Members Down will take the selected members of the superclass or interface to the current child class.
To use the Push Members Down or Pull Members Up option, your current class should have a base class or implement an interface. To access these methods easily, use Control+T (Ctrl + Alt + Shift + T for Windows/Linux) again to get the refactor options, and select Push Members Down or Pull Members Up to implement the interfaces.
When you select the Push Members Down option, the window shown in Figure 4.44 opens so you can select the members to push. After you've made the selection, refactor your code by pressing the Refactor button.

Figure 4.44 Push Members Down window
The Pull Members Up option works like the Pull Members Up operation, as shown in Figure 4.45.

Figure 4.45 Pull Members Up window
- Encapsulation—This option opens a window that allows you to see and select from all the fields. Selected fields are encapsulated with getter and setter methods, as shown in Figure 4.46.
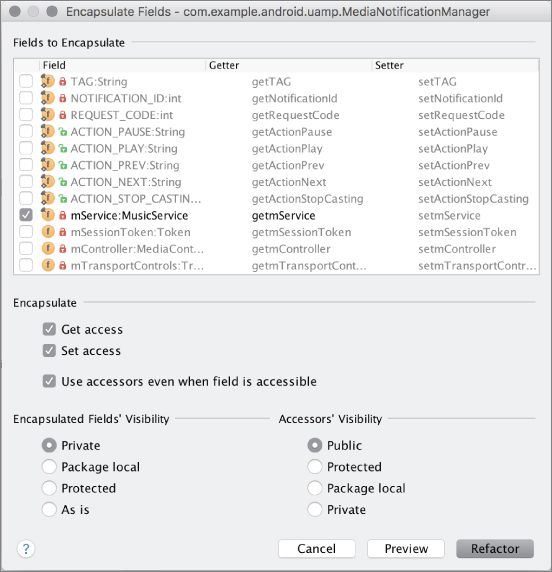
Figure 4.46 Encapsulation
- Change Signature—This refactoring option allows you to refactor a signature name. Press Control+T and select Change Signature to see the Change Signature window shown in Figure 4.47. This window presents the visibility, return type, and name of the function. It also allows you to add and remove parameters for the existing function. It is a practical way to edit the function and complete the refactoring.

Figure 4.47 Change Signature window
Refactoring is a very useful technique to clean up the code you have written in a rush or while just trying out code snippets.
Another very useful concept is extraction of resources. The following list discusses the options:
- Extract Variable—Extracting an expression into a variable instead of recursive method calls is widely used to write clean, easy-to-understand code. To extract an expression into a variable, first select the expression and select Variable under Extract. The selection will be assigned into a new variable.
-
Extract Constant—You may end up using the same type of
stringorintvalues over and over in your code. Extracting repeated constant values into Constants saves memory and offers better maintainability.To extract into a constant, select the value or expression and select Constant under Extract. The selection will be turned into a
public static finalconstant in class scope. You will also be asked if you want to Replace all occurrences and Move to another class. -
Extract Method—As you progress in a project, sooner or later you will notice repeating code blocks. This repetition causes the same bugs to appear in many places in a project and creates hard-to-maintain code. Extracting a code block into a method is a powerful technique to organize your code.
To do this, select the code block you want to extract and then select Method from Extract.
Next, you are asked for the visibility, method name, and parameters, followed by a preview to show your proposed method signature.
-
Extract Interface—Although the extraction options covered so far are quite powerful and simple, you may need more structural changes in your class hierarchy in your development lifecycle. To extract an Interface from your class, navigate to the class in the target and select Interface from Extract.
The Extract Interface dialog box opens to let you choose an interface name, package, and methods to be added to the interface as a member.
Plus, Android Studio offers the option to rename the original class and create a copy of the original interface with selected definitions from the original interface. When you click the Refactor button, Android Studio automatically adds references and creates the new interface, and adds references where the new interface has been implemented.
-
Extract Superclass—Another powerful tool to manipulate your class hierarchy is to extract a superclass from your target class. Extracting a superclass works pretty much the same as Extracting an Interface.
Navigate to the class in the target and select Superclass from Extract. A dialog box will open to let you choose a class name, package, and methods to be added to the superclass. Next to each method is a checkbox to declare the extracted method as abstract.
Android Studio offers the option Rename original class and use superclass where possible to change references for the given class to the newly created parent class. Clicking the Refactor button will extract the superclass.
CREATING A SIGNING KEY FOR ANDROID APPLICATIONS IN ANDROID STUDIO
Creating a signing key is an essential part of the release process. Apps built with Android Studio need to be signed to run on a device. During the development process, Android Studio uses a debug certificate, which makes the signing process almost seamless. However, signing becomes more important when it is time to release your APK to the Google Play Store. You already know that the application ID is the unique identifier. However, you need a proper way to keep the application ID safe.
An Android signing certificate is a standard key store certificate. Each key store can have more than one key and certificate.
To create a new signing certificate, select Create signed APK from the Build menu. Android Studio will ask you to select the module to sign, as shown in Figure 4.48.

Figure 4.48 Select the module to create a signed APK
Click the Next button to open the Generate Signed APK window shown in Figure 4.49. Enter the path to save your key store somewhere safe, and provide a password for the key store.

Figure 4.49 Create new key for the signing certificate
Next, you need to provide an alias and a password for your key and complete the rest of the fields shown in Figure 4.50. Click OK and you're done.

Figure 4.50 Certificate form
BUILDING APKS IN ANDROID STUDIO
Building APKs in Android Studio is very straightforward. Each time you select Make project from the Build menu, a debuggable APK is packaged with the latest compiled code. The newly built APK can be found under your module's build/outputs/apk folder.
The previous section covered how to create a signing certificate. Click the Create signed APK option from the Build menu and select your certificate. Android Studio will package a signed APK.
Android Studio lets you change build variants for the default APK. Click Select built variant from the Build menu. On the bottom right of the IDE, the built variants window will be displayed. You can choose between the debug and release build for each module. Chapter 6 covers how to create custom build variants, which can be configured from this window.
SUMMARY
This chapter touched on almost all the visible parts of Android Studio so that you are familiar with them when you need any feature in the IDE.
The chapter has offered practical advice about the functions of Android Studio for file operations, debugging, text, and code to refactor, edit, get help and access any part of the IDE for further configuration.
Our intention is that this chapter provides a useful guide to all important features: editing texts, creating templates, editing shortcuts, accessing required extra features of Android Studio to be a good Android Studio user and become an efficient Android developer.