
Chapter 7
Sending and Receiving E-Mail

macOS includes Mail, a powerful e-mail app. After setting up your e-mail accounts, you can send and receive e-mail messages and files.
Send an E-Mail Message Using Stationery
Receive and Read Your Messages
Set Up Your E-Mail Accounts
The Mail app enables you to send and receive e-mail messages easily using your existing e-mail accounts. If you add an iCloud account to your user account during initial setup or in System Preferences, macOS can automatically set up e-mail in Mail. After setup, you can add other e-mail accounts manually. For some accounts, you need only your e-mail address and your password. For other accounts, you also need to enter the addresses and types of your provider’s mail servers.
Set Up Your E-Mail Accounts

![]() Click Mail (
Click Mail (![]() ) on the Dock.
) on the Dock.
Mail opens.
![]() Click Mail.
Click Mail.
The Mail menu opens.
![]() Click Add Account.
Click Add Account.
The Choose a Mail Account Provider dialog opens.
![]() Click the account type (
Click the account type (![]() changes to
changes to ![]() ). Your choices are iCloud, Exchange, Google, Yahoo!, AOL, or Other Mail Account.
). Your choices are iCloud, Exchange, Google, Yahoo!, AOL, or Other Mail Account.
Note: For an Office 365 account, click Exchange (![]() changes to
changes to ![]() ) and use the server name outlook.office365.com.
) and use the server name outlook.office365.com.
![]() Click Continue.
Click Continue.
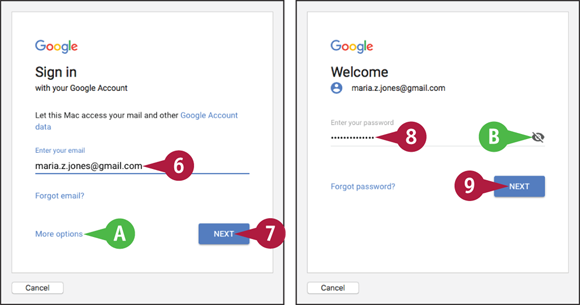
A dialog opens that allows you to sign in to the account. This example shows the Sign In dialog that appears for a Google account.
![]() In some dialogs, you can click More Options to display other options, such as setting up a new e-mail account on the service.
In some dialogs, you can click More Options to display other options, such as setting up a new e-mail account on the service.
![]() Type your e-mail address.
Type your e-mail address.
![]() Click Next.
Click Next.
The service prompts you for your password.
![]() Type your password.
Type your password.
![]() For some services, you can click Show Password (
For some services, you can click Show Password (![]() ) to reveal the characters you typed.
) to reveal the characters you typed.
![]() Click Next.
Click Next.

If you use two-factor authentication for the account, a dialog opens prompting you to provide the second form of authentication.
![]() Enter the code.
Enter the code.
![]() Click Next.
Click Next.
The Select the Apps You Want to Use with This Account dialog opens.
![]() Click the check box (
Click the check box (![]() changes to
changes to ![]() ) for each app you want to use with this account.
) for each app you want to use with this account.
![]() Click Done.
Click Done.

Mail displays your inbox, and you can begin reading and sending e-mail.
![]() You can click a message in the message list to display its contents.
You can click a message in the message list to display its contents.
![]() Mail automatically identifies possible events and contacts in e-mail messages you receive. The Event readout shows any events. You can click add to review the information and add the event to your calendar, or click Close (
Mail automatically identifies possible events and contacts in e-mail messages you receive. The Event readout shows any events. You can click add to review the information and add the event to your calendar, or click Close (![]() ) to remove the prompt.
) to remove the prompt.
Note: When you receive a calendar invitation, the message includes the name of the event and the Calendar icon. You can click Accept, Maybe, or Decline to give your response.
![]() You can click Mailboxes (
You can click Mailboxes (![]() ) to toggle the display of the Mailboxes pane.
) to toggle the display of the Mailboxes pane.
Send an E-Mail Message
The Mail app enables you to send an e-mail message to anybody whose e-mail address you know. After starting a new message, you can specify the recipient’s address either by typing it directly into the To field or by selecting it from your list of contacts in the Contacts app.
You can send an e-mail message to a single person or to multiple people. You can send copies to Cc, or carbon-copy, recipients or send hidden copies to Bcc, or blind carbon-copy, recipients.
Send an E-Mail Message

![]() In Mail, click New Message (
In Mail, click New Message (![]() ).
).
Note: You can also press ![]() +
+ ![]() or click File on the menu bar, and then click New to start a new message.
or click File on the menu bar, and then click New to start a new message.

A new message window opens.
![]() Click Add Contact (
Click Add Contact (![]() ).
).
The Contacts panel opens.
![]() Click the contact.
Click the contact.
![]() Click the e-mail address.
Click the e-mail address.
Note: In the Contacts panel, a name in lighter gray has no e-mail address in the contact record.

The contact name appears as a button in the To field.
Note: You can add other addresses to the To field as needed.
![]() To add a Cc recipient, click the Cc field.
To add a Cc recipient, click the Cc field.
![]() Start typing a name or e-mail address.
Start typing a name or e-mail address.
Mail displays matches from Contacts.
![]() Click the appropriate match or finish typing.
Click the appropriate match or finish typing.

The name or address appears in the Cc box.
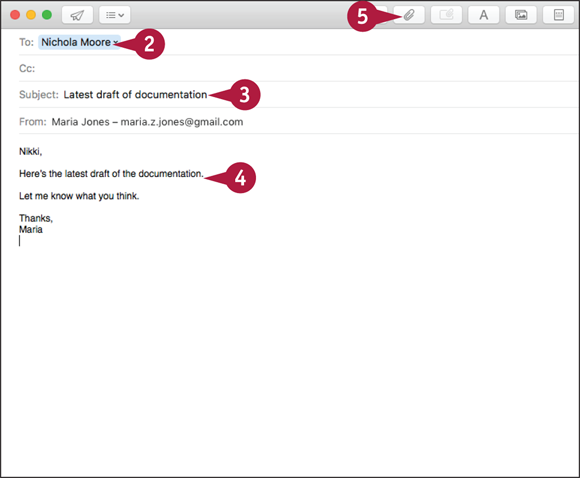
![]() Type the subject for the message.
Type the subject for the message.
![]() Type the body text of the message.
Type the body text of the message.
![]() Click Send (
Click Send (![]() ).
).
Mail sends the message and stores a copy in your Sent folder.
Send an E-Mail Message Using Stationery
Mail includes dozens of stationery templates that enable you to create messages easily that have a graphical look and consistent, attractive formatting. Mail divides the stationery templates into five categories — Birthday, Announcements, Photos, Stationery, and Sentiments — but you can use any template for any purpose.
To use stationery, you first create a new message. Next, you open the Stationery pane and apply the appropriate stationery template. You can then place your text in the template’s text placeholders and your photos in any photo placeholders.
Send an E-Mail Message Using Stationery

![]() In Mail, click New Message (
In Mail, click New Message (![]() ).
).
Note: You can also press ![]() +
+ ![]() or click File on the menu bar and then click New to start a new message.
or click File on the menu bar and then click New to start a new message.
Note: Using stationery, especially including photos, can greatly increase message size, which may cause problems for some recipients. Some e-mail apps cannot display stationery correctly.

A new message window opens.
![]() Add the recipient or recipients to the To box.
Add the recipient or recipients to the To box.
Note: You can add a recipient either by clicking Add Contact (![]() ) and then clicking the contact in the Contacts panel or by typing the recipient’s name or e-mail address.
) and then clicking the contact in the Contacts panel or by typing the recipient’s name or e-mail address.
![]() Type the subject.
Type the subject.
![]() Click Stationery (
Click Stationery (![]() ).
).

The Stationery pane opens.
![]() Click a category of stationery.
Click a category of stationery.
The stationery designs in that category appear.
![]() Click a stationery design.
Click a stationery design.
The design appears in the lower part of the message window.
![]() Click Stationery (
Click Stationery (![]() ).
).

The Stationery pane closes.
![]() Replace the sample text with your own text.
Replace the sample text with your own text.
![]() Click Photo Browser (
Click Photo Browser (![]() ) if the stationery includes photo placeholders.
) if the stationery includes photo placeholders.
The Photo Browser opens.
![]() Drag a photo from the Photo Browser to each placeholder.
Drag a photo from the Photo Browser to each placeholder.
![]() Click Photo Browser (
Click Photo Browser (![]() ) to close the Photo Browser.
) to close the Photo Browser.
![]() Click Send (
Click Send (![]() ).
).
Mail sends the message.
Receive and Read Your Messages
Mail enables you to receive your incoming messages easily and read them in whatever order you prefer. A message sent to you goes to your mail provider’s e-mail server. To receive the message, you cause Mail to connect to the e-mail server and download the message to your MacBook.
When working with e-mail, it often helps to display the mailbox list on the left side of the Mail window. You can use this list to navigate among mailboxes and to see which activities Mail is currently performing.
Receive and Read Your Messages

Display the Mailboxes List and Receive Messages
![]() In Mail, click Mailboxes (
In Mail, click Mailboxes (![]() ).
).
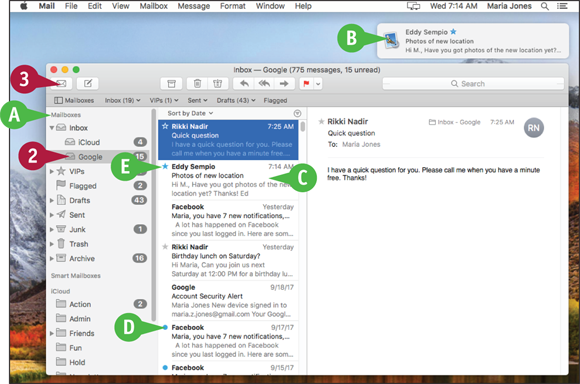
![]() The Mailboxes list appears.
The Mailboxes list appears.
![]() Click the mailbox you want to view.
Click the mailbox you want to view.
![]() Click Get Mail (
Click Get Mail (![]() ).
).
Mail connects to the e-mail server and downloads any messages.
![]() Depending on how you have configured notifications, a notification banner or alert may appear as a message arrives.
Depending on how you have configured notifications, a notification banner or alert may appear as a message arrives.
![]() The new messages appear in your inbox.
The new messages appear in your inbox.
![]() A blue dot (
A blue dot (![]() ) indicates an unread message.
) indicates an unread message.
![]() A blue star (
A blue star (![]() ) indicates an unread message from someone you have designated a VIP.
) indicates an unread message from someone you have designated a VIP.

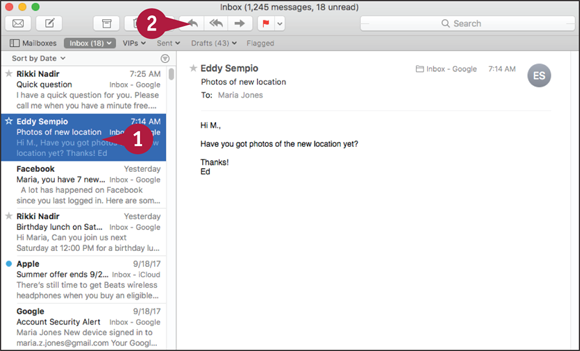
Read Your Messages
![]() Click a message in the message list.
Click a message in the message list.
![]() The message appears in the reading pane.
The message appears in the reading pane.
![]() Double-click a message in the message list.
Double-click a message in the message list.

The message’s text and contents appear in a separate window.
![]() Read the message.
Read the message.
![]() Click Close (
Click Close (![]() ).
).
The message window closes.
![]() You can click Mailboxes (
You can click Mailboxes (![]() ) when you want to hide the Mailboxes list again.
) when you want to hide the Mailboxes list again.
Reply To a Message
Mail enables you to reply to any e-mail message you receive. When you reply, you can include either the whole of the original message or just the part of it that you select.
If you are one of multiple recipients of the message, you can choose between replying only to the sender and replying to both the sender and all the other recipients other than Bcc recipients. You can also adjust the list of recipients manually if necessary, removing existing recipients and adding other recipients.
Reply To a Message
![]() In the inbox, click the message to which you want to reply.
In the inbox, click the message to which you want to reply.
Note: You can also double-click the message to open it in a message window, and then start the reply from there.
![]() Click Reply (
Click Reply (![]() ).
).
Note: If the message has multiple recipients, you can click Reply All (![]() ) to reply to the sender and to all the other recipients except Bcc recipients.
) to reply to the sender and to all the other recipients except Bcc recipients.

Mail creates the reply and opens it in a window.
![]() The recipient’s name appears as a button.
The recipient’s name appears as a button.
![]() You can position the pointer over the contact’s name, click the pop-up button (
You can position the pointer over the contact’s name, click the pop-up button (![]() ) that appears, and then click a different address if necessary.
) that appears, and then click a different address if necessary.
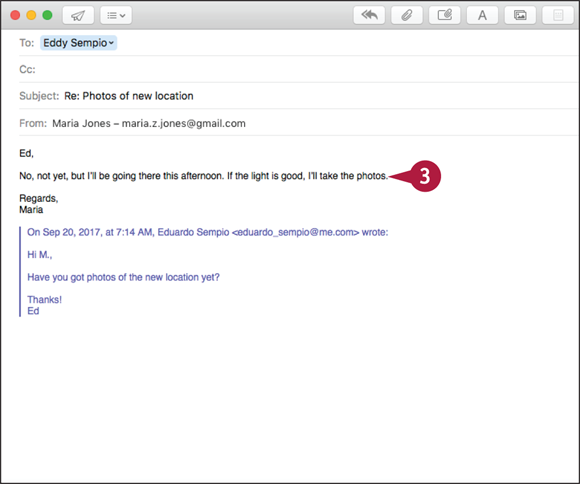
![]() Type the text of your reply.
Type the text of your reply.
It is usually best to type your text at the beginning of the reply rather than after the message you are replying to.
Note: You can also add other recipients to the message as needed. If you have chosen to reply to all recipients, you can remove any recipients as necessary.

![]() Click Send (
Click Send (![]() ).
).
Mail sends the reply and saves a copy in your Sent folder.
Note: Click Message and then click Send Again to send the same message again — for example, because the recipient has deleted it by accident. You can change recipients or the message contents as needed.
Forward a Message
Mail enables you to forward to other people a message that you receive. You can either forward the entire message or forward only a selected part of it.
When you forward a message, you can add your own comments to the message. For example, you might want to explain to the recipient which person or organization sent you the original message, why you are forwarding it, and what action — if any — you expect him to take.
Forward a Message

![]() If necessary, click Mailboxes (
If necessary, click Mailboxes (![]() ) and then click the mailbox that contains the message you want to forward.
) and then click the mailbox that contains the message you want to forward.
![]() The Replied arrow (
The Replied arrow (![]() ) indicates you have replied to a message.
) indicates you have replied to a message.
![]() The Forwarded arrow (
The Forwarded arrow (![]() ) indicates you have forwarded a message.
) indicates you have forwarded a message.
![]() Click the message.
Click the message.
The message’s content appears in the reading pane.
Note: You can also forward a message that you have opened in a message window.
![]() Click Forward (
Click Forward (![]() ).
).
Note: You can click Message and then click Redirect to redirect a message to someone else without the Fwd: indicator appearing.

A window opens showing the forwarded message.
The subject line shows Fwd: and the message’s original subject, so the recipient can see it was forwarded.
![]() Enter the recipient’s name or address. You can either type the address or click Add Contact (
Enter the recipient’s name or address. You can either type the address or click Add Contact (![]() ) and then select the address from the Contacts panel.
) and then select the address from the Contacts panel.
![]() Edit the subject line of the message if necessary.
Edit the subject line of the message if necessary.

![]() Optionally, edit the forwarded message to shorten it or make it clearer to the recipient.
Optionally, edit the forwarded message to shorten it or make it clearer to the recipient.

![]() Type any message you want to include to the recipient.
Type any message you want to include to the recipient.
![]() Click Send (
Click Send (![]() ).
).
Mail sends the forwarded message to the recipient.
Send a File via E-Mail
As well as enabling you to communicate via e-mail messages, Mail gives you an easy way to transfer files to other people. You can attach one or more files to an e-mail message so that the files travel as part of the message. The recipient can then save the file on her computer and open it.
Mail’s Send Large Attachments with Mail Drop feature enables you to transfer large files without running up against the size constraints that some mail servers impose.
Send a File via E-Mail

![]() In Mail, click Compose New Message (
In Mail, click Compose New Message (![]() ).
).
Note: If you have multiple accounts, Mail creates the new message as being sent by the account that is currently active. To use a different account, click that account in the Mailboxes pane.
A new message window opens.
![]() Add the recipient’s name or address. You can either type the address or click Add Contact (
Add the recipient’s name or address. You can either type the address or click Add Contact (![]() ) and then select the address from the Contacts panel.
) and then select the address from the Contacts panel.
![]() Type the subject for the message.
Type the subject for the message.
![]() Type any message body text that is needed.
Type any message body text that is needed.
![]() Click Attach (
Click Attach (![]() ).
).

A dialog opens.
![]() Click the file you want to attach to the message.
Click the file you want to attach to the message.
![]() Click Choose File.
Click Choose File.

The dialog closes.
![]() Mail attaches the file to the message.
Mail attaches the file to the message.
Note: Depending on the file type, the attachment may appear as an icon in the message or as a picture.
![]() The Message Size readout appears below the Subject line.
The Message Size readout appears below the Subject line.
![]() Click Send (
Click Send (![]() ).
).
Mail sends the message with the file attached.
Receive a File via E-Mail
A file you receive via e-mail appears as an attachment to a message in your inbox. You can use the Quick Look feature to examine the file and decide whether to keep it or delete it. Quick Look can display the contents of many types of files well enough for you to determine what they contain.
To keep an attached file, you can save it to your MacBook’s drive. You can then remove the attached file from the e-mail message to help keep down the size of your mail folder.
Receive a File via E-Mail
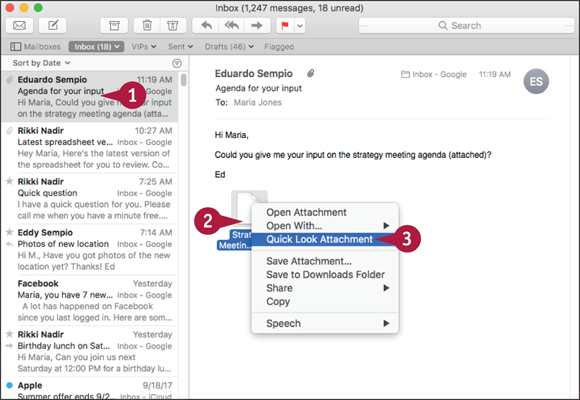
![]() In your inbox, click the message.
In your inbox, click the message.
The message appears in the reading pane.
![]() Press
Press ![]() + click the attachment.
+ click the attachment.
The contextual menu opens.
![]() Click Quick Look Attachment.
Click Quick Look Attachment.

A Quick Look window opens showing the attachment’s contents.
![]() You can click Full Screen (
You can click Full Screen (![]() ) if you want to view the document full screen.
) if you want to view the document full screen.
![]() You can click Open with to open the file in a suitable app — for example, click Open with TextEdit to open a text file in the TextEdit app.
You can click Open with to open the file in a suitable app — for example, click Open with TextEdit to open a text file in the TextEdit app.
![]() When you finish previewing the file, click Close (
When you finish previewing the file, click Close (![]() ).
).

The Quick Look window closes.
![]() Press
Press ![]() + click the attachment.
+ click the attachment.
The contextual menu opens.
![]() Click Save Attachment.
Click Save Attachment.

The Save As dialog opens.
Note: If the Save As dialog opens at its small size, click Expand Dialog (![]() ) to expand it.
) to expand it.
![]() Navigate to the folder in which you want to save the file.
Navigate to the folder in which you want to save the file.
![]() Optionally, click the Tags box and click each tag you want to assign to the file.
Optionally, click the Tags box and click each tag you want to assign to the file.
![]() Click Save.
Click Save.
Mail saves the file.
Note: If you want to remove the attachment from the message, click Message and then click Remove Attachments.
View E-Mail Messages by Conversations
Mail enables you to view an exchange of e-mail messages as a conversation instead of viewing each message as a separate item. Conversations, also called threads, let you browse and sort messages on the same subject more easily by separating them from other messages in your mailboxes.
If you decide to organize your messages by conversations, you can expand or collapse all conversations to see the messages you want.
View E-Mail Messages by Conversations

![]() In Mail, click the mailbox that contains the messages you want to view.
In Mail, click the mailbox that contains the messages you want to view.
![]() The messages in the folder appear.
The messages in the folder appear.

![]() Click View.
Click View.
The View menu opens.
![]() Click Organize by Conversation.
Click Organize by Conversation.
Note: To change the order in which the conversation’s messages appear, click Mail on the menu bar and then click Preferences. Click Viewing (![]() ) to display the Viewing pane, go to the View Conversations area, and then click Show most recent message at the top (
) to display the Viewing pane, go to the View Conversations area, and then click Show most recent message at the top (![]() changes to
changes to ![]() or
or ![]() changes to
changes to ![]() ). Click Close (
). Click Close (![]() ) to close the Preferences window.
) to close the Preferences window.

Mail organizes the messages into conversations, so that each exchange appears as a single item rather than as separate messages.
![]() The number to the right of a conversation indicates how many messages it contains.
The number to the right of a conversation indicates how many messages it contains.
![]() Click the conversation.
Click the conversation.
Note: You can expand all conversations in the folder by clicking View and clicking Expand All Conversations. Click View and click Collapse All Conversations to collapse them again.

![]() All the messages in the conversation appear in summary.
All the messages in the conversation appear in summary.
![]() Click the number to the right of the conversation.
Click the number to the right of the conversation.
![]() Mail expands the conversation so that you can see each of the messages it contains.
Mail expands the conversation so that you can see each of the messages it contains.
![]() You can click a message to display it in the reading pane.
You can click a message to display it in the reading pane.
Reduce the Amount of Spam You Receive
Spam is unwanted e-mail messages, also called junk mail. Spam ranges from messages offering specialized products, such as pharmaceuticals, to attempts to steal your financial details, passwords, or personal information.
Mail includes features that enable you to reduce the amount of spam that reaches your inbox. You can configure Mail to identify junk mail automatically, and you can learn to spot identifying features of spam messages. Unfortunately, it is not yet possible to avoid spam completely.
Reduce the Amount of Spam You Receive

Set Mail to Identify Junk Mail Automatically
![]() With the Mail app active, click Mail.
With the Mail app active, click Mail.
The Mail menu opens.
![]() Click Preferences.
Click Preferences.

The Preferences window opens.
![]() Click Junk Mail (
Click Junk Mail (![]() ).
).
![]() Click Enable junk mail filtering (
Click Enable junk mail filtering (![]() changes to
changes to ![]() ).
).
![]() Click Mark as junk mail, but leave it in my Inbox (
Click Mark as junk mail, but leave it in my Inbox (![]() changes to
changes to ![]() ) to review junk mail in your inbox.
) to review junk mail in your inbox.
![]() Click each of the three check boxes (
Click each of the three check boxes (![]() changes to
changes to ![]() ).
).
![]() Click Trust junk mail headers in messages (
Click Trust junk mail headers in messages (![]() changes to
changes to ![]() ).
).
![]() Click Close (
Click Close (![]() ).
).
The Preferences window closes.

Review Your Junk Mail
![]() Click Inbox or the inbox of a particular account, such as Google.
Click Inbox or the inbox of a particular account, such as Google.
![]() Click a message.
Click a message.
![]() See whether Mail has identified the message as junk mail.
See whether Mail has identified the message as junk mail.
![]() See if the message is addressed to you.
See if the message is addressed to you.
![]() Check whether the message greets you by name or with a generic greeting.
Check whether the message greets you by name or with a generic greeting.
![]() Look for typos, odd phrasing, or odd grammar.
Look for typos, odd phrasing, or odd grammar.
![]() Read the message’s content for veracity.
Read the message’s content for veracity.

![]() If a message appears to be spam, and Mail has not identified it as junk, click Junk (
If a message appears to be spam, and Mail has not identified it as junk, click Junk (![]() ).
).
![]() Click Delete (
Click Delete (![]() ) to delete the message.
) to delete the message.