
Chapter 4
Running Apps

macOS includes many apps, such as the TextEdit word processor, the Preview viewer for PDF files and images, and the iTunes player for music and videos. You can install other apps as needed. Whichever apps you run, you can switch among them easily, quit them when you finish using them, and force them to quit if they crash.
Install an App from the App Store
Install an App from a Disc or the Internet
Switch Apps Using Mission Control
Open an App and Quit It
macOS enables you to open your MacBook’s apps in several ways. The Dock is the quickest way to launch apps you use frequently. Launchpad is a handy way to see all the apps installed in your MacBook’s Applications folder and its subfolders. You can also launch an app from the Applications folder, but typically you do not need to do so.
When you finish using an app, you quit it by giving a Quit command. You can quit an app either from the menu bar or by using a keyboard shortcut.
Open an App and Quit It

Open an App from the Dock
![]() Click the app’s icon on the Dock.
Click the app’s icon on the Dock.
Note: If you do not recognize an app’s icon, position the pointer over it to display the app’s name.
![]() The app opens.
The app opens.

Open an App from Launchpad
![]() Click Launchpad (
Click Launchpad (![]() ) on the Dock.
) on the Dock.
The Launchpad screen appears.
To scroll to another screen, swipe left or right with two fingers on the trackpad.
![]() You can also click a dot to move to another screen.
You can also click a dot to move to another screen.
![]() Click the app.
Click the app.
The app opens.
Note: To launch an app you have used recently, click Apple (![]() ), highlight Recent Items, and then click the app in the Applications list.
), highlight Recent Items, and then click the app in the Applications list.

Open an App from the Applications Folder
![]() Click Finder (
Click Finder (![]() ) on the Dock.
) on the Dock.
A Finder window opens.
![]() Click Applications in the left column.
Click Applications in the left column.
An icon appears for each app.
![]() Double-click the app you want to run.
Double-click the app you want to run.
The app opens.
Note: You can also open an app by clicking Spotlight (![]() ), starting to type the app’s name, and then clicking the appropriate search result.
), starting to type the app’s name, and then clicking the appropriate search result.

Quit an App
![]() Click the app’s menu, the menu with the app’s name — for example, Chess.
Click the app’s menu, the menu with the app’s name — for example, Chess.
The menu appears.
![]() Click the Quit command from the menu that has the app’s name — for example, Quit Chess.
Click the Quit command from the menu that has the app’s name — for example, Quit Chess.
Note: You can also quit the active app by pressing ![]() +
+ ![]() .
.
Note: You can quit some single-window apps, such as System Preferences and Dictionary, by clicking Close (![]() ). But for most apps, clicking Close (
). But for most apps, clicking Close (![]() ) closes the window but leaves the app running.
) closes the window but leaves the app running.
Install an App from the App Store
Your MacBook comes with many useful apps already installed, such as Safari for browsing the Web, Mail for reading and sending e-mail, and iTunes for enjoying music and video.
To get your work or play done, you may need to install other apps on your MacBook. You can install apps in three ways: by downloading them from Apple’s App Store, by downloading them from other websites and then installing them, or by installing them from a CD or DVD.
Install an App from the App Store
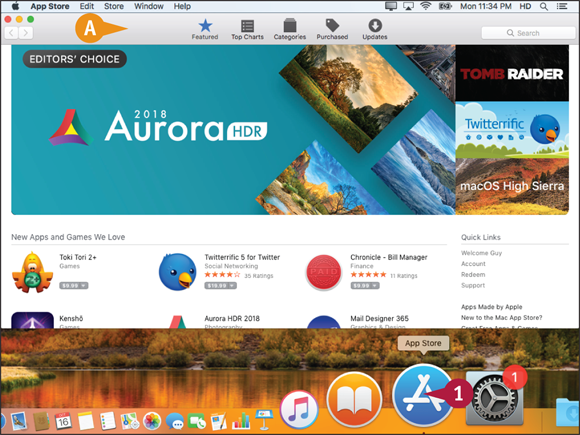
![]() Click App Store (
Click App Store (![]() ) on the Dock.
) on the Dock.
![]() The App Store window opens.
The App Store window opens.
The Featured screen includes sections such as Best New Apps and Best Games.

![]() Click Top Charts (
Click Top Charts (![]() changes to
changes to ![]() ).
).
The Top Charts screen appears, showing a Top Paid section, a Top Free section, and a Top Grossing section.
![]() You can also click Categories (
You can also click Categories (![]() changes to
changes to ![]() ) to browse apps by categories, such as Business and Entertainment.
) to browse apps by categories, such as Business and Entertainment.
![]() Click the app you want to view.
Click the app you want to view.

The app’s screen appears.
![]() Click the app’s price button, and then click the Buy App button that replaces the price button. For a free app, click Get and then click Install App.
Click the app’s price button, and then click the Buy App button that replaces the price button. For a free app, click Get and then click Install App.
The Sign In Required dialog opens.
![]() Type your Apple ID.
Type your Apple ID.
![]() Type your password.
Type your password.
![]() Click Get.
Click Get.
Note: If a dialog opens confirming the purchase, click Buy.
The download begins.
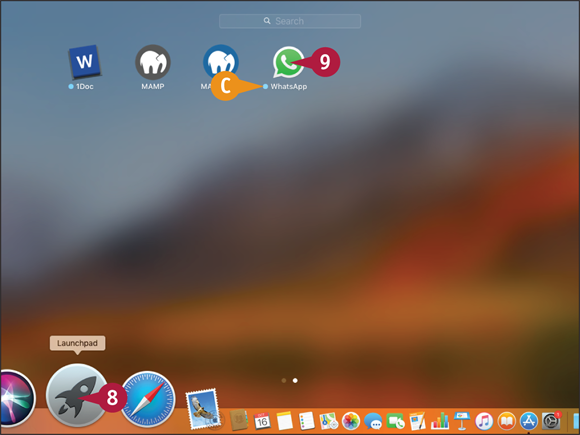
![]() Click Launchpad (
Click Launchpad (![]() ).
).
The Launchpad screen appears.
![]() A blue dot indicates a new app installed from the App Store or a recently updated app.
A blue dot indicates a new app installed from the App Store or a recently updated app.
![]() Click the app’s icon.
Click the app’s icon.
The app opens.
Install an App from a Disc or the Internet
If an app is not available on Apple’s App Store, you can acquire it either on a CD or DVD or as a file that you download. To install an app from a downloaded file, you open the file. To install an app from a CD or DVD, you must either connect an optical drive to your MacBook or use the Remote Disc feature to access an optical drive on another Mac. Before installing an app in these ways, you may need to change the Gatekeeper setting in Security & Privacy preferences.
Install an App from a Disc or the Internet

Install an App
![]() Open the disc or file that contains the app.
Open the disc or file that contains the app.
If the app is on a CD or DVD, connect an optical drive to your MacBook, and insert the disc in it.
If the app is in a file, double-click the file.
A Finder window opens showing the contents of the disc or file.
![]() If there is a file containing installation instructions, follow the instructions. Otherwise, double-click the Installer icon. If there is no installer, see the first tip in this section.
If there is a file containing installation instructions, follow the instructions. Otherwise, double-click the Installer icon. If there is no installer, see the first tip in this section.
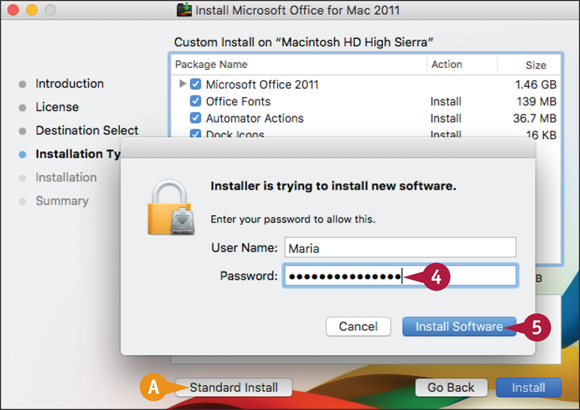
![]() Some apps let you choose between a standard install and a custom install.
Some apps let you choose between a standard install and a custom install.
![]() Click Install.
Click Install.
A dialog opens prompting you to type your password or to use Touch ID on a MacBook with the Touch Bar.
Note: To install most apps, you must have an administrator account or provide an administrator’s name and password.
![]() Type your password or use Touch ID.
Type your password or use Touch ID.
![]() Click Install Software.
Click Install Software.

The installation continues. When it completes, Installer displays a screen telling you that the installation succeeded.
![]() Click Close.
Click Close.
Installer closes.

Note: If macOS prevents you from installing the app, click Apple (![]() ) and then click System Preferences. Click Security & Privacy (
) and then click System Preferences. Click Security & Privacy (![]() ), and then click General. Click App Store and identified developers to change the Gatekeeper settings (
), and then click General. Click App Store and identified developers to change the Gatekeeper settings (![]() changes to
changes to ![]() ). For older software such as apps on CDs that do not have a developer ID, follow the prompt in the error message to give one-time permission to install the app.
). For older software such as apps on CDs that do not have a developer ID, follow the prompt in the error message to give one-time permission to install the app.
Run the App You Installed
Note: If Installer has added an icon for the app to the Dock, click that icon to run the app.
![]() Click Launchpad (
Click Launchpad (![]() ) on the Dock.
) on the Dock.
![]() Click the dot to display another Launchpad screen if necessary.
Click the dot to display another Launchpad screen if necessary.
![]() Click the app’s icon.
Click the app’s icon.
The app opens.
Run an App Full Screen
macOS enables you to run an app full screen instead of in a window. Running an app full screen helps you focus on that app, removing the distraction of other open apps.
You can instantly switch the active app to full-screen display. When you need to use another app, you can switch to that app full screen as well — and then switch back to the previous app. When you finish using full-screen display, you can switch back to displaying the app in a window.
Run an App Full Screen

Switch the Active App to Full Screen
![]() Click Zoom (
Click Zoom (![]() ).
).
Note: In many apps, you can also switch to full screen by clicking View on the menu bar and selecting Enter Full Screen or pressing ![]() +
+ ![]() +
+ ![]() .
.

The app expands to take up the full screen.

Switch to Another App
![]() Swipe left or right with three fingers on the trackpad.
Swipe left or right with three fingers on the trackpad.
Note: You can also switch apps by using Application Switcher or Mission Control.
The next app or previous app appears.
![]() Swipe in the opposite direction.
Swipe in the opposite direction.
The app you were using before you switched appears.

Return from Full-Screen Display to a Window
![]() Move the pointer to the upper-left corner of the screen.
Move the pointer to the upper-left corner of the screen.
The menu bar and the app’s title bar appears.
![]() Click Zoom Back (
Click Zoom Back (![]() ).
).
The app appears in a window again.
Note: Alternatively, move the pointer to the top of the screen, click View, and then click Exit Full Screen on the View menu.
Run Apps at Login
macOS enables you to set apps to open automatically each time you log in to your MacBook. By opening your most-used apps automatically, you can save time getting started with your work or play. Opening apps at login does make the login process take longer, so it is best to run only those apps you always use. You can configure an app to open automatically either from the Dock or by using the Login Items pane in Users & Groups preferences.
Run Apps at Login

Use the Dock to Set an App to Run at Login
![]() If the app does not have a Dock icon, click Launchpad (
If the app does not have a Dock icon, click Launchpad (![]() ) on the Dock and then click the app.
) on the Dock and then click the app.
The app’s icon appears on the Dock.
![]() Press
Press ![]() + click the app’s Dock icon.
+ click the app’s Dock icon.
The contextual menu opens.
![]() Click Options.
Click Options.
Note: You can also highlight Options without clicking.
The Options submenu opens.
![]() Click Open at Login.
Click Open at Login.
A check mark appears next to Open at Login.

Use System Preferences to Set an App to Run at Login
![]() Press
Press ![]() + click System Preferences (
+ click System Preferences (![]() ) on the Dock.
) on the Dock.
The contextual menu opens.
![]() Click Users & Groups.
Click Users & Groups.
The Users & Groups pane appears, showing your user account.
![]() Click Login Items.
Click Login Items.

The Login Items pane appears.
Note: If you need to run an app in the background, click Hide (![]() changes to
changes to ![]() ) next to the app.
) next to the app.
![]() Click Add (
Click Add (![]() ).
).

A dialog opens showing a list of the apps in the Applications folder.
Note: You can also add documents to the list for automatic opening. To do so, navigate to the document, click it, and then click Add. macOS opens the document in its default app at login.
![]() Click the app you want to run automatically at login.
Click the app you want to run automatically at login.
Note: To select multiple apps, click the first, and then press ![]() + click each of the others.
+ click each of the others.
![]() Click Add.
Click Add.
The dialog closes.
The app appears in the list.
![]() Click Close (
Click Close (![]() ).
).
System Preferences closes.
Using Split View
macOS includes Split View, which enables you to divide the screen between two apps. When you need to view two apps simultaneously, using Split View can save time and effort over resizing and positioning app windows manually.
Depending on the apps you choose and the screen resolution on your MacBook, the split in Split View may not be equal. As of this writing, only some apps work in Split View, but macOS clearly identifies windows that are not available in Split View.
Using Split View

![]() Click and hold Zoom (
Click and hold Zoom (![]() ) in the window of the first app you want to use in Split View.
) in the window of the first app you want to use in Split View.

macOS switches to the screen for setting up Split View.
![]() Drag the app window to the left side or the right side of the screen, as needed.
Drag the app window to the left side or the right side of the screen, as needed.
Note: If you want to position the first app on the blue-shaded side of the screen, you can simply release Zoom (![]() ) at this point.
) at this point.

macOS snaps the window to the side of the screen and resizes the window to occupy that section of the screen.
Any apps available for use in Split View appear on the opposite side of the screen.
Note: The message No Available Windows appears if none of the other open app windows are available in Split View.
![]() Click the app you want to position on the other section of the screen.
Click the app you want to position on the other section of the screen.

macOS snaps the window to the side of the screen and resizes the window to occupy the other section of the screen.
You can then work in the app windows as normal.
![]() You can resize the windows by dragging the separator bar between them.
You can resize the windows by dragging the separator bar between them.
Note: When you are ready to finish using Split View, move the pointer to the upper-left corner of a window. When the title bar for the window appears, click Zoom Back (![]() ).
).
Switch Quickly Among Apps
macOS enables you to switch quickly among your open apps by using either the trackpad or the keyboard.
If you have several apps displayed on-screen, you may be able to switch by clicking the window for the app you want to use. If the app is not visible, you can click the app’s icon on the Dock. If the app has multiple windows, you can then select the window you need.
Switch Quickly Among Apps

Switch Apps Using the Trackpad
![]() If you can see a window for the app to which you want to switch, click anywhere in that window.
If you can see a window for the app to which you want to switch, click anywhere in that window.

![]() If you cannot see a window to which you want to switch, click the app’s icon on the Dock.
If you cannot see a window to which you want to switch, click the app’s icon on the Dock.
All the windows for that app appear in front of the other apps’ windows.
![]() Click Window on the menu bar.
Click Window on the menu bar.
The Window menu opens.
![]() Click the window you want to bring to the front.
Click the window you want to bring to the front.
Note: To bring a specific window to the front, press ![]() + click the app’s icon on the Dock to display the contextual menu, and then click the window you want to see. You can also click and hold the app icon on the Dock to display the contextual menu.
+ click the app’s icon on the Dock to display the contextual menu, and then click the window you want to see. You can also click and hold the app icon on the Dock to display the contextual menu.

Switch Among Apps Using the Keyboard
![]() Press and hold
Press and hold ![]() and press
and press ![]() .
.
![]() Application Switcher opens, showing an icon for each open app.
Application Switcher opens, showing an icon for each open app.
![]() Still holding down
Still holding down ![]() , press
, press ![]() one or more times to move the highlight to the app you want.
one or more times to move the highlight to the app you want.

Note: Press and hold ![]() +
+ ![]() and press
and press ![]() to move backward through the apps.
to move backward through the apps.
![]() When you reach the app you want, release
When you reach the app you want, release ![]() .
.
Application Switcher closes, and the selected app comes to the front.
![]() If necessary, click Window and select the window you want.
If necessary, click Window and select the window you want.
Note: You can press ![]() +
+ ![]() to switch among the windows in the current app.
to switch among the windows in the current app.
Switch Apps Using Mission Control
The Mission Control feature helps you manage your desktop and switch among apps and windows. When you activate Mission Control, it shrinks the open windows so that you can see them all and click the one you want. You can use Mission Control to display all open windows in all apps or just the windows in a particular app.
Mission Control also shows different desktop spaces, enabling you to switch among desktop spaces or move an app window from one desktop space to another.
Switch Apps Using Mission Control

See All Your Open Apps and Windows
![]() Swipe up on the trackpad with three fingers.
Swipe up on the trackpad with three fingers.
Note: On some Mac keyboards, you press ![]() to launch Mission Control. You can also press
to launch Mission Control. You can also press ![]() +
+ ![]() on any Mac.
on any Mac.
Note: You can also launch Mission Control by using a hot corner. See Chapter 2 for instructions on setting and using hot corners.

Mission Control opens and displays all open apps and windows.
![]() The Spaces bar at the top of the window shows the open desktops and any apps that are full screen.
The Spaces bar at the top of the window shows the open desktops and any apps that are full screen.
![]() The current desktop or app is highlighted.
The current desktop or app is highlighted.
![]() Move the pointer over the Spaces bar.
Move the pointer over the Spaces bar.

Thumbnails of the desktops and full-screen apps appear.
![]() To preview a window in an app, position the pointer over the window so that a blue outline appears around it. Then press
To preview a window in an app, position the pointer over the window so that a blue outline appears around it. Then press ![]() to preview the window. Press
to preview the window. Press ![]() again to close the preview.
again to close the preview.
![]() Click the window you want to use.
Click the window you want to use.
The window appears, and you can work with it.

See All the Windows in the Active App
![]() Click the Dock icon of the app you want to see.
Click the Dock icon of the app you want to see.
![]() Press
Press ![]() +
+ ![]() .
.
Note: On some MacBooks, you can also press ![]() +
+ ![]() to display the windows of the active app.
to display the windows of the active app.
macOS displays thumbnails of that app’s windows.
![]() Click the window you want to see.
Click the window you want to see.
macOS restores all the windows from all the apps, placing the window you clicked at the front.
Set Up Dictation and Speech
The Dictation feature enables you to dictate text, which can be a fast and accurate way of entering text into documents. The Speech feature enables you to have the system voice read on-screen items to you.
Before using Dictation and Speech, you use Dictation preferences and Speech preferences to enable the features. You can choose options such as whether to use the Enhanced Dictation feature, select your dictation language and the system voice, and define keyboard shortcuts for starting dictation and having your MacBook speak text.
Set Up Dictation and Speech

![]() Press
Press ![]() + click System Preferences (
+ click System Preferences (![]() ) on the Dock.
) on the Dock.
The contextual menu opens.
![]() Click Keyboard.
Click Keyboard.
The System Preferences window opens and displays the Keyboard pane.
![]() Click Dictation.
Click Dictation.
The Dictation pane appears.
![]() Click Input (
Click Input (![]() ) and select the correct input.
) and select the correct input.
![]() Click On (
Click On (![]() changes to
changes to ![]() ).
).

The Would You Like to Use Enhanced Dictation? dialog opens.
![]() Click Use Enhanced Dictation.
Click Use Enhanced Dictation.
The dialog closes.
macOS starts to download the files for Enhanced Dictation.
![]() Click Language (
Click Language (![]() ) and select your language.
) and select your language.
![]() Click Shortcut (
Click Shortcut (![]() ) and select the shortcut for starting dictation.
) and select the shortcut for starting dictation.
![]() Click Show All (
Click Show All (![]() ).
).
The main System Preferences pane appears.
![]() Click Accessibility (
Click Accessibility (![]() ).
).

The Accessibility pane opens.
![]() Click Speech.
Click Speech.
The Speech pane opens.
![]() Click System Voice (
Click System Voice (![]() ) and select the voice you prefer.
) and select the voice you prefer.
Note: You can install other voices by clicking Customize on the System Voice pop-up menu.
![]() Click Play to hear the voice.
Click Play to hear the voice.
![]() Drag the Speaking Rate slider to adjust the speed if necessary.
Drag the Speaking Rate slider to adjust the speed if necessary.

![]() Click Enable announcements (
Click Enable announcements (![]() changes to
changes to ![]() ) to hear alerts.
) to hear alerts.
![]() You can click Options to choose the voice, phrase, and delay for alerts.
You can click Options to choose the voice, phrase, and delay for alerts.
![]() Click Speak selected text when the key is pressed (
Click Speak selected text when the key is pressed (![]() changes to
changes to ![]() ) to make your MacBook speak selected text.
) to make your MacBook speak selected text.
![]() You can click Change Key to set the keystroke.
You can click Change Key to set the keystroke.
![]() Click Close (
Click Close (![]() ).
).
System Preferences closes.
Using Dictation and Speech
With the Dictation and Speech features enabled and configured on your MacBook, you can use them freely as you work or play. When you are using an app that accepts text input, you can press your keyboard shortcut to turn on Dictation, and then dictate text into a document.
To make Speech read to you, you select the text you want to hear and then press the appropriate keyboard shortcut. If you have enabled the announcing of alerts, your MacBook automatically speaks their text as well.
Using Dictation and Speech

Use Dictation
![]() Open the app into which you want to dictate text. For example, click Notes (
Open the app into which you want to dictate text. For example, click Notes (![]() ) on the Dock to open Notes.
) on the Dock to open Notes.
![]() Open the document into which you will dictate text. For example, in Notes, click the appropriate note.
Open the document into which you will dictate text. For example, in Notes, click the appropriate note.
![]() Position the insertion point.
Position the insertion point.
![]() Press the keyboard shortcut you set for starting Dictation.
Press the keyboard shortcut you set for starting Dictation.
Note: The default keyboard shortcut is pressing ![]() twice.
twice.

![]() The Dictation window opens.
The Dictation window opens.
![]() Speak into your microphone.
Speak into your microphone.
Note: To enter a word with an initial capital letter, say “cap” followed by the word — for example, say “cap director” to enter “Director.” To enter punctuation, say the appropriate word, such as “period,” “comma,” or “semicolon.” To create a new paragraph, say “new paragraph.”
![]() Dictation inserts the text in the document.
Dictation inserts the text in the document.
![]() Click Done.
Click Done.
The Dictation window closes.

Make the Speech Feature Read Text Aloud
![]() In an app that contains text, select the text you want to hear.
In an app that contains text, select the text you want to hear.
![]() Press the keyboard shortcut you set for Speech.
Press the keyboard shortcut you set for Speech.
Note: The default keyboard shortcut is ![]() +
+ ![]() .
.
Speech reads the selected text to you.

Hear Alerts from Speech
![]() After an alert appears, Speech waits as long as specified in Dictation & Speech preferences.
After an alert appears, Speech waits as long as specified in Dictation & Speech preferences.
If you have not dismissed the alert, Speech announces the app and then reads the text of the alert.
![]() Click Close or Snooze, as appropriate, to dismiss the alert.
Click Close or Snooze, as appropriate, to dismiss the alert.
Configure and Invoke Siri
The powerful Siri feature on your MacBook enables you to take essential actions by using your voice to tell your MacBook what you want. Siri requires an Internet connection, because the speech recognition runs on servers in Apple’s data center. You can configure several settings to specify how to invoke Siri and to make Siri work your way.
Configure and Invoke Siri

Configure Siri
![]() Press
Press ![]() + click System Preferences (
+ click System Preferences (![]() ) on the Dock.
) on the Dock.
The contextual menu opens.
![]() Click Siri.
Click Siri.
The System Preferences window opens and displays the Siri pane.
![]() Select Enable Ask Siri (
Select Enable Ask Siri (![]() ) if you want to be able to trigger Siri by saying “Hey, Siri!”
) if you want to be able to trigger Siri by saying “Hey, Siri!”
![]() Click Keyboard Shortcut (
Click Keyboard Shortcut (![]() ) and then click the shortcut you want to use. The default shortcut is to hold down
) and then click the shortcut you want to use. The default shortcut is to hold down ![]() +
+ ![]() .
.

![]() Click Mic Input (
Click Mic Input (![]() ) and then click the microphone you will use. You can click Automatic to have macOS switch automatically between microphones — for example, when you connect an external microphone.
) and then click the microphone you will use. You can click Automatic to have macOS switch automatically between microphones — for example, when you connect an external microphone.
![]() Click Language (
Click Language (![]() ) and then click your language, such as English (United States).
) and then click your language, such as English (United States).
![]() Click Siri Voice (
Click Siri Voice (![]() ) and then click the voice, such as American (Female).
) and then click the voice, such as American (Female).
![]() On the Voice Feedback line, select On (
On the Voice Feedback line, select On (![]() ) or Off (
) or Off (![]() ), as needed.
), as needed.
![]() Click Show Siri in menu bar (
Click Show Siri in menu bar (![]() changes to
changes to ![]() ) if you want the Siri icon in the menu bar.
) if you want the Siri icon in the menu bar.
![]() Click Siri Suggestions & Privacy.
Click Siri Suggestions & Privacy.

The Siri Suggestions & Privacy dialog opens.
![]() Click any app or feature (
Click any app or feature (![]() changes to
changes to ![]() ) from which you do not want Siri to learn and make suggestions.
) from which you do not want Siri to learn and make suggestions.
![]() Click Done.
Click Done.
The Siri Suggestions & Privacy dialog closes.
![]() Click Close (
Click Close (![]() ).
).
The System Preferences window closes.
Invoke Siri
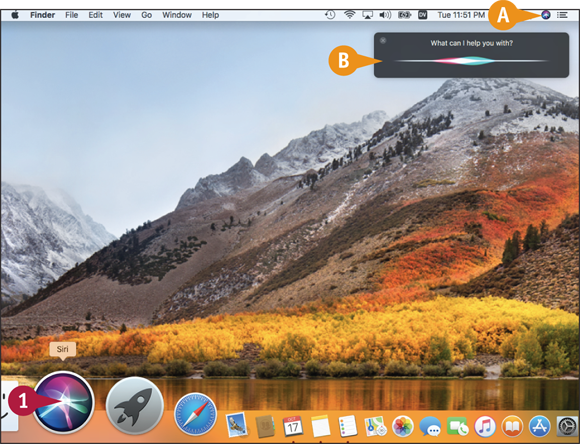
![]() Click Siri (
Click Siri (![]() ) on the Dock.
) on the Dock.
![]() You can also click Siri (
You can also click Siri (![]() ) on the menu bar if you chose to display this icon.
) on the menu bar if you chose to display this icon.
![]() The Siri window opens, asking how Siri can help you.
The Siri window opens, asking how Siri can help you.
A tone plays to tell you that Siri is ready to help.
Note: If you invoke Siri unintentionally, press ![]() to close the Siri window.
to close the Siri window.
![]() Tell Siri what you want to do or research. See the next section for some of your options.
Tell Siri what you want to do or research. See the next section for some of your options.
Perform Tasks with Siri
You can use Siri either with the MacBook’s built-in microphone or with a headset microphone. You can get good results from the built-in microphone if you are in a quiet environment and you speak loudly and clearly, or if you can speak as close to the built-in microphone as possible. Otherwise, use a headset microphone, which will usually provide better results.
This section gives examples of the many uses to which you can put Siri.
Send an E-Mail Message

Say “E-mail” and the contact’s name, followed by the message. Siri creates an e-mail message to the contact and enters the text. Review the message, and then click Send to send it.
You can also say “E-mail” and the contact’s name and have Siri prompt you for the various parts of the message. This approach gives you more time to collect your thoughts.
If your Contacts list has multiple e-mail addresses for the contact, Siri prompts you to choose the address to use.
Send a Text Message

Say “Tell” or “Text” and the contact’s name. When Siri responds, say the message you want to send. For example, say “Tell Kelly Wilson” and then “I’m stuck in traffic, but I’ll be there in about 15 minutes.” Siri creates a text message to the contact, enters the text, and sends the message when you say “Send” or click Send.
You can also say “Tell” and the contact’s name followed immediately by the message. For example, “Tell Bill Sykes the package will arrive at 10AM.”
Set a Reminder for Yourself

Say “Remind me” and the details of what you want Siri to remind you of. For example, say “Remind me to take the wireless transmitter to work tomorrow morning.” Siri listens to what you say and creates a reminder. Check what Siri has written; if the reminder is correct, you need do nothing more, but if it is incorrect, click Remove to remove it.
Set Up a Meeting

Say “Meet with” and the contact’s name, followed by brief details of the appointment. For example, say “Meet with Don Williamson for lunch at noon on Thursday.” Siri listens and warns you of any scheduling conflict. Siri then displays the appointment for you to check.
If you click Confirm, Siri sends a meeting invitation to the contact if it finds an e-mail address. Siri adds the meeting to your calendar.
Gather Information with Siri

You can use Siri to research a wide variety of information online — everything from sports and movies to restaurants worth visiting or worth avoiding. Here are three examples:
- “Siri, when’s the next Patriots game?”
- “Siri, where is the movie Blade Runner 2049 playing in Indianapolis?”
- “Where’s the best Mexican food in Spokane?”
Remove Apps
macOS enables you to remove apps you have added, but not apps included with the operating system. If you no longer need apps you have installed, you can remove them to reclaim the disk space they occupy and to prevent them from causing your MacBook to run more slowly.
You can remove most apps by simply moving them to the Trash. But if an app has an uninstall utility, you should run that utility to remove the app and its ancillary files.
Remove Apps

Remove an App by Moving It to the Trash
![]() Click Launchpad (
Click Launchpad (![]() ) on the Dock.
) on the Dock.
Note: You can also place four fingers on the trackpad and pinch them together to display the Launchpad screen.
The Launchpad screen appears.
![]() If necessary, click a dot to move to another screen in Launchpad. You can also swipe left or right with two fingers on the trackpad.
If necessary, click a dot to move to another screen in Launchpad. You can also swipe left or right with two fingers on the trackpad.

![]() Click the app and drag it to the Trash.
Click the app and drag it to the Trash.
Finder places the app in the Trash.
Note: You can also drag an app to the Trash from the Applications folder. Alternatively, click the app in the Applications folder, click Action (![]() ), and then select Move to Trash.
), and then select Move to Trash.

Remove an App by Using an Uninstall Utility
![]() Click Finder (
Click Finder (![]() ) on the Dock.
) on the Dock.
A Finder window opens.
![]() Navigate to the folder that contains the uninstall utility.
Navigate to the folder that contains the uninstall utility.
Note: With the Finder active, you can press ![]() +
+ ![]() +
+ ![]() to open a window showing the Applications folder.
to open a window showing the Applications folder.
Note: See the tip for instructions on where to find the utility.
![]() Press
Press ![]() + double-click the uninstall utility.
+ double-click the uninstall utility.

The uninstall utility opens, and the Finder window closes.
![]() Follow the steps of the uninstall utility. For example, click Uninstall.
Follow the steps of the uninstall utility. For example, click Uninstall.
![]() When the uninstall utility finishes running, quit it. For example, press
When the uninstall utility finishes running, quit it. For example, press ![]() +
+ ![]()
Identify Problem Apps
Sometimes you may find that your MacBook starts to respond slowly to your commands, even though no app has stopped working. When this occurs, you can use the Activity Monitor utility to see what app is consuming more of the processors’ cycles than it should. To resolve the problem, you can quit that app and then restart it.
If you cannot quit the app normally, you can force quit it. You can force quit it either from Activity Monitor or by using the Force Quit Applications dialog.
Identify Problem Apps

![]() Click Launchpad (
Click Launchpad (![]() ) on the Dock.
) on the Dock.
The Launchpad screen appears.
![]() Type ac.
Type ac.
Launchpad displays only those items whose names include words starting with ac.
![]() Click Activity Monitor (
Click Activity Monitor (![]() ).
).

The Activity Monitor window opens, listing all your running apps and processes.
![]() The title bar shows (My Processes) to indicate you are viewing only your processes.
The title bar shows (My Processes) to indicate you are viewing only your processes.
![]() Click View.
Click View.
The View menu opens.
![]() Click All Processes.
Click All Processes.
Note: You should view all processes because another user’s processes may be slowing your MacBook.

![]() The title bar shows (All Processes).
The title bar shows (All Processes).
![]() Other users’ processes and system processes appear as well.
Other users’ processes and system processes appear as well.
![]() Click CPU.
Click CPU.
The details of your MacBook’s central processing units, or CPUs, appear.
![]() The CPU Load graph shows how hard the CPU is working.
The CPU Load graph shows how hard the CPU is working.
![]() Click % CPU once or twice, as needed, so that Descending Sort (
Click % CPU once or twice, as needed, so that Descending Sort (![]() ) appears on the column heading.
) appears on the column heading.

Activity Monitor sorts the processes by CPU activity in descending order.
![]() Identify the app that is using the most processor cycles.
Identify the app that is using the most processor cycles.
![]() Click that app’s Dock icon.
Click that app’s Dock icon.
The app appears.
![]() Save your work in the app, and then quit it.
Save your work in the app, and then quit it.
![]() Click the Activity Monitor window.
Click the Activity Monitor window.
![]() Click the Activity Monitor menu and click Quit Activity Monitor to close Activity Monitor.
Click the Activity Monitor menu and click Quit Activity Monitor to close Activity Monitor.
Force a Crashed App to Quit
When an app is working normally, you can quit it by clicking the Quit command on the app’s menu or by pressing ![]() +
+ ![]() . But if an app stops responding to the trackpad and keyboard, you cannot quit it this way. Instead, you use the Force Quit command that macOS provides for this situation.
. But if an app stops responding to the trackpad and keyboard, you cannot quit it this way. Instead, you use the Force Quit command that macOS provides for this situation.
When an app stops responding, it may freeze, so that the window does not change, or it may display the spinning cursor for a long time, indicating that the app is busy.
Force a Crashed App to Quit

Force Quit an App from the Dock
![]() Pressing and holding
Pressing and holding ![]() , click the app’s icon on the Dock. Keep holding down the trackpad button until the Dock menu appears.
, click the app’s icon on the Dock. Keep holding down the trackpad button until the Dock menu appears.
![]() Click Force Quit.
Click Force Quit.
macOS forces the app to quit.

Force Quit an App from the Force Quit Applications Dialog
![]() Click Apple (
Click Apple (![]() ).
).
The Apple menu opens.
![]() Click Force Quit.
Click Force Quit.
Note: You can open the Force Quit Applications dialog from the keyboard by ![]() +
+ ![]() +
+ ![]() .
.

The Force Quit Applications dialog opens.
![]() Click the app you want to force quit.
Click the app you want to force quit.
![]() Click Force Quit.
Click Force Quit.

A dialog opens to confirm that you want to force quit the app.
![]() Click Force Quit.
Click Force Quit.
macOS forces the app to quit.
![]() Click Close (
Click Close (![]() ).
).
The Force Quit Applications dialog closes.
Revert to an Earlier Version of a Document
macOS includes a feature called versions that enables apps to save different versions of the same document in the same file. You can display the different versions of the document at the same time and go back to an earlier version if necessary.
Only apps written to work specifically with the macOS versions feature enable you to revert to an older version of a document in this way. Such apps include TextEdit — the text editor and word processor included with macOS — and the apps in Apple’s iWork suite.
Revert to an Earlier Version of a Document

![]() In the appropriate app, open the document. For example, open a word processing document in TextEdit.
In the appropriate app, open the document. For example, open a word processing document in TextEdit.
![]() Click File on the menu bar.
Click File on the menu bar.

The File menu opens.
![]() Click Revert To.
Click Revert To.
Note: You can also highlight Revert To without clicking.
The Revert To submenu opens.
![]() You can click a version on the menu to go straight to that version.
You can click a version on the menu to go straight to that version.
![]() Click Browse All Versions.
Click Browse All Versions.

![]() macOS displays earlier versions of the document on the right, with newer versions at the front, and older versions at the back.
macOS displays earlier versions of the document on the right, with newer versions at the front, and older versions at the back.
![]() The current version appears on the left.
The current version appears on the left.
![]() Position the pointer over the time bars, and then click the version you want.
Position the pointer over the time bars, and then click the version you want.
The version comes to the front.
![]() Click Restore.
Click Restore.

macOS restores the version of the document.
The version opens in the app so that you can work with it.
Using Dashboard
The Dashboard feature offers an easy way to access widgets, small applications that provide very specific functionality. To use a widget, you activate Dashboard, which fills the desktop and presents the widgets installed on it. Use the widgets you want; when you are done, close Dashboard again. macOS includes a number of useful widgets by default, such as Weather, Calculator, Address Book, and Flight Tracker.
Using Dashboard

![]() Click Launchpad (
Click Launchpad (![]() ) on the Dock.
) on the Dock.
The Launchpad screen appears.
![]() Click Dashboard (
Click Dashboard (![]() ).
).
Note: You can also open Dashboard by opening Mission Control and then clicking the Dashboard space.

Dashboard opens, occupying the full screen.
![]() You can click an interactive widget, such as the Calculator widget, and use it by clicking its buttons.
You can click an interactive widget, such as the Calculator widget, and use it by clicking its buttons.
![]() You can view an informational widget, such as the Clock widget.
You can view an informational widget, such as the Clock widget.
![]() To configure a widget, move the pointer over it.
To configure a widget, move the pointer over it.
The Info button (![]() ) appears if the widget is configurable.
) appears if the widget is configurable.
![]() Click Info (
Click Info (![]() ).
).

The widget turns over, showing its configuration options.
![]() Change the widget’s configuration options as needed. For example, on the Weather widget, you can choose the location, switch between Fahrenheit and Celsius, and choose whether to include lows in the 6-day forecast.
Change the widget’s configuration options as needed. For example, on the Weather widget, you can choose the location, switch between Fahrenheit and Celsius, and choose whether to include lows in the 6-day forecast.
![]() Click Done.
Click Done.

The widget turns over, and you see the effects of your changes.
![]() When you finish using widgets, click Back (
When you finish using widgets, click Back (![]() ).
).
Dashboard disappears.
The screen that you were using before invoking Dashboard reappears.
Configure Dashboard
You can configure Dashboard to contain the widgets you find most useful. Dashboard includes a variety of built-in widgets that you can access instantly. You can download other widgets from online sources.
You can also change the layout in which the widgets appear in Dashboard. For example, you may want to position related widgets in groups so that you can find them easily.
Configure Dashboard

![]() Click Launchpad (
Click Launchpad (![]() ) on the Dock.
) on the Dock.
The Launchpad screen appears.
![]() Click Dashboard (
Click Dashboard (![]() ).
).
Note: You can also open Dashboard by opening Mission Control and then clicking the Dashboard space.

Dashboard opens, occupying the full screen.
![]() Drag the widgets to where you want them to appear.
Drag the widgets to where you want them to appear.
![]() Click Add (
Click Add (![]() ).
).

The screen of available widgets appears.
![]() Click the widget you want to add to Dashboard.
Click the widget you want to add to Dashboard.

![]() The widget appears on Dashboard, and you can start using it.
The widget appears on Dashboard, and you can start using it.
![]() When you finish using widgets, click Back (
When you finish using widgets, click Back (![]() ).
).
Dashboard disappears.
The screen that you were using before invoking Dashboard reappears.