
Chapter 9
Organizing Your Life

To help you keep your daily life organized, your MacBook includes the Calendar, Contacts, Reminders, and Maps apps.
Share an iCloud Calendar with Other People
Subscribe to a Shared Calendar
Change a Contact’s Information
Navigate the Calendar App
The Calendar app enables you to input your appointments and events and track them easily. After launching the app, you can navigate to the dates with which you need to work. You can sync your calendar data with your iOS devices, such as an iPhone or iPad.
Calendar has a streamlined user interface that makes it easy to move among days, weeks, months, and years. You can click the Today button to display the current day, or use the Go to Date dialog to jump directly to a specific date.
Navigate the Calendar App

Open Calendar and Navigate by Days
![]() Click Calendar (
Click Calendar (![]() ) on the Dock.
) on the Dock.
Calendar opens.
![]() Click Day.
Click Day.
Calendar displays the current day, including a schedule of the day’s events.
![]() Click Next (
Click Next (![]() ) to move to the next day or Previous (
) to move to the next day or Previous (![]() ) to move to the previous day.
) to move to the previous day.
Calendar displays the day you chose.

View and Navigate by Weeks
![]() Click Week.
Click Week.
Calendar displays the week for the date you were previously viewing.
![]() Click Next (
Click Next (![]() ) to move to the next week or Previous (
) to move to the next week or Previous (![]() ) to move to the previous week.
) to move to the previous week.
Calendar displays the week you chose.

View and Navigate by Months
![]() Click Month.
Click Month.
Calendar displays the current month.
![]() Click Next (
Click Next (![]() ) to move to the next month or Previous (
) to move to the next month or Previous (![]() ) to move to the previous month.
) to move to the previous month.
Calendar displays the month you chose.

View and Navigate by Years
![]() Click Year.
Click Year.
Calendar displays the year for the date you were last viewing.
![]() Click Next (
Click Next (![]() ) to move to the next year or Previous (
) to move to the next year or Previous (![]() ) to move to the previous year.
) to move to the previous year.
Calendar displays the year you chose.
Note: In Week view, Month view, or Year view, double-click a day to display it in Day view.
![]() You can click Today to display today’s date.
You can click Today to display today’s date.
Create a New Calendar
Calendar enables you to create as many calendars as you need to separate your events into logical categories. Calendar comes with two iCloud calendars already created for you: the Home calendar and the Work calendar. Any calendars in other online accounts you have set up on your MacBook appear automatically as well. You can create new calendars as needed alongside these calendars.
After creating a new calendar, you can create events in it. You can also change existing events from another calendar to the new calendar.
Create a New Calendar

![]() Click Calendar (
Click Calendar (![]() ) on the Dock.
) on the Dock.
Calendar opens.
![]() Click File on the menu bar.
Click File on the menu bar.
The File menu opens.
![]() Click New Calendar.
Click New Calendar.
Note: If, when you click New Calendar, the New Calendar submenu opens, click the calendar service, such as iCloud, in which to create the new calendar.
Note: If the Calendars pane is open, you can create a new calendar by pressing ![]() + clicking in open space in the Calendars pane and then clicking New Calendar on the contextual menu.
+ clicking in open space in the Calendars pane and then clicking New Calendar on the contextual menu.

Calendar displays the Calendars pane if it was hidden.
Calendar creates a new calendar and displays an edit box around its default name, Untitled.
![]() Type the name for the calendar and press
Type the name for the calendar and press ![]() .
.
Calendar applies the name to the calendar.

![]() Press
Press ![]() + click the calendar’s name.
+ click the calendar’s name.
The contextual menu opens.
![]() Click Get Info.
Click Get Info.

A dialog opens showing information for the calendar.
![]() Click Color (
Click Color (![]() ) and then select the color you want the calendar to use.
) and then select the color you want the calendar to use.
![]() Type a description for the calendar.
Type a description for the calendar.
![]() Click Ignore alerts (
Click Ignore alerts (![]() changes to
changes to ![]() ) if you want to suppress alerts for the calendar.
) if you want to suppress alerts for the calendar.
![]() Click OK.
Click OK.
The dialog closes.
You can now add events to the calendar.
Create an Event
Calendar makes it easy to organize your time commitments by creating an event for each appointment, meeting, trip, or special occasion. Calendar displays each event as an item on its grid, so you can see what is supposed to happen when.
You can create an event either for a specific length of time, such as 1 or 2 hours, or for an entire day. And you can create either an event that occurs only once or an event that repeats one or more times, as needed.
Create an Event

![]() Click Calendar (
Click Calendar (![]() ) on the Dock.
) on the Dock.
Calendar opens.
![]() Navigate by days, weeks, months, or years to reach the day on which you want to create the event.
Navigate by days, weeks, months, or years to reach the day on which you want to create the event.
![]() Click Day.
Click Day.
Calendar switches to Day view.
![]() Click the event’s start time and drag to its end time.
Click the event’s start time and drag to its end time.
Calendar creates an event where you clicked and applies a default name, New Event.

When you release the trackpad button, the event’s details appear in the right pane.
![]() Type the name for the event and then press
Type the name for the event and then press ![]() .
.
![]() Click Add Location and enter the location.
Click Add Location and enter the location.
![]() Click Calendar (
Click Calendar (![]() ) and then click the calendar to which you want to assign the event.
) and then click the calendar to which you want to assign the event.
![]() Click Add Alert, Repeat, or Travel Time.
Click Add Alert, Repeat, or Travel Time.
Controls for setting the alert, repeat, and travel time appear.
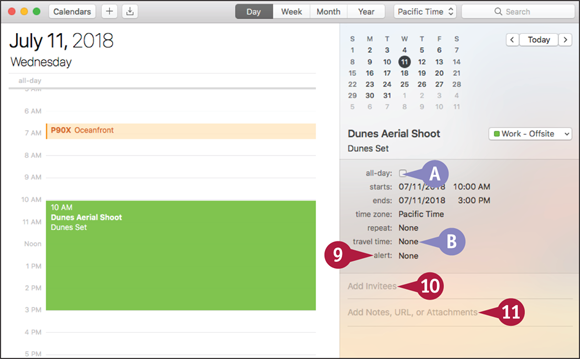
![]() You can click all-day (
You can click all-day (![]() changes to
changes to ![]() ) to make the event an all-day event.
) to make the event an all-day event.
![]() You can click travel time and specify the travel time required.
You can click travel time and specify the travel time required.
![]() If you want a reminder, click alert and specify the details of the alert, such as 10 minutes before. Choose Time to Leave to have macOS calculate the travel time to the address you have specified.
If you want a reminder, click alert and specify the details of the alert, such as 10 minutes before. Choose Time to Leave to have macOS calculate the travel time to the address you have specified.
![]() Click Add Invitees and specify anybody to invite to the event.
Click Add Invitees and specify anybody to invite to the event.
![]() To add more information, click Add Notes, URL, or Attachments.
To add more information, click Add Notes, URL, or Attachments.

![]() Click Add Note and type any notes needed.
Click Add Note and type any notes needed.
![]() Click Add URL and type or paste the URL for the event.
Click Add URL and type or paste the URL for the event.
![]() Click Add Attachment, click the file in the Open dialog, and then click Open.
Click Add Attachment, click the file in the Open dialog, and then click Open.
![]() When you finish entering details, click outside the details pane.
When you finish entering details, click outside the details pane.
The details pane closes.
Share an iCloud Calendar with Other People
Calendar enables you to share any calendar stored on iCloud with other people so that they know when you are busy. You can share an iCloud calendar either as a private calendar, available only to the people whose names or e-mail addresses you specify, or as a public calendar, available to everyone.
If you store your calendars on your MacBook rather than in iCloud, you can publish any calendar to a calendar server on the Internet to share it with others.
Share an iCloud Calendar with Other People

Open the Dialog for Sharing a Calendar
![]() Click Calendar (
Click Calendar (![]() ) on the Dock.
) on the Dock.
Calendar opens.
![]() Click Calendars.
Click Calendars.
The Calendars pane opens.
![]() Press
Press ![]() + click the calendar you want to share.
+ click the calendar you want to share.
The contextual menu opens.
![]() Click Share Calendar.
Click Share Calendar.
The Share dialog opens.

Share a Calendar with Specific People
![]() In the Share dialog, start typing a name or e-mail address.
In the Share dialog, start typing a name or e-mail address.
![]() Click the e-mail address for the contact.
Click the e-mail address for the contact.

The contact’s name appears as a button in the Shared With list.
![]() Click the pop-up button (
Click the pop-up button (![]() ) on the contact’s button.
) on the contact’s button.
The pop-up menu opens.
![]() Click View & Edit to enable the contact to edit the calendar. Click View Only to enable the contact to only view the calendar.
Click View & Edit to enable the contact to edit the calendar. Click View Only to enable the contact to only view the calendar.
![]() You can add other contacts as needed by clicking Share With (
You can add other contacts as needed by clicking Share With (![]() ).
).
![]() Click Done.
Click Done.
Calendar shares the calendar with the people you specified.

Make a Calendar Public
![]() In the Share dialog, click Public Calendar (
In the Share dialog, click Public Calendar (![]() changes to
changes to ![]() ).
).
The URL field appears, showing the web address for the shared calendar.
![]() You can click Share (
You can click Share (![]() ) to share the URL.
) to share the URL.
![]() Click Done.
Click Done.
The Share dialog closes, and the Calendar app makes the calendar public.
Subscribe to a Shared Calendar
Calendar enables you to subscribe to calendars that others have shared on iCloud or published on the Internet. By subscribing to a calendar, you add it to Calendar so that you can view the events in the calendar along with those in your calendars.
You can subscribe to a calendar either by typing or pasting its URL into Calendar or by clicking a link in a message that you have received.
Subscribe to a Shared Calendar

![]() Click Calendar (
Click Calendar (![]() ) on the Dock.
) on the Dock.
Calendar opens.
![]() Click File.
Click File.
The File menu opens.
![]() Click New Calendar Subscription.
Click New Calendar Subscription.
Note: Many organizations, sports teams, and artists make their calendars available on their websites. You can either copy the calendar’s URL or download the calendar.

The Enter the URL of the Calendar You Want to Subscribe To dialog opens.
![]() Type or paste in the calendar’s URL.
Type or paste in the calendar’s URL.
Note: If you receive a link to a published calendar, click the link in Mail. Calendar opens and displays the Enter the URL of the Calendar You Want to Subscribe To dialog with the URL inserted. Click Subscribe.
![]() Click Subscribe.
Click Subscribe.

A dialog opens showing the details of the calendar.
![]() If necessary, edit the default name to display for the calendar.
If necessary, edit the default name to display for the calendar.
![]() Click Color (
Click Color (![]() ) and select the color to use for the calendar.
) and select the color to use for the calendar.
![]() Click Location (
Click Location (![]() ) and choose where to store the calendar. Your choices are iCloud or On My Mac.
) and choose where to store the calendar. Your choices are iCloud or On My Mac.
![]() Click Alerts (
Click Alerts (![]() changes to
changes to ![]() ) if you want to remove alerts.
) if you want to remove alerts.

![]() Click Attachments (
Click Attachments (![]() changes to
changes to ![]() ) if you want to remove attachments.
) if you want to remove attachments.
![]() Click Auto-refresh (
Click Auto-refresh (![]() ) and select your preferred option for automatically refreshing the calendar, such as Every day or Every week.
) and select your preferred option for automatically refreshing the calendar, such as Every day or Every week.
![]() Click Ignore alerts (
Click Ignore alerts (![]() changes to
changes to ![]() ) if you want to ignore alerts set in the calendar.
) if you want to ignore alerts set in the calendar.
![]() Click OK.
Click OK.
Calendar adds the calendar, and its events appear.
Add Someone to Your Contacts
The Contacts app enables you to track and manage your contacts. Contacts stores the data for each contact on a separate virtual address card that contains storage slots for many different items of information, from the person’s name and phone numbers to the e-mail addresses and photo.
To add a contact, you create a new contact card and enter the person’s data on it. You can also add contact information quickly from vCard address card files that you receive.
Add Someone to Your Contacts

![]() Click Contacts (
Click Contacts (![]() ) on the Dock.
) on the Dock.
The Contacts app opens.
![]() Click Add (
Click Add (![]() ).
).
The Add pop-up menu opens.
![]() Click New Contact.
Click New Contact.
Note: You can also create a new contact card by clicking File on the menu bar and then clicking New Card on the File menu.

Contacts creates a new card and selects the First placeholder.
![]() Type the contact’s first name.
Type the contact’s first name.
Note: Press ![]() to move the selection from the current field to the next.
to move the selection from the current field to the next.
![]() Type the contact’s last name.
Type the contact’s last name.
![]() If the contact works for a company, type the company name.
If the contact works for a company, type the company name.
![]() You can click Company (
You can click Company (![]() changes to
changes to ![]() ) when creating a card for a company or organization rather than for an individual. Contacts then uses the company name for sorting.
) when creating a card for a company or organization rather than for an individual. Contacts then uses the company name for sorting.

![]() Click the pop-up menu (
Click the pop-up menu (![]() ) next to the first Phone field and select the type of phone number, such as work or mobile.
) next to the first Phone field and select the type of phone number, such as work or mobile.
![]() Type the phone number.
Type the phone number.
![]() Add other phone numbers as needed.
Add other phone numbers as needed.

![]() Click the pop-up menu (
Click the pop-up menu (![]() ) next to the first Email field and then click the type of e-mail address, such as work or home.
) next to the first Email field and then click the type of e-mail address, such as work or home.
![]() Type the e-mail address.
Type the e-mail address.
![]() Add the physical address and other information.
Add the physical address and other information.
![]() Click Done.
Click Done.
Contacts closes the card for editing.
The card appears in the contacts list.
Note: Only the fields that contain data appear in the card.
Change a Contact’s Information
Contacts makes it easy to change the information for a contact. So when you learn that a contact’s details have changed, or you need to add extra information, you can open the contact record and make the changes needed.
Contacts enables you to add a wide variety of different fields to a contact record to store the information about a contact. You can also add a photo to a contact record.
Change a Contact’s Information

![]() Click Contacts (
Click Contacts (![]() ) on the Dock.
) on the Dock.
The Contacts app opens.
![]() In the left pane, click the contact whose information you want to change.
In the left pane, click the contact whose information you want to change.
![]() Click Edit.
Click Edit.

Contacts opens the contact’s card for editing.
![]() To change an existing field, click it and then type the updated information.
To change an existing field, click it and then type the updated information.
![]() You can add a field by clicking Add (
You can add a field by clicking Add (![]() ) and then clicking the field on the contextual menu or the More Fields submenu.
) and then clicking the field on the contextual menu or the More Fields submenu.
![]() To remove an existing field, click Remove (
To remove an existing field, click Remove (![]() ) next to it.
) next to it.
![]() To add a photo for the contact, click Picture.
To add a photo for the contact, click Picture.

The Picture tab appears.
![]() Click Add (
Click Add (![]() ) or the existing picture, if there is one.
) or the existing picture, if there is one.

A dialog for choosing a picture appears.
![]() Click the photo source, such as Photo Booth.
Click the photo source, such as Photo Booth.
Note: Click Defaults to assign one of macOS’s user account pictures. Click Camera to take a photo with your MacBook’s camera. Click Photos to use a picture from the Photos app. Click Photo Booth to use a picture from the Photo Booth app.
![]() Click the photo you want to use.
Click the photo you want to use.
The photo opens for editing.
![]() Drag the slider to zoom in or out.
Drag the slider to zoom in or out.
![]() Drag the photo to change the part that appears.
Drag the photo to change the part that appears.
![]() Click Save.
Click Save.
Contacts adds the photo to the contact record.
![]() Click Done.
Click Done.
Contacts closes the contact record for editing.
Organize Contacts into Groups
Contacts enables you to organize your contacts into separate groups, making it easier to find the contacts you need. Groups are useful if you have several different categories of contacts, such as family, friends, and colleagues. You can assign any contact to as many groups as needed.
After creating groups, you can view a single group at a time or search within a group. You can also send an e-mail message to all the members of a group.
Organize Contacts into Groups

Create a Group of Contacts
![]() Click Contacts (
Click Contacts (![]() ) on the Dock.
) on the Dock.
The Contacts app opens.
![]() Click View.
Click View.
The View menu opens.
![]() Click Show Groups.
Click Show Groups.
Note: You can also press ![]() +
+ ![]() +
+ ![]() to display or hide the Groups pane.
to display or hide the Groups pane.

The Groups pane opens on the left side of the Contacts window.
![]() Position the pointer over the account in which you want to create the group, such as iCloud.
Position the pointer over the account in which you want to create the group, such as iCloud.
The Add button (![]() ) appears.
) appears.
![]() Click Add (
Click Add (![]() ).
).
Contacts adds a group and displays an edit box around the default name, Untitled Group.
![]() Type the name and press
Type the name and press ![]() .
.
The name appears.
Note: Your contact groups appear on any iOS device you sync with the same iCloud account. iOS devices enable you to create and edit contacts, but not to manipulate groups.

Add Contacts to a Group
![]() Click All Contacts.
Click All Contacts.
Contacts displays all your contacts.
![]() Drag one or more contacts to the new group.
Drag one or more contacts to the new group.
Note: To add multiple contacts to the group, click the first, and then press ![]() + click each of the others. Drag the selected contacts to the group.
+ click each of the others. Drag the selected contacts to the group.

View a Group or Search Within It
![]() Click the group.
Click the group.
Contacts displays the contacts in the group.
![]() To search within the group, click in the Search box and type a search term.
To search within the group, click in the Search box and type a search term.
Contacts displays matching contacts.
![]() Click the contact you want to view.
Click the contact you want to view.
![]() The contact’s details appear.
The contact’s details appear.
Create Notes
The Notes app enables you to create notes stored in an online account, such as your iCloud account, and sync them across your devices. Alternatively, you can store notes on your MacBook itself, which is useful for private notes you do not want to sync in online accounts.
The Notes app automatically saves your notes when you make changes. You can create straightforward notes in plain text, but you can also add formatting, check boxes, photos, and other items.
Create Notes

Open the Notes App and View an Existing Note
![]() Click Notes (
Click Notes (![]() ) on the Dock.
) on the Dock.
Note: If Notes (![]() ) does not appear on the Dock, click Launchpad (
) does not appear on the Dock, click Launchpad (![]() ) and then click Notes (
) and then click Notes (![]() ) on the Launchpad screen.
) on the Launchpad screen.
The Notes window opens.
![]() Click an existing note.
Click an existing note.
![]() The contents of the note appears in the right pane.
The contents of the note appears in the right pane.

Work with Folders and Display the “On My Mac” Account
![]() Click Show Folders (
Click Show Folders (![]() ).
).
Note: You can also toggle the display of the Folders pane by clicking View on the menu bar and then clicking Show Folders.
![]() The Folders pane appears.
The Folders pane appears.
![]() Click New Folder (
Click New Folder (![]() ).
).
Notes creates a new folder and displays an edit box around the default name, Untitled.
![]() Type the name for the folder.
Type the name for the folder.
![]() Click elsewhere or press
Click elsewhere or press ![]() to apply the name.
to apply the name.

Create a New Note and Apply Formatting
![]() In the Folders pane, click the folder in which you want to create the new note.
In the Folders pane, click the folder in which you want to create the new note.
Note: If you do not have the Folders pane displayed, you cannot control which folder Notes creates the new note in. You can move the note to another folder later if necessary.
![]() Click Create a Note (
Click Create a Note (![]() ).
).
Notes creates a new blank note.
![]() Type the title of the note and press
Type the title of the note and press ![]() .
.
Note: To set the style Notes uses for the first paragraph of a note, click Format on the menu bar; click New Notes Start With; and then click Title, Heading, or Body, as needed.
![]() Start typing the text of the note.
Start typing the text of the note.

![]() When you need to change the style for a paragraph, click Styles (
When you need to change the style for a paragraph, click Styles (![]() ).
).
The Styles pop-up panel opens.
![]() Click the style you want to apply: Title, Heading, Body, Monospaced, Bulleted List, Dashed List, or Numbered List.
Click the style you want to apply: Title, Heading, Body, Monospaced, Bulleted List, Dashed List, or Numbered List.
Note: Notes automatically switches to the Body style for the paragraph after a Title paragraph or a Heading paragraph. Notes continues the Body, Monospaced, Bulleted List, Dashed List, and Numbered List styles until you change styles manually.
The Notes app includes seven built-in styles that enable you to format your notes with a title, headings, body text, monospaced text, bulleted lists, dashed lists, and numbered lists. By using these styles to format notes instead of using direct formatting, such as bold and italic, you can create structured notes that you can easily use in a word processing app.
You can also create checklists, lists from which you can check off completed items, and create tables with as many columns and rows as you need.
The Styles pop-up panel closes.
Notes applies the style to the paragraph.
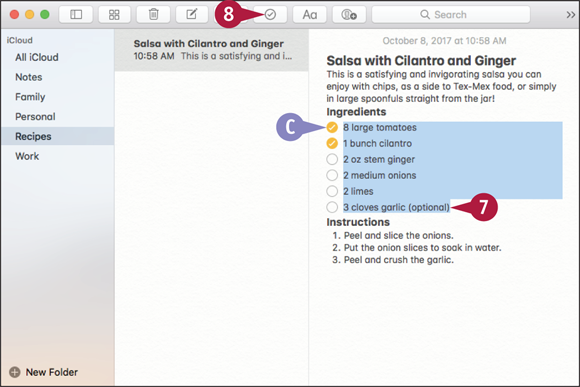
![]() To create a checklist, drag to select the paragraphs for the list.
To create a checklist, drag to select the paragraphs for the list.
![]() Click Make a checklist (
Click Make a checklist (![]() ).
).
A round check box (![]() ) appears before each paragraph.
) appears before each paragraph.
![]() You can click a check box to select it (
You can click a check box to select it (![]() changes to
changes to ![]() ).
).

![]() When you want to apply other formatting, drag to select the text you want to affect.
When you want to apply other formatting, drag to select the text you want to affect.
![]() Click Format.
Click Format.
The Format menu opens.
![]() Click or highlight Font, Text, or Indentation. This example uses Font.
Click or highlight Font, Text, or Indentation. This example uses Font.
The submenu opens.
![]() Click the formatting you want to apply. For example, click Italic.
Click the formatting you want to apply. For example, click Italic.
Notes applies that formatting to the text.

Insert a Table
![]() Position the insertion point where you want the table to appear.
Position the insertion point where you want the table to appear.
![]() Click Add Table (
Click Add Table (![]() ).
).
Notes inserts a table with two columns and two rows.
The insertion point appears in the first cell.
![]() Type the content for the first cell.
Type the content for the first cell.
![]() Press
Press ![]() .
.
The focus moves to the next cell.
![]() Type the content for the next cell.
Type the content for the next cell.
![]() Press
Press ![]() + click Select Column (
+ click Select Column (![]() ).
).

The pop-up menu appears.
![]() Click Add Column After.
Click Add Column After.
![]() You can click Delete Column to delete the current column.
You can click Delete Column to delete the current column.
Notes adds a new column.
![]() Continue typing the cell entries, pressing
Continue typing the cell entries, pressing ![]() to move to the next cell.
to move to the next cell.
Note: If the current cell is the last cell in the table, pressing ![]() automatically adds a row to the table.
automatically adds a row to the table.
![]() You can add a new row below the current row by pressing
You can add a new row below the current row by pressing ![]() + clicking Select Row (
+ clicking Select Row (![]() ) and then clicking Add Row Below on the pop-up menu.
) and then clicking Add Row Below on the pop-up menu.
![]() When you finish working with Notes, click Close (
When you finish working with Notes, click Close (![]() ).
).
The Notes app closes.
Track Your Commitments with Reminders
The Reminders app gives you an easy way to track what you have to do and your progress on your tasks. Reminders enables you to link a reminder to a specific time, a specific location, or both. Linking a reminder to a location is useful when you sync your reminders from your MacBook with an iPhone, iPad, or iPod touch that you carry from location to location. You can assign your reminders to different reminders lists for easy management.
Track Your Commitments with Reminders

Open Reminders and Manage Your Reminders Lists
![]() Click Reminders (
Click Reminders (![]() ) on the Dock.
) on the Dock.
Note: If the Reminders icon (![]() ) does not appear on the Dock, click Launchpad (
) does not appear on the Dock, click Launchpad (![]() ), and then click Reminders (
), and then click Reminders (![]() ).
).
The Reminders app opens.
![]() The sidebar on the left shows your various lists of reminders.
The sidebar on the left shows your various lists of reminders.
Note: If the sidebar does not appear, click View on the menu bar and then click Show Sidebar to display it.
![]() The main pane shows the reminders in the selected list.
The main pane shows the reminders in the selected list.
![]() Click Add List (
Click Add List (![]() ).
).

![]() A new reminders list appears, provisionally titled New List.
A new reminders list appears, provisionally titled New List.
![]() Type the name for the list, and then press
Type the name for the list, and then press ![]() .
.
Note: You can drag your lists of reminders into a different order if you want.
Note: To delete a list of reminders, press ![]() + click the list, click Delete, and then click Delete in the confirmation dialog.
+ click the list, click Delete, and then click Delete in the confirmation dialog.

Create a Reminder
![]() In the sidebar, click the list in which to create the new reminder.
In the sidebar, click the list in which to create the new reminder.
![]() Click Add (
Click Add (![]() ).
).
A new reminder appears in the list.
![]() Type the text of the reminder.
Type the text of the reminder.
The Info button (![]() ) appears to the right of the reminder.
) appears to the right of the reminder.
![]() Click Info (
Click Info (![]() ).
).

The Info panel appears.
![]() Click On a Day (
Click On a Day (![]() changes to
changes to ![]() ).
).
The date and time controls appear.
![]() Click the date and then set the date for the reminder.
Click the date and then set the date for the reminder.
![]() Click the time and then set the time for the reminder.
Click the time and then set the time for the reminder.
![]() If you want the reminder to repeat, click repeat and specify the frequency, such as Every Week.
If you want the reminder to repeat, click repeat and specify the frequency, such as Every Week.
To find the reminders you need to work with, you can search through your reminders.
When you have completed the task for a reminder, you select the reminder’s check box to mark it as complete. The reminder then disappears from your reminder lists, but you can view your completed reminders at any time by displaying the Completed list.

![]() Click priority (
Click priority (![]() ) and then click the priority: None, Low, Medium, or High.
) and then click the priority: None, Low, Medium, or High.
![]() Click note and type any notes needed for the reminder.
Click note and type any notes needed for the reminder.
![]() Click Done.
Click Done.
The Info panel closes.

Search for a Reminder
![]() Click in the Search box.
Click in the Search box.
Note: You do not need to select a particular list before searching, because Reminders searches across all your reminder lists.

![]() Start typing your search term or terms.
Start typing your search term or terms.
![]() A list of matches appears.
A list of matches appears.
![]() You can click Clear (
You can click Clear (![]() ) to clear the search, restoring the view to the reminders list you were viewing before.
) to clear the search, restoring the view to the reminders list you were viewing before.

Mark a Reminder as Completed
![]() Click the check box to the left of the reminder (
Click the check box to the left of the reminder (![]() changes to
changes to ![]() ).
).
Reminders slides the completed reminder to the top of the list and then removes it.
Note: To see the reminders you have completed, scroll to the top of the reminder list. The Completed line appears, showing the number of items you have completed. Click Show to display the completed items.
Note: To delete a reminder, press ![]() + click it, and then click Delete on the contextual menu.
+ click it, and then click Delete on the contextual menu.
Get Directions
The Maps app enables you to pinpoint your MacBook’s location by using known wireless networks. You can view your location on a road map, display a satellite picture, or view transit information for some areas. You can easily switch among map types to find the most useful one for your current needs, and you can use Maps to get directions to where you want to go.
Get Directions

Open Maps and Find Your Location
![]() Click Maps (
Click Maps (![]() ) on the Dock, or click Launchpad (
) on the Dock, or click Launchpad (![]() ) on the Dock and then click Maps (
) on the Dock and then click Maps (![]() ) on the Launchpad screen.
) on the Launchpad screen.
The Maps window opens.
![]() Click Show Your Current Location (
Click Show Your Current Location (![]() ).
).
![]() A blue dot shows your current location. The blue circle indicates that Maps is determining your location.
A blue dot shows your current location. The blue circle indicates that Maps is determining your location.
![]() You can display the scale temporarily by placing two fingers on the trackpad and pinching together or apart a short way.
You can display the scale temporarily by placing two fingers on the trackpad and pinching together or apart a short way.

Change the Map Type and Zoom In or Out
![]() Click Satellite.
Click Satellite.
The map switches to Satellite view, showing satellite images with place names.
![]() Click Zoom Out (
Click Zoom Out (![]() ) one or more times.
) one or more times.
The map zooms out.
Note: Click Zoom In (![]() ) to zoom in.
) to zoom in.
Note: You can rotate the map by placing two fingers on the trackpad and turning them. To return the map to its default northward orientation, click the orange triangle on the 3D icon (![]() ).
).
![]() Click Show (
Click Show (![]() ).
).
The pop-up menu opens.
![]() Click Show Labels.
Click Show Labels.
The place names appear.
![]() You can click Show Traffic to show traffic.
You can click Show Traffic to show traffic.
![]() You can click Show 3D Map to switch to a 3D map.
You can click Show 3D Map to switch to a 3D map.

Get Directions
![]() Click Directions.
Click Directions.
The Directions pane opens, suggesting Current Location as your starting point.
![]() Click Start and type your start point.
Click Start and type your start point.
The Suggestions panel appears.
![]() Click the best suggestion.
Click the best suggestion.

![]() Click End and type your end point.
Click End and type your end point.
Maps displays suggested routes.
![]() Click Details for the route you want to view.
Click Details for the route you want to view.
![]() The current route’s details appear in the Directions pane.
The current route’s details appear in the Directions pane.
![]() The green pin marks the start.
The green pin marks the start.
![]() The red pin marks the end.
The red pin marks the end.
![]() The current route appears in darker blue.
The current route appears in darker blue.
![]() You can click another route or its time box to display its details.
You can click another route or its time box to display its details.
![]() Click a direction to display that part of the route.
Click a direction to display that part of the route.
Explore with 3D Flyovers in Maps
The Maps app enables you not only to find out where you are and get directions to places, but also to explore with 3D flyovers of the places on the map.
To use 3D flyovers, you navigate to the place you want to explore, and then switch on the 3D feature. You can then zoom in and out on the map, pan around, and move backward to forward.
Explore with Maps

![]() Click Maps (
Click Maps (![]() ) on the Dock.
) on the Dock.
Note: If Maps (![]() ) does not appear on the Dock, click Launchpad (
) does not appear on the Dock, click Launchpad (![]() ) on the Dock and then click Maps (
) on the Dock and then click Maps (![]() ) on the Launchpad screen.
) on the Launchpad screen.
The Maps window opens.
![]() Display the area of interest in the middle of the screen by browsing or searching.
Display the area of interest in the middle of the screen by browsing or searching.
![]() Click 3D (
Click 3D (![]() ).
).

The map switches to Flyover view.
![]() Click Zoom In (
Click Zoom In (![]() ) to zoom in.
) to zoom in.
![]() Drag to scroll the map.
Drag to scroll the map.
Note: You can also scroll the map by placing two fingers on the trackpad and dragging.

![]() Place two fingers on the trackpad and turn them clockwise or counterclockwise.
Place two fingers on the trackpad and turn them clockwise or counterclockwise.
Note: You can also rotate the view by pressing ![]() + clicking and dragging clockwise or counterclockwise.
+ clicking and dragging clockwise or counterclockwise.

The view rotates, and you can explore.
Note: Pan and zoom as needed to explore the area.
![]() The red arrow on the 3D icon (
The red arrow on the 3D icon (![]() ) indicates north. You can click this icon to restore the direction to north.
) indicates north. You can click this icon to restore the direction to north.
![]() Click 3D (
Click 3D (![]() ).
).
The map returns to normal view.