Chapter 6
Entering the Wonderful World of Slack Messages
IN THIS CHAPTER
![]() Working with direct messages
Working with direct messages
![]() Sharing files with others
Sharing files with others
![]() Maintaining contact outside of Slack
Maintaining contact outside of Slack
Slack is a remarkably flexible and powerful tool on many levels. For example, Chapter 5 covers how you can use public and private channels to solicit information from — and provide targeted information to — others in your workspace. To be sure, that’s useful. Still, you may be wondering if the channel is the only way to interact with your colleagues and partners in Slack.
The answer is a resounding no.
Slack’s management understands that channels frequently don’t represent the only (let alone the best) way for people to communicate with each other. To this end, and as this chapter demonstrates, Slack lets you send discrete, direct messages to individuals and groups. Even better, threads let you lump messages together into a single unit.
Understanding Slack Messages
Within a given workspace, you can send anyone a direct message (DM) about anything and respond. (Whether the recipient responds is another matter.) You can also post messages in channels. Slack lets users attach files to their messages, as well as share links, jokes, MP3s, videos, and whatever else they want.
Sending a message
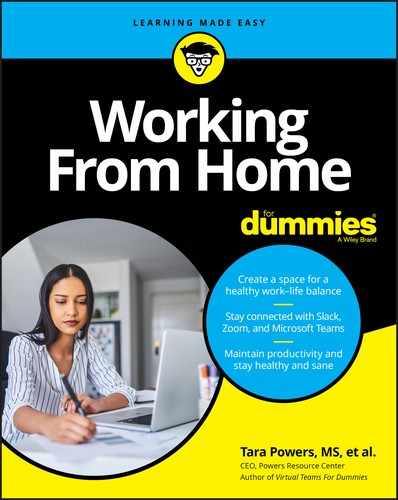
To send a message in Slack, follow these steps:
-
Click the message icon at the top of your workspace.
You can also click the plus sign next to Direct Messages in the lower part of the sidebar.
-
From the drop-down menu, either type a few letters of the person’s name or scroll down until you find him or her.
Slack displays a screen similar to Figure 6-1.
When you enter a person’s name, press the Tab key on your keyboard. Your cursor begins blinking in the message line.
 The process for posting a message to a channel is identical to sending a DM. The only difference is the recipient: a channel, not a person or group of people.
FIGURE 6-1: Composing a simple DM to send to a colleague.
-
(Optional) To attach a file to your message, click the paper-clip icon in the lower-right corner of the screen.
From there, you can attach a file in a way similar to how you add attachments to email messages. To easily share a file on your computer in a message, drag it from your desktop or a folder into Slack’s message window. Either way, Slack attaches the file you chose or dragged to your message after you’ve clicked the green Upload button.
- (Optional) Click the
@icon if you'd like to mention another workspace member in your message. - (Optional) Click the emoji icon and select one if you want to spice up your message or add a reaction.
- Press the Enter key on your keyboard.
After you send a message, Slackbot alerts you if the recipient has paused notifications. If you click Notify Them Anyway, Slack attempts to alert the individual. (Chapter 7 covers notifications in more depth.)
By default, the bottom half of the Slack sidebar shows you the people with whom you’ve most recently interacted. Of course, you can send a message to any workspace member at any point.
You can also send DMs to multiple members. You follow the same process covered in the preceding steps. Instead of choosing one recipient in Step 2, though, select as many recipients as you like (see Figure 6-2).
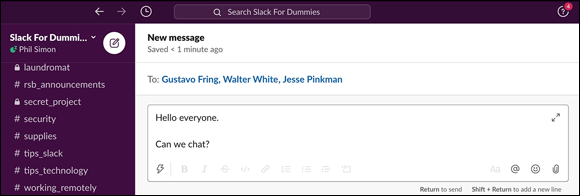
FIGURE 6-2: Selecting recipients for a group DM.
Figure 6-3 shows the results of a group DM.
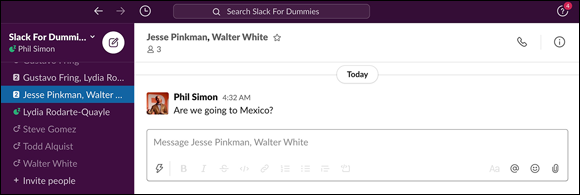
FIGURE 6-3: A group DM.
After you send a group DM, the recipients appear under Direct Messages in the sidebar. What’s more, Slack usefully displays a number to the left of the group to indicate how many members belong to your group DM.
If you want to leave yourself a note or just paste some text from another application, you’re in luck: Slack lets you send yourself DMs as you see in Figure 6-4. Simply select yourself as the recipient in Step 2 in the preceding directions.

FIGURE 6-4: An example of a DM sent to yourself.
Performing basic message actions
Slack lets you do much more than send simple messages to your peers. You have plenty of tools at your disposal.
Saving message drafts
Much as with email, Slack lets you save drafts of DMs. Simply enter some text into the message pane. Move to a different pane, and Slack saves your text as a draft.
To access all your drafts, click the Drafts view at the top of your workspace (see Figure 6-5). Return to your drafts whenever you like.

FIGURE 6-5: Slack Drafts view.
Slack bolds the word Drafts when you’ve created one or more drafts. If you haven’t saved any drafts, Slack won’t do this.
Marking messages as read or unread
At some point you’ve probably used your email program’s Mark as Read feature. Slack offers the same ability in both channels and conversations. To mark a read message as unread, follow these steps:
-
Hover over the message.
Three dots appear next to the message along with the words More Actions.
-
Click Mark Unread.
When you mark a previously read message as unread, Slack bolds the name of the person or channel name in the sidebar. The visual indicator reminds you that the ball is in your court.
Understanding Slack conversations
Broadly speaking, conversations refer to a series of either individual or group DMs. Put differently, a conversation is an exchange of DMs with other workspace members that takes place outside of a channel. That last part is critical.
By default, Slack automatically creates a conversation when you exchange a DM with one or more workspace members. You can view all your conversations in the bottom half of the sidebar under the Direct Messages view.
Referencing public channels in direct messages
Although it’s not a requirement, referencing public channel names in your DMs is a good idea. You can do this by including the hashtag before the channel name. Slack automatically creates a blue hyperlink to a public channel, but not a private one. Table 6-1 displays what happens when you use hashtags in Slack.
TABLE 6-1 Referencing Channel Names in DMs
|
Action |
Results |
|
Send a DM with a hashtag preceding the name of a public channel (for example, |
The term |
|
Send a DM with a hashtag preceding the name of the private channel (for example, |
|
For example, Figure 6-6 references the #tips_technology channel. Following this practice makes it easy for the recipient(s) to navigate to the referenced public channel.

FIGURE 6-6: A DM referencing a public channel.
Formatting your messages
Perhaps you want to emphasize certain elements of your DMs to individuals or within channels. For instance, Elaine Benes of Seinfeld fame wants to go beyond merely inserting exclamation points to accentuate her points.
Fortunately, Slack offers plenty of options if you want to spice up the format of your message. Slack easily allows users to create numbered and bulleted lists, italicize and bold text, insert code from different programming languages, and more.
At a high level, Slack offers two options for sprucing up your messages: a visual or WYSIWYG editor and keyboard shortcuts. (WYSIWYG stands for “what you see is what you get.”)
Using Slack’s WYSIWYG editor
Prettying up your text is remarkably intuitive. In this vein, Slack resembles word-processing programs such as Microsoft Word. For instance, to bold a block of text, simply select the words and press the B icon underneath the text section and — voilà! — the text is bold. Ditto for italicizing text. Table 6-2 presents all Slack’s visual formatting options from left to right.
TABLE 6-2 Formatting Slack DMs via the WYSIWYG Editor
|
Icon |
Operation |
|
Lightning bolt |
Invokes a number of shortcuts not specific to formatting per se, but still useful. |
|
B |
Bolds the text. |
|
I |
Italicizes the text. |
|
Strikethrough |
Applies strikethrough to the text. |
|
</> |
Applies code style to the existing text. |
|
Link |
Hyperlinks text. That is, your text directs to a URL. |
|
Numbers |
Creates a numbered list. |
|
Bullets |
Creates a bulleted list. |
|
Blockquote |
Indents text to indicate that you’re quoting another source or person. |
|
Code block |
Inserts an entirely new block of code. |
|
Aa |
Hides the text-formatting options. |
|
@ |
Mentions someone. |
|
⤺ |
Adds an emoji. |
|
Paper clip |
Attaches a file to a message. |
Saving time with keyboard shortcuts
If you’re more of a shortcut person, you’re in luck as well. Slack lets you disable the rich-text formatting options by clicking the letter icon. Table 6-3 shows you how to format DMs using keyboard shortcuts.
You don’t need to memorize these shortcuts if you prefer using the WYSIWYG editor.
TABLE 6-3 Formatting Slack DMs via Keyboard Shortcuts
|
Format |
Keyboard Combination |
|
Start a new paragraph |
Press Shift+Enter as many times as you like. |
|
Bold |
Place asterisks at the start and end of the text. |
|
Italics |
Place underscores at the start and end of the text. |
|
Strikethrough |
Place tildes (~) at the start and end of the text. |
|
Quoting one or more sentences |
Place an angled bracket (>) at the start of the text. |
|
Inline code |
Place back ticks (`) at the start and end of the text. Three back ticks formats a block of text. |
|
Bulleted lists |
Press Shift+8 and then press Shift+Enter/Return. Also, you can press *+Space (an asterisk plus a space) or -+Space (a hyphen plus a space), and the formatting auto-adjusts to a bulleted list. |
|
Numbered lists |
Mac users: Press ⌘ +Shift+7. PC users: Press Ctrl+Shift+7. Also, you can press 1+.+Space (the number 1 plus a period plus a space). Slack auto-adjusts the message formatting to a numbered list. |
Regardless of whether you’re a mouse or keyboard person, you can mix and match your styles in Slack messages. If you want to use bulleted lists, bold text, and a snippet of code in the same message, knock yourself out.
Finding people in your workspace to message
You’ll send plenty of DMs in Slack to different people. This begs the question: How can you find your colleagues? You won’t need to leave Slack and search your company’s email directory. Slack conveniently lets you find fellow workspace members in several ways:
-
Click the People view in the top half of the sidebar.
Slack shows you something similar to Figure 6-7.

FIGURE 6-7: Slack’s People view.
- Type some letters of the person’s name in the search bar or just scroll down until you see the person’s name or photo.
When you click a person’s name, Slack displays his profile and places a bar underneath his photo indicating his role (for example, Workspace Admin). Slack does this with all user roles save for member. (See Chapter 4 for more information on roles.)
The People view lets you sort by name, but there are plenty of other ways to quickly find the right person in your workspace. You can filter by role and even deactivated users by following these steps:
- Click the People view in the top half of the sidebar.
- Click the filter icon next to the search bar and go nuts.
You can filter by account type or whether the person uses Slack on a PC or a Mac. You can also hide deactivated accounts.
 Enterprise Grid workspaces work just a little bit differently than they do with other Slack plans. For example, in all other Slack plans, you see only the profiles of members in your individual workspace. That’s not the case with Enterprise Grid, though. You can filter workspace members, as well as organization members.
 In large firms, being able to view all employees in the Slack workspace or organization is both a blessing and a curse. Just as with email, if you’re not careful, you can send a DM to the wrong person. Before pressing Enter, consider double-checking the person’s profile to ensure that you have the right recipient, especially if your query is sensitive in nature.
Just because you find a colleague’s name in the People view doesn’t necessarily mean that the person uses Slack. This problem is particularly acute in big companies that pay for the Enterprise Grid plan.
Slack lets you do far more than send and read simple text DMs. You can edit DMs, delete them, set reminders, pin individual ones to conversations, and much more.
Editing messages
People send billions of emails every day and occasionally make mistakes. After you send an email, though, it’s out there for good unless you catch the mistake quickly and try to recall it.
Compared to email, Slack wins here hands down. If you make a mistake, you don’t need to send yet another message to everyone. Even after you send a DM, you can edit it. To do so, just follow these steps:
- Hover over a message from a colleague and three dots appear on the right in a pop-up menu.
- Click Edit Message.
- Make whatever edits to the message you like.
-
Click the green Save Changes button.
Slack saves your changes.
Note: Slack appends the text “(edited)” to the end of your initial message.
For obvious reasons, Slack prohibits even Owners and Admins from editing other users’ messages — anonymously or otherwise. Talk about opening Pandora’s box!
Deleting messages
Who hasn’t accidentally clicked Reply All on an email and regretted it five minutes later? Recalling a message may not work before others have seen it. Indeed, the mere fact that you try to recall the message may make others more inclined to read it. Slack again offers superior functionality to email.
To delete one of your messages, follow these steps:
-
Hover your mouse over the message that you want to eradicate.
Three horizontal dots and the More Actions icon appear.
-
Click Delete Message.
Slack confirms that you want to obliterate the message.
-
Click the Delete button to complete the kill.
The message disappears from Slack for good.
Just because you delete a DM doesn’t mean that someone else hasn’t already seen it. Shaking your head? When it comes to deleting individual emails, Outlook’s message-recall functionality is no fail-safe either.
Workspace Owners and Admins can delete others’ messages in public channels. This feature comes in handy if someone posts an inappropriate message.
Muting conversations
Say that you want Slack to stop pestering you with notifications about an especially noisy individual or group conversation. You can easily mute it by following these steps:
- Click the conversation that you want to mute.
-
Click the information (i) icon in the upper-right corner.
Underneath the profile image of the person with whom you’re conversing, Slack displays a three-pane tab below the word Details.
- Click the More tab on the right.
- From the drop-down menu, click Mute Conversation.
To restore proper notifications for the muted conversation, repeat this process but click Unmute Conversation in Step 4.
Say that you’ve muted a conversation with Lydia, and she sends you another DM. Slack won’t notify you. It will, however, place a red numerical badge next to her name in your sidebar. If she sends you three messages, a red 3 will appear.
Setting message-specific reminders
Odds are that you use reminders in real life. Perhaps you use a sticky note or a full-blown reminders app on your smartphone. Regardless of your tool of choice, you don’t want to forget critical things like anniversaries, paying taxes, or that Netflix premiere you’ve been waiting for.
Say you’re working on a coding project. Gilfoyle sent you yet another DM. Unfortunately, you just don’t have time to deal with him right now. To remind yourself about a specific DM, follow these steps:
- Mouse over a DM or channel message.
-
Click the three horizontal dots.
Slack displays the words More Actions.
-
Click Remind Me about This.
Slack displays a pop-up window that offers you a number of options from 20 minutes to next week.
-
Select the time and/or date that you want Slack to send you a reminder about the message.
Slack notifies you about the message with a notification at the time specified in Step 4.
Feel free to snooze a reminder when it goes off, just like your alarm clock.
Saving direct messages and channel messages
With so many messages in a workspace, are you skeptical about keeping tabs on the critical ones? Slack allows you to easily access your most important content. When you save a message, Slack places it in its Saved view. If saving in Slack seems similar to bookmarking websites and pages in your web browser, that’s because it is.
It’s a bit of a misnomer to call this process saving. Slack saves everything posted in your workspace by default unless you delete it.
To save a DM or channel message, follow these steps:
-
Hover over a message that you’d like to save.
Slack displays a menu with five icons.
-
Click the white bookmark icon.
It’s the second one from the right.
Slack turns the bookmark icon red.
You can now find a shortcut to the item in your Saved view in the top half of the sidebar.
As Figure 6-8 shows, Slack’s Saved view displays items in reverse chronological order from the date that you saved them. Slack does not sort these messages by the date that the sender originally sent or posted them.

FIGURE 6-8: Slack saved a DM.
To unsave an item, click the red bookmark for the saved item. The message’s bookmark icon returns to its original white color. Slack does not delete the message; it just ceases to appear in your Saved view.
Pinning direct messages to conversations
In any given Slack workspace, you’ll mostly likely interact with some people more than others. Over the course of months or years, you may have hundreds or even thousands of conversations with your colleagues about many different things. All messages are certainly not created equal. For example, a major group or department decision counts more than a simple thank you to your peer.
Alas, Slack lets users easily identify key DMs within a conversation. You can pin DMs to conversations. As such, you’ll be able to easily view the most important content in the conversation’s details pane.
To pin a comment to a conversation:
- Hover your mouse over the DM that you want to pin to the conversation.
-
Click Pin to This Conversation.
Slack automatically pins the message to the top of the conversation.
Slack lets you pin DMs to individual conversations. Figure 6-9 shows a pinned DM within a conversation.

FIGURE 6-9: Viewing pinned DMs in a conversation.
To unpin a message from the larger conversation, repeat the preceding steps, but in Step 2, click Un-pin from This Conversation. You can also click the X in the upper-right corner of the message. Note that removing the pin does not delete the DM.
Creating special types of messages
To be sure, you’ll get a great deal of mileage out of sending simple DMs and posting comments to discussions in channels. However, Slack recognizes that sometimes users need to send something other than text-based responses.
Welcome to the world of posts and snippets!
Creating rich-text messages with posts
Slack posts are similar to simple messages, but they allow users to apply richer formatting. The post functionality lets users create, edit, and share fully formatted documents directly in Slack. Posts represent a great way to collaborate on relatively simple long-form content. To be fair, though, you won’t be saying goodbye to Google Docs and Microsoft Word anytime soon. Examples of posts include project plans, meeting notes, articles, and drafts of blog posts. Slack posts show a green document icon to their immediate left after a user publishes one.
To create a proper post in a Slack channel, follow these steps:
- Click a channel in the sidebar.
-
In the message window in the lower-left corner, click the lightning bolt icon.
Slack displays a new menu.
-
Click Create a Post.
Slack launches a new window that you’ll use to create your post.
-
Add a title and any other formatting.
You can also add simple and formatted text, headers, bullet points, URLs, code, and more goodies.
After you type text in the main window, highlight it and mouse over it to see all your formatting options.
-
When you’re finished creating your post, click the white Share button at the top of the screen.
Slack displays self-explanatory options around sharing the post, letting others edit it, creating a link, and adding comments. Figure 6-10 displays those options.
-
When you’re finished, click the green Share button.
Your post looks something like the one in Figure 6-11.

FIGURE 6-10: Sample post options.

FIGURE 6-11: A sample rich-text post in Slack.
You can view existing posts on your Slack mobile app, but you’ll need to use Slack on a proper computer to create and edit them. You can view, create, edit, and delete regular channel messages, though, on any device you like.
Adding code and text snippets
In Slack, snippets represent a quick and simple way to share bits of code, configuration files, or log files with channel members. Slack’s native ability to easily share code represents one of the major reasons that software engineers are so fond of Slack.
Creating both types of snippets is nearly identical to creating a rich-text message. To create a proper post in a Slack channel, follow these steps:
- Click a channel in the sidebar.
-
In the message window in the lower-left corner, click the lightning bolt icon.
Slack displays a new menu.
-
Click Create a Code or Text Snippet.
Slack launches a new window.
- Use the new window to create your snippet.
-
(Optional) At the top of the page, add a title for your snippet and the type of snippet.
If you create a code snippet, Slack attempts to determine the programming language that you’re using. If Slack doesn’t get it right, just specify the language yourself from the drop-down menu. -
Enter your text or code in the main window under the Content heading.
Highlight text and mouse over it to see all your formatting options.
- (Optional) Enter a message that introduces your snippet to your intended audience.
-
When you’re finished creating your snippet, enter your snippet’s audience.
It may be a channel, an individual, or several folks.
Slack displays self-explanatory options around sharing the snippet.
-
When you’re finished, click the green Create Snippet.
Slack automatically places line numbers to the left of each line in a snippet. Figure 6-12 shows an example of a code snippet.
You can download a text snippet, view raw versions, and/or leave comments. After creating one, Slack places a white icon with a capital T to its immediate left. When you click it, you can view the snippet’s content.
FIGURE 6-12: A sample code snippet in Slack.
Mouse over a current snippet in a channel. Slack displays these options:
- Collapse or expand (depending on the length of your snippet)
- Download
- Edit
- Share
Click the ellipsis icon, and Slack displays these options as well:
- View Details
- Copy Link to File
- Save
- View Raw
- Create External Link
- Delete File
You can use posts and snippets as the basis for individual and group DMs. You don’t need to confine snippets to channels.
Converting group direct messages into private channels
For lack of a better word, channels are more permanent than individual and group DMs. If you find that it makes sense to elevate your group discussion to a proper channel, you’re in luck. As long as your conversation involves more than two people, just follow these steps:
- Click the group DM that you want to convert.
-
Click the information (i) icon in the upper-right corner.
Underneath the profile images of the people with whom you’re conversing, Slack displays a three-pane tab.
- Click the More icon.
- From the drop-down menu, click Convert to a Private Channel.
-
Confirm that you want to create the channel by clicking the green Yes, Continue button.
Slack creates a new private channel. Everyone in it can view the entire message history and all the shared files. You can’t go back.
-
Enter a name for the channel and click the green Convert to a Private Channel button.
Slack moves all the prior DMs into a new private channel.
For privacy reasons, you can’t turn a series of group DMs into a public channel.
Using threads to create topic-specific containers
A Slack thread represents a reply or series of replies to a specific DM or an in-channel interaction. Slack’s rationale for threads is to allow users to engage in more focused discussions around a single topic — one that can take place separately from other messages in a conversation or channel. Although similar in concept, Slack threads operate a bit differently from DM-based conversations in a couple ways:
- Unlike in conversations, you can create threads from discussions that take place either within or outside of channels (see the earlier section “Understanding Slack conversations”). In other words, Slack allows users to create and view threads regardless of where they take place. When you start one, Slack provides notifications of new responses at the top of the workspace under the Threads header in the sidebar. If you’re following ten threads from six channels and four different conversations, you can scan them all in one place. Put differently, through threads, you don’t need to hunt down each response in ten different places.
- Threads are useful, but they’re entirely optional. Unlike conversations, Slack doesn’t automatically start them for you.
Reviewing examples of threads
The types of threads run the gamut. Here a few:
- Tech-support teams may use the
#hardware_issueschannel to discuss a problem with a server or router. Rather than lump everything into that single channel, they thread the discussion within that channel about problems with a particular piece of equipment. - HR folks often talk about company policies and the discussion sometimes gets into the nitty-gritty. A thread on the implications of offering paid family leave makes a lot of sense.
- Gus and Walt are having an animated discussion (outside of a channel) about a key business strategy. Each of them creates a thread in his Slack workspace to receive alerts about the other's latest response.
- Four partners in a consulting firm are providing specific feedback on a deck of PowerPoint slides. By creating a thread, you keep all comments organized.
-
A college professor creates an
#ask_the_professorchannel for her classes every semester. That’s a big bucket, to be sure. Students will usually ask her questions about the textbook that they’re using, such as- What version of the textbook do I have to buy?
- Can I share the textbook with my roommate?
- Can I buy the electronic version?
The professor turns each of these queries into a channel thread. For simple yes-or-no questions, a thread rarely makes sense. Still, there’s really no downside to using them.
Creating, following, and viewing threads
To start a thread in Slack, follow these directions:
-
Hover over a message.
Slack presents a floating menu with icons with the words More Actions.
- Mouse over the second icon from the left and click Start a Thread.
Slack makes it easy to view threads in the full context of their channels:
-
Hover over a message in the thread.
Slack presents a floating menu with icons and the words More Actions.
- Mouse over the second icon from the left and click the Open in Channel icon that appears.
- To view all threads, click the Threads view in the top half of your sidebar underneath the workspace name.
As you use Slack, you’ll soon realize that not all discussions and content are created equal; you’ll invariably view some discussions as more important than others. For example, a software engineer, VP of human resources, and finance manager will all keep their eyes on different discussions. Threads are invaluable in this regard.
Unfollowing threads
If you want to disengage from an individual thread, simply unfollow it:
- Hover over a message in a thread that you currently follow.
-
Click the three vertical dots on the far right.
Slack presents the words More Actions.
- At the top of the new menu, select Unfollow Thread.
Note that you can’t mute threads, nor can you delete them. After you unfollow a thread, Slack no longer shows you those red badges for that thread under the Threads header in the sidebar. Of course, you still may see badges from threads that you’re following if someone calls you out.
Many people only use threads on a case-by-case basis. If the majority of your interactions are discrete, threads may not make sense for you. If, however, you find yourself routinely going back and forth with people about a specific topic, a thread is the perfect vehicle for tracking updates to a particular discussion.
Sharing in Slack
Slack is a group tool, not an individual one. Aside from sending DMs and posting messages in channels, you’ll often share content with your colleagues. At a high level, Slack lets you share files and messages.
Sharing files
At some point in your Slack journey, you’ll want to share documents that you’ve created in other applications with your colleagues and maybe even with yourself. Typical examples include spreadsheets, documents, photos, and presentations. Slack’s Files view makes this a snap.
Uploading files to share
To upload a file that you intend to share, follow these steps:
- Click Files in the sidebar.
-
Click the white Upload a File button in the upper-right corner.
Slack prompts you to locate the file on the computer.
-
Find the file and upload it.
You can do this in the same way as you do with email attachments. It’s probably the Open button, but the exact name will hinge upon your computer’s operating system.
- (Optional) From the prompt, enter a message about the file.
-
(Optional) Click the blue Add File link to add another file.
Slack allows you to upload multiple files at a time.
-
(Optional) From the drop-down menu, choose the channel, group of users, or app with which you want to share the file(s).
Again, you can share file(s) with yourself — and no one else.
- Click the green Upload button.
Play around with Slack’s powerful search options here. Specifically, you can
- Use the Files search bar to find specific documents.
- Sort existing shared files by name and date.
- Filter files by type, date range, and/or member who shared the file with you.
As Figure 6-13 displays, Slack’s Files view allows you to easily access the files that you’ve shared — and that others have shared with you.
Note that you can also use Slack’s main search bar at the very top of the workspace to find workspace files.

FIGURE 6-13: Slack’s Files view.
Copying links to existing Slack files
As another option, Slack allows users to create links to individual files that you’ve posted in public channels. Slack intends for you to share these links with existing workspace members. Follow these steps:
-
Hover your mouse over the file.
Three horizontal dots and the More Actions icon appear.
- Click Copy Link to File.
- Share the file link in a channel or direct message.
Note that this process creates a private link. Even outsiders who obtain access to that URL can’t view the page. Only members of the Slack workspace can view the link.
Creating external links to files posted in channels
Say that you upload a file to a channel. Now you want to share a link to that file within Slack with someone who does not belong to the workspace. You can do so by following these steps:
-
Hover your mouse over the file or message.
Three horizontal dots and the More Actions icon appear.
- Click Create External Link.
- Share that link with another person via email, text, or another method you like.
Only you can create external URLs for files that you’ve shared. Other users cannot.
If you change your mind about letting others view this link, you can easily revoke it:
- Hover your mouse over the file.
- Click View External Link.
-
Click the Revoke button.
Slack warns you that others are now unable to access the link.
- Click the Revoke It button.
People who visit the now-disabled link will see a white page that reads, “The requested file could not be found.”
Does an outsider’s ability to view files in Slack scare you in general? Slack has you covered. Workspace Owners and Admins can disable members’ ability to generate external links.
Sharing messages
You will frequently post messages to Slack channels. But what if you need to bring others into the loop? Fortunately, Slack allows you to reshare messages in a number of different ways.
Sharing messages from one public channel to another
For example, what if you spend half your time working in marketing and the other half in IT? In effect, you work as a liaison between the two departments. Not surprisingly, you belong to both the #marketing and #IT public Slack channels. This distinction is critical.
In this example, you want to let people from one department know about a decision that people in the other department have made. The following steps show you how to share messages from one public channel to another:
- Mouse over the message that you want to share.
- Click the right-pointing arrow that appears.
-
Under Share With, search for the channel with which you want to share the message.
Optionally, you can add a few words about this DM à la forwarding an email with introductory comments.
-
Click the green Share button.
You've now shared your message with members of the other channel.
You can share messages from public channels to private ones, but not vice versa.
Sharing files from existing messages
Along with messages, Slack allows you to easily reshare files — that is, to share a document that you’ve already shared with someone else. (Presumably, this document is yours.) Think of it as the equivalent of forwarding an attachment that you sent.
To share a file from an existing message that you’ve sent, follow these steps:
- Mouse over the file that someone has sent you in Slack.
- Click the right-pointing arrow that appears.
-
Under Share With, click the destination for the shared file.
The destination can be a person or a channel. You see a familiar prompt.
- (Optional) Add a message to provide some context around the file.
- Click the green Share button.
Slack does not allow you to quickly share an attachment that someone has shared with you. Of course, you can always download the file and share it as your own.
Keep in mind basic workplace etiquette. Don’t share messages or files with others unless your reason is legitimate.
Sharing private DMs
For obvious reasons, Slack doesn’t allow you to share others’ private messages. If you try, Slack displays a message like the one shown in Figure 6-14.
The same holds true for a message posted in a private channel. You can’t share that message with other channels. You can only “share” it with the sender.
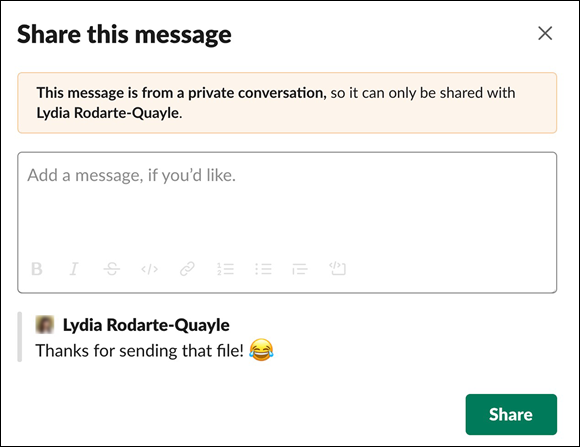
FIGURE 6-14: A Slack message forbidding a user from sharing a private DM.
Forwarding Email to Slack
What happens if an internal conversation with your colleagues starts over email, but you’d like to move it to Slack? Through any number of third-party apps, as long as everyone on the email chain can access your workspace, you can effectively move any Outlook or Gmail message to Slack for good. Simply forward the message to a unique Slack-specific email address. Slackbot delivers the email to a designated channel or DM. From there, you can continue the discussion in Slack.
For more information about apps that support this particular feature, see https://bit.ly/sfd-em.
Communicating Outside of Slack
Here’s a decidedly low-tech reminder about Slack: For two reasons, it’s unlikely that you’ll be able to use it exclusively and bid adieu to email forever:
- Not everyone in your organization may use Slack. That goes double for a large organization.
-
Even if everyone in your organization uses Slack, not every message or file necessarily belongs there. It may not be possible or even wise to record all interactions in Slack. Potential exceptions may fall into the following buckets:
- Intellectual property
- Legal matters
- Confidential or highly sensitive corporate information
- Employee-discipline and health-related matters
Ideally, though, the percentage of messages that you send in Slack will increase over time as more people in your organization use it.
Check with the powers that be at your organization about whether you should be documenting sensitive matters in Slack — or anywhere else for that matter.