
Chapter 7
Staying Informed with Notifications, Statuses, and Feeds
IN THIS CHAPTER
![]() Configuring your notifications in Slack
Configuring your notifications in Slack
![]() Setting your workplace status
Setting your workplace status
![]() Configuring notifications on specific devices
Configuring notifications on specific devices
![]() Checking out activity emails, mentions, and reactions
Checking out activity emails, mentions, and reactions
Odds are, you’ll spend a great deal of time in Slack writing messages and reading others’ responses. You’ll share files with your colleagues, make comments on them, and participate in internal polls. (Ideally, these activities collectively mean that you’ll spend far less time in your inbox.)
But how will you know that someone needs your help or input? Slack sends workspace members notifications about individual and group direct messages (DMs), updates to channels, keywords, and more.
Perhaps you think an unfettered Slack will quickly become overwhelming. That is, you’ll merely transfer your senses of information overload and constant distraction from email to Slack. You’ll just go from chronically checking one application to checking another. What’s the real benefit here?
To be sure, this position is an understandable and fairly common one. You’re mistaken, though. Slack is the antithesis of email’s never-ending, egalitarian inbox. It allows you to prioritize the types of notifications you receive, when you receive them, and on what device. Take that, email!
This chapter covers how to configure notifications in Slack. In these pages, you discover how to customize your Slack alerts — even on different devices. If you want to go completely off the grid, that’s easy to achieve in Slack, too.
Getting Your Arms around Notifications
At a high level, Slack notifications call attention to all the things in a workspace that interest you. To be fair, that’s potentially a big bucket. More specifically, you can set notifications when any or all the following events take place:
- Someone sends you a DM.
- Someone mentions you in a channel by using
@username. - Someone mentions
@everyonein a channel. - Someone uses one of your keywords.
- Slackbot reminds you to do something.
Of course, you can tweak all these settings. That is, when each of these five things happens, Slack doesn't have to notify you. Slack gives users unparalleled ability to control your alerts.
When you first install Slack and join a workspace, Slack notifies you only when someone sends you a DM or mentions you in a channel by using your username.
 By default, any unread workspace activity will cause Slack to display an indicator, or what Slack and other apps these days term a badge. The two types of badges in Slack are
- Dot: Signifies general unread activity in one of your Slack workspaces.
- Number in a red circle: Someone has done one of the following:
- Sent you a direct message
- Mentioned you or posted in a pubic channel to which you belong
- Used one of your keywords in a pubic channel to which you belong
Figure 7-1 displays a workspace with badges and unread activity.

FIGURE 7-1: A Slack workspace with badges and unread activity.
If you belong to multiple workspaces, you may be worried about missing messages in one while working in the other. Don’t be. As Figure 7-2 displays, Slack displays a numerical badge to the left of the sidebar indicating that new activity has taken place in the other workspace. (Note: Figure 7-2 displays Slack’s previous UI.)

FIGURE 7-2: A Slack badge indicator from another workspace.
That’s not to say that Slack will bother you if you want to be left alone. Later in this chapter, you see how you can easily pause workspace notifications at any point via Do Not Disturb (DND) mode.
In Slack, notifications represent an umbrella term covering a number of different types of alerts. At a high level, you can view the settings for your workspace notifications by following these steps:
- Click the main menu.
-
From the drop-down menu, click Preferences.
At the top of the screen, you see the word Notifications (see Figure 7-3).
By accessing this panel via a proper computer, you determine where all the magic happens.

FIGURE 7-3: The Slack workspace notification panel.
Before going too far down the rabbit hole, keep this maxim in mind: There’s no one right or best way to enable each of Slack’s different notifications. Play around with them until you find a system that works for you. You want to balance receiving important alerts in a timely manner with keeping your sanity.
Channel-specific notifications
Say that you belong to a public or private channel, but you only want to check in it periodically. You don’t need to receive regular notifications from the channel, but you don’t want to leave it altogether. Fortunately, Slack provides two ways to control your notifications from a channel.
Muting a channel
If you’d like to remain in a channel, but you don’t want to receive any notifications at all, this feature is just the ticket for you. Muting a channel is a particularly valuable feature.
To mute a channel, follow these steps:
-
Click the name of the channel that you want to mute.
Slack displays a new pane on the right side of the screen.
-
Click the More icon.
Slack displays a number of options.
- Click the Mute #[Channel Name] button.
 Set regular reminders to check in on muted channels.
After you mute a channel, Slack grays it out in the sidebar and places it below the non-muted ones. That is, it will no longer be the color of the unmuted channels. In Figure 7-4, the #finance and #human_resources channels are muted.

FIGURE 7-4: An example of muted Slack channels.
Muting a channel is not the same as muting a conversation with a person. A workspace member can still send you a DM or correspond with you in another channel. This action only applies to the activity that takes place within the channel.
Say that you have muted a channel and someone mentions you in it. In this case, Slack displays a red badge in the channel. It's a subtle way of reminding you to check it. At the same time, though, Slack doesn’t interrupt you with a notification.
Setting channel notifications
Slack lets you customize which channel alerts you receive and, even better, the devices on which you receive them. To tweak your channel notifications with a greater level of granularity than muting, follow these steps:
- In the bottom half of the sidebar, click the name of the channel whose notification settings you’d like to change.
-
Click the Details button in the upper-right corner of the screen.
Slack displays a new pane on the right side of the screen.
-
Click Notifications.
From here, you can ignore additional mentions and tweak the channel’s notifications on your desktop and mobile device. For example, say that you don’t want to receive desktop notifications from a particular channel but you want to receive @mentions on your mobile phone. If that’s the case, check the boxes in Figure 7-5.

FIGURE 7-5: An example of customized channel notifications.
If you don’t enable notifications from the Slack app in your phone’s settings, you won’t receive them.
In a nutshell, you can configure Slack to send you different types of notifications from different channels on different devices. This is yet another example of how Slack leaves email in the dust.
Fine, but what if you want to view all your channels’ notification settings in a single place? You don’t have to hunt and peck. Again, Slack has you covered:
- Click the main menu.
- From the drop-down menu, click Preferences.
- Click Notifications and scroll down to the very bottom of the page.
Figure 7-6 presents a composite view of channel notifications.
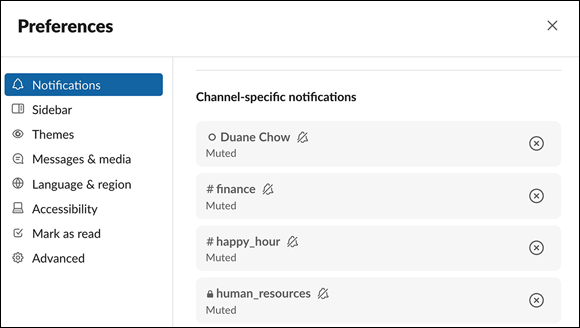
FIGURE 7-6: A composite view of channel notifications.
If you click the X next to a channel setting, Slack resets the channel’s notifications to its default state.
Keyword-specific notifications
Keeping track of channel messages is one thing, but what if you want to follow a term or phrase across all channels? Setting up a keyword alert for every channel would be cumbersome. Slack couldn’t agree more. To enable these notifications, follow these directions:
- Click the main menu.
- From the drop-down menu, click Preferences.
- Click Notifications and scroll down to My Keywords.
- Enter the keywords for which you want to receive alerts.
-
Click the X in the upper-right corner of the screen.
Slack displays a red badge in your channel list when someone uses one of your keywords in that specific channel (see Figure 7-7). For example, you may want to know when anyone in your workspace uses the term quarterly meeting. In the notification preference panel, you simply enter that term.
When someone uses this phrase in a public channel of which you’re a member, Slack notifies you. Note, however, that you won’t receive notifications when others use that term in private DMs and private channels. This alert would be a clear violation of Slack’s user privacy.

FIGURE 7-7: A Slack workspace keyword alert setting for quarterly meeting.
Direct messages from individuals and groups
When a Slack user or group of users sends you a DM, Slack sends you a notification. You can view unread messages underneath the channels (see Figure 7-8).

FIGURE 7-8: Slack unread DMs.
Missed calls
What if a colleague calls you but you aren’t able to answer? In this case, Slack places a badge next to that person’s name in the sidebar. If a colleague calls a channel and you miss it, Slack bolds the channel name in the sidebar. You see a notification that you missed a call.
DM reminders
Chapter 6 also covers reminders in more detail. For now, suffice it to say that you can easily set them. For example, at 3:51 p.m. on Friday, Steve sends you a DM but you’re busy. You quickly set a reminder to see that message at 8:30 a.m. on Monday. At that point, Slackbot reminds you about his DM, such as the one in Figure 7-9.

FIGURE 7-9: A simple Slack reminder notification.
Member join and leave messages
If you work at a big company, you probably want to disable Slack notifications when members join and leave company-wide public channels. If so, follow these steps:
- Click the main menu.
-
From the drop-down menu, select Settings & Administration and then Workspace Settings.
Slack launches a new window or tab in your default browser.
- Scroll down to Join & Leave Messages and click the white Expand button.
- Uncheck the box next to the words Show a Message When People Join or Leave Channels.
- Click the Save button.
Depending on your individual and workspace settings, Slack may still display notifications in certain cases. Examples include
- Small public channels
- Private channels
- When somebody accepts an invitation from a member of an existing private channel
Carefully think about the notifications that you need to receive. Ideally, each one really matters.
Threads and notifications
The chief conceit of email at work is that all messages are equally important to all employees all the time. As you well know, nothing could be further from the truth; different things matter to different employees at different times. One size never fits all.
Chapter 6 describes how users can create threads that stitch together individual comments and questions into a cohesive entity. What’s more, you can follow or unfollow them at your leisure. If you’re keeping tabs on a thread, Slack places a red badge next to Threads at the top of your workspace (see Figure 7-10).

FIGURE 7-10: A Slack notification of new activity in a thread.
Concurrently notifying multiple users
You probably receive mass emails just about every day at your job. Maybe a few of these messages really do apply to you. As for the rest, you rightfully dismiss them as irrelevant. Mass email blasts may only mildly annoy you. Still, you likely tolerate them because they represent the only way to alert everyone in a department or company of an announcement or event. After all, generally speaking, it’s better to let too many people know than too few, right?
Slack makes it easy to alert both workspace and channel members en masse. Table 7-1 provides some quick tips to get the attention of a bunch of people. By using these handles, you don’t need to look up everyone in the workspace and add them to a group DM — a major time-saver to be sure. What’s more, you don’t need to mercilessly pepper your colleagues with unrelated messages.
TABLE 7-1 @-Symbol Notification Tricks
|
Callout |
Purpose |
|
|
Notifies only active channel members. |
|
|
Notifies only the members of a particular user group. |
|
|
Notifies all members of a channel, active or not. |
|
|
Notifies every person in the |
 Say that you post a message in a channel with six or more members. What's more, your message includes
 @channel or @everyone. By default, Slack asks you to confirm your message before you send it unless a Workspace Owner or Admin has already disabled this warning.
In addition, keep the following pointers in mind:
-
@channeldoes not work in a thread. If you want a bunch of people to see your response to a question, post a link to the message in the desired channel. - If you use one of the callouts in Table 7-1 in a thread, a red badge appears in the sidebars of relevant members with one caveat: Depending on how individual members have configured their device notifications, they may not receive alerts.
- You can always call out a specific user by username. For instance, if you type @ianmosley, Slack shoots Ian a notification.
- See
https://bit.ly/sl-notfor more information on Slack's desktop notifications. Slack allows you to customize their sounds, appearance, and more.
Letting Others Know Your Availability
Anyone in your workspace can call you or send you DMs at any point. Still, you’ll want to let others know about availability. Put differently, just because others can contact you doesn’t mean that you want to receive notifications from them.
For example, what if someone needs to go off the grid? Say that Skyler is out of the office because she’s giving birth to her new daughter, Holly. Company president Ted is considerate. He doesn’t want to send her urgent DMs and get upset when she doesn’t respond. (Yes, these are all Breaking Bad references.)
Fortunately, Slack makes it easy and even fun to set your status — indefinitely or for a predetermined period of time. Slack statuses put the longstanding email “out of office” auto-response to shame. Note, however, that Slack can’t stop someone from ignoring your status and peppering you with urgent queries if you’re vacationing in Belize. No app can.
Setting your status
Set your status by following these steps:
-
Click the main menu and then on Update Your Status.
You see something similar to Figure 7-11, which shows some default statuses that Slack easily lets you set, although you can customize these as needed.

FIGURE 7-11: Slack default statuses.
- Click Set a Status, which appears underneath your name.
-
Enter a custom status or select an existing one.
If you like, pick an emoji that describes your status. Now everyone in the workspace can view your status.
If you know the name of the emoji that you want to include in a message, you can also type :[emoji name]: and press Enter. For example, typing :slack: produces the Slack emoji.If you do select an existing status, Slack inserts an icon to its left. You can override that icon with whatever you like.
- Click the Save button.
By letting others know your status, you can start the process of maintaining your sanity. You can also opt not to receive notifications at all via Slack’s Do Not Disturb mode, covered later in this chapter.
Viewing your colleagues’ statuses
From time to time, you’ll want to view your colleagues’ statuses. To this end, do one of the following:
-
If you’ve recently exchanged DMs with the person, click the member’s name in the sidebar under Direct Messages.
If he has set a status, it appears at the top of the workspace to the immediate right of his name.
-
If not, click People in the sidebar.
Slack displays the member’s status underneath his name.
-
If you see a white callout or emoji to the right of a person’s name in the sidebar, mouse over it.
Slack displays the member’s status.
Your custom status and icon appear to the right of your name in the sidebar. Ideally, users look at them before they send you DMs or call you.
Use a red stop sign as your status icon if want to emphasize the fact that you’re unreachable. To change your icon and/or status, click the smiley-face icon and go nuts. For example, in Figure 7-12, the user has selected the red stop-sign emoji to indicate that he wants to be left alone.
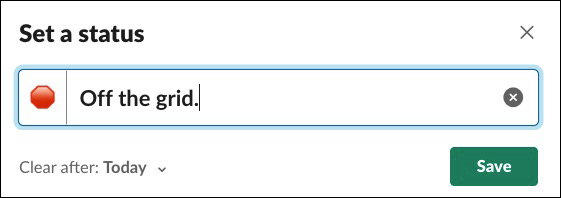
FIGURE 7-12: Slack status with a red stop-sign emoji.
Editing your status
Slack recognizes that you do different things throughout the day or week, so your status often changes. As such, you can and should set different statuses. For example, you may not want to be disturbed if you’re in an important meeting. On the other hand, you may be relatively free on Tuesday afternoon.
A Slack status is meant to be temporary. At some point, you’ll want to change it. Follow these steps:
- Click the main menu.
- Enter your new status in the white text box below your name.
Clearing your status
To remove your status altogether, follow these steps:
- Click the main menu.
- At the top of the drop-down menu, click Clear Status.
Your status is now blank.
Setting yourself to away/active
When you indicate that you’re away, Slack grays out your name in the sidebar. This way, your colleagues see that you’re unavailable. Of course, just like email, they can still send you messages, but they shouldn’t expect an immediate response.
To indicate that you’re away, follow these steps:
- Click the main menu.
-
From the drop-down menu, select Change.
If you’re active, Slack flips your status to inactive and vice versa.
When you return to a workspace after indicating that you’re away, Slack asks you whether you want to let your colleagues know that you’re now available. Of course, the option is yours. Figure 7-13 shows such a screen.

FIGURE 7-13: The Slack prompt when returning from away status.
Unplugging with Do Not Disturb mode
What if you worked at a software company called Initech? (Yes, this is an Office Space reference.) Your boss, Bill, has requested that you complete your monthly TPS reports. You start working on them, and you don’t want anyone nagging you in Slack.
If you enable DND mode, Slack won’t send you any notifications until you’ve disabled it or your DND period expires. Thanks to DND mode, you can keep Slack open and work without fear of Michael and Samir interrupting you. (Slack won’t stop annoying colleagues from tapping you on the shoulder, though.)
If you attempt to call someone who’s in DND mode, Slack displays a message that the person doesn’t want to be disturbed. In other words, Slack nixes your call.
Think of DND as snoozing. You’re taking a break for a predetermined amount of time and telling others as much.
Setting a DND schedule
Here’s how you set your default hours during which you don’t want to receive Slack notifications:
- Click the main menu.
-
From the drop-down menu, select Pause Notifications.
Slack displays a submenu to your immediate right.
- Select Do Not Disturb Schedule from the drop-down menu.
- Pick the times during which you’d like Slack to disable notifications.
- Press the Esc key on your keyboard or click the X in the upper-right corner of the screen.
Manually activating DND mode
To pause notifications apart from your normal schedule, follow these steps:
- Click the main menu.
-
From the drop-down menu, mouse over Do Not Disturb.
Slack displays a submenu to your immediate right.
- From the available options, choose how long you want to be left alone.
After you’ve done this, Slack puts a small z next to your name at the top of the workspace until your specified window elapses.
Deactivating or adjusting DND mode
If you want to deactivate DND mode, follow these steps:
- Click the main menu.
-
From the drop-down menu, mouse over Pause Notifications.
Slack displays a submenu to your immediate right.
-
Click Resume Notifications now or, if you want to adjust your time frame, click Adjust Time.
Slack removes the small z next to your name at the top of the workspace.
DND works both ways. If you see a small z to the left of someone’s name in the sidebar, that person has enabled DND mode.
As of this writing, Slack doesn’t let users create separate DND schedules for weekends. Slack’s customers have requested this feature for a while now, so the company will probably release it at some point in the future.
Sending urgent direct messages
Great, you’re thinking. Thanks to DND, you can easily tell the world to bugger off. Still, crises may arise that require someone to reach you — even if you prefer not to be disturbed unless an emergency arises. Once again, Slack has you covered.
Slack lets users send urgent messages to folks who have enabled DND mode. Recipients receive notifications despite the fact that they’re presumably busy.
What if Walt needs to send me a message, but I’ve enabled DND mode? I’m busy writing this book and rocking out to Marillion — both of which are important to me. Before sending me a message, Walt sees a green DND icon next to my name.
Ideally, my status deters him from interrupting me for the time being, but that’s not necessarily the case. Walt types his message and presses Enter on his keyboard. Slackbot informs Walt that I don’t want to be bothered right now (see Figure 7-14). Walt, however, is undeterred; he can’t wait. Things are about to break bad, and he must reach me.

FIGURE 7-14: The Slack DM options showing the member DND icon.
After seeing the message in Figure 7-15, Walt clicks Click Here. At this point, Slack sends me a notification. I can respond if I want.
Of course, I can always ignore Walt’s messages. If I do, then Slack tells me that I missed critical messages while I had DND mode activated.
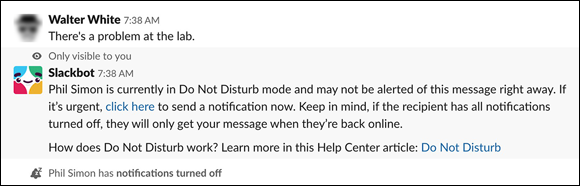
FIGURE 7-15: Overriding the DND status to send an urgent message.
What if I want to ignore all notifications — from Walt or anyone in the workspace? In other words, I want to ensure that no one bothers me for any reason. Maybe I’m trying to focus, or I’m on the golf course. My recourse is simple: I can quit the Slack app. Problem solved.
Don’t be afraid to use DND mode or quit Slack altogether. Nowhere is it written that you have to immediately respond to notifications — in Slack or any other tool, for that matter. As Chris Hoffman astutely writes for The New York Times, “Slack shouldn’t be ever-present in every minute of your life.” (View the article at https://nyti.ms/349ga07.)
Configuring Device-Specific Notifications
Slack recognizes that you may want different devices to send you different notifications. For example, you may want to see a wider array of alerts on your desktop because you’re working. (Of course, for that very reason, you may want to see fewer.) On your phone, you may elect not to be bothered at all.
Again, your configuration choices are your own. Customize to your heart’s content.
Enabling notifications on mobile devices
Chapter 4 explains how you can access Slack on any device you like — although you can only perform certain functions while using a web browser. If you’d like to install Slack on your smartphone and tablet, have at it. You can also set notifications on the mobile app of your choice.
Visit https://bit.ly/sl-mob for far more information on mobile notifications.
Understanding when settings collide
Certain Slack settings may conflict with those on your computer, web browser, or mobile device. Consider the following example.
You’re working on an urgent project. At 9 p.m., you open the Slack app on your iPhone. You disable Slack’s DND mode, but you’ve set your iPhone’s native DND functionality to automatically kick in from 10 p.m. until 6 a.m. In this case, your iPhone’s DND mode beats its Slack counterpart. As a result, you won’t receive DMs.
Here’s another plausible scenario. Say that you’re using a friend’s computer. You log in to your Slack workspace via the web browser, but you don’t enable the browser’s desktop notifications. You then launch Microsoft Word and work on a document. Slack doesn’t notify you of new activity in the browser.
Implement a notification system that works for you. You don’t want irrelevant alerts bothering you any more than you want to miss key ones. Play around. You’ll land on your own Goldilocks principle.
Finding Other Ways to Stay Current
Here are two other useful, optional, and unobtrusive ways that Slack allows you to stay current.
Receiving emails on recent activity
What if you haven’t accessed your workspace for a few weeks? (A pox on you, if you haven’t.) By default, Slack sends you an email that summarizes the workspace messages and activity that you’ve missed if you’ve been inactive for 14 days (see Figure 7-16).
If you don’t find these emails useful, you can opt out of them. Simply click the unsubscribe link at the bottom of one of the emails.
Reverting to email defeats the whole purpose of Slack. After all, one of Slack’s chief benefits is that it reduces the time that you waste in your inbox.
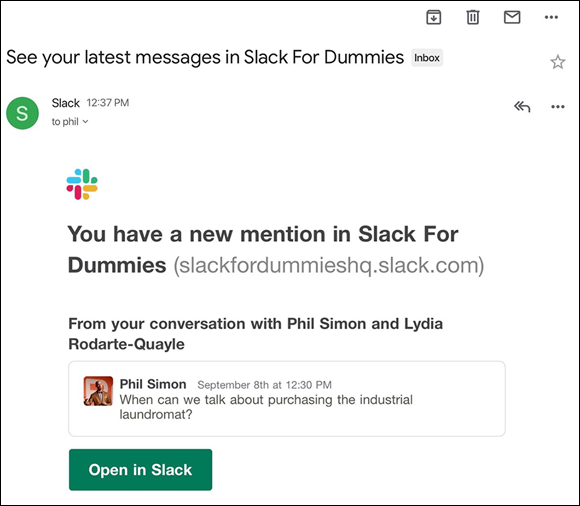
FIGURE 7-16: A Slack email to an inactive member summarizing missed activity.
Viewing mentions and reactions
As an added tool to keep track of everything that’s going on in a workspace, Slack provides the ability to easily view all your mentions in a single, consolidated view. These mentions include
- Your name
- Your notification keywords
- Your
@channelmentions (optional) - Your reactions (optional)
- Your user groups (optional)
Slack's feed eliminates the need for you to search individual channels and conversations for content related to you. At a high level, this stream is akin to the familiar news feeds of LinkedIn, Twitter, and Facebook. Even better, Slack lets you toggle this view on and off. To view your personalized mentions and reactions in Slack, follow these steps:
-
Click Mentions & Reactions in the sidebar.
Slack displays a pane on the right (see Figure 7-17).

FIGURE 7-17: Slack Mentions & Reactions.
Note a few things about Figure 7-17:
- Slack presents user mentions in reverse chronological order.
- Slack preserves the content from your previous view in the middle of the app. In this case, the user was catching up in the
#accountingchannel before clicking Mentions & Reactions. That’s why Slack displays that channel in Figure 7-17.
Say that you find the view in Figure 7-17 to be too busy. You’d prefer to see a dedicated screen of mentions involving you. No bother.
-
Click the icon to the immediate left of the X in the upper-right corner.
Slack displays a full-screen view of your feed (see Figure 7-18).

FIGURE 7-18: The Slack full-screen view of Mentions & Reactions.
Click the filter icon in the upper-right-hand corner to restrict the types of mentions that Slack shows.