5 Controlling Light
‘Without light there would be no photography.’ Such a statement seems almost so simple and obvious that voicing it sounds ridiculous, but sometimes we need to be reminded just how crucial light is to the creation of our images. When first picking up a camera we grow to understand that the quantity of light in our scenes has direct consequences on factors such as the selection of shutter speeds and apertures, but it is only further on in our photographic education that we discover that light also plays another role in the image-making process. It is a role of description. Taking lighting to this next step means that you not only become concerned with the amount of light in the scene but also with more descriptive characteristics. In this part we look at practical ways to light portraits and products and then see how we can apply these techniques outdoors, with flash and in the studio.
The basics of great lighting
There are three corner stones to great lighting – the quantity, quality and direction of the light. When shooting in the studio we have the luxury of being able to control all of these characteristics making it a great environment to learn more about your craft. Photographing outside is little trickier but good images use the same understanding of lighting when working here as they do in the studio.
There is no underestimating the importance of good lighting in the popular areas of portraiture and table top photography. After all it is the light itself that gives volume, texture and shape to your subjects. Just as a sculptor reveals the form of their subject by carving away pieces of stone from a shapeless block, so too the photographer reveals the form of their subjects by describing their surface and shape with skilful lighting control.
Quantity
So if there is no photography without light then one of the first tasks of the photographer is to ensure that he or she has enough light to enable good exposure. This is essentially a technical consideration, balancing the light level with aperture, shutter and ISO settings, but in the haste to provide enough light for subjects, many photographers forget that quantity is not an end in itself, but rather, just part of the equation. This approach often leads to images that are well exposed, sharp and clear, but are lacking a descriptive quality.

Figure 5.1 Good lighting both describes and illuminates the subject. Here the lighting adds to the drama of the portrait contrasting the girl's fair skin against the dark background and the direction of the main light adds volume and form to the subject.
Measuring light
In the days of old, you could always tell a serious photographer, as they were the one with a light meter dangling around their neck. Despite the accuracy of in-camera meters, these hand-held devices are still the studio pro's choice as they can accurately measure the light falling on a subject from both flash and continuous sources (tungsten, daylight, fluorescent). The readout provides a range of shutter and aperture combinations for a given ISO setting which can then be transferred to the camera. In addition, they are great for working out lighting ratios (the difference in brightness between light sources in the photo) helping to ensure shadows are not too dark, or highlights too bright to be recorded with detail.
If your budget doesn't stretch that far, then the camera's own light meter can be used to try using the ‘shoot and review’ approach. This involves capturing a series of test shots using different aperture/shutter/ISO settings and then assessing the results on the camera's LCD screen. Both the Histogram and Highlight Warning features in your camera should be used to help ensure good exposure and avoid clipping of highlight shadow details.

Quality
As we'll see throughout the rest of this part, it is often the quality of the light that makes a great image. So once you have ensured that there is enough light for a good exposure, you need to turn your attention towards controlling the characteristics of the light itself. You don't need to be satisfied with the light that you are first presented with; one of the key skills of a photographer is being able to modify and change the quality of the light falling on their subjects. This is true not just for studio work, but also when photographing outside.
You can change the quality of your light source falling on your subject with a range of light modifiers. Diffusion material stretched over a frame, soft box attachments or white photographic umbrellas will all soften the light where as silvered umbrellas, metal reflectors, bare bulbs or direct flash create direct, hard edged lighting. There are a range of companies that provide off the shelf, system based, attachments for their light heads, but many photographers also experiment with creating, and using, their own light modifiers. Material such as sail cloth can be stapled to a simple wooden frame to create a diffuser or tin foil adhered to a cardboard sheet for a directional reflector and large sheets of thin polystyrene foam make great white reflectors.
Direction
The direction of the light also plays a key descriptive role, providing a sense of shape, texture and volume to the subject. In simple terms lighting a subject from the front flattens the object and reduces the appearance of texture. Lighting from the side creates a sense of 3 dimensions in the photo. This sensation is underpinned by the introduction of highlights and shadows to the subject. Side lighting also emphasizes the subject's texture. Continuous light sources, or flash systems with an included modelling light, allow the photographer to preview the effects of changing the light's position. The monitor on the back of the camera also provides instant feed back on the way that the light's direction (and quality) is describing the subject. In addition some newer model cameras have a LiveView option that allows you to preview the subject and its lighting before pushing the button.
Your lighting workflow
Keep these three key areas in mind when lighting your subjects. Start with a single light. Adjust the quality by adding a diffuser, bouncing off the surface of a white board or using attachments such as a soft box or umbrella. Change the height and position of the light in relation to your subject until the direction of the light best describes the texture and volume of the subject. Check the power settings or subject to light distance to ensure adequate light quantity for your selected aperture/shutter speed/ ISO combination.
Matching subjects with a specific light quality and direction is largely a matter of style and artistic direction, but over the years photographers have developed a set of specific lighting schemas (light set ups) for portraiture and table top work that provide a good starting point to your studio experiments. Over the next few pages I'll will introduce you to these tried and true approaches.

Figure 5.2 Sharp direct lighting from behind this @ symbol casts a hard edged shadow in the foreground of the photo. But this is not the only light in this image. If it was, we would see no detail in the shadow. There is also a soft shadow light falling on the whole composition lighting the top of the symbol and filling in the shadow area.
Lighting for people photographs
Like viewpoint and framing, there are no absolute ‘rights’ or ‘wrongs’ of organizing lighting. There are basic guidelines, but you must decide which subject features you want to emphasize or suppress and the general mood you need to set, and manipulate your lights accordingly. You can dramatize and dominate the subject matter with your lighting, or keep the light simple and subsidiary so that subject features alone make your shot.
Experiment until you can forecast and control how the final picture will look. Lighting control doesn't start and end with a studio environment and a set of studio lamps but rather also encompasses those times when you are photographing outdoors or using an on-camera flash system as your main light source. The approach should be the same in all these circumstances. The photographer works with the light available, sometimes modifying the quality and direction and other times adjusting the position of the subject to take advantage of a light source that cannot be moved or modified.
When working indoors remember what you learnt by observing natural lighting outdoors. Think of a spotlight as direct sunlight and diffused or reflected light like slightly hazy sun. The difference is that you can set their position instantly instead of waiting for different times of day for the sun to move. As you get more experienced, it becomes helpful to use more than one lighting unit at a time or to modify the main light source with reflectors or diffusers. Don't allow this to interfere with your main lighting, though, destroying its ‘natural light’ basis of causing only one set of shadows. In the studio a second lamp might, for example, separately illuminate the background behind a portrait or still life. This allows you to separate the subject from the background by making it lighter, or graduated in tone, or even colored (by filtering the light source). Alternatively, when working outdoors a well-positioned reflector can add much needed light into dark shadow areas of the portrait (see Figures 5.3 and 5.4).

Figure 5.3 Adding another light to the set-up to illuminate the background provides separation between the dark hair of the model and what would be an equally dark background if left unlit.
Basic portrait lighting
One of the key factors to capturing good portraits is making sure that your lighting is up to the task. Good photographers understand and can control the quality of light within their pictures. It is up to you to start to train your eyes to see the differences in light quality and to predict the effect they will have on the way that your subjects are lit. The two main light qualities are:
1 Direct, strong lighting, which produces hard-edged, dark shadows and is often used to emphasize texture. In portraiture, this style suits subjects with big and bold personalities and strong facial features.
2 Soft, diffused light is more delicate, creates light shadows and is often used to minimize texture. This lighting is by far the most popular style of portrait lighting, as it softly caresses sitters rather than starkly defining them.

Typical portrait lighting set-ups
Most photographers control the quality and the direction of the light used for their portraits. By manipulating these two factors they can produce radically different images of the same sitter. Don’t think that these styles are only used in the studio with expensive flash kits; the same techniques can be used with affordable floodlights or when you are taking pictures with your portable flash gun, or even when shooting outside with the sun as the main light.
Photographers have their own favorite lighting set-ups that they use on a regular basis. Let’s look at the most common approaches.
Front lighting
One of the most common styles of lighting is ‘direct front’. This is especially true for those photographers whose cameras contain a built-in flash system and for those people who still remember the famous Kodak saying: ‘Always shoot with the sun behind you.’ Pictures illuminated in this way show sharp-edged shadows trailing behind the subject. The fact that the light is coming from the front also means that there will not be much texture in the subject’s face.
For most portrait photographs, this style of lighting is neither flattering nor descriptive. You should only use it when you have no other options (see Figure 5.5).

Figure 5.5 Front lighting.
Side-top lighting
Sometimes referred to as Rembrandt lighting, as it copies the way that the famous artist used to light the main figures in his paintings, with this setup the light is positioned above and to one side of the subject. This provides both texture and form to the face, and is by far the most popular set-up used by portrait photographers (see Figure 5.6).
To get the position of the light just right, make sure that:
• there is a twinkle of light in the subject’s eyes (called a ‘catch light’); and
• there is a triangle of light on the side of the face that is opposite to the light source.

Figure 5.6 Side-top lighting.
‘Okay,’ I hear you say, ‘this is all well and good in the studio with movable lights, but I don’t have that luxury.’ The trick is to use the principles of these lighting set-ups with any source that you have available.
If you are photographing outside, it will not be possible to move the sun to just the right position, so instead move the subject. If the sun is too high, then tilt the subject’s head up a little, or wait until the sun moves lower in the sky before photographing.
It is important to teach yourself to see how the lighting in your environment is falling on your subject and then either modify the lighting to suit (e.g. move the study lamp on the side desk this way or that), or change the position of your subject to take advantage of the lighting that is available.

Figure 5.7 Lighting from above.
Lighting from above
Many a photographer, wanting to avoid the flat lighting that accompanies using their camera’s flash straight on, simply flips the unit so that it faces skywards. The flash light then bounces off the ceiling and then onto the subject. The results do provide more texture in the face, but often the eyes are hidden in the dark shadows of the brows. Similar results regularly occur when photographing portraits outside when the sun is high. Top lighting is generally not used for portraiture for this reason (see Figure 5.7).
Instead of bouncing your light off the ceiling, try twisting it sidewards and reflecting it off a white wall. This will give you much better results that look and feel like soft window light. If you must shoot in the middle of the day with the sun above, try adding a little fill-flash to lighten the shadows around the eyes. Most modern cameras contain the option for this flash mode and, unlike the bad old days of manual flash calculations, the camera will generally balance the daylight and flash exposures as well.

Figure 5.8 Lighting from behind.
Lighting from behind
Positioning your main light behind the subject can create particularly dramatic portraits and silhouettes, but in most cases the lack of detail in the subject’s face can prove disappointing. By all means play with this lighting approach as it offers very real creative opportunities, but make sure that the positioning of the subject is such that the face doesn’t become a big dark chasm (see Figure 5.8).
Soft diffused light – Rembrandt style
In the previous lighting set-ups, I used a strong direct light source to make the shadow areas and direction of the light completely obvious. But this style of light is rarely used for contemporary portraiture. These days, soft or diffused light is much more popular (see Figure 5.9).
In this example, I positioned the soft light source to the left and above the subject – Rembrandt style. Notice that the triangle of light is still visible but the edges of the shadow areas are much softer.
Professionals use special attachments for their studio flashes, called ‘soft boxes’, to create this type of soft diffused lighting. Some even use semi-transparent white umbrellas in front of their flash heads. You can replicate the same effect by passing your main light through some diffusion material before it falls onto your subject. You can use drafting or tracing film, or even an offcut of white sail cloth (the sort used by sail makers to construct the sails for sailboards). This also works well when you are photographing outside with the sun as your light source. Just place the diffuser between the sun and your subject.

Figure 5.9 Soft diffused light.
Alternatively, you can bounce your light off an angled white board, or piece of polystyrene foam, that is positioned top left of the subject. All of these techniques work particularly well at softening the light falling on your subject.
Soft light with reflector
Sometimes a single light, even if it is softened, casts shadows on the subject that are too dark for our camera’s sensors to penetrate. So most professionals add a reflector to the opposite side of the subject to lighten the shadows and reveal the details hidden by the lack of light. Reflectors can be made from many different materials, including polystyrene foam and white card, but remember to keep the surface white as any color present here will be added to your shadows (see Figure 5.10).
Reflectors are often used when making portraits in the environment to help ensure that dark shadows don’t ruin a good picture.
In practice, with your main light positioned to ensure good texture and form for the face, slowly bring a reflector in from the opposite side. Watch as the shadows lighten. Be sure that, when framing the portrait, the reflector remains out of view. To make a more directional reflector, try adhering aluminum foil to a piece of card.
Lighting and movement
The lighting control you have in the studio can help with many of the experimental approaches to depicting movement, as discussed in Part 9. Figure movements during a long exposure, for example, can be turned into abstract patterns in accurately directed ways. For Figures 5.11 and 5.12, two dancers, in pale reflective clothing, posed some distance in front of a black background. The lighting was two spotlights – positioned left and right at right angles to the camera viewpoint, and screened off from both the background and lens. Within the ‘slot’ of light so formed, one dancer stood completely still while the other moved to the music throughout a five-second exposure. Including a static element, like the still dancer, in your picture gives a counterpoint to all the action going on elsewhere.

Figure 5.10 Soft light with reflector.
Lighting objects
Controlling the quality and direction of the light when capturing portrait photos is often the difference between producing an acceptable image and one that really stands out. The same can be said about lighting control when we are photographing objects. In fact, in some ways, good product photography is even more dependent on the lighting abilities of the photographer as he or she needs to adjust the set-up to suit the surface qualities of the object. It is not enough just to position the light and modify its quality, the photographer also needs to alter the way that the product is lit to ensure that the surface or textural qualities of the object are accentuated. Sound tricky? Well it is only really an extension of the lighting skills we started to develop in the last section. Remember the key to producing well-lit photos is learning to see how light describes your subjects first and then being able to modify the description when necessary.
The five studio shots and lighting set-ups in Figure 5.13 show how mixed changes of lighting can alter subject appearance, especially texture. The lighting illustration shows where the (single) light source was positioned for each version. In first image the spotlight was positioned at the rear of the stone slab, a little above lens height. Its direct light exaggerates texture but gives such contrast that the film both overexposes highlights and underexposes shadows. The second picture uses a reflector board close to the camera to return diffused light into the shadows. In photo 3 the spotlight is now to one side, changing the direction of the (harsh) shadows. With image 4 the spotlight was turned away from the leaf altogether, and illuminates a large white card. The result is diffused (’soft’) light, still directed from the side but now free of sharp-edged shadows and even less contrasty than number 2. In the last photo (5) the spotlight is now positioned close to and directly above the camera, and used direct. Like flash on the camera, everything receives light but it is like a drawing without shading, suppressing texture and form.
Arguably, the second photo gives the best compromise between drama and detail, although as a beginner you will often be tempted by photo 1 because it looks good in the studio. Always remember that your eye can cope with greater contrast than film will successfully record.

Figure 5.13 How different lighting set-ups affect texture, detail and form of objects you are photographing.
Lighting for different surfaces
Over the years, photographers have developed specific lighting setups that work well with different subject surfaces. These set-ups, sometimes called lighting ‘schema’, provide a good starting point when lighting a difficult subject in the studio.

Figure 5.14 The textural qualities of both the blocks themselves and the greater assemblage are emphasized by skimming strong directional light across the surface of the subject. In this way, the shadow provides the sense of texture, but be careful, if the shadow is too dark and not lightened with a reflector or a second weaker light, little or no detail will be seen here.
Texture
Lighting for texture is all about using strong directional light that skims across the surface of the object, producing shadows as it goes. To show texture you must create shadows, so move your light or your subject around until you see the texture become pronounced. Don’t use soft or diffused light sources, even if this results in some dark featureless shadow areas. Instead, set up your main light and then use a reflector to help fill in the shadow regions. Remember the golden rule for texture is light from the side of the object (see Figure 5.14).
Silverware or glossware
Highly reflective surfaces, such as chrome or highly polished, glossy paint, need to be treated quite differently to the textured surfaces above. Aiming a strong light directly at the surface will only result in a bright hot spot, with the rest of the object looking dull and dark. Professionals light these subjects by surrounding the object with a ‘tent’ of diffusion material that they then light through. The silver or gloss surface then reflects the white surface of the inside of the tent.

Figure 5.15 Tent lighting is the best approach to use for glossy or silver objects. The surface quality of these objects is only apparent when they are reflecting the white of the lit tent fabric.
Though this sounds a little tricky, in practice a successful silver jewellery photograph can be taken by suspending a piece of white sailcloth over the top of the object and then passing the light through the diffuser. The camera is then positioned so that it is to the side of the diffuser and is not reflected in the jewellery surface (see Figure 5.15).
Glassware
Glass objects pose a similar problem to the previous surface types in that directing a light onto the surface produces a hot spot and doesn’t show the translucency of the subject at all. To solve this problem, glassware should be lit from behind. Often, this involves a set-up where light is directed onto a lightly colored background and then photographing through the glass object to the lit surface behind.
Once you build up your confidence with lighting subjects with each of these techniques, stretch your skills by trying to light a subject that contains more than one surface type. For instance, a glass bottle with a silvered label would require you to light the bottle from behind and the label using a broad diffused light (tent) – see Figure 5.16.

Figure 5.16 The transparency or translucency of a subject is shown in a photograph by lighting it from behind, but don’t think that this is only achieved by directing the light onto the subject. Here the surface in and around the subject is lit, and then this illuminated area is photographed through the glasses.
Lighting for copying
Photographic copying means accurately recording two-dimensional subjects such as artwork, photo prints, montages and paste-ups. You can turn prints into slides, slides into prints, or color into black and white. The essential technique is to light as evenly as possible, and have the camera set up square-on. Drawings, pictures and clips from papers are best taped against black cardboard, attached to the wall and lit by two floodlights positioned about 30° to the surface. Keep each flood well back from the original to help ensure even illumination. Check lighting with a pencil (Figure 5.17) held at right angles to the original. The two shadows should be equally dark, the same length and together form one straight line.

Figure 5.17 Set-up for copying paste-up photo prints, drawings and other flat work.
To copy a slide, you can improvize by laying it horizontally on opal plastic, masked along all four edges with wide strips of black card. Illuminate the plastic from underneath using a floodlight (bounced off white card to avoid heat damage). Support the camera square-on and directly above, fitted with close-up extension tubes or bellows to allow a same-size image. Alternatively, use a slide copying attachment (Figure 5.18) added to an SLR fitted with tubes or bellows. The slide slips into the far end of the attachment, in front of a light diffuser.

Figure 5.18 Slide copying. S, slide; D, light diffuser. Adjustable length tube fits on the front of the camera lens and extension ring.
Outside shooting
Most photographers think that it is only possible to control the lighting in a photo when you are working in a studio. But this isn’t the case. Yes it is generally easier to control the lighting in a studio environment than when you are photographing outside, but understanding and being able to work with or even modify the light outside is no less important.
Portraits in the environment
When photographing people outside, always be aware of the direction and quality of the light and how it is interacting with your subjects. With most studio set-ups photographers start with a single light that defines the subject and then other lights or reflectors are added to complement this main or key light source. When capturing portraits outside the studio your approach should be the same. Think of the sun as the main or key light. You can’t alter the sun’s position so be prepared to move yourself or even your subject, if the sun is not quite in the right position. Professional photographers who regularly create environmental portraits are so aware of the position of the sun that they book portrait sessions based on time of day or even season. This way they can predict where the sun will be during the shooting session.

Figure 5.19 A natural environment with soft lighting from a cloudy sky is perfect for creating casual but intimate portraits.
As for the quality of the light, don’t forget that a portable white reflector directed at the subject or a little fill-flash can help to lighten the deep shadows caused by contrasty lighting. When you want a softer light source either diffuse the sunlight with a white umbrella, move the subject so that they are in the shade of a building or wait until a cloud moves in front of the sun (see Figure 5.19). In tricky lighting conditions, shoot and review the image on the camera’s LCD screen, paying attention to shadows and highlights. If need be, re-shoot, overriding the camera’s settings using features like the exposure compensation control to attain a good exposure.

Figure 5.20 Nestled in an old wooden crate, these bunches of lavender evoke much of the atmosphere and indeed fragrance of Provence in summer, and as such, are a good reminder of a recent trip to the area.
Location product photography
One of the joys of travel is seeing new peoples, cultures, architecture, food and hand crafts, all in their native environment. Such travel provides the photographer with wonderful opportunities to record these items against the background ambience and color that only comes from an authentic context. It is not so hard to take snapshots of the goods on display in the local market but it is a little more difficult to photograph the same scene giving due consideration to the lighting guidelines we have been looking at here. The weather, the time of day and position of the market stalls in relation to shade-giving buildings will all play a role in the quality of light falling on your subjects. When photographing in public spaces like this, you will have little chance of being able to move the subject to adjust the direction of the light so that it is more sympathetic to its surface qualities. So instead you will need to be on the look out for situations where subject positioning, light direction and quality of light all happen to coincide. The task is more one of recognizing good lighting rather than creating it (see Figure 5.20).
Landscape
It seems like a statement of the obvious that ‘Great landscape pictures are made by photographing great landscapes’, but just as visually important as the location is the time of day that you photograph it. Studio photographers have the luxury of complete control over the quality and quantity of the light they use in their pictures, but landscape shooters are totally dependent on the weather and the sun for illuminating their subjects.
This doesn’t mean that you are totally at the mercy of the gods though; the most important lighting control mechanism the landscape photographer possesses is time. Waiting just a few minutes can change the appearance of a scene dramatically. If the sun is too strong or direct, wait for a little cloud cover or even return to shoot the scene at dusk, at dawn or on an overcast day (see Figure 5.21).
Do your homework before arriving at the location so that you know where the sun will be at what time and then predict how it will light the scene. If need be, arrive and set up before sunrise to make sure that you catch the 20 or so minutes when the sun makes its way past the horizon. So select the time of day that you photograph carefully and don’t be afraid to return to a location at a later time or date to ensure the best lighting.

Figure 5.21 Landscape photographers can’t control the quality of the light in their chosen scenes but they can decide when to click the shutter button. The look and feel of the light in the scene can change dramatically over a period of just a few minutes.
Flash and its control
Flash is a very convenient way of providing enough light for photographing in low light situations. After all, most compact and many SLR cameras contain small flash lights built into the camera; its pulse of light is brief enough to prevent camera shake and freeze most subject movement, and it matches the color of daylight.
Unfortunately, this compact, handy light source has its shortcomings too. As explained below, in portraiture it is easy to get an effect called ‘red eye’ with every shot. Small, built-in flash units give harsh illumination slammed ‘flat on’ to your subject, resulting in ugly and very unnatural looking lighting effects. Subjects often show a dark, sharp-edged shadow line cast to one side of them onto background detail (see Figure 5.23).

(1) Until recently, the most powerful models, generally used by professional press and wedding photographers, attached to the camera using an angled bracket. Positioning the flash to the side of the camera also had the advantage of minimizing the occurrence of red eye.
(2) Many cameras have a ‘hot shoe’ flash mount located on the top of the camera body. This connection is used to attach a portable flash unit.
(3) Less powerful than either of the two previous flash types, the pop-up flash units found on many SLR cameras are suitable for illuminating distances up to about 3 or 4 meters.
(4) Built-in ‘twinkle’ flashes, like those found in most compact cameras, are fine for close portraits and even some fill-flash work, but because of their proximity to the lens often suffer from red eye problems.

Figure 5.23 Direct flash, straight from your camera, provides very flat lighting with strong, hard-edged dark shadows.
Any reflective surface like gloss paint or glass, square-on to the camera, records as a flare spot (see Figure 5.24). Nearest parts of a scene receive more light than furthest parts, often destroying the normal sense of depth and distance. Finally, flash pictures have a uniformity of lighting – which tends to make one shot look much like every other.
Don’t, however, let this put you off flash photography. Most of these defects can be avoided or minimized (particularly if you can use a separate, clip-on flash unit). Flash is really useful when natural light is excessively contrasty or from the wrong direction, or impossibly dim for active subjects indoors. Just don’t allow it to become the answer for all your indoor photography – especially if having a camera with a wide aperture lens loaded with fast film (or digital camera set to a high ISO value) allows you to work using existing light.
Cameras with built-in flash
With the exception of some single-use types, virtually all compact 35 mm, APS film and digital cameras today are designed with a small flash unit built in. The vast majority of SLR auto-focusing cameras are similarly equipped. Manual single lens reflexes more often have a flash shoe with electrical contacts (‘hot shoe’) on top of the camera body. This will accept one of a range of more powerful slip-on flashguns.
In both instances the flash unit takes a few seconds to charge up when switched on, and after each flash. Wiring in the camera synchronizes the flash of light to the camera shutter’s open period when you take the picture. Some cameras automatically switch on the flash when the metering system detects dim lighting conditions; it is important, though, to be able to switch it off when you want to shoot by existing light.

Figure 5.24 Watch the background of the scenes you photograph with flash. Glass or gloss surfaces directly behind your subject will reflect the flashlight back into the camera lens, causing a brilliant ‘hot spot’ to appear in the photograph.
‘Red eye’
When you look at someone’s face the pupil in the center of each eye appears naturally black. In actual fact, the light-sensitive retina at the back of the eye is pink, but is too recessed and shaded to appear colored under normal lighting conditions. However, the flash that is built into a small camera body is only displaced an inch or so to one side of the lens. Like an optician’s lamp used to closely examine eyes, the flash easily lights up that part of the retina normally seen as dark. The result is portraits showing ‘red eye’.
Camera designers go to great lengths to minimize the defect – the flash source often slides out or hinges up (Figure 5.22) to locate it further from the lens. Another approach is to make the flash give one or more flickering ‘pre-flashes’ just before flashing at full power with the shutter. This is done to make the eyes of whoever you are photographing react by narrowing their pupil size, which in turn results in reducing the occurrence of red eye.
In addition to these techniques, you can help minimize red eye by angling the camera to avoid straight-on portraits. This may also avoid glare from any reflective surfaces square-on in the background. You may even be able to diffuse and so spread the light with a loop of tracing paper over the flash window. But the best approach of all, if your camera accepts an add-on flashgun, is to ‘bounce’ the light and avoid red eye altogether.
Using bounce flash
Instead of pointing the flash direct from the camera you will get far more natural, less problematic results by bouncing the light off some nearby white surface (Figures 5.25 and 5.26). This might be a ceiling or wall indoors, or even white card or plastic in a camera-attachable support, which is usable outside too. Most accessory flashguns can be tilted or swivelled so that you can point them upwards or sideways.
Figure 5.25 Bouncing your flash off a white card reflector to the side of your subject creates a similar effect to soft window light.
The bounced surface then effectively becomes the light source for the image, providing a soft and even light similar to that available on an overcast day. Using this type of flash set-up you avoid the worst aspects of direct flash and red eye. The less flat-on lighting gives you much better subject modelling and sense of form. And instead of light intensity falling away from front to back, most of the room is lit in an even and natural-looking way – from above.
Be careful, though, not to bounce the flash off a tinted ceiling or when surrounded by strongly colored walls. The overall color cast this gives is much less acceptable in a photograph than in real life. Also, ceiling-bounced flash should be directed at an area above the camera rather than above the subject. Otherwise, the subject receives too much top lighting, resulting in overshadowed eyes and a deep shadow below the chin.
Accessory flash units
Provided your camera has some form of electrical contacts for flash such as a hot shoe, you can mount a separate flashgun on top of the body. Here the flash head itself is sufficiently spaced from the lens to avoid red eye and it still fires when triggered by the shutter. There are three main types of small add-on flashguns (see Figure 5.27).
The simplest type does not tilt, has one fixed light output, and a table on the back shows the aperture to set for different flash-to-subject distances and ISO values. Though not used often these days, this type of flash is still available and is often coupled with manual SLR cameras.
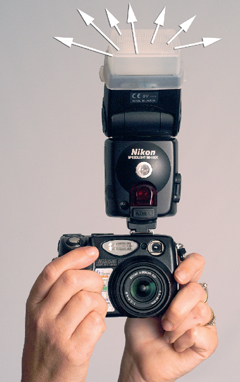
Figure 5.26 With some models you can soften the light using a flash attachment designed to spread the light coming from your flash. Some models are supplied with diffusion attachments designed for just this purpose, or you can purchase a diffuser from a thirdparty supplier.
The second kind is self-contained and semi-automatic. The ISO value and camera lens aperture you have set are also set on the flashgun. When the picture is taken, a sensor on the front of the unit measures how much light is reflected off your subject and cuts (‘quenches’) the duration of flash. The head tilts for bouncing light, but you must always have the sensor facing your subject, not the ceiling.
Then there are ‘dedicated’ flash units which, when connected into an SLR or advanced compact metering circuit, pick up information on the ISO value that is set and use the camera’s own metering system to measure and control flash power and duration.
It may be impossible to connect these styles of flash units with the most basic of compact cameras, namely those that don’t contain a connection for external flash. However, it is worth experimenting with a self-contained ‘slave’ unit, which someone can hold for you, perhaps pointed at the ceiling. The slave has a light-detecting trigger that responds to your camera’s built-in flash and instantaneously flashes at the same time. You can then use the external unit to provide bounced or diffused lighting of your main subject. With some units it is even possible to take the flash off the camera and use it to the side, providing very directional lighting (see Figure 5.28).

Figure 5.27 Add-on flashguns that connect via the camera’s ‘hot shoe’ or cable. (1) Low-cost basic unit. (2) Semi-automatic with tilting head. (3, 4) More powerful dedicated types.
Exposure and flash
With simple compact cameras that allow no adjustments, the built-in flash gives sufficient light for recording a correct exposure at a fixed aperture (typically f5.6 for an ISO value of 100) and at one set distance (typically 2.1 m or 7 ft). A flash of this power is said to have a ‘guide number’ of 12 (f5.6 @ 2.1 m) – see Appendix K for guide number, aperture and distance chart. Anything in your picture much closer or further away will be over- or underexposed respectively. The same applies to the simplest add-on flash units with a fixed light output.
Most flash units that are built into entry-level compact cameras are like self-contained automatic flash units, as they contain a small light sensor pointing at your subject. The closer and lighter your main subject, and the faster the ISO value set, the briefer the duration of your flash will be. So for a really microsecond flash, which is able to show spraying water droplets as frozen ‘lumps of ice’, work close and load fast film or set your digital camera to a high ISO value.
All self-regulating flash units, whether built-in or used as an add-on, only maintain correct exposure over a range of flash-to-subject distances. At the basic level, the distance range is often between 1.5 and 3.5 m. The more advanced the system (e.g. dedicated units), the wider the range of distances over which it will adjust to maintain correct exposure. But don’t expect to be able to light a cathedral interior with amateur flash equipment. The same goes for using an auto-flash camera in the audience at a pop concert. The power of these units is often so limited that it will probably just record people a few meters ahead of your position, with all the rest of the scene disappearing into a sea of black.

Figure 5.28 You can use your flash as a studio light replacement and can free the unit from its hot shoe base by using an extension cable. The cable maintains a link for all the flow of exposure and triggering information, whilst allowing the photographer to position the flash head away from the camera body.
Switching on the flash on a camera with built-in flash automatically sets the shutter to a speed (typically 1/60 second) short enough to hand-hold the camera, but not too short to ‘clip’ the flash. When you add a flash unit to a manual SLR you may have to perform this function yourself and set the shutter speed to ‘X’ (the default flash sync speed) or any slower setting to synchronize properly for flash.

Figure 5.29 Candid portraits taken outside, where there is little or no control over lighting conditions, can generally benefit from a little fillflash provided by the camera’s built-in flash unit. The flash lightens the shadows caused by the sun’s strong and contrasty light.
Fill-in flash
An excellent way of using flash on the camera is as auxiliary or ‘fill-in’ illumination for the existing lighting. When you shoot towards the light, as in Figures 5.29 and 5.30, a low-powered flash on the camera (built-in or clip-on) illuminates what would otherwise be dark shadows. Provided the flash is not overwhelming, the results look entirely natural – you have simply reduced excessive lighting contrast. An auto-focus compact or SLR camera that offers ‘fill-flash’ mode will make the necessary settings for this style of shooting for you.
Fill-in flash from the camera is also useful for room interiors, which may include a window and where the existing light alone leaves heavy black shadows. If possible, use a powerful flashgun in these circumstances and bounce the light off a suitable wall or surface not included in the picture. This will produce the most even fill-in effect for the scene.

Figure 5.30 Most medium-priced cameras contain exposure systems that can balance the light available in the scene (ambient) with that being emitted from the flash. Some models even have controls that enable the strength of the flash’s output to be varied to suit the scene.
‘Open flash’
An interesting way to use a separate flashgun, without needing any extra equipment, is called open flash technique. This technique involves working in a blacked out room, or outdoors at night. You set the camera up on a firm support such as a tripod and lock the shutter open on ‘B’. Then, holding the flash unit freely detached from the camera but pointed at your subject, you press its flash test firing button. Having fired the flash once and allowed it to recharge, you can fire it several more times, each from different positions around the subject, before closing the shutter again. The result looks as though you have used several lights from different directions.
Open flash allows you to photograph the garden or part of your house as if floodlit. Calculate exposure from the guide number given for your flash. This is flash-to-subject distance times the lens f-number needed. If the guide number is 30 (meters) with the film you are using then set the lens to f8 and fire each flash from about 3.75 m (12 ft) away from its part of the subject. Plan out roughly where you should be for every flash, to light a different area. The total time the shutter remains open is not important provided there is little or no other lighting present.
Alternatively, if the flash unit you are using has a built-in sensor, then match ISO and f-stop values from the camera with those on the flash and then proceed to paint your subject with the flash light, allowing the unit to automatically govern its output.

Flash modes explained
Your camera controls its flash system (either built-in or external) based on the selection you make from the flash modes available. The modes can be set using the button located on your camera body or, with some models, via the flash set-up menu in the camera’s main settings. These modes also control the way that the flash interacts with your main exposure system. Typical modes include:
(a) Anytime Flash (fill flash) – With this setting selected the flash fires every time a picture is taken. Use this option for filling in shadows when photographing in bright sunlight.
(b) Anytime Flash with Red Eye Reduction – This option is designed to reduce the red eye problem you often see in photographs taken with compact cameras. In most models a series of small flashes are fired before the main exposure. This setting is good for use when shooting portraits.
(c) Auto – This option automatically fires the flash when it is dark or the light level is low. This setting is the best choice for most shooting circumstances.
(d) Slow Shutter Flash – This option means that you can combine a long shutter speed with the flash operation. It is best used for night portraits where the flash lights up the person and the long shutter is used to record the night or city lights.
(e) Flash Cancel – This option turns the flash off so that it will not fire in any circumstance.
Layout and lighting in the studio

Figure 5.31 Working in a studio gives you the opportunity to fine-tune lighting, zone of focus and compositional skills.
Aphotographic studio is the rather grand term for any room where you can clear enough space to take pictures. Working in a studio should offer you full control over subject, camera position, lights and background, and is without doubt the best place to learn the basics of lighting and composition. A studio allows you time to experiment, especially with portraits or still-life shots. You can keep essential bits and pieces on hand and leave things set up. This is a great help in allowing you to shoot, check results and, if necessary, retake the picture with improvements (see Figures 5.31 and 5.32).
Your ‘studio’ may simply be an empty spare bedroom, or better still a garage, outhouse or barn. It should be blacked out so that all lighting is under your control. In the studio shown in Figure 5.33, a large room has been cleared. Walls and ceiling are matt white and the floor gray, to avoid reflecting color onto every subject. White surfaces are also important for ‘bouncing’ light when required. The window has a removable blind and the glass behind is covered with tracing paper. If daylight is needed, the light coming through the window is therefore soft and diffused.
To start, you don’t need a lot of lighting units. A couple of basic photographic lamps are perfectly suitable. These come in two main kinds – spotlights and floodlights. They need to be mounted on height-adjustable floor stands and have tilting heads. The ‘boom’ stand is an ideal way to position a lamp high up to backlight a figure or illuminate the background (see Figure 5.34).
As an alternative, many top-of-camera flash units can now also be used off the camera. Two such flash guns, using either sync cords or wireless links, can be employed instead of the photographic lamps for most studio work. They have the advantage of being balanced for daylight film (or white balance setting) and the exposure of many models can be automatically calculated via special flash readings in the camera. The downside is that most of these portable, on-camera models do not contain any modelling lamps and so it is very difficult to predict the positioning and quality of the light that they are emitting. Digital shooters have an advantage in this respect, being able to shoot and assess the resultant lighting via the LCD screen on the back of the camera. Changes can then be made to the lighting set-up before reshooting again.

Figure 5.32 Working with light in the studio, you can make pictures from simple oddments.
As well as lighting, you will also need a stool for portraits and one or two reflector boards and diffusers. These can be made from white card and tracing paper stretched over a simple frame. Have a table to support small still-life subjects at a convenient height. You will also need lots of useful small items – sticky tape, string, blocks of wood to prop things up with, modelling clay, wire and drawing pins.
Essential studio equipment
Light sources – One of the joys of shooting in a studio is being able to control the lighting you use to sculpt your subjects. In years past having reliable and controllable studio lighting meant investing thousands of dollars on sophisticated pro systems, but thankfully, there are now several more affordable options available to the photo enthusiast that let you shoot like the professionals, but on a modest budget.

Figure 5.33 A room cleared to form a temporary studio. The table with curved card background is used for still lifes.
Lighting systems can be broken into five general categories – portable flash (top of camera), high intensity fluorescent, traditional tungsten, entry-level studio flash and good old daylight. Each category has its own advantages, challenges, and cost points, and selecting the avenue that best suits you, should be based on criteria such as the way you work, the subjects you like photographing and, of course, your budget. See Table 5.1.
Light meter – Having enough light is only part of the equation. Matching the quantity of light with your camera settings, shutter, ISO and aperture, is also key. When shooting with daylight, or flash on camera, this task is controlled by the light meter in the camera. This is also the case with continuous light sources such as fluorescent, tungsten, and daylight, but short burst lighting, like studio flash, requires a different type of meter, generally a hand-held flash meter, to provide light level and shutter/aperture/ISO details. Hand-held meters also provide the ability to more easily gauge the light levels through out the scene, as well as determine the brightness ration provided by multiple light setups.
White balance system – Different light sources have different color temperatures. Thankfully the white balance system of most digital cameras is up to the task of neutralizing any color casts that result from these differences. For very tricky, mixed, lighting scenarios, use the custom white balance option. See Table 5.2.
Light modifiers – As you now know, the quality of light is one of the corner stones of photographic lighting and so any pieces of equipment that can be used to change the characteristics of a given light source are helpful. These can be as simple as a white reflective card to bounce your flash off, or a simple white translucent umbrella placed in front of the light to soften and diffuse. Depending on which lighting system you are using, most manufacturers have plenty of options available. Alternatively, with a little creative thinking you will probably be able to cobble together some of your own modifiers. Just be careful when using attachments with hot light systems, such as tungsten, as many of the materials may be flammable if they come in contact with the lights.
Table top light cubes or tents – If you have a passion for table top photography and regularly use the soft diffused lighting recommended for shooting glassware, silverware or glossy subjects then maybe a dedicated lighting kit would be a good investment. Available from well know companies such as Lastolite or Calumet these set ups provide both diffusion of the light sources plus a seamless interior to control the reflections in the subject’s surface. See Figure 5.34.

Figure 5.34 Commercially available tent set-ups like this one create even, diffused lighting that is suitable for glossy, reflective and silvered surfaces..
Top of camera flash modifiers – There is nothing handier than strapping your speed light to the top of your camera to light dark scenes, but the quality of the light emitted from the flash gun is not very suitable (read flattering) for most subjects. Thankfully there are several different softening attachments on the market that improve the softness of the flash light. Ranging from the tried and tested Stofen clip on diffuser caps, to the very popular Light sphere and Whale Tail from Gary Fong.
Light stands – As well as the light sources themselves, it is important to think carefully about the stands that support them. Make sure that the stand is capable of extending above the subject’s head for portraits or can be positioned easily over the centre of a table top setup.
Background – Rolls of paper, or fabric, have long been used as a means of providing a clean neutral background for portraits or object photography. Some photographers, who are lucky enough to have a dedicated studio space, build a curved, painted background in preference to using a paper background.
Tripod – Though not necessary when working with top of camera, or studio flash (the short duration of the flash burst illuminates camera shake), a good tripod is essential when using continuous light sources as shutter speeds are generally longer. With table top set ups, where exact composition is important a lock down three-way tripod head should be used. Portrait shooters, on the other hand, will benefit from the flexibility of a quick-release ball head, which provides the option to work off tripod as well as flip from vertical to horizontal quickly.

Figure 5.35 Daylight studios like this one located in an historical village harness the free energy of the sun as the primary light source for the scene.
A space to shoot – We might not all have a dedicated studio in which to shoot, but space to set up and move around is still an important factor when practicing your craft. If the lounge room stripped of furniture still doesn’t provide enough space (or harmony at home) then why not get together with your fiends and hire the local community or church hall for a studio session. The extra hands to hold reflectors or move lights will always be welcome.
| System cost | Advantages | Disadvantages | Associated requirements | |
Portable flash |
Varies – Low to Medium depending on model features and power |
• Can be used in the studio and on the move • In camera flash control very powerful • Some models are wirelessly linked • Variable output levels • Daylight balanced • More and more modifying accessories are becoming available all the time • Some models can be used in conjunction with pop-up flash to create a two light set-up |
• Generally very direct and harsh • Some models not very powerful • Can be a little confusing to set up • Difficult to predict how the light will look as no modelling light is included • Smaller range of accessories than studio flash |
• Softening attachments (e.g. Gary Fong’s Whale Tail or Light sphere) • Flash control system (in camera or via flash) • Filter attachments • Off camera leads or wireless control • Flash bracket for off camera usage |
HI Fluorescent |
Low |
• Cheap for multi-head systems • Much cooler than tungsten • Continuous output makes previewing lighting effects very easy • Some models are daylight balanced • Most use the popular E27 connection (Edison screw) and therefore can be substituted in sockets generally used for photolamps |
• Low wattage output when compared to tungsten • Single level output • Some systems require custom white balanced • High ISO necessary for lower wattage lighting |
• Generally can be used in systems designed for photo lamps • Soft boxes, umbrellas and reflectors • High ISO settings • Light meter (in camera and hand held) • White balance control • Tripod • High ISO settings |
Tungsten |
Medium |
• Tried and tested traditional system • Continuous output makes preview lighting effect easy • Can be picked up second hand cheaply |
• Generates large amounts of heat for the light output • Single level output • Requires tungsten white balance setting • Difficult to combine with daylight because of the different color temperature • Modifying accessories need to be heat resistant |
• Reflectors, diffusers, gobos (black reflectors) • Light meter (in camera or hand held) • White balance • Tripod • High ISO settings |
Entry Level Studio flash |
High |
• Controllable output level • Modelling light generally included to preview lighting effect • Professional level results possible • Daylight balanced • High power for low heat output • Low ISO settings possible |
• Generally more expensive to buy into than other systems |
• Reflectors, diffusers, gobos (black reflectors) • Light meter (in camera or hand held), • Soft boxes, umbrellas and reflectors |
Daylight (via window or skylight. See Figure 5.35.) |
Free |
• Did I mention it's free? • Beautiful effects are possible with well controlled day light |
• Not available on demand • Requires big, high windows • Intensity is fixed • Intensity and color temperature changes with the weather |
• Reflectors, diffusers, gobos (black reflectors) • Light meter (in camera or hand held) • White balance • Tripod • High ISO settings |
Matching the color of the light to the sensor
Unless you only work in black and white, however, you must ensure that the light from all your lighting units matches in color. One-hundred-watt lamps, for example, give yellower (as well as dimmer) light than 500-watt lamps, and so are best avoided for color photography. Then, having matched up your illumination, you can fit a color correction filter (see Table 5.2) to suit the daylight film you are using. Digital shooters can switch the white balance setting to tungsten or, better still, use the custom option to match the color of the light precisely to the sensor.
| Light source | Filter needed for daylight film | Filter needed for tungsten film | White balance setting on a digital camera |
| Flash | No filter | 85B | Daylight |
| Warm white fluorescent tubes | Fluor. correction or 40 magenta | 81EF | Fluorescent |
| 500 W lamps (3200 K) | 80A | No filter | Tungsten |
| 100 W domestic lamps | Not recommended | 82B | Custom or Preset |
Controlling lighting
Exploring lighting, given the freedom offered by a studio, is interesting and creative – but be prepared to learn one step at a time. Firstly, if you are shooting in color, match up the color balance of your film with the color of your lighting as closely as possible. Table 5.2 shows the code number of the blue conversion filter needed over the camera lens with daylight color film (print or slide) using 500-watt lamps. A few color films, mostly slide, are balanced for artificial light and so need different filtering, or none at all. These films are often referred to as tungsten balanced films.
Start off with a still-life subject because it is easier to take your time experimenting with this than when shooting a portrait. Set up your camera on a tripod and compose the subject. You can then keep returning to check appearance through the camera viewfinder for every change of lighting, knowing that nothing else has altered.

Figures 5.36 and 5.37 Lighting direction: Surface appearances change dramatically when you alter the position of the lamp.
Direction
Keep to one light source at first. The aim of most studio lighting is to give a fairly natural appearance as if lit by the sun. This means having one predominant source of light and shadows, positioned high rather than low down. Set up your light source (a spotlight, for example) somewhere above camera height and to one side of the subject. Adjust it to give the best lighting direction for showing up form, texture and shape – whatever you consider the most important features of your subject to stress. Figures 5.36 and 5.37 illustrate how simply changing direction picks out or flattens different parts of a three-dimensional subject.
Contrast
Be careful about contrast (the difference in brightness between lit and shadowed parts) at this point. Outdoors, in daylight, the sky always gives some illumination to shadows, but in an otherwise darkened studio direct light from a single lamp can leave very black shadows indeed. You may want to ‘fill in’ shadows with just enough illumination to record a little detail, using a large white card reflector as shown in Figure 5.38. This throws back very diffused light towards the subject and, since it does not produce a second set of clearly defined shadows, you still preserve that ‘one light source’, natural look.

Figure 5.38 Contrast control. A spotlight used alone (left) and with a large white card added (right). Shadows become paler, without additional shadows forming.
Recipes for success
It doesn’t matter whether your passion is photographing people, capturing complex table top set-ups, or even documenting a much treasured stamp collection, having your own studio is a great way to master the skills needed to produce successful photos time and time again. Having the space to work unimpeded, the lighting and camera kit to hand and the time to experiment, all contribute a perfect learning environment, but the real key is being able to ‘see’. To see the way that the subject is posed (or arranged), to see how the lights are describing the subject’s surface and shape and to see how the whole photo is composed in the viewfinder. To this end, start to train your eye by examining successful studio photos and dissecting their composition, lighting setup and posing or arrangement designs.
To point you in the right direction, here I perform just such an examination on three great studio images.


PROJECTS
1 A great way to help educate your eye as to the way that both portraits and products are lit is to examine how the professionals do it. Select a few example images from product catalogues or the advertising section of the weekend newspapers and analyze how each of the photographs is taken. For clues of lighting set-ups, look for the direction and style of shadows falling from the main subjects, as well as the reflection of light sources in the eyes of the portrait sitters or off the surface of reflective subjects. Once you diagnose the schema used, try to recreate the look of the photograph using your own set-up.
2 Photograph two portraits of a willing friend or relative using two completely different lighting set-ups. Create one with harsh direct lighting that has strong, hard-edged shadows and then use soft, well-diffused light with shadows that are almost totally filled in (with a broad white reflector) for the other.
3 Find a collector of dolls, toy soldiers, unusual teapots, stamps or something similar in your local area. Offer to make a record of some of the pieces in their collection and then go on to use the opportunity to practice your lighting and still-life photography skills.
4 Make a photographic copy of a set of montaged prints created with one of the techniques in Part 9 of this book. Ensure that the montage is evenly lit and that the camera is positioned so that it is ‘straight on’ to the original. Use the resultant image to make a single flat print of the picture.
5 Shoot separately pieces of glassware, silverware and a highly textured object, changing the lighting set-ups to suit each subject as you go. Once you have mastered each of these typical schemas, try photographing a subject that contains two, or more, of these surface types in combination.