4 Tackling Different Photographic Subjects
Many aspects of picture composition apply to all photography, as the examples in Part 1 showed. Technical controls too, such as the camera settings you make, choice of lenses and uses of flash, also play an influential role. But then again, the kind of subject you choose to photograph presents its own possibilities and problems. This part looks, therefore, at a range of subject situations with these points in mind. Potentially interesting subjects include people, places, animals, landscapes, small objects in close-up … the list is almost endless. Despite the range of these topics, it is probably true to say that all of us at some time will want to, or need to, photograph people, so this is where we will start.
People
Subjects here may be individuals or groups, posed or unposed, ranging from family and friends you know and can control, to candid shots of strangers. In all instances, it pays to pre-plan your shot as far as you can, which means concern for background and setting, direction of the light, and how ‘tight’ to frame the person (full length, half length, head and shoulders, head shot). At the same time, you must always remain able to respond quickly to any fleeting expression or unexpected moment of action or reaction, as it may occur. For example, the excitement and joyful expression on the face of the swinging child in Figure 4.1 could be lost a moment later; similarly, the baby’s quizzical expression in Figure 4.2.

Figure 4.1 Candid photography requires quick work and a sense of anticipation in order to capture the fleeting expressions that can sum up the character of a subject or the feeling of the moment.
Babies are the least self-conscious people. The main problem with these young subjects is how to manoeuvre or support a young baby so they are not just shown lying down. Try photographing over the shoulder of the supporting adult, or have the baby looking over the back of an armchair. Avoid direct, harsh sunlight. If your camera offers a zoom lens, set this to its longest focal length (T) or change to a long focal length type. A lens of 85 or 100 mm is ideal for a 35 mm camera; even used at its closest focus setting, such a lens will give you a large but undistorted image.
As children begin to grow up, they quickly become conscious of the camera. It is often better then to give them something to do – set up simple situations that are typical for the child, then wait for something t happen without over-directing the occasion. The girl on the swing in Figure 4.1 was just such a ‘can you see me?’ activity for the individual concerned, improvized on the spot for the photograph.

Figure 4.2 Plenty of patience is needed when photographing children and pets, as both subjects are unpredictable and great expressions like this one cannot be delivered on demand, but rather need to be waited for and then quickly captured.
Pairs
Portraying people in pairs allows you to relate them to each other in various ways. The relationship may be simply to do with comparative shapes and the individuals themselves remaining anonymous. Or it may be the highly personalized warmth and friendliness of the two brothers (Figure 4.3), both to each other and the person behind the camera. In this semi-posed shot, the boy in black stole into what was planned as a single portrait. The pale background helps to create a strong combined shape, and plain garments avoid distraction from faces. Lighting here was flash bounced off a white ceiling.
In other instances, expressions can have quite different connotations. The candid shot of the elderly Italians (Figure 4.4) has a rather sinister air. The hats, the corner location and the surrounding empty tables seem to suggest some plot or business meeting. A whole story can be dreamt up around such a picture – when, in fact, it was probably just a few old pals on a day out.
Your shot may be a largely constructed situation or taken incognito, but picking exactly the right moment can be quite difficult when two facial expressions have to be considered. Expect to take a number of exposures; you may find out anyway that a short series of two or three prints in an album forms an interesting ‘animated’-type sequence that has more depth than a single photograph.
Groups
Organizing people in groups is rather different to photographing them as individuals or in pairs. For one thing, each person is less likely to be self-conscious – there is a sense of safety in numbers, and a touch of collective purpose and fun. This is a good feature to preserve in your picture rather than have everyone wooden-looking and bored. For similar reasons, don’t take too long to set up and shoot (see Figure 4.5).
Groups of large numbers of people tend to call for a formal approach, and here it helps to prepare some form of structure, perhaps one or two rows of chairs. This guides people to where to sit or stand, and your camera position can also be prepared in advance. Smaller groups can be much more informally organized, participants jostling together naturally and given freedom to relate to one another, although still under your direction.

Figure 4.3 Clothes, pose and plain background help to give the picture of this pair an overall cohesive shape.

Figure 4.4 Expressions and environment give this casual meeting of friends a conspiratorial air.

Figure 4.5 Spontaneous interaction between the subjects in your picture often creates a picture that is more full of life than one that is carefully composed or orchestrated.
Most groups are linked to occasions and it is always helpful to build your group around a center of common interest – which might be the football and cup for a winning team, or a new puppy with its family of proud owners. Begin by picking an appropriate setting. Often, this means avoiding distracting and irrelevant strong shapes or colors in the background. With close, small groups you can help matters by having everyone at about the same distance from you, but keeping background detail much further away and out of focus (see depth of field).
Sometimes, though, showing the detail of the environment contributes greatly to your shot. Leaving space around the casual group in Figure 4.6 helps to convey the idea of an adventurous gang of holiday makers.
If at all possible, avoid harsh direct sunlight that will cast dark shadows from one person onto another or, if the sun is behind your camera, causes everyone to screw up their eyes. Aim to use soft, even light from a hazy or overcast sky. Alternatively, try to find a location where there is some large white surface (the white painted wall of a house, for example) behind the camera. This will reflect back diffused light into the shadows to dilute and soften them. For small groups, fill-in flash may also be a possibility.
Always try to locate the camera far enough back from the group to allow you to include everyone using a normal focal length lens. Working closer with a wide-angle or zoom lens at shortest focal length setting can make faces at the edges of a group appear distorted.
Every group shot calls for your direction to some degree. Consider its overall structure – gaps may need closing by making people move closer together (see Figures 4.7 and 4.8). With large formal groups you can aim for a strictly regular pattern of faces and clothing. To help with the composition of small groups, some photographers try to form a triangle shape with the main subject parts of their picture (see Figure 4.9). Ask if everyone has unobstructed sight of the camera lens. Always shoot several exposures because of the practical difficulty of getting everyone with the right expression, eyes open, etc. Having several versions also gives you the opportunity to digitally mix heads into one composite.

Figure 4.6 Showing surroundings can usefully add a sense of place – it would be wrong to tightly crop this informal group.
Candids
To take portraits of friends and strangers without them being aware calls for delicate handling. But results can be rewarding in warmth and gentle humor. Candid shots of strangers are easier if you begin in crowded places like a market or station, where most people are concentrating on doing other things. Observe situations carefully, especially relationships (real or apparent). These may occur between people and pets, or notices, or other people, or just the way people fit within a patterned environment.

Figure 4.7 When shooting pairs of subjects, try to ensure that there isn’t too much visual space between the two sitters. Here the distance was closed by overlapping the foreground sitter with the subject at the rear.

Figure 4.8 When working with the subjects, encourage them to interact closely so that there is little gap between the sitters in the final photograph.

Figure 4.9 Creating a good composition with the members of a small group can be a difficult prospect. Here the photographer has chosen to arrange the subjects in a triangle shape.
An auto-focus, auto-exposure camera is helpful for candids, but working manually you can often pre-focus on something the same distance away in another direction, and read exposure off the back of your hand. Avoid auto-wind cameras with noisy motors. Remember not to obstruct people when photographing in the street, and always ask permission to shoot on private property.
Places
Unlike people, places of habitation – towns, cities, buildings, etc. – are obviously fixed in position relative to their surroundings. This does not mean, however, that picture possibilities are fixed as well, and you cannot produce your own personal portrait of a place. It is just that good, interpretive shots of permanent structures require more careful organization of viewpoint and patience over lighting than most people imagine. The best picture is seldom the first quick snap.
Decide what you feel strongly about a place – this might be easiest to do when you visit the area freshly for the first time, or it may come from a longer stay giving greater insight into what the environment is really like. Compare Figures 4.10 and 4.11, which both show architecture. The Battersea power station in London, photographed from a stationary train through the scratched window on a gloomy day, provides a very personal view of the familiar site. The photographer has concentrated the viewer’s eye on the scratches using a shallow depth of field to ensure they are the only part of the image that is sharp. The towers are recognizable by their shape only. In contrast the Basilica of Sacré Coeur in Paris has received a totally different and much more mundane treatment. The building has been photographed in the same way from the same position and with the same perspective many times before and apart from accurately recording a pictorial description of the architecture the image speaks little of the photographer’s emotions or feelings towards the place.

Figure 4.10 The blurred smoke stacks of Battersea power station as seen through a scratched train window provide a personal and emotive view of a well-known scene.

Figure 4.11 A more traditional and less personal view of the Basilica of Sacré Coeur taken from the same spot as many other tourist photographs.
Choosing the lighting
Lighting also has a big part to play in the look and feel of your place pictures. Direct sun side-lighting falling across your scene can pick out specific landmarks and contrast them against dark backgrounds or shaded backgrounds. This can be a good technique to use to direct the attention of your audience to a specific part of the scene. Softer lighting can create a flattening, downbeat effect, reflecting the gray of the lighting. Overcast conditions do have the advantage of ensuring that details are recorded in the lightest (well lit) and darkest areas (shadows) of the scene.

Figure 4.12 A building’s texture, pattern and form change appearance as the sun moves direction during the day.

Figure 4.13 The texture of hieroglyphs brought out by afternoon sunlight streaming across the surface of the column.
Whenever possible, think out the sun’s position moving from east to west throughout the day and its relation to the subject or scene you are photographing. If the sun is in the wrong position it may be necessary to come back at a time when its direction will best suit the subject matter (see Figure 4.12). The same applies to choosing a day when weather conditions give direct sunlight or soft diffused light. Harsh, glancing light is essential to show the surface texture of objects such as bricks, cobble streets or surface decoration (see Figure 4.13). On the other hand, the pattern of varied chimney-pot designs photographed across the roofs of local houses would be over-complicated by their shadows if recorded in harsh light (see Figure 4.14). Overcast conditions here, together with choice of viewpoint, help to keep the picture on one flat plane. The result is a sense of the eccentric or surreal.

Remember that the best times for interesting, fast-changing lighting effects are either in the early morning or late afternoon. But be prepared to work quickly when sun-cast shadows are an important feature – they change position minute by minute (or may disappear altogether) while you are adjusting the camera. Again, don’t overlook the transformation of building exteriors at dusk, when internal lighting brightens the windows but you can still separate building shapes from the sky.
You can often sum up a whole city or village by just showing part of one building. Look for images that suggest the atmosphere and culture of the environment. But try to avoid hackneyed shots; instead, try suggesting the famous or well-recognized landmarks through a reflection or shadow. Signs and logos can form titles. Or you may want to bring together a ‘collection’ of shots of selected details such as mail-boxes, house names or interesting doors and windows. All these ‘sketches’ of what strikes you as special and most characteristic about a place will build up a highly personalized set of photographs. Leave the general views of famous sites to the excellent work of professionals shooting under optimum conditions – on sale at tourist centers.
People and places
Several other visual devices are worth remembering to help strengthen things you want to say through your pictures. For example, the size and scale of a structure can be usefully shown by the inclusion of figures (see Figure 4.15). Provided the figures you include relate to the environment in the photograph they can be also used as symbols – for example, showing the solitary outline of a person at a window in a vast, impersonal office block communicates more about the place of humans generally in the built environment rather than the life of the individual depicted specifically (see Figure 4.16).

Figure 4.15 Including walking figures in this city scene provides the viewer with a sense of scale.
On the other hand, the complete absence of inhabitants may also be important. Often, it is the hints of life that are left behind in a picture that can speak louder about how individuals live, work and dwell within a space than if the images were full of people. The audience is left to use their own imaginations to populate the space (see Figure 4.17).
Even when a destination is unexpectedly cold, bleak and empty, instead of sunny and colorful as anticipated, it can be worth shooting some pictures. Try to make them express this paradox in your glum impression of the day, perhaps by combining the sun and sea as depicted on painted signboards with the awful reality of the bleak day.
Whatever your personal reaction to a new place – perhaps good, maybe bad – aim to communicate it through your photography. New York City is impressive with its soaring architecture, but perhaps you notice too its features of public neglect (holes in the road, garbage) contrasting with corporate splendor (marble-faced commercial buildings). The discordance you recognize may become the basis of the images that you record of your visit.

Figure 4.16 Arab quarter, Jerusalem. Exposure was measured for the central area, to preserve the darkness of the foreground.
Pictures of places don’t always have to be linked to vacations and travel. You can practice your skills locally – encapsulating a street or an industrial park … even your own school or workplace. For a longer-term project, you may choose to take pictures once or twice every year from the same spot to create a series documenting the development of a garden. By always including family members in the shots, the images will also show how children grow and develop.

Figure 4.17 Newsagents in a quiet English village, at lunchtime.

Figure 4.18 (Top) Parallel vertical lines appear to converge when you tilt your camera upwards. (Bottom) Keeping the camera back vertical and later cropping off excessive foreground is one solution.
Interiors of buildings
If you are a beginner, then making pictures of the interiors of buildings may sound difficult, but the abilities of modern camera equipment has made this task easier than ever before. A wide-angle (or at least a shorter than normal focal length) lens is usually necessary. This is because there seldom seems to be enough space to get back far enough to include what the eye sees when looking around an interior. Entry-level compact cameras with their 30 or 35 mm standard lenses have an advantage here. A 28 mm lens (or equivalent on digital cameras) is probably ideal, as shorter focal lengths start to create distortion of shapes near the corners of your picture. Digital SLR shooters need to remember to account for the Lens Multiplication Factor when considering what focal length is considered wide angle.
Be cautious about tilting the camera when it is fitted with wide-angle lenses. Such an action creates images where the edges of buildings taper as they move away from the camera. This effect is often called ‘converging verticals’ and is acceptable to the eye when the photograph is obviously looking upwards or even down. But there is nothing more distracting than slightly non-parallel vertical lines in a straight-on view of a building or architectural interior. As Figure 4.18 shows, you can eliminate this effect by keeping the back of the camera vertical and either moving back or cropping off the unwanted extra foreground from your final image.

Figure 4.19 Both Photoshop and Photoshop Elements contain perspective correction features designed to remove lens distortion and correct perspective problems associated with capturing with wide- and ultra-wide-angle lenses.
For those occasions when it is not possible to keep the back of the camera parallel to the subject, or where the use of an ultra-wide-angle lens is the only solution, both Photoshop and Photoshop Elements contain perspective correction features. These tools provide a software solution for converging verticals as well as other lens problems such as barrel distortion (see Figure 4.19).
Even though you will tend to use wide-angle lenses for most of your architectural pictures, you will also find that a long focal length lens, such as 100 or 135 mm, is useful for photographing out-of-the-way details within a large interior. Picking out interesting architectural features can suggest the whole.
Interior lighting
The main problem here is contrast, and to a lesser extent the dimness and color of the light. The lighting range between, say, the most shadowy corner of an interior and outside detail shown through a window is often beyond the exposure capabilities of your film or sensor. To avoid this problem you could exclude windows, keeping them behind you or to one side out of frame, but where windows need including as an important architectural feature:
1 Shoot when the sky is overcast.
2 Pick a viewpoint where windows in other walls help illuminate interior detail.
3 Capture a series of bracketed exposures from which you can select the best image later. After all, some degree of window ‘burn out’ may prove atmospheric and acceptable provided you have retained important detail in shadow areas. Alternatively, the bracketed pictures can be used to assemble a High Dynamic Range (HDR) photo using the tools inside Photoshop. This photo type is capable of storing images with huge contrast ranges.
4 With smaller domestic size interiors, fill-in flash from the camera can reduce contrast, but don’t expect success using this technique in a space as vast as a cathedral, especially using a camera with a tiny built-in flash!

Figure 4.20 Dome of the temple of the Holy Dormition Cathedral in Budapest.
10 mm wide-angle lens, exposed for 1/30 second at f3.5 at ISO1250.

Figure 4.21 Mass in St Peter’s. Mixed artificial light and daylight. The altar area records orange on daylight film.

Figure 4.22 Paris fountains. Exposure was read from the central, lit water area.
Dimness of light need be no problem provided your camera offers long exposure times and you have some kind of firm camera support – improvized or, preferably, a tripod (see Figure 4.20). Some cameras offer timed exposures of up to 30 seconds. By selecting aperture priority mode and setting an f-number chosen for depth of field, the camera’s metering system will automatically hold the shutter open for a calculated period. If you time this with a watch you can then change to manual mode and take shots at half and double this exposure time to get a range of results. Or better still, if your camera has an exposure compensation system, simply adjust the feature to add one stop more and one stop less exposure.
Even during daytime, the interiors of large public buildings are often illuminated by artificial light mixed with light through windows and entrances. In most cases, the interior light is a warmer color than daylight – a difference barely noticed by the eyes of someone there at the time but exaggerated in a color photograph (see Figure 4.21). In such a mixture of lighting, it is still best to continue to use normal daylight-type film, with no color correction filtering, as totally removing the orangey artificial light can turn daylit areas unacceptably bluish. As we have already seen most digital camera users have the advantage of being able to take several versions of the same mixed lighting image with different white balance settings. Later on, with the series of pictures displayed on screen, they can select the picture with the best overall color.
Cities at night
At night, floodlit monuments and city vistas have a special magic (see Figure 4.22). They are transformed from the mundane into a theatre-like spectacle. As with interiors, contrast is your main problem with these photographic subjects. Shooting at dusk is helpful, but sometimes the sparkle and pattern of lights against a solid black sky can really make your picture (see Figures 4.23 and 4.24). Wet streets after rain, reflecting illumination from shop windows and street lamps, will also help reduce contrast. But even so, dark objects still just showing detail to the eye will become silhouettes in photographs when you expose correctly for brightly lit areas. So pick a viewpoint that places interesting and relevant black shapes in the foreground, where they can add depth to the picture.

Figure 4.23 The sparkle of city lights against the dusk sky creates a theatrical and dramatic picture. Shooting the same scene on a moonless night, and at a later time, will produce a series of small pin lights against a predominantly black scene, but photographing at dusk means that there is enough light in the sky and on the water to provide texture, detail and color.

Figure 4.24 New York City. Street lights and illuminated advertising shine brightly when captured with a DSLR set to ISO 1600 with and aperture of f3.5 at 1/80th second.

Figure 4.25 Not all of your low light pictures need to be clear, crisp, cast and blur free. Try a range of different shooting techniques when photographing in low light. Even try breaking the ‘rules’ to see what interesting results you can achieve.
Advanced compacts and all SLRs can expose correctly for floodlit subjects (typically 1 second at f5.6 on ISO 200 film). Just ensure that you measure illumination from close enough to fill up the frame with the brightly lit surfaces. Note also that film behaves as if it is less sensitive when used for long exposures in dim light. For instance, for exposures of 10 seconds or longer, most color films halve their sensitivity. To compensate for this effect, set your lens aperture to one f-number wider (smaller number) or use the camera’s exposure compensation system to override the exposure settings.
Gearing up for low light photography:
Shooting at night time requires just as much planning as any other photographic task where quality image making is the goal. In fact, ensuring that the following items are already in your kitbag will go a long way towards becoming a successful low light photographer:
Torch – Not strictly a piece of photographic equipment but at the top of our list. A small torch is invaluable when you are trying to change functions, read settings or even find the exposure compensation button in the dark.
Tripod – Low light often means that you need to use a long exposure to gain enough light to make a good photograph. Long exposures make using a tripod to photograph at night a necessity rather than a luxury. So if you intend to be shooting regularly in low light make sure that a good tripod is at the top of the next Christmas list.
Fast lenses – Fast lenses are those that have a wide maximum aperture which lets plenty of light into the camera and are therefore particularly well suited for low light shooting tasks. Zoom lenses with a maximum aperture of f4.0 or f2.8 are great; those with values of f5.6 and f8.0 are okay as well but will require longer exposures to account for their slowness.
Noise Reduction feature – Check your camera manual to see if your model has a noise reduction or clear image feature built in. If it does, be sure to become familiar with the feature before heading out for your first shoot.
Extra batteries – Long exposures, noise reduction features and back of camera monitors are all camera functions that eat up battery power. So make sure that your batteries are fully charged and that you have a spare set, equally charged, handy as well.
Flask – You would be surprised at how much your photographic skill grows when you have a little warm coffee inside you. Again a flask of coffee is not a piece of photographic equipment but it will help you take better night-time photographs, especially when the temperature is getting a bit chilly.
Moonlight and
long exposures
Just as the sun is the key light source for many an image taken during the day, the moon plays this role with photos taken at night. Unlike the sun though, the moon’s intensity changes throughout its 29.5 day cycle. It is at its brightest when at the full moon stage of the cycle, providing typical exposure times of f2.0 at 30 seconds for an ISO setting of 100. Take advantage of this time of the month to decrease the size of your aperture and increase your depth of field. Just before, and just after a full moon, is a good time for balancing exposures between street lights and the moonlight in a scene, where as a moonless night allows you to concentrate on recording star trails.
Metering at night

Figure 4.26 Working with strong silhouettes, great color, and mirrored reflections, this moon lit landscape draws the viewer into the picture as the eye moves towards the distant mountains and rim lit clouds.
As the meters contained in most cameras are designed to work within the shutter speed range of the camera, many models can’t be used to measure exposure beyond 30 seconds or so. To solve this problem try metering the scene with the lens at the widest aperture first. Note down the settings and then extrapolate the required exposure for a smaller aperture setting. For example, a setting of 30 seconds at f2.0, is the same as 60 seconds at f2.8, 120 seconds at f4.0, 240 seconds at f5.6 and 480 seconds at f8.0. Remember to double the exposure time for every full aperture setting change.
The serious night shooter can obtain more accurate results using a sensitive hand held meter. The best models are very sensitive and after measuring the available light, provide a range of shutter and aperture combinations that you can use with the scene. If your budget doesn’t run to this level, then the best option is to make a test exposure and using a ‘best guess’ shutter and aperture combination. Next check the resultant image. In particular, switch the playback option to display both image and histogram. Check the look of the histogram to make sure no detail is being lost in the highlights or shadows. If necessary, adjust the camera settings and shoot again.
Full Aperture and Shutter Speed settings
With many cameras it is possible to change the aperture in fractions of a whole f-stop. It may also be possible to alter the shutter speed selection in smaller increments than is traditional. This can make life a little tricky when you are trying to recalculate the correct exposure for a night shot from one aperture shutter speed combination to another. Use the following aperture and shutter speed sequences to help you recalculate your settings.
Full aperture f-stops: f1.4, f2.0, f2.8, f4.0, f5.6, f8.0, f11, f16, f22, f32
Full shutter speed settings: 1/30, 1/15, 1/8, 1/4, 1/2, 1, 2, 4, 8, 16, 32, 64 seconds

Figure 4.27 Don’t let a cloudy night put you off venturing into the dark. Here the moon is diffused by the cloud providing a dramatic background for the silhouetted trees.
Exposures beyond your camera’s longest shutter speed
Keep in mind that to obtain exposures longer than the maximum setting for your camera you will need to switch to the ‘Bulb’ mode (and strap the camera to a sturdy tripod). This special shutter speed setting keeps the shutter open while the shutter button is depressed. Once the button is released the shutter then closes. It is very difficult, no make that almost impossible, to keep the camera steady whilst holding the shutter button down for minutes at a time, so if you regularly want to photograph under low light conditions invest in a cable release that can be locked in the open position. Couple the remote release with a small count down timer, and torch, and you are ready for executing the truly long exposure times necessary for creating moonlit images.

Figure 4.28 Night turns to day, albeit a day filled with strange colors, as this simple country scene is lit with a mixture of moon and street lights. The key to revealing these colors is ensuring that you have enough exposure.
Starting Exposures for low light shooting (at ISO 400)
Brightly lit street scene – 1/60 sec f4.0
City skyline at night – 1 sec f2.8
City skyline just after sunset – 1/60 f5.6
Campfire – 1/60 f4.0
Fireworks against dark sky – 1 sec f11
Landscape with full moon – 8 secs f2.0
Fireworks
A not-to-be-missed part of most village fairs and a mandatory inclusion in all backyard bonfire nights, photographing fireworks is a great way to flex your new-found low light shooting muscles. Capturing these brilliant explosions of color and light is not as hit and miss as it may first appear. This is especially true for digital shooters as the results of our efforts can be easily reviewed on the spot via the monitor on the back of the camera.

Figure 4.29 Using a cable release you can keep the shutter of the camera open long enough to record the full burst of the fireworks. To record multiple bursts cover the lens of the camera with a dark cloth or black baseball cap in between individual fireworks explosions.
The explosion of a firework takes place over a period of a few seconds. There is the initial thump or sound of the mortar as the shell is launched skywards. This is followed by the first explosion, maybe a series of smaller bursts and a host of trails of twinkling light. To ensure that you capture the full effect you will need to use a long exposure. So start by setting your camera on a tripod and point it to the general location in the sky where the first few bursts occur. Try to avoid including complex backgrounds or well-lit structures in the frame as these will distract from the fireworks themselves (and may overexpose your sensor given the long exposure times). This said, judicially positioned horizon detail does provide a sense of scale for your images. So check out the environment. Take a few test shots before making up your mind.
Next turn off the auto-focus mechanism and manually focus the lens into the distance. For most situations the ‘infinity’ setting works fine but it also pays to check this focus setting with the first couple of photos and adjust where necessary. Next attach a cable release to the camera. If you don’t have one of these set the shutter speed to 4 seconds (this is a starting point and can be altered later when you review your first few shots). Now that you are set up simply open the shutter when next you hear the thump of the mortar and keep the shutter open for the full length of the burst, releasing the button only when the last trails die away.

Figure 4.30 Lightning is a lot less predictable to photograph than fireworks but no less spectacular.
And don’t forget to try your hand at capturing lightning, nature’s own fireworks, the next time you are in the midst of an electrical storm. Though not as predictable as shooting a fireworks show, successfully photographing these spectacular strikes uses all the same principles outlined above.

Figure 4.31 Using long exposures with the camera hand held provides you with the opportunity to play with a different type of blur to the usual cars streaking across the frame. Here a series of photos were captured at different shutter speeds showing the range of artistic results possible when the camera is released from the steady base of a tripod. Settings for each image
1. 1/250 sec @ f2.0
2. 1/60 sec @ f4.0
3. 1/5 sec @ f16
4. 1/2 sec @ f22
5. 1/2 sec @ f22
6. 1/2 sec @ f22
7. 1/2 sec @ f22
8. 1/2 sec @ f22
9. 1/2 sec @ f22
10.1/2 sec @ f22
Low light time and motion
When most people think of shooting cityscapes at night they envisage images full of twisting light streaks of speeding cars set against the expanse of illuminated office blocks. This type of imagery is so familiar because the very act of shooting with low light levels necessitates longer shutter speeds than we would normally employ in the day light hours. Longer shutter speeds mean moving objects are not frozen in the frame, but rather are recorded as streaks flowing through the photo. The speed of the movement, the position of the subject in the frame and the length of exposure all contribute to the way that the subject is recorded.
Controlling the movement
Long exposures provide low light shooters with a unique situation to record subject movement in ways not normally available. Designing how the photo will look when so much of the picture’s impact is based on moving subjects can be tricky though. The three way combination of shutter speed, aperture and ISO setting determine the way that the movement is recorded. For images with less blur, use a higher ISO setting (400, 800, 1600) and smaller f-stop values (f2.0, f2.8, f4.0). These settings will then enable faster shutter speeds which will, in turn, help to freeze the motion. Alternatively longer exposure times will produce more streaks and more blur. To obtain the slowest shutter speeds, employ bigger f-stop values (f11, f16, f22), and at the same time use lower ISO settings (200, 100, 50).
Subject movement versus camera movement
Don’t restrict your blurred motion experiments to tripod-based captures of subject movement. Turn this idea on its head. Release the camera from its steady base and try photographing static subjects hand held. You may need to turn off the camera’s, or lens’s vibration reduction system, in order to get the most artistically, blurry photos, but experimenting with different shutter speed settings will produce a variety of effects.
Anti-blur systems
Most modern SLR camera systems contain special features designed to reduce the incidence of blur caused by camera shake. In the Nikon range this feature is called VR, or Vibration Reduction, and is built into many of the company’s lenses. With Sony DSLR cameras, the system is called Super Steady Shot and is built into the camera body, rather than the lens, providing a steadying function across all lenses. These systems compensate for the shake associated with holding the camera with wobbly hands, or shooting while standing on the deck of a moving boat. Most photographers leave this system activated to help ensure sharp, clear, photos, but if your aim is to produce arty, blurred images, then switch the system off.
The problem of noise
In a perfect world there would never be an occasion when there was a need for photographers to use either a high ISO value or a long exposure, and so all the images produced would be beautifully noise free. But alas this is not the case and the low light shooter will regularly find themselves using both long exposures and high ISO settings. Does this mean that we have to put up with noise filled images for the sake of shooting convenience? The answer is no.
Most mid to high range digital cameras now contain specialized noise reduction features that help to minimize the appearance of random pixels in images produced with either high ISO or long exposure settings. These tools attempt to isolate and remove the errant pixels from the image, creating much cleaner and sharper images in the process. Be warned though, most noise reduction features do take time to process the captured file, so turn the system off if you need to shoot several images quickly, and employ a post capture technique for noise reduction (see Part 7 for some software based Noise Reduction techniques).

Figure 4.32 Many camera manufacturers now offer vibration reduction systems in their compact and DSLR ranges. Some companies house the system in the lens, while others, like Sony, base the feature in the body of the camera making it available with all lenses.

Figure 4.33 Using a long shutter speed in this carnival atmosphere converts the motion and lights of the rides into fascinating light sculptures. For best results shoot and review your images on the camera’s LCD screen adjusting the shutter speed settings as you go. Capture details – 3.2 secs @ f16 @ ISO 100.

Figure 4.34 In comparison, this semi-frozen alternative of the same scene employs a much higher ISO setting and smaller aperture value so that a faster shutter speed can be selected. Capture details – 1/20 sec @ f6.3 @ ISO 1600.

Figure 4.35 Portraits of your pets should be no less full of life and character than those of your friends or family, but just like these images, such personality-filled pictures require much patience and skill to capture.
Animal portraits
Photographing family pets and rural animals is rather like photographing young children. You need a lot of patience because they cannot be told what to do; they are unselfconscious (although capable of showing off) and their relationships with people are a great source of situation pictures (see Figure 4.35).
For best results always take the camera to the animal rather than the reverse. In other words, don’t put the animal in a false or unfamiliar environment just because this is more convenient for your photography. Animals do not really belong in studios.
Showing character
As much as possible, try to convey the individual character of the animal you are photographing. Often, you can do this by showing the bonds between a pet and its owners, particularly children. It is also possible to show the interaction between animals, although you may have to keep your distance and so avoid disturbing them by your presence (see Figures 4.36 and 4.37).
Decide what is a typical activity and environment for your particular animal. Large pets like ponies and big dogs are often more placid than small dogs and kittens. Even so, it is not helpful to overexcite them by making the photography a ‘big event’. You can suggest size by including other things in the picture to give a sense of scale. Also, make good use of camera viewpoint. A looming great horse can be shown close from a low angle, but use a normal or long focal length lens – coming in close with a wider angle gives ugly, steep perspective. A small cat or puppy looks tiny cradled in someone’s arms, or photographed from a high viewpoint, perhaps in front of a pile of crates and casks. Create candid images of your pet by photographing from the end of the garden, inside the house or across the street with your zoom lens on telephoto setting.

Figure 4.36 A self-satisfied animal with its owner. The low angle here gives strong shapes, and comfortable relaxed relationship between owner, pet and photographer enables this candid portrait to be recorded.

Small active animals are often by nature excitable and difficult to control. If this is a valid part of your pet’s character it should be shown. Maybe it is good at leaping for balls, rolling on its back or just lapping up milk? Try setting up simple attractions – a ball on a string or a throwable stick – and then await natural developments patiently … But don’t over-manage and degrade your pet by, say, dressing it up or putting it into ridiculous situations. The movement of an animal rushing around might be portrayed via a short series of shots, like a sequence of stills from a movie. Try to keep your viewpoint for the series consistent, so that the action appears rather as if on a stage. Another approach is to pan your camera to follow the action (easiest with the lens zoomed or changed to tele) and shooting at 1/30 or 1/15 second. The blurred surroundings and moving limbs then become a feature of your pictures, although you will need to take plenty of shots on a hit-or-miss basis.
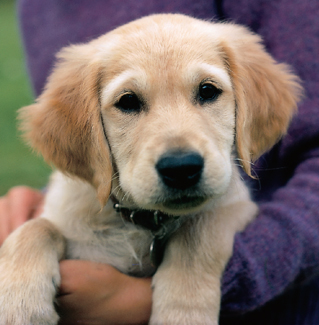
Figure 4.38 Cradling in a helper’s arms provides scale and also keeps this lively young animal under control.
Have a helper – preferably the owner – to control the animal and if necessary attract its attention just at the key moment. But make sure you brief the helper to stand near you behind the camera, and not to call the animal until requested. Another approach is to give the animal time to lose interest in you and your camera and return to its normal activities, even if this is just dozing in the sun.
Lighting and exposure
As in human portraiture, soft, even daylight is usually ‘kinder’ and easier to expose for than contrasty direct light. Try to avoid flash indoors, or if you do use it, bounce the light off the ceiling. ‘Red eye’ from flash on the camera is just as prevalent with animals as human beings. So be sure to use the red eye reduction techniques outlined in the portrait section. Load medium/fast film, say ISO 400, or set the ISO to a high value for digital cameras, so that you can still use a fast shutter speed with the available light.
If you have a multi-mode exposure system camera, select shutter priority (Tv or S) and set the shutter to 1/250 for outdoors use unless you want subject movement blur. When using a manual camera set this same shutter speed, then change the aperture setting until a reading off the animal’s coat signals correct exposure. Having all your camera controls set in advance will avoid loss of pictures due to fiddling with adjustments at the last minute. You need to combine patience with quick reactions, watching your animal through the viewfinder all the time, to be ready to shoot the most fleeting situation. A rapid auto-focus camera is helpful when an animal is liable to move about unexpectedly, especially if it is also close.
Backgrounds
Think carefully about the surroundings and background against which your subject will be shown. Many animal pictures are ruined because assertive and irrelevant details clutter up your photograph. Animals cannot be directed in the same way as people, and what may start out as a good background easily changes to something worse as you follow your subject into a different setting. The safest background to pick is a relatively large area of similar color, tone and texture. A large stretch of grass is a good option, especially when the camera viewpoint is high enough to make this fill the frame. Alternatively, by bending your knees and shooting from a low angle you can use the sky as a background.

Figure 4.39 One scared kitten sees a dizzy world through its front door.
Better still, pick surroundings showing something of your particular animal’s own habitat, adding character and enriching the portrait. A scared kitten neurotically observing a confusing world through its reeded glass front door is one case in point; a pair of horses gently dozing under the shade of a tree is another.
Not all animal portraits are set up, of course. Always look out for opportunist pictures (for which a compact camera is the quickest to bring into operation). Just like candid shots of people, you will discover a rich source of animal relationship pictures at gatherings – pet shows, livestock markets, pony races, farmyards, even dogs’ homes – where plenty of ‘animal action’ is always going on.
Shooting in the wild
Unlike the wildlife photographer who makes their living by catching magnificent beasts in their natural habitat, the closest that most of us will get to snapping photos of these kinds of animals is through the bars of the local zoo or wildlife park. But don’t be dismayed – these locations can provide you with access and proximity that a pro would need to travel for days and maybe patiently wait for weeks to achieve (see Figure 4.40). So seek out the options that are available locally. Check out the range of animals that each attraction has and find out how the exhibits are housed in a single location.
The parks whose exhibits mimic the wild habit of the beasts on show make for the best photographs. Old style zoos are not as conducive for capturing natural-looking photographs but if this is your only option don’t let it deter you. Go ahead and capture the best images you can using the shooting techniques detailed here to help minimize the intrusion of these unnatural elements.
Get permission
Choosing where to photograph is a decision that will either increase or decrease your shooting opportunities depending on how conducive the park/zoo owners are to having you photograph their exhibits. Most companies realize that photography is an integral part of any visit but few are prepared to accommodate any disruption to their show schedules or other patrons’ enjoyment, in order that you get the shots that you want. If you are planning a big day’s shooting it is worth phoning ahead and checking out the photographic policy of the park or zoo. Many will not allow you to use a tripod or flash when taking pictures. Tripods can be a hazard to other patrons and at worst block walkways or restrict the view of the audience at shows. The use of pop-up or on-camera flash is also often restricted because it can frighten or startle the animals.

Figure 4.40 Creating great wildlife images is not an activity limited to the professionals. In fact, photos like the one above are possible by digitally montaging several pictures taken during a visit to the local wildlife park.
In addition to considering such pragmatics of shooting as these, many parks also have restrictions over how you can use the images that you take whilst on their property. Photographs that are intended to adorn the walls of living rooms or sit on pages of a family album are generally not a problem, but if your intention is publication or resale, then the park’s owners will definitely want to know about it. This doesn’t mean that they will disallow the activity. In most cases you will just need to sign a photographer’s agreement stating where and when the images will be used.
Plan your day
Most parks have specific times of the day when certain animals will be displayed or, at the very least, encouraged to make an appearance for the paying customers. If possible obtain a copy of the typical schedule used in the park for the day that you plan to visit beforehand. Organize a shooting schedule for your day and base it around the timing of the shows and the appearances of the animals you most want to photograph.
Keep in mind the orientation of the exhibits and where the sun will be in relation to the animals at the time of the shows. The sun is your main light source and its position alters according to the time of day, so estimate the sun’s angle and how it will light the exhibits before deciding when to shoot what. Most shows or feeding times occur at least twice during the day and so if the sun is incorrectly positioned for one event time, schedule the alternative as your shooting period.
Solving shootingproblems
Sun behind the subject can cause some tricky problems, including the chance of:
• Flare spots in the picture as the sunlight reflects off the glass elements in the lens and
• the dreaded Silhouette effect where subject appears dark and without detail because the camera’s metering system has been fooled by the extra light coming from behind the subject.
Solutions for flare spots:
• Add a lens hood to your camera lens and ensure that it is shading the front element.
• Move slightly around the subject so that the sun isn’t shining directly into the lens.
• Have someone use an umbrella or piece of card to shade the front element of the lens.
Solutions for silhouette effect:
• Zoom in so that the main subject fills the viewfinder and hold your shutter button down halfway. This will fix the focus and exposure based on the subject. With the button still down halfway zoom back out and then press the button fully to take the photo.
• Use the camera’s exposure compensation feature to add 1–2 stops (or EV) extra light to the settings that the camera recommends for the scene. Take a test photo and check your results on the camera’s LCD monitor. Adjust the exposure compensation setting if necessary to add more or less light. Photograph the subject and then return the feature to the normal or zero setting.
What to consider when photographing
Now that we have sorted the where and when let’s concentrate on the how. Many habitats are quite large and with the subjects roaming freely it is possible that you will need to be able to cover a range of between 3 and 30 meters (10 to 100 feet) in the one enclosure. Add to this the necessary flexibility of capturing headshots, full body photographs as well as wider pictures that include the surrounding habitat and you will quickly see that you will need a lens or, more likely, a couple of lenses that cover a wide zoom range.
Most camera and lens manufacturers now produce super-zooms capable of a truly amazing range of focal lengths. These pieces of kit work well in good lighting conditions and provide a vast array of framing options and so are well suited for most zoo photography. The comparatively small maximum aperture of these lenses may be a problem if you are photographing later in the day. The mixture of low lighting levels, no tripod and small maximum lens aperture can cause blurriness in your pictures. To solve this problem try increasing the ISO setting on your camera or, if you have the option, switching to a faster lens.
When confronted with the impossible task of photographing through bars or a protective net to your subject beyond, use a small f-stop number setting to blur the foreground detail.
Be careful of the direction of your lighting. Observe the way that the light fills the habitat and make sure that you wait until the subject is well lit before pressing the shutter.
Landscapes
Successful photography of landscapes (meaning here natural scenes, principally in rural locations) goes beyond just accurate physical description. The challenge is to capture the atmosphere and essence of location, perhaps in a romanticized or dramatized way. The colors, pattern of shapes, sense of depth and distance, changes of mood which go along with variations in weather conditions, all contribute here. In fact, a landscape is rather like a stage set (see Figure 4.41).
However, photographs often fail to capture what it felt like to actually be there. Of course, elements such as sounds and smell, the wind in your face, the three-dimensional feeling of open space are all lost in a two-dimensional picture. But there is still plenty you can retain by careful selection of when and from where your shot is taken.

Figure 4.41 Just like a stage set, where the lighting, props, scenery and players all need to work together for a good performance, so too do many different elements need to combine to create a great landscape photograph. Many of these elements are out of the control of the landscape photographer, whose best skill is being in the ‘right place at the right time’.
Paramount of all the factors that affect the way that landscape images are recorded is lighting, and since we are dealing here with natural light, the time of day, the weather, even time of year, all have a strong influence on results. You can argue that not much of this is under your control, and certainly there is always an element of seizing an opportunity when by luck you find yourself in the right place at the right time. But you can also help yourself by anticipation. Don’t shoot second best – notice when conditions are not quite right and aim to return again earlier or later in the day when the weather is different or perhaps when you can bring a different item of photographic equipment with you (lens, film type, tripod, etc.; see Figures 4.42 and 4.43).
A landscape is basically immobile but it is certainly not unchanging, and there is often a decisive moment in its appearance that will not reappear for another week … or another year. Good landscape photographers therefore have to be good planners. They aim to get themselves into the right location before the right time – set up and patiently awaiting a scene to ‘unfold’.
Lighting
If you look through the viewfinder at a landscape as if it were a stage, your framing up and composing is like stage-setting. But then comes the all-important lighting of this theatrical space. Time of day affects mainly the direction of the light; weather conditions affect its quality (hard, semi-diffused, soft) as well as its distribution across the scene. Picture, for example, a mountainous landscape complete with wind-blown cloud cover providing dappled patches of direct sunlight that constantly move across the scene. Every moment the appearance of the landscape changes, which means firing the shutter just when the sun is positioned is in the right place to pick out an important feature or to show off the shapes of a landscape (see Figure 4.44).
The essential equipment for the landscape photographer:
Tripod – A tripod is not a nicety, it is a necessity for landscape work. The varying light conditions coupled with the use of large aperture numbers means that often you will be shooting with shutter speeds that cannot be successfully hand held. Choose a model that is sturdy but not too heavy – remember you will have to carry the tripod to all locations.
Camera – This sounds like an obvious inclusion in the gear round-up but the features on the camera you use can make a lot of difference to the quality of work you produce. Options like RAW file capture, manual or aperture priority exposure modes, depth of field preview button, exposure compensation system and self-timer can all contribute to the creation of better landscape photographs.
Lens – Wide-angle lenses are the usual lens of choice for landscape shooters, enabling them to squeeze very wide vistas into their camera frames. Most of the major camera companies now manufacture either fixed length or zoom wide-angle lenses suitable for use with digital SLR cameras. Look for models that have a high maximum aperture number (f16, f22) and keep in mind that most digital sensors are generally smaller than a 35 mm film frame and therefore a wide-angle lens on a film camera has a reduced angle of view when attached to a digital body. This change is usually called the camera’s multiplication factor and varies between models and manufacturers – for Nikon digital SLR cameras, for instance, it is a constant 1.5. This means that a 20 mm lens will have an angle of view equivalent to a 30 mm lens when attached to a digital body. If you are not using an SLR have a look at some of the great auxiliary wide-angle lenses that screw to the front of existing lens.
Weather protection – ‘Be prepared’ is the best advice when it comes to accounting for changes in weather – after all is it so common for a beautiful day to end up windswept, overcast and raining. Make sure that you and your camera gear are kept warm and dry. For your camera, this means using a waterproof backpack when not shooting and an umbrella or rainproof housing when you are. For yourself, a pack-a-mac or splash jacket should always be stored in the camera bag just in case.
Backpack – Use a comfortable backpack to carry your equipment. Models with weather protection, good padding and a belt strap are best. Make sure that the backpack is adjusted to suit your size and shape and that the weight is evenly distributed between shoulders and hips. And remember only carry the equipment you really need.

Memory cards – Although it mightn’t seem like it when you are paying out the cash, memory cards are the cheapest part of the landscape shooting exercise. Most of the trouble and expense is involved in getting to the location, so once you are there make sure that you have enough memory space to take plenty of shots. It may be tempting to take along a portable storage device such as the Nikon Coolwalker or the Nixvue Vista but often the extra weight and space taken up by one of these devices means that extra or larger memory cards are more practical in the long run. This is especially true with companies like Lexar now producing 8 Gb compact flash cards.
Level – Use a spirit level to ensure that your camera is sitting plumb on the tripod. This will keep your horizons straight and ensure that trees do not lean inwards at the top of your photos. To help with accurate positioning some tripods have a built-in spirit level, or you can purchase a special level that slots into the hot shoe bracket of your camera.

Notebook – Take down notes about where, when and how you photographed a scene. Not only are these important for helping you duplicate specific techniques at a later date, but they can also prove useful as a diagnostic tool when trying to figure out what went wrong.
Remote release – A remote release is not essential but helps ensure no accidental movement when releasing the shutter. If you don’t own one of these then try using the self-timer feature. By the time it has counted down most of the wobbles will have gone.
Batteries – Sometimes the best locations are also the most remote so make sure that you have plenty of batteries on hand to power your picture-taking exploits. Ensure that all rechargeable batteries are fully charged and that you have spares of any auxilliary batteries to use in the camera. Remember in cold weather batteries become less efficient so always carry spares of all power sources when things turn a little chilly.
Good shoes – Now I am really sounding like your mother but good walking shoes are worth the investment if you plan to trudge through tropical rainforest or climb over mossy rocks in search of the perfect photograph.

Figures 4.42 and 4.43 The weather and light play a critical role in the look and feel of the final landscape photograph. As seen in these examples, the same type of landscape can take on many dramatically different appearances, depending on the conditions at the time.
Cloudless sunny days, so common in the tropics, often provide monotonous lighting. Under these conditions it is more interesting to shoot early or late in the day. Shadows during these periods are long and contribute strongly to the texture of a picture. It is also important to notice that clear direct light displays the colors in the scene at their most vibrant. In contrast, hazier conditions give the same hues a more pastel appearance (see Figure 4.45).

Figure 4.44 Lighting dramatically transforms mountainous landscapes. The shape of the sand hills change as the sund gets lower in the sky and skims across the drifts.
The combination of lighting, weather and season of the year has a powerful influence on a landscape’s appearance, particularly noticeable in temperate parts of the world such as Europe. Changes in season bring about great changes in the way that the landscape appears (see Figures 4.46–4.50). Remember that, visually, the most rapidly changing, interesting seasons for landscapes are spring and fall. Snow-covered scenes in winter need direct sunlight in order to ‘sparkle’, unless you want a moody, somber effect. Very hazy conditions are good for atmosphere but can easily become dull. It may be best then to shoot against the light and base your picture on silhouetted foreground shapes linked to grayer shapes further away.

Figure 4.45 The strong lighting provided by the direct sunlight in this image is tempered by the addition of carefully positioned clouds (and their shadows) in the overall image. The landscape photographer needs to be patient when waiting for the lighting conditions and moving elements, like clouds, to be positioned in such a way that it suits the whole picture.

Figure 4.46 Spring, April.
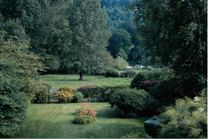
Figure 4.47 Summer, July.

Figure 4.48 Autumn, October.

Figure 4.49 Autumn, November.

Figure 4.50 Winter, January.
Camera technique
The basic elements when framing up a landscape are its foreground, middle ground and background. Each of these areas should relate in some way, and be relevant to the others (see Figure 4.51). Consider how high to place the horizon – a decision that often determines the ratio of the three parts. Beginners often position the horizon dead center. Don’t overdo this though, for unless you consciously plan a symmetrical composition, splitting the picture into equal halves can make it weaker and indecisive. Always avoid tilting the horizon, which seems to happen most easily when you use the camera on its side to shoot a vertical format picture. Keep the foreground interesting or at least filled, preferably in some way that provides a lead-in to the main elements in your picture. Even a plain foreground looks good if in shadow, contributing depth to the picture when contrasted against a lighter background.
A zoom lens that offers a short focal length or a wide-angle lens of about 28 mm are very useful for landscape work – particularly when the foreground is important or when you just want to ‘open up’ the whole of a scenic view. Secondly, a lens of moderately long focal length such as 135 mm is occasionally handy when you want a distant element in your picture – mountains on the horizon, for example – to loom large relative to mid-distance and foreground.

Figure 4.51 Using a large depth of field to keep most image parts sharp can help combine foreground, middle ground and background elements.
When your lighting is uneven, decide the key part of your landscape and measure exposure for this part – perhaps turning and reading off nearby ground that is receiving the same light. Some photographers use a number 2 graduated gray filter attached to the front of their camera lens to prevent overexposure bleaching important sky detail when setting the correct exposure for darker ground area. Other filters that are useful for landscape work include a deep orange color and a polarizing filter. The former is used for black and white photography, to darken the monochrome reproduction of blue sky and so make white clouds appear more bold. The polarizing filter, which appears overall gray, is also useful for color photography. It can reduce the glare or sheen of light reflected from surfaces such as glossy foliage, water or glass, as well as darkening blue sky at right angles to the direction of clear sunlight. The polarizing filter can therefore help to intensify subject colors, although colorless itself.
Finally a small, easily carried tripod greatly extends the possibilities of landscape work. It frees you from concern over slow shutter speeds when time of day, weather conditions and dark tones of the scene itself combine to form a dim (but often dramatic) image.
Color in landscape
The intensity of colors in landscape photography is enormously influenced by atmospheric conditions, plus the color, type and intensity of the light and technical matters such as choice of film or saturation setting for digital shooters and the use of filtration. For instance, direct, warm evening light shortly after a downpour can give intense and saturated colors. Water provides a very interesting foreground for landscapes. Changes in its surface – from still to rippled by breeze – mix colors, reflections and shapes.
A much more formal man-made landscape, like the gardens at Versailles, already has a scheme of tightly restricted colors built in. In hard, clear sunlight, the brilliance of red and green and a touch of yellow appears most strongly to the eye (see Figure 4.52).
For film users, the choice of color film (and the color paper that negatives are printed on) can fine-tune results, emphasizing the richness of certain hues in a landscape, or give more muted, subtle results. Experiment with different maker’s brands. And if you produce your own color prints through a computer printer, various software programs will allow you to ‘tweak’ the final color balance in different directions. Don’t overdo this manipulation, though.
Skies
Clouds, sunsets, vapor trails and rainbows all form an important and ever-changing element in land and seascapes. The contents of skies can also form abstract images of their own. American photographer Alfred Stieglitz called his photographs of clouds ‘equivalents’ – their shapes and tones evoking emotions such as love, foreboding, exuberance, even ageing and death.

Figure 4.52 Gardens at Versailles, a shot that needed careful framing to exclude colors outside this restricted range.
The best times of year for interesting skies are during spring and autumn. Cloud shapes appear most dramatic when back- or side-lit, in ways which strongly separate them from the general tone of the sky. For example, the sun may have just set, leaving a brilliant sky background and silhouetted shapes. Conversely, during unsettled weather, clouds can appear intensely bright against a dark background bank of storm clouds. Often, a ‘skyscape’ needs a weight of tone to form a base to your picture. You might achieve this by composing darker parts of a cloud mass low in the frame or by including a strip of land across the bottom of the shot. Where possible, make elements in this lower part of your picture complement sky contents in some way. Trees may be useful in helping to frame the sun when this figures in your image.
Even though the sun is not shown in many sky images, you must decide carefully how you will measure exposure for these pictures. It’s easy to overexpose when your camera metering system becomes too influenced by a darker land mass also in the picture. The consequence is that cloud texture and sky colors appear burned out. Choose which part of the picture should finally appear a midtone – midway between darkest and lightest details – then fill the entire frame with this or a visually matching area while you measure and set exposure (then set the AF lock on automatic exposure cameras). If possible, make one or two bracketed exposures, giving less rather than more exposure. Make sure your final picture is printed dark enough to give exactly the feeling for shadow and light that you wanted.
Warning: The sun’s bright globe loses its energy and can be harmlessly imaged late in the evening, when the light passes through miles of haze. But never point your camera directly at the sun in clear sky at other times of day. Like using binoculars under such conditions, the intensity of light can damage your eyes. The camera’s exposure meter too is temporarily blinded and can give rogue readings for several minutes afterwards. Also, digital sensors may be permanently damaged if used to capture a photograph of the sun directly.

Figure 4.53 Be sure that composition in the pictures that you convert to grayscale is based on non-color based design ideas such as pattern, tone, or in this case, line.
Creating black and white images
Though some digital cameras still have an option to shoot in black and white (grayscale) largely this mode has been removed from the features list of many current models. Consequently most photographers, no matter how ‘in love’ with monochrome images and printing they are, shoot color all the time, choosing to convert their pictures to black, white and gray, after capture, and with the aid of their favorite software program. But as many of you can probably already attest, shooting great monochrome pictures is quite a different art to the act of capturing wonderful color photographs. Here we will look at how best to shoot color when you have monochrome in mind.
See tones not color
The most important fact to consider when creating monochrome pictures is that at some stage during the process the color that you see before you in the scene will be converted to a series of grays. Even in the days of film this was the case. It was the skilled photographer who understood the conversion process and could predict how certain colors would be recorded. They trained their eyes to downplay contrasts in color within the scene and encouraged their sight to emphasize how the other design elements, such as pattern, texture, line and, the most important of all, light, played in the photograph. In this way, although seeing in color, they could account for the characteristics of the conversion to black and white and adjust the way that they shot to make best monochrome pictures possible.
Even if your camera has the option of shooting grayscale, I recommend that you should always capture in glorious color. This approach will never limit your options. The same picture can be processed as a color photograph or skilfully converted to a series of grays and spend its life as a rich velvety monochrome print.
Compose using the other design rules
In some ways the strength of your composition is more important when the color is removed from a picture and it is stripped down to just the bare tone of the image. It is as though we are examining the very structure of the photograph without the distraction of any colorful embellishments. For this reason it is critical that you revisit the basics of composition and spend your viewfinder time ensuring that the frame is well balanced. Examine the whole of the scene checking that details in the fore-, mid- and background are all consistent with the picture layout. Make the most of the design elements that don’t rely on color for their visual strength. Use pattern, texture, tone, and line to both balance the subjects in your photograph as well as direct the viewer’s eye to the picture parts that you deem as important.
Light is king
In the absence of color, light moves to the forefront of the queue of visual factors to consider when shooting. Where soft and diffused lighting may be appropriate for an image that contains a group of brightly colored subjects, strong and textural side-lighting will help bring drama to your monochrome images. This doesn’t mean that you should religiously take all your pictures with contrasty lighting but black and white pictures do live or die based on the quality of the light within them.

Figure 4.54 The strength of this monochrome image is drawn from its great use of strong and direct light. Pictures that contain subjects that have little contrast in themselves need to be strongly lit to ensure dramatic results.
Softly lit photographs have to rely more heavily on the contrast of the tones within the picture itself rather than the differences that come from a dramatic change of the light falling upon the surface of the subjects in the scene.
Aim for quality
The decades of beautifully produced and richly toned monochrome prints that preceded the birth of digital photography have left us with a hard black and white act to follow. Practitioners like the famed Ansel Adams and Minor White prided themselves on the careful recording and production of technically magnificent and visually stunning prints. They were true masters of the silver tradition and it is in their foot steps that our own digital monochrome production must follow.
Though the technology has changed, the methodical approach that they advocated is still as relevant today as it was then. Their workflow entailed matching the subject brightness range of the scene (the difference between shadow and highlights) with the capture medium (in their case film), nurturing the recorded tones through the production process (chemical developing) and finally squeezing the results into a black and white fibre based print. Our version of the process still contains capture, process (editing and enhancing on the desktop) and printing. Translating their concerns to our workflow would mean that we should:
• Ensure that all images are captured at the best quality capable by our cameras or scanners. This means RAW where available, TIFF and JPEG (highest quality/least compression) where it is not.

Figure 4.55 RAW file capture, together with the options for enhancement in Adobe Camera Raw, provides the best quality image which can then be used as a starting point for grayscale conversion.
• Capture with enough resolution (total number of pixels) to ensure enough detail for the maximum print size you require.
• Make sure that capture settings record both highlight and shadow areas equally and that no tones are clipped in the process.
• Make all editing and enhancement changes to your pictures in 16 bit mode to take advantage of the extra tones available with this option.
• Carefully peg black and white points and adjust midtone values of your picture with sophisticated tools such as Levels and Curves. Do not use features such as the Brightness/ Contrast sliders which can easily cause valuable tones and details to be lost.
• Use a calibrated monitor for all editing and enhancement changes. This increases your ability to make fine tuning changes to your pictures that are predictable and consistent.
• Use a calibrated or ICC profiled printing system. It may seem strange but color calibration is even more critical when outputting ‘neutral’ black and white prints. Using a profiled system means that you can spread the considerable detail in your original photograph across the full extent of the printer’s, ink’s and paper’s capabilities predictably and accurately.
Photoshop is your friend
In seeking to create the best quality pictures from capture to print, software like Photoshop or Photoshop Elements are by far the monochrome shooter’s best friends. Starting with the package’s ability to import and process RAW files right through to the sophistication of its tonal control features (ie. Curves and Levels) and the way that it employs a full ICC profile color management system, the king of editing packages gives you the fine level of adjustment that is necessary for the production of quality black and white prints.
Gearing up for monochrome production
This technique’s gear list is a little oblique. Rather than just include the equipment needed for the capture of good pictures that will eventually end up as great monochrome prints, we have also thrown into the mix the other components (some of them software based rather than hardware) of the process that are just as important.
RAW or 16bit TIFF capture option – Check to see what is the highest quality setting for your camera and scanner gear. Use RAW where it is available, failing that trawl through the manual for the possibility of using a 16 bit TIF file format.
Careful exposure control – Though not strictly gear related, the impact of quality exposure on the production of high class monochrome prints cannot be overstated. Slight under or over exposure may be tolerable but go a little further away from the optimal exposure and you will quickly find you will lose details in your shadow or highlight areas.
Good conversion process – Ensure that you use a quality color to grayscale conversion process. The best results are rarely obtain by simply changing the color mode from RGB to Grayscale, instead employ techniques that make use of alternative approaches such as multiple Hue/Saturation adjustment layers, using the ‘L’ channel from an image in LAB mode or the Channel Mixer feature.
Quality editing and enhancement steps – Continue the quality workflow by applying changes in brightness and contrast with tools like Curves and Levels and with the image in 16 bit mode.
Matched paper and ink set – Reduce the possibility of creating cast-ridden black and white prints by using matched paper and ink sets along with the ICC profile created for the media.
Monochrome-ready printer – For best results use one of the photographic printers that contains extra light black (gray) cartridges to help with the creation of neutral gray tones.

Close-up subjects
Working close up (within 30 cm or so of your subject) opens up a whole new spectrum of picture possibilities. You can not only record small objects so that they fill the frame, but interesting, even dramatic pictures can be made from details of relatively ordinary things that you might not otherwise consider for photography. A cabbage, or a few clothes pegs, or just the page edges of a thick book are examples of hundreds of simple subjects that can be explored for hours in close-up. Along with plants and flowers, and weathered or corroded materials, they provide a rich source of pictures based on color, shape, pattern and texture (see Figure 4.56).
Close-up photography is also useful to record possessions for identification purposes. Items of special value to you can be logged in detail, against possible damage or theft, leading to an insurance claim. If you are an enthusiast then your collection of stamps, coins or model cars can be visually catalogued this way and then scanned into a computer file. Photographing inanimate objects in close-up is also an excellent self-teaching process for control of lighting and picture composition generally, working in your own time.
Technically, the main challenges in close-up work are to:
1 Sharply focus and accurately frame your subject.
2 Achieve sufficient depth of field, which shrinks alarmingly with close subjects.
3 Arrange suitable lighting.
Focus and framing
The closer your subject, the more the camera lens must be located further forward of the film or sensor to give you a sharp image. Basic, fixed focus cameras do not sharply image subjects nearer than about 1.5 m, unless you can add a supplementary close-up lens. A typical 35 mm compact camera allows focus adjustment down to 0.6 m (20 in) and the more expensive models to 0.45 m (12 in). The latter means that you can fill the picture with a subject about 6.5 cm wide. Some cameras have a so-called macro setting for their closest focusing distance. It may mean there is a gap between the lens’s continuous focusing adjustment and its positioning for the closer distance. This is more limiting than to be able to focus ’all the way down’ but will still enable you to capture good close-up pictures (see Figure 4.57).

Figure 4.57 Close focusing with an SLR. (Top) Fifty-millimeter lens used at its closest setting, no ring. (Center) With a 1 cm ring added. (Bottom) Using a 5 cm ring instead.
The macro setting on many digital compact cameras allows you to focus extremely closely. In some newer models, this can be as close as 2 cm from the front lens element. This, plus the ability to review the image immediately, makes these cameras prime candidates for close-up work.
One way to adapt any camera for close subjects is to fit a close-up lens element over the main lens, which shortens its focal length. These supplementary lenses, like reading glasses, are rated in different dioptre power according to strength. Fitting a +1 close-up lens to a fixed focus 50 mm lens camera, for example, makes it focus subjects 87 cm distant. Used on a focusing compact with a camera lens set for 0.6 m, it sharply focuses subjects 30 cm away.
The main difficulty using a close-up lens on a compact camera is that the separate viewfinder system becomes even more inaccurate the nearer the subject. A close-up lens is more practical on a digital camera, where you can observe focus and composition accurately on the electronic display screen. Similarly, any single lens reflex film camera has a viewfinding system that allows you to see exactly what is being imaged.
However, close-up lenses – particularly the most powerful types – do reduce the overall imaging quality of your main lens. This is where an SLR camera scores heavily over a compact. For, instead of adding a lens, you can detach its regular high-quality lens from the camera body and fit an extension ring between the two. The extra spacing this gives reduces the minimum focusing distance. This might mean that your normal lens, which focuses from infinity down to 0.45 m, now offers a range from 0.45 to 0.27 m (so the subject is imaged on film about one-quarter life size).
By using extension rings of different lengths – singly or several at once – you can move in closer still. The degree of extension, and therefore how close a subject can still be focused, is even greater if you fit a bellows unit rather than extension rings. Generally, when using bellows or extension rings, auto-focus lenses have to be manually focused (see Figure 4.58).
The gear you need to get up close
Tripod – Getting in close exaggerates the slightest camera or subject movement. For this reason it is essential to use a tripod to steady your gear when photographing.
Cable or remote release or self-timer – Even with your camera locked down to a study tripod the action of pushing the shutter button can still produce a blurry image when you are shooting with longer shutter speeds. To help stop the shakes use a cable or remote release to fire the shutter. Alternatively, try using the self-timer feature to release the shutter several seconds after you have pushed the button.

Macro lens – If you own a major brand digital SLR then you can purchase specialist macro lenses designed to get you in very close to your subjects. These pieces of glass are a serious investment but still represent the best way to obtain high-quality macro shots. If you want the class without the expense then try hiring one of these beauties for the day from your local professional gear outlet.
Reflector and extra lighting – Great images require great lighting. Make sure that you don’t forget to take just as much time lighting your close-up pictures as you would illuminating a studio portrait. This means ensuring that you have reflectors and even an extra light source handy to fill shadows or add a highlight.

Dedicated macro light – For the truly dedicated Nikon has a dedicated macro ring light attachment for their series of Coolpix cameras. Called the Cool Light SL-1, the device screws directly onto the lens of some models and via a step-down ring for others. This attachment is not a flash but rather provides a permanent and continuous light source for macro shooting from a series of 8 white LEDs. As many of the cameras in Nikon’s range can focus down to as little as 2 cm, such an attachment makes the job of lighting subjects that are very close to the camera much easier.
Most SLR zoom lenses offer a macro setting on the focusing scale. This adjusts components inside the lens so you can sharply focus subjects an inch or so from its front surface. Often, the range of subject distances is very restricted. For best quality and greatest flexibility in close-up work, change your SLR camera lens to a more expensive macro lens, specially designed for close subjects. Its focusing scale allows continuous focusing down to about 0.2 m and thereafter closer still if you add rings or bellows.
If you have no macro lens, you can achieve maximum magnification with your SLR camera equipment by combining your shortest focal length lens with your longest extension tube or bellows. In other words, if you own a simple extension ring, fitting it behind a 28 mm lens instead of a normal 50 mm type will sharply focus your subject about 30 per cent larger. However, you will be working much closer, which may result in the camera casting a shadow. This close proximity also makes three-dimensional subjects record with steepened perspective.

Figure 4.58 A bellows unit for close work with an SLR camera.

Figure 4.59 Morning glory. (Left) Using f4 and 1/250 second. (Right) Using f16 and 1/15 second. The former version has a less distracting background and looks more threedimensional. Hazy daylight from above and behind helps to reveal form.
Depth of field
Depth of field decreases as you move closer to your subject, even though you use the same lens aperture (e.g. a lens focused on something 1.5 m away might give nearly 20 cm depth of field, but this shrinks to only 3 cm depth when the same lens is focused for 0.45 m). This means that your focusing must be very precise, there is little latitude for error. Where possible, arrange your camera viewpoint so that all the parts of the subject you need to show pin sharp are about the same distance from the lens. Provided that every part of the subject where you must show detail is sharp, rendering things at other distances out of focus helps to isolate them, erasing clutter. A manual camera with depth of field preview button is very useful here – observing image appearance as you alter the lens aperture setting will give you a good idea of the extent of sharp detail (although you must get used to the screen getting darker as the aperture is reduced in size). Alternatively, digital camera users can use the ‘shoot and review’ process to ensure that the zone of focus is where you want it (see Figure 4.59).

Figure 4.60 Good lighting is essential for close-up work, as low light levels can contribute to aperture and shutter speed settings that produce shallow depth of field and perhaps even some camera shake.
Garden flower close-ups
Flowers are a rich source of color, pattern, texture and form. Lighting is therefore very important. Shooting against diffused sunlight out in the garden is a good way to show the transparency of petals and leaves, emphasized by shadowed background. Back- or side-lighting also reveals the stalks and other structural detail in a three-dimensional way. Direct sunlight from the side is good for emphasizing texture (see Figure 4.60). Even when sunlight is diffused, fit a lens hood or shade to your lens to minimize light scatter and flare caused by light falling on the front element of the lens. Measure the majority of your exposure from the delicate petal detail – if this approach results in dark stalks it is still more acceptable than burnt-out flower colors. Use soft, even lighting for strongly patterned flowers, as it will cause less confusion than direct light, which will add shadow and texture to the picture as well.
One advantage of working so close to a small subject is that it is not difficult to modify natural light to suit your needs. Something as simple as a piece of tracing paper hung between a plant and direct sunlight will bathe everything in soft, even illumination. A hand mirror can direct sunlight into the shadow areas and a white card held close behind the camera reduces the excessive contrast of back lit shots.
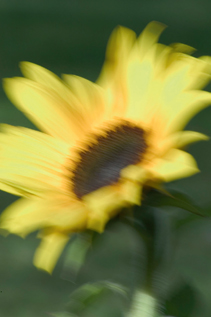
Figure 4.61 In breezy conditions, ensure that you are using a fast shutter speed and then be prepared to shoot several images of the one flower set to ensure that one of the series is captured with no subject movement.
Movement blur
A feature of working outdoors you will discover is that small movements of the flower caused by the slightest breeze are magnified by image size and recorded as blur. As a result, if the subject keeps swaying out of focus there will be an increased risk of movement blur (see Figure 4.61).
A shield made of card on the windward side and positioned just outside the picture area will help reduce the movement. In addition, selecting a high ISO value or a fast film will allow you to set a combination of brief shutter speed (perhaps 1/125 second to reduce blur and allow camera hand-holding) plus a really small aperture to produce sufficient depth of field.
Be careful, though, as the faster the film or higher the ISO value, the more grain is apparent in the final picture. Too much grain and you will destroy the finer qualities of your image, especially if you plan a big print. The best approach is to work using a tripod, or at least partly support the camera on top of a stick or ‘monopod’ reaching to the ground. A monopod with the camera attached can minimize movement blur yet still allow quick adjustments to distance.
When using a manual or semi-automatic camera on aperture priority mode, first set an aperture to achieve the depth of field you need and then shoot at the shutter speed indicated to give correct exposure. Clamping the flower in some way, perhaps holding its stem with your hand just outside the picture area, will also help.
Flash is a handy source of movement-freezing illumination in a close-up situation. If possible, have a flashgun on an extended lead – so that you can position it from the best angle for the subject features you want to show, using the light either direct or diffused with tracing paper. Flash on or near the camera can be useful when working with daylight to dilute or lighten shadows, leaving sunlight from above to pick out the form. Flash will also suppress unwanted background or surroundings by under-lighting them, but take care that this does not give you unnatural looking results.
Close-ups indoors
Being able to work close up means that you can find all kinds of subjects indoors. You may use these subjects for factual record purposes, or to create artistic pictures. You might, for example, create a ‘portrait’ of someone through a still-life group of related possessions and personal memorabilia. For a child, this might be the contents of their schoolbag; for an aged relative, it may be pictures and objects displayed on a bureau. Much of this work can be done by using the existing daylight as your source of light. Hazy sunlight through cloud (not blue sky) will give most accurate color, and if you can work in a room with a large window, this will help to avoid uneven illumination. Figure 4.62 was photographed this way. For this type of indoors work a tripod is practically essential – it not only gives you the freedom to give longer exposures without camera shake, but anchors viewpoint and distance in one spot while you build up your picture, bit by bit.

Figure 4.62 This piece was lit by a wide rear window. Shooting from a distance avoided steep perspective and hid camera reflection.

Figure 4.63 Copied on a window sill, lit by soft overcast daylight from above, and white card below the lens to fill in.
Copying flat surface subjects
The most important factors in photographing or making copies of physically flat subjects such as drawings, sheets of stamps, etc. are:
1 To be square-on to your subject.
2 To have it evenly lit.
Unless the back of your camera is truly parallel to the surface you are copying, horizontal and/or vertical lines will converge. Look very carefully around the edges of the frame to ensure that the borders of your subject line up – don’t be tempted to tilt the camera a bit if the picture is not quite central (shift it sideways instead).
When using daylight through a window, come close to the glass so you have the widest possible width of illumination, e.g. lay your subject flat on a bay window sill. Evenness is further improved if you place a white card vertically facing the window on the room side of your subject just outside the picture area. Be careful about measuring exposure when your subject is on a background sheet of a very different tone, as in Figure 4.63. Stamps displayed on a black, or white, page will be over- or underexposed respectively by a general light reading. It is best to cover the whole page with a mid-gray card and measure off this surface, set the aperture and shutter speed, and then remove the card before exposing.


Figure 4.65 Same lens and ring; f16 was used to get eye and distant window sharp.
Reflective subjects
Reflective surfaces such as glass or shiny metal need special lighting care; otherwise, shadowy reflections of the camera will confuse detail. Sometimes you can help matters by shooting from further away, using a longer focal length lens on an extension tube. This way, the camera can be far enough back to be a small, unsharp, almost invisible reflection (see Figure 4.64). A large sheet of tracing paper used close to your subject is the best way of controlling reflection. Angle the camera so that the tracing paper surface (through which all the lighting passed) is shown as an even white reflection off the reflective surface.
Some close-up shots stretch depth of field to its limits. For instance, with extreme close-ups of a face it can be almost impossible to get nose, eyes and ears all sharp. For the biggest depth of field possible, set the lens to the smallest aperture (f22 or f32) and, with the depth of field preview button pushed, examine the dim image as you move the camera fractionally backwards and forwards; all the important elements in your picture are just within the depth-of-field boundaries (see Figure 4.65). If you stick can’t get the depth that you need try using a slightly wider lens as this too will increase the amount of the subject that will be sharp.
Action and sports photographs
Alot of photographers shy away from shooting action or sports images because they feel that these areas are the strict domain of professionals only. Others say that they don’t have the equipment needed to make great action photographs. In some respects these statements are true. Great action images can take a lot of skill and good equipment to produce but this shouldn’t be a barrier keeping new photographers, or the occasional action shooter, from trying their hand.
Photography should be an enjoyable and memorable activity. And nothing could be more so than spending the afternoon shooting a local village football match, or the kids on the carousel on Brighton beach. And whether you like it or not, to capture great images from these activities you will need some of the skills of the action photographer.

Figure 4.66 Great action photography is like good comedy, it is all about the timing. Anticipating the action is as much a part of capturing photos like this one as being able to handle your equipment appropriately.
In fact, I believe that shooting action or sports events will help develop a range of skills that might be missed if the photographer avoided the area. Timing, thinking ahead, seeing and working seamlessly with your equipment are all skills that can be learnt ’having a go’ at shooting action or sports images. With this in mind let’s make a start …
It’s all in the timing!
Timing is crucial. Famous Magnum photographer, Henri Cartier Bresson, called it the ‘decisive moment’ and the name has stuck. For him it was the point when all the elements in the frame came together in one perfect composition. We probably all recall his famous street scene that captured the precise moment when a man was jumping a puddle. He was frozen forever in the air, his reflection skimming off the water’s surface. Bresson was no sports photographer but he knew the importance of timing and anticipation.
Even in this age of digital and new technology we can still learn a lot from the lessons that he and other ’greats’ pass down to us. It’s the photographer’s job to look and anticipate where and how the action is going to unfold, and then be ready to capture it (see Figure 4.66). In a sports context the area where the action will be is fairly predictable, bounded by sidelines, and governed by the norms and rules of the game. In football, for instance, you know, or rather hope, that there will be some action around the goalmouth. The pitch and the game’s structure itself dictate this.
If timing is the key then how does a new photographer develop great photographic timing? Simple – practise, practise, practise!
Do some pre-planning
My old photography teacher used to say that ‘Scouts and photographers are very similar, they both need to be prepared’, and as with most photographic activities, a little pre-planning goes a long way towards guaranteeing the success of your first action shoot.
If possible, it is worth checking out the location beforehand. Look to see where the best vantage points are, and assess how far you will be from the action. A rough rule of thumb is that for each 10 meters you are from your subject you will need 100 mm of lens length if your subject is to fill a standard vertical 35 mm frame (remember to take into account the Lens Multiplication Factor for DSLRs). In practice this means that if you are shooting basketball from the sideline (near baseline) then a 100 mm lens should give you full frame shots. If, on the other hand, you are photographing a football match and you are 30-40 meters from the penalty area then you will need a 300–400 mm lens to achieve similar results. In sports like cricket it is not unusual for some photographers to be using lenses of 600 mm or more with ‘doublers’ attached, giving an effective lens length of 1200 mm.
Being close enough is only part of the equation when choosing your shooting spot. Watch out for distracting backgrounds. It’s true that some of the distraction of the crowd in the background can be minimized by using a shallow depth of field, but it is best to have as clear a background as possible. This will help your subject stand out.
Expect the worst … from the weather, that is. When shooting outdoors it’s also worth assuming that the weather is going to turn bad. This doesn’t mean that you need to be laden down with all manner of wet weather gear. A ‘pack-a-mac’ and a couple of plastic bags will see you and your valuable equipment through all but the most torrential downpours.
Digital continuous shooting modes
Many digital cameras have the option for shooting a sequence of pictures rapidly. The rate at which sequential images are captured and the total number possible for a single burst varies from camera to camera. If you plan to take action sports shots regularly then this feature is one that you should check carefully before purchasing new equipment. Use the following ideas as a checklist:
• Check the frame rate. This should be in frames per second.
• Find out the sustain rate. Look for how many frames can be shot at the fastest rate before slowing.
• Research which file formats work with the fastest frame rates.
• Check the compression level used if the mode is only available in JPEG format. Low-compression images process faster but have less quality.
• Look at the picture dimensions for each mode. Having a very fast mode that only produces pictures with enough pixels to print a postage stamp is not that useful.
• Check the type of memory card used for the statistics, as the speed with which the card saves the files can also affect the overall frame rate.
Ensure that your camera’s batteries are fully charged and that you have a spare set stashed in a side pocket of your bag. Auto-focus cameras are notorious for their power consumption, and this is even more of an issue when you are asking the camera to drive a long lens back and forth during the whole of a sports event.
Check that you have plenty of memory card space (or rolls of film). Arriving at an event with cards already partially filled will hamper your ability to shoot freely. Make sure that you have enough space to cover the whole event and account for anything unusual that might happen. Action shooting has a higher ratio of shots taken to shots used than other types of photography, so expect to capture many frames during the course of the event. It’s better to have too much space rather than too little.

Figure 4.67 Understanding where the action is in any event will help you capture more dramatic images. Here the swimmer is photographed just as he rises from the water to catch a breath.
Know the game or event
Good action photographers have, at the very least, a good working understanding of the sport or activity they are shooting. This gives them the chance to maximize their chances of being in the right place at the right time. Having some idea about the natural flow of the activity will mean that you can pre-empt where some of the action will be.
Pick the peak shooting points of the action. In every action there is a moment which typifies the activity. In golf, it’s the end of the swing at the moment of contact with the ball, in the high jump it’s the clearing of the bar when the participant is at the top of the jump’s arc and on the ballet stage it’s the point at which the lead dancer is in full graceful flight. It’s these moments that the photographer needs to capture. They exemplify the action and the achievement of the participants. You need to think about the nature of the action and try to capture the parts of the activity that are most visually descriptive (see Figure 4.67).
When analyzing the action you are not just looking for the most aesthetically representative moment but also the one that can most easily be captured by your camera. Take a competitive diver as an example. There is a point in the execution of the dive when just after leaving the platform the upward motion ceases and for a fraction of a second the diver is suspended in midair. In photographic terms this part of the action can be frozen more easily than at the fastest point of the activity where the diver enters the water. If you are shooting indoors then the difference in the speed of the action might be crucial if you are trying to achieve crisp, frozen images.
The same is true for motor sports. Trying to photograph a speeding car or bike as it passes you on the straight doing over 150 miles an hour is much more difficult than photographing the same vehicle as it slows to take a corner. It pays to know your sport or activity and plan the shooting points according to the access you have available, the nature of the action and what is photographically possible.
The final pre-planning activity is to check with organizers about restrictions that surround the event. Often photographers are confined to a particular part of the arena. Depending on where this places you in relation to the action this will determine the type of equipment that you need and the range of shots you will be able to get. Other restrictions that you might confront could include not being able to use flash or in the case of theatrical performances not being able to shoot at all. This particular problem is solved by stage shots being taken during full dress rehearsals rather than performances.
The important thing to remember is that a lot of difficulties on the day could be overcome by making some simple enquiries to the organizers the week before. Better to be prepared than to end up with shots taken from the 35th row of a packed stadium because you didn’t get a clearance to photograph from pitch side.
Action and sports shooting techniques
Freezing the action
Stop motion or freezing the action is the aim for a lot of sports photographers. A quick look at a range of sports publications shows that these are also the images most selected by the picture editors for publication. The images are clear and sharp, with the main subject jumping out from the background. If these are the type of images you want there are essentially two techniques you can use to achieve them:
Fast shutter speed – Sounds simple enough, select a high shutter speed and fire away, but there is a direct link between aperture, shutter speed, ISO value and the light in the scene. Put simply, to be able to use speeds that will freeze motion you need a fast lens, high ISO setting and good light.

Fast light source – The alternative to shooting with a fast shutter speed is exposing with a light source that has a very short duration. In most instances this source will be a portable flash. Most on-camera flash systems output light for durations of between 1/800th and 1/30,000th sec. It is this brief flash that freezes the motion. Don’t be confused with the shutter speed that your camera uses to sync with the flash – usually between 1/125th and 1/250th sec – the length of time that is used to expose your frame is very short and is based on the flash’s duration. Although there are not too many sporting or stage events that allow flash photography there are plenty of other action activities where using flash will help capture that decisive moment.
Blurred motion techniques
In some instances, images where the motion is frozen completely don’t carry the emotion or atmosphere of the original event. They appear sterile and even though we know that they are a slice of real-time motion something seems missing. In an attempt to solve this problem photographers throughout history have also played with using slower shutter speeds to capture moving subjects. The results, though blurry, do communicate a feeling of motion.

Slow shutter speed – There is no secret formula for using this technique. The shutter speed, the direction of the motion through the frame, the lens length and the speed of the subject are all factors that govern the amount of blur that will be visible in the final image. Try a range of speeds with the same subject, making notes as you go. Too fast and the motion will be frozen, too slow and the subject will be unrecognizably blurred or, worse still, not apparent at all. Your tests will give you a starting point which you can use next time you are shooting a similar subject.
Extended blurred motion techniques
Panning – An extension of the slow shutter technique involves the photographer moving with the motion of the subject. The aim is for the photographer to keep the subject in the frame during the exposure. When this technique is coupled with a slow shutter speed it’s possible to produce photographs that have sharp subjects and blurred backgrounds. Try starting with speeds of 1/30th sec.

Flash blur – To achieve this effect you need to set your camera on a slower than normal sync shutter speed. The short flash duration will freeze part of the action and the long shutter will provide a sense of motion. The results combine stillness and movement.
Focusing issues
Viewfinder focusing areas – In the viewfinder of a modern AF system you will see at least one, but probably more than one, focusing area. For the camera to focus accurately, the subject must be in this area. In entry-level cameras the area is positioned in the center of the frame. In the viewfinders of more expensive examples you will not only find multiple focusing areas but you will also notice that they are distributed across the viewfinder. With the aid of a dial, or a thumb toggle, the photographer can choose which area will be used for primary focus. This enables the focusing of subjects that are off center.
Zone focusing – There are a range of activities that allow the photographer the chance to predict where the subject will be with reasonable accuracy. In swimming, for instance, the lanes and the end points of the pool are well defined. To use this technique the photographer would pre-focus (in manual mode) on one point in the pool and wait for the subject to pass into this zone before pressing the shutter.
Single and constant auto-focus – In AF terms these two modes determine the way in which the auto-focus system works on your camera. In single mode when the button is held halfway down the lens focuses on the main subject. If the user wishes to change the point of focus then they will need to remove their finger and repress the button. If the subject moves whilst using this mode, then you must refocus.
The constant or continuous focusing mode also focuses on the subject when the shutter button is half pressed, but unlike the single mode, when the subject moves the camera will adjust the focusing in order to keep the subject sharp. This is sometimes called focus tracking. Some AF systems have taken this idea so far that they have ’pre-emptive focusing’ features that not only track the subject but analyze its movement across the frame and try to predict where it will move to. This in turn helps to keep the main subject fully sharp.

During shooting
This is the stage where all your good planning bears fruit. Position yourself well. Make sure that all your gear is set. Anticipate the action and capture your images, concentrating on your pre-planned shooting points. There is an old sports photographer’s adage that says ‘if you see the action through the viewfinder then you’ve lost it’, and this is largely true. At the moment of exposure for SLR users, the viewfinder goes blank to allow the mirror to retract and the shutter open. So if you see the action then you have missed the chance to record it. It takes a bit of practice but anticipating the action point is one of the most important skills needed to take good images.
Shoot plenty of images – after all exposing digital frames essentially costs nothing. Wherever it is possible use the continuous shooting feature on your camera to capture action sequences or, better still, if your camera is up to it, shoot ‘through’ the action and select the best images later at the desktop.

Figure 4.69 When photographing action or sports activities don’t limit yourself to pictures containing motion, spend time capturing the periods before and after the action.
Make sure that you make the most of the location. Eventually you will get to a stage where, in your own mind, you feel that you have covered a particular section of the meet or event; it’s then time to move around and find a new vantage point. In photographer’s language, this is called ‘working the location’.
Concentrate on the action but don’t forget that there are stories to be had behind the scenes as well. Try shooting the participants as they are preparing or after they have finished. To make a more complete set of images it could even be worthwhile following the progress of one individual through their warm-ups, heats, the big event and the aftermath, be it jubilation or despondency. There is always drama to be had for the photographer who is prepared to look (see Figure 4.68).
Vary your shots. You should make sure that you use a range of different focal lengths so that at the end of the event you will have a variety of images ranging from the close-up, through mid, and onto long range shots. A couple of good quality zoom lenses can help cover an astonishing range of focal lengths, providing the contemporary photographer with no excuses for ending up with a bunch of similar images (see Figure 4.69).
Keep in mind that there are a variety of techniques that you can use to photograph action. These range from those designed to freeze a precise moment to those that give the feeling or sense of movement and those that are a combination of the two. When you are out shooting for the day, remember keep thinking, keep looking and keep shooting.
Going with the flow
With over 70 per cent of the world’s surface being water it would be unusual if at some stage during your photographic lifetime this liquid asset didn’t appear in your photos. But just because it is plentiful doesn’t mean that many of us actually spend much time considering how best to photograph it. Like other tricky subjects, water needs special care and attention if we are really going to capture its true essence in our photos. In this section I’ll look at some of the techniques you can use to capture the water images that surround you.
Static or in motion
Whether it is the local stream after a little rain or a giant waterfall in a famous national park there is something intoxicating about the sound and the look of moving water. When including such features in a picture the landscape photographer is immediately faced with a multitude of decisions. Composition aside selecting the shutter and aperture combination is usually based on the exposure needed first and then depth of field or sharpness considerations. But in choosing the shutter speed the photographer is also deciding how the moving water will appear in the final photograph.

Figure 4.70 The classical blurred water shot consists of a mountain stream running through a green landscape. The long exposure changes the water to a silken blanket which contrasts nicely against the rich hue of the foliage. You can easily replicate this yourself using a tripod and a series of exposures made with long shutter speeds.
Selecting a slow shutter (less than ¼ second) will produce a photo where the moving water appears like threads of loosely spun silk. This is a look that some photographers refer to as ‘angel’s hair’. Alternatively picking a faster speed will freeze the movement preserving the intricacies of the eddy and flow of the stream in sharp focus for all to see.

Figure 4.71 Using fast shutter speed and the camera switched to continuous-shooting mode is the best way to try to capture a frozen droplet shot like this one.

Figure 4.72 The short duration time of the light that is emitted from your top of camera flash unit is great for freezing the movement of water close to the camera.
Both approaches have definite merit and generally a couple of test shots will quickly reveal which direction should be used for a particular environment. There is no golden rule here; it is definitely a matter of ‘shoot and see’. For this reason you should carry a small (but sturdy) tripod to ensure that you always have a choice when it comes to how you will capture water movement in your photos.
Freezing movement: an
alternative
‘Apart from using a high shutter speed how else can I freeze the movement of water in my photos?’ Well I am glad you asked. Another option that you may not have readily considered is to add a portable flash into the equation. For most models the duration of the flash burst that exits the unit can be measured in tens of thousandths of a second. This is much faster than the quickest shutter speed on all but professional stop motion cameras. What’s more, the advanced exposure system of modern digital systems can easily combine sunlight and fill-flashlight in the same exposure without the risk of over exposure.
These two factors combine to provide you with the ability to use your ‘top of camera flash’ to light the moving water detail in the foreground of a scene and, in doing so, freeze its movement. The clarity from these flash frozen photos is truly amazing and beyond what is generally possible with shutter control alone.
See beneath the surface
Sometimes in our haste to embrace all that is digital we forget some of the lessons of the past. This is definitely the case when it comes to using such essential pieces of equipment as the polarizing filter. Designed to cut down the reflections or glare in a picture (and improve the overall saturation of the photo) sadly the polarizing filter is not the ‘must have’ accessory it once was.

Figure 4.73 Adding a polarizer to your lens will not only darken and saturate the colors in your picture but will also reduce the reflections from surfaces like water allowing you to see the detail beneath the waves.
This is a shame as this humble little filter has great benefits for the water shooter. When the sun is correctly positioned and the polarizer attached to your camera lens a couple of quick turns of the filter and magically the surface reflections will disappear. In this way water vistas captured with a polarizing filter record both the scene above water and also allow the viewer’s gaze to penetrate beneath its surface.
Move in closer
Some of the most interesting images are found when you start to move closer into your water based subjects - the last droplet on a drooping leaf after rain or the dew condensing on a spider’s web early in the morning. Be careful though as successfully filling your frame with water requires you to not only pay attention to composition and macro focusing but also to how the subject is lit.

Figure 4.74 Getting in close to your water subjects can really create some interesting design and compositional possibilities.
The translucent nature of water means that it is best lit from behind or the side as direct lighting will produce bright hotspots and reflections. You can easily create this type of lighting setup in a studio, by moving the light or the subject or both, but working in the field is another proposition. Here the position of the light (the sun) and the subject is generally fixed. In these circumstances try shading the subject with a dark reflector (gobo) and changing your own position until the lighting is more appropriate. To make a subject such as a water droplet really stand out, light from behind and then try to position the subject so that it is against a dark subject in the background.

Figure 4.75 Don’t limit yourself to the traditional water subjects. Challenge your photographic skills by try to capture scenes containing ice or steam.
The essential kit for photographing water
Tripod – To ensure that you have the choice of using short or long exposure be cure to include a tripod (even a small one) in your kit bag. There is nothing worse than stumbling upon a free-flowing stream and not being able to emphasize the moment of the water with a long shutter speed.

Portable Flash – Though not essential for taking great water shots the addition of a flash to your equipment bundle will provide the added option of freezing airborne water droplets with the flash burst rather than a very fast shutter speed.
Splash proof housing or DIY camera-mac (plastic bag with holes cut in it) – I probably don’t need to tell you that water and camera electronics are not the best of friends so make sure that your expensive equipment is well protected before entering a wet environment. This might mean that you use a simple plastic bag with a few well positioned holes cut in it to shield your camera from unexpected splashes or for the dedicated water photographer, it may well be worth investing in a water-proof or splash-proof housing.
Fold-up backgrounds – As we have seen, capturing the true transparent nature of water is enhanced when the liquid is photographed against a dark background. But what if your environment doesn’t contain a suitable backdrop? Simple, bring your own. A folded dark green or black cloth that can be draped in the background of the photograph is a quick solution to problem backdrops.

Polarizing filter – A simple polarizing filter fitted to the end of your lens can make a world of difference to the appearance of the water in your photo. Given the right position of the sun in the scene this filter can reduce and in some cases eliminate the glare reflecting from the surface of the water allowing you to see what lies beneath.
Neutral density (ND) filter – A neutral density filter is constructed of an uniform gray material and is used to reduce the amount of light entering the camera. This filter is particularly helpful if you want to use a long shutter speed but the brightness of the scene (and the minimum ISO setting available on the camera) will not allow you to select a suitable shutter speed. Adding a ND filter can increase the length of the shutter speed from 2 to 8 times depending on how dark the filter is.
PROJECTS
Tackling self-set themes
A good way to extend your photography is to work to a particular topic or theme – something you have chosen, or set perhaps by a competition. This will challenge you to organize ideas and plan your approach, and actually having to carry out an assignment encourages you to solve technical problems, gaining experience and confidence.
Themes might place greatest emphasis on the subject itself (a person or thing) or on shapes or structures. Or again they may be concerned with underlying concepts, such as humour and emotions of various kinds.
Singles or series?
Your result might be a single picture, or a pair or sequence of photographs. One picture can sum up a simple concept, such as joy or sorrow whereas taking two separate photographs offers opportunities for comparisons and contrasts when presented together. Sometime it’s helpful or even necessary to make features such as background, positioning in the frame and angle of view similar in both pictures to show up differences in your main subjects. A longer series of pictures gives scope to tell a story or explain a process, show changes of tim and place, and thus develop a theme.
Subject-based themes
Several subject themes have been touched on in this part of the book, but there are many more, such as travel, natural history and still life, for you to choose from. Perhaps you decide to work to a portrait theme. Think of all the ways you can show an individual – at work, at home with their possessions, with family and friends, travelling, relaxing or practicing a hobby. You need patience and time to get to know your subject well, observing mannerisms and seeking out representative aspects of their life.
Another way of working is to shoot a collective portrait, say one picture of every family in a street or apartment block. Here you might show each at their own front door, keeping your viewpoint and lighting similar to provide continuity.
Structural themes
Here the project might center on movement or color, or shapes. You might build a set of pictures from ‘found’ subjects that all share a common color scheme but have many variations in content, scale and/or texture. One might be blue sky with clouds, another a group of blue-painted signs, a house with blue curtains or a close-up of blue flowers. Make sure each shot is a satisfying image within itself, as well as working as a part of the whole series.
To begin a project on the theme ‘light’, you could consider qualities such as brilliance, reflection, color, cast shadow and so on. Observe the effects of light on various surfaces under different atmospheric conditions. Next, work through your list, eliminating similarities and identifying six or so characteristics you want to show. Then find suitable subjects (don’t overlook the macro world) and techniques to strongly communicate each aspect of the theme.
Emotive and narrative themes
Projects based on the dominant feelings a viewer reads out of your picture are arguably more difficult to plan and tackle. A sense of jubilation, or stress, implied menace, despair, loneliness or close friendship are all feelings that can form the basis of an interesting series. Your chosen approach might be factual and objective, or implied through the shape of a shadow or plant structure, or something colorful but quite abstract.
Alternatively, you may want to work in a more storytelling or narrative way. You could use your sequence of images to illustrate a poem, or cover a passage of time, or a journey from one place to another. A picture series like this needs visual variety as well as continuity if all the photographs are to work as individual pictures and also as part of a series. Start off with a strong general view as an establishing shot, then move in to concentrate on particular areas, including close-ups and lively (but not puzzling) viewpoints. The final photograph might bring the viewer full circle, e.g. the opening picture reshot at dusk.
1 Pick a letter of the alphabet and photograph five different found objects that look like the letter shape. Don’t forget to use close-up as well as distant shots to add variety to your series.
2 Sum up your impressions of one of the following places in three or four pictures: (a) a graveyard; (b) the seashore; (c) a modern industrial park.
3 Try to illustrate the color red in three pictures without actually photographing any objects colored with the hue.
4 Make a short series of pictures of owners and pets to prove or disprove the theory that they grow to resemble one another.
5 Create a descriptive portrait of the character of a family member by photographing three images containing places and things that are important to the subject. Don’t include the subject in any of the pictures.
6 Produce two or three animal ‘head and shoulders’ portraits of either: (a) a dog; (b) a tame rabbit or hamster; or (c) a cat. Try to convey character through showing what they do. Include the owner if relevant.
7 Photograph a series of valuable items to record them for insurance purposes. Include a ruler alongside for scale.
8 Using hands as an expression of emotion, produce three pictures, each conveying one of the following: anger; tenderness; tension; prayer.
9 Illustrate three of the following themes using a pair of pictures in each case: simple/ complex; young/old; tall/short; hard/soft.
10 Make a documentary series of four pictures on either ‘children at play’, ‘shopping’ or ‘a day off’.