
CHAPTER 2
Using Ubuntu Server for
System Imaging
Clonezilla on Ubuntu Server
In the first chapter of this book, you read how to perform an enterprise network installation of Ubuntu Server. The topic of this chapter is somewhat related to installation of Ubuntu Server. In this chapter you'll learn how to set up a Clonezilla imaging server. There may be several reasons why you would want to set up such a server. The most important of them is that working with workstation images reduces help desk expenses. If after a minimal period of troubleshooting it turns out that repairing a workstation is going to take too long, it's much faster just to restore the image of that workstation. Of course, this assumes that all work-related files will be written to some other server first. In this chapter you'll learn how to set up Clonezilla for imaging.
Setting Up a Clonezilla Imaging Server
The Clonezilla imaging server is currently the most popular open source imaging solution. It has two versions, a stand-alone version and a server version. Whereas the stand-alone version does well to make and restore images of single machines, you'll need the server version if you need to make images of multiple systems. In its current version, up to 40 workstations can be imaged simultaneously using a method that uses broadcast or multicast to ensure optimal use of network bandwidth.
Before installing the required software, make sure that your environment is set up for imaging. Basically, it comes down to two elements:
- A fast dedicated network for imaging (you do absolutely want Gigabit or better). This means that you need a second network card installed on your server and a dedicated Ethernet network connected to that network card.
- Workstations that can boot from the network card (PXE boot). All modern network cards support PXE boot, so that shouldn't be a problem. Just make sure that you enable network boot in the BIOS of your workstation.
I'll assume that you have both elements. If not, save yourself a great deal of hassle and make sure that these are in place before you start.
Setting Up Diskless Remote Boot in Linux
To use Clonezilla in a server environment, you need to set up diskless remote boot first. The solution for that is Diskless Remote Boot in Linux (DRBL); you can download it from http://drbl.sourceforge.net/one4all. Before setting up DRBL, you must set up the network interface card. Assuming that you've just installed on your Ubuntu 8.04 server a second network card for use with DRBL and the network card hasn't been set up yet, follow this procedure to set up the second network card:
- Using root permissions, open the file
/etc/network/interfaces. - To add a second network card that is meant to be used for Clonezilla only, add the following information to the file. Of course, you are free to use any IP information that you want to use.
auto eth1

iface eth1 inet static

      address 10.0.0.10

      netmask 255.255.255.0

      network 10.0.0.0

      broadcast 10.0.0.255
- Restart the network to activate the new configuration. Don't forget to make sure that your new network card (you should see it as
eth1) really is available.
Installing the DRBL Software
Now that the network is prepared, you can install the DRBL software. It is a good idea to use Ubuntu's secure apt to do this, so you first need to download the DRBL GPG key and install it. Use the following two commands to do that:
wget http://drbl.nchc.org.tw/GPG-KEY-DRBL

apt-key add GPG-KEY-DRBL
Next, you need to change the /etc/apt/sources.list file to add the new installation sources that allow you to add the DRBL software and keep it up to date. Make sure to add the following two lines to the sources.list file:
deb http://free.nchc.org.tw/ubuntu hardy main restricted universe multiverse

deb http://free.nchc.org.tw/drbl-core drbl stable
Next, execute the following commands to install the software:
apt-get update

apt-get install drbl
Depending on the speed of your Internet connection, this may take a while. After this command has finished execution, all required software is downloaded but nothing is installed yet.
When you run the apt-get install drbl command, the installation program asks the following questions, the recommend answers to which are provided:
- Do you want to install some network boot images for different Linux distributions? Doing so would download more than 100 MB from the Internet to allow you to perform an easy installation of workstations. Normally, you don't need to do this, so press Enter to accept the default value No and proceed.
- Do you want serial console output for typical clients? Unless you know you do need it, choose the default option, which is No.
- What kind of kernel do you want to use on the clients to do imaging? Typically, you would choose option 1, which offers i586 and better. Option 0 is for old, pre-Pentium clients only, and option 2 is only for if your CPU is the same on the DRBL server and clients. This would typically not be the case, so choose 1 here and proceed.
- Do you want to upgrade your operating system? Assuming you don't need to do that at this point, press Enter to accept the default value of No. Go have a cup of coffee now, because several megabytes of files need to be downloaded at this stage.
Configuring the DRBL Software
After the download is finished, you can start the configuration. I'll assume that your DRBL server has two network interfaces (see Figure 2-1): eth0, which is used for normal Internet and user traffic, and eth1, which is used for DRBL. eth1 is configured with the IP address 10.0.0.10 in this example; of course, you are free to use any other address range you like. Do make sure, however, that you are using a 24-bit subnet mask, because otherwise the broadcast/multicast performance will be very bad.

Figure 2-1. Schematic overview of the imaging network
Now to configure DRBL, use the /opt/drbl/sbin/drblpush -i command. This will set up your server. Setting up your server this way is easy, because the program will detect almost all settings automatically.
The first couple of questions ask you about the DNS configuration you want to use. Pay attention when you're asked which network card is used for your Internet connection; specify the correct card here, or else you'll have DRBL traffic on that card. After you select the Internet interface, the DRBL interface is selected automatically.
Next, you can populate the database of your DRBL server with the MAC addresses of the clients. How does this work? Press Y to tell DRBL that it should start collecting MAC addresses now.
Finally, start up all the client computers one by one and make sure they boot from their network card. As indicated in the menu, press 1 to find out if all the clients have been found. Once you are confident that all clients have been detected, press 2 to finish collecting MAC addresses of connected clients and quit. The advantage of doing this is that you can bind particular configurations to particular workstations. You are not required to do this, though. Without the fixed MAC address to IP address connection, DRBL also works well. And after all, you have more flexibility if you don't have to create fixed IP address to MAC address mappings first.
Note You also can use DRBL to boot workstations with a Ubuntu image. The software even allows you to store private configuration environments on the server for each of these workstations. If you want to go this way, it is a very good idea to make a mapping between IP addresses and MAC addresses of the workstations. If you just want to do imaging, there is no reason to create this mapping.
Setting Up the DHCP Server
In the next step (see Listing 2-1), the DRBL program asks you whether you want the DHCP server, which is configured automatically, to hand out the same IP address to clients at all times. This is useful if you want the same client to work with the same configuration at all times. If this is the case, press Y; otherwise, press Enter to continue. In case you do want the clients to work with the same IP addresses at all times, their MAC addresses must be stored in a configuration file. The DRBL setup program creates this file automatically for you. Just press Enter to accept the default name for this file.
Listing 2-1. The DRBL Program Sets Up a DHCP Server Automatically
Do you want to let the DHCP service in DRBL server offer same IP address to the

client every time when client boots (If you want this function, you have to

collect the MAC addresses of clients, and save them in file(s) (as in the

previous procedure)). This is for the clients connected to DRBL server's

ethernet network interface eth1 ?

[y/N]
Next, you must specify the IP address that the DHCP server will hand out for the first client. You do this by specifying the last byte only (see Listing 2-2). So, for example, if you are on the network 10.0.0.0/24 and you want the first client to have the IP address 10.0.0.101, just enter 101 here. A DHCP range will then be configured automatically. Press Y to accept this range. You will see an overview of the network configuration of your DRBL server. Happy with it? Then press Enter to continue.
Listing 2-2. Specify How the DHCP Range to Be Used Must Be Configured
******************************************************

Do you want to let the DHCP service in DRBL server offer same IP address to the

client every time when client boots (If you want this function, you have to collect

the MAC addresses of clients, and save them in file(s) (as in the previous

procedure)). This is for the clients connected to DRBL server's ethernet network

interface eth1 ?

[y/N] n

******************************************************

OK! Let's continue, we will set the IP address of clients by "first boot gets IP

first" instead of fixed one!

******************************************************

What is the initial number do you want to use in the last set of digits in the IP

(i.e. the initial value of d in the IP address a.b.c.d) for DRBL clients connected

to this ethernet port eth1.

[1]
Once the DHCP server has been fully configured, the configuration program tells you what the DRBL network should currently look like (see Listing 2-3). Check that this is what you expected, and if it is, proceed with the configuration.
Listing 2-3. The DRBL Setup Program Shows What It Is Going to Configure
The Layout for your DRBL environment:

******************************************************

          NIC    NIC IP                    Clients

+-----------------------------+

|         DRBL SERVER         |

|                             |

|    +-- [eth0] 192.168.1.60 +- to WAN

|                             |

|    +-- [eth1] 10.0.0.111 +- to clients group 1 [ 12 clients, their IP

|                             |            from 10.0.0.50 - 10.0.0.61]

+-----------------------------+

******************************************************

Total clients: 12

******************************************************

Press Enter to continue...
Next you need to specify which DRBL mode you want to use. There are two different scenarios here. First, you can use DRBL to provide each client with a boot image that you'll use to give them a useable operating system. Do this at all times, because it gives you a complete working environment available on the client, and that may be useful if you need to set additional parameters from the client's PXE-delivered operating system.
During the next step, specify that you want to use full Clonezilla mode. This provides everything a client needs to boot and do its work in the Clonezilla environment, which enables you to do easy workstation imaging.
Completing Clonezilla Configuration
Now you are getting to the next step of the configuration. You need to assign a directory that can be used by Clonezilla. I suggest using a rather large storage device, formatting it with XFS, and mounting it on a directory; /clonezilla might be suitable. Do not use ReiserFS for this file system, because it isn't very stable. Also make sure that your /etc/fstab file is modified to activate this directory the next time your server boots. To configure this, follow these steps:
- Assuming that you have a dedicated hard disk with an existing partition on it, which is reachable via the device
/dev/sdb1, usemkfs.xfs /dev/sdb1to format the device with the XFS file system. - Use
mkdir /clonezillato create the Clonezilla directory. - Make sure your
/etc/fstabincludes the following line to mount the Clonezilla directory automatically:
/dev/sdb1 /clonezilla xfs defauls 0 0
After you specify which file system to use, the configuration program asks you if you want to set a password as well. If you use a password, only authenticated clients can use Clonezilla services. Do what fits your situation best here.
Now the installer asks if you want to define a boot prompt for clients. It may be a good idea to do so, so that your clients have the option to specify what they want to do when booting with an image they've obtained from the DRBL server. A default timeout of 7 seconds is generated for this boot prompt. If this is not enough time, change it in the next step. Following that, just press Enter to specify that you don't want to see a graphical boot menu on the client computers.
Next the configuration program asks if you want to use the DRBL server as a NAT server. If you just want to use Clonezilla for cloning, select No here. For the next three questions, press Enter to select the default options. This will start the Clonezilla DHCP server, and all related services. At this stage, you can use PXE boot on the clients to boot them into the Clonezilla server.
Configuring the Clients for Cloning
Now that you've set up a basic Clonezilla environment, you are going to use the drbl-client-switch command to add the appropriate Clonezilla options to the boot menu, thus enabling end users to specify what they want to do on their client workstations. You can configure the environment in different ways—for fully automatic setup, or in such a way that the administrator starts the cloning process manually after using PXE boot on the client. First you'll learn how to use the drbl-client-switch command to set up the server, and then you'll learn how to start cloning on the clients.
Setting Up the Server for Cloning
The following procedure, typically a one-time-only procedure, allows you to set up the Clonezilla server for cloning:
- On the server (either by SSH or directly), start the
/opt/drbl/sbin/drbl-client-switchcommand to access the screen shown in Figure 2-2.
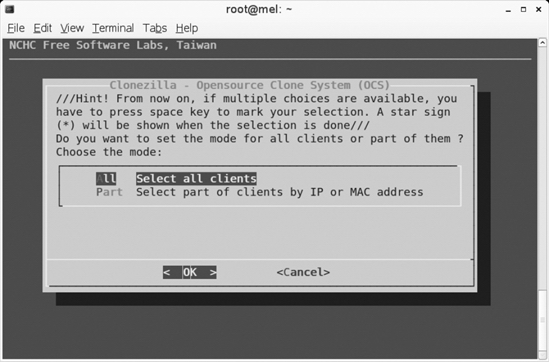
Figure 2-2. You can set up imaging for all nodes, or for a limited selection of nodes only.
- Specify in what mode your client will be starting automatically. Assuming that you'll be using PXE boot only when you want to clone the client, select the option
clonezilla-start, as shown in Figure 2-3. This automatically starts the cloning engine.
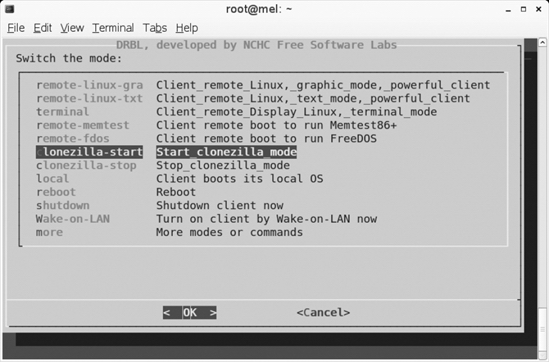
Figure 2-3. Make sure to select clonezilla-start to start the cloning process automatically after your workstation boots from its network card.
- You can now select an option to start a clone or restore process automatically (see Figure 2-4). After you choose one of these automatic options, Clonezilla will use multicast mode, thus allowing you to clone at the highest possible speed. The disadvantage of using an automatic option, where your selection is predefined, is that you'll always need to run the
drbl-client-switchcommand before every major job. The alternative is to use the optionselect-in-client, which uses unicast but gives more flexibility from within the client. Because it is more flexible, I'll use this option. - Specify what to offer as the default client boot option. Make sure to select the option
-y1, which halts to show you the boot menu. In the next and last screen, select-p reboot, which will reboot the client machine automatically after it has been cloned.
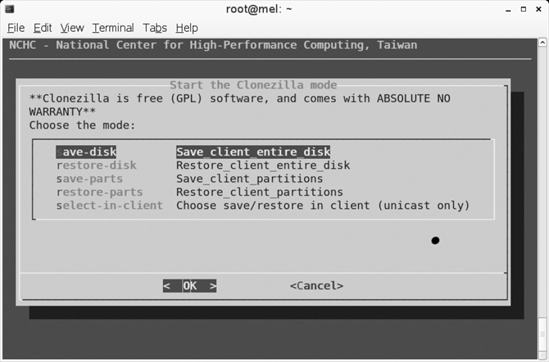
Figure 2-4. For optimal performance, use one of the first four options; for optimal flexibility, use the select-in-client option.
Cloning the Client
Now that everything is set up, you are ready to start cloning your client:
- Make sure the workstation that you want to boot boots from its network card. You'll see the DRBL boot menu, with the Clonezilla option selected by default (see Figure 2-5). Make sure your workstation boots this option.
- From the Clonezilla menu, you can choose from two different options, as shown in Figure 2-6. Use the option
device-imageto write an image file to the Clonezilla server. Thedevice-deviceoption is useful only if you want to clone the contents of a hard drive to an external storage device. This doesn't write an image file; it just clones your hard drive to the selected storage device. Any storage device can be used for this purpose, as long as it is at least as big as the hard drive you want to clone.
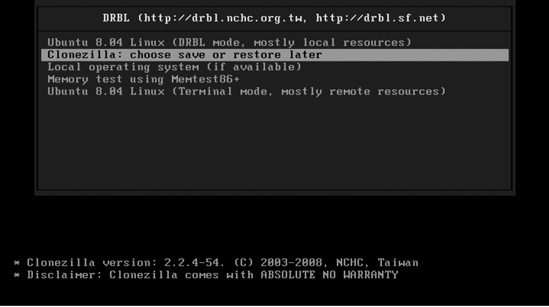
Figure 2-5. When booting the workstation from the network card, the Clonezilla option automatically pops up.

Figure 2-6. Use the device-image option to write the cloned disk to an image file on the Clonezilla server.
- Specify what action you want to take (see Figure 2-7). The most important options are
savedisk, which clones the entire disk to the image file, andrestoredisk, which restores the client from an image file. The other two options allow you to save and restore individual partitions only.
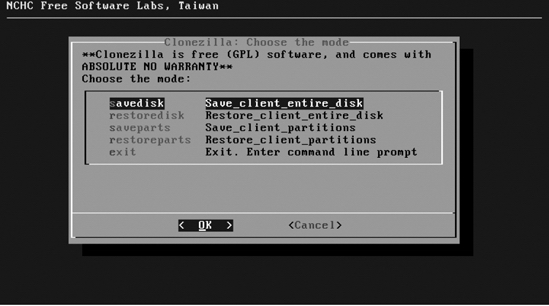
Figure 2-7. Select savedisk to write the contents of the entire hard drive to an image file.
- Specify what priority should be used. The default priority fits well; it will try the
ntfscloneprogram, which obviously is for NTFS file systems only; if you're not using NTFS, it triespartimage, and if that also doesn't work, it will use the (very slow)ddcommand to clone the disk. Count on that to take a couple of hours, though, becauseddis rather inefficient. - Make sure that the option is selected that forces the client to wait before cloning. This option makes sure that nothing will happen by accident, and as you can imagine, that's rather important.
- In the following screen, you need to specify what command you want to use to compress the cloned image. The default value, which uses
gzip, will do rather well here. Following that, you need to give a name to save the image (see Figure 2-8). This is very important, because when restoring the original state of your hard drive, this image name will be the only thing that you've got. So, make sure that all your machines have a unique name, and use that machine name (appended by the date on which you've created the image if you'd like) to store the image.

Figure 2-8. Make sure to use something more descriptive than the default name for your image.
- Select the hard disk(s) that you want to clone (see Figure 2-9). Typically only one disk will be offered, but if the machine you're cloning has more than one hard drive, you can clone all of them with Clonezilla.

Figure 2-9. Select all disks that you want to include in your image.
That's all. The cloning process will start now. Be patient, because it can take some time to complete.
Summary
In this chapter you've learned how to use Ubuntu Server as a system imaging solution. This is a very useful solution that allows you to recover from problems on workstations fast and easily. In the next chapter you'll learn all about performance monitoring on Ubuntu Server.