
CHAPTER 12
Configuring Ubuntu Server
As a VPN Server
Networking Securely over
the Internet
If you need to connect securely to a server that is not on your site, one option is to purchase a dedicated line. Unfortunately, dedicated lines are expensive. A cheap and very common alternative is to configure a Virtual Private Network (VPN), a connection between two sites or two computers that goes over the Internet. VPNs are available as hardware appliances, but it is relatively easy to configure Linux as a VPN server.
Because the Internet by nature is an unsecured network, you have to implement security measures when setting up a VPN. These security measures are applied by using encryption. Several solutions are available to create a VPN. You are probably already familiar with one of them: when you establish an SSH session with your server and start a program on your server that displays its output on the local workstation, basically you are using a VPN. However, an SSH VPN is not the most versatile VPN solution. A very popular and versatile Linux VPN solution is OpenVPN, which uses functionality from the OpenSSL package to ensure its security. In this chapter you'll learn how to set up a VPN that is based on OpenVPN.
Installing and Configuring OpenVPN
As with most software on Ubuntu Server, installing OpenVPN is not too hard: just run apt-get install openvpn to download and install the software. The installation process installs all software and also starts the openvpn daemon. You can manipulate the process from its init scripts as well. For example, you can start it with /etc/init.d/openvpn start and stop it with /etc/init.d/openvpn stop. Unfortunately, the init script doesn't provide an option to get the current status of the openvpn software.
Before you set up the VPN itself, as covered later in this section, you need a clear understanding of the way in which a VPN normally is configured, as described next.
VPN Networking
In most VPN solutions, a dedicated network interface is created and maintained by the VPN. In OpenVPN, this is the tun interface, instead of the eth0 interface you normally see for an Ethernet network card. Working with two interfaces makes configuring the VPN slightly complex. The node on which the VPN is configured has to distinguish between traffic that must be sent through the VPN to the other site and traffic that can be sent straight to the Internet or to other nodes in the same local network. Figure 12-1 gives an overview of this situation. To make sure the node does this, you have to configure routing.

Figure 12-1. Schematic overview of a VPN configuration
Before going any further, you should determine if you want to use a routed VPN or a bridged VPN. OpenVPN offers both options. However, in most situations you will use routing. Routing is easier to set up and offers better flexibility with regard to access control. Bridging is useful only if you need to use very specific features of your VPN, such as in the following cases:
- The VPN needs to handle protocols other than IP, such as IPX.
- You are running applications that rely on LAN broadcasts over the VPN.
- You want to browse to Windows shares without setting up a Samba or WINS naming server.
Generating Certificates
OpenVPN heavily relies on the use of certificates, so before you start to configure the VPN, you should set up a public key infrastructure (PKI). Before the mutual trust that is required on the VPN can be established, the server and client must exchange their PKI certificates.
Note Although this chapter refers to a client/server VPN setup, a VPN can also be established between sites, in which case one site is configured as the client and the other is configured as the server.
In Chapter 11 you learned how to set up a certificate authority (CA). Because OpenVPN has its own scripts to set up the complete PKI infrastructure, this chapter also covers setting up the CA. If you already have a CA, you can skip this configuration and proceed to creating certificates for the client and the server.
Configuring the Certificate Authority
By default, you'll find the OpenVPN scripts that help you to build the CA and its keys in the directory /usr/share/doc/openvpn/examples/easy-rsa/2.0. Copy these scripts to /etc/openvpn/easy-rsa to prevent them from being overwritten when you're updating software on your server.
When setting up a CA and associated certificates, you need to specify what country, province, and city you are in. You also need to enter other personal parameters, such as the name of your organization and the administrator e-mail address. In OpenVPN, you enter these details in the file /etc/openvpn/easy-rsa/vars. Listing 12-1 provides an example of this file. Most of the lines in this example file can be used as displayed. You need to modify only the last four lines, which refer to your specific information.
Listing 12-1. vars Makes Passing the Appropriate Parameters Easier when Generating the CA
root@mel:/etc/openvpn/easy-rsa# cat vars

# easy-rsa parameter settings


# NOTE: If you installed from an RPM,

# don't edit this file in place in

# /usr/share/openvpn/easy-rsa --

# instead, you should copy the whole

# easy-rsa directory to another location

# (such as /etc/openvpn) so that your

# edits will not be wiped out by a future

# OpenVPN package upgrade.


# This variable should point to

# the top level of the easy-rsa

# tree.

export EASY_RSA="'pwd'"


#

# This variable should point to

# the requested executables

#

export OPENSSL="openssl"

export PKCS11TOOL="pkcs11-tool"

export GREP="grep"


# This variable should point to

# the openssl.cnf file included

# with easy-rsa.

export KEY_CONFIG='$EASY_RSA/whichopensslcnf $EASY_RSA'


# Edit this variable to point to

# your soon-to-be-created key

# directory.

#


# WARNING: clean-all will do

# a rm -rf on this directory

# so make sure you define

# it correctly!

export KEY_DIR="$EASY_RSA/keys"


# Issue rm -rf warning

echo NOTE: If you run ./clean-all, I will be doing a rm -rf on $KEY_DIR


# Increase this to 2048 if you

# are paranoid.  This will slow

# down TLS negotiation performance

# as well as the one-time DH parms

# generation process.

export KEY_SIZE=1024


# In how many days should the root CA key expire?

export CA_EXPIRE=3650


# In how many days should certificates expire?

export KEY_EXPIRE=3650


# These are the default values for fields

# which will be placed in the certificate.

# Don't leave any of these fields blank.

export KEY_COUNTRY="US"

export KEY_PROVINCE="CA"

export KEY_CITY="SanFrancisco"

export KEY_ORG="Fort-Funston"

export KEY_EMAIL="[email protected]"
After making sure that the vars file contains the appropriate parameters, you can create the CA. You do this by executing three scripts from the /etc/openvpn/easy-rsa directory:
source ./vars

./clean-all

./build-ca
Of these commands, the first two just clean up the current configuration and pass to your current environment the variables you've set in /etc/openvpn/easy-rsa/vars. The latter command generates the CA for you. Listing 12-2 gives an example of the output of these commands.
Creating Server Keys
At this point the CA is available and you can generate keys. The following command creates the keys for the server (replace yourserver with the actual name of your server):
./build-key-server yourserver
Executing this command starts an interactive command sequence. When it asks if you want to sign the keys as well, enter yes. This makes sure that you can start using the keys immediately. Listing 12-3 shows the output of the build-key-server command.
Listing 12-3. Use build-key-server to Create Keys for Your Server
root@mel:/etc/openvpn/easy-rsa# ./build-key-server mel

Generating a 1024 bit RSA private key

.....++++++

..................................................++++++

writing new private key to 'mel.key'

-----

You are about to be asked to enter information that will be incorporated

into your certificate request.

What you are about to enter is what is called a Distinguished Name or a DN.

There are quite a few fields but you can leave some blank

For some fields there will be a default value,

If you enter '.', the field will be left blank.

-----

Country Name (2 letter code) [NL]:

State or Province Name (full name) [NB]:

Locality Name (eg, city) [Roosendaal]:

Organization Name (eg, company) [sander]:

Organizational Unit Name (eg, section) []:

Common Name (eg, your name or your server's hostname) [mel]:

Email Address [[email protected]]:


Please enter the following 'extra' attributes

to be sent with your certificate request

A challenge password []:

An optional company name []:

Using configuration from /etc/openvpn/easy-rsa/openssl.cnf

Check that the request matches the signature

Signature ok

The Subject's Distinguished Name is as follows

countryName           :PRINTABLE:'NL'

stateOrProvinceName   :PRINTABLE:'NB'

localityName          :PRINTABLE:'Roosendaal'

organizationName      :PRINTABLE:'sander'

commonName            :PRINTABLE:'mel'

emailAddress          :IA5STRING:'[email protected]'

Certificate is to be certified until Aug 24 07:46:42 2018 GMT (3650 days)

Sign the certificate? [y/n]:y


1 out of 1 certificate requests certified, commit? [y/n]y

Write out database with 1 new entries

Data Base Updated
Creating Client Keys
Now that the server keys have been created, you can create keys for your client as well. Creating client keys is almost the same procedure as creating the server keys, but you use ./build-key client, still from the /etc/openvpn/easy-rsa directory. Replace client with the actual name of the client you are creating the keys for. Listing 12-4 shows the output of this command. When you run this command, answer yes to the questions that are asked.
Listing 12-4. Use build-key to Create Keys for Your Clients
root@mel:/etc/openvpn/easy-rsa# ./build-key myl

Generating a 1024 bit RSA private key

..++++++

...................................++++++

writing new private key to 'myl.key'

-----

You are about to be asked to enter information that will be incorporated

into your certificate request.

What you are about to enter is what is called a Distinguished Name or a DN.

There are quite a few fields but you can leave some blank

For some fields there will be a default value,

If you enter '.', the field will be left blank.

-----

Country Name (2 letter code) [NL]:

State or Province Name (full name) [NB]:

Locality Name (eg, city) [Roosendaal]:

Organization Name (eg, company) [sander]:

Organizational Unit Name (eg, section) []:

Common Name (eg, your name or your server's hostname) [myl]:

Email Address [[email protected]]:


Please enter the following 'extra' attributes

to be sent with your certificate request

A challenge password []:

An optional company name []:

Using configuration from /etc/openvpn/easy-rsa/openssl.cnf


Check that the request matches the signature

Signature ok

The Subject's Distinguished Name is as follows

countryName           :PRINTABLE:'NL'

stateOrProvinceName   :PRINTABLE:'NB'

localityName          :PRINTABLE:'Roosendaal'

organizationName      :PRINTABLE:'sander'

commonName            :PRINTABLE:'myl'

emailAddress          :IA5STRING:'[email protected]'

Certificate is to be certified until Aug 24 08:13:05 2018 GMT (3650 days)

Sign the certificate? [y/n]:y


1 out of 1 certificate requests certified, commit? [y/n]y

Write out database with 1 new entries

Data Base Updated
Generating Diffie-Hellman Parameters
You now have a public/private key pair for your server and for your client. Next, you need to generate the Diffie-Hellman parameters that are required for the key exchange between client and server. Use the ./build-dh command from /etc/openvpn/easy-rsa to generate these parameters. Listing 12-5 shows the output of this command.
Note The Diffie-Hellman key exchange is a cryptographic protocol that is needed to exchange two symmetric keys over a unsecured channel. You need these keys to establish a secure channel over which you can continue building the VPN.
Listing 12-5. Use build-dh to Generate the Diffie-Hellman Parameters
root@mel:/etc/openvpn/easy-rsa# ./build-dh

Generating DH parameters, 1024 bit long safe prime, generator 2

This is going to take a long time

......................................................................

......................................................................

......................................................................

.....+................................................................


......................................................................

......................................................................

......................................................................

.+..........................................+......................+..

....................................+.+...............................

......................................................................

.............+.....+....................................................

..................................+...+......................................

.............++*++*++*
At this point, a set of keys is created in the directory /etc/openvpn/easy-rsa/keys. Table 12-1 gives an overview of the keys and their use.
Table 12-1. Overview of Keys Generated
| Filename | Needed By | Purpose |
ca.crt |
Server and all clients | Root CA certificate |
ca.key |
Server | Root CA key |
dh.pem |
Server | Diffie-Hellman parameters |
server.crt |
Server | Server certificate |
server.key |
Server | Server key |
client.crt |
Client | Client certificate |
client.key |
Client | Client key |
Copying the Keys to the Client
Now that you have created all the keys, it is time to copy the client keys to the client. The following procedure summarizes how to do this:
- Use
sshto open a session to your client, and then create a directory in which you can store the keys, usingmkdir /etc/openvpn/keys. - Close the SSH session to your client, using the
exitcommand. - From your server, use
scpto copy the client keys to the client. The name of the client key should reflect the name of the client, so if your client's name ismyl, the keys should be namedmyl.crtandmyl.key. The following command (when used from the/etc/openvpn/easy-rsa/keysdirectory) copies the keys to the proper location on the client:
scp myl* root@client-ip-or-name:/etc/openvpn/keys
- The client should have the certificate of your in-company CA as well. You created this certificate earlier in this procedure, and it is stored in the file
/etc/openvpn/easy-rsa/key/ca.crt. Copy this as well, using the following command:
scp ca.crt root@client-ip-or-name:/etc/openvpn/keys
Configuring the VPN Server
Now that you have created the public and private keys, you can create the configuration files. Both the server and the client need a configuration file. (The next section covers the client configuration.) You can copy the sample files from /usr/share/doc/openvpn/examples/sample-config-files, which is recommended, because the sample configuration files already contain everything that you need to set up the VPN.
By default, the sample server.conf file creates a VPN in which a network interface with the name tun is used for routing. This interface listens to client connections coming in on UDP port 1194 and distributes IP addresses from the 10.8.0.0/24 subnet. In most situations, this configuration works fine. There is one piece of information you have to change, though: the sample server.conf file does not use the keys that you've just generated, so change the ca, cert, key, and dh parameters to reflect the proper keys. Listing 12-6 shows the most important lines from the lengthy sample configuration file.
Listing 12-6. Critical Parameters from server.conf
root@mel:/etc/openvpn# cat server.conf

port 1194

proto udp

dev tun

ca /etc/openvpn/keys/ca.crt

cert /etc/openvpn/keys/server.crt

key /etc/openvpn/keys/server.key


dh /etc/openvpn/keys/dh1024.pem

server 10.8.0.0 255.255.255.0

ifconfig-pool-persist ipp.txt

keepalive 10 120

comp-lzo

persist-key

persist-tun

status /var/log/openvpn-status.log

verb 3
Now that you have created the configuration file for the server, it is time to start the OpenVPN service. You would normally do that by executing the init script /etc/init.d/openvpn start, but because this is the first time you are starting it, you may want to see some more output. Therefore, run the following command:
openvpn --config /etc/openvpn/server.conf
If anything is wrong in your configuration, this command identifies it in its output. An example of such an error message is provided in Listing 12-7.
Listing 12-7. Starting openvpn from the Command Line Outputs Any Error Messages
root@mel:/etc/openvpn/easy-rsa/keys# openvpn --config /etc/openvpn/server.conf

Tue Aug 26 04:53:15 2008 OpenVPN 2.1_rc7 i486-pc-linux-gnu [SSL]

[LZO2] [EPOLL] built on Jun 11 2008

Tue Aug 26 04:53:15 2008 Diffie-Hellman initialized with 1024 bit key

Tue Aug 26 04:53:15 2008 Cannot load certificate file

/etc/openvpn/easy-rsa/keys/server.crt: error:02001002:system

library:fopen:No such file or directory: error:20074002:BIO

routines:FILE_CTRL:system lib: error:140AD002:SSL

routines:SSL_CTX_use_certificate_file:system lib

Tue Aug 26 04:53:15 2008 Exiting
As you can see in Listing 12-7, the openvpn program complains that it can't find the server.crt file that the configuration file refers to. This complaint is valid, because the files of my server keys have the name of the server itself. So, in my case, I have to replace server.* in the server.conf file with mel.*. As Listing 12-8 shows, the next attempt is more successful.
Listing 12-8. The Server Console Indicates a Successful Start of openvpn
root@mel:/etc/openvpn# openvpn --config /etc/openvpn/server.conf

Tue Aug 26 04:58:48 2008 OpenVPN 2.1_rc7 i486-pc-linux-gnu [SSL]

[LZO2] [EPOLL] built on Jun 11 2008

Tue Aug 26 04:58:48 2008 Diffie-Hellman initialized with 1024 bit key

Tue Aug 26 04:58:48 2008 /usr/bin/openssl-vulnkey -q -b 1024 -m <modulus omitted>

Tue Aug 26 04:58:48 2008 TLS-Auth MTU parms [ L:1542 D:138 EF:38 EB:0 ET:0 EL:0 ]

Tue Aug 26 04:58:48 2008 TUN/TAP device tun0 opened

Tue Aug 26 04:58:48 2008 TUN/TAP TX queue length set to 100

Tue Aug 26 04:58:48 2008 ifconfig tun0 10.8.0.1 pointopoint 10.8.0.2 mtu 1500

Tue Aug 26 04:58:48 2008 route add -net 10.8.0.0 netmask 255.255.255.0 gw 10.8.0.2

Tue Aug 26 04:58:48 2008 Data Channel MTU parms [ L:1542 D:1450 EF:42

 EB:135 ET:0 EL:0 AF:3/1 ]

Tue Aug 26 04:58:48 2008 Socket Buffers: R=[1048576->131072] S=[1048576->131072]

Tue Aug 26 04:58:48 2008 UDPv4 link local (bound): [undef]:1194

Tue Aug 26 04:58:48 2008 UDPv4 link remote: [undef]

Tue Aug 26 04:58:48 2008 MULTI: multi_init called, r=256 v=256

Tue Aug 26 04:58:48 2008 IFCONFIG POOL: base=10.8.0.4 size=62

Tue Aug 26 04:58:48 2008 IFCONFIG POOL LIST

Tue Aug 26 04:58:48 2008 Initialization Sequence Completed
You now can use Ctrl+C to interrupt the openvpn service, and then restart it, but using the init script this time: /etc/init.d/openvpn start. As you can see, no comments are output to your computer monitor, but when you use ifconfig, you can see that a new device is added to your server. The VPN uses the tun device to route all VPN traffic to the other side. Listing 12-9 shows what it looks like.
Listing 12-9. After a Successful Start of the VPN, a tun Device Is Added to the Server
root@mel:/etc/openvpn# ifconfig tun0

tun0      Link encap:UNSPEC  HWaddr 00-00-00-00-00-00-00-00-00-00-00-00-00-00-00-00

          inet addr:10.8.0.1  P-t-P:10.8.0.2  Mask:255.255.255.255

          UP POINTOPOINT RUNNING NOARP MULTICAST  MTU:1500  Metric:1

          RX packets:0 errors:0 dropped:0 overruns:0 frame:0

          TX packets:0 errors:0 dropped:0 overruns:0 carrier:0

          collisions:0 txqueuelen:100

          RX bytes:0 (0.0 B)  TX bytes:0 (0.0 B)
Configuring a Linux VPN Client
Now that the server is configured successfully, it's time to create the client configuration. Let's start with a Ubuntu desktop client first. Before you configure it, make sure that the required software is installed. Install the OpenVPN package just as you have done on the server. For instance, you can use sudo apt-get install openvpn to install it from the command line. There is no need to do anything with the keys, because you have already copied them to the client.
Note In this procedure, you have created the client keys on the server. An alternative method is to create them on the client and then issue a certificate signing request from the client to the server. This requires more work, but because the private key is created on the client computer and never leaves the client computer, it is also considered a more secure method. Consult Chapter 11 for more information about this procedure.
As on the server, you can use the sample client.conf file from /usr/share/doc/openvpn/examples/sample-config-files. In this sample file, you must change the names of the key files you are referring to. Also, you should include the correct address of the VPN server. Normally, this is a public IP address that can be reached on the Internet. Before the client sets up the VPN connection, the client must contact this public address to set up the connection. Figure 12-2 gives an overview of how the public IP address is used to set up the VPN connection.
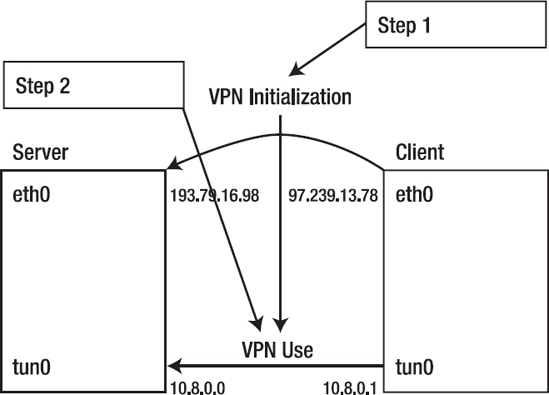
Figure 12-2. To initialize the VPN connection, the client first contacts the public IP address of the server.
Listing 12-10 shows an example of what the client configuration file looks like. In this file, I used an IP address from the private address range to contact the server. I did this because, in my test environment, I created the VPN connection over my private network. This can be useful if for some reason you don't completely trust the private network. Normally, however, this would be the public IP address of the server.
Listing 12-10. Example Client Configuration File
root@MYL:/etc/openvpn# cat client.conf

client

remote 192.168.1.99

port 1194

proto udp

dev tun

resolv-retry infinite

nobind

ca /etc/openvpn/keys/ca.crt

cert /etc/openvpn/keys/myl.crt

key /etc/openvpn/keys/myl.key

keepalive 10 120

user nobody

group nogroup

persist-key

persist-tun

status /var/log/openvpn-status.log

verb 3

mute 20

comp-lzo
Now use the openvpn command to test the connection:
openvpn --config /etc/openvpn/client.conf
In its verbose output, this command shows whether it has been successful. An example is provided in Listing 12-11.
Listing 12-11. Starting the Client Manually on the First Attempt Shows Whether It Was Successful
root@MYL:/etc/openvpn/keys# openvpn --config /etc/openvpn/client.conf

Tue Aug 26 11:32:43 2008 OpenVPN 2.1_rc7 i486-pc-linux-gnu [SSL]

[LZO2] [EPOLL] built on Jun 11 2008

Tue Aug 26 11:32:43 2008 WARNING: No server certificate verification

method has been enabled.  See http://openvpn.net/howto.html#mitm for more info.

Tue Aug 26 11:32:43 2008 /usr/bin/openssl-vulnkey -q -b 1024 -m <modulus omitted>

Tue Aug 26 11:32:43 2008 LZO compression initialized

Tue Aug 26 11:32:43 2008 Control Channel MTU parms [ L:1542 D:138

EF:38 EB:0 ET:0 EL:0 ]

Tue Aug 26 11:32:43 2008 Data Channel MTU parms [ L:1542 D:1450 EF:42

EB:135 ET:0 EL:0 AF:3/1 ]

Tue Aug 26 11:32:43 2008 Local Options hash (VER=V4): '41690919'

Tue Aug 26 11:32:43 2008 Expected Remote Options hash (VER=V4): '530fdded'

Tue Aug 26 11:32:43 2008 NOTE: UID/GID downgrade will be delayed

because of --client, --pull, or --up-delay

Tue Aug 26 11:32:43 2008 Socket Buffers: R=[110592->131072] S=[110592->131072]

Tue Aug 26 11:32:43 2008 UDPv4 link local: [undef]

Tue Aug 26 11:32:43 2008 UDPv4 link remote: 192.168.1.99:1194

Tue Aug 26 11:32:43 2008 TLS: Initial packet from 192.168.1.99:1194,

 sid=a2338f7c 329dacc8

Tue Aug 26 11:32:43 2008 VERIFY OK: depth=1,

/C=NL/ST=NB/L=Roosendaal/O=sander/CN=sander_CA/[email protected]

Tue Aug 26 11:32:43 2008 VERIFY OK: depth=0,

/C=NL/ST=NB/L=Roosendaal/O=sander/CN=mel/[email protected]

Tue Aug 26 11:32:43 2008 Data Channel Encrypt: Cipher 'BF-CBC'

initialized with 128 bit key

Tue Aug 26 11:32:43 2008 Data Channel Encrypt: Using 160 bit message

hash 'SHA1' for HMAC authentication

Tue Aug 26 11:32:43 2008 Data Channel Decrypt: Cipher 'BF-CBC'

initialized with 128 bit key

Tue Aug 26 11:32:43 2008 Data Channel Decrypt: Using 160 bit message

hash 'SHA1' for HMAC authentication

Tue Aug 26 11:32:43 2008 Control Channel: TLSv1, cipher TLSv1/SSLv3

DHE-RSA-AES256-SHA, 1024 bit RSA

Tue Aug 26 11:32:43 2008 [mel] Peer Connection Initiated with 192.168.1.99:1194

Tue Aug 26 11:32:44 2008 SENT CONTROL [mel]: 'PUSH_REQUEST' (status=1)

Tue Aug 26 11:32:44 2008 PUSH: Received control message:

 'PUSH_REPLY,route 10.8.0.1,topology net30,ping 10,ping-restart

 120,ifconfig 10.8.0.6 10.8.0.5'

Tue Aug 26 11:32:44 2008 OPTIONS IMPORT: timers and/or timeouts modified

Tue Aug 26 11:32:44 2008 OPTIONS IMPORT: --ifconfig/up options modified

Tue Aug 26 11:32:44 2008 OPTIONS IMPORT: route options modified

Tue Aug 26 11:32:44 2008 TUN/TAP device tun0 opened

Tue Aug 26 11:32:44 2008 TUN/TAP TX queue length set to 100

Tue Aug 26 11:32:44 2008 ifconfig tun0 10.8.0.6 pointopoint 10.8.0.5 mtu 1500

Tue Aug 26 11:32:44 2008 route add -net 10.8.0.1 netmask 255.255.255.255 gw 10.8.0.5

Tue Aug 26 11:32:44 2008 GID set to nogroup

Tue Aug 26 11:32:44 2008 UID set to nobody

Tue Aug 26 11:32:44 2008 Initialization Sequence Completed
If the client has started successfully, use Ctrl+C to stop it again. Next, you can start it using its init script: /etc/init.d/openvpn start. After a successful start, you now have a tun0 interface at the client as well. By monitoring this interface, you can get more details about the VPN connection, such as the IP address of the server and the number of packets sent over the VPN connection (see Listing 12-12).
Listing 12-12. The tun0 Interface on the Client Shows Status Information About the VPN Connection
root@MYL:/etc/openvpn/keys# ifconfig tun0

tun0      Link encap:UNSPEC  HWaddr 00-00-00-00-00-00-00-00-00-00-00-00-00-00-00-00

          inet addr:10.8.0.6  P-t-P:10.8.0.5  Mask:255.255.255.255

          UP POINTOPOINT RUNNING NOARP MULTICAST  MTU:1500  Metric:1

          RX packets:0 errors:0 dropped:0 overruns:0 frame:0

          TX packets:0 errors:0 dropped:0 overruns:0 carrier:0

          collisions:0 txqueuelen:100

          RX bytes:0 (0.0 B)  TX bytes:0 (0.0 B)
By initializing the VPN connection, your routing configuration has also been changed. Changing the routing configuration makes sure that all packets destined for the VPN host are sent to the VPN host, whereas packets destined for the Internet or other networks follow the default route to your normal gateway. Listing 12-13 shows what routing looks like after initializing a VPN connection on the client.
Listing 12-13. By Initializing the VPN, Routing Is Modified Automatically
root@MYL:/etc/openvpn/keys# route -n

Kernel IP routing table

Destination   Gateway     Genmask         Flags  Metric Ref    Use Iface

10.8.0.5      0.0.0.0     255.255.255.255 UH     0      0      0 tun0

10.8.0.1      10.8.0.5    255.255.255.255 UGH    0      0      0 tun0

192.168.1.0   0.0.0.0     255.255.255.0   U      0      0      0 eth0

169.254.0.0   0.0.0.0     255.255.0.0     U      1000   0      0 eth0

0.0.0.0       192.168.1.254   0.0.0.0     UG     0      0      0 eth0
Configuring Windows Clients
OpenVPN is available for Windows clients as well. First, you need to create keys for this client as well. To do this, follow the procedure described earlier in this chapter in the section "Generating Certificates." To get the Windows client, download the graphical installer from http://openvpn.se. Install the program and then copy keys and certificates to the directory c:program filesOpenVPNkeys. In this directory, you should also create the client configuration file for your Windows machine. The name client.opvn is fine. You can see an example of its contents in Listing 12-14.
Note On Windows, some of the extensions that OpenVPN uses are different.
Listing 12-14. Example Contents for client.opvn on Windows
ca v:\Program Files\openvpnkeys\ca.crt

cert c:\Program Files\openvpnkeys\client.crt

key c:\Program Files\openvpn\keys\client.key

ns-cert-type server

tls-auth c:\Program Files\openvpn\keys\ta.key 1

comp-lzo

verb 3
After you create the configuration file on Windows, right-click the OpenVPN icon in the taskbar (the red icon depicting two computers).
Summary
In this chapter you have learned how to set up a VPN connection, using the popular OpenVPN package. In the next chapter, you will learn how to set up Kerberos and NTP.