The Microsoft .NET Framework is an extensive platform. However, despite having reached version 4.0, it still does not duplicate all the features that are available in unmanaged code. Currently, the .NET Framework does not include every function that is available in the Win32 API, and many businesses use proprietary solutions that they have built in native code or as COM or ActiveX components.
Fortunately, the .NET Framework is equipped with interoperability features that allow you to use native code from .NET Framework applications as well as access .NET assemblies as though they were COM components. The recipes in this chapter describe how to do the following:
Call functions defined in a DLL, get the handles for a control or window, invoke an unmanaged function that uses a structure, invoke unmanaged callback functions, and retrieve unmanaged error information (recipes 12-1 through 12-5)
Use COM components from .NET Framework applications, release COM components, and use optional parameters (recipes 12-6 through 12-8)
Use ActiveX controls from .NET Framework applications (recipe 12-9)
Expose the functionality of a .NET assembly as a COM component (recipe 12-10)
Note
The web site PInvoke.net (http://pinvoke.net) is an invaluable resource when trying to use PInvoke to call Win32 API functions. It provides predefined method signatures for most if not all of the Win32 API functions, as well as usage examples and tips for many of the functions.
You need to call a function exported by a native DLL. This function might be a part of the Win32 API or your own native code library.
Declare a method in your C# code that you will use to access the unmanaged function. Declare this method as both extern and static, and apply the attribute System.Runtime.InteropServices.DllImportAttribute to specify the DLL file and the name of the unmanaged function.
To use a native function contained in an external library, all you need to do is declare a method with the appropriate signature—the Common Language Runtime (CLR) automatically handles the rest, including loading the DLL into memory when the function is called and marshaling the parameters from .NET data types to native data types. The .NET service that supports this cross-platform execution is named PInvoke (Platform Invoke), and the process is usually seamless. Occasionally, you will need to do a little more work, such as when you need to support in-memory structures, callbacks, or mutable strings.
PInvoke is often used to access functionality in the Win32 API, particularly Win32 features that are not present in the set of managed classes that make up the .NET Framework. Three core libraries make up the Win32 API:
Kernel32.dllincludes operating system–specific functionality such as process loading, context switching, and file and memory I/O.User32.dllincludes functionality for manipulating windows, menus, dialog boxes, icons, and so on.GDI32.dllincludes graphical capabilities for drawing directly on windows, menus, and control surfaces, as well as for printing.
As an example, consider the Win32 API functions used for writing and reading INI files, such as GetPrivateProfileString and WritePrivateProfileString, in Kernel32.dll. The .NET Framework does not include any classes that wrap this functionality. However, you can import these functions using the attribute DllImportAttribute, like this:
[DllImport("kernel32.DLL", EntryPoint="WritePrivateProfileString")]
private static extern bool WritePrivateProfileString(string lpAppName,
  string lpKeyName, string lpString, string lpFileName);
The arguments specified in the signature of the WritePrivateProfileString method must match the DLL method or a runtime error will occur when you attempt to invoke it. Remember that you do not define any method body, because the declaration refers to a method in the DLL. The EntryPoint portion of the attribute DllImportAttribute is optional in this example. You do not need to specify the EntryPoint when the declared function name matches the function name in the external library.
The following is an example of using some Win32 API functions to get INI file information. It declares the unmanaged functions used and exposes public methods to call them. (Other Win32 API functions for getting INI file information not shown in this example include those that retrieve all the sections in an INI file.) The code first displays the current value of a key in the INI file, modifies it, retrieves the new value, and then writes the default value.
using System;
using System.Runtime.InteropServices;
using System.Text;
using System.IO;

namespace Apress.VisualCSharpRecipes.Chapter12
{
    class Recipe12_01
    {
        // Declare the unmanaged functions.
        [DllImport("kernel32.dll", EntryPoint = "GetPrivateProfileString")]
        private static extern int GetPrivateProfileString(string lpAppName,
          string lpKeyName, string lpDefault, StringBuilder lpReturnedString,
          int nSize, string lpFileName);

        [DllImport("kernel32.dll", EntryPoint = "WritePrivateProfileString")]
        private static extern bool WritePrivateProfileString(string lpAppName,
          string lpKeyName, string lpString, string lpFileName);

        static void Main(string[] args)
        {
            // Must use full path or Windows will try to write the INI file
            // to the Windows folder, causing issues on Vista and Windows 7.
            string iniFileName = Path.Combine(Directory.GetCurrentDirectory(),
                "Recipe12-01.ini");

            string message = "Value of LastAccess in [SampleSection] is: {0}";

            // Write a new value to the INI file.
            WriteIniValue("SampleSection", "LastAccess",
                DateTime.Now.ToString(), iniFileName);

            // Obtain the value contained in the INI file.
            string val = GetIniValue("SampleSection", "LastAccess", iniFileName);
            Console.WriteLine(message, val ?? "???");

            // Wait to continue.
            Console.WriteLine(Environment.NewLine);
            Console.WriteLine("Press Enter to continue the example.");
            Console.ReadLine();

            // Update the INI file.
            WriteIniValue("SampleSection", "LastAccess",
                DateTime.Now.ToString(), iniFileName);

            // Obtain the new value.
            val = GetIniValue("SampleSection", "LastAccess", iniFileName);
            Console.WriteLine(message, val ?? "???");
// Wait to continue.
Console.WriteLine(Environment.NewLine);
Console.WriteLine("Main method complete. Press Enter.");
Console.ReadLine();
}
public static string GetIniValue(string section, string key,
string filename)
{
int chars = 256;
StringBuilder buffer = new StringBuilder(chars);
string sDefault = "";
if (GetPrivateProfileString(section, key, sDefault,
buffer, chars, filename) != 0)
{
return buffer.ToString();
}
else
{
// Look at the last Win32 error.
int err = Marshal.GetLastWin32Error();
return null;
}
}
public static bool WriteIniValue(string section, string key,
string value, string filename)
{
return WritePrivateProfileString(section, key, value, filename);
}
}
}Note
The GetPrivateProfileString method is declared with one StringBuilder parameter (lpReturnedString). This is because this string must be mutable; when the call completes, it will contain the returned INI file information. Whenever you need a mutable string, you must substitute StringBuilder in place of the String class. Often, you will need to create the StringBuilder object with a character buffer of a set size, and then pass the size of the buffer to the function as another parameter. You can specify the number of characters in the StringBuilder constructor. See recipe 2-1 for more information about using the StringBuilder class.
Many classes, including all Control-derived classes and the FileStream class, return the handle of the unmanaged Windows object they are wrapping as an IntPtr through a property named Handle. Other classes also provide similar information; for example, the System.Diagnostics.Process class provides a Process.MainWindowHandle property in addition to the Handle property.
The .NET Framework does not hide underlying details such as the operating system handles used for controls and windows. Although you usually will not use this information, you can retrieve it if you need to call an unmanaged function that requires it. Many Microsoft Windows API functions, for example, require control or window handles.
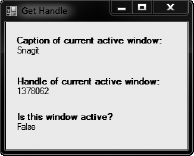
As an example, consider the Windows-based application shown in Figure 12-1. It consists of a single window that always stays on top of all other windows regardless of focus. (This behavior is enforced by setting the Form.TopMost property to true.) The form also includes a timer that periodically calls the unmanaged GetForegroundWindow and GetWindowText WinAPI functions to determine which window is currently active.
One additional detail in this example is that the code also uses the Form.Handle property to get the handle of the main application form. It then compares with the handle of the active form to test if the current application has focus. The following is the complete code for this form:
using System;
using System.Windows.Forms;
using System.Runtime.InteropServices;
using System.Text;

namespace Apress.VisualCSharpRecipes.Chapter12
{
    public partial class ActiveWindowInfo : Form
    {
        public ActiveWindowInfo()
        {
            InitializeComponent();
        }
// Declare external functions.
[DllImport("user32.dll")]
private static extern IntPtr GetForegroundWindow();
[DllImport("user32.dll")]
private static extern int GetWindowText(IntPtr hWnd,
StringBuilder text, int count);
private void tmrRefresh_Tick(object sender, EventArgs e)
{
int chars = 256;
StringBuilder buff = new StringBuilder(chars);
// Obtain the handle of the active window.
IntPtr handle = GetForegroundWindow();
// Update the controls.
if (GetWindowText(handle, buff, chars) > 0)
{
lblCaption.Text = buff.ToString();
lblHandle.Text = handle.ToString();
if (handle == this.Handle)
{
lblCurrent.Text = "True";
}
else
{
lblCurrent.Text = "False";
}
}
}
}
}Warning
The Windows Forms infrastructure manages window handles for forms and controls transparently. Changing some of their properties can force the CLR to create a new native window behind the scenes, and the new window gets assigned a different handle. For that reason, you should always retrieve the handle before you use it (rather than storing it in a member variable for a long period of time).
Define the structure in your C# code. Use the attribute System.Runtime.InteropServices.StructLayoutAttribute to configure how the structure fields are laid out in memory. Use the static SizeOf method of the System.Runtime.Interop.Marshal class if you need to determine the size of the unmanaged structure in bytes.
In pure C# code, you are not able to directly control how type fields are laid out once the memory is allocated. Instead, the CLR is free to arrange fields to optimize performance, especially in the context of moving memory around during garbage collection. This can cause problems when interacting with native functions that expect structures to be laid out sequentially in memory as defined in include files. Fortunately, the .NET Framework allows you to solve this problem by using the attribute StructLayoutAttribute, which lets you specify how the members of a given class or structure should be arranged in memory.
As an example, consider the unmanaged GetVersionEx function implemented in the Kernel32.dll file. This function accepts a pointer to an OSVERSIONINFO structure and uses it to return information about the current operating system version. To use the OSVERSIONINFO structure in C# code, you must define it with the attribute StructLayoutAttribute, as shown here:
[StructLayout(LayoutKind.Sequential)]
public class OSVersionInfo {

    public int dwOSVersionInfoSize;
    public int dwMajorVersion;
    public int dwMinorVersion;
    public int dwBuildNumber;
    public int dwPlatformId;
    [MarshalAs(UnmanagedType.ByValTStr, SizeConst=128)]
    public String szCSDVersion;
}
Notice that this structure also uses the attribute System.Runtime.InteropServices.MarshalAsAttribute, which is required for fixed-length strings. In this example, MarshalAsAttribute specifies that the string will be passed by value and will contain a buffer of exactly 128 characters, as specified in the OSVERSIONINFO structure. This example uses sequential layout, which means that the data types in the structure are laid out in the order they are listed in the class or structure. When using sequential layout, you can also configure the packing for the structure by specifying a named Pack field in the StructLayoutAttribute constructor. The default is 8, which means the structure will be packed on 8-byte boundaries.
Instead of using sequential layout, you could use LayoutKind.Explicit; in which case, you must define the byte offset of each field using FieldOffsetAttribute. This layout is useful when dealing with an irregularly packed structure or one where you want to omit some of the fields that you do not want to use. Here is an example that defines the OSVersionInfo class with explicit layout:
[StructLayout(LayoutKind.Explicit)]
public class OSVersionInfo {

    [FieldOffset(0)]public int dwOSVersionInfoSize;
    [FieldOffset(4)]public int dwMajorVersion;
    [FieldOffset(8)]public int dwMinorVersion;
    [FieldOffset(12)]public int dwBuildNumber;
    [FieldOffset(16)]public int dwPlatformId;
    [MarshalAs(UnmanagedType.ByValTStr, SizeConst=128)]
    [FieldOffset(20)]public String szCSDVersion;
}
Now that you've defined the structure used by the GetVersionEx function, you can declare the function and then use it. The following console application shows all the code you will need. Notice that InAttribute and OutAttribute are applied to the OSVersionInfo parameter to indicate that marshaling should be performed on this structure when it is passed to the function and when it is returned from the function. In addition, the code uses the Marshal.SizeOf method to calculate the size the marshaled structure will occupy in memory.
using System;
using System.Runtime.InteropServices;

namespace Apress.VisualCSharpRecipes.Chapter12
{
    class Recipe12_03
    {
// Declare the external function.
[DllImport("kernel32.dll")]
public static extern bool GetVersionEx([In, Out] OSVersionInfo osvi);
static void Main(string[] args)
{
OSVersionInfo osvi = new OSVersionInfo();
osvi.dwOSVersionInfoSize = Marshal.SizeOf(osvi);
// Obtain the OS version information.
GetVersionEx(osvi);
// Display the version information.
Console.WriteLine("Class size: " + osvi.dwOSVersionInfoSize);
Console.WriteLine("Major Version: " + osvi.dwMajorVersion);
Console.WriteLine("Minor Version: " + osvi.dwMinorVersion);
Console.WriteLine("Build Number: " + osvi.dwBuildNumber);
Console.WriteLine("Platform Id: " + osvi.dwPlatformId);
Console.WriteLine("CSD Version: " + osvi.szCSDVersion);
Console.WriteLine("Platform: " + Environment.OSVersion.Platform);
Console.WriteLine("Version: " + Environment.OSVersion.Version);
// Wait to continue.
Console.WriteLine(Environment.NewLine);
Console.WriteLine("Main method complete. Press Enter.");
Console.ReadLine();
}
}
// Define the structure and specify the layout type as sequential.
[StructLayout(LayoutKind.Sequential)]
public class OSVersionInfo
{
public int dwOSVersionInfoSize;
public int dwMajorVersion;
public int dwMinorVersion;
public int dwBuildNumber;
public int dwPlatformId;
[MarshalAs(UnmanagedType.ByValTStr, SizeConst = 128)]
public String szCSDVersion;
}
}If you run this application on a Windows 7 system, you will see information such as this:
Class size: 148

Major Version: 6

Minor Version: 1

Build Number: 7600

Platform Id: 2

CSD Version:

Platform: Win32NT

Version: 6.1.7600.0
Create a delegate that has the required signature for the callback. Use this delegate when defining and using the unmanaged function.
Many of the Win32 API functions use callbacks. For example, if you want to retrieve the name of all the top-level windows that are currently open, you can call the unmanaged EnumWindows function in the User32.dll file. When calling EnumWindows, you need to supply a pointer to a function in your code. The Windows operating system will then call this function repeatedly—once for each top-level window that it finds—and pass the window handle to your code.
The .NET Framework allows you to handle callback scenarios like this without resorting to pointers and unsafe code blocks. Instead, you can define and use a delegate that points to your callback function. When you pass the delegate to the EnumWindows function, for example, the CLR will automatically marshal the delegate to the expected unmanaged function pointer.
Following is a console application that uses EnumWindows with a callback to display the name of every open window:
using System;
using System.Text;
using System.Runtime.InteropServices;

namespace Apress.VisualCSharpRecipes.Chapter12
{
    class Recipe12_04
    {
        // The signature for the callback method.
        public delegate bool CallBack(IntPtr hwnd, int lParam);

        // The unmanaged function that will trigger the callback
        // as it enumerates the open windows.
        [DllImport("user32.dll")]
        public static extern int EnumWindows(CallBack callback, int param);

        [DllImport("user32.dll")]
        public static extern int GetWindowText(IntPtr hWnd,
            StringBuilder lpString, int nMaxCount);

        static void Main(string[] args)
        {
            // Request that the operating system enumerate all windows,
            // and trigger your callback with the handle of each one.
            EnumWindows(new CallBack (DisplayWindowInfo), 0);

            // Wait to continue.
            Console.WriteLine(Environment.NewLine);
            Console.WriteLine("Main method complete. Press Enter.");
            Console.ReadLine();
        }

        // The method that will receive the callback. The second
        // parameter is not used, but is needed to match the
        // callback's signature.
        public static bool DisplayWindowInfo(IntPtr hWnd, int lParam)
        {
            int chars = 100;
            StringBuilder buf = new StringBuilder(chars);
            if (GetWindowText(hWnd, buf, chars) != 0)
            {
                Console.WriteLine(buf);
            }
return true;
}
}
}You need to retrieve error information (either an error code or a text message) explaining why a Win32 API call failed.
On the declaration of the unmanaged method, set the SetLastError field of the DllImportAttribute to true. If an error occurs when you execute the method, call the static Marshal.GetLastWin32Error method to retrieve the error code. To get a text description for a specific error code, use the unmanaged FormatMessage function.
You cannot retrieve error information directly using the unmanaged GetLastError function. The problem is that the error code returned by GetLastError might not reflect the error caused by the unmanaged function you are using. Instead, it might be set by other .NET Framework classes or the CLR. You can retrieve the error information safely using the static Marshal.GetLastWin32Error method. This method should be called immediately after the unmanaged call, and it will return the error information only once. (Subsequent calls to GetLastWin32Error will simply return the error code 127.) In addition, you must specifically set the SetLastError field of the DllImportAttribute to true to indicate that errors from this function should be cached, as shown here:
[DllImport("user32.dll", SetLastError=true)]You can extract additional information from the Win32 error code using the unmanaged FormatMessage function from the Kernel32.dll file.
The following console application attempts to show a message box, but submits an invalid window handle. The error information is retrieved with Marshal.GetLastWin32Error, and the corresponding text information is retrieved using FormatMessage.
using System;
using System.Runtime.InteropServices;

namespace Apress.VisualCSharpRecipes.Chapter12
{
    class Recipe12_05
    {
        // Declare the unmanaged functions.
        [DllImport("kernel32.dll")]
        private static extern int FormatMessage(int dwFlags, int lpSource,
          int dwMessageId, int dwLanguageId, ref String lpBuffer, int nSize,
          int Arguments);

        [DllImport("user32.dll", SetLastError = true)]
        public static extern int MessageBox(IntPtr hWnd, string pText,
          string pCaption, int uType);

        static void Main(string[] args)
        {
            // Invoke the MessageBox function passing an invalid
            // window handle and thus force an error.
            IntPtr badWindowHandle = (IntPtr)453;
            MessageBox(badWindowHandle, "Message", "Caption", 0);

            // Obtain the error information.
            int errorCode = Marshal.GetLastWin32Error();
            Console.WriteLine(errorCode);
            Console.WriteLine(GetErrorMessage(errorCode));

            // Wait to continue.
            Console.WriteLine(Environment.NewLine);
            Console.WriteLine("Main method complete. Press Enter.");
            Console.ReadLine();
        }

        // GetErrorMessage formats and returns an error message
        // corresponding to the input errorCode.
        public static string GetErrorMessage(int errorCode)
        {
            int FORMAT_MESSAGE_ALLOCATE_BUFFER = 0x00000100;
            int FORMAT_MESSAGE_IGNORE_INSERTS = 0x00000200;
            int FORMAT_MESSAGE_FROM_SYSTEM = 0x00001000;

            int messageSize = 255;
            string lpMsgBuf = "";
            int dwFlags = FORMAT_MESSAGE_ALLOCATE_BUFFER |
              FORMAT_MESSAGE_FROM_SYSTEM | FORMAT_MESSAGE_IGNORE_INSERTS;
int retVal = FormatMessage(dwFlags, 0, errorCode, 0,
ref lpMsgBuf, messageSize, 0);
if (0 == retVal)
{
return null;
}
else
{
return lpMsgBuf;
}
}
}
}Here is the output generated by the preceding program:
1400

Invalid window handle.
Use a Primary Interop Assembly (PIA) supplied by the COM object publisher, if one is available. Otherwise, generate a runtime callable wrapper (RCW) using the Type Library Importer (Tlbimp.exe) or the Add Reference feature in Visual Studio .NET.
Because of the continuing importance of COM objects in Windows-based software development, the .NET Framework includes extensive support for COM interoperability. To allow .NET clients to interact with a COM component, .NET uses an RCW—a special .NET proxy class that sits between your managed .NET code and the unmanaged COM component. The RCW handles all the details of communicating between .NET code and COM objects, including marshaling data types, using the traditional COM interfaces, and handling COM events.
You have the following three options for using an RCW:
Obtain an RCW from the author of the original COM component. In this case, the RCW is created from a PIA provided by the publisher, as Microsoft does for Microsoft Office.
Generate an RCW using the
Tlbimp.execommand-line utility or Visual Studio .NET.Create your own RCW using the types in the
System.Runtime.InteropServicesnamespace. (This can be an extremely tedious and complicated process.)
If you want to use Visual Studio .NET to generate an RCW, you simply need to right-click your project in Solution Explorer and click Add Reference in the context menu, and then select the appropriate component from the COM tab. When you click OK, the RCW will be generated and added to your project references. After that, you can use the Object Browser to inspect the namespaces and classes that are available.
If you are not using Visual Studio .NET, you can create a wrapper assembly using the Tlbimp.exe command-line utility that is included with the .NET Framework. The only mandatory piece of information is the filename that contains the COM component. For example, the following statement creates an RCW with the default filename and namespace, assuming that the MyCOMComponent.dll file is in the current directory.
tlbimp MyCOMComponent.dll
Assuming that MyCOMComponent has a type library named MyClasses, the generated RCW file will have the name MyClasses.dll and will expose its classes through a namespace named MyClasses. You can also configure these options with command-line parameters, as described in the MSDN reference. For example, you can use /out:[Filename] to specify a different assembly file name and /namespace:[Namespace] to set a different namespace for the generated classes. You can also specify a key file using /keyfile[keyfilename] so that the component will be signed and given a strong name, allowing it to be placed in the Global Assembly Cache (GAC). Use the /primary parameter to create a PIA.
If possible, you should always use a PIA instead of generating your own RCW. PIAs are more likely to work as expected, because they are created by the original component publisher. They might also include additional .NET refinements or enhancements. If a PIA is registered on your system for a COM component, Visual Studio .NET will automatically use that PIA when you add a reference to the COM component. For example, the .NET Framework includes an adodb.dll assembly that allows you to use the ADO classic COM objects. If you add a reference to the Microsoft ActiveX Data Objects component, this PIA will be used automatically; no new RCW will be generated. Similarly, Microsoft Office provides a PIA that improves .NET support for Office automation. However, you must download this assembly from the MSDN web site.
The following example shows how you can use COM Interop, in the form of the Microsoft Office PIAs, to access Office automation functionality from a .NET Framework application. As you can see, the code is like any other .NET code—the key is the need to add the appropriate reference to the COM wrapper, which handles the communication between your code and the COM component. The example code also highlights (using the Workbooks.Open method) the significant syntax simplification enabled by .NET 4.0 when calling Interop methods that contain many optional parameters—something discussed further in recipe 12-8.
using System;
using System.IO;
using System.Runtime.InteropServices;
using Excel = Microsoft.Office.Interop.Excel;

namespace Apress.VisualCSharpRecipes.Chapter12
{
    class Recipe12_06
    {
        static void Main()
        {
            string fileName =
                Path.Combine(Directory.GetCurrentDirectory(),
                "Ranges.xlsx");

            // Create an instance of Excel.
            Console.WriteLine("Creating Excel instance...");
            Console.WriteLine(Environment.NewLine);
            Excel.Application excel = new Excel.Application();

            // Open the required file in Excel.
            Console.WriteLine("Opening file: {0}", fileName);
            Console.WriteLine(Environment.NewLine);

            // Open the specified file in Excel using .NET 4.0 optional
            // and named argument capabilities.
            Excel.Workbook workbook =
                excel.Workbooks.Open(fileName, ReadOnly: true);

            /* Pre-.NET 4.0 syntax required to open Excel file:
            Excel.Workbook workbook =
                excel.Workbooks.Open(fileName, Type.Missing,
                false, Type.Missing, Type.Missing, Type.Missing,
                Type.Missing, Type.Missing, Type.Missing, Type.Missing,
                Type.Missing, Type.Missing, Type.Missing, Type.Missing,
                Type.Missing); */

            // Display the list of named ranges from the file.
            Console.WriteLine("Named ranges:");
            foreach (Excel.Name name in workbook.Names)
            {
                Console.WriteLine("  {0} ({1})",name.Name,name.Value);
            }
            Console.WriteLine(Environment.NewLine);

            // Close the workbook.
            workbook.Close();

            /* Pre-.NET 4.0 syntax required to close Excel file:
            workbook.Close(Type.Missing, Type.Missing, Type.Missing); */
// Terminate Excel instance.
Console.WriteLine("Closing Excel instance...");
excel.Quit();
Marshal.ReleaseComObject(excel);
excel = null;
// Wait to continue.
Console.WriteLine(Environment.NewLine);
Console.WriteLine("Main method complete. Press Enter.");
Console.ReadLine();
}
}}You need to ensure that a COM component is removed from memory immediately, without waiting for garbage collection to take place, or you need to make sure that COM objects are released in a specific order.
Release the reference to the underlying COM object using the static Marshal.FinalReleaseComObject method and passing the appropriate RCW.
COM uses reference counting to determine when objects should be released. When you use an RCW, the reference will be held to the underlying COM object even when the object variable goes out of scope. The reference will be released only when the garbage collector disposes of the RCW object. As a result, you cannot control when or in what order COM objects will be released from memory.
To get around this limitation, you usually use the Marshal.ReleaseComObject method. However, if the COM object's pointer is marshaled several times, you need to repeatedly call this method to decrease the count to zero. However, the FinalReleaseComObject method allows you to release all references in one go, by setting the reference count of the supplied RCW to zero. This means that you do not need to loop and invoke ReleaseComObject to completely release an RCW.
For example, in the Excel example in recipe 12-6, you could release all references to the Excel Application component using this code:
System.Runtime.InteropServices.Marshal.FinalReleaseComObject(excel);
Note
The ReleaseComObject method does not actually release the COM object; it just decrements the reference count. If the reference count reaches zero, the COM object will be released. FinalReleaseComObject works by setting the reference count of an RCW to zero. It thus bypasses the internal count logic and releases all references.
Prior to .NET 4.0, you would need to use the Type.Missing field. As of .NET 4.0, you can simply omit unused optional parameters and use named parameters for those values you do want to provide.
The .NET Framework is designed with a heavy use of method overloading. Many methods are overloaded several times so that you can call the version that requires only the parameters you choose to supply. COM, on the other hand, does not support method overloading. Instead, COM components usually implement methods with a long list of optional parameters.
Prior to .NET 4.0, C# (unlike Visual Basic .NET) did not support optional parameters, which meant C# developers were forced to supply numerous additional or irrelevant values when calling a method on a COM component. And because COM parameters are often passed by reference, code could not simply pass a null reference. Instead, it had to declare an object variable and then pass that variable. This resulted in code that used the Type.Missing field whenever there was an unused optional parameter. In Office automation code, it is not unusual to see method calls with 10 or 15 Type.Missing parameters with 1 or 2 real values scattered among them. The optional and named parameter features included in .NET mean that COM Interop code becomes much cleaner and easier to understand. Instead of providing Type.Missing references for optional parameters you do not use, you can simply ignore them. And for those few parameters that you do need to provide, you can use named parameter syntax.
The following code snippet, taken from recipe 12-6, illustrates the improved clarity achieved using the optional and named parameter support added in .NET 4.0. In the example, the fileName parameter is not named as it is in the correct position (first), whereas ReadOnly would actually be the third parameter if it were not identified by name.
// Open the specified file in Excel using .NET 4.0 optional
            // and named argument capabilities.
            Excel.Workbook workbook =
                excel.Workbooks.Open(fileName, ReadOnly: true);

            /* Pre-.NET 4.0 syntax required to open Excel file:
            Excel.Workbook workbook =
                excel.Workbooks.Open(fileName, Type.Missing,
                false, Type.Missing, Type.Missing, Type.Missing,
                Type.Missing, Type.Missing, Type.Missing, Type.Missing,
                Type.Missing, Type.Missing, Type.Missing, Type.Missing,
                Type.Missing); */
}
Use an RCW exactly as you would with an ordinary COM component (see recipe 12-6). To work with the ActiveX control at design time, add it to the Visual Studio .NET Toolbox.
The .NET Framework includes the same support for all COM components, including ActiveX controls. The key difference is that the RCW class for an ActiveX control derives from the special .NET Framework type System.Windows.Forms.AxHost. You add the AxHost control to your form, and it communicates with the ActiveX control behind the scenes. Because AxHost derives from System.Windows.Forms.Control, it provides the standard .NET control properties, methods, and events, such as Location, Size, Anchor, and so on. In the case of an autogenerated RCW, the AxHost classes will always begin with the letters Ax.
You can create an RCW for an ActiveX control as you would for any other COM component, as described in recipe 12-6: use the Type Library Importer (Tlbimp.exe) command-line utility or use the Add Reference feature in Visual Studio .NET and create the control programmatically. However, an easier approach in Visual Studio .NET is to add the ActiveX control to the toolbox. To add a control to the toolbox, in Visual Studio, open the Tools menu and click the Choose Toolbox Items menu option. Choose the COM Components tab and either select an item that is already listed or click the Browse button to locate a new control.
Nothing happens to your project when you add an ActiveX control to the toolbox. However, you can use the Toolbox icon to add an instance of the control to your form. The first time you do this, Visual Studio .NET will create the Interop assembly and add it to your project. For example, if you add the Microsoft Masked Edit control, Visual Studio .NET creates an RCW assembly with a name such as AxInterop.MSMask.dll. Here is the code you might expect to see in the hidden designer region that creates the control instance and adds it to the form:
this.axMaskEdBox1 = new AxMSMask.AxMaskEdBox();
((System.ComponentModel.ISupportInitialize)(this.axMaskEdBox1)).BeginInit();

//
// axMaskEdBox1
//
this.axMaskEdBox1.Location = new System.Drawing.Point(16, 12);
this.axMaskEdBox1.Name = "axMaskEdBox1";
this.axMaskEdBox1.OcxState = ((System.Windows.Forms.AxHost.State)
  (resources.GetObject("axMaskEdBox1.OcxState")));

this.axMaskEdBox1.Size = new System.Drawing.Size(112, 20);
this.axMaskEdBox1.TabIndex = 0;

this.Controls.Add(this.axMaskEdBox1);
Notice that the custom properties for the ActiveX control are not applied directly through property set statements. Instead, they are restored as a group when the control sets its persisted OcxState property. However, your code can use the control's properties directly.
Create an assembly that follows certain restrictions identified in this recipe. Export a type library for this assembly using the Type Library Exporter (Tlbexp.exe) command-line utility.
The .NET Framework includes support for COM clients to use .NET components. When a COM client needs to create a .NET object, the CLR creates the managed object and a COM callable wrapper (CCW) that wraps the object. The COM client interacts with the managed object through the CCW. The runtime creates only one CCW for a managed object, regardless of how many COM clients are using it.
Types that need to be accessed by COM clients must meet certain requirements:
The managed type (class, interface, struct, or enum) must be public.
If the COM client needs to create the object, it must have a public default constructor. COM does not support parameterized constructors.
The members of the type that are being accessed must be public instance members. Private, protected, internal, and static members are not accessible to COM clients.
In addition, you should consider the following recommendations:
You should not create inheritance relationships between classes, because these relationships will not be visible to COM clients (although .NET will attempt to simulate this by declaring a shared base class interface).
The classes you are exposing should implement an interface. For added versioning control, you can use the attribute
System.Runtime.InteropServices.GuidAttributeto specify the GUID that should be assigned to an interface.Ideally, you should give the managed assembly a strong name so that it can be installed into the GAC and shared among multiple clients.
In order for a COM client to create the .NET object, it requires a type library (a TLB file). The type library can be generated from an assembly using the Tlbexp.exe command-line utility. Here is an example of the syntax you use:
tlbexp ManagedLibrary.dll
Once you generate the type library, you can reference it from the unmanaged development tool. With Visual Basic 6, you reference the TLB file from the Project References dialog box. In Visual C++, you can use the #import statement to import the type definitions from the type library.