In previous chapters, you learned about displaying moving graphics with the UIImageView, and about drawing lines, shapes, paths, and gradients on a UIView with Quartz 2D. These technologies pack a lot of functionality and are essential to making 2D games on the iPhone. You will be using them a lot in your games.
Quartz 2D is actually a Mac OS X technology that has made its way unchanged to the iPhone. Like the Core Foundation and Foundation frameworks, Quartz 2D is a fundamental API in both Mac OS X and iPhone OS. UIKit, while very central to iPhone programming, is a simplified version of Mac OS X's AppKit.
Another iPhone technology with a lot of functionality is Core Animation. Unlike Quartz 2D and UIKit, Core Animation was invented just for the iPhone, and made its way into Mac OS X Leopard after the iPhone was developed. Core Animation's power for making dynamic effects on the iPhone's UI is what gives the iPhone its personality.
Core Animation is the technology behind the slick way views slide as you navigate around in many iPhone apps. It's used to make an application's loading image grow and fade in once you touch the app's icon. It's also behind the application screen shrinking and fading to nothingness once you quit with the home button.
To be clear, the animation part of the name Core Animation has nothing to do with displaying a sequence of images in rapid succession. Core Animation is used for the movement of components across the screen, such as the sliding of photos on and off the screen as you navigate through a photo album in your favorite photo app. It is also used for special effects, such as the curling page in the Maps application. You will use Core Animation to add cool animated effects to your game's UI, or to make a terrific intro screen.
In this chapter, you will learn how to unleash the power of Core Animation in your own games.
To get started with Core Animation as soon as possible, we will begin coding from an existing project. This will get us to the important code faster than walking through creating the project in Interface Builder, which is covered in Chapter 3.
To begin, open the sample project called CoreAChicken first stage (provided with this book's source code) in Xcode. Select the Resources group in the Groups and Files pane. Double-click the CoreAChickenViewController.xib file to open it, as shown in Figure 5-1.
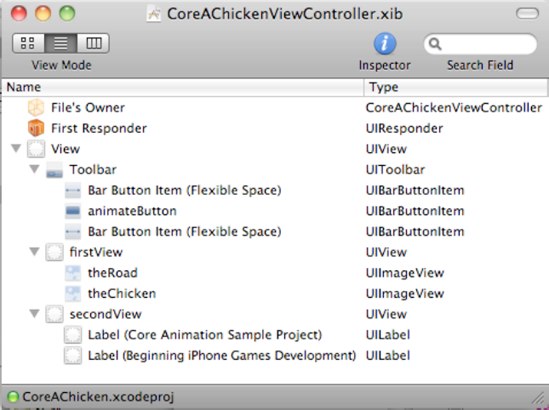
Figure 5.1. The CoreAChickenViewController.xib file opened in Interface Builder, in list view mode, with view and toolbar objects expanded to show their components
Figure 5-1 shows the logical composition of the sample app's only view controller. It is composed of a view, which contains a toolbar and two views. The views are called firstView and secondView. The toolbar has a button called animateButton. The firstView is composed of two image views, called theRoad and theChicken. The secondView contains two labels.
Let's look now at the visual composition of the same view controller. If you don't see the window shown in Figure 5-2, double-click the component called View to open it.
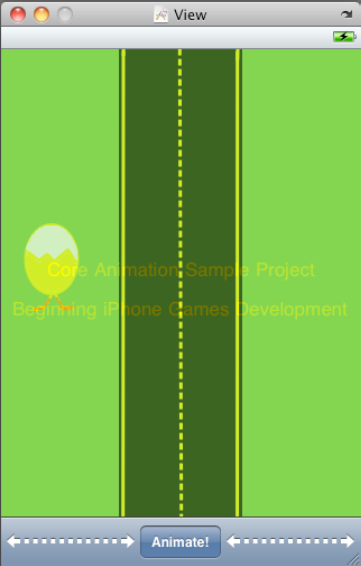
Figure 5.2. The visual layout of the app's main screen as displayed in Interface Builder's view editing window
In Figure 5-2, you can see the toolbar at the bottom of the screen, with the animateButton component. Above the toolbar are two views stacked on top of one another. The secondView is laid out on top of firstView, but secondView actually has its hidden property set. This makes Interface Builder show secondView as half transparent in this window. Because secondView is shown half transparent, you can see firstView behind it, and the image views called theChicken and theRoad laid out in firstView.
Keep in mind that even though secondView is shown half transparent in Interface Builder, when the app runs, it will not be visible because the hidden property is set. When the app first runs, firstView will be visible, and the first animations will be run on it. We will change secondView's hidden property and animate it in some of the code we will write in this chapter, to create fades and other types of animated transitions between the two views.
The code we'll be concerned with in this chapter is an animate method, which will demonstrate Core Animation routines. It's in the CoreAChickenViewController.m file, which you can open in Xcode, from the Classes group. Listing 5-1 shows the code, which is appears around line 20 in the file.
Example 5.1. The code that powers the animateButton in the sample app (in CoreAChickenViewController.m)
- (IBAction)animate {
    static int counter = 0;

    switch (++counter) {
        default:
            counter = 0;
            break;
    }
}
The code begins by defining an IBAction method named animate. IBAction methods are connected to a UI component in Interface Builder. They are called when a button gets clicked or when the user triggers some other event. The animate method is connected to the animateButton displayed on the toolbar at the bottom of the app's main view.
In this first stage of the code, the method doesn't do much. It declares a static integer variable called counter, increments it, and checks it in a switch statement. There's only one case in the switch, the default case, which resets the counter back to 0.
In the course of this chapter, we will code the animate method to play through a sequence of Core Animation routines—a different routine each time the animateButton is clicked. When the last routine plays, the counter is reset to start again from the first routine.
You will be adding switch cases and animation routines to this method throughout this chapter. I will walk you through the code and explain the Core Animation APIs used.
The easiest way to use Core Animation is to take advantage of its close integration with UIKit on the iPhone. In creating UIKit, Apple engineers added basic animation functionality that uses Core Animation behind the scenes, simplifying its application for the most common use cases. We will examine the simpler APIs in this section, and explore the more complex (and more flexible) APIs in later sections.
The UIView class provides class methods for the programming of animated transitions between different property values in your UI components. You use these class methods to begin an animation block, to set animation properties such as animation duration, and to commit the animation block.
You begin an animation block by calling the UIView class method named beginAnimations:context:. This method takes two parameters: an NSString instance used to identify the animation block and a context. Both parameters are optional, but their purpose is to help you identify which animation block called your animation delegate methods (as you'll see in the examples throughout this chapter).
The context parameter is a void pointer, meaning that you can pass anything you want in this parameter. You can use this context pointer to pass a data structure or instance of a class that your animation delegate may need to analyze or modify in regard to the animation starting or finishing.
Once you have begun an animation block, you close it by calling the UIView class method named commitAnimations. Committing the animation block will make Core Animation play the animation in a separate thread from your UI event handling.
Animation blocks can be nested, which means you can begin one animation block within another. Each animation block can have its own animation properties, such as its own animation identifier and duration. But the nested animation blocks won't start playing until the outer animation block is committed. Here's how animation blocks can be nested:
[UIView beginAnimations:@"animation1" context:nil];

// component1 properties animated here

[UIView beginAnimations:@"animation2" context:nil];

// component2 properties animated here

[UIView commitAnimations];

[UIView commitAnimations];
As you may remember from Chapter 3's introduction to UIKit, UIKit components such as UIImageView, UILabel, and UIButton are derived from UIView. By deriving from a common class, they have many properties in common, such as position, size, and alpha. Core Animation can animate the following five UIView properties:
frame: The component's frame rectangle, in terms of its superview.center: The coordinates of the component's center point, in terms of its superview.bounds: The view's bounding rectangle, in coordinates inside the component.transform: The transform applied to the component, relative to the center of the bounding rectangle.alpha: The component's alpha value, which represent its opacity.
Changing any of these properties within an animation block will make Core Animation play an animation in which the value of the property or properties change from their initial value just before the start of the animation block to the final value set within the animation block.
For example, let's say we have a UIImageView component with an initial alpha property value of 1. We start an animation block, set the value of the component's alpha property to 0, and then commit the animation to close the animation block. This will make Core Animation play an animation in which the opacity of the component changes from fully opaque to fully transparent.
That's enough talk, let's look at some code to make these concepts become more concrete. Listing 5-2 shows the animate method, expanded to support a total of ten animations. Replace the current version of the animate method in the CoreAChickenViewController.m file with this one.
Example 5.2. The expanded animate method, with ten animations (in CoreAChickenViewController.m)
- (IBAction)animate {
    static int counter = 0;

    switch (++counter) {
        case 1:
            [self viewAnimation1];
            break;
        case 2:
            [self viewAnimation2];
            break;
        case 3:
            [self viewAnimation3];
            break;
        case 4:
            [self viewAnimation4];
            break;
        case 5:
            [self viewAnimation5];
            break;
        case 6:
            [self viewAnimation6];
            break;
        case 7:
            [self viewAnimation7];
            break;
        case 8:
            [self viewAnimation8];
            break;
        case 9:
            [self viewAnimation9];
            break;
        default:
            [self viewAnimation10];
            counter = 0;
            break;
    }
    animateButton.enabled = NO;
}
In Listing 5-2, the animate method's switch statement has been modified with nine new case statements. Each case statement, including the default one, calls a different method. The methods are called viewAnimation1 through viewAnimation10.
You may note that at the end of the animate method, the animateButton is disabled. This is so that the user cannot trigger another animation before the current animation is completed. Animation blocks cancel each other out unless they are nested. If the animationButton is not disabled between animations, and the user clicks the button while one animation is playing, the current animation will be canceled as the next animation starts, and this will look wrong. As you'll see in the rest of the code to follow, the animateButton is enabled again at the end of each animation.
Let's now walk through these view animation methods.
Listing 5-3 shows the code for method viewAnimation1.
Example 5.3. The viewAnimation1 method
- (void)viewAnimation1 {
    // Reset properties to default values
    theChicken.transform = CGAffineTransformIdentity;
    theChicken.frame = CGRectMake(15, 144, 62, 90);

    [UIView beginAnimations:@"viewAnimation1" context:theChicken];
    [UIView setAnimationDelegate:self];
    [UIView setAnimationDidStopSelector:
        @selector(animationDidStop:finished:context:)];

    theChicken.frame = CGRectMake(15, 330, 62, 90);

    [UIView commitAnimations];
}
The first line of code in the viewAnimation1 method resets theChicken's properties to default values. The transform property controls rotation, scaling (size changes), and translation (position changes) using a set of functions that will be discussed in the "UIView Transforms" section later in this chapter. The CGAffineTransformIdentity constant resets the property to a value that essentially means "no transform." After resetting the transform, the code sets theChicken's frame property to the starting position for this animation.
The next line of code starts an animations block with the animation identifier viewAnimation1 and theChicken image view as the context parameter.
Following that, the code sets the animation delegate:
[UIView setAnimationDelegate:self];
[UIView setAnimationDidStopSelector:@selector(animationDidStop:finished:context:)];
The animation delegate receives notifications when the animation is about to start and when the animation has stopped through two selectors you can assign. We assign the selector named animationDidStop:finished:context: to be called when the animation stops. Setting the delegate and selectors is optional. But in this sample project, we must always set a delegate and delegate method for stopping the animation, because we need to reenable the animateButton at the end of each animation. You can also assign a selector to be notified when the animation is about to start, if you need that functionality, by calling the UIView class method setAnimationWillStartSelector: and passing the appropriate selector.
In the next line of code in the viewAnimation1 method, we change the frame of the image view theChicken:
theChicken.frame = CGRectMake(15, 330, 62, 90);
The initial position of theChicken's in the Interface Builder .xib file is at coordinates 15 and 144 for the x and y values. Its initial size is a width of 62 and a height of 90. So this line of code simply moves theChicken down the screen to y coordinate 330.
The last line of code in the viewAnimation1 method commits the animation, closing the animation block:
[UIView commitAnimations];
This makes Core Animation play an animation that moves theChicken down the screen in 0.2 second, to stand at the top of the toolbar. The duration of 0.2 second is the default of a UIView animation, unless you set a different duration using the UIView method setAnimationDuration:.
Once the animation stops, Core Animation calls the method we set earlier for notifications that the animation ended. Listing 5-4 shows the code for this delegate method.
Example 5.4. The animationDidStop:finished:context: animation delegate method
- (void)animationDidStop:(NSString *)theAnimation finished:(BOOL)flag
context:(void *)context
{
    animateButton.enabled = YES;
}
The signature for this method is the standard signature for the animationDidStop delegate. You can call the method anything you want, but if the method takes parameters, the parameter types must match this signature, or the method may cause a crash.
The first parameter must be a pointer to an NSString instance. It will be set to the value you passed for the animation name in the beginAnimations:context: call for this animation. The second parameter, if there is one, must be a Boolean flag. The value passed will be YES if the animation ran to completion or NO if it was interrupted. The current animation can be interrupted by another animation block being committed before the current animation plays out.
The last parameter to the delegate method must be a void pointer. It will be set to the value of the context parameter passed in the beginAnimations:context: for the current animation calling the animation delegate.
Listing 5-5 shows the method viewAnimation2 and its animation stop delegate method.
Example 5.5. The viewAnimation2 method and its animation stop delegate method
- (void)viewAnimation2 {
    [UIView beginAnimations:nil context:nil];
    [UIView setAnimationDuration:1];
    [UIView setAnimationDelegate:selfs];
    [UIView setAnimationDidStopSelector:@selector(animationDidStop)];
theChicken.frame = CGRectMake(15, 144, 62, 90);
[UIView commitAnimations];
}
- (void)animationDidStop {
animateButton.enabled = YES;
}In this listing, the animation block begins with no parameters set for the animation identifier and for the context. In the next line of code, we set the animation duration to 1 second by calling the setAnimationDuration: class method.
Rather than set the animationDidStop selector to the standard signature, we pass in a selector with no parameters. This has no danger of causing a crash, as any parameters passed by the caller will be ignored.
After setting the delegate and animation stop selector, the code sets the frame for theChicken image view back to the original x and y coordinates of 15 and 144. Then we commit the animation to close the animation block.
When this animation plays, theChicken image view slides back up to the original coordinates over the length of 1 second. If you look carefully, you will see the animation starts moving the image view slowly, picks up speed as it progresses, and then slows down as the animation is about to end. This is the default animation curve used by Core Animation.
When making an animation, the result can look rather mechanical if the animator just changes the movement of the animated component in an evenly spaced manner between frames. Through decades of study and practice in the art of animation, professional animators have learned that there are ways to animate a scene and add a touch of variation to their work. These variations make the animation look more interesting than just moving something from position A to B in a straight line.
Animation curves are a property of an animation you can set to tell Core Animation to apply the changes to the component you want to animate in an uneven manner, to add these variations to the animated result. These curves modify how Core Animation processes the animation. For example, it may begin slowly and pick up acceleration as the animation progresses, or it might start by moving rapidly and then slow down as it reaches the end.
You set the animation curve by calling the UIView class method setAnimationCurve:, passing one of the following curve constants:
UIViewAnimationCurveEaseInOut: The default animation curve. The animation begins slowly, accelerates until the middle of the animation's duration, and then slows down again until completion.UIViewAnimationCurveEaseIn: The animation begins slowly and accelerates until the end.UIViewAnimationCurveEaseOut: The animation begins fast but slows down until it reaches the end.UIViewAnimationCurveLinear: The animation runs at a constant speed.
So far, you've learned that animations have a default duration of 0.2 second and that they have a default animation curve that makes the animation start slowly, pick up speed for about half the duration, and then slow down until it stops for the other half of the duration. You also learned you can set delegate methods to be notified when the animation is about to start and when it has come to an end.
The viewAnimation3 method, shown in Listing 5-6, demonstrates a few more animation properties.
Example 5.6. The viewAnimation3 method and its animation stop delegate method
- (void)viewAnimation3 {
    [UIView beginAnimations:@"viewAnimation3" context:theRoad];
    [UIView setAnimationCurve:UIViewAnimationCurveLinear];
    [UIView setAnimationDuration:0.5];

    [UIView setAnimationRepeatAutoreverses:YES];
    [UIView setAnimationRepeatCount:2];
    [UIView setAnimationDelegate:self];
    [UIView setAnimationDidStopSelector:
        @selector(theRoadAnimationDidStop:finished:context:)];

    theRoad.alpha = 0.0;
    [UIView commitAnimations];
}

- (void)theRoadAnimationDidStop:(NSString *)theAnimation finished:(BOOL)flag
context:(void *)context
{
    ((UIView *)context).alpha = 1.0;
    animateButton.enabled = YES;
}
The viewAnimation3 method begins by starting an animation block, passing in the string "viewAnimation3" as the animation identifier and the image view called theRoad as the context parameter.
The next method sets the animation curve to linear:
[UIView setAnimationCurve:UIViewAnimationCurveLinear];
This means the animated properties will change at constant speed, from the current value to the value set within the animation block.
The next line of code sets the animation duration to half a second:
[UIView setAnimationDuration:0.5];
The following lines of code set the animation to autoreverse and to play twice:
[UIView setAnimationRepeatAutoreverses:YES];
[UIView setAnimationRepeatCount:2];
The animation will play forward for the duration set in the previous line, play backward for the same duration, and then repeat. This means that the animation plays forward once for half a second, then plays backward for half a second, then plays forward again for half a second, and once again backward for half a second. The animation's total play time will be 2 seconds.
By default, animations don't autoreverse and the repeat count is set to 0, which means there is no repetition. The autoreverse setting is ignored if the repeat count is 0.
The repeat count can be fractional, which means the animation will not play all the way through. If you set the repeat count to 0.5, for example, the animation will stop at the exact halfway point of the duration setting. If you set the repeat count to 6.5, the animation will repeat six times, then stop halfway through a seventh repetition.
The next two lines of code set the animation delegate object and the name of the method that will be called when the animation stops:
[UIView setAnimationDelegate:self];
[UIView setAnimationDidStopSelector:@selector(theRoadAnimationDidStop:finished:context:)];
The selector's signature matches the standard signature for this delegate method. In this particular delegate method, it means the animation context will be passed as the third parameter to the method. We will make use of the context parameter in the animation delegate method to set the object's property to its final value.
This next line identifies the object and property being changed in the animation:
theRoad.alpha = 0.0;
The image view named theRoad has a current alpha value of 1, making theRoad fully opaque. In this animation, it is being changed to 0, fully transparent.
In the last line of code in this method, the animation block is closed with the committing of the animation to the Core Animation queue.
[UIView commitAnimations];
In essence, the viewAnimation3 method makes theRoad fade out and fade back in twice over a length of 2 seconds.
The next section of code is the animation stop delegate method:
- (void)theRoadAnimationDidStop:(NSString *)theAnimation finished:(BOOL)flag
context:(void *)context
{
    ((UIView *)context).alpha = 1.0;
    animateButton.enabled = YES;
}
In this method, we use the context parameter, which was set to theRoad at the start of the animation block in viewAnimation3. So the delegate method is setting theRoad's alpha property back to 1 now that the animation has ended.
The next view animation methods introduce a few new animation settings. Let's continue with Listing 5-7, which shows viewAnimation4.
Example 5.7. The viewAnimation4 method and its animation stop delegate method
- (void)viewAnimation4 {
    [UIView beginAnimations:nil context:nil];
    [UIView setAnimationDelay:0.5];
    [UIView setAnimationDuration:1];
    [UIView setAnimationCurve:UIViewAnimationCurveEaseIn];

    [UIView setAnimationRepeatAutoreverses:YES];
    [UIView setAnimationRepeatCount:2];
    [UIView setAnimationDelegate:self];
    [UIView setAnimationDidStopSelector:
        @selector(resetTheChickenProperties)];

    theChicken.frame = CGRectMake(15, 330, 62, 90);
    [UIView commitAnimations];
}

- (void)resetTheChickenProperties {
    theChicken.transform = CGAffineTransformIdentity;
    theChicken.frame = CGRectMake(15, 144, 62, 90);
    animateButton.enabled = YES;
}
The viewAnimation4 method introduces the concept of the animation delay. You can set a delay for the start of the animation by calling the UIView class method setAnimationDelay:. The animation delay defaults to a value of 0, and the setting accepts a fraction. In this code sample, the animation delay is set to 0.5 second.
The animation curve is set to ease-in. This curve is what you should use for animations simulating bouncing. This animation makes theChicken bounce on the toolbar a couple of times.
Listing 5-8 shows the code for viewAnimation5, which uses the ease-out animation curve.
Example 5.8. The viewAnimation5 method
- (void)viewAnimation5 {
    [UIView beginAnimations:nil context:nil];
    [UIView setAnimationDuration:1];
    [UIView setAnimationCurve:UIViewAnimationCurveEaseOut];
    [UIView setAnimationDelegate:self];
    [UIView setAnimationDidStopSelector:@selector(animationDidStop)];

    theChicken.frame = CGRectMake(235, 144, 62, 90);
    [UIView commitAnimations];
}
The ease-out animation curve is perfect for simulating throwing an object up in the air and seeing gravity slow it down over time. It's the opposite of the bouncing effect.
The next three animations introduce the transform property. The transform property is used to affect the size (scale), position (translation), and/or rotation of a UIKit component, using the following Core Graphics functions:
CGAffineTransformMakeScale: Changes the size of the component. You pass a scale for the width and height of the component. The value of the parameters can be fractions.CGAffineTransformMakeTranslation: Changes the position of the component relative to its original position. You pass units of relative movement along the x and y axes. The x and y units can be fractions.CGAffineTransformMakeRotation: Rotates the component about its center coordinates. You pass the number of radians by which to rotate. The value of the parameter can be a fraction.CGAffineTransformIdentity: Resets thetransformproperty (no transformation).
Note
Radians are the metric equivalent to the degree of rotation of the English system. 180 degrees equal 3.14159 radians. A positive value means clockwise rotation. A negative value means counterclockwise rotation. To convert from degrees to radians, apply the formula degrees * pi / 180.
Listing 5-9 shows the viewAnimation6 and viewAnimation7 methods. These two methods demonstrate scaling and rotation transforms.
Example 5.9. The viewAnimation6 and viewAnimation7 methods
- (void)viewAnimation6 {
    [UIView beginAnimations:nil context:nil];
    [UIView setAnimationDuration:1];
    [UIView setAnimationCurve:UIViewAnimationCurveLinear];
    [UIView setAnimationDelegate:self];
    [UIView setAnimationDidStopSelector:@selector(animationDidStop)];

    theChicken.transform = CGAffineTransformMakeScale(1.25, 1.25);
    [UIView commitAnimations];
}

- (void)viewAnimation7 {
    [UIView beginAnimations:nil context:nil];
    [UIView setAnimationDuration:1];
    [UIView setAnimationCurve:UIViewAnimationCurveLinear];
    [UIView setAnimationDelegate:self];
    [UIView setAnimationDidStopSelector:@selector(animationDidStop)];

    CGAffineTransform transform1 = CGAffineTransformMakeScale(1, 1);
    CGAffineTransform transform2 =
        CGAffineTransformMakeRotation(179.9 * M_PI / 180.0);
theChicken.transform = CGAffineTransformConcat(transform1,
transform2);
[UIView commitAnimations];
}In the viewAnimation6 method, we are scaling theChicken to 1.25 times its original size. In the viewAnimation7 method, theChicken is scaled back down to original size. And at the same time, it rotates theChicken clockwise by 179.9 degrees. (Remember that a positive value means clockwise rotation; a negative value means counterclockwise rotation.)
Note
The rotation applied is 179.9 degrees rather than 180 degrees, because Core Animation misinterpreted my intention when I specified 180 degrees. When I specified 180 degrees for the transform, Core Animation interpreted this as a counterclockwise rotation of 180 degrees. Using 179.9 made Core Animation apply the animation as I intended.
The viewAnimation7 method shows that transforms can be combined. The result of two CGAffineTransformMake* functions can be used as inputs to the CGAffineTransformConcat function. This result can be concatenated with a third, and the result concatenated with a fourth, and so on. In this case, we combine two transforms and assign them to the component's transform property.
The viewAnimation8 method, presented in Listing 5-10, shows another way of combining transforms.
Example 5.10. The viewAnimation8 method
- (void)viewAnimation8 {
    [UIView beginAnimations:nil context:nil];
    [UIView setAnimationDuration:1];
    [UIView setAnimationCurve:UIViewAnimationCurveEaseInOut];
    [UIView setAnimationDelegate:self];
    [UIView setAnimationDidStopSelector:
        @selector(resetTheChickenProperties)];

    CGAffineTransform transform1 =
        CGAffineTransformMakeTranslation(-220, 0);
    theChicken.transform =
        CGAffineTransformRotate(transform1, 359.9 * M_PI / 180.0);
    [UIView commitAnimations];
}
In the viewAnimation8 method, the code creates a transform, which applies a translation of 220 pixels to the left of the current position. When applied to theChicken at this point in the animations, this transform essentially moves it to the original frame coordinates set in the CoreAChickenViewController.xib file. Before applying this transform, though, we call the function CGAffineTransformRotate, and apply to the translation transform a clockwise rotation transform of 359.9 degrees. This completes the half circle rotation started in viewAnimation7. These combined transforms are applied to theChicken, and then the animation block is closed and the animation committed.
Note
The rotation applied is 359.9 degrees rather than 360 degrees, because Core Animation misinterpreted my intention when I specified 360 degrees. Using 359.9 made Core Animation apply the animation as I intended.
If you want to see a finished working version of the code up to this part of the chapter, you can check out the Xcode project in the folder called CoreAChicken UIView animations, in the source code for this chapter.
Besides animating the movement and opacity of UI components such as image views, UIKit's integration of Core Animation also has the ability to animate transitions that occupy the whole screen. These work well to swap areas of the screen out and replace that area with other components.
The API for using UIView transitions is called setAnimationTransition:forView:cache:. This API takes as parameters a transition type, the superview of the components to be transitioned, and a Boolean describing whether you want Core Animation to cache the look of the superview before and after the animation. This caching improves Core Animation's performance.
Four transition types are used by UIView transitions:
UIViewAnimationTransitionFlipFromRight: Makes the view contents flip from the right to the left, revealing another view on the other side of the screen. You can see this transition type in the Weather app, when you click the Info disclosure icon at the lower-right corner of the screen.UIViewAnimationTransitionFlipFromLeft: Makes the view contents flip from the left to the right, revealing another view on the other side of the screen. This animation is the opposite of the previous one. In the Weather app, it hides the "back" of the Weather app when you click the Done button.UIViewAnimationTransitionCurlUp: Makes the current view curl up and away like a page on a notepad, revealing another view underneath. You can see this animation play only 50% of the way in the Maps app, when you click the curling page icon to the lower left on the toolbar.UIViewAnimationTransitionCurlDown: Takes the current view and covers it as if a page were uncurling from the top of the screen and revealing another view. This animation is the opposite of the previous one. You can see this by clicking the curling page icon again after revealing the view beneath.
The viewAnimation9 and viewAnimation10 methods use view transitions to hide firstView and show secondView and vice versa. Listing 5-11 shows these methods.
Example 5.11. The viewAnimation9 and viewAnimation10 methods
- (void)viewAnimation9 {
    [UIView beginAnimations:nil context:nil];
    [UIView setAnimationDuration:1];
    [UIView setAnimationCurve:UIViewAnimationCurveEaseIn];
    [UIView setAnimationTransition:UIViewAnimationTransitionCurlUp
        forView:self.view cache:YES];
    [UIView setAnimationDelegate:self];
    [UIView setAnimationDidStopSelector:@selector(animationDidStop)];

    firstView.hidden = YES;
    secondView.hidden = NO;
    [UIView commitAnimations];
}

- (void)viewAnimation10 {
    [UIView beginAnimations:nil context:nil];
    [UIView setAnimationDuration:1];
    [UIView setAnimationCurve:UIViewAnimationCurveEaseInOut];
    [UIView setAnimationTransition:UIViewAnimationTransitionFlipFromLeft
        forView:self.view cache:YES];
    [UIView setAnimationDelegate:self];
    [UIView setAnimationDidStopSelector:@selector(animationDidStop)];

    firstView.hidden = NO;
    secondView.hidden = YES;
    [UIView commitAnimations];
}
The code for viewAnimation9 should look familiar by now. It starts an animation block, sets an animation duration and animation curve, sets delegates and delegate selectors, and commits the animation to close the animation block. The main difference is the use of the setAnimationTransition:forView:cache: method.
[UIView setAnimationTransition:UIViewAnimationTransitionCurlUp
        forView:self.view cache:YES];
This line of code sets the animation transition type to curl up. We specify the transition is for the view controller's view, which contains both firstView and secondView. We also specify that Core Animation should cache the animation for the best performance.
The next relevant lines of code are the hiding and showing of the views:
firstView.hidden = YES;
    secondView.hidden = NO;
We simply hide firstView and show secondView. When the animation is committed, Core Animation whisks firstView away with a page-curl animation about a second long, with secondView shown as firstView animates away.
In the viewAnimation10 method, the relevant code is the line that sets the animation transition type:
[UIView setAnimationTransition:UIViewAnimationTransitionFlipFromLeft
forView:self.view cache:YES];
Here, we specify the transition type that flips the view, with the new view coming from the left side of the screen.
In this view animation, we show the firstView and hide the secondView:
firstView.hidden = NO;
    secondView.hidden = YES;
We are essentially undoing the work of the previous animation, but with a different transition type. When this animation is committed, Core Animation flips the screen from the left, hiding secondView behind firstView, which is again the only visible view.
There are other transition animations the iPhone can do, but these require coding directly with Core Animation APIs. Our exploration of UIView animation methods concludes, and we move on to the more complex APIs offered by Core Animation itself.
I mentioned at the beginning at the UIView animations section that the animation methods provided by UIView were a convenience—a gentle façade provided by the designers of the iPhone SDK to hide the complexity of Core Animation from developers for the most common types of animation effects. In this section, we'll look at how to create animations with Core Animation APIs to do many of the same things you can do with UIView animations.
Core Animation operates on instances of the class CALayer. Every UIKit component has a CALayer instance, accessible through the layer property of the component. It is on this layer that UIKit components draw, and it is the UIKit component's layer that is displayed on screen. When working with UIKit components to create your UI, you typically don't need to concern yourself with the Core Animation layer, unless you want to use the Core Animation APIs directly.
Core Animation layers have many of the same properties as UIView, such as frame, bounds, backgroundColor, and hidden. Like UIView, many of the layer's properties can be animated, including the following (a partial list):
positionboundsanchorPointbackgroundColorhidden
You can trigger an animation on a layer simply by changing one of the layer properties that can be animated. For a UIKit component, you reference the layer property, and then change the property on the layer, as in this example:
theChicken.layer.position = CGPointMake(225, 144);
This is called an implicit animation, and does not require the creation of an animation block. Just change one or several properties, and an animation will be played on the layer, changing the property or properties from the current value to the new value.
Implicit animations have a default duration of 0.25 seconds. You can change the duration of an implicit animation by setting the duration value in the implicit Core Animation transaction, as follows:
[CATransaction setValue:[NSNumber numberWithFloat:1.0]
                             forKey:kCATransactionAnimationDuration];
You change the animation duration value before you modify the property you want to animate. Once changed, the animation will play for the specified duration.
Implicit animations are played with a linear animation curve. Core Animation calls animation curves timing functions (covered in the next section). Here is an example of changing to the ease-in, ease-out timing function:
[CATransaction setValue:kCAMediaTimingFunctionEaseInEaseOut
                             forKey:kCATransactionAnimationTimingFunction];
One thing to remember is that the animation duration and timing function are reset back to default values after the implicit animation plays to the end. Unless you create an explicit transaction and retain it for reuse at later points, the values you give these settings are lost once the implicit transaction is finished playing.
The Core Animation term timing function seems like an important distinction, but it's just another name for animation curve. You assign the timing function by calling the class method functionWithName: in the CAMediaTimingFunction class. This class method takes as a parameter the type of timing function you want to use. The Core Animation timing functions are as follows:
kCAMediaTimingFunctionDefault: Approximates a Bézier timing function with control points (0.0,0.0), (0.25,0.1), (0.25,0.1), (1.0,1.0). It's a curve similar to ease-in, ease-out, but the start and stop slowdowns are not as pronounced.kCAMediaTimingFunctionEaseInEaseOut: Equivalent toUIViewAnimationCurveEaseInOut.kCAMediaTimingFunctionEaseIn: Equivalent toUIViewAnimationCurveEaseIn.kCAMediaTimingFunctionEaseOut: Equivalent toUIViewAnimationCurveEaseOut.kCAMediaTimingFunctionLinear: Equivalent toUIViewAnimationCurveLinear. This is the default timing function for transitions.
kCAMediaTimingFunctionDefault is the default timing function for all Core Animation classes, except transitions. As noted, the default timing function for transitions is kCAMediaTimingFunctionLinear.
Now that we've covered the basics of implicit animations on Core Animation layers, let's cover one explicit animation class in the Core Animation arsenal: layer animation transitions. Core Animation provides four transition types:
kCATransitionFade: Fades in or out the layer content as it becomes visible or hidden (the default).kCATransitionMoveIn: The layer content slides over the layers underneath.kCATransitionPush: The layers underneath are pushed out by the layer as it slides over.kCATransitionReveal: The layer content is revealed gradually, covering the layers underneath.
Let's expand the animate method to demonstrate these transitions, as shown in Listing 5-12. The code in bold represents the code you need to add or change.
Example 5.12. New code for the animate method in CoreAChickenViewController.m
case 10:[self viewAnimation10];break;case 11:[self transition1];break;case 12:[self transition2];break;case 13:[self transition3];break;default:[self transition4];counter = 0; break;
This code adds four new switch case statements and animation methods to the animate method, called transition1 through transition4. Let's look at each of these methods.
Listing 5-13 shows the transition1 method.
Example 5.13. The transition1 method
- (void)transition1 {
    CATransition *transition = [CATransition animation];
    transition.duration = 0.75;
    transition.timingFunction = [CAMediaTimingFunction
        functionWithName:kCAMediaTimingFunctionLinear];
    transition.delegate = self;

    transition.type = kCATransitionFade;

    [self.view.layer addAnimation:transition forKey:@"transition1"];

    firstView.hidden = YES;
    secondView.hidden = NO;
}
The method begins by creating an instance of a class called CATransition. This is class derived from CAAnimation, the base class for all Core Animation animation APIs. You instantiate a CATransition instance by calling the class method named animation:
CATransition *transition = [CATransition animation];
The CATransition instance has properties for specifying how a transition is going to play—its type and its duration, and other important aspects such as its delegate. The properties of the CATransition instance are similar in nature to the animation settings in UIView, although they may be called differently in Core Animation.
One similarity to a UIView animation is that creating the CATransition instance is like beginning a UIView animation block. One difference is that there is no animation identifier and no context. The class instance itself is used as the identifier in the Core Animation delegate.
One major difference between animations and transitions is that transitions work on the whole screen. UIView animations and Core Animation implicit animations work at the more granular level of properties.
The next lines of code set the animation duration and the timing function:
transition.duration = 0.75;
    transition.timingFunction = [CAMediaTimingFunction
        functionWithName:kCAMediaTimingFunctionLinear];
The duration property and timing functions were discussed earlier. As in UIView animation, transitions play for 0.25 second unless you specify a value.
The next line of code sets the delegate for the transition:
transition.delegate = self;
Unlike the UIView animation delegate, you don't need to set a selector. The transition expects the delegate to have methods named animationDidStart: and animationDidStop:finished:.
The next line of code sets the transition type:
transition.type = kCATransitionFade;
As noted earlier, kCATransitionFade fades in or out the layer content as it becomes visible or hidden.
The next line of code adds the animation to the layer property of the view controller's view.
[self.view.layer addAnimation:transition forKey:@"transition1"];
Until it is removed, this layer will play this transition every time a subview of the view controller's view is animated. If firstView or secondView is hidden, shown, or removed from the superview, or if one of these or another view is added to the superview, Core Animation will trigger this transition. You can remove an animation from a layer by calling the CALayer instance method removeAnimationForKey: and passing in the key with which it was added to the layer.
Adding the animation to the layer is similar in concept to committing a UIView animation block. The exception is that the animation does not begin playing immediately upon being added to the layer. Core Animation transitions and other animation types begin playing when the event handler loop goes idle. The animate method that calls the various animation and transition methods is called by Cocoa Touch to handle the touch event for the animateButton. Therefore, the Cocoa Touch event handler is busy while the animate method processes the touch event. The transition will play once the animate method ends and the flow of execution returns to the Cocoa Touch event handler.
Now that the transition has been added to the layer, the next lines of code tell the fade transition what to operate on:
firstView.hidden = YES;
    secondView.hidden = NO;
The transition will hide the firstView and show the secondView.
In summary, the transition1 method creates a Core Animation transition to hide the firstView and show the secondView using the fade transition type and the linear timing function over a period of 1 second.
In line 6 of Listing 5-13, we set the delegate for this transition. As noted earlier, we don't need to specify a selector for the notification methods. Core Animation expects the delegate to provide at least one of two methods: animationDidStart: and animationDidStop:finished:. Listing 5-14 shows the transition delegate method implemented in the sample project.
Example 5.14. The transition delegate method animationDidStop:finished:
- (void)animationDidStop:(CAAnimation *)theAnimation finished:(BOOL)flag {
    animateButton.enabled = YES;
}
As I mentioned earlier, Core Animation passes the transition object as the first parameter of the delegate methods, in a similar fashion to how it passes the animation identifier as first parameter in a UIView animation delegate method.
Let's examine the other transition methods in our example, shown in Listing 5-15.
Example 5.15. The transition2, transition3, and transition4 methods
- (void)transition2 {
    CATransition *transition = [CATransition animation];
    transition.duration = 0.75;
    transition.timingFunction = [CAMediaTimingFunction
                        functionWithName:kCAMediaTimingFunctionEaseIn];
    transition.delegate = self;

    transition.type = kCATransitionMoveIn;
    transition.subtype = kCATransitionFromRight;

    [self.view.layer addAnimation:transition forKey:@"transition2"];

    firstView.hidden = NO;
    secondView.hidden = YES;
}

- (void)transition3 {
    CATransition *transition = [CATransition animation];
    transition.duration = 0.75;
    transition.timingFunction = [CAMediaTimingFunction
                        functionWithName:kCAMediaTimingFunctionEaseOut];
    transition.delegate = self;

    transition.type = kCATransitionPush;
    transition.subtype = kCATransitionFromLeft;

    [self.view.layer addAnimation:transition forKey:@"transition3"];

    firstView.hidden = YES;
    secondView.hidden = NO;
}

- (void)transition4 {
    CATransition *transition = [CATransition animation];
    transition.duration = 0.75;
    transition.timingFunction = [CAMediaTimingFunction
                        functionWithName:kCAMediaTimingFunctionEaseInEaseOut];
    transition.delegate = self;

    transition.type = kCATransitionReveal;
    transition.subtype = kCATransitionFromRight;

    [self.view.layer addAnimation:transition forKey:@"transition4"];

    firstView.hidden = NO;
    secondView.hidden = YES;
}
These other transition methods are nearly identical to transition1. They differ by setting different timing functions and transition types. Another key difference is that these methods also set a subtype property on the transition. Whereas in the UIView transitions, we had transition types of curl up/curl down and flip left/flip right, in these Core Animation transitions types, we have only types of move in, push, and reveal. The subtype specifies a direction for the transition. as follows:
The fade transition type ignores the subtype because there is only one fade transition. You fade one view out and fade another one in. There is no movement involved.
Core Animation transitions are a cool way to make your UI stand out, by adding interesting animations every time you change screens. UIKit already provides animated transitions as part of the UINavigator functionality, but with Core Animation, you can choose to add your own interesting twist with four types and four subtypes of transitions.
In this chapter, you learned how to animate UIView instances by changing their properties within an animation block. You learned how to customize the playback of your animations by changing animation block settings such as animation duration, repetition count, and animation delay. The chapter also covered UIView transition effects. You then learned how to use implicit Core Animation animations to perform similar techniques by modifying the Core Animation layer present in all UIKit components. The chapter concluded with examples of Core Animation transitions.
The code for the full implementation of this chapter's example project is provided in a folder called CoreAChicken finished version. I have also provided a version of the brick-breaking game from Chapter 3 that integrates Core Animation, in a folder named IVBricker CoreAnim. When the ball hits a brick in this version of the game, the brick doesn't just fade out to nothing—it also falls off the screen. The fading out of the brick and its falling to the bottom of the screen are implemented using UIView animations.
Core Animation provides a tool set for adding slick transition effects and animations to your game. With the knowledge acquired in this chapter, you can create cool screens, animated intros, cutscenes, and other great game features.
Many more Core Animation APIs are available. If you're interested, you can refer to Apple's excellent iPhone SDK documentation to learn more about Core Animation.