In the previous chapters, you've been introduced to gaming on the iPhone and taken a trip through the world of UIKit. This can be considered GUI-level development. You use the Apple-supplied tools, dragging and dropping icons, and assembling the logic with bits of code here and there. If you're lucky, you get to stay in the world of Objective-C, tossing messages back and forth. It's a wonderful world. Apps can be built in a single day!
Soon, though, you'll want more. You might want to draw your own characters or import vector art from popular programs such as Adobe Illustrator. You may want your graphics to shrink and grow, fade, twirl, and change color. Static text can be much more interesting when it, too, changes size, rotates about the screen, and bounces off other objects. Fixed graphics become animated, flipbook movies, allowing your characters to come to life. Characters should jump, laugh, wiggle, and entertain. Games should be fun.
This chapter introduces you to the world of Quartz 2D games on the iPhone. Quartz 2D is a powerful API that simplifies the inner workings of the iPhone, allowing you to draw vector art, play with images, and manipulate fonts. As you leave the world of UIKit and enter the land of Quartz 2D, you'll write code to position and manipulate these items. There is a bit of math involved. We'll do our best to keep it simple.
To give you insight into how popular games are built, we'll walk though the construction of a Quartz 2D implementation of Atari's Asteroids. Let's begin with an overview of how we'll build the game.
The iPhone SDK includes copious documentation on Quartz 2D, as well as sample code for numerous Quartz 2D-powered apps. Our goal here is to make sense of it all, and to help you understand how to use Quartz 2D to build games. We'll skip over a lot of Quartz's capabilities, such as the ability to generate Adobe PDF documents or work on standard Mac OS X platforms. You won't need those for your games. Instead, we'll choose the tasty bits and assemble them into a framework.
We begin by organizing the rich capabilities of Quartz 2D into Objective-C classes called sprites. The English definition of a sprite is a small or elflike supernatural being, an elflike person, a ghost. In the gaming world, a sprite can be the main character, an animated scoop of ice cream, a space rocket, or the tiny dust particles that appear after something has exploded. Sprites move; they do stuff. Our classes provide general methods for moving, rotating, scaling, and coloring sprites in a game world. The guts of our classes are functional calls into the Quartz 2D API.
With sprites out of the way, we introduce a Quartz 2D game loop, depicted in Figure 4-1. As you saw in Chapter 3, timers are an effective tool for making changes 30 times a second. We call each iteration of the loop a "tic," like the ticking of a clock. The game loop organizes the changes to sprites during a tic into three steps: update, render, and persist.

At the beginning of every tic of the timer clock, the update step adds or deletes items from the game, and then moves each sprite just a hair. The render step places visible sprites on the screen. The persist step records shared information on a common "blackboard," while capturing external changes to the UI (such as a finger touch or accelerometer movement). The loop repeats, 30 times a second, giving the illusion of movement and interactivity.
We implement the game loop with a set of classes, following the Model-View-Controller (MVC) design pattern introduced in Chapter 3. The blackboard is our model, holding information that persists beyond each game loop. The controller manipulates sprites during the update step with custom game logic. The controller also records changes to the UI and iPhone events in the model. Finally, the view places sprites on the screen during the render step. Quartz 2D plays a heavy role in the views, and is only a bit player in the controller and model.
With sprites and the game loop in hand, we dive into an implementation of Atari's Asteroids, as shown in Figure 4-2. This game is a set of sprites with one model. The buttons are implemented as image sprites, using frame animation to emulate button presses. The core and status displays are simple text sprites. The ship, rocks, and bullets are sprites made with shaded vector art. Sound effects, button presses, scoring, and lives are all kept in a centralized model. Game logic, from exploding asteroids to firing missiles, is kept in a controller class.

The source code provided for this chapter includes two projects: figures.tar.gz and asteroids.tar.gz. The figures.tar.gz project contains all the sample code through the "Heads-Up Displays" section. One of the files, Defs.h, contains documentation on how to build the code for each figure in a live project. You may find it helpful to keep a window open with the source code, this book at your side, going back and forth between the text and the Xcode project.
The asteroids.tar.gz project covers the more detailed Asteroids game which is described in the "Asteroids Game Architecture" section. This is a complete game with sound effects, animation, levels, and scoring, built and extended from the classes we'll cover here. A lot of the logic and effects are particular to Asteroids and will not be covered in the chapter text. However, the code contains copious documentation to take your learning further.
Let's get started.
Quartz 2D paints and draws on a graphics context. The context is essentially the canvas for your game, and you'll need it when calling the various functions in the Quartz 2D API. It's an internal data structure associated with a UIView. Let's create one now. Luckily, you need to do this only once.
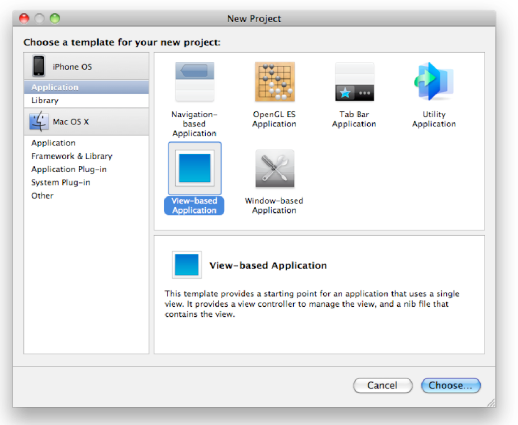
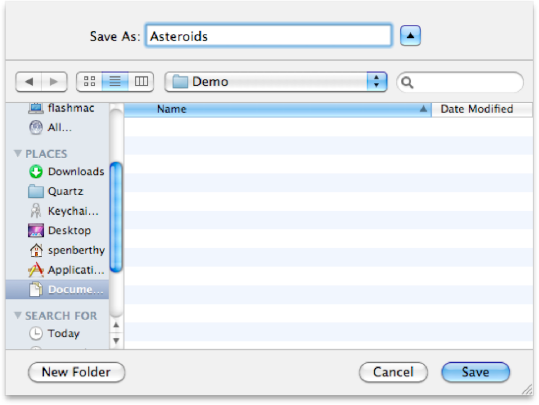
Open Xcode and start a new project. Select View-based Application, as shown in Figure 4-3. Then name the project Asteroids, as shown in Figure 4-4.
Open Asteroid's project settings in Xcode (select Project

Now let's create a UIView subclass to hold our Quartz canvas. Add a new file to the Classes group in Xcode, choosing Cocoa Touch Class, and then selecting UIView as its superclass. Name it AsteroidsView.m, as shown in Figure 4-6. Click Finish. The window shows generated text for Asteroids.m, using your name and company name, as shown in Figure 4-7.


We now have a skeletal class for the main view of our game. We need to connect this view to the default controller, telling the iPhone we want total control over how the view is drawn. To do this, open the Resources group in the Xcode navigator and double-click MainWindow.xib to launch Interface Builder (as you did in Chapter 3), as shown in Figure 4-8.

In Interface Builder, click the MainWindow.xib icons in the upper left, choosing the one with lines in the middle. This will shift to a detailed view that displays the entire name of each object, as seen on the left in Figure 4-9. Double-click the Asteroids View Controller entry to reveal the window on the right of Figure 4-9. Note how the view states that it is loaded from our main controller, AsteroidsViewController.
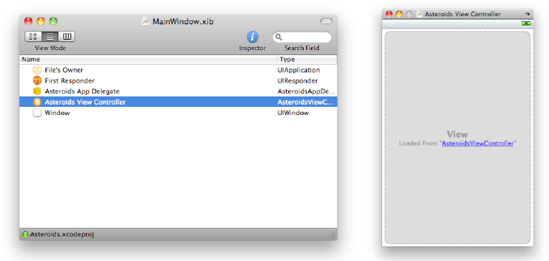
Click the blue underlined text AsteroidsViewController. This will reveal the underlying view object, shown on the left of Figure 4-10. We'll now tell Interface Builder that this view should use AsteroidsView, versus the default UIView. Double-click View to reveal the View window on the right of Figure 4-10.

Click the View window. Carefully press
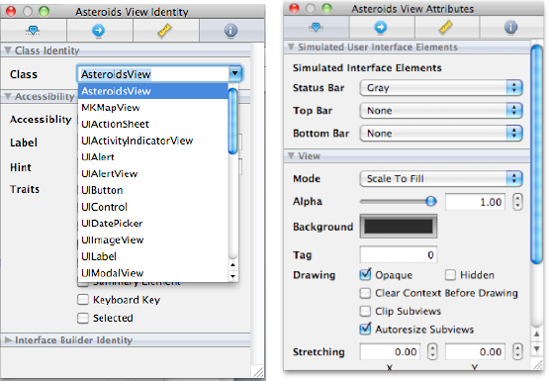
Figure 4.11. Connecting our AsteroidsView class to the main view in Interface Builder, then changing the background color to Licorice (solid black)
Our Asteroids game occurs in space. We'll need a black background. While we're here, let's change that as well. Click the icon in the upper left of the Inspector window—the one that looks like a slider. The window will change to look like the one on the right in Figure 4-11. The current color will be a default gray. Click the color, changing it to Licorice, a solid black color. The view window will also change to black.
Press
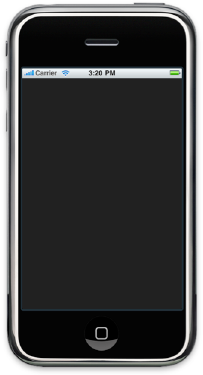
Return to Xcode, and then compile and run Asteroids in the simulator. The simulator should start fine, showing a completely black view, as shown in Figure 4-12. At the top of the view, you'll see a gray status bar. Let's get rid of it.
Navigate to the Resources group again in the Xcode navigator. Click Asteroids-Info.plist, revealing attributes for the application in Xcode's property list editor. Click the very last entry, which will create a plus sign at the end of the row. Now click the plus sign. This will create a new property, prompting you to select from a given list. Navigate this list and choose Status Bar is Initially Hidden. Then click the little check box to the right. You should see a window similar to that in Figure 4-13.

Compile and run your application in Xcode (

At this point, you're probably itching to play with graphics. The steps we just completed set up our main view, connected the view controller to this view, turned off the status bar, and gave us total control over drawing.
Open the AsteroidsView class and change the content of the drawRect method to the following code. This method is called whenever AsteroidsView needs updating.
- (void)drawRect:(CGRect)rect {
// Get a graphics context, saving its state
CGContextRef context = UIGraphicsGetCurrentContext();
CGContextSaveGState(context);
// Reset the transformation
CGAffineTransform t0 = CGContextGetCTM(context);
t0 = CGAffineTransformInvert(t0);
CGContextConcatCTM(context,t0);
// Draw a green rectangle
CGContextBeginPath(context);
CGContextSetRGBFillColor(context, 0,1,0,1);
CGContextAddRect(context, CGRectMake(0,0,100,200));
CGContextClosePath(context);
CGContextDrawPath(context,kCGPathFill);
CGContextRestoreGState(context);
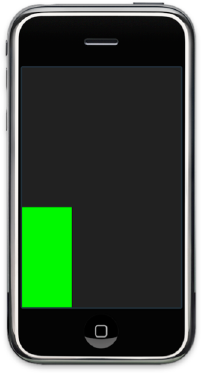
}Save your project and compile. A green rectangle will appear on the canvas, as shown in Figure 4-15. The rectangle is painted at the lower left (0,0), and proceeds 100 units to the right in the x direction and 200 units to the top in the y direction. The rectangle demonstrates the default coordinate system of Quartz 2D. On the iPhone and iPod touch, the x axis extends from 0 to 320 pixels. The y axis extends from 0 to 480 pixels.

Figure 4.15. A 100-by-200 green rectangle painted at (0,0) by Quartz 2D. The default Quartz 2D coordinate system is shown on the right.
The iPhone provides a single call to retrieve the Quartz 2D graphics context during a draw operation:
// Get a graphics context, with no transformations
CGContextRef context = UIGraphicsGetCurrentContext();
All Quartz 2D data structures and API calls have a CG prefix, which stands for Core Graphics. CGContextRef is a pointer to a Quartz data structure for the artist canvas. UIGraphicsGetCurrentContext asks the iPhone for the current view. Unlike with desktop operating systems, there is only one window within the phone, and thus one context.
You can think of the context as a physical canvas. Like a canvas, the context can be moved, rotated, shrunk, and stretched, and then covered in layers of paint. Imagine you are an artist with a large canvas in front of you, perhaps several feet on a side. If you have a complex scene you're trying to paint, you can rotate and move the canvas to make things easier to draw. For example, after you paint birds in the sky, you can move the canvas again, and paint the grass or ocean waves.
So, when you sit down at a canvas, the first thing you need to do is to get your bearings. You may have left it in an odd state the day before, when the birds were being painted. Today, you're painting the ocean. Time to move the canvas.
But first, we need to be good citizens by calling CGContextSaveGState. This remembers the current state of the canvas for us, which we can later restore with a single call to CGContextRestoreGState.
In a large program, multiple classes and artists will be painting on the canvas. As a rule of thumb, we should always leave the canvas in the same state that we found it. With the canvas state stowed away, we can safely move it into place.
Quartz 2D describes the shifts of the canvas with matrix transformations. These are mathematical relationships that tell how to position points in space. In 2D games, we're typically interested in affine transformations. An affine transformation does what you expect in the real world. If you scale or move an object, edges that started straight remain straight. Affine transformations are reversible. If you scale an object down, then scale it back up, it doesn't change. If you move an object from one point to another, then back, it doesn't change.
It's important to follow one simple algorithm whenever drawing with Quartz 2D:
Save the context state.
Perform a single, combined matrix transformation.
Draw your graphics that need this transformation.
Restore the context.
Note
I found that trying to be smart or tricky—combining multiple transformations within a single draw or trying to figure out the math when multiple items need to be on the screen in various scales and rotations—is rarely worth the effort. Once you finally get the math right, your design may change. Worse, looking at the complex code weeks or months later will lead to confusion, making the code brittle.
Let's tell Quartz 2D to put our canvas back in the default or (0,0) position. We do this by asking for the current transformation, a mathematical matrix describing how the canvas was moved from its original location, orientation, and scale. The canvas could be in any state. We then calculate the exact opposite motion, which in mathematics is called the inverse matrix. Finally, we ask Quartz 2D to apply the inverse matrix to the current transformation. Since the transformations are affine, and since all affine transformations are reversible, this will place our canvas back to the default location.
We need three lines of code:
CGAffineTransform t0 = CGContextGetCTM(context);
t0 = CGAffineTransformInvert(t0);
CGContextConcatCTM(context,t0);
CGContextGetCTM returns the graphic context's transformation matrix or CTM, as a matrix data structure. We call CGAffineTransformInvert to create the inverse matrix. We then call CGContextConcatCTM, which will concatenate our new matrix t0 with the existing matrix. Concatenation is the act of multiplying the matrix you supply (t0 in this case) with the current drawing matrix. When any matrix is multiplied by its inverse, we get the identity matrix. The identity matrix restores the canvas to its original, native state, as though no transformations were performed.
Note
More details on matrices and transformations can be found online at http://bit.ly/cmwg7D, a shortened URL to relevant sections of Apple's Quartz 2D Programming Guide.
Let's throw some paint on the canvas. Like any good artist, Quartz 2D likes to paint outlines before it fills in a scene. These outlines are called paths. The following lines of code create a rectangular path (the lines are numbered on the right for clarity).
CGContextBeginPath(context);                                 (1)
CGContextSetRGBFillColor(context, 0,1,0,1);                  (2)
CGContextAddRect(context, CGRectMake(0,0,100,200));          (3)
CGContextClosePath(context);                                 (4)
As before, the API functions begin with the letters CG. Most calls require the graphics context, which we went through great pains to create. CGContextBeginPath, on line 1, starts a fresh, new path in Quartz 2D. The Quartz 2D engine is like an artist with just one pair of hands. At any time, only one path is being created.
CGContextSetRGBFillColor, on line 2, specifies the color we would like to use in our path. Colors in Quartz 2D are specified in three unit values—a floating-point number between 0 and 1—for each of red, green, and blue. A value of 0 means to use no color for the given color component, 0.5 means to use 50% of that color, and 1.0 means to use 100% of the color. A fourth unit value represents the opacity, where 0 means the graphic is invisible, 0.5 means make the graphic 50% transparent, and 1 means the graphic is completely opaque. Quartz has numerous, powerful ways to combine these colors for interesting effects. For now, we'll use the default, which just adds the components together to create a single green, completely opaque color:
(0 x red) + (1.0 x green) + (0.0 x blue) at an opacity of 1.0
CGContextAddRect, on line 3, adds a single rectangle to the current path. We describe our rectangle using the CGRectMake macro. The macro is passed an origin (0,0), a width (100), and a height (200).
CGContextClosePath, on line 4, tells Quartz 2D that we're finished with the current path, and ready to paint with it on the canvas. The following call tells Quartz to take the current path, fill it in with the current color, and add it to the canvas. The first argument is the context. The second argument is a drawing mode, one of several available.
CGContextDrawPath(context,kCGPathFill);
Finally, being good citizens, we restore the state of the canvas with a single call:
CGContextRestoreGState(context);
Our Quartz 2D API calls for drawing the green rectangle can be generalized, then reused for all kinds of graphical items on the screen. Instead of hard-coding the location, size, and attributes of our rectangle, we create a class to store these values as instance variables. As noted earlier in the chapter, the common name used in the industry for an object that comes alive is the sprite.
Let's create a new class, Sprite, as a subclass of NSObject. Add a new file to the Classes group in Xcode, naming it Sprite. Replace the default @interface definition in Sprite.h to that shown in Listing 4-1.
Example 4.1. The Sprite interface in Sprite.h
@interface Sprite : NSObject {
                CGFloat x;                       // x location
                CGFloat y;                       // y location
                CGFloat r;                       // red tint
                CGFloat g;                       // green tint
                CGFloat b;                       // blue tint
                CGFloat alpha;                   // alpha value, for transparency
                CGFloat speed;                   // speed of movement in pixels/frame
                CGFloat angle;                   // angle of movement in degrees
                CGFloat rotation;                // rotation of our sprite in degrees, about the center
                CGFloat width;                   // width of sprite in pixels
                CGFloat height;                  // height of sprite in pixels
                CGFloat scale;                   // uniform scaling factor for size
                int frame;                       // for animation

                CGFloat cosTheta;                // precomputed for speed
                CGFloat sinTheta;
                CGRect box;                      // our bounding box

                BOOL render;                     // true when we're rendering
                BOOL offScreen;                  // true when we're off the screen
                BOOL wrap;                       // true if you want the motion to wrap on the screen
}

@property (assign) BOOL wrap, render, offScreen;
@property (assign) CGFloat x, y, r, g, b, alpha;
@property (assign) CGFloat speed, angle, rotation;
@property (assign) CGFloat width, height, scale;
@property (assign) CGRect box;
@property (assign) int frame;
The Sprite class captures the 2D geometry and color of a graphic that we would like to place on the iPhone. x and y capture the desired location of our graphic on the screen. The variables r, g, b, and alpha capture the Quartz 2D color and transparency (floating-point values ranging from 0.0 to 1.0, as described earlier).
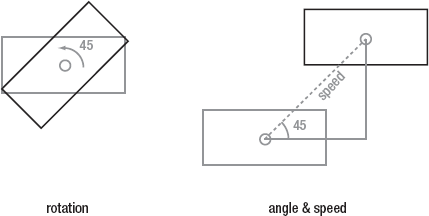
We store two different angles for each sprite. Figure 4-16 demonstrates these two angles on a rectangle. The original or starting position is shown in thinner gray lines, and the modified position is shown with thicker black lines.
rotation captures the number of degrees we've rotated our object (about its center). We follow standard geometry, where increasing angles represent counterclockwise rotations. An angle of 0 means no rotation. A 90-degree rotation turns the graphic counterclockwise a quarter turn. A 180-degree rotation turns the graphic counterclockwise a half turn. A 360-degree rotation is a complete spin, back to the original orientation. Figure 4-16 shows a rectangle rotated 45 degrees.
Quartz 2D uses radians to measure angles. You might recall that a 360-degree circle is equal to 2π radians and that π is approximately 3.1415926. Let's add convenience functions to the sprite, so that we can work in degrees, while the math is stored natively inside the sprite. We do this by overriding the default methods for getting and setting the rotation instance variable, as shown in Listing 4-2.
Example 4.2. Convenience functions for working in degrees vs. radians
- (void) setRotation: (CGFloat) degrees
{
        rotation = degrees*3.141592/180.0;
}

- (CGFloat) rotation:
{
        return  rotation*180.0/3.141592;
}

- (void) setAngle: (CGFloat) degrees
{
        rotation = degrees*3.141592/180.0;
        cosTheta = cos(rotation);
        sinTheta = sin(rotation);
}

- (CGFloat) angle:
{
        return  rotation*180.0/3.141592;
}
angle describes movement of sprites on the canvas. An angle of 0 represents a straight movement to the right, parallel to the x axis. An angle of 90 is straight up and parallel to the y axis, 180 is to the left, and 270 is straight down. Figure 4-16 shows a rectangle that has a movement angle of 45 degrees. The amount a sprite moves during each tic of the game loop is represented as its speed.
Two variables save processing time during the update cycle of a game loop. costheta stores the cosine of the movement angle, and sintheta stores the sine of the movement angle. These trigonometry functions are expensive and best computed once, when the angle of movement changes.
box stores the bounding box for our sprite. A bounding box is the smallest rectangle that completely covers all parts of our sprite, rotated if necessary. Games use these all the time to determine whether two sprites might collide. In Asteroids, we'll use the bounding box of rocks and bullets to determine when a rock should explode. The bounding box for our ship is compared against the bounding box for rocks to determine if our ship should die. Figure 4-17 shows the bounding box for a rock and ship at different rotations.

scale tells us how big to draw the sprite. A scale of 1.0 means to draw it at default size, 0.5 at half the size, 4.0 at four times the size, and so on. width and height capture the dimensions of our sprite, before any rotations or scaling are done.
We keep three Boolean switches for every sprite: render, offscreen, and wrap. render determines whether our sprite should be drawn on the screen. This is a handy switch for taking sprites on and off the canvas. This can be useful for things like space aliens that suddenly appear, pop-up menus, destroyed rocks, and alert messages. offscreen records whether the sprite has moved out of sight. In the Asteroids game, an off-screen bullet just disappears, assuming it continues to fire off into the ether. wrap tells the update loop what to do when a sprite goes off the screen. Rocks don't disappear. They come back to haunt the main ship, wrapping around the screen. Your ship doesn't disappear, either. As you thrust across the screen, your ship wraps from one side to the next.
Finally, we keep an integer value frame to represent the current "frame" for the sprite's own movie. Some sprites are composed of multiple images or drawings, one for each frame of a small animation. This enables a sprite to appear to walk, emit fire, and so on.
It's time to put our Sprite class to work. Open the Sprite.m file in Xcode. Quartz likes to generate paths first, before filling them in. Add the following outlinePath: method to the Sprite class:
- (void) outlinePath: (CGContextRef) context
{
        // By default, just draw our box outline, assuming our center is at (0,0)

        CGFloat w2 = box.size.width*0.5;
        CGFloat h2 = box.size.height*0.5;

        CGContextBeginPath(context);
        CGContextMoveToPoint(context, -w2, h2);
        CGContextAddLineToPoint(context, w2, h2);
        CGContextAddLineToPoint(context, w2, -h2);
        CGContextAddLineToPoint(context, -w2, -h2);
        CGContextAddLineToPoint(context, -w2, h2);
        CGContextClosePath(context);
}
We use two new Quartz 2D functions: CGContextMoveToPoint and CGContextAddLineToPoint. Paths in Quartz 2D have the notion of the "current point" for sketching. The CGContextMoveToPoint function moves the current point to an (x,y) location, shown here as (-w2,-h2), where w2 is half the width of the bounding box and h2 is half the height. The CGContextAddLineToPoint function tells Quartz 2D to draw a line from the current point to a new (x,y) location, moving the current point to (x,y) as well. We make four such calls, drawing a rectangle centered at the origin, as shown in Figure 4-18.

The outline path is the shape of the sprite's bounding box. It doesn't yet have the scale, rotation, or location information. Transformations do the math for us. We'll add color later, too. We do this in two steps, one draw method to set up the canvas and current color, invoking a second drawBody to do the actual drawing. First, let's add the method for drawBody, which will fill the path with our chosen r,g,b color and transparency alpha:
- (void) drawBody: (CGContextRef) context
{
        CGContextSetRGBFillColor(context, r, g, b, alpha);
        [self outlinePath: (context)];
        CGContextDrawPath(context,kCGPathFill);
}
This method uses the outline path and the Quartz 2D call CGContextDrawPath to fill it with the current color, just as we did with our green rectangle. Add just one more method to the Sprite class, draw:
- (void) draw: (CGContextRef) context
{
        CGContextSaveGState(context);

        // Position the sprite
        CGAffineTransform t = CGAffineTransformIdentity;
        t = CGAffineTransformTranslate(t,x,y);
        t = CGAffineTransformRotate(t,rotation);
        t = CGAffineTransformScale(t,scale,scale);
        CGContextConcatCTM(context, t);

        // Draw our body
        [self drawBody: context];

        CGContextRestoreGState(context);
}
Here, we encounter a bit of math and some peculiarities with Quartz 2D. Let's walk through it.
We first make a copy of the identity matrix CGAffineTransformIdentity in the local variable t. Think of this as the number 1 in multiplication. If you concatenate (multiply) the current matrix by the identity matrix, it leaves the current transformation unchanged—any number times 1 equals that number.
Next, we pass the matrix t to CGAffineTransformTranslate, creating a new matrix that will translate the canvas x units in the x direction, and our y units in the y direction. Translate is the mathematical term for movement along a given axis. We store the result of this translation back in our matrix t. This technique is called chaining, where we chain together multiple matrix transformations into one.
We chain the matrix t again, calling CGAffineTransformRotate, rotating our canvas by our sprite's rotation.
We chain the matrix one final time, calling CGAffineTransformScale, scaling our canvas by the scale of our sprite. This will ensure that a unit movement (1 pixel on our path) equals the appropriate units on our canvas.
Now here's the peculiar part. Our code executes three transformations in a row: a translation, a rotation, and a scale. The underlying mathematics, however, capture these in reverse order, much like a last-in-first-out stack in computer science. When Quartz applies the transformation matrix to drawing operations, the math essentially applies the transformations in the reverse order that we specified. Thus, our drawing operations will conduct the following transformations, in order:
Scale the drawing by the scale property.
Rotate the drawing by the rotation property.
Translate the drawing to the specified (x,y) location.
We write the code in reverse, first translating (step 3), then rotating (step 2), then scaling (step 3). We've conveniently located our outline path so that it centers at (0,0) of the canvas. In fact, all drawBody methods should center their drawing at (0,0). This way, when the canvas is spun in one direction or another by Quartz, our graphic spins about its center.
Quartz performs the affine transforms of draw as shown in Figure 4-19, correctly positioning the desired graphic on our iPhone screen.

Before we try out our sprite, let's tidy up the Sprite class by adding @synthesize definitions for all these attributes, and changing the init method to use some default values. Change the beginning of your Sprite class definition so that it looks like this, at the top of Sprite.m:
@implementation Sprite
@synthesize x,y,speed,angle,width,height,scale,frame,box,rotation,wrap,render;
@synthesize r,g,b,alpha,offScreen;
Objective-C will create methods that allow us to access sprite attributes with the dot syntax; for example, mySprite.speed becomes shorthand for [mySprite speed].
Next, replace the init method with the code shown in Listing 4-3.
Example 4.3. The Sprite init method, which chooses default values
- (id) init
{
        self = [super init];
        if (self) {
                wrap = NO;
x = y = 0.0;
width = height = 1.0;
scale = 1.0;
speed = 0.0;
angle = 0.0;
rotation = 0;
cosTheta = 1.0;
sinTheta = 0.0;
r = 1.0;
g = 1.0;
b = 1.0;
alpha = 1.0;
offScreen = NO;
box = CGRectMake(0,0,0,0);
frame = 0;
render = YES;
}
return self;
}Now we can see how our sprite works. Return to the definition of the AsteroidsView class. Update the header file (AsteroidsView.h), adding a new Sprite instance variable named test:
#import <UIKit/UIKit.h>
#import "Sprite.h"

@interface AsteroidsView : UIView {
        Sprite *test;
}

@end
Let's change the init routine of AsteroidsView so that we create a single sprite, just like the green rectangle from earlier. Open AsteroidsView.m and add the following initWithCoder method. This is the init method for windows created by Interface Builder.
- (id)initWithCoder: (NSCoder *) coder {
    if (self = [super initWithCoder: coder]) {
                // Initialization code
        test = [[Sprite alloc] init];
        test.x = 50;
        test.y = 100;
        test.width = 100;
        test.height = 200;
        test.r = 0.0;
        test.g = 1.0;
        test.b = 0.0;
    }
    return self;
}
We can use the drawing routines of our Sprite class, ditching the hard-coded routines from earlier. Change the drawRect of our AsteroidsView class in AsteroidsView.m to reflect this (the changes are shown in bold).
- (void)drawRect:(CGRect)rect {
    // Get a graphics context, saving its state
    CGContextRef context = UIGraphicsGetCurrentContext();
    CGContextSaveGState(context);

    // Reset the transformation
    CGAffineTransform t0 = CGContextGetCTM(context);
    t0 = CGAffineTransformInvert(t0);
    CGContextConcatCTM(context,t0);

    // Draw a green rectangle
    [test updateBox];
    [test draw: context];

    CGContextRestoreGState(context);
}
#
Don't forget to clean up after yourself, changing the dealloc method of the AsteroidsView class as follows:
- (void)dealloc {
    [test release];
    [super dealloc];
}
Compile and run AsteroidsView. You should see something familiar if all went well (see Figure 4-20).
It looks like nothing has changed! However, to the contrary, we have significantly more power at our disposal.
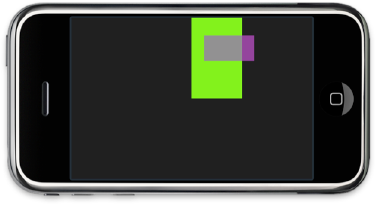
Let's change the drawRect routine of our AsteroidsView class. After the first rectangle is drawn, we'll move the test sprite, rotate it by 90 degrees, change its color to purple, scale it by 50%, and set its alpha transparency to 25%. We draw it a second time, using the sprite like a rubber stamp to produce another rectangle on our screen.
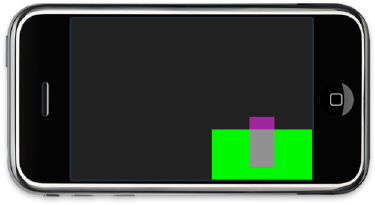
See Listing 4-4 for the new source code of drawRect, and Figure 4-21 for the resulting display. Quartz layers the sprites onto the canvas using the painter's model of 2D graphics. Basically, this means that items are layered in the order they're drawn, like painting with oils on a canvas. The green rectangle is drawn first; the purple, semitransparent purple rectangle is drawn second. You can see the green underneath the purple, creating a combined color.
Example 4.4. An updated drawRect routine
- (void)drawRect:(CGRect)rect {
    // Get a graphics context, saving its state
    CGContextRef context = UIGraphicsGetCurrentContext();
    CGContextSaveGState(context);

    // Reset the transformation
    CGAffineTransform t0 = CGContextGetCTM(context);
    t0 = CGAffineTransformInvert(t0);
    CGContextConcatCTM(context,t0);

    // Draw a green rectangle
    [test updateBox];
    [test draw: context];

    // Draw it again, in purple, rotated
    test.x = 75;
    test.y = 100;
    test.r = 1.0;
    test.g = 0.0;
    test.b = 1.0;
    test.alpha = 0.25;
    test.scale = 0.5;
    test.rotation = 90;
    [test updateBox];
    [test draw: context];

    CGContextRestoreGState(context);

}
Our sprites look great in portrait mode, where the screen is vertical. Many games prefer landscape mode, providing a wider area for scrolling backgrounds, card tables, and two thumbs. Asteroids is one such game.
Let's turn our iPhone into a landscape application and see what happens. Make the following change to the applicationDidFinishLaunching method of our AsteroidAppsDelegate class (see the source code in AsteroidAppsDelegate.m):
- (void)applicationDidFinishLaunching:(UIApplication *)application {

        [application setStatusBarOrientation: UIInterfaceOrientationLandscapeRight animated:NO];
        [application setStatusBarHidden:YES animated:NO];
        [window addSubview:viewController.view];
        [window makeKeyAndVisible];
}
We call the setStatusBarOrientation method on our main application, specifying that we want landscape mode. We also make sure the status bar doesn't pop back up, asking that it remain hidden.
Compile and run the Asteroids application. Your screen should look like Figure 4-22.
If you look at this sideways, you'll see that nothing has changed. The green and purple rectangles are drawn as they were before, along the left edge, above the iPhone button. This is not what we want. Instead, we expect to see the green rectangle in the lower left of the display, regardless of orientation. We can fix this with transformations on the Quartz context. We keep the same coordinates for our objects. We turn the virtual canvas to suit our needs.
Replace the draw method in Sprite.m with the following code:
- (void) draw: (CGContextRef) context
{
         CGContextSaveGState(context);

         // Position the sprite
         CGAffineTransform t = CGAffineTransformIdentity;
         t = CGAffineTransformTranslate(t,y,480-x);
         t = CGAffineTransformRotate(t,rotation - 3.141592*0.5);
         t = CGAffineTransformScale(t,scale,scale);
         CGContextConcatCTM(context, t);

         [self drawBody: context];

         CGContextRestoreGState(context);
}
Compile and run the application. Your screen should now look like Figure 4-23.
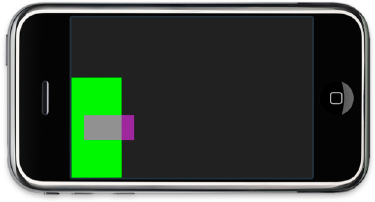
We left the scale the same. That doesn't change when we shift from landscape to portrait mode. We decrease the rotation angle by −90 degrees, to offset the iPhone landscape rotation of +90 degrees. Finally, we reverse the y and x values, offsetting x from 480 to make everything line up.
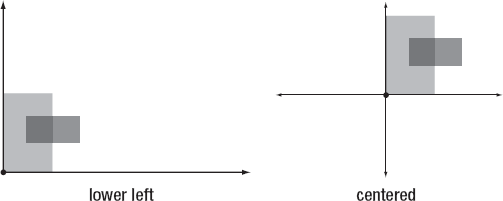
So far, we've been using the lower-left corner of the display as the origin of our game coordinate system. The Asteroids game starts with a ship in the center, fending off rocks and ships that come from all angles. You may find it easier to use a coordinate system where the origin is in the center of the display, with x increasing to the right and y increasing toward the top, as shown in Figure 4-24.
We accomplish this by adjusting our transform. Here is a version of the Sprite draw method that centers the origin in landscape mode:
- (void) draw: (CGContextRef) context
{
        CGContextSaveGState(context);

        // Position the sprite
        CGAffineTransform t = CGAffineTransformIdentity;
        t = CGAffineTransformTranslate(t,y+160,240-x);
        t = CGAffineTransformRotate(t,rotation - 3.141592*0.5);
        t = CGAffineTransformScale(t,scale,scale);
        CGContextConcatCTM(context, t);

        [self drawBody: context];
        CGContextRestoreGState(context);
}
Change the draw method in Sprite.m, recompile, and run the application. You'll see the rectangles shift to the center, as indicated by the "centered" coordinate system in Figure 4-24. A sample output is shown in Figure 4-25.

If this seems confusing, don't worry. It is! We just have to get it right once, add the transforms to our core Sprite class, and then forget about it. I usually add methods to my game controller to sense the device orientation, as follows:
UIDeviceOrientation orient = [[UIDevice currentDevice] orientation];
The value of orient will be one of the following:
UIDeviceOrientationUnknown: Unknown, assume no rotationUIDeviceOrientationPortrait: No rotationUIDeviceOrientationPortraitUpsideDown: 180 degree rotationUIDeviceOrientationLandscapeLeft: 90 degree rotationUIDeviceOrientationLandscapeRight: −90 degree rotationUIDeviceOrientationFaceUp: Unknown rotationUIDeviceOrientationFaceDown: Unknown rotation
Good interface designs are simple and intuitive. I recommend that you only use two orientations for drawing, the ones included in this chapter: portrait and landscape right. It's up to you whether to place the origin at the lower left or use the center. I prefer the center. The math is cleaner in code.
If you have made it this far, congratulations! The bulk of the math is behind us. We'll now look at three subclasses of Sprite: one for vector art, another for images, and a third for text.
Our green and purple rectangles can also be called vector art. In fact, a popular display at the Museum of Modern Art in New York City shows just that: large green, purple, and red rectangles. It's an acquired taste.
Vector art uses the drawing routines of Quartz 2D to draw lines, curves, and polygons. These shapes can be filled with color using other Quartz 2D API calls. Vector art scales nicely, producing smooth edges and curves regardless of the scale.
Figure 4-26 shows vector art for a spaceship suitable for Asteroids. Let's figure out how to make these come alive with a new class, VectorSprite. We'll keep the drawings simple to focus on the use of Quartz 2D.

Return to your Asteroids project in Xcode. Create a new class named VectorSprite as a subclass of NSObject (see Figure 4-27), placing it in the Classes group.

Change the contents of VectorSprite.h to the following:
#import <Foundation/Foundation.h>
#include "Sprite.h"

@interface VectorSprite : Sprite {
        CGFloat *points;
        int count;
        CGFloat vectorScale;7
}
@property (assign) int count; @property (assign) CGFloat vectorScale; @property (assign) CGFloat *points; + (VectorSprite *) withPoints: (CGFloat *) rawPoints count: (int) count; - (void) updateSize; @end
The VectorSprite class is a subclass of the Sprite class we just created. It will inherit the drawing operations, transformations, and all those nifty parameters to describe how a sprite moves and positions itself in space.
We add a few new instance variables to capture the vector art:
CGFloat *points;
int count;
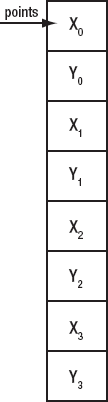
We're going to assume that art is quite simple—just a set of connected lines in 2D that form one polygon. The points variable is an array of floating-point values, stored in a compact array in memory. The edges of our line segments are stored in order, (x0, y0), (x1, y1), ..., , (xn, yn) for all n points. The integer count records the number of point pairs. Figure 4-28 shows an example of how points are laid out in memory with a count of 4.
We then make points an assignable property rather than a retained property, assuming someone else will worry about managing their memory usage:
@property (assign) CGFloat *points;
@property (assign) int count;
Why? We could have dozens of sprites that all share the same design. There's no sense duplicating this data and wasting precious memory on the iPhone.
We can vary the size of the art by paying attention to the scale property in our parent Sprite class. This introduces the last instance variable, vectorScale. Often, we'll want art to get small or large, but keep the lines the same size. Think of multiple rocks within an Asteroids game, floating in space, all of various sizes. If we relied on the canvas to scale our art, the line thickness would scale just as well. Multiplying the size of our art by five would produce lines that are five times thicker! That's clearly not what we want. To keep our interface clean, we'll override the default scale routines in Sprite. Let's do that now.
Add the setScale and updateSize methods shown in Listing 4-5 to the VectorSprite class in VectorSprite.m. The first of these overrides the dot-method for size in Sprite. We intercept the attempt to change the native size. We store the value in vectorScale instead, calling an updateSize routine to figure out our sprite's new width and height.
Example 4.5. Overriding changes to scale in VectorSprite.m
@synthesize points, count, vectorScale;

- (void) setScale: (CGFloat) s
{
        self.vectorScale = s;
        scale = 1.0;
        [self updateSize];
}

- (void) updateSize
{
CGFloat w,h,minX,minY,maxX,maxY;
w = h;
minX = minY = maxX = maxY = 0.0;
for (int i=0; i < count; i++) {
CGFloat x1 = points[i*2]*vectorScale;
CGFloat y1 = points[i*2+1]*vectorScale;
if (x1 < minX) minX = x1;
if (x1 > maxX) maxX = x1;
if (y1 < minY) minY = y1;
if (y1 > maxY) maxY = y1;
}
width = ceil(maxX - minX);
height = ceil(maxY - minY);
}
Every vector sprite will need a set of points, and these are often shared. Let's create a class-wide method that will take a constant array of points and return a VectorSprite that uses them. Add the following withPoints:count: method to the VectorSprite class in VectorSprite.m:
+ (VectorSprite *) withPoints: (CGFloat *) rawPoints count: (int) count
{
        VectorSprite *v = [[VectorSprite alloc] init];
        v.count = count;
        v.points = rawPoints;
        v.vectorScale = 1.0;
[v updateSize];
return v;
}With a set of points, scale, width and height, we're ready to draw something on the screen. We'll replace the default Sprite method for creating a path with our own. Add the following outlinePath method to the VectorSprite class in VectorSprite.m:
- (void) outlinePath: (CGContextRef) context
{
        CGContextBeginPath(context);
        CGContextSetRGBStrokeColor(context, r, g, b, alpha);
        for (int i=0; i < count; i++) {
                CGFloat x1 = points[i*2]*vectorScale;
                CGFloat y1 = points[i*2+1]*vectorScale;
                if (i == 0) {
                        CGContextMoveToPoint(context, x1, y1);
                }
                else {
                        CGContextAddLineToPoint(context, x1, y1);
                }
        }

        CGContextClosePath(context);
}
You've seen these Quartz 2D API calls before, when we created our green and purple rectangles. This time, we're generalizing our code to use an arbitrary set of points, connecting them together into a single polygon, and then filling them as before. It's time to test it.
Open the definition for our view, AsteroidsView.m. Make sure to import the definition for our newly created VectorSprite class, and then change the initWithCoder routine to use a VectorSprite instead of the default Sprite. Leave everything else unchanged. Remember that our VectorSprite is a subclass of Sprite, and should behave just as our rectangles did. All we've done is change how the sprite is stored and how its outline is drawn. See Listing 4-6 for the changes to the top of AsteroidsView.m.
Example 4.6. A revised AsteroidsView class that uses a VectorSprite to draw rectangles
#import "AsteroidsView.h"
#import "VectorSprite.h"

@implementation AsteroidsView

#define kVectorArtCount 4
static CGFloat kVectorArt[] = {
       −50,100,  50,100,  50,−100,  −50,−100,
};

- (id) initWithCoder: (NSCoder *) coder {
        if (self = [super initWithCoder: coder]) {
                test = [VectorSprite withPoints: kVectorArt count: kVectorArtCount];
test.scale = 1.0;
test.x = 50;
test.y = 100;
test.r = 0.0;
test.g = 1.0;
test.b = 0.0;
test.alpha = 1.0;
}
return self;
}With these changes, you should see our familiar rectangles in the centered coordinate system, as shown in Figure 4-29.
The rectangles display as before. We've moved the hard-coded points into an external array of data. Note how the data is arranged so that the VectorSprite points are centered at (0,0). We have specified the first point as (−50,100), or the upper left of our green rectangle, centered at (0,0). The second point is (50,100), moving to the right on the x axis, but staying at the top of the y. We drop down to the lower right (50,−100), and then back to the lower left (−50,−100). Quartz 2D closes the path for us.
The data for every shape in our game must be centered at (0,0). This enables us to share common matrix transformations with all sprites. We use the x, y, rotation, and scale attributes to position them on the display. We do not use points for this. Instead, the points are like a Quartz 2D path—a generalized version of the vector art that we can reposition, scale, and rotate to our heart's content.
Let's put our first pair of asteroids on the screen. Change the points in the kVectorArt array to the following, then compile. You should see two asteroids in place of the rectangles, as shown in Figure 4-30.
#define kVectorArtCount 12
static CGFloat kVectorArt[] = {
        −7,12, 1,9, 8,12, 15,5, 8,3, 15,−4, 8,−12,
        −3,−10, −6,−12, −14,−7, −10,0, −14,5
};
The source code for Asteroids (in asteroids.tar.gz) demonstrates other tricks you can do with a VectorSprite. Here, we've used a simple, solid fill color. The Asteroids code includes a gradient fill, outlining the objects in white. I'll spare you the details of creating a gradient, which is the subject of a more advanced book on Quartz 2D. Instead, let's peek at the drawBody method for VectorSprite within the full Asteroids game:
- (void) drawBody:(CGContextRef)context
{
        [self outlinePath: context];                          (1)
        CGContextDrawPath(context,kCGPathFillStroke);

        [self outlinePath: context];                          (2)
        CGContextClip(context);                               (3)
        [self gradientFill: context];                         (4)
}
As labeled in the listing, this code works as follows:
We draw the outline path, but tell Quartz 2D to just fill the stroke of the path. Think of the stroke as a pen, following along the points of the path.
We create another copy of the outline path.
We turn the current path into a clipping region. Once a clipping region has been set in Quartz 2D, all subsequent draw operations are clipped if they fall outside the path area. Clipping cuts off a drawing at the edges of the path.
We call a routine to draw a large splotch of gradient color. This gives rocks with a bit more texture, as shown in Figure 4-31.

A production game will use more elaborate vector graphics—potentially multiple polygons in several colors, each with a particular shading technique. Still, the basic design is the same as the one shown here. VectorSprite instances are subclasses of Sprite, referring to a set of shared data points.
Some art can be quite complicated, with hundreds of polygons and dozens of layers, plus shading effects like dropped shadows, gradients, and blends. Drawing these 30 times a second in Quartz 2D is just not possible. In these cases, we need to use bitmap images for our sprites. We'll cover that next.
Note
In Chapters 6 through 8, Ben Smith will introduce OpenGL, a layer in the iPhone beneath Quartz 2D, closer to the metal of the graphics processor. OpenGL is happy to draw polygons with hundreds of points at game speed.
Over two centuries ago, flipbook animations were an inspiration for the original motion picture. Figure 4-32 contains two flipbooks, where the individual pages are laid out in a grid. The animation on the left mimics what we're doing here – app construction. It depicts a construction worker walking in four different directions, one direction per row. Let's call him Mario. The flipbook on the right shows a two-frame animation for buttons in our Asteroids app: a thrust button, a button for rotating left, a button for rotating right, and a final button for firing missiles. Since buttons can get a tad dull, we'll instead create a small diversion and make Mario come alive. We'll have him walk about our screen, as if on break from hours of coding. The Asteroids game we review at the end of the chapter will animate the buttons, a simpler version of what we'll now describe.
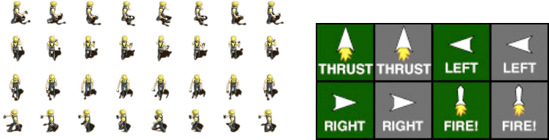
Let's first dispense with some basic terminology common to all games. A single image that contains multiple frames of an animation is called a sprite atlas. The simplest atlas uses a fixed size for each frame, arranging them neatly into rows and columns. Frames are numbered from 0 at the upper left, reading from left to right, and then down the atlas, as shown in Figure 4-32 and illustrated in Figure 4-33.

Time to cut some code.
Return to the Asteroids project in Xcode. Create a new file in the Classes group, a subclass of NSObject. Call it AtlasSprite.m, as shown in Figure 4-34.

Replace the contents of AtlasSprite.h with the class definition shown in Listing 4-7.
Example 4.7. The AtlasSprite class definition in AtlasSprite.h
#import <Foundation/Foundation.h>
#import "Sprite.h"

@interface AtlasSprite : Sprite {
        CGFloat w2;                   // half width, for caching
        CGFloat h2;                   // half height, for caching
        CGFloat atlasWidth;           // as it says
        CGFloat atlasHeight;
        UIImage *atlas;               // atlas containing all images of this sprite
        CGImageRef image;             // a Quartz reference to the image
        CGRect clipRect;              // a clip rectangle
        int rows;                     // how many rows are in the atlas
        int columns;                  // how many columns are in the atlas
}

@property (assign) CGFloat w2, h2, atlasWidth, atlasHeight;
@property (assign) CGRect clipRect;
@property (assign) int rows, columns;
@property (retain, nonatomic) UIImage *atlas;
@property (assign) CGImageRef image;

+ (AtlasSprite *) fromFile: (NSString *) fname withRows: (int) rows withColumns: (int) columns;
+ (NSMutableDictionary *) sharedSpriteAtlas;
+ (UIImage *) getSpriteAtlas: (NSString *) name;

@end
Here, you see a few new items from Quartz 2D. CGImageRef is a pointer to an internal structure in Quartz that holds all the display information for an image. You used UIImage in the previous chapter, where images were created in Interface Builder. We'll be using UIImage to quickly read from a file, digging inside the structure to pull out a CGImageRef.
We'll build a convenience function at the class level, fromfile:withRows:withColumns, for building an atlas sprite from a single image. This method will take an input file name, plus the number of rows and columns in the sprite image. The class figures out all the rest.
The class will assume that a single image is shared by multiple sprites, much like the VectorSprite class assumed vector data was shared.
Open the AtlasSprite.m file. We'll create a shared dictionary to store all the images needed by our sprites. Add the following methods to the AtlasSprite implementation, plus the Objective-C directives to expose our data, at the top of AtlasSprite.m.
@implementation AtlasSprite
@synthesize rows,columns;
@synthesize image, atlas, atlasWidth, atlasHeight, clipRect, w2, h2;

+(NSMutableDictionary *) sharedSpriteAtlas
{
        static NSMutableDictionary *sharedSpriteDictionary;
        @synchronized(self)
        {
                if (!sharedSpriteDictionary) {
                        sharedSpriteDictionary = [[NSMutableDictionary alloc] init];
                        return sharedSpriteDictionary;
                }
        }
        return sharedSpriteDictionary;
}
The sharedSpriteAtlas method synchronizes access to a static variable, which we use to store a common NSMutableDictionary. If the dictionary doesn't exist, we create it—once. This is a common technique for implementing singletons, object-oriented-speak for (gasp) global variables.
Now we need a class method to look up an image by its short file name. Add the following method to your AtlasSprite class:
+ (UIImage *) getSpriteAtlas: (NSString *) name
{
        NSMutableDictionary *d = [AtlasSprite sharedSpriteAtlas];
        UIImage *img = [d objectForKey: name];
        if (!img) {
                img = [[UIImage alloc]
                           initWithContentsOfFile: [[NSBundle mainBundle]
                                pathForResource:name ofType:nil]];
                [d setObject: img forKey: name];
        }
        return img;
}
The class method getSpriteAtlas takes a file name as an argument. It first checks whether the file name has an associated UIImage pointer in the shared dictionary. If so, the pointer is returned. If not, the method looks for the file name in the global application bundle, creating a UIImage and storing it in the dictionary, and then returns it. This is referred to as image caching in the previous chapter.
Let's create the main convenience function of our AtlasSprite class:
+ (AtlasSprite *) fromFile: (NSString *) fname withRows: (int) rows withColumns: (int) columns
{
        AtlasSprite *s = [[AtlasSprite alloc] init];
        s.atlas = [[AtlasSprite getSpriteAtlas: fname] retain];
        CGImageRef img = [s.atlas CGImage];
        s.image = img;

        int width = CGImageGetWidth(s.image);
        int height = CGImageGetHeight(s.image);
        if (rows < 1) rows = 1;
        if (columns < 1) columns = 1;
        s.atlasWidth = width;
        s.atlasHeight = height;
        s.rows = rows;
        s.columns = columns;
        s.width = round(width/s.columns);
        s.height = round(height/s.rows);
        s.w2 = s.width*0.5;
        s.h2 = s.height*0.5;
        s.clipRect = CGRectMake(-s.width*0.5,-s.height*0.5,s.width,s.height);
        return s;
}
The first two lines allocate an AtlasSprite and retrieve the atlas image from the shared dictionary. The first bold line sends the CGImage message to the UIImage object, giving us a CGImageRef handle. This is a C structure and cannot receive Objective-C messages. We store it locally.
The next few lines extract the dimensions of the image, using the Quartz methods CGImageGetWidth and CGImageGetHeight. Note that we don't need a context in these API calls, as we did for other Quartz 2D calls. That indicates that we're asking for data or activities that are unaffected by transformations. We want the raw, original size of our image.
After we extract the atlas's width and height, we use a bit of arithmetic to calculate the width and height of a single sprite image. We store these values in the newly created AtlasSprite image. We cache splitting the dimensions in half, as we'll need these values for every draw operation. Pay close attention to this line:
s.clipRect = CGRectMake(-s.width*0.5,-s.height*0.5,s.width,s.height);
Recognize this? We're creating a rectangle, centered at (0,0). The upper left is (-w/2,-h/2) and it extends the full width and height of a single sprite. This rectangle has the same dimensions as the default outline path in our Sprite class, shown in Figure 4-17. We're going to use this rectangle to clip out a section of the sprite atlas. The magic occurs in the drawBody method of AtlasSprite. Add that now to AtlasSprite.m:
- (void) drawBody: (CGContextRef) context
{
        int r0 = floor(frame/columns);
        int c0 = frame-columns*r0;
        CGFloat u = c0*width + w2;                    // (u,v) center of sprite frame
CGFloat v = atlasHeight - (r0*height + h2); // within the atlas
// clip our image from the atlas
CGContextBeginPath(context);
CGContextAddRect(context, clipRect);
CGContextClip(context);
// draw the atlas
CGContextDrawImage(context, CGRectMake(-u,-v,atlasWidth,atlasHeight), image);
}The drawBody method first computes the center of our current frame within the sprite atlas. We label its x coordinate u and its y coordinate v. You'll learn more about (u,v) coordinates in the chapters on OpenGL.
Next, we set up the path centered at (0,0). We tell Quartz that we want to clip everything that falls outside this smaller rectangle.
Finally, we draw the image using CGContextDrawImage. This method expects an image reference, which we have, as well as a rectangle on which to draw the image.
We need to be careful. Quartz will scale the existing image to fit the rectangle. Since we have all the scaling we need in the base Sprite class, we draw the entire sprite atlas at the given width and height. The trick here is to shift the sprite atlas to (-u,-v). That centers the frame we want at (0,0). Figure 4-35 shows this technique for the (u,v) coordinates of frame 16 in the construction worker atlas. The clipping path is also centered at (0,0).

Now for some housekeeping. Change the init method of AtlasSprite to set some default values, and clean up after ourselves in the dealloc method in AtlasSprite.m:
- (id) init
{
        self = [super init];
        if (self) {
                rows = 0.0;
                columns = 0.0;
        }
        return self;
}

- (void) dealloc
{
        [atlas release];
        CGImageRelease(image);
        [super dealloc];
}
The dealloc method introduces CGImageRelease, the Quartz 2D API call for releasing a CGImageRef handle. Images can eat up a lot of memory, so it's important to make sure you allocate and release images carefully. That's all we need for the atlas sprite. Now let's animate one, making Mario run around our iPhone screen.
We'll need to upgrade the base Sprite class, finally using those angle, speed, cosTheta and sinTheta values with simple trigonometry in the tic method (see Listing 4-8). This method will be called with every tick of the game clock. We'll upgrade the bounding box calculations as well, checking whether the sprite has moved off the screen, wrapping it across edges if necessary (also in Listing 4-8).
Example 4.8. Changes to the Sprite class in the Sprite.m file
#define kScreenWidth 320
#define kScreenHeight 480

- (void) updateBox
{
        CGFloat w = width*scale;
        CGFloat h = height*scale;
        CGFloat w2 = w*0.5;
        CGFloat h2 = h*0.5;
        CGPoint origin = box.origin;
        CGSize bsize = box.size;
        CGFloat left = -kScreenHeight*0.5;
        CGFloat right = -left;
        CGFloat top = kScreenWidth*0.5;
        CGFloat bottom = -top;

        offScreen = NO;
        if (wrap) {
                if ((x+w2) < left) x = right + w2;
                else if ((x-w2) > right) x = left - w2;
                else if ((y+h2) < bottom) y = top + h2;
                else if ((y-h2) > top) y = bottom - h2;
        }
else {
offScreen =
((x+w2) < left) ||
((x-w2) > right) ||
((y+h2) < bottom) ||
((y-h2) > top);
}
origin.x = x-w2*scale;
origin.y = y-h2*scale;
bsize.width = w;
bsize.height = h;
box.origin = origin;
box.size = bsize;
}
- (void) tic: (NSTimeInterval) dt
{
if (!render) return;
CGFloat sdt = speed*dt;
x += sdt*cosTheta;
y += sdt*sinTheta;
if (sdt) [self updateBox];
}Note
The updateBox method as shown handles only landscape mode on the iPhone. It's left as an exercise for the reader to upgrade this method for portrait mode or other coordinate systems.
With this code in place, all sprites know how to move themselves. We send the sprite a tic message, along with an interval of time in seconds. The default action advances the x and y position along the angle of motion, and then updates the bounding box for later collision or off-screen detection.
The final changes we need are a timer and an atlas sprite, updating the atlas sprite at each tic, rendering it on screen. We start with Mario at the center, facing right. We choose a random angle and send Mario along his way. When he hits an edge (offscreen becomes true), we calculate the angle back to the center of the screen. We then add a random bounce angle, back in the general direction of the screen center, +/- a few degrees. This logic normally sits in a game controller. We'll cheat for now and make the changes in AsteroidsView.m, as shown in Listing 4-9. We'll also change the background color of our view to white, creating a sense of being "behind the scenes" of our app. Mario will be walking back and forth in this white wasteland.
Example 4.9. Changes to AsteroidsView.m to demonstrate animation with AtlasSprite
#define RANDOM_SEED() srandom(time(NULL))
#define RANDOM_INT(__MIN__, __MAX__) ((__MIN__) + random() % ((__MAX__+1) - (__MIN__)))
// Some constants for our motion
#define kSteps 8
#define kSpeed 300
#define kFPS 20.0
#define kBounce 30
#define kDirForward 0
#define kDirBackward 1
#define kDirUp 2
#define kDirDown 3

// Some Mario walking animations, using frame numbers
static int kForward[] =  {0,1,2,3,4,5,6,7};
static int kUpward[] =   {8,9,10,11,12,13,14,15};
static int kDownward[] = {16,17,18,19,20,21,22,23};
static int kBackward[] = {24,25,26,27,28,29,30,31};

- (id) initWithCoder: (NSCoder *) coder {
        if (self = [super initWithCoder: coder]) {
                test = [AtlasSprite fromFile: @"mario.png" withRows: 4 withColumns: 8];
                test.angle = 0;
                test.speed = kSpeed;
                direction = kDirForward;
                self.backgroundColor = [UIColor whiteColor];
                timer = [NSTimer scheduledTimerWithTimeInterval: 1.0/kFPS
                                                         target:self
                                                         selector:@selector(gameLoop)
                                                         userInfo:nil
                                                         repeats:YES];
        }
        return self;
}

- (void) gameLoop
{
        frame = (frame+1)%kSteps;
        [test tic: 1.0/kFPS];

        // If we run offscreen, head back to the center of the screen
        // +/- kBounce degrees. Pick our new animation using the angle of walk.
        if (test.offScreen) {
                RANDOM_SEED();
                int toCenter = round(atan2(-test.y,-test.x)*180.0/3.141592);
                if (toCenter < 0) toCenter += 360;
                int bounce = (toCenter+RANDOM_INT(-kBounce,kBounce))%360;
                if (bounce <= 60 || bounce >= 300) direction = kDirForward;
                else if (bounce > 60 && bounce < 120) direction = kDirUp;
                else if (bounce >= 120 && bounce <= 240) direction = kDirBackward;
                else direction = kDirDown;
                test.angle = bounce;
                test.scale = 0.4+1.6*RANDOM_INT(0,10)/10.0;
                while (test.offScreen) [test tic: 1.0/kFPS];
        }

        // Choose the appropriate frame for our motion.
        switch (direction) {
case kDirForward: test.frame = kForward[frame];
break;
case kDirBackward: test.frame = kBackward[frame]; break;
case kDirUp: test.frame = kUpward[frame]; break;
case kDirDown: test.frame = kDownward[frame]; break;
}
[self setNeedsDisplay]; // We need to be rendered, please.
}
- (void)drawRect:(CGRect)rect {
// Get a graphics context, saving its state
CGContextRef context = UIGraphicsGetCurrentContext();
CGContextSaveGState(context);
// Reset the transformation
CGAffineTransform t0 = CGContextGetCTM(context);
t0 = CGAffineTransformInvert(t0);
CGContextConcatCTM(context,t0);
[test draw: context];
CGContextRestoreGState(context);
}
- (void)dealloc {
[test release];
[timer invalidate];
[super dealloc];
}The code in Listing 4-9 requires a new instance variable, holding the current animation state and frame number. Make the following changes to AsteroidsView.h:
@interface AsteroidsView : UIView {
        Sprite *test;
        NSTimer *timer;
        int frame;
        int direction;
}
The source for the Mario sprite image (mario.jpg) is found in both the asteroids.tar.gz and figures.tar.gz source code for this chapter. You will need to add this to the Resources group in Xcode.
The code describes motion with an array of frame values, tracking the motion name with a state variable, direction. Four such motions are defined:
#define kDirForward 0
#define kDirBackward 1
#define kDirUp 2
#define kDirDown 3

static int kForward[] =  {0,1,2,3,4,5,6,7};
static int kUpward[] =   {8,9,10,11,12,13,14,15};
static int kDownward[] = {16,17,18,19,20,21,22,23};
static int kBackward[] = {24,25,26,27,28,29,30,31};
The forward (kForward) motion starts at frame zero (0), with Mario standing straight. It advances to frame 7,showing Mario walking to the right as he swings his hammer back and forth. The frames are drawn by Reiner "Tiles" Prokein, a generous character animator in Germany with numerous free animations. See http://bit.ly/PzclV for many more.
Reiner has carefully designed the last frame of each animated walk so that it flows seamlessly back to the initial frame (0). We advance frames in the app by incrementing a frame counter, using modulo (%) arithmetic to wrap the number between 0 and kSteps – 1.
frame = (frame+1)%kSteps;
The code also changes Mario's size every time he runs off screen. The size starts at 40% of the sprite size and scales randomly up to 200%. Since this can move him quite a bit, and we don't want the offscreen flag to keep firing, we run a while loop, waiting for him to reappear before continuing:
test.scale = 0.4+1.6*RANDOM_INT(0,10)/10.0;
while (test.offScreen) [test tic: 1.0/kFPS];
The sprite's speed is specified in pixels per second. We want him moving rather quickly, so we set this to 300 pixels per second:
#define kSpeed 300
To summarize, here's what we did in the last several pages:
Created a sprite atlas and stored it in the project's Resources group.
Added
AtlasSpriteas a subclass ofSprite. ThedrawBodymethod extracts the current frame through clipping and translation.Upgraded
Spriteto support motion at every tic, updating the bounding box, setting theoffscreenflag or wrapping around edges.Upgraded
AsteroidsViewby adding a timer, anAtlasSprite, and agameLoopmethod that causes Mario to bounce around the screen.
That gives us Mario, as shown in Figure 4-36!
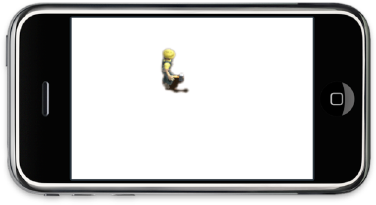
Figure 4.36. Mario walks aimlessly around the iPhone, bouncing off edges and changing size, all courtesy of AtlasSprite and an updated AsteroidsView class.
Atlas sprites are powerful. They pick up where vector sprites fall short. However, sometimes you'll need to display text to the user. Most games have heads-up displays that show the current score, the number of lives or time left, and other critical statistics. Creating all these with atlas sprites is possible yet tedious. Quartz 2D provides a rich set of libraries for drawing text from local fonts. We might as well use it. In the next section, you'll learn how to use Quartz fonts within the sprite framework we've begun to build.
Quartz 2D has rich font support—on the desktop. The iPhone is limited to a small set of preloaded fonts, probably to keep the local storage to a minimum and to stay within tight design constraints. Designers are passionate about fonts. Spend a few minutes Googling for "Comic Sans" to get a taste. The simple font shown in Figure 4-37 seems to drive designers batty, with font-hating groups, t-shirts, and hilarious cartoons that humiliate fans of Comic Sans. Will we ever see Comic Sans on the iPhone? You must be crazy.

I've found it safe to stick with Arial and Helvetica—nice clean fonts without messy serifs at the edges. We'll wrap the Quartz 2D font API in a nice little sprite, enabling us to rotate, scale, colorize, and move the text around on the screen.
Ready? Let's cut some code.
Use Xcode to create a new class, TextSprite, as a subclass of NSObject. Place it in the Classes group as you've done with our other sprite classes. Figure 4-38 should look familiar.

Replace the generated code in TextSprite.h with the following class definition for our TextSprite class:
#import <Foundation/Foundation.h>
#import "Sprite.h"

@interface TextSprite : Sprite {
        NSString *text;
        NSString *font;
        uint fontSize;
        uint textLength;
}

@property (assign) NSString *text;
@property (assign) NSString *font;
@property (assign) uint fontSize;

+ (TextSprite *) withString: (NSString *) label;
- (void) moveUpperLeftTo: (CGPoint) p;
- (void) newText: (NSString *) val;

@end
TextSprite is a subclass of Sprite, as are AtlasSprite and VectorSprite. Here, we store two strings: text will contain the string we want to display, and font will contain the name of the Quartz 2D font we want to use. The iPhone allows the following font names, which I've shown here as NSString constants you can use for the font instance variable:
@"Arial"@"Helvetica"@"Georgia"@"Courier New"@"Marker Felt"@"Times New Roman"@"Trebuchet MS"@"Verdana"@"Zapfino"
TextSprite retains the desired fontSize in points, and caches the number of characters in the current text as textLength. Both of these values are used every time text is rendered, so we cache them to prevent needless calls to the length method of NSString.
We support a convenience class function, TextSprite withString: @"", for creating text sprites directly from an NSString resource. Since the text is often used for heads-up displays, where values change frequently, we supply a newText method for changing the underlying string. Finally, we provide a moveUpperLeftTo: method for positioning the upper-left corner of a text string on the display. All the other sprites were positioned at the center. I find text is easier to grab onto the left edge and move it around in code.
Let's jump to the implementation of the TextSprite class. Open TextSprite.m and replace the generated code with a new init routine and our convenience method for creating text sprites. Here, we'll set some default values.
#import "TextSprite.h"
#define kDefaultFont     @"Helvetica"
#define kDefaultFontSize         14

@implementation TextSprite
@synthesize text, font, fontSize;

- (id) init
{
        self = [super init];
        if (self) {
                font = [kDefaultFont retain];
                fontSize = kDefaultFontSize;
                text = nil;
                width = height = 0.0;
        }
        return self;
}

+ (TextSprite *) withString: (NSString *) label
{
        TextSprite *ts = [[TextSprite alloc] init];
        if (ts) {
                ts.text = [label retain];
        }
        return ts;
}

- (void) newText: (NSString *) val
{
        if (text) [text release];
        text = [val retain];
        width = 0;
        height = 0;
} @end
TextSprite makes a habit of retaining every NSString that it receives, to prevent memory issues in future renderings. The init and withString methods are no different. We make sure to clean this up in the dealloc method, also part of TextSprite.m:
- (void) dealloc
{
        [text release];
        [font release];
        [super dealloc];
}
The newText method appears to be doing something peculiar. After storing a copy of the NSString in the text variable, it sets the width and height of the sprite to zero. The drawBody method of newText watches for a zero width and height, indicating that it needs to step aside and calculate the overall string size and bounding box. These change with every new string or font change. Copy the code from Listing 4-10 and place it in TextSprite.m as well.
Example 4.10. The core routines of the TextSprite class
- (void) computeWidth: (CGContextRef) context
{
        textLength = [text length];

        CGFontRef fref = CGFontCreateWithFontName((CFStringRef) font);
        if (!fref) {
                width=0.0;
                height=0.0;
                printf("Warning: missing font %s
",[font UTF8String]);
                return;
        }
        CGRect bbox = CGFontGetFontBBox(fref);
        int units = CGFontGetUnitsPerEm(fref);

        // Convert from glyph units, multiply by fontSize to get our height
        height = ( ((float) bbox.size.height) / ((float) units)) * fontSize;

        // Draw the text, invisibly, to figure out its width
        CGPoint left = CGContextGetTextPosition(context);
        CGContextSetTextDrawingMode(context, kCGTextInvisible);
        CGContextSetTextMatrix(context, CGAffineTransformIdentity);
        CGContextSelectFont(context,[font UTF8String],
                                   fontSize, kCGEncodingMacRoman);
        CGContextShowText(context, [text UTF8String], textLength);
        CGPoint right = CGContextGetTextPosition(context);
        width = right.x - left.x;

        // Figure out our new bounding box and release
        [self updateBox];
        CGFontRelease(fref);
return;
}
- (void) drawBody: (CGContextRef) context
{
if (!text) return;
if (!width) [self computeWidth: context];
CGContextSelectFont(context, [font UTF8String],
fontSize, kCGEncodingMacRoman);
CGContextSetTextDrawingMode (context, kCGTextFillStroke);
CGContextSetRGBFillColor(context, r,g,b,alpha);
CGContextSetRGBStrokeColor(context,r,g,b,alpha);
CGContextShowTextAtPoint(context, 0,0, [text UTF8String], textLength);
}Recall that drawBody is called whenever a sprite is sent a draw message. TextSprite first checks if it has any text. If not, there's no reason to do anything, so it just returns without affecting the screen. Next, it checks whether the current width is zero. If so, the computeWidth method is invoked for the current context.
You may wonder why we don't calculate the string's dimensions at the time it's changed. The reason is that fonts differ in size based on the context in which they're drawn. Quartz 2D was designed to let us manipulate graphics, images, and fonts without worrying about the underlying hardware or printer. If we really need to know how big something is going to be on a device, we must wait until we have a handle on the context (our canvas).
The computeWidth method is chock-full of Quartz 2D API calls. We first call CGFontCreateWithFontName and hand it a Quartz string (known as a CFStringRef) that represents the name of the font we want to use. Luckily, CFStringRef and NSString use the same data structure. Casting from one to the next is a free operation. The API function gives us a CGFontRef data structure. As with CGImageRef, this is a C structure and cannot receive Objective-C messages.
We first check to see the CGFontRef (fref) is nonzero. This means we have a valid pointer, and Quartz was able to find the font for us. If not, we just print an error. If the font can't be found, the app can't really do anything, so it should exit gracefully. In this case, we just do nothing and print something to the console for debugging.
Assuming that our font reference fref is valid, we call CGFontGetFontBBox, which returns a bounding box that is big enough any character in the font. While some characters are clearly smaller than others (think a period versus a capital W), the bounding box is still useful for determining the maximum height of our string. But there's still a problem.
The CGFont class works in "glyph units." We don't care what they are; we just need to convert them to device units. We do that by first calling CGFontGetUnitsPerEm, which tells us how many of those glyph units are equal to one point. Remember our pointSize? The next line computes the height, multiplying pointSize times the size of a single point in the given font.
Calculating width is more involved. We actually need to draw the font on the screen—invisibly—and watch as Quartz advances its hand. We then measure the distance from when Quartz started and when it finished, giving us the width in device units. Obviously, we want to do this as few times as possible. Quartz 2D draws a font with five steps:
Pick a drawing mode with
CGContextSetTextDrawingModeto know how characters will hit the canvas.Specify any font transformations you want with
CGContextSetTextMatrix.Select a font with
CGContextSelectFont, passing in a font name as anUTF8Stringand the font size as a floating-point value.Optionally, set a stroke color with
CGContextSetRGBStrokeColorand a fill color withCGContextSetRGBFillColor.Display the text, either at the current point with
CGContextShowTextor at a specific point on the canvas withCGContextShowTextAtPoint.
You can see these steps in action, both in computeWidth as we draw the text invisibly, and then again in drawBody. We position the font at (0,0). Quartz 2D draws the string of characters, placing the baseline of the first character at (0,0). This is the imaginary line on which all characters in a string "sit" so that they line up properly. See Figure 4-39 for a description of the various parts of a font.

We can simplify all this fontery by adding another method to our TextSprite class. Add the following to TextSprite.m:
- (void) moveUpperLeftTo: (CGPoint) p
{
        CGPoint p2 = CGPointMake(0,0);
        p2.x = p.x;
        p2.y = p.y + height;
        [self moveTo: p2];
}
That's it for our TextSprite. Let's draw some text.
Open our overworked view, AsteroidsView.m. Assuming you've kept up with this, you should now have a routine that moves Mario around the screen. First, add the following import statement to the top of AsteroidsView.m:
#import "TextView.h"
We're going to leave the drawRect routine in place, but replace the initializer in AsteroidsView.m:
- (id) initWithCoder: (NSCoder *) coder {
        if (self = [super initWithCoder: coder]) {
                         test = [TextSprite withString: @"Hello World!"];
                         test.r = 0;
                         test.g = 1.0;
                         test.b = 1.0;
                         test.x = −85;
                         test.y = −30;
                         test.rotation = 20;
                         [(TextSprite *) test setFontSize: 36];
        }
        return self;
}
The new initWithCoder creates a text sprite, passing in the string "Hello World!". We change its color to cyan, a combination of green (1.0) and blue (1.0). Next, we move the string a bit to the left in the x direction, and then down a bit in the y direction. We rotate the text 20 degrees counterclockwise. Finally, we set the font size to a large 36 points.
Compile and run the result. You should see the bright cyan words "Hello World" in the center of the iPhone, as shown in Figure 4-40. Note how the rotations are different from our earlier sprites. We've written the code to rotate the text from the lower left, along the baseline of the first character. This is typical convention in many graphics programs. A 90-degree rotation is useful for labeling y axes, with the words moving up, from bottom to top. A −90-degree rotation has the words reading from top to bottom.

At this point, we've created basic sprites, vector sprites, atlas sprites, and text sprites. You can see the pattern forming. We create a new subclass of Sprite, adding a few instance variables to track the data we need. We override the outlinePath or drawBody method, drawing our sprite centered at (0,0). We respond to the tic method, taking a time interval and updating our internal model accordingly.
We packed a lot of functionality into the drawRect: method of AsteroidsView that really should be pulled into an outside controller. The data in the view should also be extracted, and kept in a separate model class. As you'll see, many games are just a set of sprites and a shared model, plus a bit of programming for game logic, audio, special effects, and networking—just a tad.
We're now going to leap ahead and move quickly to cover game architecture.
The companion source code for this chapter includes an entire game of Asteroids in asteroids.tar.gz, built from the sprite classes discussed here. We'll now step through the basic game architecture and highlight interesting bits.
Note
This version of Asteroids does include a basic audio system, keying off state changes in a shared model. Audio systems are described by Eric Wing in Chapters 9 through 12.
You saw many of the parts of a game loop in the earlier part of this chapter. The Asteroids code extends it a bit in Figure 4-41, and organizes the work into an MVC design pattern.

When the app first launches, the iPhone invokes the AsteroidsViewController. This class creates the model and controllers, places the phone in landscape mode, creates a timer as we did earlier, and then calls the tic method of the game controller until the app is terminated by a user. Here's the complete source of its gameLoop method:
- (void)gameLoop
{
         // we use our own autorelease pool so that we can control when garbage gets collected
         NSAutoreleasePool * apool = [[NSAutoreleasePool alloc] init];

         self.timeSinceLevelStart = [levelStartTime timeIntervalSinceNow];
         self.deltaTime =  lastFrameStartTime - timeSinceLevelStart;
         self.lastFrameStartTime = timeSinceLevelStart;

         [game tic: self.deltaTime];

         [apool release];
}
As shown in Figure 4-41, the primary purpose of AsteroidsViewController is to run the tic loop. All of the sprites and game state are stored in AsteroidsModel, a class that really doesn't do much other than keep things in one place. I like to treat the model as a database of sorts. I may occasionally add routines to this, much like someone would add stored procedures to a database, when accessing local data is much faster and cleaner than doing it "over the wire" to an external class.
Let's take a peek inside a real game model. Here's the complete interface definition of AsteroidsModel:
@interface AsteroidsModel : NSObject {
        NSMutableArray *rocks;
        NSMutableArray *bullets;
        NSMutableArray *deadSprites;
        NSMutableArray *newSprites;
        NSMutableDictionary *fingers;
        Sprite *ship;
        Sprite *saucer;

        AtlasSprite *thrust;
        AtlasSprite *left;
        AtlasSprite *right;
        AtlasSprite *fire;
        TextSprite *status;
        TextSprite *lives;

        NSMutableDictionary *state;
        int lastBullet;
        CGFloat time;
}
The mutable arrays store all rocks and bullets that fly around the screen. We also synchronize the addition or creation of sprites. During a single tic, sprites may die and sprites may be born. We push all new sprites into one array and all dead sprites into another. After the rendering is complete, we clean up the sprite lists in the persist cycle, before the next tic occurs.
The model points to several atlas sprites, which are used as buttons in the interface. Two text sprites form the heads-up display: one to show our score and status, and another to show the number of lives left.
What I find most useful is the central dictionary, state. Two convenience methods are defined and used throughout the game:
+ (int) getState: (NSString *) indicator
{
        AsteroidsModel *game = [AsteroidsModel sharedModel];
        if (game.state == nil) game.state = [[NSMutableDictionary alloc] init];
        NSNumber *n = [game.state objectForKey: indicator];
        if (n) {
               return [n intValue];
        }
        return kUnknown;
}

+ (void) setState: (NSString *) indicator to: (int) val
{
        AsteroidsModel *game = [AsteroidsModel sharedModel];
        if (game.state == nil) game.state = [[NSMutableDictionary alloc] init];
        NSNumber *n = [NSNumber numberWithInt: val];
        [game.state setObject: n forKey: indicator];
}
The various controllers and views can get any information about the game by referring to these methods. This forms the heart of the persist step, for keeping information in between tic cycles. We define several constants for the state variable names, and also use constants for their values. This helps us by letting the compiler catch state errors, where we're using an unknown value for some state variable.
For example, we use the following constants to track the major state of the game:
#define kGameState                @"gameState"
#define kGameStatePlay            0
#define kGameStateLevel           1
#define kGameStateNewLife         2
#define kGameStateDone            3
Other classes can query the game state with this call:
uint state = [AsteroidsModel getState: kGameState];
They change the state value with another call:
uint state = [AsteroidsModel setState: kGameState to: kGameStatePlay];
Following in this convention, we also keep a list of the current finger state in an array of Fingers. This doesn't have much to do with Quartz graphics, so we won't go into the details here. Suffice it to say that we keep the current location of fingers on the display. During an update cycle, the game controller tests whether these finger points intersect with the atlas sprite buttons. If they do, their frame is changed.
Remember how we kept changing AsteroidsView to demonstrate each new sprite that we created? In a real game, the view should be kept nice and clean. Though this game was put together rather quickly (and therefore could use some optimization), here's the entire interface:
@interface AsteroidsView : UIView {
        AsteroidsModel *model;
        BOOL ready;
}
The ready flag is used to delay display until the game and audio controllers are running. The view maintains a reference to the common, underlying model, AsteroidsModel. The model will hold the position of all our elements, their colors, and so forth with Sprite instances. Our view will sift through the items and figure out how to display them quickly on the phone. For this simple application, we need only a single drawRect method:
- (void)drawRect: (CGRect)rect {
        if (!ready) return;

        // Get a graphics context, with no transformations
        CGContextRef context = UIGraphicsGetCurrentContext();           (1)
        CGContextSaveGState(context);
        CGAffineTransform t0 = CGContextGetCTM(context);                (2)
        t0 = CGAffineTransformInvert(t0);
        CGContextConcatCTM(context,t0);

        [model.status draw: context];                                   (3)
        [model.lives draw: context];

        // Draw
        if (![AsteroidsModel getState: kGameOver]) {
                [[model myShip] draw: context];
        }

        NSMutableArray *rocks = [model rocks];
        for (Sprite *rock in rocks) {
                [rock draw: context];
        }

        NSMutableArray *bullets = [model bullets];
        for (Sprite *bullet in bullets) {
                [bullet draw: context];
        }

        [model.left draw: context];
        [model.right draw: context];
        [model.thrust draw: context];
        [model.fire draw: context];

        CGContextRestoreGState(context);                                (4)

}
Other than the typical initialization and teardown routines, this is the bulk of AsteroidsView. It should look familiar. We grab the context (1) and save its state for later. We reset the transformation (2). We call the draw method of all our items (3). Finally, we restore the context state (4).
As the number of sprites grows, you may find your application bogging down. The clean abstractions we've introduced here are common in object-oriented programming. Each sprite sets up its own transformations, displays itself, returning control to the view for the next item. At scale, this can get expensive. Each change to the transformations, colors, and so on requires a context switch within the rendering chips on the phone. These switches are expensive, slowing down the graphics pipeline.
Production applications are not as pretty. The views often optimize the display loop, combining multiple operations into one, minimizing the number of calls into the graphics chip. These techniques are called pipeline optimization. Although we won't go into the details of these techniques here, just remember that when you find yourself needing to break the sprite abstraction, or feeling like you need to bunch things together for speed, have no fear—this is typical.
Let's move on to the heart of our game, the game controller.
Practically all of the game logic for Asteroids is kept in a single class, GameController. Yet the MVC design pattern allows us to keep a clean structure. Here is the interface definition:
@interface GameController : NSObject {
        AsteroidsModel *model;
        AsteroidsView *view;
        AudioController *audio;
        BOOL start;
        int restartDelay;
}
You've seen AsteroidsModel and AsteroidsView. We'll save AudioController for later in the book. The Boolean, start, is a flag to let us know if this is the very first tic, so that we can initialize our model state. The integer restartDelay is a countdown timer. When a life or level ends, the game controller sets this variable to a set number of frames. As long as the restartDelay is nonzero, the game controller will ignore the buttons and keep the ship hidden from view.
Let's take a look at how GameController starts up and handles the tic message:
- (id) initWithView: (AsteroidsView *) theView
{
        self = [super init];
        if (self) {
                AsteroidsModel *m = [AsteroidsModel sharedModel];
                self.audio = [[AudioController alloc] init];
                self.model = m;
                self.view = theView;
self.start = YES;
[m initState];
[theView useModel: m];
}
return self;
}
- (void) tic: (NSTimeInterval) dt
{
if (start) {
start = NO;
model.time = 0;
}
else {
[self updateModel: dt];
[self updateView: dt];
[audio tic: dt];
}
}The initializer is passed a view by the AsteroidsViewController. We then tap into the singleton AsteroidsModel and create the audio controller. We wire up the view, model, audio, and call the initState of AsteroidsModel, which initializes state values for our game::
- (void) initState
{
        [AsteroidsModel setState: kThrust to: kThrustOff];
        [AsteroidsModel setState: kLeft to: kLeftOff];
        [AsteroidsModel setState: kRight to: kRightOff];
        [AsteroidsModel setState: kFire to: kFireOff];
        [AsteroidsModel setState: kReload to: 0];
        [AsteroidsModel setState: kGameOver to: 0];
        [AsteroidsModel setState: kLife to: kLives];
        [AsteroidsModel setState: kScore to: 0];
        [AsteroidsModel setState: kLevel to: 0];
        [AsteroidsModel setState: kGameState to: kGameStatePlay];
}
The tic method is surprisingly simple. We update the model, and then update the view. Updating the model uses a divide-and-conquer approach. During updateBullets, we check whether the bullets on the screen are hitting any rocks, increasing score, dividing a rock in half, setting the new fragments on their way. During updateShip, we check whether rocks have smashed into our side. We also check the state of the buttons (e.g. fire, left, right, and thrust), and then adjust the sprite values for speed, rotation, and angle. If the fire button is depressed, we emit small sprites into the ether as "bullets." These bullet sprites copy the rotation of the ship as their initial, angular motion, appearing to fire out of the tip of the ship.
- (void) updateModel: (NSTimeInterval) dt
{
        model.time += dt;
        [self moveRocks: dt];
        [self updateShip: dt];
        [self updateFingers: dt];
        [self updateBullets: dt];
[model updateButtons];
[model unleashGrimReaper];
}The last method call is my favorite, unleashGrimReaper. This cleans up the model, moving all dead sprites back into a common pool (such as bullets and rock fragments). They, too, will live another day.
This chapter began by creating a blank canvas, which Quartz 2D calls a context. We jumped through menus and configuration panels to put Quartz 2D in total control over our main view. We then defined our first sprite, an elfish creature that captures the basics of motion and position for all objects in a game. Sprites tap into the Quartz 2D API and provide a clean abstraction, hiding much of the complexity.
Sprites introduced a bit of math. You learned about affine transformations, which convert the (x,y) position of a sprite into a physical location on the iPhone screen. These transformations are done once a cycle, during the draw method. We showed affine transformations for successfully rotating, scaling, and translating sprites, both in portrait and landscape modes.
Then we created three types of sprites: vector sprites, atlas sprites, and text sprites. Vector sprites are helpful in turning an array of points into filled shapes, which form things like rocks, spaceships, and bullets. Atlas sprites extend this capability, allowing arbitrarily complex images to be displayed in a single call through images. An atlas sprite pulls its image from a matrix of frame images stored on a single, larger image called a sprite atlas. We used an antique frame atlas to animate a character wandering around our iPhone. Text sprites hide the complexity of Quartz 2D fonts and enable us to position and colorize text anywhere on the screen. We promised not to use Comic Sans.
Finally, we took a quick tour of the game loop and classes within an Asteroids game, built from the sprites covered in this chapter. The game loop followed the three steps of update, render, and persist, all run by the tick of a clock set up by our main AsteroidsViewController.
I encourage you to play with the source code of Asteroids. I also hope you have as much fun building derivatives of the game, and using pieces of the code in your own wonderful creations, as I did building this game. Feel free to follow me on Twitter, at @drjsp173. Send me a direct message anytime to chat.