Being able to play a computer game with or against one other human is definitely an improvement over going at it alone. But wouldn't it be better if we could invite even more of our friends to participate? That's exactly what we are going to do in this chapter. You will learn how to use sockets, streams, and Bonjour to create games that several people can play at once over Bluetooth or a local Wi-Fi network.
Just as in the previous chapter, we need to pick a game idea to implement before we can plunge into coding. This time we want as many people as possible playing together, coming and going as they please without interrupting the game play—like a real party that you might throw at your house. Pong is limited to two players due to how its playing field is configured. It would be very difficult to extend it to meet our criteria without turning it into something that doesn't even look like Pong anymore.
Fortunately, a whole class of games fit the bill perfectly. Let's call this category "trivia games." In our case, instead of answering questions about longest rivers, tallest mountains, and French monarchs, we will have players try to solve arithmetic puzzles faster than everyone else, in a game called TwentyFour.
In each round of TwentyFour, you are given four random numbers between 1 and 9. Your goal is to use addition, subtraction, multiplication, or division to combine all of those numbers into an expression that results in 24. Whoever finishes this task first wins the round, and the game starts again. For example, suppose you got the numbers 8, 9, 2, and 5. The simplest solution is to add all the numbers together. But you can also go another way: start with 5 − 2 = 3, followed by 9 / 3 = 3, and finally 8 × 3 = 24. Here is another example: 2, 4, 6, and 3. One of the answers is 4 × 6 × (3 − 2). Can you spot another one?
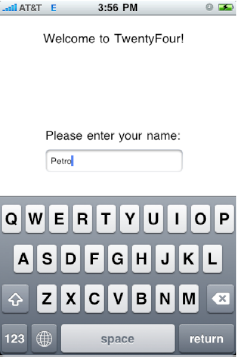
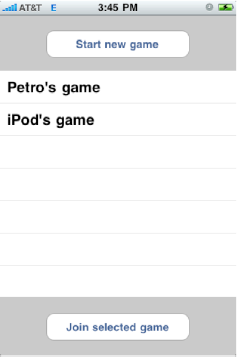
For the sake of saving some time, we are going to start with a functioning version of the game and gradually add multiplayer features to it, just as we did with GKPong. If you haven't already downloaded the project archive for this book, now would be a good time to do so. After you download and unpack the source code, locate the project called TwentyFour and open it in Xcode. Build and run it. You will notice that the interface has already been set up to accommodate more than one player, as shown in Figures 15-1 through 15-4. Go ahead and play a few games.


Let's walk through its source code and see how the various classes work together, starting with the view controllers. Each one has a corresponding Interface Builder .xib file and is responsible for managing its respective view:
WelcomeViewControllergreets the player and asks for the player's name.LobbyViewControllerallows the player to start a new game or join one that was started by someone else. In the initial version of the app, only the former option is available.TwentyFourViewControlleris the most complex of them all, as it deals with the UI for the actual game.ResultsViewControllertakes care of displaying the results of each round. Right now, you will not see any other names besides your own appear there, because the multiplayer logic is not implemented yet.WaitingViewControlleris the simplest one. It's a half-transparent overlay with a rotating activity indicator in the center. We will be using it later on.
We also have two classes that are not derived from UIViewController:
TwentyFourAppDelegatedeals with switching the views around and managing the overall flow of the application.GameControllerkeeps track of several aspects of the game logic, such as timing of rounds, making up puzzles, and processing results.
Before embarking on this exciting journey, we need to get some clarity about what is it that we want to see in the final version of the app. Let's imagine how we would play this game in the real world, and then attempt to turn that concept into something that we can implement in software.
First, we get a whole bunch of people in one room. Since we want everyone to compete on equal terms, we need to make sure that all the players get the same challenge to work on and the same amount of time to find the solution. This means that someone must be appointed to make up the numbers, distribute them to players, collect answers, and keep track of time. We will call this person the host. The flow will look something like this:
The host comes up with a set of four random numbers and writes them on pieces of paper, one copy for each player.
The host distributes these challenges to each player. Players are not allowed to look at the numbers until they are given a signal by the host.
The host gives a signal for the players to start solving the challenge, and starts the clock, giving each competitor 100 seconds to find a solution and submit an answer.
The players try to find a solution to the challenge. On the piece of paper they were given, they write their answer, along with their name, and hand it back to the host. Any competitors who can't find the solution write "I give up."
Whenever the host collects an answer from one of the players, the host writes down how long it took that player to find the solution.
After 100 seconds, the host collects answers (or lack thereof) from any remaining players and declares the round to be over.
The host arranges all answers in the order of how long it took to produce them, from fastest to slowest, and declares a winner.
The game begins all over again.
These rules might be a bit too bureaucratic for a game that you would play at a real party. It is better to think of this as an algorithm. All we need to do now is translate some of the concepts into software requirements, and we are good to go.
Instead of a real room, we will have virtual rooms. Each player can decide whether she wants to join an existing room or create a new one. Of course, we won't be putting our numbers or answers on paper. This will be done using the iPhone UI and whatever networking tools are available in the SDK. Finally, we will offload to the computer such boring tasks of generating random numbers, keeping track of time, and tabulating answers.
Now that we know what we want, let's talk about how we will go about making it happen.
Take another look at the list of steps in the previous section. Notice that it would be pretty difficult to implement this game without having a separation between the host and players. In the course of a round, the two kinds of participants have distinctly different responsibilities: The host controls the flow of the game, and the players are there to enjoy the ride. Contrast that with Pong, where it is possible to play without putting someone in charge of the game.
What does all this mean in terms of how we should implement the multiplayer logic? When it comes to designing software that utilizes networking, developers often encounter just such a division of responsibilities between modules—one is in charge, and all others follow orders. Chances are that you have heard the name of this design idea before: the client/server model. You encounter it every time you use a browser, which is a client, to connect to a web server. Our game will use the same model of interaction. In order to avoid confusion, from this point on, I will use the term player to refer to users of our app. Client will refer to the part of our application that allows players to join rooms and enjoy the game of TwentyFour. Server refers to our implementation of the host.
Let's list responsibilities of these two components to get a better idea of the differences between them:
The server will do the following:
Create a game room and allow clients to join it.
Whenever a new player joins, update the player list accordingly and notify all other clients about it.
Whenever a player leaves, update the player list accordingly and notify all other clients about it.
Come up with challenges.
Tell clients what the challenge is.
Collect answers from clients.
Make sure that game rounds don't go over the allotted time.
Tabulate the results.
Announce the results to clients.
The client will do the following:
Find out what game rooms are available and allow the player to select and join a room.
Upon receiving a challenge from the server, present it to the player.
Allow the player to enter answers to challenges and submit them to the server.
Whenever the player decides to leave the game, notify the server about it.
Upon receiving results of the round from the server, present them to the player.
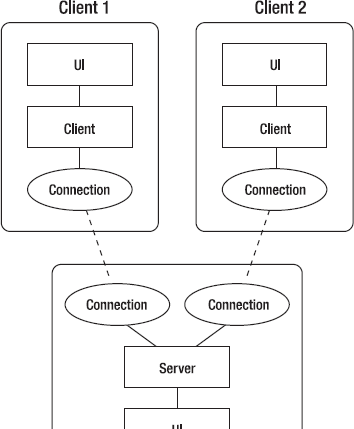
Keep in mind that we don't want any of our players to explicitly perform the tasks of the host from the "real-world" version of the game—that's what computers (or, in our case, iPhones and iPod touches) are for. Whenever a player decides to create a new room, that player will be able to play in it along with everyone else—instead of shuffling papers and checking the clock—and a server object will be created to take on the host's responsibilities for that room. The final structure will look something like the diagram in Figure 15-5.
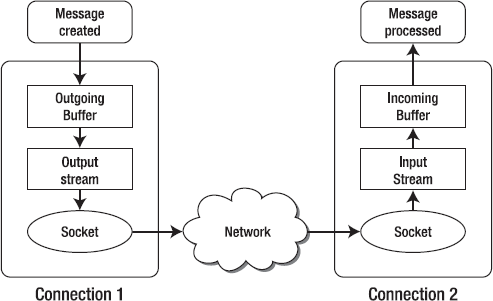
Notice that the picture in Figure 15-5 includes a few instances of a connection. As you will remember from the GKPong example, communication between applications doesn't "just happen." Before any of the other good stuff can take place, we need a component that will make sure that clients can talk to the server and vice versa.
A word of warning: This and the next part of the chapter will be the most complex. Strictly speaking, you don't need to understand every last detail of what's included here. However, if you are curious as to what makes networking applications tick, this is your chance to peek under the hood.
If you took the time to carefully read the previous chapter, it will be easier to make sense of the material that follows. We will talk about two things that we have dealt with before, but didn't cover in detail: socket connections and socket servers.
The code that we are about to write will not be game-specific. In fact, you can use same classes as part of any other application that needs to communicate over a network. In the process, some things will seem a bit abstract, but I promise you that all of it will start falling into place soon. For now, just hang on tight.
A connection is an object that allows us to exchange data bidirectionally with another party over a network. For example, the GKSession object that we used in Chapter 14 to enable two GKPong apps to talk to each other is a kind of connection, enabling us to exchange data bidirectionally over Bluetooth.
But we won't be using GKSession in this chapter. Instead, we will be dealing with a networking framework that GameKit itself is built on top of (at least partially): CFNetwork. This will give us a great opportunity to look at what goes on behind the scenes and get our hands dirty in some fairly low-level code.
If you want to get anything done on a network, you will most likely need to use sockets, which were introduced in Chapter 13. Usually, it takes quite a bit of code to use such a primitive but very powerful construct on its own. Luckily for us, Apple engineers made it possible to pair sockets with another entity that makes our life easier: streams. A stream is an object through which you can transmit data in one direction, guaranteeing that the bytes that you send will come out on the other end in the same order as they were entered. There are two kinds of streams:
You can read data from input (also known as read) streams.
You can write data into output (also known as write) streams.
In the SDK, you will find these under NSInputStream and NSOutputStream, respectively.
By itself, a stream is just a buffer that temporarily holds data before or after its transmission. In order to actually deliver data somewhere meaningful, streams need to be tied to something, like a file, a memory location, or a socket.
It turns out that the NSStream framework already implements so much of the functionality that we require that we don't even need to interact with sockets directly, except for when we implement the aforementioned socket server. So, don't be surprised if you don't see many references to socket objects in the following code.
Keep in mind that each stream can send bytes in only one direction. Therefore, if we want to implement bidirectional data exchange, we will need a pair of streams: one for input and one for output.
Let's create a new class called Connection. Here is what Connection.h will look like:
#import <Foundation/Foundation.h>

@class Connection;

@protocol ConnectionDelegate
- (void)connectionClosed:(Connection*)connection;
@end

@interface Connection : NSObject {
  NSInputStream *inputStream;
  NSMutableData *incomingDataBuffer;
  int nextMessageSize;
  BOOL outputStreamWasOpened;
  NSOutputStream *outputStream;
  NSMutableData *outgoingDataBuffer;
  id<ConnectionDelegate> delegate;
  id userInfo;
}
@property (nonatomic, retain) NSInputStream *inputStream; @property (nonatomic, retain) NSOutputStream *outputStream; @property (nonatomic, retain) id<ConnectionDelegate> delegate; @property (nonatomic, retain) id userInfo; - (id)initWithNativeSocketHandle:(CFSocketNativeHandle)nativeSocketHandle; - (id)initWithInputStream:(NSInputStream*)istr outputStream:(NSOutputStream*)ostr; - (BOOL)connect; - (void)close; @end
Before exploring what some of these variables do, let's go through Connection.m. We will look at it in five parts: Initialization, closing and cleanup, reading data, writing data, and handling stream events. In order to get the whole listing, concatenate all five parts into one file (or get the final version from the project archive).
Here's the first part of Connection.m, which handles initialization:
#import "Connection.h"
#import <CFNetwork/CFSocketStream.h>

@implementation Connection

@synthesize delegate, userInfo;
@synthesize inputStream, outputStream;

- (id)initWithNativeSocketHandle:(CFSocketNativeHandle)nativeSocketHandle {
  CFReadStreamRef readStream;
  CFWriteStreamRef writeStream;
  CFStreamCreatePairWithSocket(kCFAllocatorDefault, nativeSocketHandle,
      &readStream, &writeStream);

  self.inputStream = (NSInputStream*)readStream;
  self.outputStream = (NSOutputStream*)writeStream;
  return self;
}

- (id)initWithInputStream:(NSInputStream*)istr outputStream:(NSOutputStream*)ostr {
  self.inputStream = istr;
  self.outputStream = ostr;
  return self;
}

- (BOOL)connect {
  if ( !inputStream || !outputStream ) {
    return NO;
  }

  incomingDataBuffer = [[NSMutableData alloc] init];
  outgoingDataBuffer = [[NSMutableData alloc] init];

  CFReadStreamSetProperty((CFReadStreamRef)inputStream,
kCFStreamPropertyShouldCloseNativeSocket, kCFBooleanTrue);
CFWriteStreamSetProperty((CFWriteStreamRef)outputStream,
kCFStreamPropertyShouldCloseNativeSocket, kCFBooleanTrue);
inputStream.delegate = self;
[inputStream scheduleInRunLoop:[NSRunLoop currentRunLoop]
forMode:NSDefaultRunLoopMode];
outputStream.delegate = self;
[outputStream scheduleInRunLoop:[NSRunLoop currentRunLoop]
forMode:NSDefaultRunLoopMode];
outputStreamWasOpened = NO;
nextMessageSize = −1;
[inputStream open];
[outputStream open];
return YES;
}We are anticipating that our connection will get initialized in two ways:
When
initWithNativeSocketHandle:is called, we receive a value callednativeSocketHandle, which is a data type that the operating system uses to refer to open files and sockets. This means that the actual socket connection will already be established elsewhere.On the other hand, some other part of the code might have already done the work of binding a socket to a pair of streams. In that case, it will call
initWithInputStream:outputStream:to create a connection.
We will use both of these initialization methods later on.
The next step in opening a connection is to properly initialize the input and output streams. That's what happens inside the connect method. Here, we have a chance to configure the behavior of the connection to our liking. For example, whenever we decide to close our streams, we want the underlying socket connection to also be terminated. We also need to provide each stream with a delegate that will be notified about significant events in the stream's life cycle. We will cover events in detail later on.
Let's move on to the next part of Connection.m.
The second part of Connection.m, which handles closing and cleanup, looks like this:
- (void)close {
  [inputStream removeFromRunLoop:[NSRunLoop currentRunLoop]
      forMode:NSDefaultRunLoopMode];
  [inputStream close];
  inputStream.delegate = nil;

  [outputStream removeFromRunLoop:[NSRunLoop currentRunLoop]
      forMode:NSDefaultRunLoopMode];
  [outputStream close];
  outputStream.delegate = nil;
}
- (void)dealloc {
self.delegate = nil;
self.userInfo = nil;
inputStream.delegate = nil;
self.inputStream = nil;
outputStream.delegate = nil;
self.outputStream = nil;
[incomingDataBuffer release];
[outgoingDataBuffer release];
[super dealloc];
}This part is fairly straightforward. Whenever we want to terminate the connection, we call the close method, which reverses what we did in connect.
Oh, and you should be fairly familiar with what dealloc does by now.
Next up is the third part of Connection.m, which is the section that reads data:
- (void)processIncomingData:(NSData*)data {
}

- (void)readFromStreamIntoIncomingBuffer {
  uint8_t buf[1024];
  while( [inputStream hasBytesAvailable] ) {
    NSInteger bytesRead = [inputStream read:buf maxLength:sizeof(buf)];
    if ( bytesRead > 0 ) {
      [incomingDataBuffer appendBytes:buf length:bytesRead];
    }
    else {
      if ( [inputStream streamStatus] == NSStreamStatusAtEnd ) {
        break;
      }
      else {
        [self close];
        [delegate connectionClosed:self];
        return;
      }
    }
  }

  while( YES ) {
    if ( nextMessageSize == −1 ) {
      if ( [incomingDataBuffer length] >= sizeof(int) ) {
        memcpy(&nextMessageSize, [incomingDataBuffer bytes], sizeof(int));
        NSRange r = {0, sizeof(int)};
        [incomingDataBuffer replaceBytesInRange:r withBytes:nil length:0];
      }
      else {
        break;
}
}
if ( [incomingDataBuffer length] >= nextMessageSize ) {
NSData* raw = [NSData dataWithBytes:[incomingDataBuffer bytes]
length:nextMessageSize];
[self processIncomingData:raw];
NSRange r = {0, nextMessageSize};
[incomingDataBuffer replaceBytesInRange:r withBytes:NULL length:0];
nextMessageSize = −1;
}
else {
break;
}
}
}This is probably the most complicated piece of code that you will encounter in this chapter. Before trying to understand what is going on here, let's talk about how data actually gets packaged and shipped over.
Imagine a conveyor belt that transports goods from a warehouse to a shipping facility, where they get put into boxes and sent to customers. Let's say someone purchased a book. Right after that, another order came in—this time for a digital camera and some batteries. It was followed by an order for five DVDs. Warehouse employees could just pile up all those items on the belt and send them on their merry way. But how will the person on the receiving end know what to do with all those things? Does she put them all in one box and ship it out? Does she need to separate them? One way to avoid the guessing game is to place a simple order description on the belt before sending the actual goods. It should give the shipping facility employees enough information to sort the items into boxes correctly.
Our socket stream is similar to a conveyor belt. It transports bytes from one end to the other. It is up to the sender to include some instructions that will help the receiver make sense of the never-ending stream of bytes. One way to go about it is to agree that every group of bytes that constitutes a "message" will be preceded by another group of 4 bytes (enough to hold a variable of type int) that tells the receiver the length of the incoming message. Such a structure will look something like this:

Now let's go over the method called readFromStreamIntoIncomingBuffer step by step. We start by trying to read as much data from the input stream as possible:
uint8_t buf[1024];
  while( [inputStream hasBytesAvailable] ) {
    NSInteger bytesRead = [inputStream read:buf maxLength:sizeof(buf)];
If data is available, we place it in a temporary buffer. Otherwise, we try to figure out why the read operation failed, which could be because we exhausted the stream and must wait for more data to arrive. In case an error occurs, we simply close the connection and let the outside world know about it:
if ( bytesRead > 0 ) {
      [incomingDataBuffer appendBytes:buf length:bytesRead];
    }
    else {
      if ( [inputStream streamStatus] == NSStreamStatusAtEnd ) {
        break;
      }
      else {
        [self close];
        [delegate connectionClosed:self];
        return;
      }
    }
  }
At this point, all of the bytes that we took off the conveyor belt should be in our temporary buffer, and we now need to sort them into messages. First, we try to find the 4 bytes that will tell us the message's length. Note that sizeof(int) is equal to 4:
while( YES ) {
    if ( nextMessageSize == −1 ) {
      if ( [incomingDataBuffer length] >= sizeof(int) ) {
        memcpy(&nextMessageSize, [incomingDataBuffer bytes], sizeof(int));
        NSRange r = {0, sizeof(int)};
        [incomingDataBuffer replaceBytesInRange:r withBytes:nil length:0];
      }
      else {
        break;
      }
    }
We need to be careful not to process the same data over and over again. That's why we remove the first 4 bytes from the buffer by calling replaceBytesInRange:withBytes:length: immediately after copying them into nextMessageSize. Now that we know how long the next message is, we will try to extract that many bytes from the buffer using the same copy-then-remove technique. But keep in mind that we might not have all of the bytes available to us yet. If that's the case, we will keep whatever data we have so far in incomingDataBuffer (which is an instance variable, and it isn't destroyed when we exit this method). Whenever a new batch of bytes arrives, we will come back and try to finish putting together the message. However, if we do have a complete message, we will go on to process it by calling processIncomingData::
if ( [incomingDataBuffer length] >= nextMessageSize ) {
      NSData* raw = [NSData dataWithBytes:[incomingDataBuffer bytes]
          length:nextMessageSize];
      [self processIncomingData:raw];
      NSRange r = {0, nextMessageSize};
      [incomingDataBuffer replaceBytesInRange:r withBytes:NULL length:0];
      nextMessageSize = −1;
}
else {
break;
}
}
}Note that we don't yet have the logic to process the actual messages. That's because we still are not sure what they will contain. We will come back to this a bit later in the chapter.
That does it for the reading part. What about writing?
The fourth part of Connection.m takes care of writing data:
- (void)writeOutgoingBufferToStream {
  if ( [outgoingDataBuffer length] == 0 || !outputStreamWasOpened ) {
    return;
  }
  if ( ! [outputStream hasSpaceAvailable] ) {
    return;
  }

  NSInteger bytesWritten = [outputStream write:[outgoingDataBuffer bytes]
      maxLength:[outgoingDataBuffer length]];

  if ( bytesWritten == −1 ) {
    if ( [outputStream streamStatus] == NSStreamStatusClosed ||
        [outputStream streamStatus] == NSStreamStatusError ) {
      [self close];
      [delegate connectionClosed:self];
    }
    return;
  }

  NSRange r = {0, bytesWritten};
  [outgoingDataBuffer replaceBytesInRange:r withBytes:nil length:0];
}
By the time this method is called, we should already have our messages stored in outgoingDataBuffer, packaged and ready to be shipped out. (We will add the part that actually composes messages later.) At this point, all we need to do is write as many bytes as we can into the outputStream. The stream has a finite amount of storage space available, and, depending on how many bytes we want to send out, it might not be able to accommodate all of our data at once. For example, if we want to send 100 bytes, but the output stream has space for only 75 bytes, we need to hang on to the remaining 25 bytes and wait for an event that will tell us that more data can be sent. Meanwhile, the 75 bytes that did go out need to be removed from our outgoing buffer, which is done by calling replaceBytesInRange:withBytes:length:.
That was simple enough. Now let's look at the last part.
The final part of Connection.m handles stream events:
- (void)stream:(NSStream *)theStream handleEvent:(NSStreamEvent)streamEvent {
  if ( theStream == inputStream && streamEvent & NSStreamEventHasBytesAvailable ) {
    [self readFromStreamIntoIncomingBuffer];
  }

  if ( theStream == outputStream && streamEvent & NSStreamEventHasSpaceAvailable ) {
    [self writeOutgoingBufferToStream];
  }

  if ( theStream == outputStream && streamEvent & NSStreamEventOpenCompleted ) {
    outputStreamWasOpened = YES;
    [self writeOutgoingBufferToStream];
  }

  if ( streamEvent & (NSStreamEventErrorOccurred|NSStreamEventEndEncountered)) {
    [self close];
    [delegate connectionClosed:self];
  }
}

@end
Remember that during initialization, we designated self to be the delegate for both inputStream and outputStream. From that point on, whenever the operating system has anything important to tell the world about what is happening with one of those streams, we will be the first ones to know about it. Any time that happens, stream:handleEvent: will be called, giving us a chance to react. Whenever data arrives via the input stream, we will try to read it by calling readFromStreamIntoIncomingBuffer. If the output stream has room for more bytes to be written, we will take that opportunity and execute writeOutgoingBufferToStream. And if one of the streams reports an error, we will take as a sign that it's time to terminate the connection.
So, how does iPhone OS know to send these events to the delegate? That happens because we scheduled our streams to be processed by something called a run loop. Think of it as the main loop of the application that processes everything from user's taps on the screen, to timers, to miscellaneous UI and socket events. Using a run loop allows us to tell the operating system, "Wake me up if something important happens, I'm interested in one of the following events...," instead of needlessly waiting around for things to do. As a result, we can save some CPU cycles and battery power, which is especially important on a small device like an iPhone.
Voila! We can now read and write data over a network using sockets. The Connection class consists of a few components that work together, which means that we can benefit from having a diagram that should be worth at least a couple dozen words (see Figure 15-6).
This all sounds great. But how do we actually establish these connections?
Have you ever moored a boat? You know, where you stand aboard the vessel, throw a rope ashore, and someone ties it down? What if no one were available to catch that rope, and you couldn't really get to the shore yourself? That's right—you would be adrift, floating around without a connection to dry land. Having a rope is not enough; you need some way to fasten it.
Establishing a network connection between two applications is just like mooring a boat: One side initiates the connection (throws the rope), and the other side (the server) recognizes the request, performs all the steps necessary to establish the connection, and sends back an acknowledgment (ties down the rope).
In order to get some help with the boat, we need to know to whom to throw the rope. The same goes for socket connections: We need to uniquely identify the endpoint on the network with which we would like to establish communication. And what's more, something needs to be listening for our connection request on that other end. Fortunately, the operating system developers at Apple have already done most of the hard work for us, and all we need to know is which part of the iPhone SDK to use to make this happen. It turns out that CFNetwork framework includes everything that's required to both listen and respond to socket connection requests.
It's time to create a new class. Let's call it SocketServer. Open SocketServer.h and put the following code there:
#import <Foundation/Foundation.h>
@class Connection;

@protocol SocketServerDelegate
- (void)socketServerStarted;
- (void)socketServerDidNotStart;
- (void)newClientConnected:(Connection*)connection;
@end

@interface SocketServer : NSObject {
  CFSocketRef listeningSocket;
  uint16_t listeningPort;
  NSNetService *netService;
  NSString *serverName;
  id<SocketServerDelegate> delegate;
  BOOL serverStarted;
}

@property (nonatomic, retain) NSNetService *netService;
@property (nonatomic, retain) NSString *serverName;
@property (nonatomic, retain) id<SocketServerDelegate> delegate;

- (BOOL)start;
- (void)stop;
@end
Just as we did with Connection class, we will look at the implementation file in parts, which will give us a chance to discuss each piece separately. We will cover how to create a server, how to announce its existence to the world, how to terminate the server, and how we control its life cycle (starting and stopping). Open SocketServer.m, and let's begin.
In the first part of SocketServer.m, we create the socket server:
#include <sys/socket.h>
#include <netinet/in.h>
#include <unistd.h>
#include <CFNetwork/CFSocketStream.h>
#import "SocketServer.h"
#import "Connection.h"

@implementation SocketServer

@synthesize serverName, netService;
@synthesize delegate;

static void serverAcceptCallback(CFSocketRef socket, CFSocketCallBackType type,
    CFDataRef address, const void *data, void *info) {
  SocketServer *server = (SocketServer*)info;
  if ( type != kCFSocketAcceptCallBack ) {
    return;
  }
  CFSocketNativeHandle handle = *(CFSocketNativeHandle*)data;
  Connection *connection = [[[Connection alloc]
      initWithNativeSocketHandle:handle] autorelease];
if ( [connection connect] ) {
[server.delegate newClientConnected:connection];
}
}
- (BOOL)createServer {
CFSocketContext socketCtxt = {0, self, NULL, NULL, NULL};
  listeningSocket = CFSocketCreate(kCFAllocatorDefault, PF_INET, SOCK_STREAM,
    IPPROTO_TCP, kCFSocketAcceptCallBack, (CFSocketCallBack)&serverAcceptCallback,
    &socketCtxt);
  if ( listeningSocket == NULL ) {
    return NO;
  }

  int existingValue = 1;
  setsockopt( CFSocketGetNative(listeningSocket),
    SOL_SOCKET, SO_REUSEADDR, (void *)&existingValue,
    sizeof(existingValue));
struct sockaddr_in socketAddress;
  memset(&socketAddress, 0, sizeof(socketAddress));
  socketAddress.sin_len = sizeof(socketAddress);
  socketAddress.sin_family = AF_INET;
  socketAddress.sin_port = 0;
  socketAddress.sin_addr.s_addr = htonl(INADDR_ANY);

  NSData *socketAddressData =
    [NSData dataWithBytes:&socketAddress length:sizeof(socketAddress)];
  if ( CFSocketSetAddress(listeningSocket,
      (CFDataRef)socketAddressData) != kCFSocketSuccess ) {
    if ( listeningSocket != NULL ) {
      CFRelease(listeningSocket);
      listeningSocket = NULL;
}
    return NO;
  }
NSData *socketAddressActualData =
      [(NSData *)CFSocketCopyAddress(listeningSocket) autorelease];
  struct sockaddr_in socketAddressActual;
  memcpy(&socketAddressActual, [socketAddressActualData bytes],
      [socketAddressActualData length]);
  listeningPort = ntohs(socketAddressActual.sin_port);
CFRunLoopRef currentRunLoop = CFRunLoopGetCurrent();
  CFRunLoopSourceRef runLoopSource =
      CFSocketCreateRunLoopSource(kCFAllocatorDefault, listeningSocket, 0);
  CFRunLoopAddSource(currentRunLoop, runLoopSource, kCFRunLoopCommonModes);
  CFRelease(runLoopSource);

  return YES;
}That's one dense-looking piece of code, if you ask me. Fortunately, we don't need to cover most of it in great detail, but it would still be good to understand the general flow.
Take a look at the very first function, serverAcceptCallback(). Once we configure our server, the operating system will execute this piece of code whenever another application decides to initiate a connection to us. Whenever that happens, we will create a Connection object and pass it to our delegate, which is responsible for handling whatever happens after that.
Also note that serverAcceptCallback() mixes both C and Objective-C. That's because we are dealing with CFNetwork there, which is not an Objective-C framework (unlike Cocoa Touch and others, where class names start with NS), which means that we need to use C to do some of the work.
The second method, createServer, requires a bit more explanation. We will go through it step by step. First of all, we need to create a socket. There are a whole lot of configuration options here, most of which we are not interested in right now. The important bit is that this is where we designate serverAcceptCallback to be responsible for handling connection requests. The only other two things that you might want to know is that we will be using the TCP protocol (the IPPROTO_TCP flag) and that the same socket will be used multiple times to accept as many connections as possible (the SO_REUSEADDR flag):
CFSocketContext socketCtxt = {0, self, NULL, NULL, NULL};
listeningSocket = CFSocketCreate(kCFAllocatorDefault, PF_INET, SOCK_STREAM,
IPPROTO_TCP, kCFSocketAcceptCallBack, (CFSocketCallBack)&serverAcceptCallback,
&socketCtxt);
if ( listeningSocket == NULL ) {
return NO;
}
int existingValue = 1;
setsockopt( CFSocketGetNative(listeningSocket),
SOL_SOCKET, SO_REUSEADDR, (void *)&existingValue,
sizeof(existingValue));But it turns out that this particular socket does not yet have a network address associated with it, which is why we need to bind it to one. Here, we are asking the operating system to allow us to listen for connection requests that come from any network that our device is connected to (the INADDR_ANY flag), and we are leaving it up to the networking subsystem to find a free port for us to listen on (socketAddress.sin_port = 0):
struct sockaddr_in socketAddress;
memset(&socketAddress, 0, sizeof(socketAddress));
socketAddress.sin_len = sizeof(socketAddress);
socketAddress.sin_family = AF_INET;
socketAddress.sin_port = 0;
socketAddress.sin_addr.s_addr = htonl(INADDR_ANY);
NSData *socketAddressData =
[NSData dataWithBytes:&socketAddress length:sizeof(socketAddress)];
if ( CFSocketSetAddress(listeningSocket,
(CFDataRef)socketAddressData) != kCFSocketSuccess ) {
if ( listeningSocket != NULL ) {
CFRelease(listeningSocket);
listeningSocket = NULL;}
return NO;
}In order for others to establish connections to our server, we will need to tell them exactly which endpoint we are listening on, which means that we need to know which port the operating system assigned to us. That's what happens here:
NSData *socketAddressActualData =
[(NSData *)CFSocketCopyAddress(listeningSocket) autorelease];
struct sockaddr_in socketAddressActual;
memcpy(&socketAddressActual, [socketAddressActualData bytes],
[socketAddressActualData length]);
listeningPort = ntohs(socketAddressActual.sin_port);And last, but not least, we need to add our listening socket to the run loop in order for the operating system to notify us about new connection requests:
CFRunLoopRef currentRunLoop = CFRunLoopGetCurrent();
CFRunLoopSourceRef runLoopSource =
CFSocketCreateRunLoopSource(kCFAllocatorDefault, listeningSocket, 0);
CFRunLoopAddSource(currentRunLoop, runLoopSource, kCFRunLoopCommonModes);
CFRelease(runLoopSource);
return YES;
}The work that we have done just now gives us the ability to catch the rope and tie it down to some stationary object ashore. But how will the world know to throw the rope to us? That's what the next part is about.
In the second part of SocketServer.m, we let the world know about our server:
- (BOOL)publishService {
  netService = [[NSNetService alloc]
      initWithDomain:@"" type:@"_twentyfour._tcp."
      name:serverName port:listeningPort];
  if (self.netService == nil)
    return NO;
  [self.netService scheduleInRunLoop:[NSRunLoop currentRunLoop]
      forMode:NSRunLoopCommonModes];
  [self.netService setDelegate:self];
  [self.netService publish];
  return YES;
}

- (void)netServiceDidPublish:(NSNetService*)sender {
  if ( sender != self.netService ) {
    return;
  }
  if ( serverStarted ) {
    return;
  }
  serverStarted = YES;
[delegate socketServerStarted]; }
One of Apple's strengths is its ability to take useful but complex technologies and make them easy to use. And we are looking at a great example of one such technology in action. NSNetService is an implementation of the Bonjour protocol, which was introduced in Chapter 13. The best part is that we don't need to understand exactly what happens behind the scenes in order to use it.
In publishService, all we need to do is pass a few configuration parameters, such as the type of our server, to distinguish it from other applications ("_twentyfour._tcp."), the server's name, and on which port we can be contacted. As before, the run loop will take care of notifying us of important events via delegation.
Once we publish the service, the operating system will try to tell the world about our app. If it succeeds, netServiceDidPublish: will be called. As soon as that happens, our server will be fully operational and ready to accept connections.
The final part of SocketServer.m deals with controlling the server:
- (void)terminateServer {
  if ( listeningSocket != nil ) {
    CFSocketInvalidate(listeningSocket);
    CFRelease(listeningSocket);
    listeningSocket = nil;
    listeningPort = 0;
  }
}

- (void) unpublishService {
  if ( self.netService ) {
    [self.netService stop];
    [self.netService removeFromRunLoop:[NSRunLoop currentRunLoop]
        forMode:NSRunLoopCommonModes];
    self.netService = nil;
  }
}

- (void)netService:(NSNetService*)sender didNotPublish:(NSDictionary*)errorDict {
  if ( sender != self.netService ) {
    return;
  }
  [self terminateServer];
  [self unpublishService];
  [delegate socketServerDidNotStart];
}

- (BOOL)start {
  if ( ! [self createServer] ) {
    return NO;
  }
  if ( ! [self publishService] ) {
    [self terminateServer];
return NO;
}
return YES;
}
- (void)stop {
serverStarted = NO;
[self terminateServer];
[self unpublishService];
}
- (void)dealloc {
self.netService = nil;
self.serverName = nil;
self.delegate = nil;
[super dealloc];
}
@endAs much as we would like to keep the server running for as long as we can, sometimes we need to shut it down. Here, we are simply undoing the setup procedure. We need to be able to shut down the listening socket in terminateServer, which will prevent any further connections from being accepted. In unpublishService, we ask Bonjour to stop telling everyone about the server.
But we also need to handle the case when Bonjour wasn't able to announce anything in the first place, for whatever reason. That's when netService:didNotPublish: will get called, giving us a chance to release whatever resources the server was taking up.
The start and stop methods allow users of the SocketServer class to control it. For instance, we don't want anyone calling createServer and publishService directly, because they might do it in a wrong order. That's why we are encapsulating it in a separate start method.
While we have our eyes on the networking part of the app, let's implement one more important component. We can now advertise our server on the network, but there is no code to look for servers and connect to them. Remember how LobbyViewController already has a table view that we can fill with a list of games? Let's write that part now. Open LobbyViewController.h and add the following code to it:
#import <UIKit/UIKit.h>

@interface LobbyViewController : UIViewController <UITableViewDataSource> {
  UITableView *gameList;
  NSMutableArray *games;
  NSNetServiceBrowser *netServiceBrowser;
  NSNetService *selectedGame;
}
@property (nonatomic, retain) IBOutlet UITableView* gameList;
@property (nonatomic, retain) NSNetServiceBrowser *netServiceBrowser;
@property (nonatomic, retain) NSNetService *selectedGame;
- (IBAction)startNewGame;
- (IBAction)joinSelectedGame;
@endHere, we are introducing an array that will contain servers that we find on the network, a Bonjour-related object that will let us search for those servers, and a variable that will reference whichever server the user selects from the list. Switch to LobbyViewController.m and let's see these in action, in two parts.
The first part of LobbyViewController.m deals with looking for servers:
#import "LobbyViewController.h" #import "TwentyFourAppDelegate.h" @implementation LobbyViewController @synthesize gameList;@synthesize gameList, netServiceBrowser, selectedGame;- (void)viewDidLoad {netServiceBrowser = [[NSNetServiceBrowser alloc] init];netServiceBrowser.delegate = self;games = [[NSMutableArray alloc] init];}- (void)viewDidAppear:(BOOL)animated {[games removeAllObjects];[gameList reloadData];[netServiceBrowser searchForServicesOfType:@"_twentyfour._tcp." inDomain:@""];[super viewDidAppear:animated];}- (void)viewDidDisappear:(BOOL)animated {[netServiceBrowser stop];[super viewDidDisappear:animated];}- (void)netServiceBrowser:(NSNetServiceBrowser *)netServiceBrowserdidFindService:(NSNetService *)netService moreComing:(BOOL)moreServicesComing {if ( ! [games containsObject:netService] ) {[games addObject:netService];}if ( !moreServicesComing ) {[gameList reloadData];}}- (void)netServiceBrowser:(NSNetServiceBrowser *)netServiceBrowserdidRemoveService:(NSNetService *)netServicemoreComing:(BOOL)moreServicesComing {
[games removeObject:netService];if ( !moreServicesComing ) {[gameList reloadData];}}- (NSInteger)tableView:(UITableView *)tableView numberOfRowsInSection: (NSInteger)section { return 0;return [games count];} - (UITableViewCell *)tableView:(UITableView *)tableView cellForRowAtIndexPath:(NSIndexPath *)indexPath {static NSString* gameListIdentifier = @"gameListIdentifier";UITableViewCell *cell = (UITableViewCell *)[tableViewdequeueReusableCellWithIdentifier:gameListIdentifier];if (cell == nil) {cell = [[[UITableViewCell alloc] initWithFrame:CGRectZeroreuseIdentifier:gameListIdentifier] autorelease];}NSNetService* server = [games objectAtIndex:indexPath.row];cell.textLabel.text = [server name];return nil;return cell;}
NSNetServiceBrowser allows you to search, or browse, for services that were published by NSNetService, just as we did in SocketServer.m. In order to get relevant results, we need to specify the type of servers that we are seeking. In our case, the type is equal to the string value @"_twentyfour._tcp.", because that's what we specified when the server was advertised.
We would like the search to start whenever the view becomes visible, and cease when the screen is showing something else. Hence, we have the call to NSNetServiceBrowser's searchForServicesOfType:inDomain: in viewDidAppear:, and the corresponding stop in viewDidDisappear:. Avoiding unnecessary searches while the user isn't looking at this particular view allows us to save some CPU cycles and reduce the amount of data we are sending over the network, which is a fairly power-intensive operation.
Whenever the Bonjour subsystem finds something of interest, it will notify us by calling the appropriate delegate methods:
netServiceBrowser:didFindService:moreComing:lets us know that a new service was found.netServiceBrowser:didRemoveService:moreComing:is executed whenever a service is removed and is no longer being advertised.
Note the moreServicesComing Boolean flag. Whenever several services are added or removed at the same time, corresponding delegate methods will be called once for each entry. However, you might want to refresh the table view only after processing all the entries, to avoid flickering and unnecessary refreshing of the list. This flag will let you know whether or not you should expect more updates in the immediate future.
We are keeping the server list in a variable called games, which is being used as a source of rows for the table view.
The remainder of LobbyViewController.m handles connecting to a server:
- (IBAction)startNewGame {
  [[TwentyFourAppDelegate getInstance] startNewGame];
}

- (IBAction)joinSelectedGame {
  NSIndexPath *currentRow = [gameList indexPathForSelectedRow];
  if ( currentRow == nil ) {
    return;
  }

  [[TwentyFourAppDelegate getInstance] showWaitingScreen];

  self.selectedGame = [games objectAtIndex:currentRow.row];
  selectedGame.delegate = self;
  [selectedGame resolveWithTimeout:5.0];
}

- (void)netService:(NSNetService *)sender didNotResolve:(NSDictionary *)errorDict {
  if ( sender != selectedGame ) {
    return;
  }

  [[TwentyFourAppDelegate getInstance] hideWaitingScreen];

  [selectedGame stop];
  selectedGame.delegate = nil;
  self.selectedGame = nil;

  UIAlertView *alert = [[UIAlertView alloc] initWithTitle:@"Error"
      message:@"Selected game is not available" delegate:nil
      cancelButtonTitle:@"Ok" otherButtonTitles:nil];
  [alert show];
  [alert release];
}

- (void)netServiceDidResolveAddress:(NSNetService *)sender {
  if ( sender != selectedGame ) {
    return;
  }

  [[TwentyFourAppDelegate getInstance] hideWaitingScreen];
NSInputStream *inputStream;NSOutputStream *outputStream;if ( ! [selectedGame getInputStream:&inputStream outputStream:&outputStream]) {UIAlertView *alert = [[UIAlertView alloc] initWithTitle:@"Error"message:@"Could not connect to selected game" delegate:nilcancelButtonTitle:@"Ok" otherButtonTitles:nil];/[alert show];[alert release];[selectedGame stop];selectedGame.delegate = nil;self.selectedGame = nil;return;}[selectedGame stop];selectedGame.delegate = nil;self.selectedGame = nil;Connection *connection = [[[Connection alloc] initWithInputStream:inputStreamoutputStream:outputStream] autorelease];[[TwentyFourAppDelegate getInstance] connectToGame:connection];}- (void)dealloc { self.gameList = nil;self.netServiceBrowser = nil;self.selectedGame = nil;[games release];games = nil;[super dealloc]; } @end
Now that the server list is visible, our users are free to pick which server they would like to play on by selecting one of the entries and tapping the "Join selected game" button. As soon as that happens, joinSelectedGame is called, and our code springs into action once again.
In order to connect to the selected server, we need to retrieve a few bits of information about it, such as its network address and on which port it's listening. In Bonjour lingo, this process is called resolving the service. But it cannot happen immediately, because it involves actually reaching out to the service in question over the network and querying it. By specifying a timeout of 5 seconds in the call to resolveWithTimeout:, we are setting a deadline for Bonjour to get back to us with or without results. In the meantime, we will put up an activity indicator on the screen to let the user know that something is happening. We do this by calling TwentyFourAppDelegate's showWaitingScreen, which displays WaitingViewController's half-transparent view on top of the LobbyViewController.
If Bonjour fails to resolve the service within the specified amount of time, it will let us know by calling netService:didNotResolve:. At that point, we can't really do much besides letting the user know that something went wrong by displaying an alert view. We should also not forget to hide the temporary activity indicator at this point. Usually, Bonjour does a pretty good job of keeping the list of services current, but every once in a while, you might see a ghost entry that points to a server that no longer exists. If you try to resolve such service, it will fail, of course.
If the service is resolved, netServiceDidResolveAddress: will be called, giving us a chance to actually open a connection to that particular server. As I noted earlier, the NSNetService class was designed by Apple engineers to be as easy to use as possible. To this end, they already included a method that tries to initiate a socket connection based on the service's address and port information, and tie a pair of streams to it: getInputStream:outputStream:. We are using it here to keep the code shorter, but if you feel like doing a bit more work, you can accomplish the same thing by accessing the service's connection information via NSNetService's hostName and port methods, and passing that information into NSStream's getStreamsToHost:port:inputStream:outputStream: method.
In any case, we should end up with a pair of streams that are attached to a socket. This is the second time that we get to create an instance of the Connection class that we wrote a little while ago. Only this time, instead of passing a native socket handle, we are using input and output streams that were generously created for us by NSNetService.
How is this connection going to be used? Frankly, we don't know yet, since we don't have the multiplayer logic fleshed out right now. All we know is that some class somewhere will need it to send and receive data. TwentyFourAppDelegate seems to be aware of every component of our app, which makes it a good candidate for the role of a traffic cop of sorts. It seems to be as good a place as any to send our connection, and find a good use for it later. Let's open TwentyFourAppDelegate.h and declare a new method, called connectToGame::
#import <UIKit/UIKit.h>
#import "Connection.h"
#import "GameController.h"

@class TwentyFourViewController;
@class WelcomeViewController;
@class LobbyViewController;
@class ResultsViewController;
@class WaitingViewController;

@interface TwentyFourAppDelegate : NSObject <UIApplicationDelegate,
    GameControllerDelegate> {
  UIWindow *window;
  NSString* playerName;
  TwentyFourViewController *tfViewController;
  WelcomeViewController *welcomeViewController;
  LobbyViewController *lobbyViewController;
  ResultsViewController *resultsViewController;
  WaitingViewController *waitingViewController;
GameController *gameController;
}
@property (nonatomic, retain) IBOutlet UIWindow *window;
@property (nonatomic, retain) NSString *playerName;
@property (nonatomic, retain) IBOutlet TwentyFourViewController *tfViewController;
@property (nonatomic, retain) IBOutlet WelcomeViewController *welcomeViewController;
@property (nonatomic, retain) IBOutlet LobbyViewController *lobbyViewController;
@property (nonatomic, retain) IBOutlet ResultsViewController *resultsViewController;
@property (nonatomic, retain) IBOutlet WaitingViewController *waitingViewController;
+ (TwentyFourAppDelegate*)getInstance;
- (void)playerNameEntered:(NSString*)name;
- (void)startNewGame;
- (void)submitResultFailure:(NSString*)reason;
- (void)submitResultSuccess:(float)seconds;
- (void)exitGame;
- (void)showWaitingScreen;
- (void)hideWaitingScreen;
- (void)connectToGame:(Connection*)connection;
@endFor the time being, let's leave the body of the method, located in TwentyFourAppDelegate.m, empty:
#import "TwentyFourAppDelegate.h"
#import "TwentyFourViewController.h"
#import "WelcomeViewController.h"
#import "LobbyViewController.h"
#import "ResultsViewController.h"
#import "WaitingViewController.h"

@implementation TwentyFourAppDelegate

@synthesize window;
@synthesize playerName;
@synthesize tfViewController, welcomeViewController, lobbyViewController;
@synthesize resultsViewController, waitingViewController;

- (void)submitResultFailure:(NSString*)reason {
  [gameController submitResultFailure:reason];
}

- (void)submitResultSuccess:(float)seconds {
  [gameController submitResultSuccess:seconds];
}

- (void)startRoundWithChallenge:(NSArray*)challenge secondsToPlay:(float)seconds {
  [tfViewController startRoundWithChallenge:challenge secondsToPlay:seconds];
  [window addSubview:tfViewController.view];
  [resultsViewController.view removeFromSuperview];
}

- (void)updateGameStatus:(NSString*)status {
  resultsViewController.labelStatus.text = status;
}
- (void)updateGameResults:(NSArray*)results {
resultsViewController.results = results;
[resultsViewController.tableResults reloadData];
}
- (void)playerNameEntered:(NSString*)name {
self.playerName = name;
[window addSubview:lobbyViewController.view];
[welcomeViewController.view removeFromSuperview];
}
- (void)showWaitingScreen {
[window addSubview:waitingViewController.view];
[window bringSubviewToFront:waitingViewController.view];
}
- (void)hideWaitingScreen {
[waitingViewController.view removeFromSuperview];
}
- (void)startNewGame {
[self showWaitingScreen];
GameController *game = [[GameController alloc] init];
game.delegate = self;
[game startWithPlayerName:playerName];
gameController = game;
}
- (void)connectToGame:(Connection*)connection {
}
- (void)gameControllerStarted {
[self hideWaitingScreen];
[lobbyViewController.view removeFromSuperview];
}
- (void)gameControllerDidNotStart {
[self hideWaitingScreen];
[gameController release];
gameController = nil;
UIAlertView *alert = [[UIAlertView alloc] initWithTitle:@"Error"
message:@"Could not start/join game." delegate:nil cancelButtonTitle:@"Ok"
otherButtonTitles:nil];
[alert show];
[alert release];
}
- (void)exitGame {
[gameController stop];
gameController.delegate = nil;
[gameController release];
gameController = nil;
[window addSubview:lobbyViewController.view];
[tfViewController.view removeFromSuperview];
}- (void)showGameResultsScreen {
[window addSubview:resultsViewController.view];
[tfViewController.view removeFromSuperview];
}
- (void)gameControllerTerminated {
UIAlertView *alert = [[UIAlertView alloc] initWithTitle:@"Error"
message:@"Game has been terminated." delegate:nil cancelButtonTitle:@"Ok"
otherButtonTitles:nil];
[alert show];
[alert release];
[gameController release];
gameController = nil;
[window addSubview:lobbyViewController.view];
[tfViewController stopRound];
[tfViewController.view removeFromSuperview];
}
- (void)applicationDidFinishLaunching:(UIApplication *)application {
sranddev();
[window addSubview:welcomeViewController.view];
[window makeKeyAndVisible];
}
+ (TwentyFourAppDelegate*)getInstance {
return (TwentyFourAppDelegate*)[UIApplication sharedApplication].delegate;
}
- (void)dealloc {
[tfViewController release];
[welcomeViewController release];
[lobbyViewController release];
[resultsViewController release];
[waitingViewController release];
[gameController release];
self.playerName = nil;
[window release];
[super dealloc];
}
@endCongratulations! At this point, you have learned quite a bit: how to use sockets and streams; listen for network connection requests; and advertise, discover, and connect to servers. Given these tools, you can create a variety of interesting applications. Now is a good time to take a break, as we still have quite a bit of work ahead of us.
We have spent a lot of time working on the networking infrastructure, and we are now in the position to start taking full advantage of it. As I mentioned earlier, we have two major components that need to be communicating with each other: a game server and a game client. We can pick either one to be implemented first. We are going to start with the client, since it is the simpler of the two. In a sense, we are saving best for last!
Let's review the responsibilities we decided to assign to the client part:
Find out what game rooms are available and allow a player to select and join a room.
Upon receiving a challenge from the server, present it to the player.
Allow a player to enter answers to challenges and submit them to the server.
Upon receiving results of the round from the server, present them to the player.
Whenever a player decides to leave the game, notify the server about it.
For the client, it turns out that we have already implemented the logic to discover and connect to game rooms (we have been calling them game servers) inside LobbyViewController, which addresses the first point. As for the remaining client functionality, we need to look at the structure of the existing application in order to find the right places to hook into.
Let's look at which classes are currently responsible for starting a new game round, collecting the player's answer, and coming up with final results. Keep in mind that right now the game doesn't do any significant tallying of results, since we have only one player, who always wins. Single-player flow is shown in Figure 15-7. In order to better understand what's going on, try cross-checking it with the corresponding source files in Xcode.
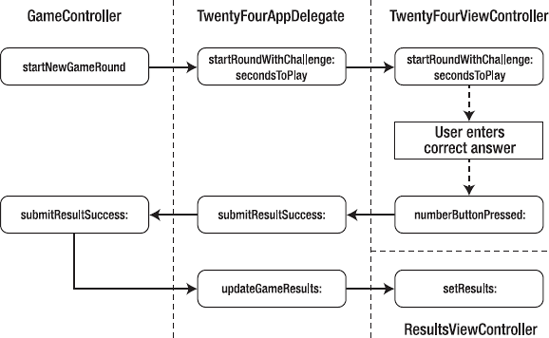
Figure 15.7. GameController is in charge of directing the flow of the game. TwentyFourAppDelegate is simply passing messages around. TwentyFourViewController is responsible for the UI.
For the multiplayer version, we need to move most of the decision-making over to the server, which includes coming up with challenges and aggregating results, leaving the client to be the go-between for the game UI and the server. What's the best way to accomplish that? After all is said and done, we probably want the flow to look something like the diagram shown in Figure 15-8.

Figure 15.8. GameControllerClient is responsible for communicating with the server. The rest of the app doesn't need to know about it, as the interfaces stay the same.
Notice how the middle and the right columns don't change. That's because the current version of the game has been deliberately constructed to contain all of the important logic in one spot and allow for the changes that we are looking to make to be contained to the smallest number of source files possible. We don't need to touch any of the view controllers, and TwentyFourAppDelegate will require only minor modifications. We will need to replace our current GameController class with another one that has an ability to communicate with the server by using a Connection object. Instead of rewriting GameController, we'll use it as a base, and override some of the methods. By the time we are finished with the client, you'll see why such an approach makes sense.
Figure 15-8 contains a few boxes that say "Send message to server" and "Receive message from server." But if you look at the Connection class, you will see that we still don't have any methods there that allow us to send and receive messages. Remember that we decided to leave that part for later. Well, now is the time to make the decision about what our messages will look like.
We were faced with the same problem when implementing GKPong in the previous chapter. There, we decided to pack data into byte arrays in a particular way for each message type. The final messages came out short, and the message-building code was fairly efficient, which is important for a real-time game that requires frequent communications. The downside is that the format turned out to be fairly rigid, requiring us to add a block of somewhat arcane code for each new type of message that we wanted to send. In other words, we traded flexibility for efficiency.
With TwentyFour, we are going to try something different. We can afford to sacrifice some performance in exchange for a more flexible message format. This will allow us to expand and tweak the game without needing to spend too much time making up new message types.
In general, network message construction involves two steps:
Create an object or a structure in memory that represents the message, and fill it with values.
Turn that object into an array of bytes.
For GKPong, we did both of those ourselves, by hand, so to speak. This time around, we will try to use existing tools to do some coding. In particular, the second step can be implemented using a class called NSKeyedArchiver, which automatically encodes objects into byte arrays. Whenever you need to turn the resulting block of data back into an object, you use NSKeyedUnarchiver. Both of these are part of the Foundation framework.
To accomplish the first step, we need to find a fitting data structure. Arrays aren't very convenient, since you need to remember which index corresponds to which value. It would be great if we could access values by name, which would make the code easier to understand. What does that remind you of? NSDictionary, of course! We can store and look up values using string literals and not worry about in which order to store values.
Let's implement it. Whenever a message is received, we will pass it on to the delegate via connection:receivedMessage:. In order to send a message, we need to call the new sendMessage: method. Open Connection.h and add the method definitions:
#import <Foundation/Foundation.h>

@class Connection;

@protocol ConnectionDelegate
- (void)connectionClosed:(Connection*)connection;- (void)connection:(Connection*)connection receivedMessage:(NSDictionary*)message;@end @interface Connection : NSObject { NSInputStream *inputStream; NSMutableData *incomingDataBuffer; int nextMessageSize; BOOL outputStreamWasOpened; NSOutputStream *outputStream; NSMutableData *outgoingDataBuffer; id<ConnectionDelegate> delegate; id userInfo; } @property (nonatomic, retain) NSInputStream *inputStream; @property (nonatomic, retain) NSOutputStream *outputStream; @property (nonatomic, retain) id<ConnectionDelegate> delegate; @property (nonatomic, retain) id userInfo; - (id)initWithNativeSocketHandle:(CFSocketNativeHandle)nativeSocketHandle; - (id)initWithInputStream:(NSInputStream*)istr outputStream:(NSOutputStream*)ostr; - (BOOL)connect; - (void)close;- (void)sendMessage:(NSDictionary*)message;@end
Back when we wrote Connection.m, we left one of the methods empty, in anticipation of implementing it later. Switch to Connection.m and add the following code to processIncomingData::
- (void)processIncomingData:(NSData*)data {
  NSDictionary* message = [NSKeyedUnarchiver unarchiveObjectWithData:data];
  [delegate connection:self receivedMessage:message];
}
Then add the new sendMessage: method immediately after writeOutgoingBufferToStream:
- (void)writeOutgoingBufferToStream {
  if ( [outgoingDataBuffer length] == 0 || !outputStreamWasOpened ) {
    return;
  }
  if ( ! [outputStream hasSpaceAvailable] ) {
    return;
  }

  NSInteger bytesWritten = [outputStream write:[outgoingDataBuffer bytes]
      maxLength:[outgoingDataBuffer length]];

  if ( bytesWritten == −1 ) {
    if ( [outputStream streamStatus] == NSStreamStatusClosed ||
        [outputStream streamStatus] == NSStreamStatusError ) {
      [self close];
      [delegate connectionClosed:self];
    }
return;
}
NSRange r = {0, bytesWritten};
[outgoingDataBuffer replaceBytesInRange:r withBytes:nil length:0];
}
- (void)sendMessage:(NSDictionary*)message {
NSData* rawMessage = [NSKeyedArchiver archivedDataWithRootObject:message];
int messageLength = [rawMessage length];
[outgoingDataBuffer appendBytes:&messageLength length:sizeof(int)];
[outgoingDataBuffer appendData:rawMessage];
[self writeOutgoingBufferToStream];
}Now that we have given the Connection class a language to speak, it's time to make our app talk.
Create a new class called GameControllerClient. Your GameControllerClient.h file should look like this:
#import <Foundation/Foundation.h>
#import "GameController.h"
#import "Connection.h"

@interface GameControllerClient : GameController <ConnectionDelegate> {
  Connection *gameServerConnection;
  BOOL isFullyConnected;
}
@property (nonatomic, retain) Connection *gameServerConnection;
- (void)startWithConnection:(Connection*)connection playerName:(NSString*)name;
@end
Now, switch over to GameControllerClient.m and fill in the implementation:
#import "GameControllerClient.h"

@implementation GameControllerClient

@synthesize gameServerConnection;

- (void)startWithConnection:(Connection*)connection playerName:(NSString*)name {
  self.playerName = name;
  self.gameServerConnection = connection;
  gameServerConnection.delegate = self;
  if ( ! [gameServerConnection connect] ) {
    self.gameServerConnection = nil;
    [delegate gameControllerDidNotStart];
    return;
  }
  isFullyConnected = NO;
  [gameServerConnection sendMessage:
      [NSDictionary dictionaryWithObjectsAndKeys:playerName, @"handshake", nil]];
}
- (void)submitResultSuccess:(float)seconds {
[gameServerConnection sendMessage:
[NSDictionary dictionaryWithObjectsAndKeys:[NSNumber numberWithFloat:seconds],
@"resultSuccess", nil]];
}
- (void)submitResultFailure:(NSString*)reason {
[gameServerConnection sendMessage:
[NSDictionary dictionaryWithObjectsAndKeys:reason, @"resultFailure", nil]];
}
- (void)connection:(Connection*)connection receivedMessage:(NSDictionary*)message {
if ( [message objectForKey:@"results"] ) {
    [delegate updateGameResults:[message objectForKey:@"results"]];
    if ( !isFullyConnected ) {
      [delegate gameControllerStarted];
      [delegate showGameResultsScreen];
      isFullyConnected = YES;
    }
  }
if ( [message objectForKey:@"startRound"] ) {
    if ( !isFullyConnected ) {
      [delegate gameControllerStarted];
      isFullyConnected = YES;
    }
    [delegate startRoundWithChallenge:[message objectForKey:@"startRound"]
        secondsToPlay:[[message objectForKey:@"time"] floatValue]];
  }
if ( [message objectForKey:@"status"] ) {
    [delegate updateGameStatus:[message objectForKey:@"status"]];
  }
}
- (void)stop {
if ( !isFullyConnected ) {
[delegate gameControllerDidNotStart];
}
[gameServerConnection close];
gameServerConnection.delegate = nil;
isFullyConnected = NO;
}
- (void)connectionClosed:(Connection*)connection {
if ( connection != gameServerConnection ) {
return;
}
if ( !isFullyConnected ) {
[delegate gameControllerDidNotStart];
}
else {
[delegate gameControllerTerminated];
}
gameServerConnection.delegate = nil;
isFullyConnected = NO;}
- (void)dealloc {
self.gameServerConnection = nil;
[super dealloc];
}
@endLet's break it down. In startWithConnection:playerName:, we begin by initializing a controller with a Connection object and the name of our player. In order for the server to correctly maintain a list of participants, each client will need to introduce itself whenever it connects. So, we agree to include the "handshake" key in the very first message that is sent, with its value set as our player's name. The server won't need any more information from us at this point, so having only one entry in the dictionary is sufficient. We expect to receive a reply to this message at some point in the future, which will tell us that the connection has been fully established. In the meantime, we will keep isFullyConnected set to NO.
The two methods submitResultSuccess: and submitResultFailure: were originally introduced in GameController, and we are overriding them here. In the original version, each answer was turned into a list of results that contained one element, which was then fed back to the ResultsViewController (as was shown in Figure 15-7). Now we simply send the answer to the server and have it take care of aggregating the results (shown in the top part of Figure 15-8).
Whenever we receive a message from the server, connection:receivedMessage: is called. Here, we take the message apart and try to interpret its contents:
if ( [message objectForKey:@"results"] ) {
[delegate updateGameResults:[message objectForKey:@"results"]];
if ( !isFullyConnected ) {
[delegate gameControllerStarted];
[delegate showGameResultsScreen];
isFullyConnected = YES;
}
}Whenever the incoming message includes the key "results", we take it as a cue to update ResultsViewController (shown in the bottom part of Figure 15-8). If this is a reply to our handshake, we consider ourselves to be fully connected. At this point, we want to let our delegate know that we are in business by calling gameControllerStarted, because it might have put up an activity indicator on the screen while waiting for the connection to be established, and we don't want it to be hanging there forever. Another key that we check for is called "startRound".
if ( [message objectForKey:@"startRound"] ) {
if ( !isFullyConnected ) {
[delegate gameControllerStarted];
isFullyConnected = YES;
}
[delegate startRoundWithChallenge:[message objectForKey:@"startRound"]
secondsToPlay:[[message objectForKey:@"time"] floatValue]];
}Whenever we receive such message, we know that it's time to kick off the next game round. We expect the message to contain two values of interest: an array of numbers that represents the challenge and a number of seconds that the player has to come up with an answer before the round is over. Here, we see the real power of NSKeyedArchiver, which is able to encode a whole tree of objects, which point to other objects, which point to other objects, and so on. After being turned from a byte array into a dictionary, the "startRound" message will look something like this:

The line of text on the bottom of the results view is used to keep players informed about how the game is progressing, and to warn them whenever a new round start is imminent. The server can control what that text shows by sending a "status" key:
if ( [message objectForKey:@"status"] ) {
[delegate updateGameStatus:[message objectForKey:@"status"]];
}That's it for the connection:receivedMessage method. The rest of the methods deal with closing connections and deallocating memory.
Finally, we need to actually plug our new class into the app. Remember that LobbyViewController is responsible for displaying which servers are available and allowing the user to pick one. As soon as that happens, TwentyFourAppDelegate's connectToGame: is called. At that point, GameControllerClient should be instantiated and given control over the connection to the server. Let's do that now. Open TwentyFourAppDelegate.m and add the following code:
- (void)startNewGame {
  [self showWaitingScreen];

  GameController *game = [[GameController alloc] init];
  game.delegate = self;
  [game startWithPlayerName:playerName];

  gameController = game;
}

- (void)connectToGame:(Connection*)connection {
  [self showWaitingScreen];
GameControllerClient *game = [[GameControllerClient alloc] init];game.delegate = self;[game startWithConnection:connection playerName:playerName];gameController = game;}
If you try to build the project now, you will get a compilation error at this point. Make sure to import GameControllerClient.h at the top of TwentyFourAppDelegate.m.
Notice how remarkably similar startNewGame and connectToGame: are. Depending on what the user wants to do, we instantiate the appropriate type of game controller, and the rest of the code stays exactly the same. This is an excellent example of using inheritance to change the behavior of an existing class. If the app is constructed correctly, the UI code doesn't really need to know whether the game is being played in a stand-alone mode or a server is involved. Such an approach increases reusability of the code, which is A Good Thing!
The server is the brain behind our little multiplayer game. It's the glue that makes the whole thing work together. Let's review the list of everything that we want the server to do:
Create a game room and allow clients to join it.
Whenever a new player joins, update the player list accordingly and notify all other clients about it.
Whenever a player leaves, update the player list accordingly and notify all other clients about it.
Come up with challenges.
Tell clients what the challenge is.
Collect answers from clients.
Make sure that game rounds don't go over the allotted time.
Tabulate the results.
Announce the results to the clients.
Some of the functionality already exists, and it will simply get moved around. But there are several pieces of code that we need to write from scratch. Let's begin with the ability to manage player lists.
Up until now, we have dealt with one player, and life has been simple. Each round ended with a list of results that contained only one entry. Unfortunately, those days are over. We now need to store more information, which requires some more coding.
As usual, you should understand what is it that we are trying to achieve before writing more code. For example, what does it mean for the server to "tabulate results"? Ideally, whenever a user is presented with results of a particular round, the list of players should be sorted so that the player who answered in the shortest amount of time appears at the top. If some player gave up, it should be clearly indicated, and that player's name should appear after the names of those players who came up with an answer. The same is true for players who failed to solve the challenge because time ran out. In other words, we want our ResultsViewController's view to look like the one in Figure 15-4.
This means that we will probably need an array that contains objects that describe players, and a way to sort that array according to the rules we've established. We know that each player has a name, and we know the amount of time it took the player to submit the answer. In case players don't come up with an answer, we also need a variable that will explain the reason for failure (they either gave up or ran out of time).
This is enough to start writing some code. Let's introduce a new class called Player. In Player.h, we want to have the following declarations:
#import <Foundation/Foundation.h>

@interface Player : NSObject {
  NSString *name;
  NSString *status;
  float lastResult;
  BOOL isPlaying;
}

@property (nonatomic, retain) NSString *name;
@property (nonatomic, retain) NSString *status;
@property (nonatomic, assign) float lastResult;
@property (nonatomic, assign) BOOL isPlaying;

- (void)startPlayingWithStatus:(NSString*)status;
- (void)setDidntAnswerLastRound;
- (BOOL)didAnswerLastRound;
- (NSComparisonResult)compare:(Player*)anotherPlayer;
- (NSString*)describeResult;
@end
We are budgeting in a couple of convenience methods here that will come in handy a bit later. Now, switch over to Player.m and add the following:
#import "Player.h"

@implementation Player

@synthesize name, status, lastResult, isPlaying;

- (void)startPlayingWithStatus:(NSString*)s {
self.status = s;
lastResult = MAXFLOAT;
isPlaying = YES;
}
- (void)setDidntAnswerLastRound {
lastResult = MAXFLOAT;
}
- (BOOL)didAnswerLastRound {
return (lastResult != MAXFLOAT);
}
- (NSComparisonResult)compare:(Player*)anotherPlayer {
if ( ![self didAnswerLastRound] && [anotherPlayer didAnswerLastRound] ) {
    return NSOrderedDescending;
  }
  else if ( [self didAnswerLastRound] && ![anotherPlayer didAnswerLastRound] ) {
    return NSOrderedAscending;
  }
  else if ( ![self didAnswerLastRound] && ![anotherPlayer didAnswerLastRound] ) {
    return [name localizedCaseInsensitiveCompare:anotherPlayer.name];
  }
else {
    if ( lastResult > anotherPlayer.lastResult ) {
      return NSOrderedDescending;
    }
    else if ( lastResult < anotherPlayer.lastResult ) {
      return NSOrderedAscending;
    }
    else {
      return NSOrderedSame;
    }
  }
}
- (NSString*)describeResult {
if ( lastResult != MAXFLOAT ) {
return [NSString stringWithFormat:@"%@: %.2f seconds", name, lastResult];
}
else {
return [NSString stringWithFormat:@"%@: %@", name, status];
}
}
- (void)dealloc {
self.name = nil;
self.status = nil;
[super dealloc];
}
@endLet's take a closer look at the method called compare:. Such methods are sometimes called comparators. You usually don't execute comparators directly, but instead supply them as arguments to sorting methods, which use them to figure out relative positions of two objects of the same type in an array. The sorting algorithm will proceed to call this method on each pair of elements that it needs to compare, and it will adjust the order of the list based on the return value. In our case, we will use this method to sort lists of players based on whether or not they submitted their answers and how fast they did so:
if ( ![self didAnswerLastRound] && [anotherPlayer didAnswerLastRound] ) {
return NSOrderedDescending;
}
else if ( [self didAnswerLastRound] && ![anotherPlayer didAnswerLastRound] ) {
return NSOrderedAscending;
}
else if ( ![self didAnswerLastRound] && ![anotherPlayer didAnswerLastRound] ) {
return [name localizedCaseInsensitiveCompare:anotherPlayer.name];
}Here, we want players who did submit correct responses to be placed above those that didn't (returning NSOrderedDescending will make anotherPlayer be placed before self in the list). The ones who failed to answer should be sorted by their names in an alphabetic order. Likewise, players who answered in a shorter amount of time should be placed above those who took longer:
else {
if ( lastResult > anotherPlayer.lastResult ) {
return NSOrderedDescending;
}
else if ( lastResult < anotherPlayer.lastResult ) {
return NSOrderedAscending;
}
else {
return NSOrderedSame;
}
}The next method, describeResult:, is responsible for coming up with a textual description of the player's round results—that's where the contents of the table view cells in Figure 15-4 come from.
Now that we finally have all building blocks in place, let's implement the server. I will list the complete source code for the new class, and then we will go over it step by step to cover everything that needs explaining.
Create a new class called GameControllerServer. Open GameControllerServer.h and add the following:
#import <Foundation/Foundation.h>
#import "GameController.h"
#import "SocketServer.h"
#import "Player.h"
#import "Connection.h"

@interface GameControllerServer : GameController <SocketServerDelegate,
    ConnectionDelegate> {
  SocketServer *server;
NSMutableSet *connections; NSMutableSet *connectedPlayers; Player *myPlayer; NSTimeInterval roundLength; NSDate *timeRoundStarted; NSMutableArray *challenge; BOOL isPlaying; } @property (nonatomic, retain) NSMutableArray *challenge; @property (nonatomic, retain) NSDate *timeRoundStarted; @property (nonatomic, retain) Player *myPlayer; @end
And here is the source for GameControllerServer.m:
#import "GameControllerServer.h"

@interface GameControllerServer ()
- (void)handleNewPlayer:(NSString*)name connection:(Connection*)connection;
- (void)startNewGameRound;
- (void)checkIfRoundShouldStop;
- (void)handleResultSuccess:(Connection*)connection seconds:(NSNumber*)seconds;
- (void)handleResultFailure:(Connection*)connection reason:(NSString*)reason;
- (void)tabulateResults;
- (void)broadcastMessage:(NSDictionary*)message;
@end

@implementation GameControllerServer

@synthesize challenge, timeRoundStarted, myPlayer;

- (void)startWithPlayerName:(NSString*)name {

  server = [[SocketServer alloc] init];
  server.serverName = [NSString stringWithFormat:@"%@'s game", name];
  server.delegate = self;
  connections = [[NSMutableSet alloc] init];
  connectedPlayers = [[NSMutableSet alloc] init];

  if ( ! [server start] ) {
    [self socketServerDidNotStart];
    return;
  }

  Player *player = [[Player alloc] init];
  player.name = name;
  self.myPlayer = player;
  [connectedPlayers addObject:player];
  [player release];
}

- (void)socketServerStarted {
  [delegate gameControllerStarted];
  [self startNewGameRound];
}
- (void)socketServerDidNotStart {
[delegate gameControllerDidNotStart];
server.delegate = nil;
[server release];
server = nil;
}
- (void)newClientConnected:(Connection*)connection {
connection.userInfo = nil;
connection.delegate = self;
[connections addObject:connection];
}
- (void)connection:(Connection*)connection receivedMessage:(NSDictionary*)message {
if ( [message objectForKey:@"handshake"] && connection.userInfo == nil ) {
[self handleNewPlayer:[message objectForKey:@"handshake"]
connection:connection];
return;
}
if ( [message objectForKey:@"resultSuccess"] ) {
[self handleResultSuccess:connection
seconds:[message objectForKey:@"resultSuccess"]];
return;
}
if ( [message objectForKey:@"resultFailure"] ) {
[self handleResultFailure:connection
reason:[message objectForKey:@"resultFailure"]];
return;
}
}
- (void)handleNewPlayer:(NSString*)name connection:(Connection*)connection {
  Player *player = [[Player alloc] init];
  player.name = name;
  [player setDidntAnswerLastRound];
float timeLeft = roundLength + [timeRoundStarted timeIntervalSinceNow];
if ( isPlaying && timeLeft > 20.0 ) {
    [player startPlayingWithStatus:@"New player, guessing..."];
    [connection sendMessage:[NSDictionary dictionaryWithObjectsAndKeys:
        challenge, @"startRound",
[NSNumber numberWithFloat:timeLeft], @"time", nil]];
  }
  else {
    player.status = @"Just joined, itching to play!";
    player.isPlaying = NO;
  }
connection.userInfo = player;
  [connectedPlayers addObject:player];
[self tabulateResults];
if ( isPlaying ) {
[connection sendMessage:[NSDictionary dictionaryWithObjectsAndKeys:
@"Waiting for answers...", @"status", nil]];
}
else {[connection sendMessage:[NSDictionary dictionaryWithObjectsAndKeys:
@"Next round will start shortly...", @"status", nil]];
}
}
- (void)connectionClosed:(Connection*)connection {
id player = connection.userInfo;
connection.userInfo = nil;
connection.delegate = nil;
[connections removeObject:connection];
if ( player ) {
[connectedPlayers removeObject:player];
[player release];
[self tabulateResults];
[self checkIfRoundShouldStop];
}
}
- (void)startNewGameRound {
isPlaying = YES;
roundLength = 100.0;
self.timeRoundStarted = [NSDate date];
self.challenge = [self makeNewChallenge];
[connectedPlayers makeObjectsPerformSelector:
@selector(startPlayingWithStatus:) withObject:@"Still guessing..."];
[self broadcastMessage:[NSDictionary dictionaryWithObjectsAndKeys:
challenge, @"startRound",
[NSNumber numberWithFloat:roundLength], @"time",
@"Waiting for answers...", @"status", nil]];
[delegate startRoundWithChallenge:challenge secondsToPlay:roundLength];
[delegate updateGameStatus:@"Waiting for answers..."];
[self tabulateResults];
if ( nextRoundTimer ) {
[nextRoundTimer invalidate];
}
self.nextRoundTimer = [NSTimer scheduledTimerWithTimeInterval:roundLength+2.0
target:self selector:@selector(stopGameRound) userInfo:nil repeats:NO];
}
- (void)checkIfRoundShouldStop {
if ( !isPlaying ) {
return;
}
NSEnumerator *enumerator = [connectedPlayers objectEnumerator];
Player *player;
while ((player = (Player*)[enumerator nextObject])) {
if ( player.isPlaying ) {
return;
}
}
isPlaying = NO;
[nextRoundTimer setFireDate:[NSDate date]];}
- (void)stopGameRound {
[self broadcastMessage:[NSDictionary dictionaryWithObjectsAndKeys:
@"Next round will start shortly...", @"status", nil]];
[delegate updateGameStatus:@"Next round will start shortly..."];
if ( nextRoundTimer ) {
[nextRoundTimer invalidate];
}
self.nextRoundTimer = [NSTimer scheduledTimerWithTimeInterval:10.0
target:self selector:@selector(startNewGameRound) userInfo:nil repeats:NO];
}
- (void)stop {
if ( nextRoundTimer ) {
[nextRoundTimer invalidate];
}
server.delegate = nil;
[server stop];
[connections makeObjectsPerformSelector:@selector(close)];
[connections release];
connections = nil;
}
- (void)handleResultSuccess:(Connection*)connection seconds:(NSNumber*)seconds {
Player *player = connection.userInfo;
if ( player ) {
player.lastResult = [seconds floatValue];
player.isPlaying = NO;
[self tabulateResults];
[self checkIfRoundShouldStop];
}
}
- (void)handleResultFailure:(Connection*)connection reason:(NSString*)reason {
Player *player = connection.userInfo;
if ( player ) {
[player setDidntAnswerLastRound];
player.status = reason;
player.isPlaying = NO;
[self tabulateResults];
[self checkIfRoundShouldStop];
}
}
- (void)submitResultSuccess:(float)seconds {
myPlayer.lastResult = seconds;
myPlayer.isPlaying = NO;
[self tabulateResults];
[self checkIfRoundShouldStop];
}
- (void)submitResultFailure:(NSString*)reason {
[myPlayer setDidntAnswerLastRound];
myPlayer.status = reason;
myPlayer.isPlaying = NO;
[self tabulateResults];[self checkIfRoundShouldStop];
}
- (void)tabulateResults {
NSArray *results = [[connectedPlayers allObjects]
sortedArrayUsingSelector:@selector(compare:)];
NSMutableArray *textResults = [NSMutableArray arrayWithCapacity:[results count]];
for( int ndx = 0; ndx < [results count]; ndx++ ) {
Player *p = [results objectAtIndex:ndx];
[textResults addObject:[p describeResult]];
}
[self broadcastMessage:[NSDictionary dictionaryWithObjectsAndKeys:
textResults, @"results", nil]];
[delegate updateGameResults:textResults];
}
- (void)broadcastMessage:(NSDictionary*)message {
[connections makeObjectsPerformSelector:
@selector(sendMessage:) withObject:message];
}
- (void)dealloc {
server.delegate = nil;
[server release];
[connections release];
[connectedPlayers release];
self.myPlayer = nil;
self.timeRoundStarted = nil;
self.challenge = nil;
[super dealloc];
}
@endThe startWithPlayerName: method does all of the setup. We allocate two mutable sets that will hold live connections to the server, and Player objects that describe all of the players who are playing. The direct user of our app is also considered to be one of the players.
Note
What is an NSMutableSet and why are we using it instead of, say, an array? The official definition of a set is "an unordered collection of distinct elements." You can also think of it as a bag of items. Arrays contain elements in order, and the order is not important to us at the moment. Plus, sets do provide a performance benefit sometimes, which isn't too big of a deal in this particular app, but is pretty cool nevertheless. If you ask a set to check whether or not a particular element is a member, it takes less CPU time to do so than with an array. If you wanted to remove an element from an array, you would need to know its index to get the best performance. We don't want to be dealing with indexes, which means that the array would need to scan all of the elements to locate the one we are removing; a set can perform such removal faster.
In order to allow others to connect to us, we create a socket server. If it starts up successfully, we can begin playing the game. Otherwise, we let the delegate know that something went wrong.
Whenever a client connects to our socket server, the newClientConnected: delegate method will be called. At that point, we store the connection in the set, therefore retaining it and preventing it from being deallocated.
But we don't consider the connection to be fully established until we receive a handshake, which we check for in the connection:receivedMessage: delegate method, which is called whenever a message comes from one of the connected clients. The other two keys that we recognize tell us about whether or not that particular player found a correct answer to a challenge. Instead of processing it on the spot, we call helper methods, which we will cover a bit later.
Whenever a handshake does come in, it gets processed by the handleNewPlayer:connection: helper method. Before we can do anything, a Player object needs to be created:
- (void)handleNewPlayer:(NSString*)name connection:(Connection*)connection {
Player *player = [[Player alloc] init];
player.name = name;
[player setDidntAnswerLastRound];After that, we face a dilemma: If a player joins the game in the middle of a round, should we let her play or should we make her wait until the next round starts? I'm a big proponent of keeping players engaged at all times, unless it creates confusion. We are happy to throw a new player right in the thick of things, unless there isn't really enough time left in the round for the player to have a fair chance of finding a solution. (How would you feel if I teased you with a problem and gave you only few brief seconds to think about it, let alone punch in the answer?)
The way we calculate remaining time might seem a bit counterintuitive at first. Why would we be adding the two values instead of subtracting one from the other?
float timeLeft = roundLength + [timeRoundStarted timeIntervalSinceNow];
But keep in mind that since timeRoundStarted points to a moment in the past when the current round started, timeIntervalSinceNow will return a negative value, as per the documentation for NSDate.
If we have more than 20 seconds left in this round, the new player is free to participate, and we immediately send a "startRound" message, which will cause that client to update its UI accordingly. Otherwise, that player will need to wait for the next round to begin before getting a chance to compete:
if ( isPlaying && timeLeft > 20.0 ) {
[player startPlayingWithStatus:@"New player, guessing..."];
[connection sendMessage:[NSDictionary dictionaryWithObjectsAndKeys:
challenge, @"startRound",[NSNumber numberWithFloat:timeLeft], @"time", nil]];
}
else {
player.status = @"Just joined, itching to play!";
player.isPlaying = NO;
}Whenever a message arrives from one of the clients, we definitely know which connection it came through, because we are passed a Connection object along with the message itself (take a look at connection:receivedMessage: again). But we also need to know which Player object each connection is associated with in order to process game results correctly. To make our lives easier, the Connection class includes a property called userInfo of type id, which allows us to assign anything we want to it. When a new Player object is created, we immediately associate it with the connection, in addition to inserting it into the set that holds all of our players:
connection.userInfo = player; [connectedPlayers addObject:player];
Now that we have a new player, we want everyone to know about her. Calling tabulateResults will cause an updated list of results (that includes our new participant) to be distributed to all the clients:
[self tabulateResults];
We want to keep the new player informed about what's going on in the game as much as possible, which is why we are sending a "status" message at the very end of the method. The isPlaying variable tells us whether a game is in progress or we are between rounds right now:
if ( isPlaying ) {
    [connection sendMessage:[NSDictionary dictionaryWithObjectsAndKeys:
        @"Waiting for answers...", @"status", nil]];
  }
  else {
    [connection sendMessage:[NSDictionary dictionaryWithObjectsAndKeys:
        @"Next round will start shortly...", @"status", nil]];
  }
}
Everyone who joins the game will inevitably leave at some point. We face this fact of life every time that a client connection is closed and the connectionClosed: delegate method is called. Here, we simply reverse the setup that was done in newClientConnected: and handleNewPlayer:connection:.
The next group of methods is responsible for controlling the game flow and creating challenges for players to solve. The startNewGameRound method consists of three parts.
First, it sets up various variables that describe the state of the game:
- (void)startNewGameRound {
  isPlaying = YES;
roundLength = 100.0; self.timeRoundStarted = [NSDate date]; self.challenge = [self makeNewChallenge];
At this point, we also need to reset that state of all participating Player objects, which is done by calling the startPlayingWithStatus: method on every one of them:
[connectedPlayers makeObjectsPerformSelector:
      @selector(startPlayingWithStatus:) withObject:@"Still guessing..."];
Second, we need to send a "startRound" message to all of the connected players, and update our local UI (you might recognize those two delegate method calls from the original GameController implementation):
[self broadcastMessage:[NSDictionary dictionaryWithObjectsAndKeys:
      challenge, @"startRound",
      [NSNumber numberWithFloat:roundLength], @"time",
      @"Waiting for answers...", @"status", nil]];
  [delegate startRoundWithChallenge:challenge secondsToPlay:roundLength];
  [delegate updateGameStatus:@"Waiting for answers..."];
Once again, in order to keep everyone updated on the last list of players and their status, we rebuild and resend aggregate results. All of the players will have their status appear as "Still guessing...":
[self tabulateResults];
The final part of the method ensures that roughly 100 seconds from now, at the latest, the round will be stopped, by scheduling a timer that will call stopGameRound:
if ( nextRoundTimer ) {
    [nextRoundTimer invalidate];
  }
  self.nextRoundTimer = [NSTimer scheduledTimerWithTimeInterval:roundLength+2.0
      target:self selector:@selector(stopGameRound) userInfo:nil repeats:NO];
}
But the round might actually be over sooner. If we run out of players who are still thinking about the solution, we don't really want to wait for the full 100 seconds to elapse. That's what checkIfRoundShouldStop is for. In it, we use a handy object called an enumerator to check every Player object in our set to see if that player is still guessing:
NSEnumerator *enumerator = [connectedPlayers objectEnumerator];
  Player *player;
  while ((player = (Player*)[enumerator nextObject])) {
    if ( player.isPlaying ) {
      return;
    }
  }
Every time we ask for nextObject, the enumerator will pick out a new object from the set and return it to us, and we can then inspect it. Whenever we run out of objects, nil will be returned, terminating the loop. Keep in mind that this is a read-only operation, as it doesn't modify the contents of the set.
If we go through all of the players without finding anyone who has yet to submit an answer, the round is officially over. Instead of letting nextRoundTimer fire whenever it was originally scheduled to do so, we will force it to fire immediately by resetting its fireDate to "now":
isPlaying = NO;
  [nextRoundTimer setFireDate:[NSDate date]];
Two things happen when stopGameRound gets called. First, we tell everyone that the next round will start soon by sending a "status" message to connected players and calling a delegate method to update our own UI:
[self broadcastMessage:[NSDictionary dictionaryWithObjectsAndKeys:
      @"Next round will start shortly...", @"status", nil]];
  [delegate updateGameStatus:@"Next round will start shortly..."];
Then we schedule nextRoundTimer to fire again in 10 seconds, and to call startNewGameRound this time:
if ( nextRoundTimer ) {
    [nextRoundTimer invalidate];
  }
  self.nextRoundTimer = [NSTimer scheduledTimerWithTimeInterval:10.0
      target:self selector:@selector(startNewGameRound) userInfo:nil repeats:NO];
In this way, we create a loop in which startNewGameRound and stopGameRound take turns being called, guaranteeing that the game keeps running until the app shuts down or the player who is hosting this particular game server decides to leave (at which point, stop will be called, giving us a chance to break the timer chain and do some cleanup).
And how does this sequence get set in motion? If you go back to the "Initialization" section, you'll notice that the very first time startNewGameRound gets called is right at the point where our socket server gets the go-ahead—in socketServerStarted. If you drew a picture of the game's life cycle, it would look something like Figure 15-9.
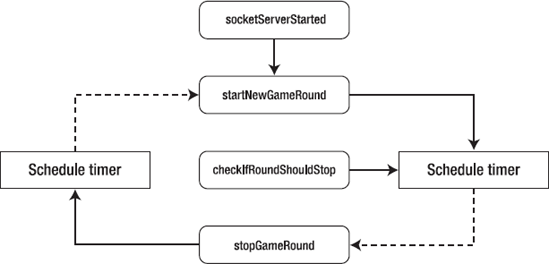
As we are going through the code, keep in mind that besides serving clients that are connected to us over the network, we also have a player who uses the same app on which the game server is running to play the game. During each round, solutions to the challenge might come from two different directions, and we must process them both. That's why we have two sets of result-processing methods:
handleResultSuccess:seconds:andhandleResultFailure:reason:are invoked byconnection:receivedMessage:to handle answers that come from remote players.submitResultSuccess:andsubmitResultFailure:handle our local participant.
The only difference between the two is how they get their hands on the Player object.
Whenever a player comes up with the correct solution, we record how long it took her to give the answer, mark that particular player as "no longer playing in this round," and retabulate and redistribute results:
player.lastResult = [seconds floatValue];
    player.isPlaying = NO;
    [self tabulateResults];
This is also a good time to see if we have finally collected all of the answers and can stop the round:
[self checkIfRoundShouldStop];
If the answer is wrong, we use the Player object's status property to record the reason why it was incorrect. If you search through TwentyFourViewController.m for mentions of submitResultFailure, you'll see that wrong answers come in two flavors: a player either runs out of time or gives up.
How do we tabulate the results? It turns out to be a relatively easy task. First, we turn the connectedPlayers set into an array and sort it using the comparator that we created as part of the Player class:
NSArray *results = [[connectedPlayers allObjects]
      sortedArrayUsingSelector:@selector(compare:)];
But we are only interested in our results list containing the textual description of each result, not a whole Player object. To accomplish that, we insert NSStrings that describe each player's result into another array:
NSMutableArray *textResults = [NSMutableArray arrayWithCapacity:[results count]];
  for( int ndx = 0; ndx < [results count]; ndx++ ) {
    Player *p = [results objectAtIndex:ndx];
    [textResults addObject:[p describeResult]];
  }
After we have our list, it is distributed to all of our connected clients. To keep everything in sync, we also update our local UI via a delegate method:
[self broadcastMessage:[NSDictionary dictionaryWithObjectsAndKeys:
      textResults, @"results", nil]];
[delegate updateGameResults:textResults];Now that we have the final piece, it's time to complete the puzzle. Let's start the game server whenever a user taps the "Start new game" button in the lobby view. Switch over to TwentyFourAppDelegate.m. Write an import statement for GameControllerServer.h at the top of the file, and then modify startNewGame to use our new server class:
- (void)startNewGame {
  [self showWaitingScreen];

  GameController *game = [[GameController alloc] init];
  GameControllerServer *game = [[GameController alloc] init];
  game.delegate = self;
  [game startWithPlayerName:playerName];

  gameController = game;
}
How's that for surgical precision?
This chapter was a pretty intense ride. Not only did we need to cover how to use sockets and connections, but we also had to pay close attention to how the game logic itself is laid out in order to keep the code manageable and reuse as much of it as possible.
Whenever you develop a game from scratch, it pays off to think about it as a multiplayer game from the very beginning, even if you don't have any plans (yet) to take it there. Such an approach imposes a certain order on the code that you'll be writing, and makes you think about your app as a set of coupled components, rather than a monolith that will be very difficult to debug when you need to come back to it in a couple months.