
Chapter 10
MapKit & Tables with Storyboarding
There are five things I want you to bear in mind regarding this chapter:
- Continuation of Chapter 9: Chapter 10 takes what you learned in Chapter 9 and injects it with steroids. You will need to go over what you learned in Chapter 9 and go right into Chapter 10. In the lecture hall, I make my students in class run Chapter 9 in twenty minutes, that’s if they want a grade and then, immediately after emailing me a screenshot of their completed project, we go right into Chapter 10. May I suggest that, if you have taken a couple of days off after ending Chapter 9, that you too make yourself repeat Chapter 9 a couple of times until you can do it under twenty minutes. Even if you have to do it 15 times, do it over and over again before trying this chapter.
- Non-trivial: When you're done with Chapter 10, you will have really accomplished something you can be proud of. Yes, on one hand students shriek with laughter when we debate what level of geekdom a student will be at a certain point, but the truth is that after you've completed this app, you will be able to get work as an Objective-C programmer, or at least be able to hold a decent conversation with an interviewer who will not believe you classified yourself as an absolute beginner. Neither did Apple when they hired a student of mine to work in their iOS 5 development in Cupertino. Eight months earlier, she'd never owned a Mac and was studying the first edition of this book, so take this seriously; this chapter will be a defining chapter in your life.
- Big Picture: As true as you are reading these words, there WILL be a time when this code will bog you down and, if you were in my lecture hall and I saw you overwhelmed and freaking out, I would walk up to you and remind you of the Big Picture. Throughout this chapter, I will bring you back to the Big Picture, which, in a nutshell, is a storyboard containing a table that is populated with many city names. We go to Google's server and fetch the geospatial addresses of each of these cities and, when the user taps on one of the cities listed in your table, we travel along another segue that instantiates a MapKit that drops a pin in the center of that city.
- Chapter Outline: Chapter 10 has very little preliminaries because I want you to seamlessly keep your momentum from Chapter 9 right into 10. I will explain where the help files and videos are, how to use them if you choose to, and how these are different from previous help files.
- DO NOT GIVE UP: Chapter 10 tests you and I want you to break through. Listen to me when I say that nobody is going to do Chapter 10 in one try! You will have to start from scratch repeatedly. This issue of starting over is, in fact, the key: After spending a little time debugging, just start again from scratch. Please do not say to yourself: “Oh I can't get this, look I've tried this 5 times and I can't get through it! ” It's OK to fail and start again and I really want you to get through this. I want to see you go to the forum and tell everybody you got through Chapter 10! OK? Yeah!
NOTE: It has come to my attention that a few of my students do not pronounce the word segue correctly. Here are some of the amazing renditions of this word I've heard from my students: “Seeg”, “Seg-you”, “Zeeyoo”, “Suh-goo-wee”, and, of course, “Sega”, as in the game system! Really! If you did not know it already Segue is pronounced as follows: “Seg-way”. That's my way of defining it. The proper and correct way, as defined by The Merriam-Webster Dictionary, is as follows:
se·gue se-( )gwā, sā-
1 : proceed to what follows without pause—used as a direction in music
2 : perform the music that follows like that which has preceded—used as a direction in music
Origin of SEGUE: Italian, there follows, from seguire to follow, from Latin sequi — First Known Use: circa 1740.
myStory_02: A Single-View Application
In myStory_02, we divide the project into Parts 1 and 2. In Part 1, we use storyboarding to create a simple table that is populated by an array of cities. The length of the list will be whatever the “count” of the number of cities on the list is that you have or make up. When a user selects one of the cities on the list, nothing really happens. However, it's important to know that your application works at this point before moving forward. You can take a sneak peek at this by going to Figure 10–26. Then, in Part 2, we send the list of cities that populate our table to the Google server where we parse the server for the longitudinal and latitudinal addresses for each city. We store these address and, when the user selects a city, we “go” from the table, through the segue, and onto a View with a UIMapKit that instantiates a map of the city with a pin dropping into the city-center.
Possible Prepping for the App
Let's prep ourselves with two sets of terminology: “Parsing” and “going up onto the internet”. We will be using the word “parse” quite a lot and, even though I was reticent to include parsing when I designed my course and this book, I decided on erring on teaching you something that is so fundamental to be able to code in this day and age: parsing is writing code that allows you to enter a server and extract only the terms you want from your database. For example, the Google server may have 6,000 associated pointers, links, and terms associated with the city of Durban, South Africa. We will parse the Google server, ignoring everything except for the longitudinal and latitudinal address of Durban. Think of the millions of application that need to go to a server somewhere and extract only the information that the user wants? This is critical coding, and I'm going to show you exactly how to do this (and make it look really cool on your iPad).
Of course you know that the Internet is not “up” in the air or a cloud. Yes, a certain amount of data is sent up to satellites but then comes back down to earth and travels through lines until it gets to a server. Having iPad and iPhone apps that can grab important data from a particular server is critical. I once had a student who wrote a final class project app that parsed the server of Colorado Springs' traffic cameras located here in Colorado. After parsing the correct images from the city server, he sent a couple of snap shots per second of each intersection back to the iPhone app so the user could “see ahead” at intersections and make decisions based on the amount of traffic at the intersection. Beautiful! However, as bright as this student was, when standing in the front of the lecture hall, he pointed to the sky when he described how he wrote the code to parse the server. I asked him if he knew that the server was located only 4 miles from campus. He looked at me and said: “So, it does not go up into the cloud?”
Even I point up at the clouds when I say go onto the internet but I want you to remember that, when we parse the Google server, we don't care where it is or how we got there. We are only concerned with whether our code correctly parses the server for only the information that is important to us.
Preliminaries
This chapter's download files are a little different from previous tutorials. Of course one does not have to download anything. You can follow along with the book and run the app perfectly sans the video, the source code, or the download files. I suggest you first try to do it without the video, download files, or source code. However, if you feel inclined to utilize the download files, you will want to pay attention to the following. The download files contain 6 images and 9 boilerplate codes. They are set forth as shown in Table 10–1:
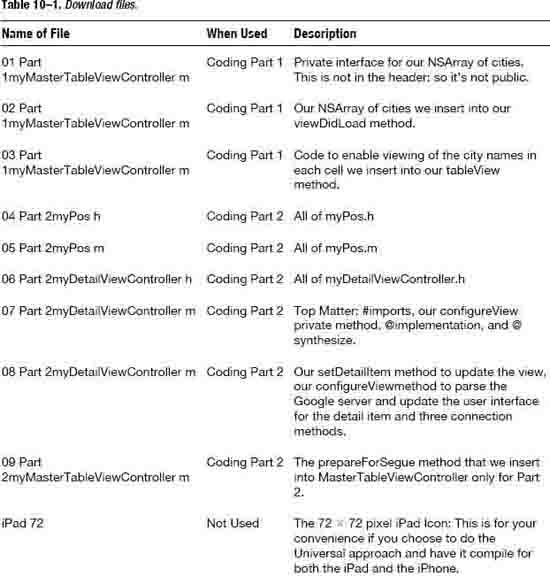
These download files can be located at http://bit.ly/nvc3Xk. One can download the sample code that I programmed on the video here: http://bit.ly/raKxPe. To view the screencast of this chapter's exercise, go to http://bit.ly/pEsztt.
THE BIG PICTURE
A New Single View Template
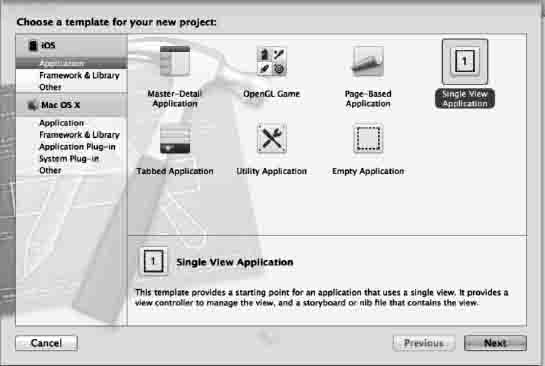
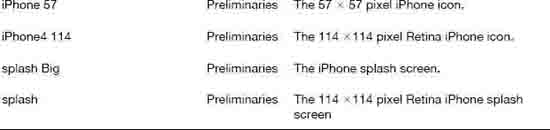
Figure 10–1. Select the Single View Application icon, and press return or next.
1. As in myStory_01, we will use a Single View Application. So open Xcode and enter ![]()
![]() N,
N,
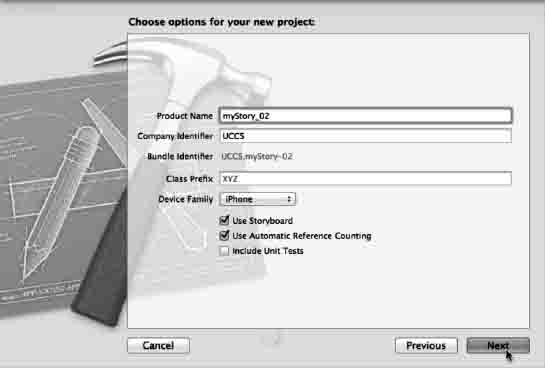
Figure 10–2. Name your app myStory_02 making sure Storyboard and automatic referencing is on.
2. In order to follow along with me as closely as you can, name it “myStory_02”, select “iPhone”, check the “Use Storyboard” and “Use Automatic Reference Counting” but leave the “Class Prefix” and “Include Unit Tests” unchecked, as shown in Figure 10–2. Automatic Referencing is really out of the scope of this book but, in very basic terms, Automatic Reference Counting (ARC) is code that invokes your Mac's automatic memory management for Objective-C objects and blocks. This frees the experienced programmer from the need to explicitly insert retains and releases.
Bring in the Images!
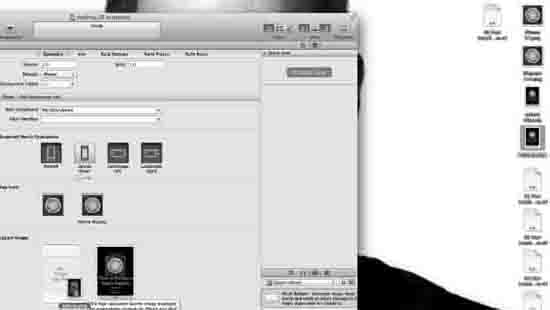
Figure 10–3. Drag in your graphics.
3. Just as we did in myStory_01 after going to my website at http://bit.ly/oqnNM7 and downloading the images and boilerplate code onto your desktop, drag in the 57 by 57 px for the iPhone classic, the 114 × 114 px for the iPhone 4S Retina Display. Also bring in the 640 × 960px splash screen for iPad and iPhone Retina displays and, as shown in Figure 10–3, drag in the 320 by 480px for the classic iPhone.
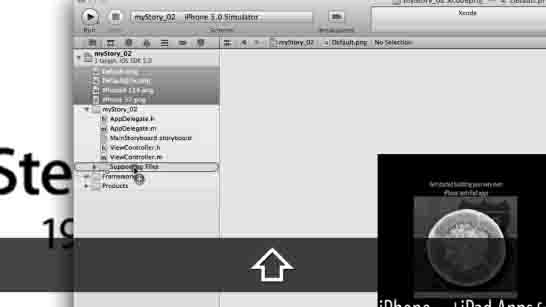
Figure 10–4. Drag the images into the Supporting Files Folder.
4. Because we always want to keep thing nice and orderly and in their proper place, you will see that the files holding the images you just dragged into Xcode are in the root directory. We want to drag them into their proper location – the Supporting Files folder. This is illustrated in Figure 10–4.
Organize Storyboard
One of the most benign ways one can really get lost in Storyboarding is not focusing on exactly how your structures connect and associate with your objects in Storyboarding. It is so easy to look at the Storyboard canvas and believe everything is great while not noticing that the wrong element is actually connected. So, make sure you follow along exactly as I am here.
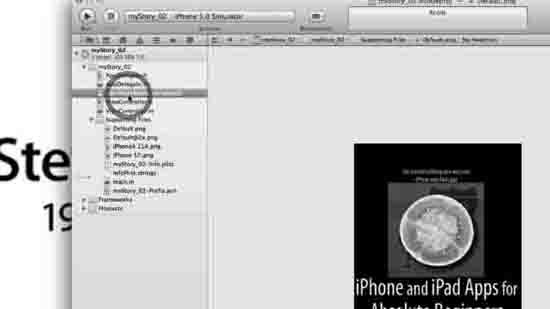
Figure 10–5. Select the Storyboard.
5. Select the storyboard, as shown in Figure 10–5.
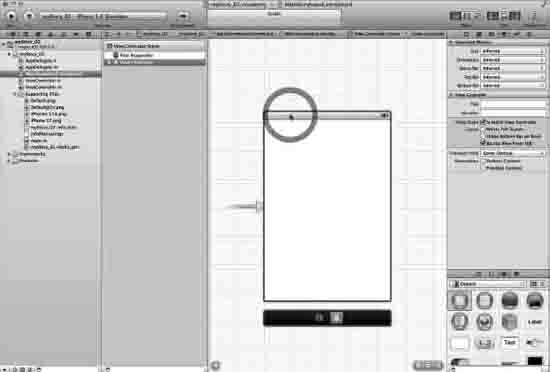
Figure 10–6. We do not want a View Controller here.
6. When Storyboard first opens up, you'll see a View Controller, as shown in Figure 10–6. We are selecting the default view Controller because we need to delete it. This is quite easy to grasp: we want a TableView with all its bells and whistles, the ones that are not there if you merely add a table onto a View Controller. We will make our own view Controller later. Right now, we need to delete the default View Controller, so go ahead and do it, as shown in Figure 10–6.
THE BIG PICTURE
Adding the Table View Controller
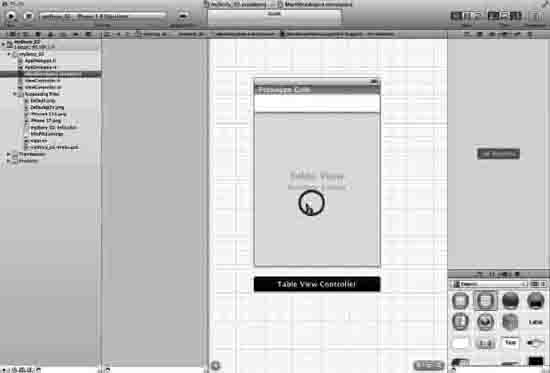
Figure 10–7. Drag a Table View Controller onto the canvas.
7. As mentioned, we need to have a fully loaded Table View to hold our array of cities and interact with Storyboarding and MapKit. So drag a Table View Controller onto the canvas, as shown in Figure 10–7.
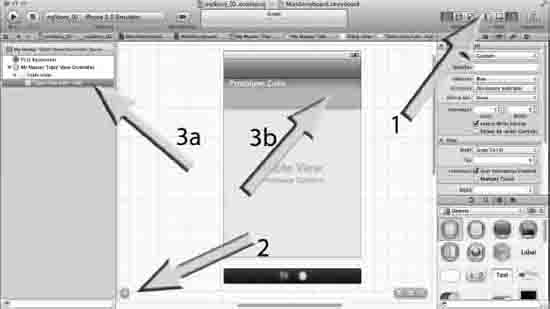
Figure 10–8. Selecting the Table View Cell - Cell
8. Something that is really cool and innovative about Storyboarding is that, we can edit the Table View right here in Storyboarding. The tricky thing is that navigating yourself around the canvas can be challenging.
- In order to select the Table View Cell - Cell if you need to unclutter your screen. First Close Navigator (Figure 10–8, arrow 1)
- Then make sure that your Document Outline is open (Figure 10–8, arrow 2)
- Then, in your My Master Table View Controller Scene, select the Table View Cell - Cell open (Figure 10–8, arrow 3a).
- Now, it is true that you could select it by clicking the prototype cell on the Storyboard (Figure 10–8, arrow 3b). However, I do NOT want you to get into the habit of selecting objects on the canvas because many experienced Objective-C coders have learned the very hard way that sometimes the object we think we've selected is actually under the object we actually selected. Many painful hours later, or redoing the code and bugging endlessly, we found our error. The other reason for not getting into the habit of selecting on the Storyboard is that by making you open the Document Outline and selecting the correct object in its pane, it helps one visualize where we are.

Figure 10–9. Name the Identifier “Cell” and save your work.
9. We are going to want to reuse the nib cells. In other words, rather than create a massive list of cells, we'll just use one and reuses it for whatever the number of cities we have in our array. This means we need to give its Identifier a name that we can reuse, so let's just call it “Cell”, as shown in Figure 10–9.
THE BIG PICTURE
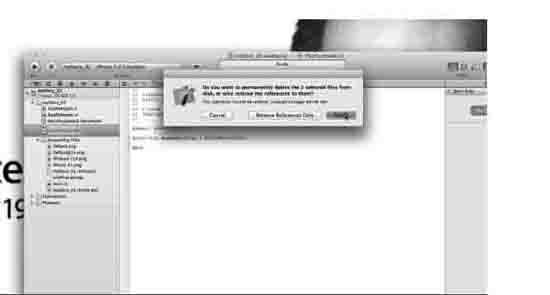
Figure 10–10. Delete the original view Controller.
10. We see that what we just built in the Storyboard was built with the original View Controller. We need to build our own View Controller so delete both its header and implementation files, as shown in Figure 10–10.
NOTE: Make sure that you delete the entire class, not just its references.
THE BIG PICTURE: EXPANDED STEPS 10 - 17
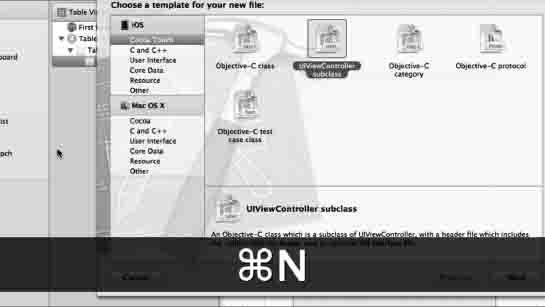
Figure 10–11. Create the first of our two UIViewController subclasses.
11. Now that we've deleted the table's default ViewController, we need a new backing class file to hold our cities and code structures that will enable a table to be populated with a list of cities. We will need two UIViewController subclasses, one to do exactly this and another to grab all the data we need from the Google server. We will also need a “My Position “ (myPos) Objective-C class just like we did in myStory_01 to hold the current location. So let's start building these 3 classes: Enter ![]() N and select a
N and select a UIViewController subclass, as shown in Figure 10–11.
THE BIG PICTURE
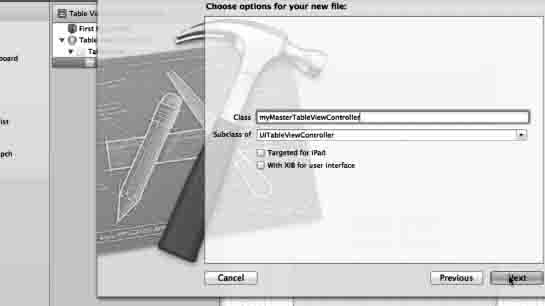
Figure 10–12. Name it myMasterTableViewController.
12. We need to make sure that this new class we are creating is a subclass of UITableViewController because we need it to know how to do table actions, such as hold our cities in the table. So, after you name it myMasterTableViewController, please make sure you make sure it's a subclass of UITableViewController because, if you don't, you'll be crying later. See Figure 10–12.
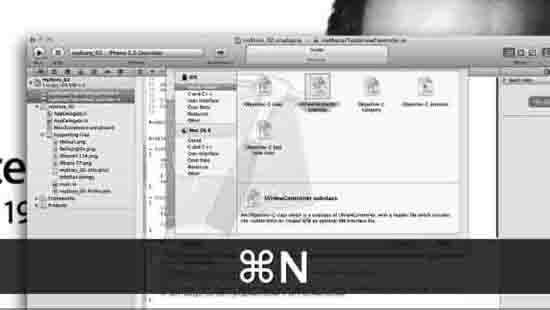
Figure 10–13. Create the first of our two UIViewController subclasses.
13. Once you have created your myMasterTableViewController, enter ![]() N again and select another UIViewController subclass, as shown in Figure 10–13.
N again and select another UIViewController subclass, as shown in Figure 10–13.
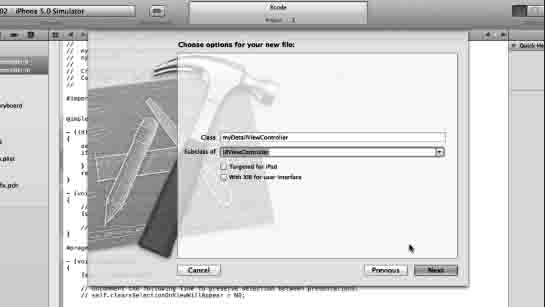
Figure 10–14. Name thisUIViewController subclass myDetailViewController.
14. ThisUIViewController subclass is going to be more involved with parsing the Google server and interacting between myPos and the View the user sees. So, after naming it myDetailViewController, make sure it's not a subclass of a UITableViewController but rather a subclass of a UIViewController, as shown in Figure 10–14.
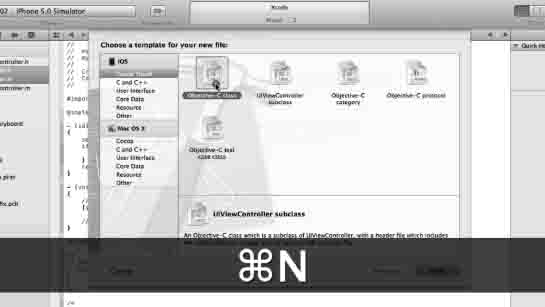
Figure 10–15. Select an Objective-C class
15. We've created our two UIViewController subclasses and now we need to create our 3rd class, an Objective-C class. So let's do it: enter ![]() N again and select an Objective -C class, as shown in Figure 10–22
N again and select an Objective -C class, as shown in Figure 10–22
THE BIG PICTURE
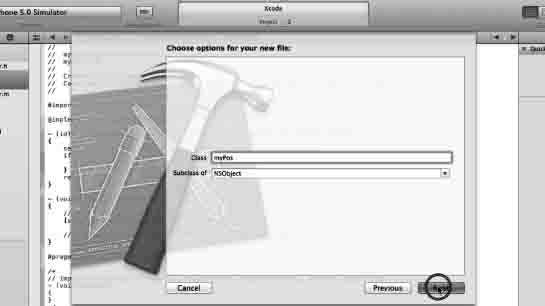
Figure 10–16. Name it myPos
16. Just as we did in myStory_01, this needs to be an NSObject subclass. Once you've made sure of this and named it myPos, click next or press enter, as shown in Figure 10–16. Let's move on.
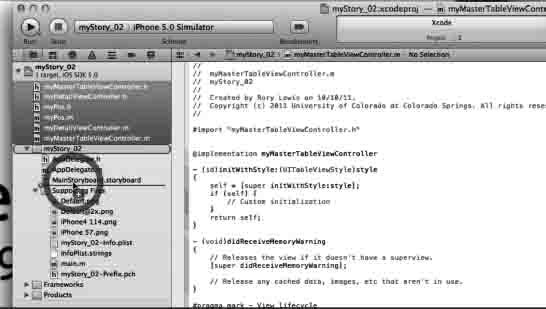
Figure 10–17. Housekeeping part1: Drag the files into your myStory_02 folder.
17. These classes need to be placed into our myStory_02 file because, if you don't and you're my student, you lose a letter grade for your project. If you're not one of my students and working for somebody, they will not look kindly upon you at all. If you're working for yourself and you do not organize your files, then God help you because not only will your life become very miserable with huge amounts of negative karma pouring all over you, but the folks in the iTunes store who ratify your code will have zero respect for you if they see messy organization and then your life will really be bad. Get the picture? This is shown in Figure 10–17.
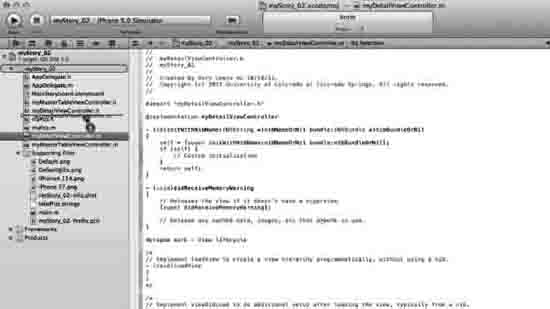
Figure 10–18. Housekeeping part 2: organize your header and implementation files.
18. After you have brought your files into your mySTory_02 folder, you will notice that your .h and .m files are together. This is not good. You need to put each class' header and implementation files together as shown in Figure 10–18
Coding myMasterTableViewController
In the video, I simply drop in the boilerplate code to save time. Here we will go through each line so that you can learn. So if you have any problem with writing all this code, please get over it. It's the only way you can learn how to code. Rather than throwing a bucket of paint onto the surface of a canvas, we are going talk about how each little stroke of code makes a beautiful Mona Lisa. A beautiful app that makes you feel great about yourself, teaches you how to write apps, and make money! OK, let's get to it. We need to do five things: create a private interface for our NSArray of cities, insert the actual NSArray of cities, have the table return 1 section, have the number of rows equal the number of cities, and enable viewing of the city names in each cell.
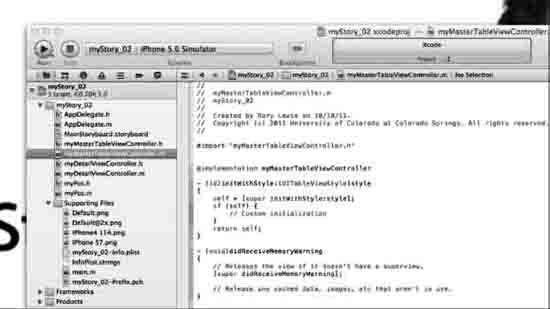
Figure 10–19. This is how your myMasterTableViewController implementation file looks when you open it.
19. We are now ready to code the myMasterTableViewController implementation file. Click on the myMasterTableViewController.m file located in your myStory_02 folder inside the root folder. Figure 10–19 shows how the myMasterTableViewController.m file looks when we open it.
THE BIG PICTURE: CODING MYMASTERTABLEVIEWCONTROLLER: STEPS 20 to 22
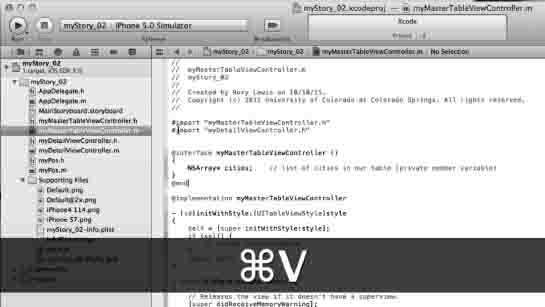
Figure 10–20. Select and open myMasterTableViewController.m.
20. Figure 10–20 shows the boilerplate paste of the private interface for our NSArray located in your download file “01 Part 1myMasterTableViewController.m”. We are going to type it in though and talk about it. We need to do two things. First, we are going to import the myDetailViewController header file and then create our private interface that contains a list of cities. We'll make it an NSArray with a pointer that will contain our cities, as you will see further below in the code. For now though, just remember that to make it a private member variable (we're doing it mainly as an exercise we could put this in the header file but then its public and I want to show you how to make it private because often lists of things need to be private). To make it private, we need to start with our @interface with name of the class followed by closed brackets () and then end it with an @end, as shown below
#import "myDetailViewController.h"


@interfacemyMasterTableViewController ()

{

NSArray* cities;

}

@end

Figure 10–21. Create an array with a list of cities.
21. We need to allocate the array we are pointing to in our private array. In other words, we need to create an array, which we have already called “cities” in our private Interface. We are initializing the “cities” variable with a new array we will construct. So let's make cities be an NSArray that has objects in it. It goes on until it sees the nil at the end of it. Feel free to enter your own cities if you like. See the code below and the code in “02 Part myMasterTableViewController m” being pasted In Figure 10–21.
cities = [NSArrayarrayWithObjects:@"New Delhi", @"Durban", @"Islamabad",

@"Johannesburg", @"Kathmandu", @"Dhaka", @"Paris", @"Rome", @"Colorado Springs", @"Rio

de Janeiro", @"Beijing", @"Canberra", @"Malaga", @"Ottawa", @"Santiago de Chile", nil];
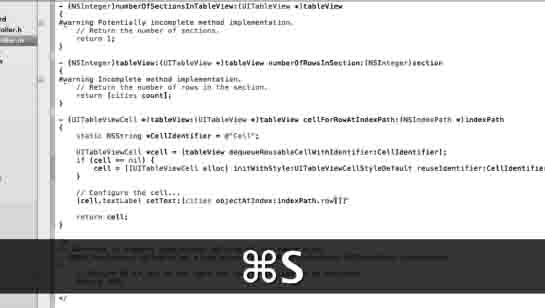
Figure 10–22. Finish coding myMasterTableViewController.m
22. We need to do three small tweaks to make sure our table can handle the list of cities we gave it and pop it onto the TableView. We need to have the table return 1 section, have the number of rows equal the number of cities, and, finally, enable viewing of the city names in each cell:
a. Have the table return 1 section: Go to numberOfSectionsInTableView and add the return1 after the comment. By default, it contains return 0 already. Be advised to remove or change this. Otherwise, you may wind up with two return statements and be very upset.
NOTE: The normal weight code is the default code that the clever people at Apple have already coded for us. The bold text is what you will need to enter.
- (NSInteger)numberOfSectionsInTableView:(UITableView *)tableView

{

    // Return the number of sections.

    return 1;

}
b. We now need to modify the table view methods for our purposes. We need to first have the number of rows equal the number of cities. Go to numberOfRowsInSection and we'll make the number of rows be dynamic, which means that no matter the amount of cities we put into the table, we'll make the return be the count of the total cities:
- (NSInteger)tableView:(UITableView *)tableView numberOfRowsInSection:(NSInteger)section

{
// Return the number of rows in the section.
return [cities count];
}
c. Lastly we need to make sure that the city names show up in the cell. We need to grab the appropriate city names that we will show in each cell from the index and insert it into the textLabel. Go to the bottom of tableViewcellForRowAtIndexPath and enter the following.
NOTE: Right now I do not want you to be concerned about the meaning of each line of grey code that Apple has coded on our behalf. At this point, I just want you to accept that it works and we will continue.
- (UITableViewCell *)tableView:(UITableView *)tableView

cellForRowAtIndexPath:(NSIndexPath *)indexPath

{

   static NSString *CellIdentifier = @"Cell";

    UITableViewCell *cell = [tableView

dequeueReusableCellWithIdentifier:CellIdentifier];

    if (cell == nil) {

        cell = [[UITableViewCell alloc] initWithStyle:UITableViewCellStyleDefault

reuseIdentifier:CellIdentifier];

    }

    // Configure the cell...

    [cell.textLabel setText:[cities objectAtIndex:indexPath.row]];

    return cell;

}
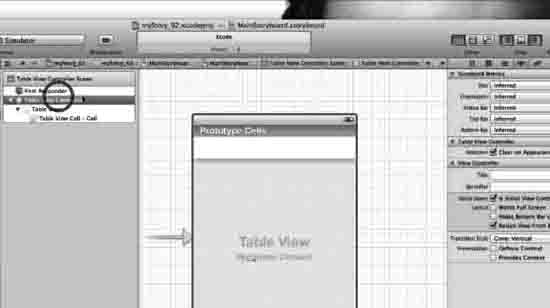
Figure 10–23. Go back to Storyboard and select the Table View Controller.
23. We need to associate the Table View with myMasterTableViewController. Go back into Storyboard and select the Table View Controller in the Document Outline, as shown in Figure 10–23.
THE BIG PICTURE: CODING MYMASTERTABLEVIEWCONTROLLER: STEPS 24 to 26.
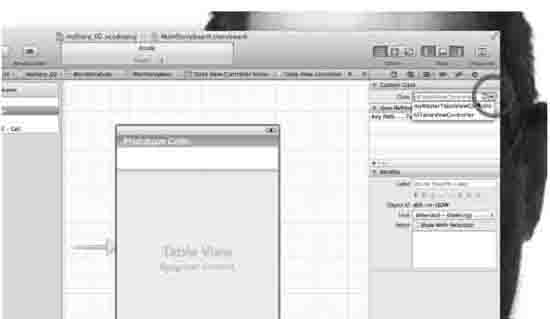
Figure 10–24. Select myMasterTableViewController.
24. Select the Identity inspector in the Utilities. Then, in Custom Class, open the drop down menu in Class and select myMasterTableViewController, as shown in Figure 10–24. This ensures that all the code we wrote in Steps 20-22 is now going grind away underneath our Table View and make magic!

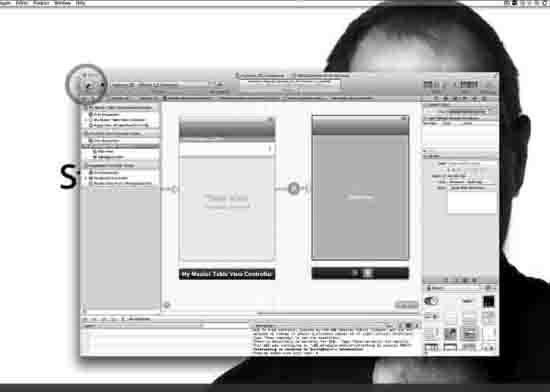
25. We need to run it. See Figure 10–25.

Figure 10–26. A beautiful Splash screen takes us to a populated table.
26. Make sure we see a splash screen appear and then a table populated with our list of cities, as shown in Figure 10–26. Sure enough, we see a splash screen, Lulu fruit and all. Then we see a table that is populated with our cities. It's not doing much at all when you click on it, but it's there. We're done with the first part of myStory_02.
THE BIG PICTURE
Part 2
Let's take a deep breath and look around. If it was the lecture hall, I'd have you look at the latest greatest “Fail” videos on YouTube or play a Grateful Dead song like Ripple. Yes, the students know I'm completely whacko but, having had an acute brain injury and epilepsy, I know a little bit about the brain and, as a human, I know we need to rest.
We've successfully populated our table with a list of cities. Now, in Part Two, we will send that list of cities to Google, parse out the geospatial addresses of each city, store them, and then shoot them out to the MapKit when a user selects a city on our list.
Looking at the big picture below, one can see that we need to add the MapKit framework, do the code to make this work, and then tweak Storyboard to accept out new code.
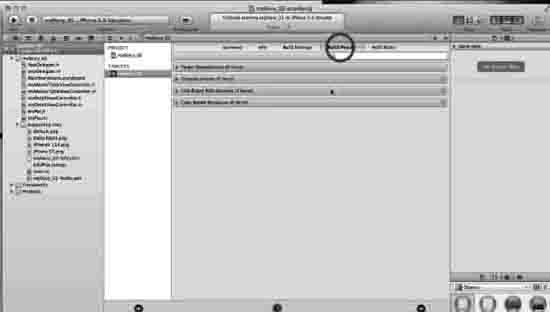
Figure 10–27. Click on Build Phases to so you can add the MapKit framework.
27. We need to add the MapKit framework just as we did on myStory_01. So go to your root directory and click on the Build Phases tab, as shown in Figure 10–27.
THE BIG PICTURE: OVERVIEW OF PART 2
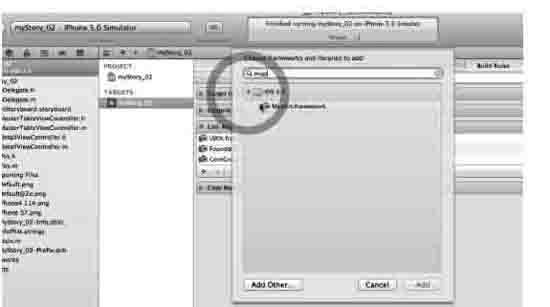
Figure 10–28. Enter “map” to locate the MapKits framework!
28. Now click on the Link Binaries with Libraries bar and click on the “+”. When the pop-up window appears, enter map to search for the MapKit framework. Select it, as shown in Figure 10–28, and click the Add button.
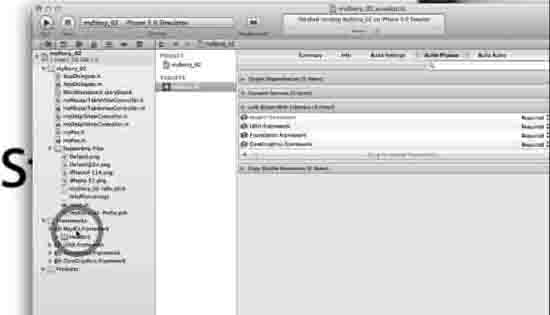
Figure 10–29. Move the MapKit framework from the root folder to the Frameworks folder.
29. The MapKit framework appears in the root directory just as it did in Figure 9-18 in myStory_01. Except there we also had Corelocation. Here we do not because we'll use Google's. Again, you will need to drag it to where the framework belongs, the Frameworks folder, as shown in Figure 10–29.

Figure 10–30. Open myPos header file and either code or paste in the proper code.
30. We will now code the myPos header file. I highly encourage you to not simply paste it into your header file as I did on the video. You will learn NOTHING by doing that. Follow along with me and you will learn how to code. Remember that myPos is handling the public interface and, in its header file, we need to set the two main fields, which are the name and the geospatial address of our cities. The names of the cities will be stored at the address pointed to by title. The geospatial longitudinal and latitudinal addresses of each city will be handled by 2-Dimensional location method and stored in a variable we'll name coordinate.
NOTE: The CLLocationCoordinate2D is a structure that contains our geospatial coordinate using the World Geodetic System (WGS 84) reference frame, which is takes it locations from the core of the earth and know that it's off by 2 centimeters!
When we first open the myPos.h file, we see the following:
#import <Foundation/Foundation.h>

@interface myPos : NSObject

@end
The first thing we do is addMapKitby entering #import <MapKit/MKAnnotation.h>. Next we insert <MKAnnotation> after the given @interface myPos :NSObject. We use the MKAnnotation protocol every time we need to use annotation-related information in a map view. Next, we set our CLLocation class reference to incorporate the geospatial coordinates and altitude of our device by entering CLLocationCoordinate2Dcoordinate, which will use a variable I've called coordinate. We also need to store the name of the city, which we will do in the title using NSString. Finally, we create @property statements for both the location and title of each city. Your code for the myPos header file will now look as shown in Figure 10–30 or as follows:
#import <Foundation/Foundation.h>

#import <MapKit/MKAnnotation.h>


@interface myPos : NSObject <MKAnnotation>

{

    CLLocationCoordinate2D _coordinate;

    NSString *_title;

}


@property (nonatomic, assign) CLLocationCoordinate2D coordinate;

@property (nonatomic, copy) NSString *title;


@end
NOTE: In the @property for our name of the city, which is a string we use (nonatomic, copy), I just want you to remember that, without getting all screwed up in the details, as a general rule, always use (nonatomic, copy) with strings.
THE BIG PICTURE: CODING OVERVIEW
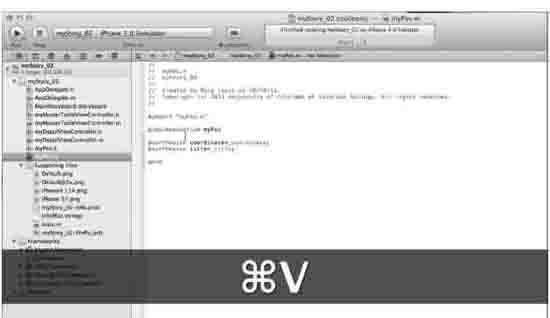
Figure 10–31. Now we open up the myPos Implementation file.
31. All we need to do in the implementation of the myPos header file is synthesize your coordinate and titles. The final code is shown in Figure 10–31.
#import "myPos.h"

@implementation myPos


@synthesize coordinate=_coordinate;

@synthesize title=_title;


@end
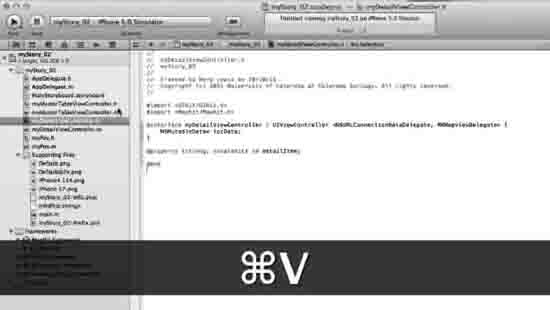
Figure 10–32. Open the myDetailViewController header file to paste or code it.
32. We now need to build the myDetailViewController class. Let's first import our MapKit and MapKit header file by entering #import <MapKit/MapKit.h> after the #import <UIKit/UIKit.h>. Now, looking at @interface myDetailViewController, we need to base it on the UIViewController and we are going support the myDetailViewController class with protocols first for connecting datadelegates and secondly for supporting map viewdelegates by coding <NSURLConnectionDataDelegate, MKMapViewDelegate>. With this done, we assign our local data to the NSMutableData as shown. Next we need to make a public property for the detail item, which we will set to prepare for the segue that will connect the table to the map view. Last, let's set the @property for this by entering @property (strong, nonatomic) id detailItem. Save it all and, before moving on to the implementation of this code in the implementation file, please check your code against Figure 10–32 or what is shown below.
#import <UIKit/UIKit.h>

#import <MapKit/MapKit.h>


@interface myDetailViewController : UIViewController <NSURLConnectionDataDelegate, MKMapViewDelegate> {

    NSMutableData* locData;

}


@property (strong, nonatomic) id detailItem;


@end
Coding the myDetailViewController.m file
You are about to embark on the most advanced section of code I have used in the book. This is the section that will most probably let you down and crash. Because of this, I am open to you pasting a couple of the larger sections of code from my code. I want you to keep your cool and just follow along. I will show you how to code this and where to paste each specific set of boilerplate code. But first, let's take another look at the big picture.
THE BIG PICTURE: MYDETAILVIEWCONTROLLER.M EXPANDED.
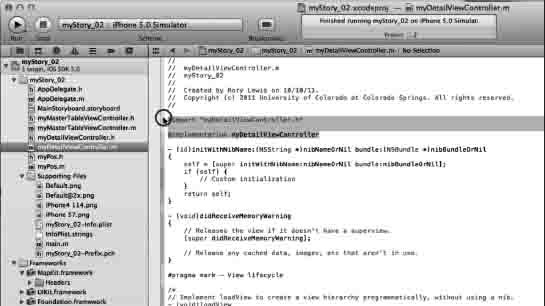
Figure 10–33. Open up the myDetailViewController implementation file.
33. As one can see from looking at the Big Picture, the myDetailViewController is going to contain a significant amount of code so let's start by coding the code found in the “07 Part 2myDetailViewController m” boiler plate code. Open the file, as shown in Figure 10–33.
a. We first need to import the myPos.h file because, when we setup the zoom and pin drop code, we use title and coordinate for the myPos annotation.
#import "MyPos.h"
b. Next we need configure our view as a private method by using a forward declaration of our method that you will code later. You can see what I mean here by looking at the code before my comment below // private method. We are declaring configureView. Do you see it anywhere yet? Nope? That's because we have yet to code it. But we will. It's private because it starts with the @interface [name of this class] followed by a () and then ends with an @end
@interface myDetailViewController ()

- (void)configureView;  // private method

@end
c. Lastly, for this top section, we need to synthesize the property.
@synthesize detailItem=_detailItem;
This is all the code in the “06 Part 2myDetailViewController h” file and it should look as follows:
#import "myDetailViewController.h"

#import "myPos.h"
@interface myDetailViewController ()
- (void)configureView; // private method
@end
@implementation myDetailViewController
@synthesize detailItem=_detailItem;
Don't be concerned if at this point you receive a warning about an incomplete interface, we will be taking care of it right now. But before moving on, let's look at the Big Picture again. As one can see, we have just completed 2.2.2.2.1 thru to 2.2.2.2.3.in step 33. In the next two steps (34 and 35), we will complete 2.2.2.2.4 thru to 2.2.2.2.5. (Everything between “Code the configureView method” and “Setup zoom and pin drop”.)
THE BIG PICTURE

Figure 10–34. Place your cursor in-between @end and the end of shouldAutorotate.
34. We are now going to code a means to access the Google server, fetch data, and bring it back to the iPhone or iPad. For parsing and other heavy-duty code, I like to insert such code soon after the shouldAutorotateToInterfaceOrientation method but of course before the @end of the class I am coding. In our case, we have no choice but you will see that, in the myMasterDetailViewController when we insert the segue method, this can be far from the bottom of the code. So place your cursor as indicated and illustrated in Figure 10–34.
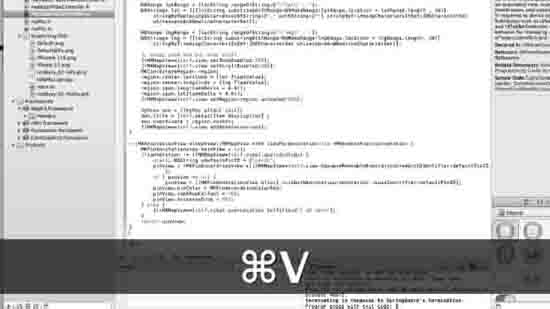
Figure 10–35. Let's parse the Google server.
35. I do not have a problem with you pasting the “08 Part 2myDetailViewController m” boilerplate code that parses the Google server because we all use it over and over. We all use and tweak it here and there. If you skipped my instruction in step 34, make you sure you know where to paste it. I will also go through the critical sections that you need to know and tweak. The odds are that Apple will soon make a class or framework to do this because we all use this code to parse servers. After pasting the code where it need to be, let's go through it.
a. Go back to where we began this last section of code. We first need to import the myPos.h file because, when we setup the zoom and pin drop code, we use title and coordinate for the myPos annotation. The first method we see is the setDetailItem, as shown below. We set the detailItem so it can be used and then, once it's stored locally, we'll configure the view which, in other words, means making a new map that will redraw itself when a change is needed. The configureView is the huge method that is next in the myDetailViewController.m
- (void)setDetailItem:(id)newDetailItem

{

if (_detailItem != newDetailItem) {

_detailItem = newDetailItem;


// Update the view.

        [selfconfigureView];

    }

}
b. The next item we look at is the configureView method that is a utility method and called internally. This is where the real action happens. First, let's look at how we get onto the server. We go to the server associated with mapURI, which in our case is the API geocode at Google, maps.googleapis.com. We're going to ask it for a city and make the code take care of the spaces, whether denoted by a space or a “%20”
NSString* mapURI =

@"http://maps.googleapis.com/maps/api/geocode/json?address=city&sensor=false";

        mapURI = [mapURI stringByReplacingOccurrencesOfString:@"city"

withString:[self.detailItem description]];

        NSURL* mapURL = [NSURL URLWithString:[mapURI

stringByReplacingOccurrencesOfString:@" " withString:@"%20"]];
Well, you can see above that we've told the server that we want data but the issue is how the server returns that data to us. This is where the NSURL protocols we'll use do the work but we have to call them by calling connection
NSURLConnection* connection = [NSURLConnection connectionWithRequest:[NSURLRequest

requestWithURL:mapURL] delegate:self];

        if (connection)

            locData = [NSMutableData data];
Here you can see how “connection” consists of three parts:
connection:(NSURLConnection *)connection didReceiveResponseconnection:(NSURLConnection *)connection didReceiveDataconnectionDidFinishLoading:(NSURLConnection *)connection
The connectionDidFinishLoading:(NSURLConnection *)connection is the method that actually collects the longitudinal and latitudinal data from the Google server and stores it.
- (void)connectionDidFinishLoading:(NSURLConnection *)connection {


NSRegularExpression* regex = [NSRegularExpressionregularExpressionWithPattern:@"location.*?\}"

options:NSRegularExpressionDotMatchesLineSeparators

error:nil];

NSString* dataString = [[NSStringalloc]

initWithData:locDataencoding:NSASCIIStringEncoding];

NSTextCheckingResult* locResult = [regex firstMatchInString:dataString

options:0range:NSMakeRange(0, [dataString length])];

NSString* locString = [dataString substringWithRange:[locResult range]];


NSRange latRange = [locString rangeOfString:@""lat" : "];

NSString* lat = [[[locString substringWithRange:NSMakeRange(latRange.location +

latRange.length, 20)] stringByReplacingOccurrencesOfString:@","withString:@""]

stringByTrimmingCharactersInSet:[NSCharacterSetwhitespaceAndNewlineCharacterSet]];


NSRange lngRange = [locString rangeOfString:@""lng" : "];

NSString* lng = [[locString substringWithRange:NSMakeRange(lngRange.location +

lngRange.length, 20)]

stringByTrimmingCharactersInSet:[NSCharacterSetwhitespaceAndNewlineCharacterSet]];
// setup zoom and pin drop stuff
[(MKMapView*)self.viewsetZoomEnabled:YES];
[(MKMapView*)self.viewsetScrollEnabled:YES];
MKCoordinateRegion region;
region.center.latitude = [lat floatValue];
region.center.longitude = [lng floatValue];
region.span.longitudeDelta = 0.01f;
region.span.latitudeDelta = 0.01f;
[(MKMapView*)self.viewsetRegion:region animated:YES];
MyPos* ann = [[MyPosalloc] init];
ann.title = [self.detailItemdescription] ;
ann.coordinate = region.center;
[(MKMapView*)self.viewaddAnnotation:ann];
}
c. Since we also need to handle the map delegation as a protocol, we have one more piece of code to handle here. Most of this, we do not use, but it does drop the pin for us. In the lecture hall, I make my students play around with changing the animation, the pin color, and the setTitle. Suffice to say we just drop it in as you too will find yourself doing. I encourage you to also play with at least the pinView.pinColor = MKPinAnnotationColorRed, the pinView.canShowCallout = YES, and the pinView.animatesDrop = YES.
(MKAnnotationView *)mapView:(MKMapView *)mV

viewForAnnotation:(id<MKAnnotation>)annotation {

    MKPinAnnotationView *pinView = nil;

    if(annotation != ((MKMapView*)self.view).userLocation) {

        static NSString *defaultPinID = @"pinID";

        pinView = (MKPinAnnotationView *)[(MKMapView*)self.view

dequeueReusableAnnotationViewWithIdentifier:defaultPinID];

        if ( pinView == nil )

            pinView = [[MKPinAnnotationView alloc] initWithAnnotation:annotation

reuseIdentifier:defaultPinID];

        pinView.pinColor = MKPinAnnotationColorRed;

        pinView.canShowCallout = YES;

        pinView.animatesDrop = YES;

    } else {

        [((MKMapView*)self.view).userLocation setTitle:@"I am here"];

    }

    return pinView;

}


@end
But the most important thing that I stress here is that you CANNOT be freaked out if you do not know what every piece of the code does. You do not know what every single part of your car's engine does to drive it. Similarly, you have enough right here above to know how to connect to a server, parse out what you want, and animate it as you like. Enough said. Get over it and move on. If as you move on you find you need to parse a server, go ahead, use this code, tinker around with it, and make it work.
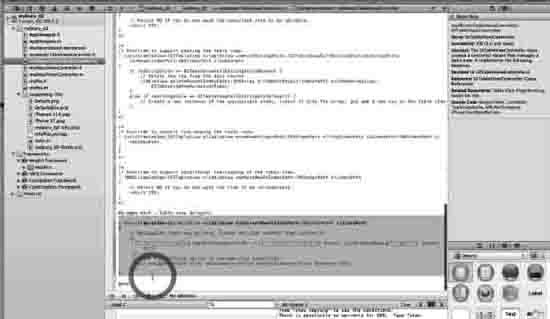
Figure 10–36. Select and delete the tableView method.
38. OK, we are through with the myDetailViewController and it's now time to do some housekeeping in the myMasterTableViewController. So, open it up and scroll down to the bottom of the myMasterTableViewController.m until you get to the tableView method. What I want you to see here is that this is the method we used when we used the table View delegate before storyboarding. The thing is that we now use storyboarding, so we no longer need it. Select it all, as shown in Figure 10–36, and either comment it out or delete it. In the video, I delete it out.
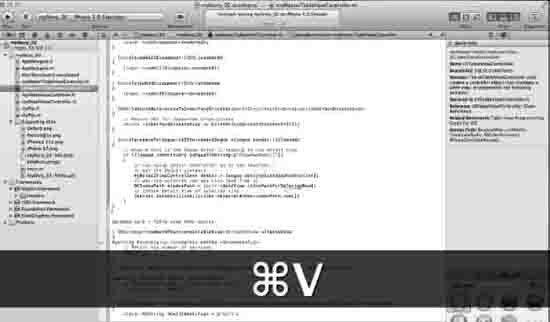
Figure 10–37. Create the prepareForSegue method.
37. Staying in the myMasterTableViewController implementation file, we need to look ahead and imagine that we are just about to create a segue that leads from our table to the MapKit, which in essence takes the place of the tableView method we just deleted. We will need a method to handle this. Again, you can either download the “09 Part 2myMasterTableViewController.m” boilerplate file or you can code along with me. Go to the end of the shouldAutorotateToInterfaceOrientation method, create a couple of blank line, and let's start coding or pasting the code in and following along.
a. The first thing to note here is that we have already imported the myDetailViewController.h file in step 20.
b. Now we need to tell the myDetailViewController what city to show and we do this with:
NSIndexPath *indexPath = [self.tableView indexPathForSelectedRow];
c. We need to also make it only tell myDetailViewController if we're going to navigate through the segue. But the problem is that we need to tell the compiler the name of the segue it needs to keep a look out for us but we've yet to give this segue a name. So let's give it a name now!
d. Let's call it ShowMapDetail. We also need the code that we will need to check if this segue is being used and then, if the segue called ShowMapDetail is, in fact, being used.
e. We know we are going to be going to a detailViewController so we grab the city name from the current and selected row because the user just clicked one.
f. We also set and create a detail item, the details of the city, as follows:
- (void)prepareForSegue:(UIStoryboardSegue *)segue sender:(id)sender

{

    // ensure this is the Seque which is leading to the detail view

    if ([[segue identifier] isEqualToString:@"ShowMapDetail"])

    {

        // now setup detail controller so it can function...

        // get the Detail instance

        MyDetailViewController* detail = [segue destinationViewController];

        // get the selected row and city name from it

        NSIndexPath *indexPath = [self.tableView indexPathForSelectedRow];

        // inform Detail View of selected city

        [detail setDetailItem:[cities objectAtIndex:indexPath.row]];

    }

}
Tweaking the Storyboard
We now have written or pasted all the code we need to parse the Google server for the geospatial specifics of each city we populated in our list on Part 1, and we also have the code to route these coordinates through a segue, which does not exist yet, through to a MapKit that will have a pin drop down into the middle of the selected city. In short, we need something that will contain our MapKit Framework and, to do this, we will add a navigation controller and a detail view. We will have to create a new View Controller and bring it onto the canvas. Then we need to connect the Master View to the Detail View and add a MapView to its Navigation. Looking at the big picture expanded, we see the following below.
THE BIG PICTURE: STORYBOARD TWEAKING EXPANDED
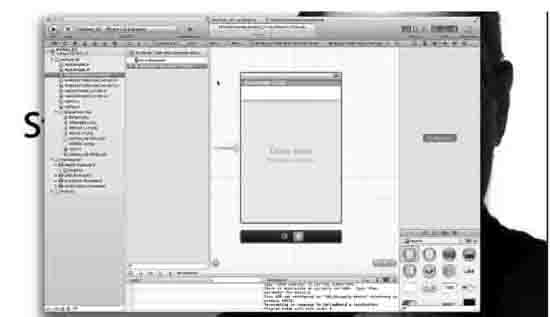
Figure 10–38. Open up the Storyboard for some final tweaking.
38. With this said, let's open up the Storyboard, as shown in Figure 10–38

Figure 10–39. Add a Navigation Controller.
39. We need to add a Navigation controller, so select Editor ![]() Embed
Embed ![]() Navigation Controller, as shown in Figure 10–39.
Navigation Controller, as shown in Figure 10–39.
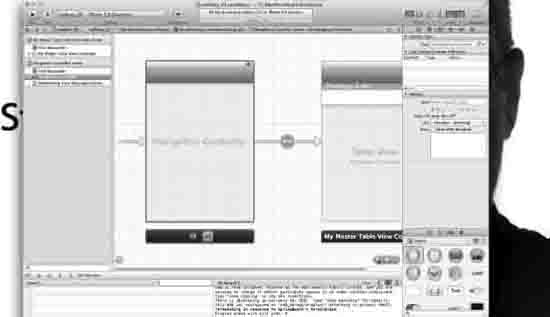
Figure 10–40. The new Navigation Controller automatically connects to the Table View.
40. As we can see in Figure 10–40, the new navigation controller automatically connects to our Table View. Make some space on your Storyboard by closing the Navigator.

Figure 10–41. Add Detail View that will contain our MapKit Framework.
41. Zoom out so you can see more of the canvas. Now scroll to the left so you have a large area of blank canvas to the right of your Table View. Now grab a View Controller and drag it onto the canvas to the right of the Table View, as shown in Figure 10–41.
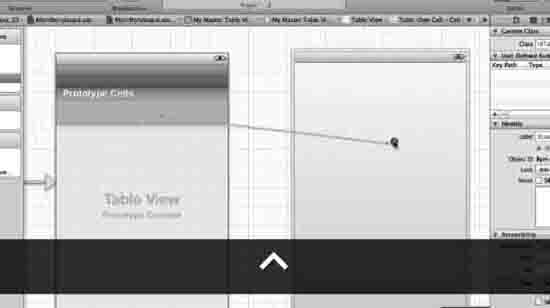
Figure 10–42. Create a segue.
42.We now need to connect the Master View and the Detail View with a segue - specifically with a push. To do this, I want you to select the cell in the Master View and then control drag from the cell to the View, as shown in Figure 10–42.
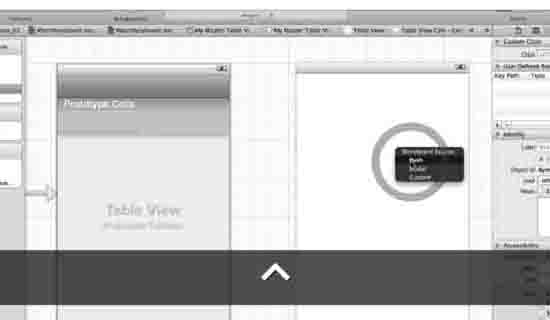
Figure 10–43. Select Push.
43. After you have controlled dragged from the cell to the View, you will see a drop down menu occur with three options of segue connectivity: Push, Modal, and Custom. We want to select Push. This is shown in Figure 10–43.
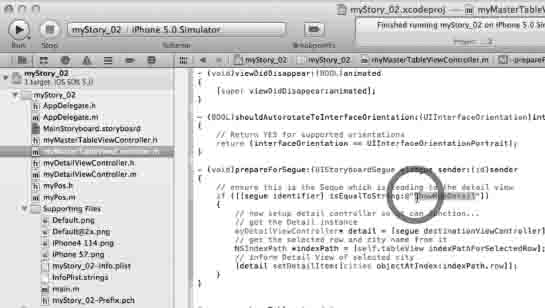
Figure 10–44. Remember the name we gave the segue?
44. We now need to give the segue that we just created the name we gave it in the prepare for segue method in the myMasterTableViewController.m class. In case you forgot the name you gave it, or even if you remember it, go back and copy the name of the segue so that your brain can make the connections. This is illustrated in Figure 10–44
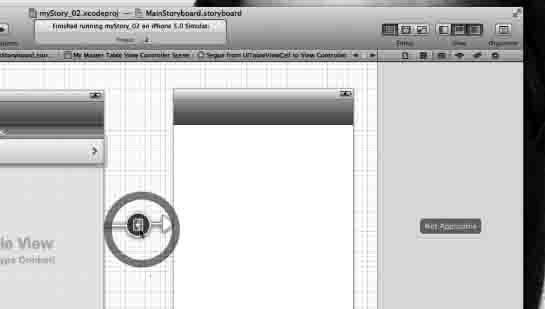
Figure 10–45. Select the segue.
45. This may sound really unnecessary but students have the most difficult time naming segues because they forget to first select it. I know it's new but it's amazing how many forget to do this. For this reason, I've taken the time to specifically include this image in the book. Select the segue, as shown in 10–45, and then we will give it its name.

Figure 10–46. Paste the name in the Identifier.
46. Once you have selected the segue connecting the UITableViewCell to the Detail View Controller, paste the name in the Identifier box, as shown in Figure 10–46.
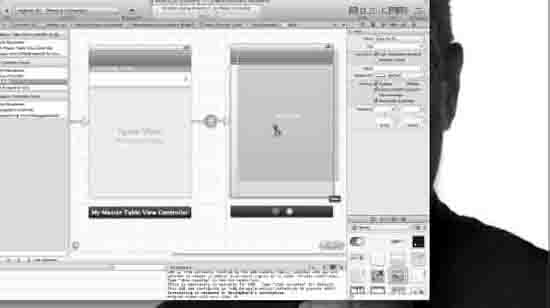
Figure 10–47. Drag a Map View onto the View.
47. We now have everything connected for the map to appear on the view except … ahh - the Map View! Grab a Map View from the Library and drag it onto the View, as shown in Figure 10–47.
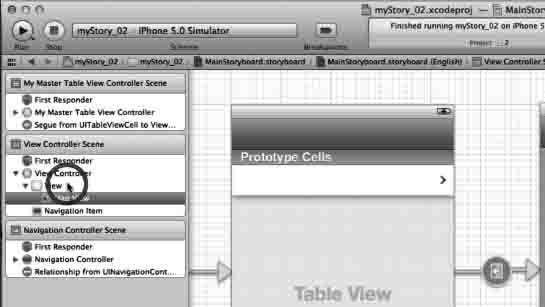
Figure 10–48. Select the Map View.
48. We now need to make the Map View become the Primary View. As you can see in Figure 10–48, the View is above the Map View. In geek terms, we say that the Map View is subordinate to the View and the View is currently the primary view. Remember how I said that Views lying on top of one another can be very confusing. Well, there's a reason I'm investing three images into this point.

Figure 10–49. Drag Map View on top of the View.
49. Right now, the Map View that we just dragged onto the View is subordinate to the view. To make the view go away and have the Map View be the primary view, select the View Controller in the view Controller Scene in the Document Outline and then drag the Map View above the View, as shown in Figure 10–49.
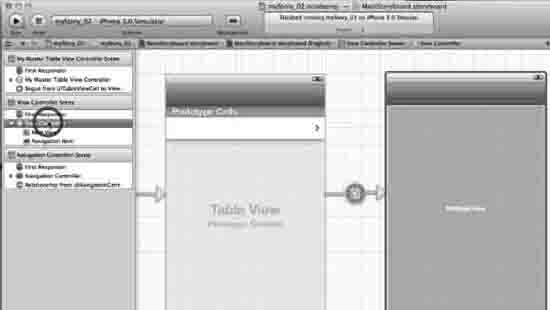
Figure 10–50. Now Map View is the Primary View.
50. Once the Map View is above the View, the View disappears and the MapView will be the Primary view. This is critical because nothing else will work if this doesn't happen! Make sure you can master this. Don't move on unless your screen looks like the screen in Figure 10–50.
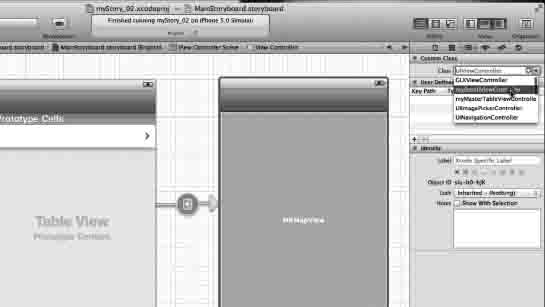
Figure 10–51. Associate the Map View with your myDetailViewController.
51. Remember the tons of work you did for the myDetailViewController.m? Well, that's all got to work underneath the Map View we have just created. Select the View Controller Detail in the View Controller Scene in the Document Outline. Select the Identity inspector in the Utilities. Then in the Custom Class, go to the drop down menu in Class and select myDetailViewController, as shown in Figure 10–51.
52. Run it.

Figure 10–53. Splash goes to Table View, then selecting a city, Durban.
53. Yes, it is beautiful, isn't it? All that hard work, huh? The Splash appears, then we see the table we populated with cities but now we see the beautiful disclosures on the right side of each cell that are telling us that if we click on the cell then something very cool will happen. We then click on the cell and it segues in a Map view, as shown in the right image in Figure 10–54.
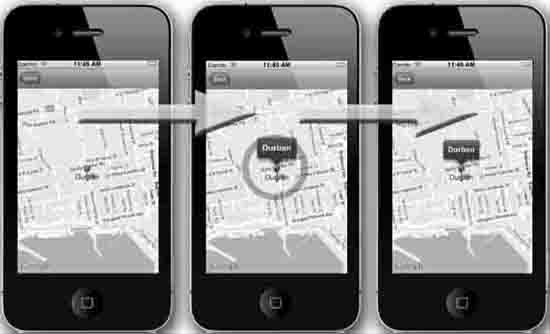
Figure 10–54. The pin drops and the annotation works.
54. Congratulations. The one thing I am going to have you do as an exercise is name the Navigation Bar the “Detail View” and also call the Table View the “Master” in the navigation bar. Go back to where you were in Figure 10–47 and simply double click near the center of the navigation bar and name it whatever you like actually. The reason I leave this out is because students often think that the name we give the navigation bar actually has some effect on the code. I've seen quite a few students changing the name on the navigation bars trying to debug their code. Leaving the names out shows you that these names have zero affect at all.
These two series have been very long. There is nothing beyond the code that I want to show you. In fact, there have been quite a few times that we have gone beyond the scope of “Beginner”, let alone absolute beginner. So we will not dig down any more into the code than what we have already done. Now take a break, relax, and glow in the satisfaction!