
Chapter 9
MapKit & Storyboarding
I have been looking forward to writing this chapter on the MapKit framework and Storyboardingsince I first conceived this book. This and the next two chapters will represent the culmination of our work together. Our journey is almost over and it is fitting that we finish with a bang. I am confident that integrating the MapKit framework, Storyboarding, TableViews, and iTunes will not disappoint you. This is not a trivial matter. Our journey over the last three chapters will be as follows: Chapter 9 will be Storyboarding and the MapKit framework. Chapter 10 will be Storyboarding, TableViews, and the MapKit framework. Finally, in Chapter 11, we will tackle Storyboarding and the iTunes stores (the place where you will place your apps). We will get more into Chapter 11 later, but suffice to say, I will show you how the most compelling apps incorporate Storyboarding, the MapKit framework, TableViews, and the Internet/iTunes store.
In this chapter, we will see that some of the coolest and most successful apps are based on the MapKit framework. We will place this framework on top of the Storyboarding platform and doing so will represent a tremendous accomplishment. The major reason I saved these concepts for last is that the topics require some experience to not overwhelm the student. Teaching this course to a lecture hall full of eager, and mostlynovice, programmers, I learned the hard way that when I succumbed to the students' enthusiasm and tried to teach MapKit midway through the semester, I invariably led the entire class into a brick wall.
Even though MapKitprovides usthe means to write powerful and vivid apps, it also demands that we be quite aware of and fully understand methods, classes, and frameworks. Incorporating this application with Storyboarding further compounds this challenge. Originally, the scope of this book didn't include all of those concepts; but in the end, there was no way I could write the book and leave out MapKit!
So, before we begin, we need to sit back and look at a few things. MapKit, as a toolbox, is a challenging set of utilities and devices, but we will cover some of the basics and learn how we can use them with Storyboarding to successfully and creatively navigate the example in this chapter. We will first talk about frameworksand classes. Then, we will see what MapKitcan already do without us having to program anything at all. After that, we will dig deeper to see what other programmers have done using MapKit and we will glean what we can from them. We've already looked at Storyboarding; but now we want to add some truly innovative code. After honing our understanding of methods, and once we have acquired a respectable grasp of frameworks, classes, and other Apple goodies contained inMapKit, we'll gently tackle the exercise.
In the latter half of the chapter, I will serve an extended dessert in the “Digging My Students' MapKit Code” section. Rather than finishing with an eclectic mix of technical references, I will present three of my students' efforts in MapKit–related projects. I am hopeful that when we look at what these representative students were able to accomplish very shortly after they passed my class, we will all feel even more inspired to set our course for the next challenge.
My objective is to get us all to a place where we can say: I have programmed a basic iPadMapKit app with Storyboarding, and I understand how to move forward with confidence into the more advanced goal of coordinating Storyboarding, TableViews, and the MapKit framework in Chapter 10.
A Little about Frameworks
When Steve Jobs was fired from Apple, he formed a business called NeXT. In the early '90s, his company produced beautiful, black, streamlined computers that made me drool with envy. A few of my professors owned a NeXT computer and I was aware of their capabilities. The most profound aspect of this outfit was not that they cranked out these black, streamlined boxes, but rather that they utilized a language called Objective–C. Jobs had found that, even though it was difficult to program in this complex language, the code it produced was able to “talk to” the microprocessor quite elegantly. So, what does this have to do with MapKit?
What NeXT did was create frameworks of complex Objective–C code, which we can regard much like the tools that a carpenter might have in his toolbox. When we useMapKit, we are bringing into our own code a framework of map–related tools—just as a carpenter may have one set of tools for cabinetry and another specially made set specifically for making intricate furniture. These specialized tools will differ significantly from the type of tools that a roofing carpenter might use.
To this end, we will bring two frameworks into Xcodethat we have not used before. It will be almost as if we had been learning techniques as a flooring and cabinetry carpenter in Chapters 1–8; however, today we are going to the hardware store to get outfitted for our next gig, which will be audio–video installations in walls and ceilings. Therefore, before we continue on to the next program, we are going to have to go buy two brand–new tools. One of our new tools, the CoreLocation framework, shows us where we are geographically. The other tool, MapKit, enables us to interact with maps in a number of different of ways.
As we know, the way users interact with the iPad and iPhone is completely unlike anything ever seen before. Before the advent of these slick devices, 99% of all interactions with computers were based upon the mouse and a keyboard. As we have been learning from the examples we already programmed, we have used unique methods and classes to jump between screens and to sense when a user is pinching, tapping, or scrolling on the screen. To this already formidable set of tools, we are now going to add CoreLocation and MapKit frameworks.
Most of the programming we have explored up until now has been relatively transparent. However, in this chapter, it won't be quite so perceptible. We will have to really maintain our concentration in order to keep track of and understand how MapKit knows where we are on a map. We'll examine how it follows our finger interactions and how it knows where we are in terms of the various screens and views associated with maps.
One of the central areas of iPad/iPhone app development is event handling. Since this section confused many of my previous students, I will consciously do my best to keep us all focused on what we need to know from this area. If we get a firm grasp of the concepts of frameworks and classes, we will not be burdened by being overly concerned with event handling. We can get an idea of the scale of this topic by considering that while part of our app is keeping track of interacting both with a map and a GPS satellite, another portion of our code has to always be looking at when the user is going to direct the program to a new event.
Important Things to Know
There are three important things to know about the foundation of Storyboard and map–related applications in the iPad and iPhone arena. These two critical apps in Chapter 9 and 10 rely on four important tools: Storyboarding, MapKit, CoreLocation, and the MKAnnotationView class reference. As I have already indicated, we are not going to involve ourselves with how these sophisticated tools work so much as we are going to practice the art of deciding when to reach for which tool in our newly expanded toolbox.
Among other things, these tools allow us to effortlessly create a beautiful flow of technology with Storyboarding, display maps in our applications, use annotations, work with Geocoding(which works with longitude and latitude), and interact with our location (via CoreLocation).
When we want to interact effortlessly with Google Maps, we will use the Apple–provided MapKit framework. When we want to obtain our location or do cool things using GPS–satellite technology (with Google Maps)—we will use the CoreLocation framework. When we want to put it all together and seamlessly integrate with our user—we will take all the aforementioned technology and place it onto Storyboarding. Finally, when we want to place pins on a map, create references, draw chevron marks, or insert an image of our dog showing where he is on a map—we will call these annotations and, thus, use MKAnnotationView.
Preinstalled MapKit Apps
In order to take maximum advantage of the new ideas presented in this chapter, and be prepared to stretch and expand into a new level of creativity, we will first take a tour of the existing apps, preinstalle don the iPad and iPhone. It is important that we become familiar with these so that we can more easily add bells and whistles to our own creations—and that is on top of these ready–made“map apps,” as described at Apple.com.
Find Yourself
Say we're in an unfamiliar neighborhood looking for a nearby restaurant. With iPhone, we can pinpoint our location on a map so we can figure out how to get there from where we are. iPhone 4 finds our location quickly and accurately using a combination of GPS, Wi–Fi, and cellular towers. As we move, iPhone automatically updates our location. When we arrive, we can drop a pin to mark our location and share it with others via email or MMS.
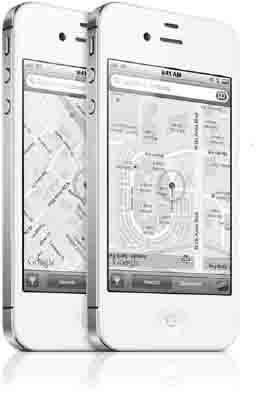
Figure 9–1. Find yourself—a powerful zooming map function on the iPhone/iPad.
Search for a location
We need a shot of espresso. Where's the nearest cafe? iPhone with the MapKit framework has the answer. Just type “coffee” in the search field within Maps and suddenly nearby coffee houses appear on the map; all represented by pins. Searching works with specific addresses and business names, too. When we find what we're looking for, we tap the pin to bring up more information, such as phone numbers, web addresses, and more. The “pin” extracts all the annotations we programmed in our MKAnnotationView.
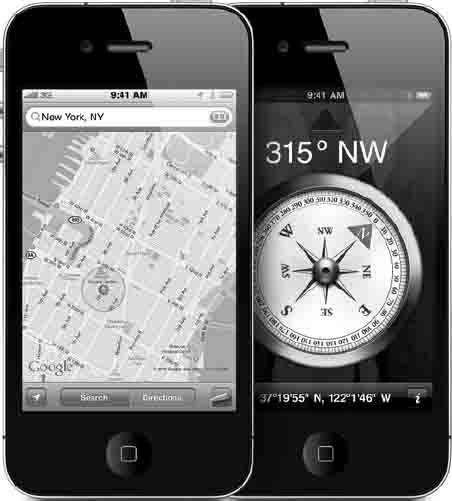
Figure 9–2. Search for a location—use this in conjunction with, or in lieu of, the visual map (with highlighted route).
Change the view. See traffic
Maps on iPhone 4 look amazingly crisp and detailed on the high–resolution Retina display. We can switch between map view, satellite view, and hybrid view. We can even see a street view of a particular address. We can double–tap or pinch to zoom in and out on a map. Maps on iPhone also provide us with live traffic information, as well as indicating traffic speed along our route in easy–to–read green, yellow, and red highlights.
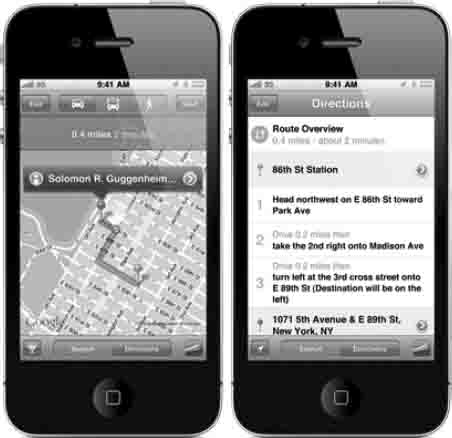
Figure 9–3. Change the view and see traffic—shows the orientation with built–in compass (on Model 3GS) directions that indicate which way we are looking.
We can forget printing out directions from our computer. With iPhone, we can view a list of turn–by–turn directions or follow a highlighted map route and track our progress with GPS. We can choose to see walking or driving directions, or even see what time the next train or bus leaves with public transit directions. The Compass app works with the built–in digital compass to tell us which direction our iPhone is facing. In addition, in the Maps app, the compass rotates the onscreen map to match the direction we're facing.

Figure 9–4. Directions and seeing what direction we're facing—one of the many possibilities when running ‘Maps' on iPhone/iPad.
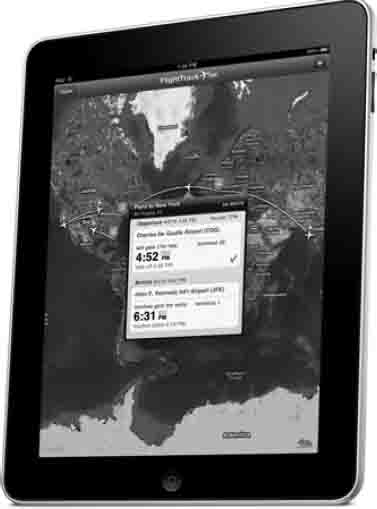
Figure 9–5. FlightTrack uses the MapKit framework to track flights and then integrates with gate changes, schedules, and the rest of the personal data on any given ticket.
Cool and Popular MapKit Apps Inspire Us
A funny thing happened along the way to teaching MapKits and Storyboarding to my students: Most thought they knew what MapKits were but actually, they had no idea how awesome the MapKit framework really was. So, before we dive into this chapter, we will take a few minutes to learn about the fantastic features of the MapKit framework.
![]() CASE IN POINT: One of my former students recently started working at Apple on iOS 5. She did exceptionally well in MapKits and, of all the departments within iOS 5 that she could have worked in, they placed her in the MapKit framework. One of the first things she told me was how huge this division was and how even though she loved MapKits—she had no idea that so many teams with so many incredibly intelligent people were all working on one thing: MapKits!
CASE IN POINT: One of my former students recently started working at Apple on iOS 5. She did exceptionally well in MapKits and, of all the departments within iOS 5 that she could have worked in, they placed her in the MapKit framework. One of the first things she told me was how huge this division was and how even though she loved MapKits—she had no idea that so many teams with so many incredibly intelligent people were all working on one thing: MapKits!
I found that it really helped my students when, after showing them the pre built apps, we spent some time reviewing some super–cool third–party MapKit apps—to inspire them and get their brains storming. So, imagine you are sitting with us and taking this brief tour as well. Here are 11MapKit apps that caught my eye, some of which I use regularly.
- FlightTrack: This MapKit app lets us manage every aspect of our domestic and international flights with real–time updates and beautiful, zoomable maps. We can receive updates on gates, delays, and cancellations so we can book an alternate flight. The app covers more than 5000 airports and 1400 airlines. See Figure 9–5.
- Metro Paris Subway: Never get lost in the City of Light. Metro Paris Subway is a comprehensive guide to traveling through Paris, including official metro, RER, and bus maps and schedules. Complete with an interactive map and route planner, Metro Paris Subway will have us navigating like a real Parisian in no time. See Figure 9–6.
- MapMyRide: I use this MapKit app all the time. I simply turn it on and start riding around on my bike. It tracks my speed, time, and mileage, as well as the incline. It takes into account my age, gender, and body weight; then it tells me how many calories I burned. (On a good day, I can burn off two doughnuts!) The point is, this application calculates all these things while I'm just riding along huffing and puffing! When I get home, I can see the route on my computer. It does most of its work by using and manipulating preinstalled MapKit apps.
- QuikMaps: This do–it–yourself map app allows you to doodle on the map. It integrates with a number of places, including your website, Google Earth, or even your GPS.
- 360 Cities: The World In Virtual Reality: This shows 360–degree panoramas of over 50 world cities and 6000 panoramas. It is the perfect technology for real estate agents, tour guides, and adventurers.
- Cool Maps: 7 Wonders of the World: This shows the seven wonders of the ancient world, and the seven wonders of the modern world, including natural wonders, underwater wonders, strange wonders, and local wonders. I am very impressed with how slick the programmers have made the touch and feel of the app.
- Blipstar: This app converts Internet business URL addresses to their corresponding brick–and–mortar stores and presents it all on a cool map.
- Twitter Spy: This app lets people see where the person who is tweeting them is currently located. Yep—wacky and crazy, but true.
- Geo IP Tool: This app displays the longitude and latitude information of businesses on the Web. Then it provides us with a choice of the best ways to get there.
- Map Tunneling Tool: This one is just cleverfun. Imagine where we would come out if we began digging a hole straight down—from wherever. Is the answer always China?
- Tall Eye: This app shows you where you will go if you walk directly, in a straight line, around the earth, starting at one point and staying on a specific bearing all the way around.
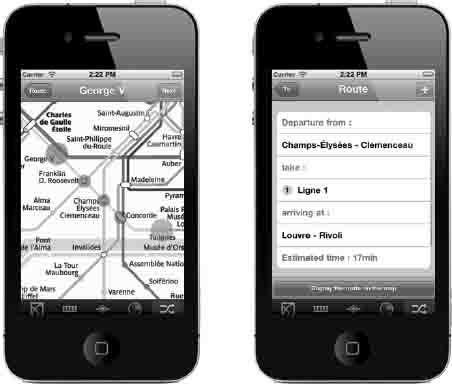
Figure 9–6. Metro Paris Subway: Parsing GPS data from the trains in the subways helps us to know when a train going in our direction will appear at the nearest train station.
myStory_01: A Single–View Application
In this exercise, we are going to begin with some boilerplate code and splash screens and icons that suit our basic requirements. Then, we will modify it from there. We will tour some of the same building blocks and files that we've seen throughout this book, and we will be challenged to see what areas of the code are pretty much the same as what we've already encountered and what areas are different—given the nature of this application.
The ability to recognize patterns and see structures just under the surface is a powerful aptitude that we all have, but we programmers cultivate ours to a heightened degree. We will play a little game to see if we can anticipate some of the moves we will have to take.
Possible Prepping for the App
We are going to consider a wide variety of components that we will use to build in to our app. Before that, though, I want to make sure we all have a firm grasp of some important terminology. For this project, we programmers need to recall some basic earth science and geography so that our code will be as effective as possible.
When we direct the computer to animate a pin dropping down, with annotations, onto a specific location, giving “longitude” and “latitude,” we need to know what these terms really mean. Lines of latitude are the imaginary lines that circle the globe “horizontally,” running east to west (or west to east). These invisible lines are measured in degrees, minutes, and seconds, north or south of the Equator. The Equator is the elliptical locus of points on the Earth's surface midway between the poles, which physically are real points—defined by the Earth's rotation on its axis. Lines of latitude are often referred to as parallels. The North Pole is 90 degrees north latitude; the South Pole is 90 degrees south latitude.
Lines of longitude, often called meridians, are imaginary “vertical” lines (ellipses) that cross through the North and South Poles. They are also measured in degrees, minutes, and seconds, east or west of the Prime Meridian, an arbitrary standard that runs through Greenwich, England. Unlike the Equator, which goes all the way around the world—360 degrees, the Prime Meridian (0 degrees longitude) is a semi–circle (semi–ellipse), extending from the North Pole to the South Pole; the other half of the arc is called the International Date Line, and it is defined as 180 degrees east and/or 180 degrees west longitude.
For our Chapter 9 app, the example I used to demonstrate the “pin drop” on location is my office at the University of Colorado at Colorado Springs. We, of course, can use any location we choose. We may want to use our own address, or a well–known landmark. To do this, we must get the latitude and longitude values of that location—most likely from Google Maps or a direct GPS reading. There are many sites on the Internet where we can find these coordinates; Figure 9–7 illustrates one of them, http://bit.ly/vGszNu.
Figure 9–7. Batchgeo (www.batchgeocode.com/lookup)is one of many Internet sites where one can enter an address and receive its longitudinal and latitudinal coordinates.
Here's a thought—let's start to the end of our process and think backwards for a minute. Go ahead and jump forward in this chapter for a sneak peek at what the app will look like—what results it will return if all goes well. In Figure 9–34, we see a picture of a hybrid map showing a red pin that's sitting on top of a building. That's the Engineering Building at the University of Colorado at Colorado Springs; the pin is located right above my office. The next picture has what we call an annotation, which is the text. “Dr. Rory Lewis” is the title, and “University of Colorado at Colorado Springs” is the subtitle.
Later in the tutorial, we will see that we need to be careful about the title and the subtitle. We also control the color of the pin and we decide on the style of animation—how the pin drops on to the map image.
This is a good place for a reminder of the title of this book: iPhone and iPad Apps for Absolute Beginners. Take a deep breath! Even if we were all meeting our greatest expectations of learning the most we ever have and even if we were all meeting our greatest expectations of ourselves—learning so much complexity in such a short time, we would still not be an expert in this challenging area of MapKit code! At this point, my humble goal is not fluency, but reasonable familiarity and a sense of what lies ahead.
If that sounds right, let's get on with it.
Preliminaries
As in previous chapters, please download and extract images and boilerplate code for this chapter. Navigate to http://bit.ly/oDqzvYand download its contents. The images include three icon files, two splash screens, and two files of boilerplate code. Later, I will explain what these icons, splash screens, and boilerplates mean. Right now though, we will just download it to our desktop. Then, we will extract the files onto our beautifully clean desktop.
Sample code that I programmed on the video is available for download here: http://bit.ly/qd6iDT. After extracting all the files, remember to delete the 011_myStory_01.zip and myStory_01 folders. This is to avoid overwriting files and/or potential conflicts with the exercise code. To view the screen cast of this chapter's exercise, go to http://bit.ly/owk24r.
A New Single View Template
Let's get started and choose the template.

Figure 9–8. Select the Single View Application icon, and then press Return or hit Next.
1. Open Xcode and enter ![]()
![]() N, as shown in Figure 9–8. Then click on the View–based Application template. We will call it
N, as shown in Figure 9–8. Then click on the View–based Application template. We will call it myStory_01 and then we will save it to our desktop. A folder bearing that name appears on the desktop.

Figure 9–9. Name your app myStory_01 making sure Storyboard and automatic referencing is on.
2. In order to follow along as closely as possible, because it will get complex later, we will name our project “myStory_01.” To do so, select iPhone, not iPad or Universal, leave the Class Prefix and Include Unit Tests options alone and as shown in Figure 9–9. Check that the Storyboard and Automatic Referencing option is on.
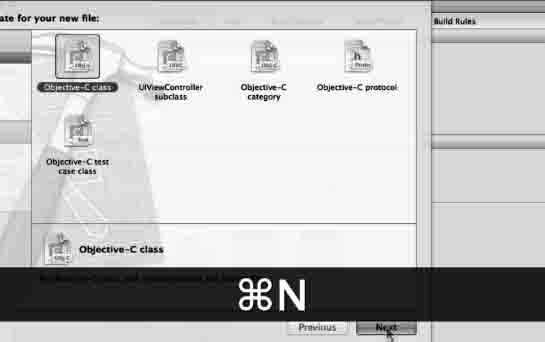
Figure 9–10. Create an Objective–C class for your annotations.
Preliminaries: Adding the Annotation File
3. While we're here setting up our project, we need to create an annotation file and import some frameworks. Let's start with the annotation file. As previously mentioned, we need a means to control our annotation. For that, we will create an Objective–C class that will control all the characteristics we want to display on this annotation. Click the Classes folder and enter ![]() N as shown in Figure 9–10. When finished, click Next.
N as shown in Figure 9–10. When finished, click Next.
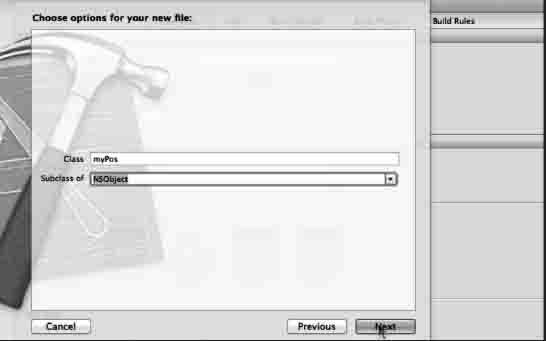
Figure 9–11. Name it myPos and make sure it's an NSObject subclass.
4. Because this controller will be in charge of controlling annotations for our position, let's name it something that correlates to my position; how about name it “myPos.” Also, make sure that it is not a subclass of UIView or any other subclass. Make sure it's a subclass of NSobject. This is shown in Figure 9–11
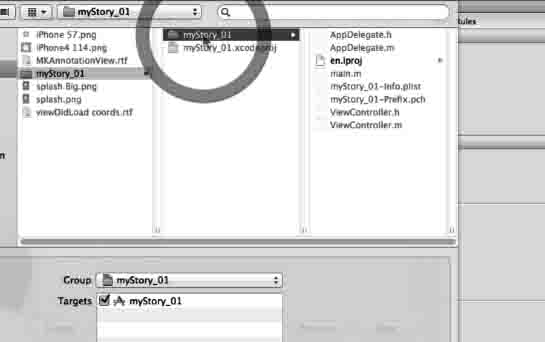
Figure 9–12. Save it inside you myStory_01 folder.
5. Make sure to save this inside the myStory_01 folder. This will make it much easier to export and is simply a good habit to have when we start sharing classes and objects with other programmers. See Figure 9–12.
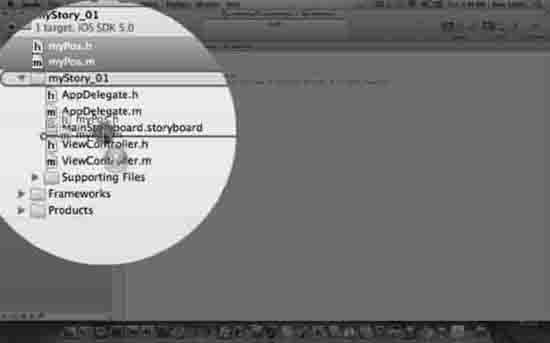
Figure 9–13. Move the newly created NSObjects into the correct folder.
6. As shown in Figure 9–13, our two newly created NSObjects named myPos.h and myPos.m are located in the root directory of our project. We need to move them to the correct place in the correct folder. I typically order the files I will be coding in the sequence I will code them under the nib or storyboard files. We usually do not work a lot with the AppDelegate files so I keep them on top and out of the way. Because I will start coding the NSObjects that keep track of my position, we will put them immediately under the Storyboard.
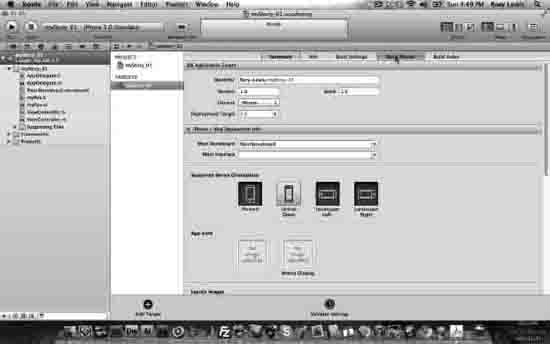
Figure 9–14. Go to the myStory_01 root directory and select the Build Phases tab.
Preliminaries: Adding Frameworks
7. The first thing we need to do is add two frameworks: For a newbie, we would say: “Frameworks are huge gobs of super code that is used for specialized stuff. It is too big to be carried around all the time but if we write an app that needs a framework—then we drag this framework into our code.” Yeah, but we're not a newbie anymore—we're heading at a fast and furious pace to becoming a bona fide geek, respected by others left in the swamps of technology—so, let's look at this. Yes, it is specialized code. We will put it in a hierarchical directory that encapsulates s dynamic shared libraries such as, nib files, image files, localized strings, header files, and reference documentation in a single package. In our app, we will use Corelocation and MapKit frameworks and when we bring them into our app, the system loads them into memory as needed and shares the one copy of the resource among all applications whenever possible. So, we will go to our root directory and click on the Build Phases tab as shown in Figure 9–14.
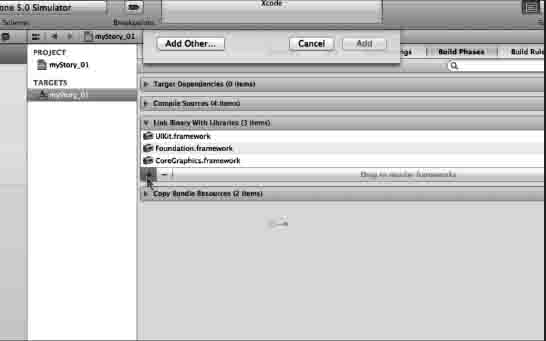
Figure 9–15. Click on the Link Binaries with Libraries bar and click on the “+”.
8. As shown in Figure 9–15, click on the Link Binaries with Libraries bar and click on the “+”.
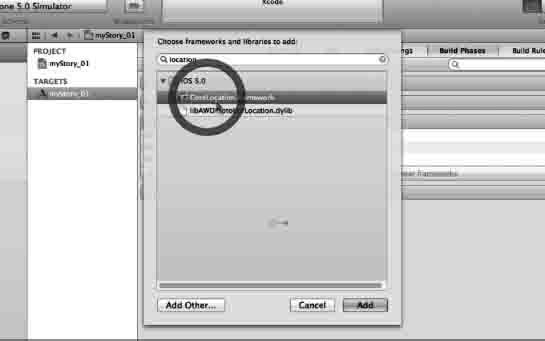
Figure 9–16. Select the Corelocation Framework.
9. We will either scroll through all our options or enter location in the search bar and select Corelocation Frameworks. Then we will press Add or Enter/Return as shown in Figure 9–16.
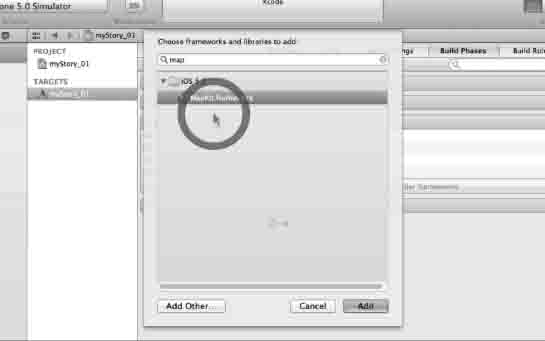
Figure 9–17. Select the MapKit Framework.
10. Repeating step 9, we will now do the same for MapKit. We will either scroll through all of our options or enter location in the search bar and select MapKit Framework. Then press Add or Enter/Return as shown in Figure 9–17.
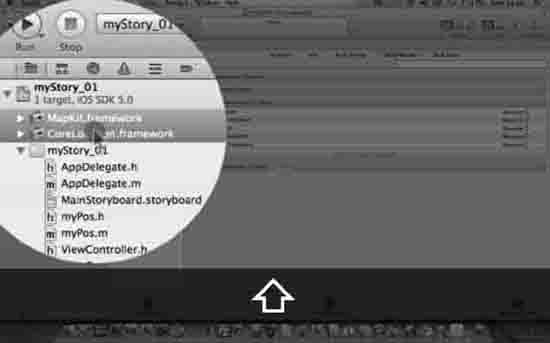
Figure 9–18. Move the imported Frameworks to the Frameworks folder.
11. As shown in Figure 9–18, we will grab our two newly imported Frameworks that are by default stored in the root directory. We will then move those to our frameworks folder. It is important that we create good habits and store all of our Frameworks in the correct folder.
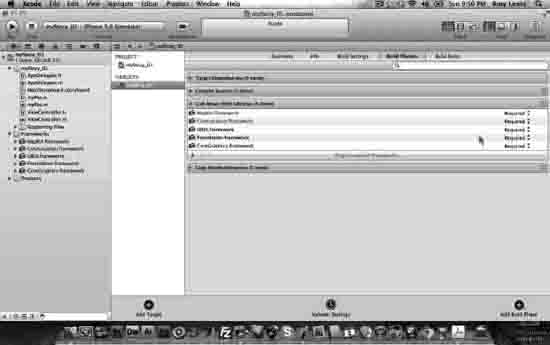
Figure 9–19. Check your directories and files against mine.
12. Before we move on, we need to make sure that we check our project against the example shown in Figure 9–19. We need to make sure that our NSObjects myPos.h, myPos.m and that our Corelocation and MapKit Frameworks are placed like those in the example. With this step completed, we will move on; place our images and then start coding.
Bring in the Images!
We want to have five essential images for every app we make. For convenience, these are included in the package available for download from my website at http://bit.ly/oDqzvY. They include the essential icons and two splash screens. These include the 57 by 57 px for the iPhone classic, the 72 x 72 px for the iPad, and the 114 × 114 px for the iPhone 4S Retina Display. I've also designed two splash screen images that are available for your use. Splash screen images appear on the screen of the app while the apps code loads. They usually only appear for less than a second, but they give the user something cool to look at—and they set the tone for the super cool app that is loading. You will need two splash screens because you have to accommodate the various iPad and iPhone configurations the user using your app might have. The 640 by 960 px splash screen for iPads and iPhone Retinas and a 320 by 480 px for the classic iPhone are included. After you have downloaded them, you can always use them as a template for your future apps.
NOTE: In this application, we are only using the iPhone. In the next chapter, when we design myStory_02, we will use both the IPhone and the iPad where we can use all the icons. So, just keep the extra iPad icon for later use when you design your own icons.
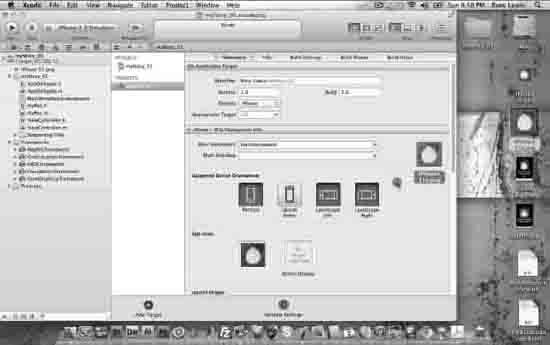
Figure 9–20. Drag in the icons.
13. Staying in the root directory after importing the frameworks, drag the icon images into the icon boxes. Figure 9–20 shows the 57 × 57 px classic iPhone icon in its box and the Retina icon being drug over to it.
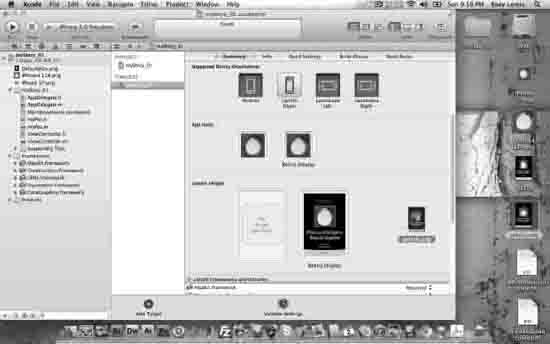
Figure 9–21. Drag in the icons.
14. Similar to step 13, after importing the icons, we now need to import our splash screen images into their boxes. Figure 9–21 shows the iPhone Retina 320 by 480 px classic splash screen already in place with the classic iPhone 640 × 960 px splash screen being dragged in. Once we are finished dragging these images in, we are ready to start with the code.
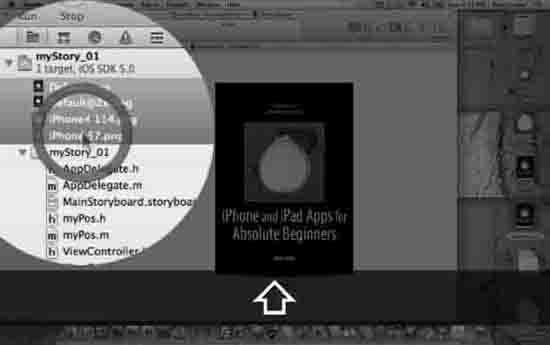
Figure 9–22. Drag in your icons so you can take them to the correct folder.
15. Before we start to code, we need to make sure that all our files are in the correct folders. At this point, we know that Xcode will recognize the correct icons and splash screens—but look where they are! They're in the root directory again. Grab them, as shown in Figure 9–22, and move them into the supporting files folder.

Figure 9–23. Drop the project icons into the supporting files' folder.
16. The supporting Files folder is probably not open. That's OK. As we drag the icons with our mouse, we will need to slow down as we hover over the supporting Files folder so it will open up. Once it opens up, drop the files into the folder as shown in Figure 9–23.
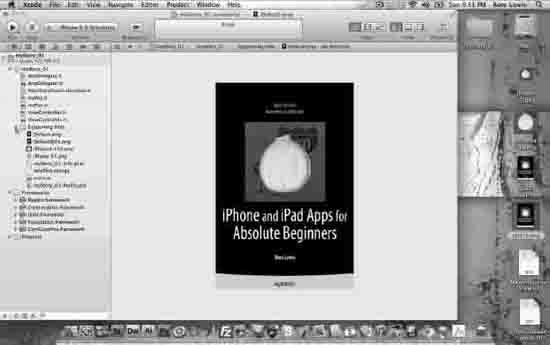
Figure 9–24. Ready to paint ….erh…. code.
17. Take a good look at Figure 9–24. We are now ready to code. We need to get used to wanting to see our coding canvas laid out before we ever start writing our code. This is very much like a painter who will first buy a canvas, get paint, turpentine, brushes, rags and a model of what will be painted before the first dab is ever painted. This is what we've just done. We need to get used to first setting everything up before we write our code.
NOTE: I cannot understand why some students invariably dive into the code immediately upon receiving an in class assignment. I also always stop them immediately and make them prep as we have done here and throughout this book. It is during this time while I bring in all my files and create whatever new frameworks and NSObjects that I need that my mind goes into a semi meditative state and I quietly plan out how I will write the code. During this time, my mind tries out all kinds of different options and by the time I am finished prepping, I am completely ready to code.
Coding the myPos NSObject
Remember that myStory_01 is a lead–in or segue into myStory_02, which is where the real action is. In fact, many MapKit apps will need a separate NSObject to keep track of many positions. In this small app, we do not necessarily have to program the myPos.h and myPos.m files at all. But you need to get used to always creating an NSObjectmyPos to keep track of your position or an array of positions to feed into the annotations and MapKit framework. So, follow along with me as I explain in detail what we will be doing here. In myStory_02, I skip over some of these steps because I assume we all did our homework and programmed myStory_01 many times until we could do it without this book or any accompanying notes.

Figure 9–25. myPos.h as it looks upon opening it.
18. Click on the myPos.h file located in your myStory_01 folder inside the root folder. Upon opening it, as shown in Figure 9–25, we see the following:
#import <Foundation/Foundation.h>

@interface myPos : NSObject

@end
- The first thing we do is add aMapKit framework for our annotations by entering
#import <MapKit/MkAnnotation.h>to the@interface myPos : NSObjectdirective. - We also need to add
<MKAnnotation>,which is a protocol. I explain protocols in Digging the Code, but for now, it means we'll have to write our own annotation object that implements this protocol. Just remember that an object that adopts this protocol must implement a property we call the coordinate property. Which, of course, we will do. - We also set our
CLLocationClass Reference to incorporate the geographical coordinates and altitude of our device with a variable that we'll namecoordinate, as seen in Figure 9–26. We do that with this line:CLLocationCoordinate2D coordinate; - Now, we need two
NSStringvariables to hold our titles and subtitles, which we will name*titleand*subtitleas follows:NSString *title;
NSString *subtitle; - Finally, we create
@propertystatements for the coordinate, title, and subtitle, as shown in the code that follows. Once we have made these additions, we will save our work as shown in Figure 9–26.#import <Foundation/Foundation.h>
#import <MapKit/MkAnnotation.h>
@interface myPos : NSObject <MKAnnotation>
{
CLLocationCoordinate2D coordinate;
NSString *title;

NSString *subtitle;
}
@property (nonatomic, assign) CLLocationCoordinate2D coordinate;
@property (nonatomic, copy) NSString *title;
@property (nonatomic, copy) NSString *subtitle;
@end
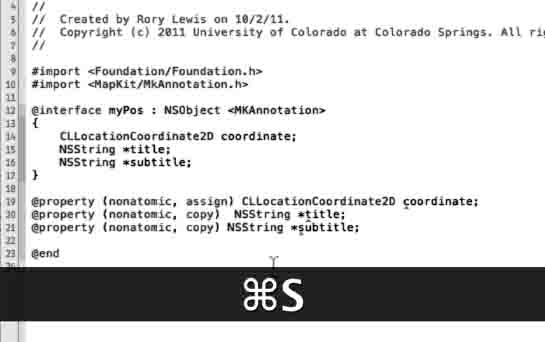
Figure 9–26. The MyPos.hincorporates the geographical coordinates and altitude of our device.
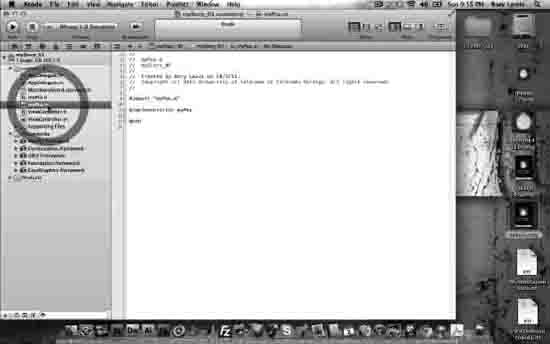
Figure 9–27. This is how our myPos implementation file looks when we open it.
19. We are now ready to code the myPos implementation file. We will click on the myPos.m file located in our myStory_01 folder inside the root folder. Figure 9–27 shows how the myPos.m file looks when we open it. Here we simply synthesize our coordinate, title, and subtitle with a @synthesizestatement, which includes coordinate, title, and subtitle. Once done, our file should look similar to Figure 9–28. We will save our work on this file.
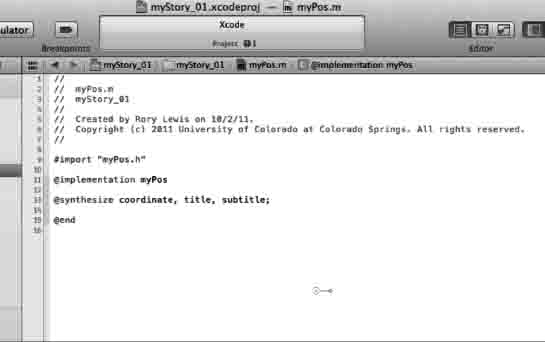
Figure 9–28. This is how the myPos implementation file looks after the synthesis.

Figure 9–29. Open the view controller.
Coding the View Controller
We will start by declaring our classes, methods, and outlets in our ViewController.h file and then implementing them in our ViewController.m file. I have included some boilerplate code that we can drop into the implementation file. However, I am going go over each line separately, so it will be better if you follow along without dropping in the boilerplate code.
20. We will start, as always, with the header file. We will open up our header file by clicking on ViewController.h inside the root folder below the my Pos.m file or thereabout. When we first open it up, it will look similar to Figure 9–29 and as shown below.
#import <UIKit/UIKit.h>

@interface ViewController : UIViewController

@end
- The first thing we need to do is tell our app that we have imported the MapKit framework; we do this by
#import <MapKit/MapKit.h>under the line#import <UIKit/UIKit.h>.The next thing we will do is tell the header file that we will be using theMKMapViewDelegateprotocol. This protocol defines a set of optional methods that our app will use to receive map update records. - Next, we will add the
<MKMapViewDelegate>protocol for the controller class. - We are now able to add an outlet with a pointer to the
MKMapViewclass. We do this by typing inMKMapView *mapView, which declares an object of typeMKMapView. - The last thing we need to do is define the
@property, by entering.@property (nonatomic, retain) IBOutlet MKMapView *mapViewNOTE Some people may say: “Whoah! You only declared the IBOutllet outside the interface!” Well, actually, whether we stated IBOutletMKMapView *mapView inside the interface or “outside,” they really are both still inside and there is no need to declare it twice. I prefer to use outlets on @properties because it makes memory management of the objects loaded from the storyboard clearer. I go deeper into this in Memory Management of Storyboard Objects in Digging the Code.
- Once done, save it. Our code should appear as follows and as shown In Figure 9–30:
#import <UIKit/UIKit.h>

#import <MapKit/MapKit.h>


@interface ViewController : UIViewController <MKMapViewDelegate>

{

    MKMapView *mapView;

}


@property (nonatomic, retain) IBOutlet MKMapView *mapView;


@end

Figure 9–30. A completed ViewController header file.
Dealing with the View Controller's Implementation
As mentioned in the introduction to this chapter, controlling and working with the MapKitand CoreLocation frameworks is not a trivial matter. Daunting as these areas can be, I could not leave them out of this book. We proceed on the basis that we have learned by now to look for familiar patterns, integrate what we can, and just follow directions when things get a bit complicated or beyond our immediate understanding!
Let's think about this—after doing the necessary importing of our myPos header file and the synthesis of the ViewController that we just set up in the header file—we need to do two things:
- Set up the coordinates of my office into the viewDidLoad method; and then,
- Make a pin drop down onto this exact latitude and longitude set forth in the viewDidLoad and put an annotation on it that states this is the office of Dr. Lewis.
In our case, we will set the map type to a Hybrid map. If we prefer, though, we may choose to use a Satellite map or a Street map. Remember, at this point, we will bring in the location of my office at the University of Colorado at Colorado Springs, we can go ahead and use mine, or you can choose your own point.

Figure 9–31. The ViewController's implementation file before coding.
21. When you first open up the viewController.m file, you will see the default code as shown in Figure 9–31. Let's first bring in the header file and synthesis:
- Right under the
#import "ViewController.h"We want to import our mypos header file by coding#import "myPos.h" - Now, under the
@implementation,we will add our synthesis of the mapView:@synthesize mapView; - Now, we can either drop in the boiler plate code from the file called viewDidLoad coord.rtf right over and in place of the comment
// Do any additional …in theviewDidLoadmethod under the[super viewDidLoad];as shown:[super viewDidLoad];
// Do any additional setup after loading the view, typically from a nib. - The boilerplate code is as follows, but we will go step–by–step through it.
[mapView setMapType:MKMapTypeStandard];

[mapView setZoomEnabled:YES];

[mapView setScrollEnabled:YES];

mapView.mapType=MKMapTypeHybrid;
MKCoordinateRegion region = { {0.0, 0.0 }, { 0.0, 0.0 } };
region.center.latitude = 38.893432;
region.center.longitude = -104.800161;
region.span.longitudeDelta = 0.01f;
region.span.latitudeDelta = 0.01f;
[mapView setRegion:region animated:YES];
[mapView setDelegate:self];
myPos *ann = [[myPos alloc] init];
ann.title = @"Dr. Rory Lewis";
ann.subtitle = @"University of Colorado at Colorado Springs";
ann.coordinate = region.center;
[mapView addAnnotation:ann];
22. Now, going through this line by line;
- First, we make it standard and enable zoom and scroll:
[mapView setMapType:MKMapTypeStandard];
[mapView setZoomEnabled:YES];
[mapView setScrollEnabled:YES]; - Then, we do a reset on the previous coordinates by setting all the coordinate regions to zeros.
MKCoordinateRegion region = { {0.0, 0.0 }, { 0.0, 0.0 } }; - Then, we enter coordinates of our place of interest—which, for me, is my office at the University of Colorado at Colorado Springs. I enter
Region.center.latitude = 38.893432;(the positive value denotes north of the Equator) andregion.center.longitude = -104.800161;(the negative sign denotes west of the Prime Meridian).region.center.latitude = 38.893432;
region.center.longitude = -104.800161; - Related to these parameters, we need to set the latitude and longitude Delta
= 0.01f. If your math or physics is rusty, recall that “delta” refers to the change, or difference, between two values.region.span.longitudeDelta = 0.01f;
region.span.latitudeDelta = 0.01f; - I have chosen to animate the pin when it drops.
[mapView setRegion:region animated:YES]; - The next action is to set the view controller class as the delegate, which is the role that will handle the interaction between the frameworks of our mapView. We do this with:
[mapView setDelegate:self];NOTE: Regarding the dropped pin and the attached label: We need to make the annotation object the holder of the information of our coordinates. Our annotation view is the type of view associated with the annotation object. Our annotation object needs to comply with all the rules we will set forth in our
MKAnnotationprotocol. In order to create this annotation object, we must define a new class, which we did when we created themyPosclasses. - We now need to instantiate this
myPosobject and add it to our map. To do this, we add the delegate function that will display the annotations onto our map. We start by havingmyPosname a pointer we'll callann.myPos *ann = [[myPosalloc] init]; - Next, we set the title, and in my case, I chose to use my name.
ann.title = @"Dr. Rory Lewis"; - We handle the subtitle similarly:
ann.subtitle = @"University of Colorado at Colorado Springs".ann.subtitle = @"University of Colorado at Colorado Springs"; - We also
wantthe pin to drop in the center of the map: ann.coordinate = region.center.ann.coordinate = region.center; - Reference all of the above with
[mapView addAnnotation:ann].[mapView addAnnotation:ann];
At this point, we will take advantage of the next boilerplate method of code that most MapKit maps use. Unlike the viewDidLoad coord.rtf, the MKAnnotationView.rtf is a chunk of code we all use. Read the note below:
NOTE: We seldom change chunks of code like viewDidLoad coord.rtf and by the time this book is printed, it may be part of a new function or a new class. The reason is that when people start using the same piece of code over and over, referring to it as “boilerplate code,” that's about the time Apple decides to make a new class or function out of it, and sets it to a specific name. So, keep on using it and get the message through to Apple!
For now, there are a few things we all need to know about this code:
- It creates a delegate method that manages our annotation during zooming and scrolling. In other words, it keeps track of where we are—even when the user scrolls, zooms in, or zooms out of our map.
- It creates a static identifier, which controls our “queue meaning.” If it can't dequeue our annotation, it will allocate one that we choose. I have also included code that changes the pin color to red. In addition, I have allowed callout views.
Paste the MKAnnotationView.rtfright after the – (void)viewDidLoad method and right before the – (void)viewDidUnload method. After you have pasted it there, your implementation file should look like the following.
#import "ViewController.h"
#import "myPos.h"
@implementation ViewController
@synthesize mapView;
- (void)didReceiveMemoryWarning
{
[super didReceiveMemoryWarning];
// Release any cached data, images, etc., that aren't in use.
}
#pragma mark - View lifecycle
- (void)viewDidLoad
{
[super viewDidLoad];
[mapView setMapType:MKMapTypeStandard];
[mapView setZoomEnabled:YES];
[mapView setScrollEnabled:YES];
mapView.mapType=MKMapTypeHybrid;
MKCoordinateRegion region = { {0.0, 0.0 }, { 0.0, 0.0 } };

region.center.latitude = 38.893432;

region.center.longitude = -104.800161;

region.span.longitudeDelta = 0.01f;

region.span.latitudeDelta = 0.01f;

[mapView setRegion:region animated:YES];

[mapView setDelegate:self];


myPos *ann = [[myPos alloc] init];

ann.title = @"Dr. Rory Lewis";

ann.subtitle = @"University of Colorado at Colorado Springs";

ann.coordinate = region.center;

[mapView addAnnotation:ann];
}
- (MKAnnotationView *)mapView:(MKMapView *)mV viewForAnnotation:(id <MKAnnotation>)annotation
{
MKPinAnnotationView *pinView = nil;
if(annotation != mapView.userLocation)
{
static NSString *defaultPinID = @"com.rorylewis";
pinView = (MKPinAnnotationView *)[mapView dequeueReusableAnnotationViewWithIdentifier:defaultPinID];
if ( pinView == nil )
pinView = [[MKPinAnnotationView alloc] initWithAnnotation:annotation reuseIdentifier:defaultPinID];
                  pinView.pinColor = MKPinAnnotationColorRed;

                  pinView.canShowCallout = YES;

                  pinView.animatesDrop = YES;

        }

        else

        {

                  [mapView.userLocation setTitle:@"I am here"];

        }


    return pinView;

}


- (void)viewDidUnload

{

    [super viewDidUnload];

    // Release any retained subviews of the main view.

    // e.g. self.myOutlet = nil;

}


- (void)viewWillAppear:(BOOL)animated

{

    [super viewWillAppear:animated];

}

- (void)viewDidAppear:(BOOL)animated

{

    [super viewDidAppear:animated];

}


- (void)viewWillDisappear:(BOOL)animated

{

        [super viewWillDisappear:animated];

}

- (void)viewDidDisappear:(BOOL)animated

{

        [super viewDidDisappear:animated];

}

- (BOOL)shouldAutorotateToInterfaceOrientation:(UIInterfaceOrientation)interfaceOrientation

{

    // Return YES for supported orientations

    return (interfaceOrientation != UIInterfaceOrientationPortraitUpsideDown);

}


@end
The Storyboard
Go ahead and open the Storyboard file. It will look similar to what you see in Figure 9–32.
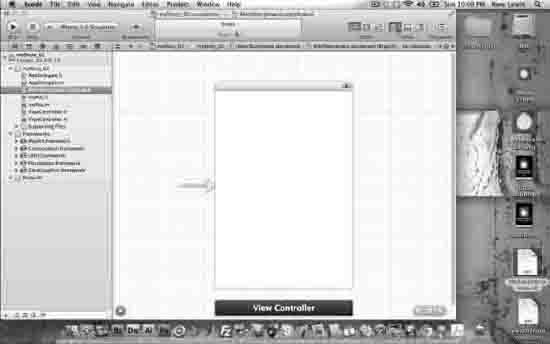
Figure 9–32. Open Storyboarding
As I have already mentioned quite a few times, I specifically chose myStory_01 as a segue to myStory_02, which will have a very complex Storyboard. In this app, I just want you to deal with setting up the MapKit framework. In myStory_02, we will set up the MapKit framework as we did here; then, we will set up a pretty tableView onto a Storyboard. Doing it all at one time would not be practical and I do know this. So, for how—this segment of the Storyboarding will be relatively easy—just a couple of steps. In myStory_02, this will not be the case. So, give your brain a break and follow along as we set up this very simple, one–piece Storyboard.

Figure 9–33. Drag aMKMapView onto the view.
23. With the Storyboard open—close the Inspector and open up the Utilities folder. Then drag a Map View (MKMapView) onto your view as shown in Figure 9–33.
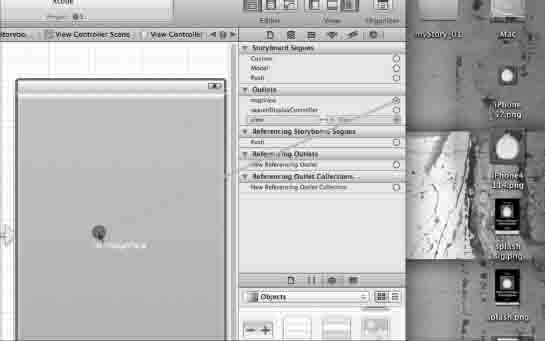
Figure 9–34. Open the Connection Inspector and control drag to the MKMapView.
24. We need to connect the mapView to the MKMapView. In the Document Outline Bar, select the View Controller and then click on the Connection Inspector and control–drag from the mapView to the MKMapView.
(MKAnnotationView *)mapView:(MKMapView *):
25. That's it! Run it. When we see a splash screen appear, we drop a pin right onto my office or the location we chose. See Figure 9–35.
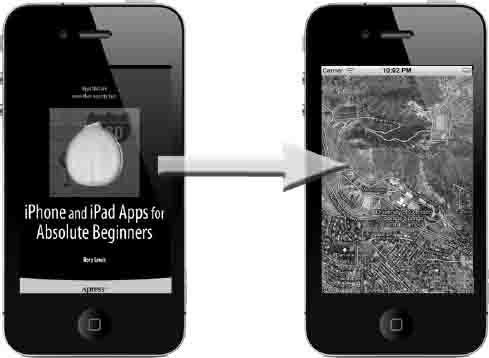
Figure 9–35. MapKIts and Storyboarding! Splash screen appears and then a pin drops onto a specified location!
Congratulations! Once again, we have successfully implemented an app of fair complexity and we started with a body of code that we merely modified. As we compare our own Simulator to the images ahead, bask in the glow of accomplishment.
Then, perhaps after a brief rest, I hope that we might venture forward to see if some student examples in the “Digging My Students' MapKit Code” section whet our appetite for further development and challenge.

Figure 9–36. At this point, I have my students implement it in class on the iPad. Try it out. The zoom is really far out as is shown here.
Digging the Code
Here, in Digging the Code, we will go over protocols, memory management of Storyboard objects, parsing servers for MapKits, and reviewing some of my student's coolMapKit apps. Since it will open up new doors, I suggest that, if anything, we all read the parsing section well enough to be able to discuss and talk about it. When it comes to parsing, many coders fall short during interviews and discussions.
Protocols
Protocols area list of methods that are not officially part of a language, but that a class can implement. We typically use protocols when we need to define methods for implementation by other classes. The aforementioned is my view. Apple, on the other hand, defines protocols a little differently. Apple officially states that protocols declare methods available for implementation by any class. Protocols are useful in at least three situations:
- To declare methods that others are expected to implement,
- To declare the interface to an object while concealing its class,
- To capture similarities among classes not hierarchically related.
Memory Management of Storyboard Objects
In Objective–C, ivar stands for Instance Variable. Now, IBOutlets are part of the public interface of a class and this is why I personally believe that it's better to declare our methods inside the @property implementation detail. Remember that IBOutlet ivars call setters, if they exist; however, if no setter is found, the object loaded from the nib is directly retained. This means that advertising the property as the IBOutlet at least makes it clear that the property's setter will always be used and follow whatever memory management rule has been set for that property. Apple puts it this way:
“Objects in the nib file are created with a retain count of 1 and then auto released. As it rebuilds the object hierarchy, UIKit reestablishes connections between the objects using setValue:forKey:, which uses the available setter method or retains the object by default if no setter method is available. This means that (assuming you follow the pattern shown in “Outlets”) any object for which you have an outlet remains valid. If there are any top–level objects you do not store in outlets, however, you must retain either the array returned by the loadNibNamed:owner:options: method or the objects inside the array to prevent those objects from being released prematurely.”
Simply put, if given the choice, as in step 20, to either do it the way we did it:
#import <UIKit/UIKit.h>

#import <MapKit/MapKit.h>


@interface ViewController : UIViewController <MKMapViewDelegate>

{

    MKMapView *mapView;

}


@property (nonatomic, retain) IBOutlet MKMapView *mapView;


@end
Or this way:
#import <UIKit/UIKit.h>

#import <MapKit/MapKit.h>


@interface ViewController : UIViewController <MKMapViewDelegate>

{

    IBOutlet MKMapView *mapView;
}


@property (nonatomic, retain) MKMapView *mapView;


@end
The most interesting aspect of this is that if you simply drag your IBOutlet from the Storyboard Interface Builder into your header file—Xcode will make these decisions for you. It is “better” to use the first example and declare the IBOutlet in your @property, but that's only ‘style' and you may work in an environment that uses the second method or the ‘new' method we used in the first few chapters of this book.
Do yourself a favor and just do it the way I showed you—the first way.
Digging My Students' MapKit Code
When people come up to me and say, “Hey, Dr. Lewis, I have this really great idea for a new app…,” it is amazing how often it involves using the MapKit framework. We have seen how fun and sexy this stuff is, and by now, you have likely also gathered that delving into the code can turn into quite a complexity.
As a final buffet of tasty, high–calorie, high–tech fun, and flash, I am going to share some final project scenarios with you. I certainly hope you actively follow along here, but I also want to honor the fact that you're done. You already succeeded in making it to the end of Chapter 9. So, remember, this section is like one of those “bonus feature” DVDs that Hollywood loves to include—at no extra cost. Relax and enjoy!
Parsing to MapKit from the Internet
A little background: I presented my class the MapKit session very much as I laid out the first example of this chapter. Then, we moved into one of the coolest things there is with MapKit—the ability to parse, or read live info, from the ether. This feature allows users to “see” the info on their map. I'll explain this to a degree before I present three student final projects.
One of the most intriguing things we can do with MapKit is get real live information from the Internet and configure it in a way that makes the Google Map on the user's iPhone come alive with live information (weather, traffic, geographical phenomena, taxis, planes, and so on). For example, one of the most popular apps for the San Francisco Bay Area is a program demonstrated in iPhone Cool Projects (Wolfgang Ante, et al., Apress, 2009) (see Figure 9–28) called “RoutesyBay Area San Francisco Muni and BART,” written by Steven Peterson.
Peterson parses all the data from the BART (Bay Area Rapid Transit, http://www.bart.gov/) web server that keeps track of how close to schedule its trains are, the location of the trains, and their speeds. The app parses all this data and makes it useful and relevant to users at their specific locations in the San Francisco Bay Area. In Figure 9–29, you will see their app's red icon, and then several iPhone images. The left one shows all the places a user can catch buses and trains. The middle picture uses the same code we used in our example with a core location to show a user's current location with a blue icon, and where a requested station is. The right image reports to the user the relevant information on the best train given the context, the timing, etc. The app provides data for the next three trains that will be arriving at the train station nearest the user.
In essence, the MapKit code on the iPhone is, among other things, a parsing utility. It retrieves live information from a server that most people don't even know exists, and it puts a stream of data to a novel and useful purpose.
Because of the immediate and practical results that users of Peterson's app, and others like it, can reap, I figured this would be a perfect theme to round out this book. I'll first go over some of my “Parsing with the MapKit framework” lecture notes. Then I will show you several solid final projects created by my students on that basis.
With my students' blessing, the code for their projects (as shown below)is available for download from my website. This gives you the opportunity to have the code on your Mac while I simultaneously point out how you can modify it, learn the key features from it, or just put it on your iPad and show the folks at the bar these cool apps.
Figure 9–37. Apress's iPhone Cool Projects.

Figure 9–38. App icon and examples of three action screens—parsing app: “Routesy Bay Area San Francisco Muni and BART.” It combines data from the web and MapKit.
The code for these three student Final Projects is located as follows:
- Stephen A. Moraco (Son):
http://www.rorylewis.com/xCode/011b_TrafficCam.zip - Stephen M. Moraco (Father):
http://www.rorylewis.com/xCode/011a_APRSkit.zip - SatishRege:
http://www.rorylewis.com/xCode/011c_MyTraffic.zip
MapKit Parsing
Remember, this is digging deep into the code at a level that is outside the scope of the book. However, all of the following instructions are seen in my students' code, which you are welcome to download. For now, just read along and see if you can follow their pattern of parsing, creating delegate objects, and so forth.
Before we look at their actual apps, consider a hypothetical scenario:Imagine there is a Grateful Dead Server that broadcasts an update on every Deadhead's geographical location—at least those who allow themselves to be visible on the grid. This hypothetical app allows a (serious) fan of the Grateful Dead to locate all the other Deadheads nearby at any given time. These fans can meet and share bootlegs, hang out, and generally relate on a plane that only other Grateful Dead disciples can appreciate.
Starting Point
If we were to create such an app, just as in the “Routesy” example, we would allow users to see where they are by bringing up the Attributes Inspector and turning on a Shows User Location switch. We would create a controller called DeadHeadsView that creates an instance of a parser we'll call Gratefuldead. Then, we would make it set itself as the delegate so it receives the feedback and calls a getGratefuldead data method.
Getting Data from the Web
As our parser sifts through the XML on the Grateful Dead Server, we would want it to grab Gratefuldead element data and create an instance of each Gratefuldead object. So, for each instance it creates, it calls back to us with an addGratefuldead method. We would need to implement our Gratefuldead and Parser methods on our deadHeadsViewcontroller. We might find that it's easier to think of our GratefuldeadParser.h this way:
+ (id)GratefuldeadParser; // this creates it

- (void)getGratefuldeadData; // this activates it
Add Methods to View Controller
Before addingimplementation methods on our DeadHeadsView controller, we would need to implement the protocol with GratefuldeadParser Delegate and import its header file #import <GratefuldeadParser.h>. At this point, we'd be finished with the header, and we'd move to the implementation file.
First, we'd copy the two implementation methods from GratefuldeadParser.h and paste these two methods after the @synthesize statement:
@implementation DeadHeadsViewC0ntroller


@synthesize deadView


- (void)getGratefuldeadData:(Gratefuldead *)Gratefuldead;

-(void)parserFinished
Test the Parser Feed
To test the Grateful Dead Server, we would see if we could log some messages. Let's separate the two methods, delete the semicolons, add brackets, and then enter “log” as shown:
- (void)getGratefuldeadData Gratefuldead *)Gratefuldead {
NSLog(@"Hippie Message");
}
-(void)parserFinished{
NSLog(@"located a Dead Head at %@", Gratefuldead.place");
}
Start the Parser Method
Having implemented our delegate methods, we would need to do three things:
- Code the parser method. Put it into a method we could call
(void)viewWillAppear. This would be called on by a view controller when its view is about to be displayed. If we were to do it this way, note that we would always want to call in our- (void)viewWillAppearmethod. - Create an instance of our parser that we would call
GratefuldeadParser. With this, we'dgetGratefuldeadParser *parser = [GratefuldeadParsergratefuldeadParser]. We want to make ourselves the delegate, which means that, now,GratefuldeadParserparser.delegate = self. - Two actions in this step: first, tell the parser to get the Gratefuldead data:
[parser getGratefuldeadData];#import "GratefuldeadParser.h"Then, when the
– (void)viewWillAppearis invoked, it would create an instance ofGratefuldeadParser. As it receives the locations of all the Deadheads, it shows us where they are!
Do you recall how we made sure that the user of the app would appear on the map as a blue dot? I want you to think of the blue dot as just an annotationview. When added to the deadView, it essentially asks its delegate for its location.
NOTE: If we return anything other than nil, then our annotation view, instead of the blue one, will be used and then return that view.
So, looking at this, we return nil when the annotation does not equal the user's current location.
- (MKAnnotationView *)deadView:(MKDeadView *)deadView

                  viewForAnnotation:(id <MKAnnotation>)annotation {

MKAnnotationView *view = nil;

return view;
But here's the thing; we do not want to returnnilfor our Gratefuldeadlocations. Conversely, we want to do cool things when our annotation is not equal to the deadViewuserLocation property, which itself is an annotation:
if(annotation != deadView.userLocation) {


                // THIS IS WHERE WE DO OUR COOL STUFF

               // BECAUSE IT'S A DEADHEAD, NOT THE USER

}
At this point, we use the dequeueReusableAnnotationViewWithIdentifier, delegate method, which is available for reuse the instant they are off screen. It has a handy way of storing annotations in a separate data structure and then automatically adding and removing them from your map as the user's events require it. Note that dequeueReusableAnnotationViewWithIdentifieris about getting the reusable annotation view from the map, and it has nothing to do with adding or removing annotations:
GratefuldeadAnnotation *eqAnn = (GratefuldeadAnnotation*)annotation;

view = [self.deadView  dequeueReusableAnnotationViewWithIdentifier:@"GratefuldeadLoc"];

       if(nil == view) {

        view = [[[MKPinAnnotationView alloc] initWithAnnotation:eqAnn

                                              reuseIdentifier:@"GratefuldeadLoc"] autorelease];

}
The annotation view goes and looks in its reuse queue to see if there are any views that can be reused if(nil == view) { … If there are none, it returns nil, which means we need to create a new one view = [[[MKPinAnnotationViewalloc] initWithAnnotation:eqAnn.
There are many creative ways to make your annotations appear with animated chevrons, bells and whistles, Grateful Dead beads, and so on. You can see what's out there and available to make the iCandy portion of your annotations however you might wish.
In this regard, at this point of writing your code, the most important step is to review your code for errors using your NSLog debugger; this will determine whether it connects to a server of your choice. Once complete, it becomes an issue of parsing the XML. Then, the final step is to shop for iCandy for the annotations.
Three MapKit Final Projects: CS–201 iPhone Apps, Objective–C
The following are three apps that draw heavily on parsing information from the Internet. The first two come from a father and son, both named Stephen Moraco, and the third is from SatishRege. They were all kind enough to write unedited bios as to why they took the class. They also included detailed lecture notes, the apps shown in this book, and what they got out of the course.
BIOGRAPHICAL INFO FOR EXAMPLES 1 AND 2
Stephen A. Moraco (Son)
Stephen M. Moraco (Father)
Steve A. (Figure 9–39) is in his senior year in high school. He has been concurrently enrolled at UCCS and has taken courses for dual credit (both high school and college). I, Stephen M. (Figure 9–40), am a professional software engineer working for Agilent Technologies, Inc. Both of us have iPhones and have an interest in learning to write applications for the iPhone. The UCCS course caught our attention as a way we could learn this together. In fact, we really enjoyed Dr. Lewis' CS201 classes, in which we toured the iPhone SDK and practiced writing a number of applications. The discussions in class and then between the two of us as we were driving home always had us excited about things we could do with the iPhone. Our final projects came from these discussions. Dr. Lewis, thank you for offering this course. It provided, in our case, a wonderful time of shared learning. We couldn't have had a more enjoyable time.

Figure 9–39. StephenA.Moraco(Son)

Figure 9–40. Stephen M.Moraco(Father)
Final Project—Example 1
Stephen M. Moraco's app is one that is close to his heart. Being an amateur radio hobbyist, he decided to parse Bob Bruning's WB4APR site, where Bob had developed an Automatic Position Reporting System (APRS). Very much like the example that I gave in class, locating Deadheads, Stephen, the father, made an app that can locate all the Amateur Radio Operators that are within a user–specified distance from where they are at the time. I will not go over all of Stephen's code because you can download it and go over it carefully. The portions I think you should take note of are as follows: His APRSmapViewController header file sets out the road map with 3 IBOutlets, 1 IBAction, and a ViewController:
@property (nonatomic, retain) IBOutlet MKMapView *mapView;

@property (nonatomic, retain) APRSwebViewController *webBrowserController;

@property (nonatomic, retain) IBOutlet UISegmentedControl *ctlMapTypeChooser;

@property (nonatomic, retain) IBOutlet UIActivityIndicatorView *aiActivityInd;


-(IBAction)selectMapMode:(id)sender;
Inthe APRSkit_MoracoDadAppDelegate implementation file, he uses the following code to give the user a chance to log in. See Figure 9–41 for the results. The particulars of this step, seen in the -(void)applicationDidFinishLaunching method, also houses the distance (radius) from the user that the system will search for matches:
-(void)applicationDidFinishLaunching:(UIApplication*)application{


    NSLog(@"MapAPRS_MoracoDadAppDelegate:applicationDidFinishLaunching - ENTRY");

    //Override point for customization after app launch


    [window addSubview:[navigationController view]];

          [windowmakeKeyAndVisible];


     //preload our applcation defaults

     NSUserDefaults *upSettings = [NSUserDefaults standardUserDefaults];

     NSString *strDefaultCallsign = [upSettings stringForKey:kCallSignKey];

     if(strDefaultCallsign == nil)

     {

          strDefaultCallsign = strEmptyString;

     }

     self.callSign = strDefaultCallsign;

     //[strDefaultCallsign release];


     NSString *strDefaultSitePassword = [upSettings stringForKey:kSitePasswordKey];

     if(strDefaultSitePassword == nil)

     {

          strDefaultSitePassword = strEmptyString;

     }

     self.sitePassword = strDefaultSitePassword;


     NSString *strDefaultDistanceInMiles = [upSettings stringForKey:kDistanceInMilesKey];

     if(strDefaultDistanceInMiles == nil)

     {

          strDefaultDistanceInMiles=@"30";
     }

     self.distanceInMiles = strDefaultDistanceInMiles;

     //[strDefaultSitePasswordrelease];

     //INCORRECT DECR [upSettings release];

}
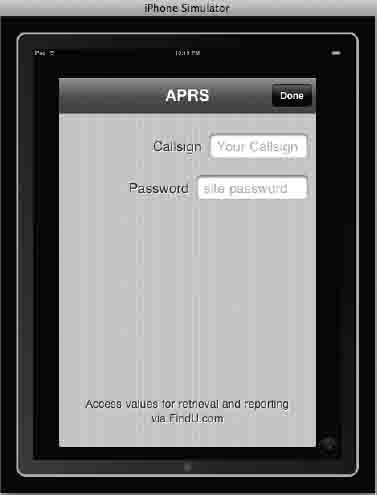
Figure 9–41. CS–201 Final Project—Stephen M. Moraco's APRS set–up screen where users enter their Amateur Radio call signs and passwords.
One of the first things Stephen did when he went to the website was make a list of all the attributes in the XMLfeed. The following list shows what he saw.
- Column–1 was the call sign, CALLSIGN
- Column–2 was the URLtoMessagetrafficifavailable
- Column–3 was the URLtoWeatherpageifavailable
- Column–4 was the Latitude
- Column–5 was the Longitude
- Column–6 was the distancefromme(inmiles)
- Column–7 was the DD:HH:MM:SSof the lastreport
To account for this data, he made eight pointers in his APRSstationParser.m file. Note that he has an extra one for possible unknown columns.
NSString *kCallSignCol          = @"Callsign";

NSString *kMsgURLCol            = @"MsgURL";

NSString *kWxURLCol             = @"WxURL";

NSString *kLatitudeCol          = @"Lat";

NSString *kLongitudeCol         = @"Long";

NSString *kDistanceCol          = @"Distance";

NSString *kLastReportCol        = @"LastReport";

NSString *kUnknownCol           = @"???";// re didn't recognize column #
Then, in the same file, he made case statements:
case1:

          m_strColumnName=kCallSignCol;

          break;

      case2:

          m_strColumnName=kMsgURLCol;

          break;

      case3:

          m_strColumnName=kWxURLCol;

          break;

      case4:

          m_strColumnName=kLatitudeCol;

          break;

      case5:

          m_strColumnName=kLongitudeCol;

          break;

      case6:

          m_strColumnName=kDistanceCol;

          break;

      case7:

          m_strColumnName=kLastReportCol;

          break;

     default:

          m_strColumnName=kUnknownCol;

          break;
Also, inthe APRSkit_MoracoDadAppDelegate implementation file, the -(void)recenterMap method scans all annotations to determine geographical center and, just as we did in this chapter's exercise, to calculate the region of the map to display. Stephen does likewise after his three if statements. Figure 9–42 shows an image of the pins dropping.
-(void)recenterMap{

    NSLog(@" - APRSpinViewController:recenterMap - ENTRY");

         NSArray *coordinates = [self.mapView

valueForKeyPath:@"annotations.coordinate"];

     CLLocationCoordinate2DmaxCoord={-90.0f,-180.0f};

     CLLocationCoordinate2DminCoord={90.0f,180.0f};

     for(NSValue*valueincoordinates){

          CLLocationCoordinate2Dcoord={0.0f,0.0f};

          [value getValue:&coord];

               if(coord.longitude>maxCoord.longitude){

                    maxCoord.longitude=coord.longitude;

               }
               if(coord.latitude>maxCoord.latitude){

                    maxCoord.latitude=coord.latitude;

               }

               if(coord.longitude<minCoord.longitude){

                    minCoord.longitude=coord.longitude;

               }

               if(coord.latitude<minCoord.latitude){

                    minCoord.latitude=coord.latitude;

               }

}
Note that in the APRSstation class, Stephen represents the details parsed from the APRS, which sets the location of the pins.
#import<CoreLocation/CoreLocation.h>


@interfaceAPRSstation:NSObject{

     NSString    *m_strCallsign;

     NSDate      *m_dtLastReport;

     NSNumber    *m_nDistanceInMiles;

     NSString    *m_strMsgURL;

     NSString    *m_strWxURL;

     NSString    *m_strTimeSinceLastReport;

     CLLocation  *m_locPosition;

     int          m_nInstanceNbr;

}


@property(nonatomic, copy)NSString *callSign;

@property(nonatomic, copy)NSNumber *distanceInMiles;

@property(nonatomic, retain)NSDate *lastReport;

@property(nonatomic, copy)NSString *timeSinceLastReport;

@property(nonatomic, copy)NSString *msgURL;

@property(nonatomic, copy)NSString *wxURL;

@property(nonatomic, retain)CLLocation *position;


@end
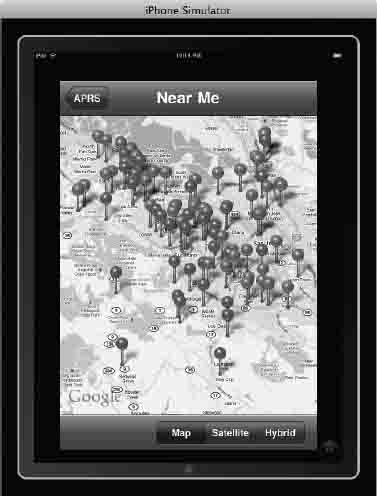
Figure 9–42. CS–201 Final Project—Stephen M. Moraco's Animated pins drop down within the specified radius of the user's location. Here on the iPad simulator, the pins drop in the surrounding areas of Apple Headquarters.
Another cool thing Stephen did was to distinguish between the amateur radio stations that have their own websites and those that do not. For the ones that have web sites, on the annotation view, he includes a chevron which, when clicked, yields the web page. See Figures 9–42 and 9–43. This code is directly under the switch cases in the APRSstationParser.m file.
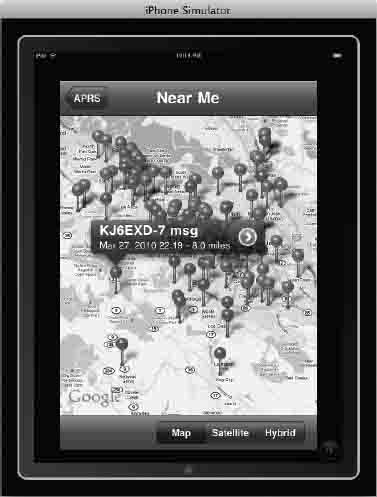
Figure 9–43. CS–201 Final Project—Stephen M. Moraco's app provides Annotations to appear when one clicks on a pin and where a linked website is on the APRS server, a blue chevron appears where one may click to go to the amateur radio station's website. In this case, amateur radio station KJ6EXD–7 does have a website.
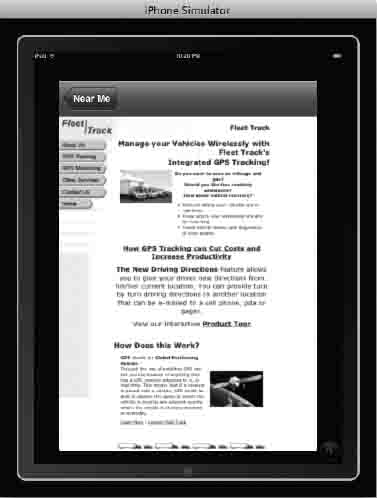
Figure 9–44. CS–201 Final Project—Stephen M. Moraco's App showing the KJ6EXD–7 website embedded in the iPad.
In the APRSmapViewController implementation file, Stephen includes, among other things, a bare–bones methodology to switch between map, satellite, and hybrid views. An example of this is seen when we show the closest radio station to the user, which, in simulator mode is Apple Headquarters. See Figure 9–44, where the view is in Hybrid mode.
-(IBAction)selectMapMode:(id)sender

{

     UISegmentedControl *scChooser = (UISegmentedControl *)sender;

     intnMapStyleIdx = [scChooser selectedSegmentIndex];

     NSLog(@"APRSmapViewController:selectMapMode - New Style=%d" ,nMapStyleIdx);


     switch (nMapStyleIdx) {

          case0:

              self.mapView.mapType = MKMapTypeStandard;

              break;

          case1:

              self.mapView.mapType = MKMapTypeSatellite;

              break;

          case2:

              self.mapView.mapType = MKMapTypeHybrid;

              break;
          default:

               NSLog(@"APRSmapViewController:selectMapMode - Unknown Selection?!");

               break;

          }

}
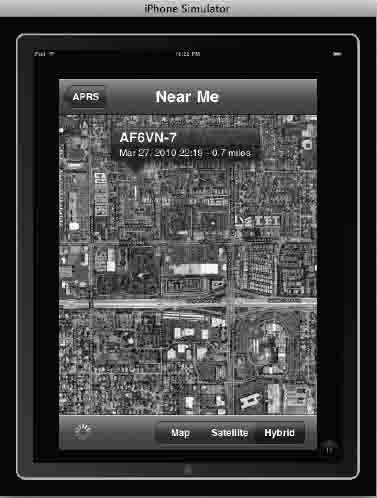
Figure 9–45. CS–201 Final Project—Stephen M. Moraco's App showing the closest amateur radio station to Apple Headquarters in the Hybrid map view.
Finally, as a finishing touch, which I always encourage students to complete; Stephen included a nice About page in the AboutView nib. See Figure 9–45.
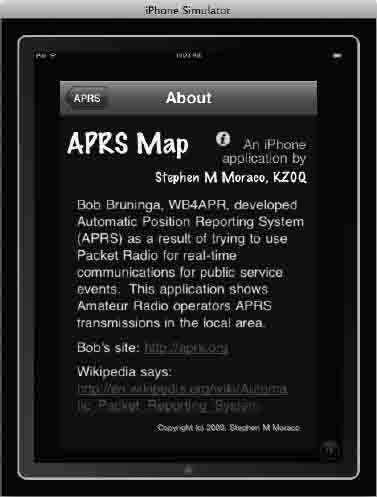
Figure 9–46. CS–201 Final Project—Stephen M. Moraco's App showing his “About Page” —totally cool!
NOTE: In order to run the code, you will need to have a password and username. You have two options: 1) Acquire your own, or 2) Download any of these three apps, which are essentially the same.
     http://itunes.apple.com/us/app/pocketpacket/id336500866?mt=8

     http://itunes.apple.com/us/app/ibcnu/id314134969?mt=8

     http://itunes.apple.com/us/app/aprs/id341511796?mt=8
Final Project—Example 2
Stephen A. Moraco is a gifted high school student who attended my class. His app parses the National Weather Cam network at http://www.mhartman-wx.com/wcn/. This can be seen in the TrafficCamParser implementation file static NSString *strURL=http://www.mhartman-wx.com/wcn/wcn_db.txt.
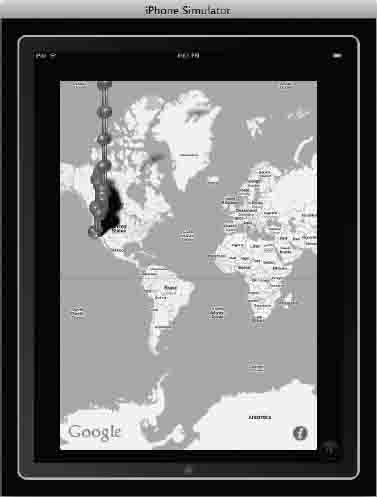
Figure 9–47. CS–201 Final Project—Stephen A. Moraco's App launches with hundreds of pins plummeting from the sky as they fill up a specified area around the user's “current” location at Apple Headquarters.
He found that he needed to use an adapter to filterto out bad meta tags in the <head></head> sections. There was so much extraneous matter on the server it was crashing the code. To take care of this, he had to make rules to replace "^" with </field><field>, replace <br>'s with blank space, replace "<fontsize="-1">("and")<br>" with </field><field>, start and end with <CAM> <field> and </field> </CAM> and remove </font tags, remove nonbreaking spaces. I've added numbering to help you see the start of each line, as the word wrap confuses me, too!
NSString *strNoParaQueryResults = [strQueryResults

stringByReplacingOccurrencesOfString:@"<fontsize="-1">("

withString:@"</field><field>"];
strNoParaQueryResults = [strNoParaQueryResults
stringByReplacingOccurrencesOfString:@")<br>" withString:@"</field><field>"];strNoParaQueryResults = [strNoParaQueryResults
stringByReplacingOccurrencesOfString:@"</font>" withString:@""];strNoParaQueryResults = [strNoParaQueryResults
stringByReplacingOccurrencesOfString:@" " withString:@""];strNoParaQueryResults = [strNoParaQueryResults
stringByReplacingOccurrencesOfString:@"></a>" withString:@"></img></a>"];strNoParaQueryResults = [strNoParaQueryResults
stringByReplacingOccurrencesOfString:@"width=150" withString:@"width="150""];strNoParaQueryResults = [strNoParaQueryResults
stringByReplacingOccurrencesOfString:@"height=100" withString:@"height="100""];strNoParaQueryResults = [strNoParaQueryResults
stringByReplacingOccurrencesOfString:@"width=100" withString:@"width="100""];strNoParaQueryResults = [strNoParaQueryResults
stringByReplacingOccurrencesOfString:@"height=150" withString:@"height="150""];strNoParaQueryResults = [strNoParaQueryResults
stringByReplacingOccurrencesOfString:@"border=0" withString:@"border="0""];strNoParaQueryResults = [strNoParaQueryResults
stringByReplacingOccurrencesOfString:@""""withString:@"""];strNoParaQueryResults = [strNoParaQueryResults
stringByReplacingOccurrencesOfString:@".jpg" withString:@".jpg""];strNoParaQueryResults = [strNoParaQueryResults
stringByReplacingOccurrencesOfString:@"&" withString:@"and"];strNoParaQueryResults = [strNoParaQueryResults
stringByReplacingOccurrencesOfString:@"<fontsize="-1">" withString:@""];strNoParaQueryResults = [strNoParaQueryResults
stringByReplacingOccurrencesOfString:@"</b<" withString:@"</b><"];
The TrafficCamAnnotation.h header files used is straightforward and simple, using the +(id)annotationWithCam:(TrafficCam*)Cam; and - (id)initWithCam:(TrafficCam*)Cam; pointers as described earlier for my hypothetical GratefuldeadParser.h. In this case, +(id)annotationWithCam:(TrafficCam*)Cam; creates parsed file and - (id)initWithCam:(TrafficCam*)Cam; initializes it. The result of all this hard work, taking care of the non-useful code, is seen in the clean annotation. See Figure 9–47.
#import <MapKit/MapKit.h>

#import<CoreLocation/CoreLocation.h>


@classTrafficCam;


@interfaceTrafficCamAnnotation:NSObject<MKAnnotation>{

     CLLocationCoordinate2D Coordinate;

     NSString *Title;

     NSString *Subtitle;

     TrafficCam*Cam;

}


@property(nonatomic,assign)CLLocationCoordinate2Dcoordinate;

@property(nonatomic,retain)NSString*title;

@property(nonatomic,retain)NSString*subtitle;

@property(nonatomic,retain)TrafficCam*cam;


+(id)annotationWithCam:(TrafficCam*)Cam;

-(id)initWithCam:(TrafficCam*)Cam;


@end

Figure 9–48. CS–201 Final Project—Stephen A. Moraco's App zoomed into the Colorado Springs area. The annotation of North Academy at Shrider appears because the author clicked on that intersection.
Stephen also found he could not automatically use the camera video views. Working around this challenge was not a trivia ltaskin TrafficCamSettingsViewController.m. One examplewastoalloworientationsotherthanthedefaultportraitorientation:
BOOL)shouldAutorotateToInterfaceOrientation:(UIInterfaceOrientation)interfaceOrientation{

    //Return YES for supported orientations

    return (interfaceOrientation == UIInterfaceOrientationPortrait);

}
He had to arrange this code in order to have beautifully spaced video cam images fitting nicely in the screen, as illustrated in Figure 9–48.
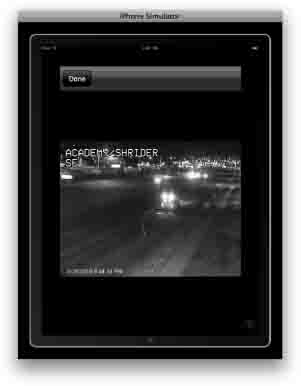
Figure 9–49. CS–201 Final Project—Stephen A. Moraco's App zoomed into the Colorado Springs area. The annotation of North Academy at Shrider appears because the author clicked on that intersection.
BIOGRAPHICAL INFO FOR EXAMPLE 3
Satish Rege
Why do I want to be an iPhone developer? Simple—the iPhone imparts the computing, the communicating, and the multimedia experience of a large computing system in the palm of your hand. It provides rich resources and user interface primitives to express creative capabilities in a synergistic way. These iPhone properties attracted me to want to learn iPhone development tools to express my own ideas. Rory's course was an excellent introduction that covered a multitude of iPhone capabilities and made them easy to master.

Figure 9–50. SatishRege
Final Project—Example 3
Satish (Figure 9–42) always came up with simple eloquent code for all his homework assignments. When I graded the weekly assignments, I realized that Satish had the knack of being able to put into 20 lines of code what others would often take three times as much to do the same thing. For his final project, Satish's app allows one to look up ahead at the traffic at intersections to come, and, if there is a traffic jam at one intersection, to recommend another.
At least in theory, that is how it works. Satish saved a lot of heartache by starting at one location he knew would be a tough intersection: I–25Northbound. He focused on controller implementation files and then he rotates back and forth from there depending on location in Colorado Springs. He has 27 cases for the 27 cameras in Colorado Springs. Simple, elegant, beautiful.
Figure 9–51 shows the list. Figures 9–52 and 9–53 show two examples of the traffic views.
//Choose the camera depending on your co-ordinate


     switch(cameraCordinate){

          case1:

              url=[NSURLURLWithString:@"http://www.springsgov.com/trafficeng/bImage.ASP?camID=17"];     //Camera-SAcademy/I-25North

               break;

          case2:

              url=[NSURLURLWithString:@"http://www.springsgov.com/trafficeng/bImage.ASP?camID=18"];     //Camera-HWY85/87/I-25N

               break;


>>>>>>

>>>>>>

>>>>>>

          case26:

               url=[NSURLURLWithString:@"http://www.springsgov.com/trafficeng/bImage.ASP?camID=33"];     //Camera-Monument/I-25N

               break;

          case27:

               url=[NSURLURLWithString:@"http://www.springsgov.com/trafficeng/bImage.ASP?camID=49"];     //Camera-CountyLine/I-25SE

               break;
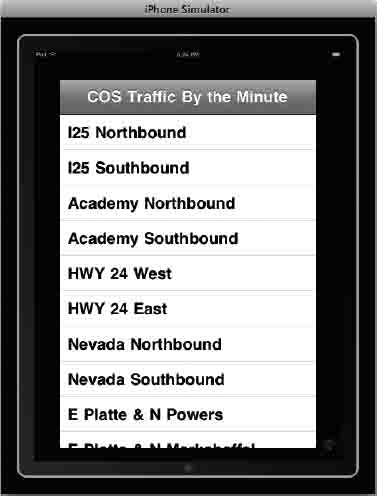
Figure 9–51. CS–201 Final Project—Rege's app selects the traffic lights closest to the user as he or she is driving down the street.

Figure 9–52. CS–201 Final Project—Rege's traffic monitoring app showing the embedded camera view.
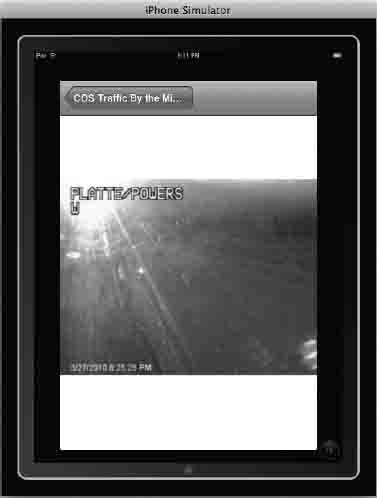
Figure 9–53. CS–201 Final Project—SatishRege's app showing another embedded camera view.
Zoom Out… Seeing the Big Picture
It's important to know where we came from, where we are now, and where we are going next. Not to get too metaphysical, but this chapter is a bit of a metaphor for our lives. Where were you five years ago? Last year? One day before you bought this book? Where do you intend to be six months from now?
That's why this subject is so popular. People love to know where they are! People love to know, and love to be shown how to get from “here” to “there.”
You know how men stereotypically refuse to stop and ask for directions? I know I do—it is because I should just know where I'm going. When GPS came on the scene, I was impressed. But when Apple included one, by way of ‘Maps,' in my first iPhone, I was totally blown away. All of a sudden, I had the ability to consult the oracle and maintain my male ego at the same time!
That's power, that's authority… and that's the same revolution we all joined. Now that you have completed this book, and successfully navigated through these exercises—some easier, some tougher—you are well on your way in the world of programming.
As I stated earlier, my goals for you in this chapter were humble. However, as in any really challenging and worthwhile pursuit, practice makes perfect. If you are exhausted, but still excited about these ideas and possibilities, then I count that as full success—both for you and for myself.
Some of you are perhaps thinking about topics that we did not cover in this book: the accelerometer, cameras/videos, peer–to–peer protocol, RSS feeds, mail clients/POP servers, etc. If these areas interest you, my hope is that your mind is already racing off in these new directions. That means you do know where you are, and that you know where you want to go. Life is good!