
Chapter 1
Before We Get Started
This introductory chapter will ensure that you have all of the required tools and accessories to proceed fully and confidently through this book. Some of you may already have Xcode, an up-to-date iOS simulator, and Interface Builder installed on your Mac and you may believe that because you are solid on these points, you are ready to jump right in. If so, you may want to jump ahead to Chapter 2 and start immediately on your first program.
It will behoove you, though, to understand why I teach certain things and skip over others. For those of you who have never programmed in Objective-C, it is quite a challenge—even for my engineering students who know Java, C, and C#. Nevertheless, with the appropriate preparation and mindset, you will accomplish programming in Objective-C.
So—I urge you to read on. The time you will invest in this chapter will be well worth it in peace of mind and confidence. Chapter 1 will help to structure the way that your brain will file away all of the rich content that is to come.
Necessities and Accessories
In order to program for the iPhone and/or iPad, and to follow along with the exercises, tutorials, and examples presented in this book, you’ll need to have 5 minimal requirements. You may not completely understand them right now, but that’s OK—just roll with me for a second. I’ll explain everything as we go through these steps. Briefly, the 5 you need are:
- A Mac
- The correct operating system for your Mac called an “OS X"
- Registration as a developer (discussed in detail below)
- The correct operating system for your iPhone, called an iOS
- The correct Software Development Kit for your iPhone, called an SDK that runs a program called Xcode.
Let's go into some of these in a bit more detail.
First, you will need an Intel-based Macintosh running Lion (OS X 10.7.2 or later). If your system was bought after 2006, you’re OK. I purposely program everything on a MacBook bought in 2006. All of the videos on the net are screencast from either my MacBook from 2006, or if I broadcast from my 2010 iMac, I first run it on my MacBook bought in 2006. You don’t need the latest revved up Mac. If you haven’t bought one yet, I suggest you get a basic, no-frills MacBook Air. If you do own an older Mac, then you may be able to add some RAM. Make an appointment at the Genius Bar at an Apple Store and ask them to increase the RAM as much as possible. Also, ask them explicitly: “Can this old computer run Lion at least 10.7.2, iOS5, and Xcode 4.2 or later?”
If you do not have a Mac, then keep in mind that, as mentioned, I have made a point to code and run every program in this book on Apple’s smallest and cheapest model, the MacBook. Apple has discontinued the MacBook; they now sell the MacBook Air for $999, which is more advanced than the Author's MacBook. You can purchase a MacBook on eBay and other such sites. See Figure 1–1.

Figure 1–1. I use the cheapest 2006 Mac on the market, the MacBook, to perform all the coding and compiling in this book. Essentially, there is no need at all to buy a more expensive or higher-end Mac to perform all the exercises.
Second, you will need the correct OS X. As I write this, it is OS X 10.7.2. We need to make sure that you have the latest and greatest operating system (OS X) inside your Mac. I cannot tell you the number of emails and forum questions that show that many of you will think: “Ahh my code probably did not compile correctly because Dr. Lewis has a different OS X or/and iOS on his machine …”
NOTE: The operating system that runs your computer (OS X) is different from the iPhone/iPad Operating System, commonly known as “iOS.” Even if you think that everything is up to date, I suggest that you follow along with me and make sure that your system has the latest OS X and the latest iOS inside it. As you follow along with me and tackle all the programs that I teach you in this book, there will be times when your code will not work the first time you run it. In fact, most of the time your code will not work the first time you run it (or “compile it” as us geeky guys say.) So! Let’s take care of this now.
Close every program running on your Mac, so that the only program running is “Finder”. Go up to the little apple located on the upper left-hand corner of your Mac and select “About This Mac,” as illustrated in Figure 1–2.
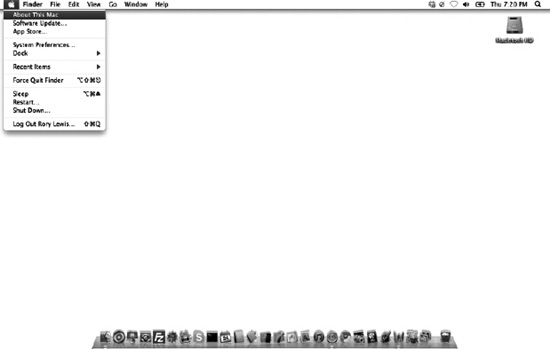
Figure 1–2. Go to your Desktop, click on the Apple, and select “About This Mac.”
Once you have selected this, you will see a window called “About This Mac,” as illustrated in Figure 1–3.
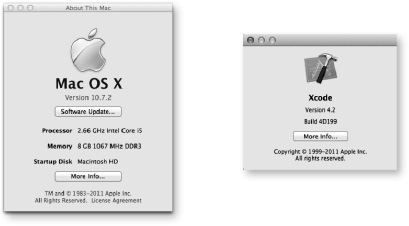
Figure 1–3. The “About This Mac” window, and Xcode version window. Here you can see that my MacBook is using OS X 10.7.2. We will discuss iOS later in this chapter. If you have already installed Xcode (or after you install Xcode), under “Xcode,” click on “About Xcode” and you will see what version you are running (as shown here on the right).
Note again that I have OS X 10.7.2 and this is the operating system I will use for this book. By the time you read this book, it will most likely have changed to a higher level. You need to bear two things in mind here. First, you need to update to that latest OS X, as shown below, and secondly, you need to go to the book’s online forum to see if there is anything you need to know about changes in the new version of the OS X that may impact this book. So, let’s look at how you need to update your system to the latest OS X.
With all of your programs closed except for “Finder,” go back up to the apple in the upper left-hand corner of your Mac and select “Software Update …,” as illustrated in Figure 1–4. Next, simply follow the instructions and the four screen prompts, as illustrated in Figure 1–5.
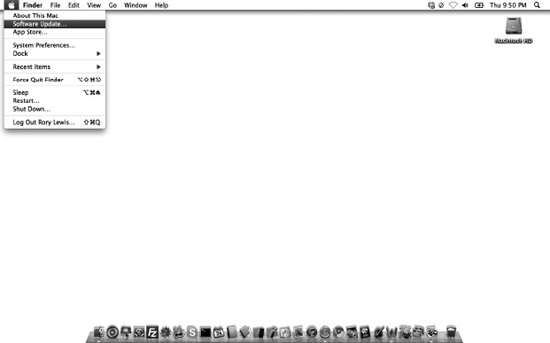
Figure 1–4. Go to your Desktop, click on the Apple and select “Software Update...”
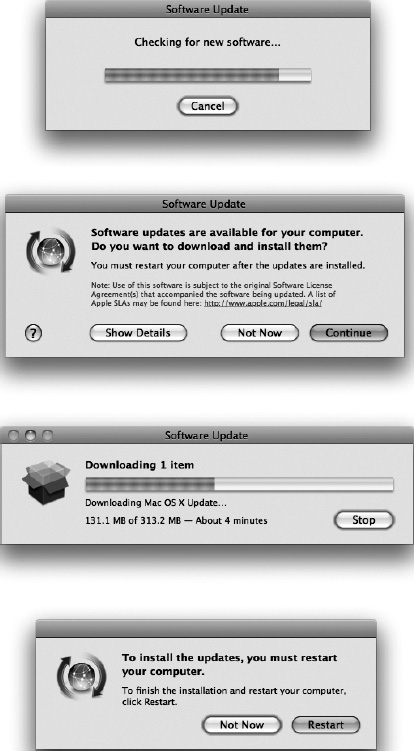
Figure 1–5. Top - Checking for new software; 2nd from the top - Select the option to download the new software; 2nd from the bottom - Wait for your new software to download; Bottom – Select “Restart” to have your Mac properly install the new software.
If, by the time you are reading this book, you realize that the OS X, and/or the iOS make my pictures appear dated, then do not freak out. I have a forum that is always online where I and many volunteers love to help others. We always update the forum with news regarding recent updates of the OS X and the iOS. Visit the forum here: www.rorylewis.com/ipad_forum/ or bit.ly/oLVwpY. See Figure 1–20.
Thirdly, you will need to become a registered developer via the iPhone/iPad Software Development Kit (SDK) and download Xcode. If you are a student, it’s likely that your professor has already taken care of this, and you may already be registered under your professor’s name. If you are not a student, then you will need to follow these numbered steps to sign up.
NOTE: Even if you absolutely do not want to be a developer, you can still download Xcode with your purchase of Lion or buy it at the Mac store. I have yet to have a student last for more than a week trying alternatives to this. The $100 allows you to have access to the Apple developer tool kits, tutorials, example code, and help forums, and to receive a provisioning license to run your apps on a physical iPhone or iPad. Lastly, you’re reading this book so you can make an app and sell it on iTunes store and make $$—you need to pay the $100 for this alone. Buying a Mac, Xcode, and this book—but not buying the $100 registered license—is like paying to learn to drive a car, buying a car, but then never obtaining a driver’s license. Many of the tools that I teach you to use in this book to debug assume you have a license. It’s your choice.
- Go to
developer.apple.com/programs/ios/orbit.ly/quO4ow,which will bring you to a page similar to the one shown in Figure 1–6. Click the Enroll Now button.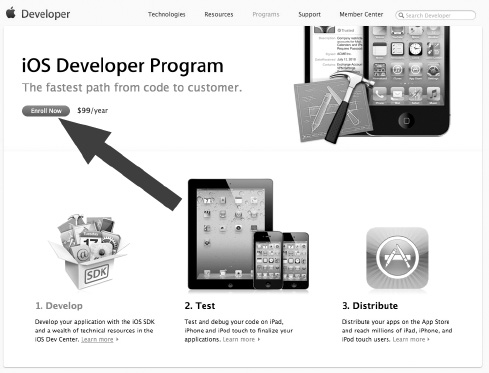
Figure 1–6. Click the “Enroll Now button”.
- Click the Continue button, as illustrated in Figure 1–7.
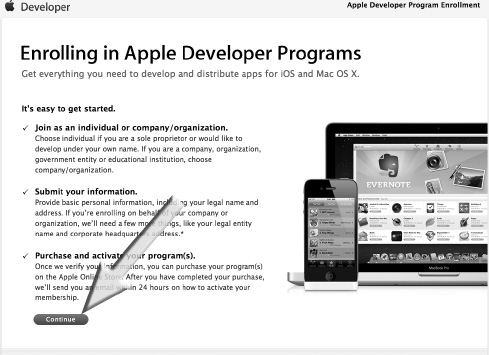
Figure 1–7. Click the Continue button.
- Most people reading this book will select the “I need to create a new account for …” option (arrow 1 in Figure 1–8). Next, click the Continue button as illustrated by arrow 2 in Figure 1–8. If you already have an existing account, then you have been through this process before. Go ahead with the process beginning with the “I currently have an Apple ID …” option, and I’ll meet you at step 6, where we will log onto the iPhone/iPad development page and download the SDK.

Figure 1–8. Click the “I need to create an Apple ID…” option to proceed.
- You are probably going to be enrolling as an individual, so click the Individual link, as illustrated in Figure 1–9. If you are enrolling as a company, click the Company option to the right and follow the appropriate steps; I’ll meet you at step 6.
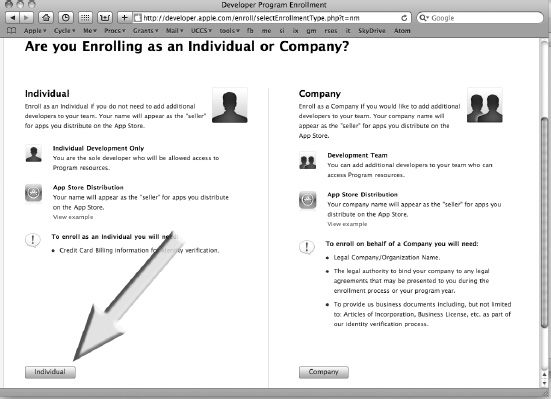
Figure 1–9. Click the Individual option.
- From here, you will enter all of your information, as shown in Figure 1–10, and you will pay your fee of $99 for the Standard Program. This provides you with all of the tools, resources, and technical support that you will need. (If you’re reading this book, you really do not want to buy the Enterprise program at $299, as it is for commercial in-house applications.) After paying, save your Apple ID and Username; then receive and interact with your confirmation email appropriately.
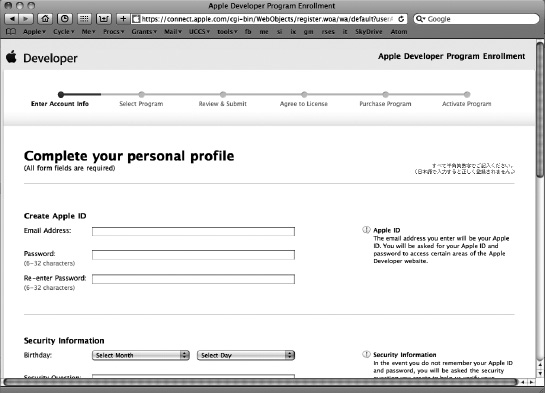
Figure 1–10. Enter all of your information accordingly.
NOTE: Before we move onto Step 6, you will want to make sure that you have received your confirmation email and have chosen a password to complete the last step of setting yourself up as a bona fide Registered Apple Developer. Congratulations!
- Use your Apple ID to log into the main iPhone/iPad development page at
developer.apple.com. This page has three icons for the three types of Apple programmers. As shown by the arrow in Figure 1–11, click on the top icon—iOSDev Center—to get to the download page for iPhone/iPad Operating System software.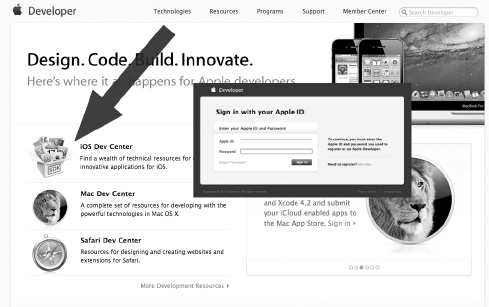
Figure 1–11. For now, click on the “iOS Dev Center” icon indicated by the arrow. Later, you may also want to program apps for the Mac Computer or the Safari Web Browser.
NOTE: While we’re here, let's go over the other 2 download options. The icon below the iOS is for people who want to download an environment to program wonderful things that run on a Mac. The third and last icon is for people who want an environment to program apps that operate inside Safari's web browser. Maybe one day you will want to connect your cool zany innovative idea that has made thousands of dollars to Safari. Well, this is the place you will want to do that.
- After logging in to iOSDev with your username and password, as described in step 6, you will see a screen similar to that shown in Figure 1–12. The iOS Dev Center contains all the tools necessary to build iPhone and iPad apps. Later on you will spend time here, but for now we just want to go to the Developer Page of the latest build of the iOS SDK. Locate the 'Downloads' icon indicated by the arrow and click it. You may notice that this only takes you to the bottom of the page, as illustrated in Figure 1–13. Whether you scrolled down or clicked down here, just click on the “Download Xcode 4” button so that you can get to the Xcode 4 and iOS SDK 4.3 page.
NOTE: Again, at the time I wrote this book, Xcode 4.2 and iOS SDK 5 were the latest versions. The chance is great that by the time you read this book, these may have larger numbers. This is not a problem; just go on to Step 8. If, by chance, something has really thrown us all a curve ball, it will be discussed and solved for you in easy-to-read English at our forum located at
www.rorylewis.com/ipad_forum/orbit.ly/oLVwpY.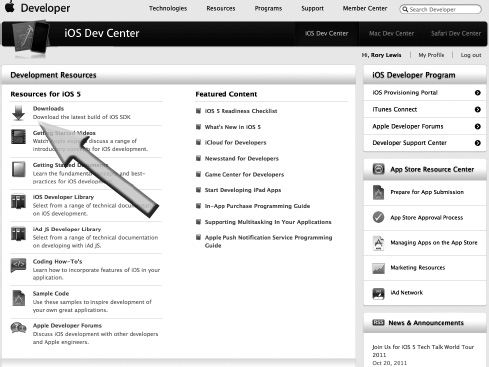
Figure 1–12. This takes you to the bottom of the page, as shown in Figure 1–13.
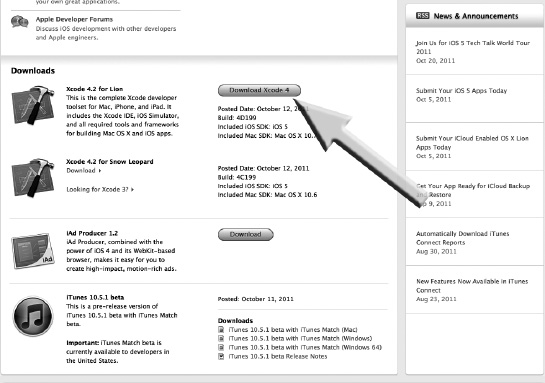
Figure 1–13. Click on the “Download Xcode 4” button and that will take you to the Xcode 4 Developer Page.
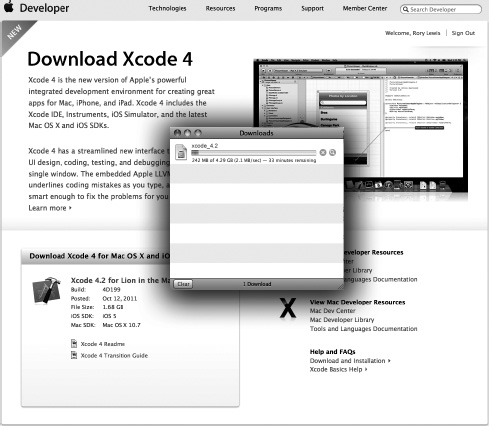
- I know you're probably thinking: “Gee, I just want to download it!' Remember that there are thousands of downloads at Apple.com. This page, illustrated in Figure 1–14, is called the Xcode 4 Developer Page and it has all of the relevant downloads for you. For now, we want to click on the latest version. These figures show the latest version at the time of this printing. It WILL be different by the time you read this in print. Right now, the latest version available at this point is “Xcode 4.2 for Lion,” so this is the link that is indicated by the arrow. It will look similar at this point—click on it.
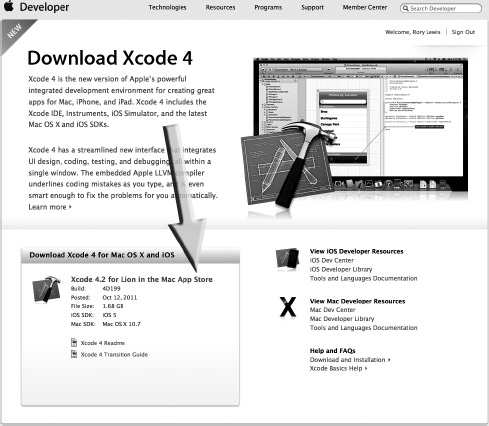
Figure 1–14. Click on the “Xcode 4.2 for Lion in the Mac App Store” link.
- Your download will start and, depending upon your connection speed, it may take somewhere between 2 to 15 minutes. Your screen should look something like the one shown in Figure 1–15.
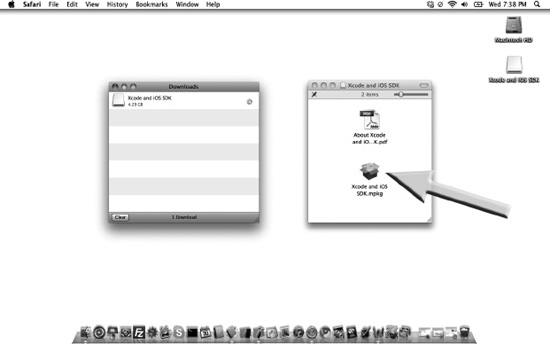
- Once the download has completed, the Xcode and iOS SDK drive icon will appear on your desktop and a window with your Xcode and iOS SDK.mpkg will appear, as shown in Figure 1–16. Click on the “Xcode and iOS SDK.mpkg,” as indicated by the arrow in Figure 1–16.
- Once you have clicked on the Xcode and
iOS SDK.mpkgicon, a security verification window will open up. Click on the “Continue” button as shown by the arrow in Figure 1–17. Next, you will see the “Install Xcode and iOS SDK” window, as shown in left-hand image in Figure 1–18. Now click on “Continue,” as indicated by the arrow. After several minutes, the installation will be complete and you will see a “The Installation was Successful” window appear. Click the “Close” button, as indicated by the arrow in the right-hand image in Figure 1–18.
Figure 1–17. The security verification window. Click on the “Continue” button.

Figure 1–18. The “Install Xcode and iOS SDK” window. Click on the “Continue” button.
- Included with the Apple SDK that you’ve now downloaded is Apple’s integrated development environment (IDE). This programming platform contains a suite of tools, sub-applications, and boilerplate code that all enable us to do our jobs more easily. We will use Xcode, Interface Builder, and the iPhone/iPad Simulator extensively, so I advise you to bring these icons to your dock (see Figure 1–19) as described in Step 13 below. This will save you tons of time searching for them.
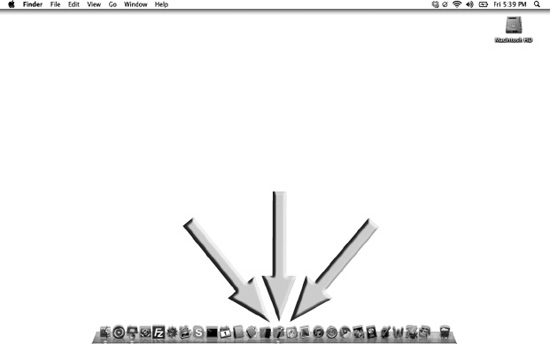
Figure 1–19. Xcode, Interface Builder, and the iPhone/iPad Simulator—locked & loaded, ready to roll!
- Bring Xcode to your dock by choosing Macintosh HD
 Developer Applications Xcode.app and dragging it onto your dock, as illustrated in Figure 1–19. In the same way, bring Interface Builder to your dock by choosing Macintosh HD Developer Applications Interface Builder.app and dragging it. Finally, bring the iPhone/iPad Simulator to your dock by choosing Macintosh HD Developer Platforms iPhone/iPad Simulator Platform and dragging it. I've placed them together at the center of my dock, as illustrated in Figure 1–19.
NOTE: Whenever I say “iPhone” or “iPad,” I am referring to any iPhone or iPad OS device. This includes the iPod touch. In addition, when I say Macintosh HD, yours may have been named something different.
What I Won’t Teach You
With your Xcode, Interface Builder, and iPhone/iPad Simulator tools installed and ready to access easily, you’re ready to roll. But wait! You need to know where we’re going.
First, though, let me say something about where we won’t be going—what I will not be covering. I will not attempt to teach you how every line of code works. Instead, I will take a subsystem approach, indicating which pieces or sections of code will serve you in which situations.
While this book is designed to impart to you, the reader and programmer, a comprehensive understanding and ability, we will be dealing in molecules rather than atoms or subatomic particles. The emphasis will be on how to recognize general attributes, behaviors, and relationships of code so that you need not get bogged down in the symbol-by-symbol minutiae. I will get you to a place where you can choose those areas where you may want to specialize.
Computer Science: A Broad and Diverse Landscape
Consider this analogy: suppose that the iPhone/iPad is a car. Most of us drive cars in the same way that we use computers. Just as I would not attempt to teach you how every part of the car works if I were giving you driving lessons, I would not—and will not—approach iPhone and iPad programming with fundamental computer engineering as the first step.
Even great mechanics who work on cars every day rarely know the fundamental physics and electronics behind the modern internal combustion engine, not to mention all the auxiliary systems. They can drive a car, diagnose what’s wrong with it when it needs servicing, and use their tools and machines (including computers) to repair and tune it optimally. Similarly, clever programmers who create the apps for the iPhone and iPad rarely know the fundamental coding and circuit board designs at the root of the Apple platforms. Nevertheless, they can use these devices, they can envision a new niche in the broad spectrum of applications needs, and they can use their tools and applications—residing on their desktops and laptops—to design, code, and deliver their ideas to the market.
To continue with this analogy, programming the iPhone or iPad is like playing with the engine of your car—customizing it to do the things you want it to do. Apple has designed a computing engine every bit as fantastic as a V8 motor. Apple has also provided a pretty cool chassis in which we can modify and rebuild our computing engine. However, we have restrictions on how we can “pimp” our iPhone/iPad cars. For those of you who have never pimped a car, I will demonstrate how to maximize creative possibilities while honoring these restrictions.
I’m going to show you, without too much detail, how to swap oil filters, tires, seats, and windows to convert your vehicle into an off-road car, a hot rod, a racing car, or a car that can get us through the jungle. When you’ve mastered this book, you will know how to focus on and modify the engine, the transmission, the steering, the power train, the fuel efficiency, or the stereo system of the car.
Why Purgatory Exists In Objective-C
My Assumption: you’ve never worked on a car, and you’ve never gotten grease on your hands, and you want to pimp one of the world’s most powerful automobiles—with a complex V8 engine. I’m going to show you exactly how to do this, and we’re going to have fun doing it!
First, you need to know a little about how we even came to have the souped-up car with the V8—that is, the iPad. In 1971, Steve Jobs and Steve Wozniak met, and five years later they formed Apple, producing one of the first commercially successful personal computers. In 1979, Jobs visited Xerox PARC (Palo Alto Research Center), and secured the Xerox Alto's features into their new project, then called the Lisa. Although the Alto was not a commercial product, it was the first personal computer to use the desktop metaphor and graphical user interface (GUI). The Lisa was the first Apple product with a mouse and a GUI.
In early 1985, Jobs lost a power struggle with the Board of Directors at Apple, resigned from the company, and founded NeXT, which was eventually bought out by Apple in 1997. During his time at NeXT, Jobs changed some critical features of the code on the Macintosh (Mac) to talk in a new language—a very intense but beautiful language called Objective-C. The power of this language was in its ability to efficiently use objects. Rather than reprogramming code that was used in one portion of the application, Objective-C reused these objects. Jobs’ brain was on overdrive at the time, and this incredible code took this new language of Objective-C to new heights. His inspiration was fused into the guts of the Mac by creating a metalanguage we call Cocoa. A metalanguage is a language used to analyze or define another language. As I’ve indicated, Objective-C is a very challenging beast, and you can think of Cocoa as the linguistic taming of the beast, or at least the caging of the beast.
As an “absolute beginner” to the world of programming, you cannot be expected to be concerned with the subtleties of coding language distinctions. I am simply giving you an overview here, so that you will have a rough historical context in which to place your own experience. The main point I’m making here is that Objective-C and Cocoa are very powerful tools, and both are relevant to the programming of the iPhone/iPad.
Houston, We Have a Problem
This is the essence of the challenge that intrigued me, and led to the design of my original course. How can one teach non-engineering students, perhaps like you, something that even the best engineering students struggle with? At the university level, we typically have students first take introductory programming classes, and then proceed to introductory object-oriented programming, such as C# or C++.
That being said, we are going to dive head on into Objective-C! At times, I’m going to put blindfolds onto you; at other times, I’m going to cushion the blows. There will be times when you may need to reread pages or rewind video examples a few times—so that you can wrap your head around a difficult concept.
How We’ll Visit Purgatory Every Now and Again
At specific places in my courses, I know that half the class will immediately get it, a quarter will have to sweat over it before they get it, and the remaining quarter will struggle and give up. This third group will typically transfer out of engineering and take an easier curriculum. I know where these places are, and I’m not going to tell you. I’ll repeat that. I will not tell you.
Don’t worry, I won’t allow you to disturb a hornet’s nest (of Objective-C issues) and get stung to death. Nor will I mark off those concepts that you may find difficult. I’m not going to explain this now. Just accept it! If you just relax and follow my lead, you’ll get through this book with flying colors.
When you do find yourself in one of those tough spots, persevere. You can always reread the section, rewind the video examples, or—most importantly—go visit the Forum where many people, including myself, are often online and ready to help you immediately. We may refer you to somebody else's solution or we may help you directly. So go to the forum, say “hello” to the crowd, and become immersed by first seeking help from others and then going back to help others. The forum is located at: www.rorylewis.com/ipad_forum/ or bit.ly/oLVwpY. See Figure 1–20.

Figure 1–20. Visiting the Forum can help if you find yourself in a tough spot.
Looking Forward… Beginning iPhone 4 Development: Exploring the iPhone SDK
Down the line, some of you may want to continue your iPhone and iPad programming adventure by reading Dave Mark and Jeff Lamarche’s book, Beginning iPhone 4 Development: Exploring the iPhone SDK (Apress, 2009). Remember the analogy of becoming a mechanic for an automobile with a V8 engine mounted on a basic chassis? Their book presumes that the readers know what a carburetor is, know what a piston is, and that they can mount racing tires and super fly rims on their friends’ pimped-up wheels.
In other words, they assume that you understand the fundamentals of object-oriented programming: that you know what objects, loops, and variables are, and that you are familiar with the Objective-C programming language.
On the other hand, I assume that you don’t know, for example, what a “class” is, or what a “member” or “void” is. I imagine that you have no idea how memory management works on an iPhone/iPad and, furthermore, that you never had an interest—until now—in understanding an array, or an SDK.
What You Will Learn
When students start a challenging class, I have found that it works wonders to have them create something really cool, and with relative ease. At each stage of this process, I will typically present an example that you can read, see, and digest right away. Later on, we will return to analyze some of the early steps and go into more detail. I will explain how we accomplished some task or action the first time without even knowing it. Then, by comparing the first time through with subsequent modifications, you will learn how to tweak the program a little here, a little there. This way, you’ll stay on track—motivated and inspired to absorb the next new batch of tricks, lessons, and methods.
Creating Cool and Wacky Apps: Why I Teach This Way
You’ve heard the bit about how we best remember things: doing is better than seeing, which is better than hearing, and so on. Well, I know that students love humor—and guess what! We remember funny stories and lessons much better than we remember dull and boring ones. I have found that, without exception, when students work on code that is fun and wacky, they tend to spend much more time solving it.
The more we apply ourselves mentally toward the solution of a problem, the more neural connections are made in our brains. The more neurons we connect, the more we remember and—most importantly—the less apt we are to waste time on ineffective methods.
The more time we spend on a particular topic, the more chance there is that you will experience gut feelings about whether a particular methodology for solving a project is on track or not. So, as we proceed, be aware that I am employing humor to burn computer science and Objective-C concepts and methods into your brain without your exerting any conscious effort.
It is common for my students to contact me after receiving a difficult homework assignment. First, they’ll send me a tweet asking if they can Skype me. One particular night, I was playing chess with a colleague when I received a tweet asking if I was available. “Of course,” I responded. I warned my colleague, also a professor at the University of North Carolina, that students he knew were about to appear on Skype. When they buzzed in, sure enough, they were four of my electrical engineering students, wide-eyed and smiling. “Hey, Dr. Lewis, we finally got it, but Dude! The last method you assigned…”
When we finished our conversation, and I turned off my Mac, it was 12:30 a.m. My colleague asked, “Rory, I never called a professor this late in the evening—much less after midnight! Shouldn’t they ask these questions during office hours?!” He was probably right, but after thinking about it for a minute I replied, “I’m just happy that they’re working on my wacky assignment!” As we set up the next chess game, he murmured something about how I might be comfortable in the insanity ward.
The point is that I want you to read this entire book. I want you to work all the examples and to feel elation as you complete each assignment! I have done everything I can to make this book enjoyable. If you choose to engage with the ideas contained herein, this book will change your life!
By the way, successfully navigating these lessons will make you a certified geek. Everybody around you will sense your growing ability and will witness your transformation; as a result, they will seek you out to request that you write apps for them.
Evangelizing to Your Grandmother… What You Coded Is Crucial!
It’s important that you not let complex code turn you inside-out. Just two minutes ago, a student walked into my office—so confused that he couldn’t even tell me what it was he didn’t know. He said something like, “My second order array worked fine in-line, but not as a class or a method.” I said, “No, that’s too complex! Here’s an easier way of saying it…”
I described how he had a long line of “stuff” going in one end and being spat out the other—and it worked really well. But, when he put it in a method, he couldn’t see the start of the long line of stuff; when he put it in a class, he couldn’t see any of the stuff!”
“Wow! I know what I did wrong, Dr. Lewis. Thank you!” Now, as I type this, he’s explaining it to his two buddies who came in yesterday and tried to ask the same question. Don’t worry. The confusion that drove these questions—such as the distinctions between “classes” and “methods,” and other coding entities—will be covered later in this book. All in good time!
If you can keep your feet on the ground and transform complex things into simpler ideas, then you can remember them—and master them. Grasp this concept, and you will be able to convert your far out ideas into code—and who knows where that will take you! This is why I am so determined to impart to you the ability to convert things your grandmother wants to be able to do into iPhone and iPad programming language.
How Does This All Work?
Before we start our first program in Chapter 2, it’s critical that you are able to step back and know where we’ve been, where we are now, and where we will go next. In other words, you may ask yourself: How do I convert an innovative idea for an iPhone or iPad app into money in my back pocket? How does this work? Does it even work or are all those crazy stories of people making massive amounts of money from iPhone and iPad Apps untrue?
So, are these stories of Apps-to-Riches true? This is easy to answer. As of March 02, 2011, when Steve Jobs revealed the iPad 2, he announced that Apple had paid a cumulative $2 billion to developers for apps sold in the App Store (see Figure 1–23, #9). Note that only eight months earlier Apple announced that it had paid out $1 billion to iPhone and iPad app developers since the App Store launched in July 2008.
A sum of $2 billion has never been paid to programmers before. You are entering a booming, epic event in computers and technology. Reading this book and learning how to program apps is going to change your life. During this new post-PC era, Apple has single-handedly created a never-before-seen environment for developers to take advantage of these more personal and powerful machines. This vibrant community of programmers that you are about to enter has helped push Apple’s count of apps up to more than 350,000. But still you may ask: How does this work?
I have created map of how the innovative process works and you need to understand this to know where you are going with this book. Looking at Figure 1–21, I want you to start by looking at …err…YOU! Yes, that’s you there, at #1, sitting next to a bag of money represented by #11, which is the 11th of 12 steps. Starting at #1, which is you with your brilliant innovative idea, you take your idea to #2, which represents the OSX on your Mac. Once you open your Mac, you are accessing the SDK (#3), which includes the iPhone/iPad Simulator (#4), Interface Builder (#5) and Xcode (#6), all lying on a gray strip that is part of your SDK iOS. These items (#4 to #6) will be explained in detail later; 90 percent of this book deals with the items in this strip. The only thing not covered here is where you convert your idea into code by programming in Objective-C.

Figure 1–21. The iPhone and iPad app programming landscape
NOTE: In Figure 1–21, the gray box contains the Interface Builder (#5) which technically is not supposed to exist in these latest versions of Xcode. The problem is that it’s still there, just in the background and we still use it extensively in Storyboarding (Chapter 7) onwards. So, be aware that some will say Interface Builder is gone (they’re wrong) and that we are not using it (wrong again. We do after Chapter 7). To the left of this area is where you’ve already been: Remember that you have a Mac with an OSX (#2) purchased after 2006 and running Mac OS X 10.7.2 or higher, and we’ve just walked through the process of downloading the iPhone and iPad SDK (#3) (Figures 1–6 through 1–20). We have also extracted the iPhone/iPad Simulator (#4), Interface Builder (#5) and Xcode (#6) and positioned them onto your dock (Figure 1–12).
In Chapter 2, we will start using Xcode (#6), Interface Builder (#5), and the iPhone/iPad Simulator to turn you into a bona-fide geek! In your geeky state you will test your Apps on real iPads (#7) and real iPhones (#8). Once you know that your code works fanatabulously (that’s my geekdom word), you will upload your app to the App Store (#9) where people with money (#10) will download your app by paying the App Store money. The money that is received by the App Store is split up, with two-thirds of it going to you and one-third going to Apple.
We’re going to run all of the programs we create by compiling them to one of several possible locations—the icons for these are to the right of the central gray area. The primary location will be the iPhone/iPad Simulator. The secondary locations will be your local iPhone and/or your local iPad. Lastly, we could use iTunes to upload your iPhone and/or iPad App to the App Store, where people can purchase it or download it for free. This is where we are going.
The two central objects in Figure 1–21, as you now know, are where we will spend the vast majority of our time within this book. We’ll be using Xcode to type in code, just like the serious geeks do. I’ll show you how to operate all of its features, such as file management, compilation, debugging, and error reporting. Interface Builder is the cool way Apple allows us to drag and drop objects onto our iPhone/iPad apps. If you want a button, for instance, you simply drag and drop it where you want it to be located on the virtual iPhone or iPad.
Essentially, we’ll use Xcode to manage, write, run, and debug your app—to create the content and functionality. We’ll use Interface Builder to drag and drop items onto your interface until it looks like the colorful and cool application you envisioned—to give it the style, look, and feel that suits your artistic tastes.
After we integrate all of the interface goodies with the code that we wrote in Xcode, we might get advanced and tweak the parameters that deal with memory management and efficiency. But that’s jumping too far ahead in our story.
Our Road Map: Using Xcode and Interface Builder
Very often, authors of programming books do the same old thing. First, they present a very simple, ubiquitous “Hello World” application and then they throttle the user with intense code that loses a great many readers and students straight away. Utilizing Objective-C (being run in Cocoa) along with the iPhone and iPad SDK, I’ve had to really rethink this introductory process. I have identified four challenges here:
- Teaching you “Hello World” and then going into advanced technologies and APIs would be counter-productive.
- It makes no sense to randomly choose one of the many ways to say Hello to the world from your iPhone or iPad. They are all going to be necessary to have in your toolkit at a later date.
- Trying to write a simple “Hello World” application in Objective-C is more involved than the beginner is ready for, unless we break up the process into stages or layers.
- Deciding how to progress slowly, get comfortable, and become familiar with the nomenclature and the process, and then get to Storyboarding and other more advanced concepts.
My solution to overcoming these issues is simple. I’ll show you how to say hello to the world from your iPhone/iPad in not one, not two, but quite a few different ways. Each time, we’ll go a little bit deeper, and we’ll have a blast as we do so.
Each time you travel down the road into the land of Xcode, you are immediately asked what type of vehicle you’d like to drive. A Jeep? A race car? A convertible? By focusing on basics, I am going to show you how to “drive” in Xcode. The objective here will be to gain competence and confidence in whatever style of vehicle we must access. So, let’s take a look at exactly what these different vehicles have to offer. Here, I would like you to follow along with me.
Getting Ready For Your First iPhone/iPad Project
Assuming that you have already downloaded the SDK and installed Interface Builder, Xcode, and the iPhone/iPad Simulator, open up your Mac and click the Xcode icon on your dock. Your screen should look similar to Figure 1–22. Up pops the Welcome to Xcode window; it includes all of your iPhone and iPad resources.
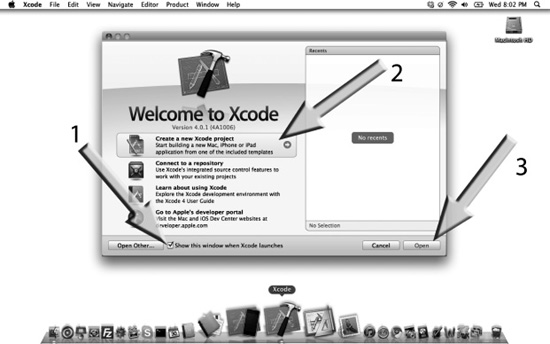
Figure 1–22. After clicking the Xcode icon, you will see the “Welcome to Xcode” screen.
As indicated by arrow 1, make sure you keep the “Show this window when Xcode launches” option checked. You'll find many valuable resources here that will come in handy. I suggest that, after you have completed Chapter 4, you take a little time to explore these resources—give them a test drive, so to speak. This practice will open all kinds of creative doors for you.
Without actually starting a new project, let’s walk up to the showroom floor and check out some of the models we might be driving. To open a new project in Xcode, click on the Xcode icon. When it opens, you can do one of two things: either click on the number 2and then number 3 arrows as indicated on Figure 1–22, or enter Command + Shift + N (![]()
![]() N), simultaneously. This will open a new window that showcases the different types of vehicles that you can drive in the land of Xcode.
N), simultaneously. This will open a new window that showcases the different types of vehicles that you can drive in the land of Xcode.
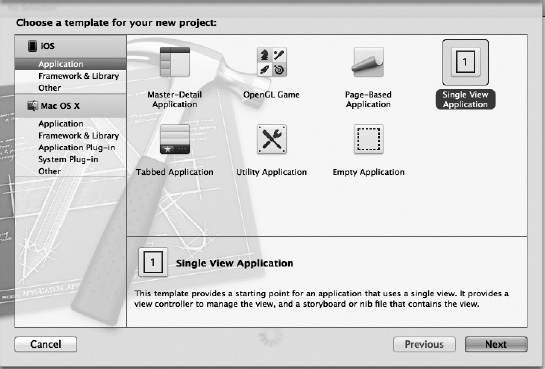
Figure 1–23. The new window that showcases the different types of vehicles that you can drive in the land of Xcode.
Figure 1–23 displays the seven vehicle models: Master-Detail Application, OpenGL Game, Page-Based Application, Single View Application, Tabbed Application, Utility Application and Empty Application.
Early on, most of our travel in Xcode will be by one of the latter two styles shown. Switching back to computer terms, View-based Application and Window-based Application are the structures that we will utilize in the basic development cycle for the iPhone/iPad. It is here that we will access cool gadgets and components.
Don’t worry: I haven’t forgotten our goal of creating a simple “Hello World” application. We will say hello to the world while using a number of the six options, and you will become familiar with each. Before we drive our car, let's make sure the key works in the ignition—or in computer land, let's check that the iOS compiles a blank document and brings up the iPhone/iPad Simulator. Click on Single View Application, as shown in Figure 1–23. Looking at your screen, you should see something very similar to that of Figure 1–24. First call it “test,” as indicated by arrow 1, then make sure you select iPhone as depicted by arrow 2, and then click on the “Next” button as indicated by arrow 3.
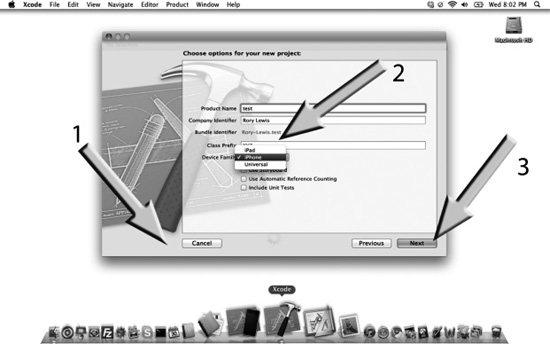
Figure 1–24. Let’s go for a test drive.
If your program does not default to saving it onto your Desktop, then navigate your way to your Desktop and the click on the “Create” button, as illustrated in Figure 1–25.

Figure 1–25. Navigate to your Desktop and create your test app.

Figure 1–26. The initial Integrated Development Environment (IDE) screen.
Figure 1–26 shows the initial view of Xcode 4’s integrated development environment (IDE). We will not get tangled up in explaining everything right now. All I want you to do is to click on any of the any of the files that end with an “.h” or an “.m”. Now click on the testViewController.h file, as indicated by the arrow in Figure 1–26. This will bring up the screen shown in Figure 1–27, where I want you to run your blank app by clicking on the “go” button as indicated by the arrow. Oh Yeah! The iPhone in the iPhone/iPad Simulator pops up, as illustrated in Figure 1–28. Congratulations! You've loaded Xcode and you've taken it for a test drive. It's time to realize that you're just about to embark into a whole new world.
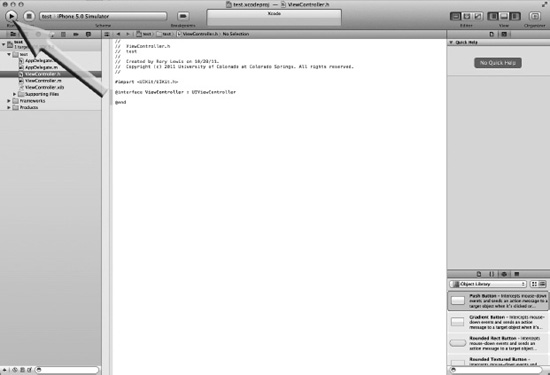

Figure 1–28. Your first test-drive.
The Accompanying Screencasts
All figures shown in this book have been captured from my screen as I write the code—in a screencast. For example, the helloWorld_001 example in Chapter 2 is located at www.rorylewis.com/docs/02_iPad_iPhone/06_iphone_Movies/002_helloWorld_002.htm or bit.ly/quO4ow.
It is not necessary to view the aforementioned screencast, since I have included all the instructions in Chapter 2. However, I’ve heard students say that it’s fun to retrace what they heard in the lesson. These video examples tend to be rather condensed. If you would like to follow along with the screencasts, please note these recommendations:
- Stop the video when I get ahead of you. Rewind it and get back on track with me.
- After you can complete the project in full, save the screencast to another folder. Then, go through it again with fewer stops until you can master it… and compile it.
- For the competitive among you, perhaps a goal is to execute the code in time with me as I go. Generally, though, I want you to feel good and comfortable with programming at a high level. It would behoove you to practice this for all the examples in the book.
The Accompanying PDFs
I also provide a PDF version of the keynote slides that I give to my students at the University of Colorado. These PDFs—which are not required, but merely supplemental—show all the slides from this chapter. There are also links for those of you who want to probe deeper into subject matter that is not covered in this book.
NOTE: You can access videos and supplementary materials at the www.apress.com web site.
Pretending Not to Know: The Art of De-Obfuscation
Before we begin in earnest, I want to reiterate that I am going to show you how to program while knowing only the essentials. As we move forward, I will explain concepts a little deeper. However, I will only do this once we’ve gotten your head wrapped around the easy concepts. This is a new way of teaching, and I have had great success with it.
You may think I’ve completely lost my mind, but I ask you to follow my instructions anyway. If you have a question that I don’t appear to address, trust me that it’s not important at the time. We will cover it down the road!
How We’ll Travel Through Each Step
This book is completely inclusive. Even though I provide video tutorials for the exercises in this book, you don’t need any of it. You can read this book alone, without any Internet connection, and everything that you need you can find within these pages.
So, now that you’ve finished checking your system parameters, signed up as an official Apple developer, downloaded the SDK, extracted the essential tools, and configured your dock, it is time to advance to Chapter 2 and create some code.
A LITTLE EXERCISE
Looking at Figure 1–28, you see that on the test drive we ended up with an iPhone popping up on the iPhone/iPad Simulator. Well, what about the iPad? Well, that’s what I’d like you to do on your own. See if you can get the iPad in the iPhone/iPad Simulator, as illustrated in Figure 1–29. The clues are seen in Figure 1–24 and in Figure 1–29 where, under the test folder, is a brand new folder called test 2.
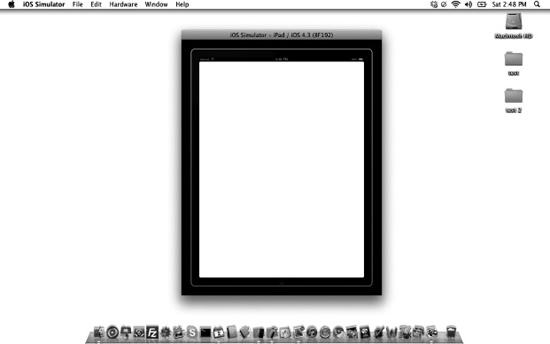
Figure 1–29. iPad2 in the iPhone/iPad Simulator.