
Chapter 2
Blast-Off!
The first program we shall attempt, as mentioned in Chapter 1, will be a basic and generic “Hello World” application. This Blast-Off chapter emulates precisely what I have found, through experience, to work very well in the lecture halls when teaching this course. I use this simple, innocent, benign “Hello World App” as a basis to introduce students to the most critical skill sets that they will use over and over again. As happens with my own students, by the time you finish Chapter 2, you will know how to run your first app in 3 different ways, according to each of the following sections:
2.1. iPhone Simulator.
2.2. iPad Simulator reading your iPhone environment (pseudo iPad).
2.3. iPad Simulator.
In my lectures, I want to keep the flow of adrenaline by continuously creating app after app and getting that geeky feeling of conquering the world. Therefore, I leave §2.4 to 2.6 for a special Saturday class that is optional for students who want to create their own business selling apps and making money. Likewise for you, the reader, I suggest that you only do §2.1 to 2.3 and then go to Chapter 3, as this will keep the flow going. Our first adventure with this new set of tools will be saying “Hello” to the world from the View-based Application template in Xcode. Later, we will say “Hello” to the world from the Navigation-based Application template, first in a very basic way and then with some modifications.
Besides the information I present here in this book, including various screenshots, I also offer you screencasts of myself going through each of the examples in this book. Downloads for that will assist you in getting through this book, as will lecture notes, 3rd party resources, and pertinent YouTube videos—all of which can be accessed by clicking on the blue Xcode 4 icon located top center at: www.rorylewis.com.
Running Your App on the iPhone Simulator
In this first example, we are going to click on a button that will have text appear above it saying “Hello World.”
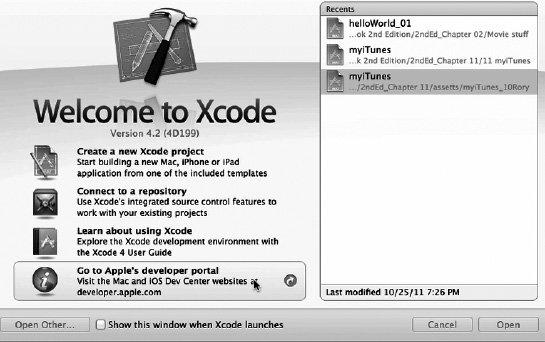
Figure 2–1. Click the Xcode icon in your Dock to open it. You will be presented with the “Welcome to Xcode” frame, as discussed in Chapter 1.
- Before opening Xcode, first close all open programs so that you will be able to optimize your processing capabilities and focus your undivided attention on this new material. Press Command + Tab (

 ) and then Command + Q ( Q) to close everything, until only the Finder remains on your screen. Find and click the Xcode icon in your Dock to open it. You will be presented with the Xcode “Welcome” screen discussed in Chapter 1. See Figure 2–1.
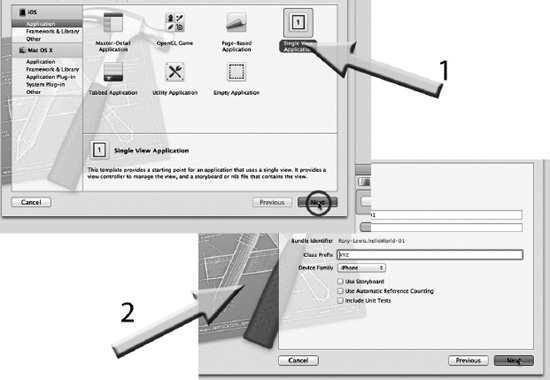
Figure 2–2. Name it
hello_World_01and use your name or company name for the Company Identifier. For the Device, select iPhone. - Now open a new project in Xcode. The two ways to accomplish this are by using keyboard shortcuts or by clicking your mouse. I strongly suggest that you use keyboard shortcuts. These will save you time and make you feel like a pro. Be aware that the best way to not get work as an iPhone and iPad app developer is to use your mouse for functions that can be done via shortcuts. Using your keyboard, press Command + Shift + N at the same time. These three keystrokes appear in Figure 2–1 as

N. (If you were using your mouse to open a new project, you would choose Create a new Xcode project.) Select View-Based App and then press Return ( ). Name it
 helloWorld_01, enter your name, and select iPhone, as depicted in Figure 2–2.NOTE: My View-based Application template icon was highlighted by default; yours may not be. Regardless, click on it, and save the new project to your desktop as
helloWorld_01.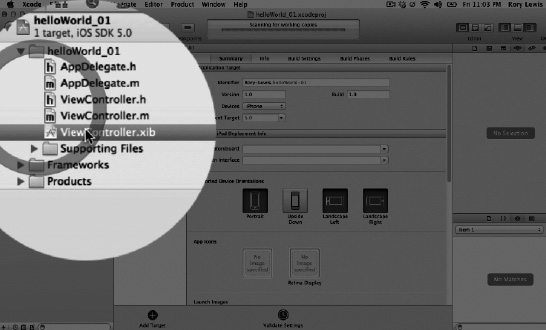
Figure 2–3. Click the
helloWorld_01 ViewController.xibto open the Interface Builder. - As soon as you save this project to your desktop, Xcode instantiates the
helloWorld_01project environment, as indicated by the name on the top of the window (see Figure 2–3). If this looks a bit scary, stay cool… don’t freak out! This is Apple’s way of arranging all of the goodies that you will eventually use to write complex apps. For now, just follow along and try to set aside all the questions you may be asking. Xcode has created 6 files:- 2 classes that contain two files (a header file (
.h)and an implementation file (.m)). Two of them end inAppdelegateand two of them end inViewController. We will get back to this later. Right now just know this: Each “class” is comprised of two files: a header file and an implementation file. - 2 nib files (
.xib).Don’t ask yourself what “nib” means yet. Just open the file where you can see a visualization of your program. In due time, you’ll get to know plenty about nibs.
As shown in Figure 2–3, double-click to open up the
helloWorld_01ViewController.xib(pronounced “nib”) file that is located in the manila-coloredhelloWorld_01folder that is located inside of the blue Xcode folder located at the top left-hand side of the Navigator Area of your Xcode environment.NOTE: There is a slight possibility that your Navigation Pane, which bears the folders seen in the highlighted circle in Figure 2–3, is closed. This is not a problem. To open your utility area, go to the upper left of the workspace window, which includes inspectors and libraries. Use the View Selector in the toolbar to open and close the navigator, debug, and utility areas. You may also need to again select the black folder icon called the Project Navigator located directly under the “Run” button— it looks like the “play” button in iTunes.
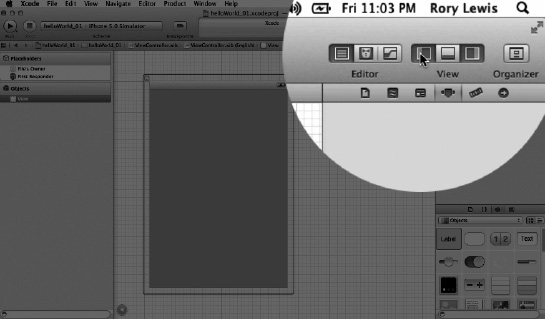
Figure 2–4. Open the Utilities Pane by clicking on the Utilities Icon in the View Selector.
- 2 classes that contain two files (a header file (
- We need to open the utility area located to the right of the workspace window (see Figure 2–4), which includes inspectors and libraries. Navigate to your View Selector, which contains 3 icons, and select the far right icon called the Utilities Icon.
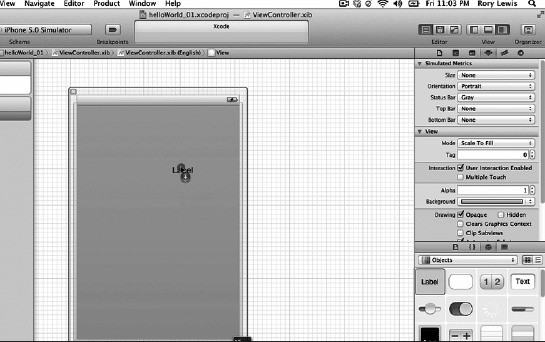
Figure 2–5. Drag out a label onto your canvas. Delete its text and center its content.
- We now need to drag some goodies from the library onto our canvas. First, however, let’s think about what we're going to do. We are going to click on a button that will have text that will appear above it saying “Hello World!” Therefore, we need something to click on; that will be a button and we need a label that will contain the text that says “Hello World!” Easy! First drag a label onto your canvas, as shown in Figure 2–5. Move it to a height that suits you and then move it horizontally until the blue center line appears. At this point, you will let it go, nicely centered in the middle of your canvas. Now, this label will eventually contain the text “Hello World!” so drag the label's side handlebars out to the right and left to make it a little larger, to about the same size shown in Figure 2–5. Now go to the Text box and delete the text label so that it is blank, as shown in Figure 2–5. Lastly, still looking at Figure 2–5, notice how my arrow is hovering over the “centered text” icon. Do the same and click it so that when your “Hello World!” text appears in the label, it will be nicely centered inside the centered label. Beautiful. Now let's move onto the button.
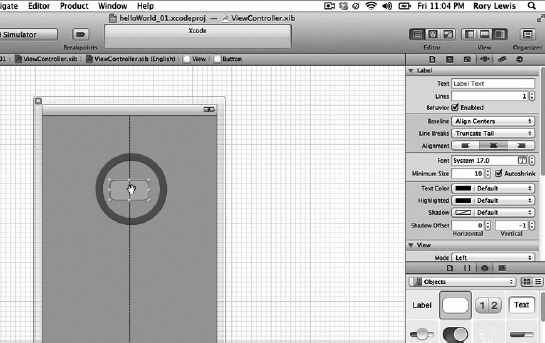
- Drag out a button and place it below your text, moving it left to right until the center lines tell you it's centered. At that point, you let it go, as shown in Figure 2–6. Immediately double click on it and type the text “Press Me” (see Figure 2–7).

Figure 2–7. Close the Utilities folder, save your work, and open the Assistant, as indicated by the arrow.
- We are finished loading our two items onto the canvas, so go to the Utilities Folder again and close it by clicking on it, as shown in Figure 2–7. As you are finished with this file, you may also want to save it by using the shortcut Command + S, (
S). This is the preferred method of saving—rather than using your mouse. Now we need to open up the Assistant in the Editor Selector, located to the left of the View Selector. This is indicated by the arrow in Figure 2–7.
Figure 2–8. Control-drag from your Label to create an Outlet.
- For those readers who once dabbled in Xcode before Xcode 4 came out, this next section is the most radical and cool departure from all the previous versions of Xcode. For those newbies, don't think twice about it; let’s just move forward in blissful ignorance. We are going to be doing something here in Step 8 that is new, called the Open URL contextual menu. We want to tell the label to print out text that says “Hello World!” when we push the button. We call these things “outlets” and we used to have to code these from scratch. In Xcode 4, however, we have the source code on the right of our screen, with the graphical builder in the center, and we can simply control-drag (holding the control key while dragging your mouse) connections. First, add the squiggly brackets after the
UIViewControllerand hit return so it creates the end bracket and some space. Now, click on the label on your canvas and control-drag over from your label to any place in-between the two squiggly brackets of your@interfacemethod, as shown in Figure 2–8 (we're in the header file here). Once the black label appears saying Insert Outlet, release your mouse.NOTE: The Assistant uses a split-pane editor, which is where much of the Xcode 4’s dazzle appears. Remember that you can open the Assistant automatically by Option-clicking a file in the project navigator or symbol navigator pane.
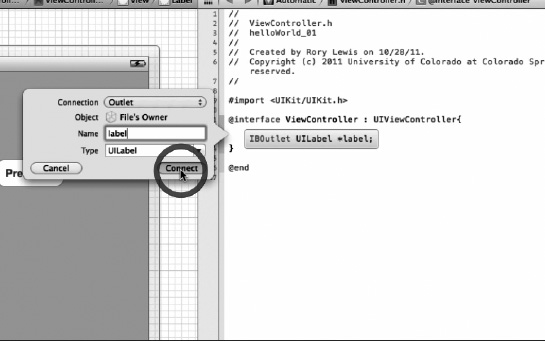
Figure 2–9. Make the
IBOutleta label. - As mentioned in Step 8, we want the connection type to be an Outlet—and the people at Apple figured this is what you probably need—so by default, it appears so we keep it selected. Don't worry about Object and File's Owner right now. You can name the label anything you like, but for now, name it label as I have (see Figure 2–9), so your code will look the same as mine when and if you compare yours to my video, the images in this book, or the code you download from my website. Don't worry about the
UILabelfor now either. Now hit return () and you will see that the code IBOutlet UILabel *label;magically appears. You can see it highlighted in the text below. We will discuss this in detail in “Digging the Code” at the end of this chapter. For now, let’s move on.#import<UIKit/UIKit.h>
@interface helloWorld_01ViewController : UIViewController {
IBOutletUILabel *label;
}
@end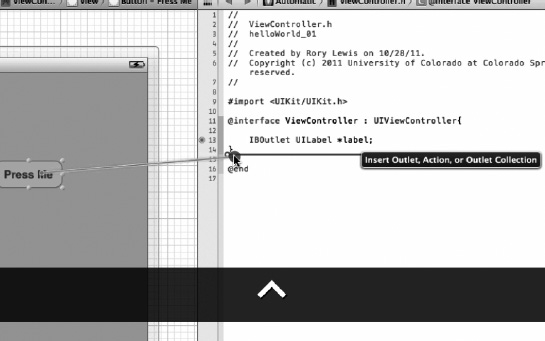
Figure 2–10. Control-drag from your button to create an Action.
- Now we need to place some code behind the button we dragged onto the canvas so it can do the “action” we want it to do. In our case, we want the button to tell the label we connected in Step 9 to say stuff. We call this “declaring an action.” For now, we just need to associate the button with action code; we'll later define exactly what these actions will be. So just as we did before with the label, click on the button in your canvas and control-drag over from your button to just below the closed squiggly bracket, as shown in Figure 2-10. Once the black label appears saying Insert Outlet, Action… release your mouse.
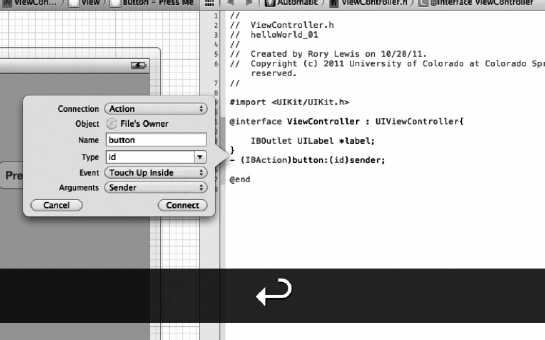
- As mentioned in Step 10, we want the connection type to be an action, so you will need to change the connection type from an Outlet to an Action by selecting it from the drop-down menu. Again, don't worry about Object and File's Owner right now. Name it “button” and ignore everything else for now. This is illustrated in Figure 2–11.

Figure 2–12. Completing your
ViewController’s header file. - Hit return () and you will see
-(IBAction)button:(id)sender; whichappears as shown below and in Figure 2–12. Yes, we will discuss this in detail in “Digging the Code” at the end of this chapter. Right now, let's keep moving.#import<UIKit/UIKit.h>
@interface helloWorld_01ViewController : UIViewController {
IBOutletUILabel *label;
}
- (IBAction)button:(id)sender;
@endBefore moving on to Step 13, we need to look around and see where we're at. Remember, back in Step 3, I said that we have 2 classes that contain two files (a header file (
.h)and an implementation file (.m)). Let me talk a little bit about the difference between these two files: one with the.hsuffix, the other with the.msuffix.The
ViewControllermanages the interactions your code has with the display, and it manages the user’s interactions with your code. It contains a view, but it is not a view itself. You only have a minimal understanding of theViewControllerclass, so far. What I want you to get, though, is that, as mentioned in Step 3, every class consists of two parts: the header (.h) file and the implementation(.m) file.I want you to read this next part aloud, and I don’t care if you’re in the bookstore! OK? “We tell the computer in a header file what types of commands we will execute in the implementation file.” Now, let’s say it again in context with our code: “We tell the computer in the
helloWorld_01ViewController.hfile what types of commands we will execute in thehelloWorld_01ViewController.mfile.”Well, admit it—that wasn’t so bad!
Let's get back to the example:

- To move on to the implementation file from this point, get into the habit of first switching views and going from the Assistant Editor (remember we did this in Steps 2–7) to the Standard Editor. To do this, go to the Editor Selector located to the left of the View Selector and click on the Standard Editor, as shown in Figure 2–13.
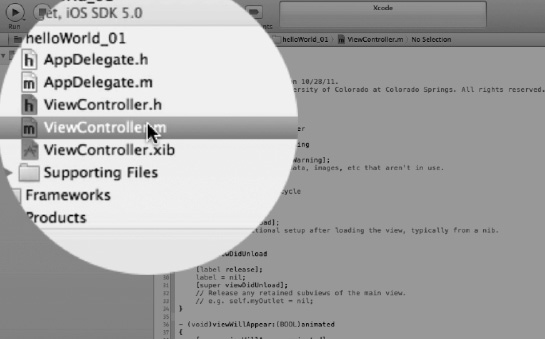
Figure 2–14. Open your
helloWorld_01ViewController’s implementation file. - Once in the Standard Editor, select your
ViewController's implementation file, as shown in Figure 2–14.Recall how, in Step 10, we “declared an action” when we control-dragged the button into our header file's code? Remember that in the header file we “declare” actions, while in the implementation file we “implement” actions. Here in your
ViewController's implementation file, we are going to implement the actions that we want to happen when somebody presses on the button. Specifically, we want it to say, in the label, “Hello World!” “Mmm, how do we do this?” you may ask. Well, we need to type your very first code to start your journey towards geekdom. Yup, you're going to code text. Take a deep breath and follow along.Looking at the text of your
helloWorld_01ViewController's implementation file, we see that the clever people at Apple programmed Xcode to already write a number of methods that need to happen in the background just to get your app with label and buttons running on your iPhone. For now we will ignore these methods, starting at the first one nameddealloc,which deallocates memory and going down to the end until we get to one named- (IBAction)button:(id)sender.Mmm… wait a minute, that’s the code that appeared in Step 12, right? Right? Well, almost. That code ended with a semicolon “;” because, in the header file, we declared this action. Xcode knows we now need to implement this action in the implementation file, so it rewrites it for us, not as a declaration but as a method. It does this by substituting the colon with squiggly brackets. You need to remember this rule. You will use it over and over again.NOTE: A declaration in
.hbecomes a method in the.mfile by replacing the colon with squiggly brackets!After reaching the implementation of your action that you declared in the header, I want you to place your cursor in between the two squiggly brackets, as indicated in the code below. Click there and read below.


Figure 2–15. As you enter the text “label.text” auto completion suggests code. If you agree with the selection, then press the Tab (
 ) key and Xcode places the command into your code.
 - The code I want you to type is
label.text = @"Hello World!"but it’s not that straightforward because, as you type, something really cool happens. Xcode figures out what you’re probably going to want to code in its auto completion window, as illustrated in Figure 2–15. If you agree with the selection, then press the Tab ( ) key and Xcode places the completed, correctly typed and spelled command into your code. If the one it suggests is not the correct one, but you see the correct one a few commands down, just arrow down (↓) until you reach the correct selection and then press . Cool, huh? After you have written
 label.text,continue on to Step 16.
Figure 2–16. Type in the text you want the label to say after the “@” directive.
- Now we need to type
@"Hello World!";which is what we want to say. Your code should look like that depicted in Figure 2–16. If you wanted to say “I can feel I'm becoming a geek!” instead, then typelabel.text = @"I can feel I’m becoming a geek!";.
Figure 2–17. Save your work:
 S.
S. - Save your work S, as shown in Figure 2–17. Please try not to use your mouse; try to make a new habit by always pressing the Control+S (S) every time you want to save. This will make you feel and look really smart and geeky. You may also want to check that your header files and nib files are also saved because, during the course of reading these instructions, you may have had to go back and change files. Well, you need to go back and save them. So go ahead and save everything now. If the file is highlighted in gray, then it means you need to save them too.
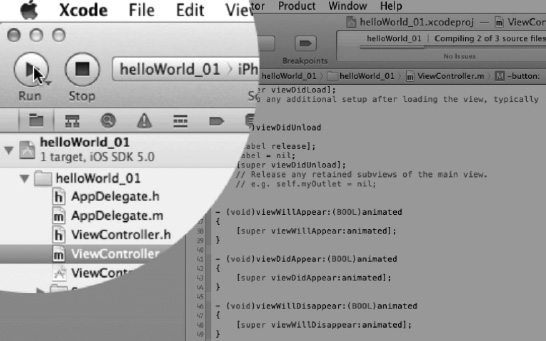
Figure 2–18. Run it!
R. - Press R and run it, as described in Figure 2–18.
As Figure 2–19 shows, the iPhone simulator loads your very first app, waits for you to press the button, and then says “Hello World!”.
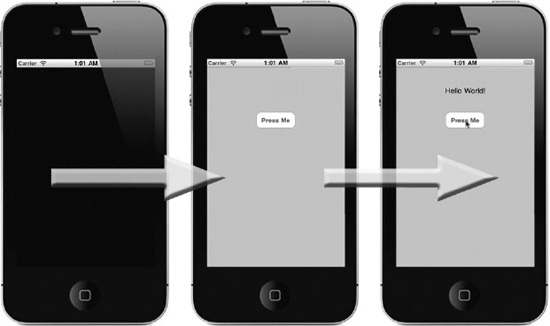
Figure 2–19. The iPhone simulator, loading and waiting for the user to press the button, and then saying “Hello World!”
Congratulations, my friend! You have really done something very special today. I know you may have cursed me a couple of times, or floundered here and there, but in getting here you've just done something very special with your life. You've gone from being a user to a coder. You've taken that very difficult leap from being a user of technology to a coder of technology. We still have a few things to do, so take a break. Walk the dog; do something that does not involve technology, even if it’s walking out to the street. Take a minute to realize that you’re beginning a long journey. It will be difficult at times, but it’s one wherein you can hold your head high and say: “Yeah, I code iPhone and iPad apps!”
Running your app on the iPad Simulator that reads your iPhone environment
Two methods are available for running your iPhone app on the iPad simulator:
- First we'll change the environment from the iOS simulator, so, while still in the iPhone simulator, I want you to click on Hardware
 Device iPad so that we can see how your first app runs if it were being run on an iPad (see Figure 2–20). The result is the display presented in Figure 2–21.
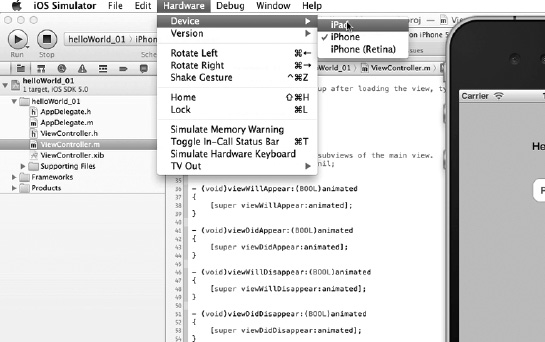
Figure 2–20. Let’s see how your iPhone app runs on the iPhone simulator.
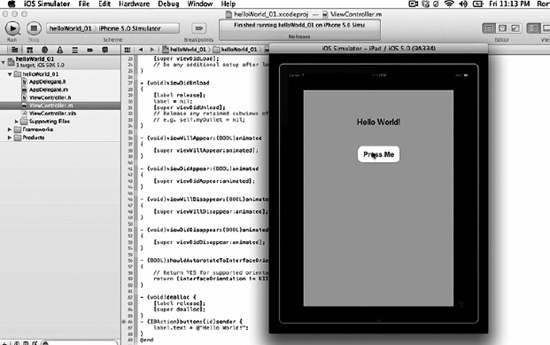
Figure 2–21. Initially it appears in the iPhone mode. Click on the zoom and view it full screen as shown here.
- The second method is achieved by changing the output device from within Xcode. To do this, I want you to close your iPhone simulator by first making sure you're in the simulator and then entering Command + Q (Q). You should now be back in Xcode.
NOTE: If you're not, then it means you've had other programs up, which is something I asked you to not do. In order for you to follow along exactly, you really need to keep your desktop and running programs identical to how I am teaching you.
- So now with Xcode open, change your scheme to the iPad simulator by clicking on the Scheme drop-down menu on the upper left hand portion of your ribbon and select iPad Simulator, as shown in Figure 2–22. Right now it says iPad 4.3 Simulator, but by the time you read this book it probably will be a higher number.
- Now enter R to run it. Again, you will come up with the same instances displayed in Figure 2–21.
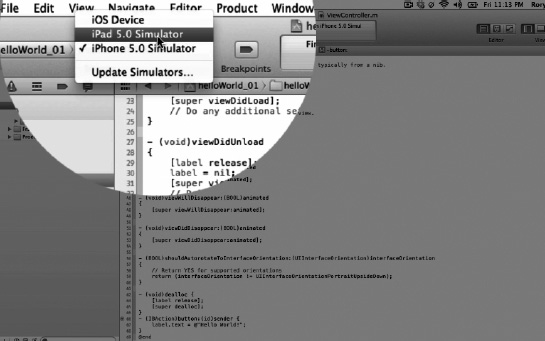
Figure 2–22. Second method of running your iPhone app in the iPad simulator.
Running your App on the iPad Simulator
helloWorld_02 – iPad Simulator
At the beginning of this chapter, I made a deal with you. I said we were going to take a very simple app and run it in all the different forms possible. Specifically, I said we would run your first app on:
- §2.1. The iPhone Simulator: (
 see Figure 2–19).
 - §2.2. The iPad Simulator reading the iPhone environment ( see Figure 2–21).
- §2.3. The iPad Simulator.
At this point, you have already completed the first two goals of running it on the iPhone simulator, with the latter being the iPad reading an iPhone app. But this is not really an iPad app. A real iPad app is made specifically for the iPad and cannot be run on an iPhone because all the graphics and sizes of screens are specifically designed for the iPad and are too large to be viewed on the iPhone.
Looking at Figure 2–21, you can see that the first image on the left shows your iPhone app inside the iPad and scaled exactly to the size of an iPhone. When you clicked the zoom, it simply zoomed and expanded everything larger to fit inside the iPad. Well, this is what I refer to in class as being “pseudoiPad,” as it’s not the real deal. So let’s go ahead and show you how to make an app specifically for the iPad.
- We will need to close your
helloWorld_01app in Xcode by enteringS to save it and then Q to quit Xcode. You should now be looking at your empty desktop, except for the helloWorld_01folder right under your Mac hard-drive icon. Good. We are now going to runhelloWorld_02, which will be exactly likehelloWorld_01except for a couple of steps. - Open up Xcode and enter Command + Shift + N at the same time. Recall that these three keystrokes appear in Figure 2–1 as N. Select View-Based App and then press Return (). Now stop and look at Figure 2–23: in Figure 2–2, we named it
helloWorld_01. However in Figure 2–23, we name ithelloWorld_02. Most importantly, in Figure 2–23, we select iPad, NOT iPhone as we did in Figure 2–2. With this done, I want you to try remember all of the steps we performed inhelloWorld_01until you run it, whereupon you will come up to only the right hand image of Figure 2–21.

Figure 2–23. Open Xcode, select the Navigation-based Application template, and then save a new project file to your desktop.
Huh? Yes that’s what I said: I make my students in the lecture hall redo helloWorld all over again, but now as a “real” iPad app and I encourage them to try and not peek at their lecture notes, to try doing it on their own. If you have to look at your notes, or this book, that’s fine. But try to do it over and over again, until you can do this without looking at any notes at all.
Running your App on Physical Devices
TIP: You may want to skip this section. Read the following carefully.
After you have set up your device and profiles, you can continue on with steps §2.4, running your app on your iPhone, §2.5, running your app on your iPad based off of an iPhone environment and §2.6, and running your app on your physical iPad.
Whatever your decision is, you will need to first do the following organizational chores. Right now, on your beautiful clean open desktop, you only have two folders containing your 2 helloWorld programs. We need to make a place to store all of your programs that will make sense to you as you continue to read this book. Create a folder in your Documents folder called My Programs, and then save the files named helloWorld_01 and helloWorld_02 there by dragging them to that folder. Now, with a fresh, clean empty desktop, close all programs. Press Command + Tab and then Command + Q to close everything until only the Finder is left on your screen
NOTE: For students in my class or at other universities, I or your professor has already taken care of this. If you are not a student and did not pay your $99 in step 5 in Chapter 1, or/and you do not have an iPhone or iPad, then skip ahead to Chapter 3.
Digging the Code
At the ends of chapters, I include this section called “Digging the Code,” wherein I start to feed you insights into the meaning of much of the code that miraculously appeared or that I just instructed you to type. What I have found, though, is that the human brain makes its own associations if it keeps on doing something over and over again and certain outcomes occur each time we repeat that action. I have found that if I first allow students to fly through huge amounts of code in sheer ignorant bliss, it does a great deal of good because it allows their brains to make connections that only they can make. So here in “Digging the Code” I start feeding you little snippets, just the right ones that connect the dots as to why we put this code here or that code there. Later, as we get towards the end of the book, you will feel totally comfortable really digging the code and getting into it. For Chapter 2, however, we have not repeated enough actions for you to make your own associations. So, for now, take a deep breath and I'll see you in Chapter 3.