
Chapter 3
Keep on Truckin’
Now that you’ve gotten your feet wet from programming your first two iPhone and iPad apps, I want you to tell yourself that you have to keep on truckin’ with more apps, more practice, and create a more natural connection of synapses in your brain. Initially, many traditional Computer Science colleagues of mine had disdain for my approach of blindly hauling newbie programmers through code without explaining it all. Over the years, I’ve learned exactly when to tell you what’s going on and when to just jostle you through the code. Most importantly, you need to keep on truckin’ and keep your brain dialed into Xcode.
This third “Hello World” application introduces you to some cool new concepts such as Strings, Delegates, and slightly more complex code. Remember that this is Objective-C; it’s a pretty complex and difficult language, so I will explain only what I deem necessary. This brings up a difference between Chapter 3 and Chapter 2. Recall that in Chapter 2, when I mentioned digging the code, I said: “For Chapter 2, however, we have not repeated enough actions for you to make your own associations.” Well, here in Chapter 3, we start really getting into digging the code. So let’s get on with the next application. When it’s done, take a break, and then be ready to go back and review lines of your input, as we focus on certain portions of the code, and look at how it all works together.
Besides the information I present here in this book, including various screenshots, I also offer you screencasts, which are available at my website. You can use the short URL, go to rorylewis.com, as indicated below when you click on the Xcode 4 icon, and then go to either video tutorial or downloads:
- Short URL ow.ly/50ksH
- Manual URL: www.rorylewis.com
helloWorld_03 – An Interactive View-Based App
In your first two programs, helloWorld_01 and helloWorld_02, you said “Hello” to the world using a view-based platform that housed a button. This third app will also be a view-based app, but a little complexity will be added to it. When a user interacts with this third app of yours, they will first be prompted to enter their name into a Text Field object. Once they have entered their name into the Text Field object, and they press the Press Me button, text will appear saying that the name entered is in fact the person saying “Hello World!”
Before you get started with the next method, you need to save helloWorld_01 and helloWorld_02 in a folder of your choice that is not on the desktop. Create a folder in your Documents folder called “My Programs,” and then save the file named helloWorld_01 there by dragging the entire folder inside your My Programs folder. Now, with a fresh, clean, empty desktop, close all other programs you may have running by selecting programs. Press Command + Tab (![]()
![]() ) and then Command + Q (
) and then Command + Q (![]() Q) to close everything until only the Finder is left on your screen.
Q) to close everything until only the Finder is left on your screen.
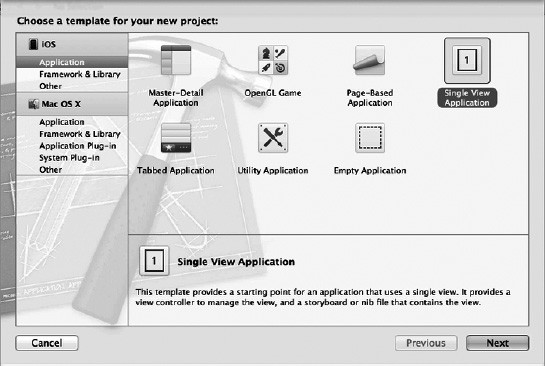
Figure 3–1. Open Xcode, select the View-based Application template, and then click the Next button.
1. Now, just as you did in the first example, launch Xcode and open a new project by using your keyboard shortcut: ![]()
![]() N. Your screen should show the New Project wizard as depicted in Figure 3–1. You may find that your View-based Application template was highlighted by default because of the last example. If, however, your View-based Application template is not selected, then click on the View-based Application icon, and then click the Next button, as indicated in Figure 3–1.
N. Your screen should show the New Project wizard as depicted in Figure 3–1. You may find that your View-based Application template was highlighted by default because of the last example. If, however, your View-based Application template is not selected, then click on the View-based Application icon, and then click the Next button, as indicated in Figure 3–1.
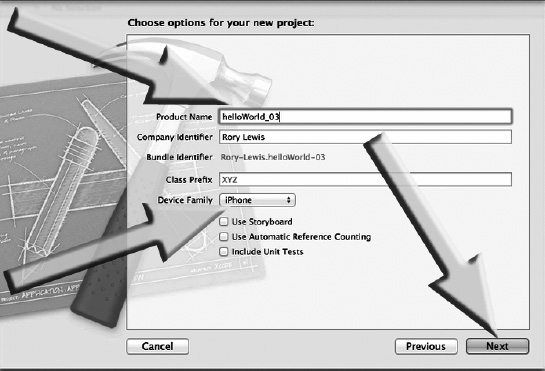
Figure 3–2. Name your project, make sure it’s for an iPhone, and then click on the Next button.
2. You are going to call this third project helloWorld_03, so type that in the Product Name box, as shown in Figure 3–2. The Company Identifier should automatically be defaulted to your Xcode license name. Remember that helloWorld_02 was created for an iPad, so the Device Family on your computer may still be set to iPad. Whatever the case, make sure that helloWorld_03 is set for theiPhone family. In the event that your “Use Storyboard”, “Use Automatic Referencing Counting” or “Include Unit Tests” are checked by default, uncheck them. Once this is done and your screen looks like that shown in Figure 3–2, click the Next button.

Figure 3–3. Drag a picture of yourself from the desktop into your Supporting Files folder.
3. For this homework assignment, my students are required to take a photo of themselves, crop it into a 320 × 480 image, and then save it as a .png file. This way, I can associate names with the correct faces in a faster manner. For those of you who are reading this book and are not my students, go ahead and get a picture of yourself, crop it to 320 × 480, and save it onto your desktop as a .png file. If you do not have access to a graphics editor, then feel free to use the picture I used for this project. You can download it at ow.ly/50ksH(scroll down to the third video tutorial from the top, helloWorld_03, and click on the box icon). A compressed file will be downloaded to your computer with the picture I used in this example, named DrLewis.png. Place it onto your desktop. Once it is on your desktop, press Command + Tab (![]()
![]() ) until Xcode is highlighted. Release the
) until Xcode is highlighted. Release the ![]()
![]() keys, at which point Xcode will now fill your screen again. Minimize Xcode slightly so you can see the desktop with your picture, or for some of you, the picture of me as illustrated in Figure 3–3. Grab it, drag it over to your Supporting Files folder, and drop it inside the folder.
keys, at which point Xcode will now fill your screen again. Minimize Xcode slightly so you can see the desktop with your picture, or for some of you, the picture of me as illustrated in Figure 3–3. Grab it, drag it over to your Supporting Files folder, and drop it inside the folder.
NOTE: Just in case you noticed, along with the positive attributes associated with giving you the exact code and images of me programming precise code that is taken directly from my online tutorials, there comes a negative aspect: you seeing me make errors. In this case, I accidently missed the Supporting Files folder. I said “Oops” and quickly dragged it from the helloWorld_03 folder into the Supporting Files folder, which is exactly when the image from Figure 3–3 was snapped. In case you noticed this, ignore it. Just drop your file into the Supporting Files folder, and let’s move on.

Figure 3–4. Complete importing your image by selecting the “copy items into destination …” option and clicking on the Finish button.
4. One of the most common mistakes that I see students make happens at this simple stage of Xcode management: they forget to check the “Copy items into destination group’s folder if needed” checkbox. When you import a file into the Supporting Files folder on your computer, if you do not check “Copy items into destination group’s folder” everything will work fine, giving you a false sense of security. In this case, even though Xcode is told that your supporting files, such as the image in this example, reside in your Supporting Files folder, what's really happening is that there’s a little note saying: “Dude, I take no responsibility for this, the file is not here, it’s still on the owner’s desktop!” So you, the writer of your code, go on doing your homework. Every time you run your code, and Xcode calls to access a supporting file, this irresponsible “Pointer Reference” guy just keeps saying, “It's not here—it's still on your desktop!” So you finish your homework and everything works great. You smile as you zip up your work and send it to me. I give you a zero and then you cry. Why? Well, the irresponsible pointer reference is telling me that your reference files are on my desktop. Nope! It’s not on my desktop, it’s on yours, and you get zero out of 10 for being negligent and depending on a Pointer Reference dude rather than selecting the “Copy items” check box. This way, you fire the Pointer Reference and have the file in your program. This way, when you zip it up and send it to me, and I open up your work to grade, it opens with all your relevant files in the exact place you want. So after dragging your picture into the Supporting Files folder, check the “Copy items into destination group” check box, as shown in Figure 3–4, and then click Finish. Now you're in good standing, and will not be brought to tears by the Pointer Reference dude.
NOTE: I can hear you asking “Why even give us this option then?” Here’s a simple answer that covers most but not all bases. Let’s say that you were designing a game or program that has a database of millions and millions of files, movies, characters, or possible responses that a player may say, and this database was too large to fit on an iPhone or iPad. Here, you would not check the “Copy items into destination group” box, and allow the Pointer Reference dude to say, “Yo, I take no responsibility for any of this, it’s not really here, it’s at this URL located at http://www.wherever.com.”
Creating the User Interface
OK, now we’re ready to start dragging and dropping items onto your View Design area, the image that the user sees when they look at their iPhone.
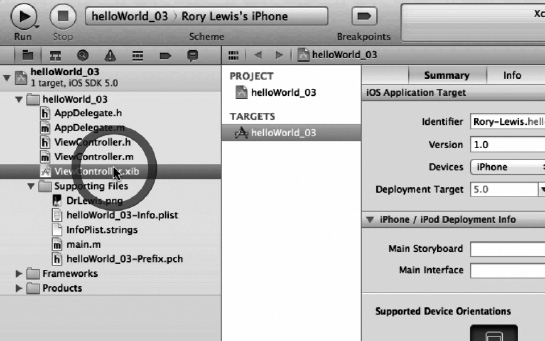
Figure 3–5. Open your nib file.
5. In order to do this, you open up your nib file, just as you did in the two previous apps. So, open up your nib file by going to your helloWorld_03 folder and selecting the helloWorld_03ViewController.xib file, as illustrated in Figure 3–5.
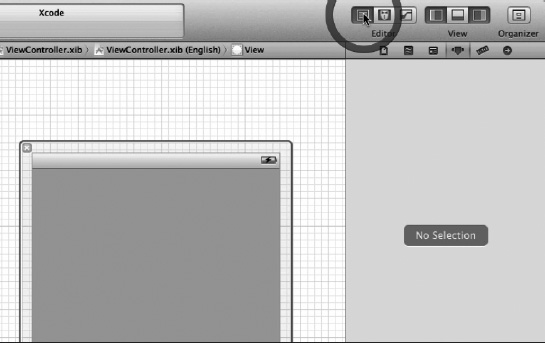
Figure 3–6. Close the Navigator View.
6. You're going to need to have space in the Xcode 4 environment, so first, close the Navigator View, because we do not need it for now, and then, open the Utilities View, so we can see the tools and icons we need to dress up the View Design area. In Figure 3–6, you can see that I am closing the Navigator View. See Figure 3–34 for more details on Xcode 4 nomenclature.
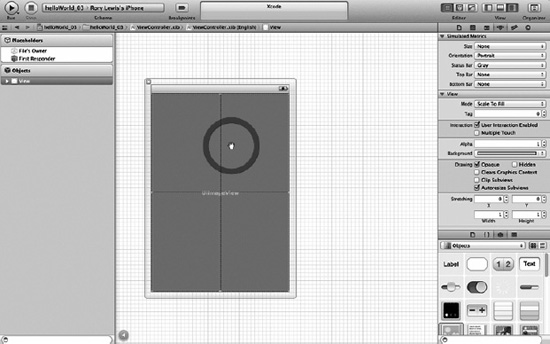
Figure 3–7. Drag a UIImageView onto your View Design area.
7. With your Utilities pane open, as shown in Figure 3–7, go to the bottom section of the panel and, making sure that you have selected the icons view (depicted by four little squares on the icon above the right-hand arrow in Figure 3–7), drag a UIImageView onto your View Design area. The reason we need a UIImageView is because we need to have an image of you underneath the buttons and text labels. That picture that you just dragged in needs to have a place where it can live. A UIImageView is just the guy for this job. He is going to reside underneath all of your buttons and embrace whatever picture you tell him to embrace.
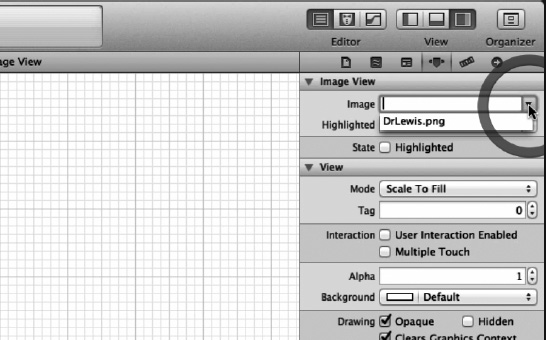
Figure 3–8. Associate your selected image with your UIImageView.
8. Remember the image that you dropped into the Resources Folder back in Figure 3–3? Well that’s the image that you will want the UIImageView to be, so you just drag it onto your View Design area to encapsulate it. To do this, you need to tell it to do so, and this is done by making sure that you have selected the Attributes Inspector in the Inspector Bar (see the icon under “View” in Figure 3–8, or as explained in Figure 3–33 at the end of this chapter). With the Attributes Inspector open, click on the Image drop down menu, and guess what you’ll see. You’ll see the name of the file you dragged into the Resources Folder. Select it, and Voila! The image appears in your View Design area. Isn’t that cool?
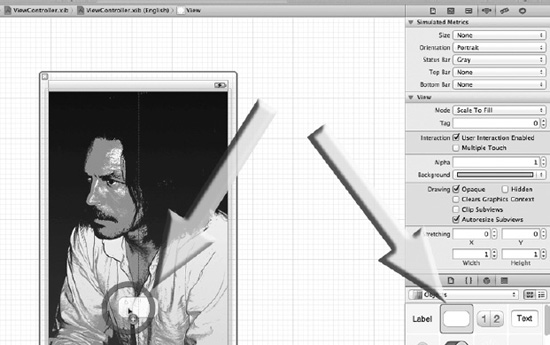
Figure 3–9. Drag a button onto your View Design area.
9. Drag a button from your Library onto your View Design area and place it at the bottom, as illustrated in Figure 3–9. Make sure it’s nicely centered. Just to remind you: when you click on this button, your code will invoke an action that will grab the name of the person that the user entered into a Text Field object, and it will output that person’s name in a label followed by the text, “Hello World!”
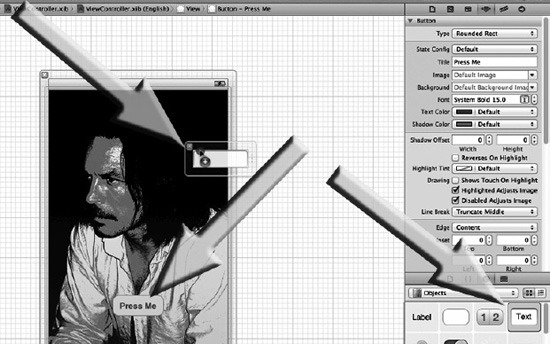
Figure 3–10. Type “Press Me” on the button, and then drag a Text Field object onto your View Design area.
10. Immediately after releasing your button, double click on it and type, “Press Me”, just as you did in the two previous assignments. Now go back to your Library and drag out a Text Field object onto your View Design area, placing it towards the top (as illustrated in Figure 3–10) and nicely centered. Remember that the text that the user types into here will be sent out to the label when they press the button saying “Press Me.”

Figure 3–11. Center your Text Field object, enter the text “Enter Your Name” in the text field, and center the text.
11. After centering your Text Field object and expanding it in your View Design area, as illustrated in Figure 3–11 (where it says “Enter Your Name”), click in the text field, go over to your Utilities Inspector pane, and enter the text that you want the user to see when they look inside the Text Field object. You want to tell the user to enter their name here, so type “Enter Your Name” inside the text field box. Also, center this text so that it is centered inside the text field box, and make sure that the text field box is also centered in the View Design area.

Figure 3–12. The three steps that ensure that the text in the Text Field object clears the instant the user activates the field. Also, note that a clear button icon is in the field, and “Done” appears on the Return Key (see Figure 3–32)
12. Once the user starts typing, you want your prompt text to disappear. To make doubly sure that your text disappears, keep the clear button (the grey crossed icon) active in the Text Field object, which allows the user to press it to clear your text—just in case your professor uses a mouse to grade your homework on the simulator and wants to make sure you know two ways to delete the text in the Text Field object. You should also delete the word “Return” on the keypad’s return key, and replace it with the text “Done.” I have illustrated the aforementioned three steps in Figure 3–12.

Figure 3–13. Drag a Label object onto your View Design area.
13. Once the user has entered their name into the Text Field object, and they press the button, you need to display the user’s name and text in a label. You have yet to place a Label object onto the View Design area, so do it now, by dragging it from the Library onto the View Design area, as illustrated in Figure 3–13.
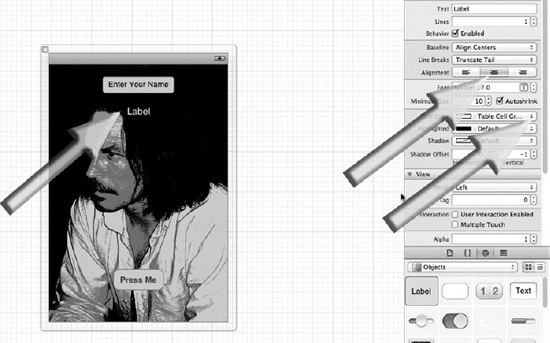
Figure 3–14. Center and expand your Label object. Also, change the text color if necessary, and center the inside of the Label object.
14. Place the Label object just below your Text Field object, and expand it, while still keeping it centered, with respect to the View Design area. Do this by quickly expanding one side and then expanding the other until the purple center line appears. This is the fastest method of expanding and centering at the same time. Next, center the text inside the Label object, and then, depending on the color of the picture, change the text color to make sure it stands out. In case of Figure 3–14, the color behind the text was black, so it was changed to white.
Connecting to the Code
OK, you are now through with dragging objects from the Library onto the View Design area. Let’s connect these objects to your file’s owner, so you can associate it with code.
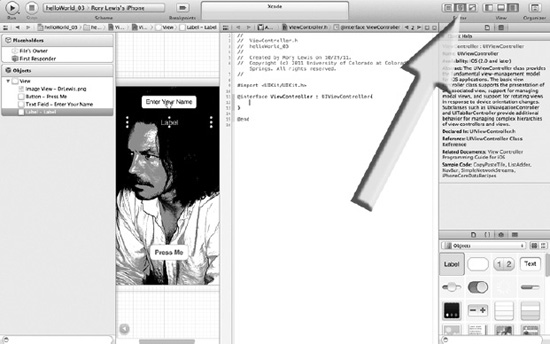
Figure 3–15. Open the Assistant Editor.
15. One of the really cool properties of Xcode 4 is that in the “olden” days, when Xcode first came out, you had to enter Control + Command + Up Arrow(^![]() ↑) or Control + Command + Down Arrow (^
↑) or Control + Command + Down Arrow (^![]() ↓)to zip back and forth between files that the clever people at Apple knew we would want to switch between. These connected pages and files are called counterparts, but you don’t have to know that because in Xcode 4, the Assistant Editor figures out cool ways to plop them all there on the screen for you. Right now, you should start connecting code with all of the goodies that you have brought onto the View. So, go to the Editor Selector with your mouse, as shown in Figure 3–15, and select the Assistant Editor, which looks like the chest of a person wearing a tuxedo. Here you’ll see how the layout changes. Just for fun, you may want to select the button immediately to the left of the Assistant Editor, called the Standard Editor, and you’ll see that now you have one screen—just like in the old days. Anyway, with the Assistant Editor selected, let’s move on.
↓)to zip back and forth between files that the clever people at Apple knew we would want to switch between. These connected pages and files are called counterparts, but you don’t have to know that because in Xcode 4, the Assistant Editor figures out cool ways to plop them all there on the screen for you. Right now, you should start connecting code with all of the goodies that you have brought onto the View. So, go to the Editor Selector with your mouse, as shown in Figure 3–15, and select the Assistant Editor, which looks like the chest of a person wearing a tuxedo. Here you’ll see how the layout changes. Just for fun, you may want to select the button immediately to the left of the Assistant Editor, called the Standard Editor, and you’ll see that now you have one screen—just like in the old days. Anyway, with the Assistant Editor selected, let’s move on.
NOTE: You can also use keyboard shortcuts to open up the Assistant Editor Option, Command + Return (![]()
![]()
![]() ) and Command + Return (
) and Command + Return (![]()
![]() ) to open up the Standard Editor. There are thousands of keyboard shortcuts; some make it into superstardom and some never make it out of books and blogs. These two shortcut keys are being mentioned because even though Xcode 4 is still young, I’m seeing myself and others starting to use these two commands naturally.
) to open up the Standard Editor. There are thousands of keyboard shortcuts; some make it into superstardom and some never make it out of books and blogs. These two shortcut keys are being mentioned because even though Xcode 4 is still young, I’m seeing myself and others starting to use these two commands naturally.
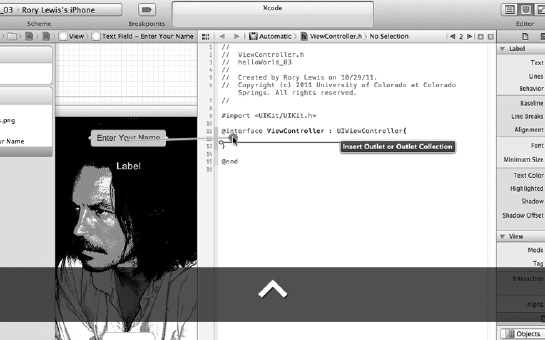
Figure 3–16. Control-Drag a connection from your text box in Interface Builder directly into your header file.
16. As you can see, you're back at a familiar screen that shows Interface Builder with your header file centered in the middle. Here you want to associate Outlets and Actions with the buttons and labels you dragged onto the View Design area. The last two times you did this, you were told to drag from this to that. Now, however, you are going to use a little bit more of the correct nomenclature, so that you can sound a little more geeky. Click once inside the text box, and then control-drag from the text box to your header file, placing it between the two curly braces. If you were to control-drag over to an invalid destination then Xcode would not display the insertion indicator, which is shown in Figure 3–16.
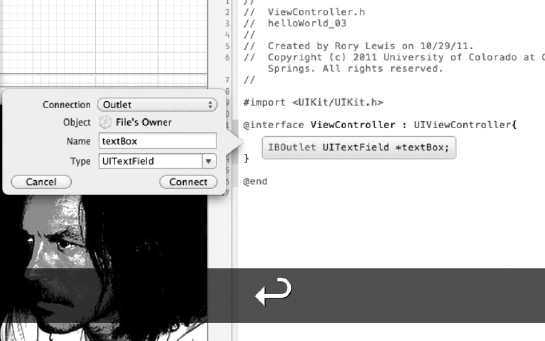
Figure 3–17. When the text box’s connection dialogue appears, specify what type of connection you plan to use in your code.
17. When you see the insertion indicator appear as you control-drag over to the area between the two curly braces, release the mouse button. Xcode displays the dialog box, where you will want to tell it that this needs to be an outlet, so don’t select anything as this is the default. This is illustrated in Figure 3–17. Later on, why this is done and what this Outlet stuff is all about will be explained. Right now, just make sure that you give it a name. In Figure 3–17, it was called textBox. Once this is done, click on the Connect button, and see how the Outlet code magically appears.
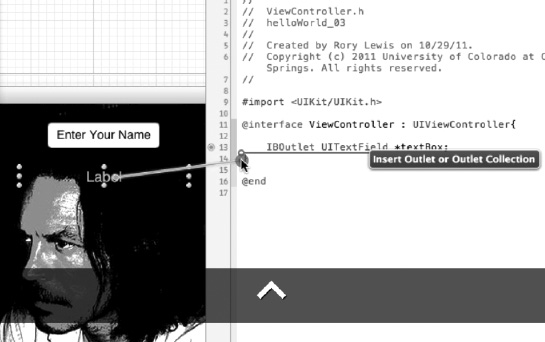
Figure 3–18. Control-drag a connection from your label in Interface Builder directly into your header file.
18. Click once inside the label and control-drag it into your header file, placing it below your textBox outlet, inside the two curly braces. Drag until you see the Display the Insertion indicator, as shown in Figure 3–18.

Figure 3–19. When the label’s connection dialogue appears, specify what type of connection you plan to use in your code.
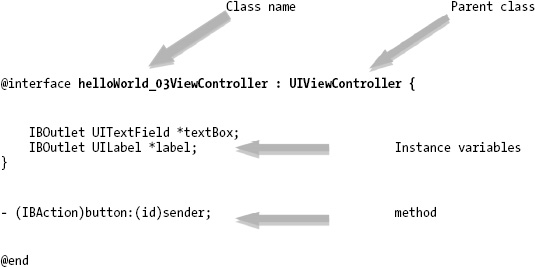
19. Just as you did with the textBox when you made it an outlet, you want to do the same here when the label's dialogue box opens. Leave it as an outlet on the top drop down and simply give it a name. In Figure 3–19, it was called “label.” When you click Connect, it plants some very cool outlet code that you did not even have to program! So you have two lines of code that were automatically added: one when you dragged over the textBox, and the other when you dragged over the label. Both of these will be outlets. Are you thinking that the button, like the other ones, will be an action? This is correct. But getting back to these outlets—when you look at this code, without understanding everything, all you need to know about each of these lines of code, as seen in Figure 3–19, is the following:
IBOutlet UITextField *textBox;
This adds an outlet to a text box.
IBOutlet UILabel *label;
This adds an outlet to a label, just as you did in previous examples.
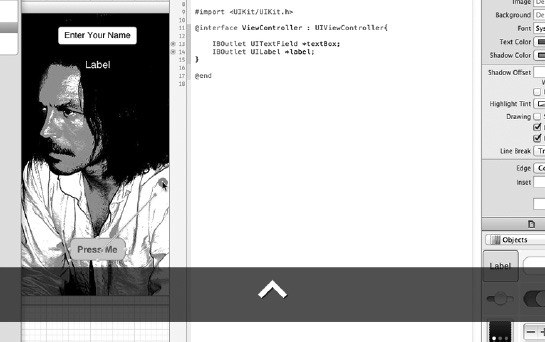
Figure 3–20. Control-drag from the button into your header file.
20. Click once on the button that says “Press Me” (as shown in Figure 3–20), and control-drag towards the area below the @interface directive and its curly braces.
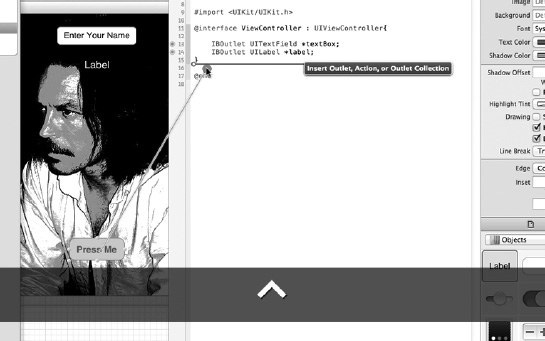
Figure 3–21. The insertion indicator now has three options.
21. Control-drag until you see the insertion indicator, as shown in Figure 3–21. Note that as you drag over to this area, Xcode already knows that this could be one of three options, not two, as shown in the insertion indicator for your label and text box outlets. See how this also includes a third option: “Action.” Now, release the mouse button when properly located after the curly braces.
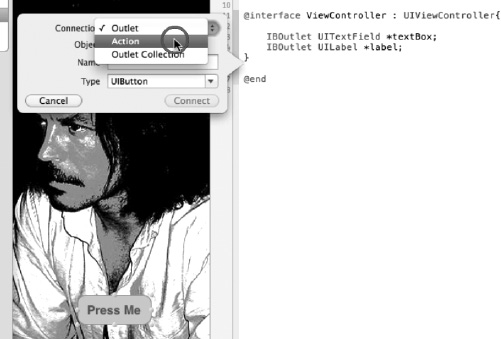
Figure 3–22. Open the drop down menu and change the type of connection to an Action.
22. The first thing you need to do here is change the connection type in the top drop down menu in the dialogue box from an outlet to an action. This is just like you did before with the outlet. See Figure 3–22.
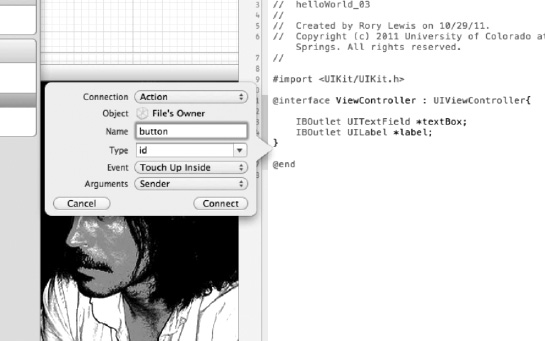
Figure 3–23. Name this action “button” and click on the Connect button.
23. After changing this button from an outlet to an action, as shown in Figure 3–23, you still need to name it. In Figure 2-23, it is named button. Now, click on the Connect button. You will now see code appear as follows
- (IBAction)button:(id)sender;
READ IT ALOUD
Avoiding an Annoying Error
But before you move onto the implementation file, you have to do a little housekeeping.
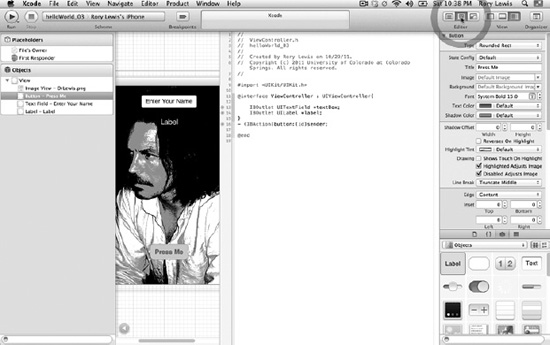
Figure 3–24. Close the Assistant.
24. You can see in this 3rd tutorial that Xcode 4 has done some remarkable things. However, as I write this book, a number of frustrated Xcode 4 programmers are encountering an irritating error. Before you move to the next step, I will show you how to avoid this error. (There is a chance that this quirky attribute of Xcode 4 will have been fixed by the time you read this.) Close the Inspector, as shown in Figure 3–24, and then open up the Utilities pane again.
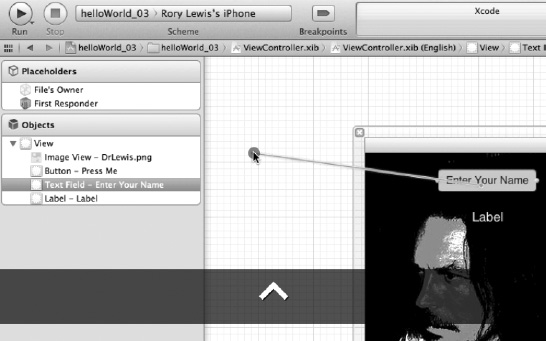
Figure 3–25. Connect your text box to the delegate – Part 1: Activate textBox and start control-dragging.
25. The way you have been connecting objects from Interface Builder directly into the code has been really cool, except that it seems that you cannot leave everything to the clever folks at Apple to make all the connections for you—yet. So, click once in the text box and control-drag to File’s Owner. If you do not connect this to the delegate then you will get a very irritating error called a SIGABRT, which means Xcode is going to abort because it cannot connect. It’s really bad news, but the good news is that you can avoid it. Here’s how.
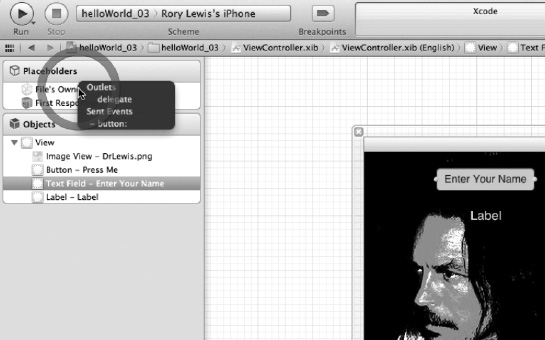
Figure 3–26. As you near File’s Owner, you will want to connect it to the delegate.
26. As you near File’s Owner, it presents you with a dark-gray contextual dialogue that tells you that you’ve already connected File’s Owner to the button and the delegate, but you know better—it’s still dangling there. You want to connect textBox to the delegate. Move your mouse right over it and when it activates, let go of the mouse. See Figure 3–26. With this done, you’ve connected all the goodies you dragged onto the View with the header file. The geeky way to say this would be to say: “Yo, dude, all my actions and outlets are now functionally connected!” Sounds pretty good, huh? What’s more, you kind of understand what you’ve been doing! You brought buttons, text boxes, and labels onto your View. Then you wired them up to function as either outlets or actions. Now, all that’s left is to dial in some code where necessary.
Setting up the Coding Environment
Before dialing in the code you need to do a little more housework.
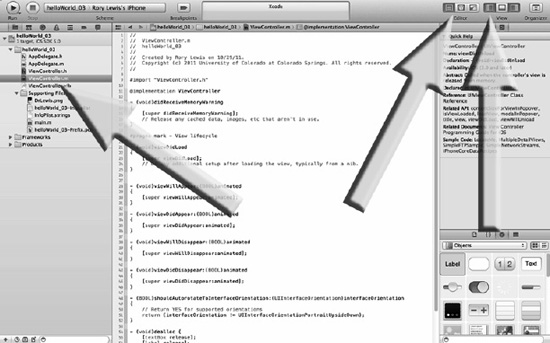
Figure 3–27. Open the Navigator, and then go to Standard View and save everything.
27. First, let’s get your screen in a manner conducive for writing code, by clicking on the Navigator (see the right arrow in Figure 3–27), and then on Standard View (middle arrow, the left icon in the Editor section). With this done, please get in the habit of saving things. Go over to your nib, header, and implementation files that are now colored dark grey, click on each one, and save them by pressing command + S (![]() S). Or use Apple+Option+S to save all. Please do not use your mouse to save, as I will magically appear, take your book away, and declare that you have failed in your endeavor to become a geek. If you decide to work for a computer company after reading this book and they see you using your mouse to save, they will laugh at you because geeky people do that to those who save with a mouse. I’m serious!
S). Or use Apple+Option+S to save all. Please do not use your mouse to save, as I will magically appear, take your book away, and declare that you have failed in your endeavor to become a geek. If you decide to work for a computer company after reading this book and they see you using your mouse to save, they will laugh at you because geeky people do that to those who save with a mouse. I’m serious!
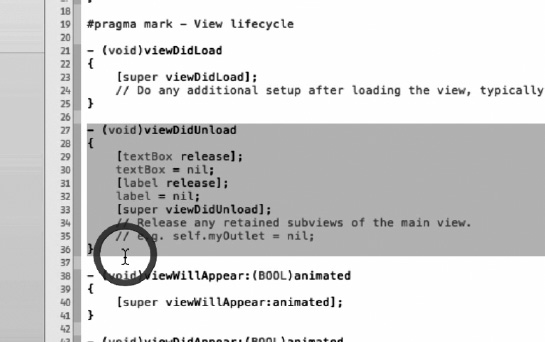
Figure 3–28. Open the ViewController’s implementation file and delete unnecessary boilerplate code.
28. Click on the ViewController’s implementation file. That’s the one that ends with a .m, as in helloWorld_03ViewController.m. Delete the viewDidUnload method, as shown in Figure 3–28.
Creating a Programming Roadmap
You’re now ready to get into some code that does something useful.
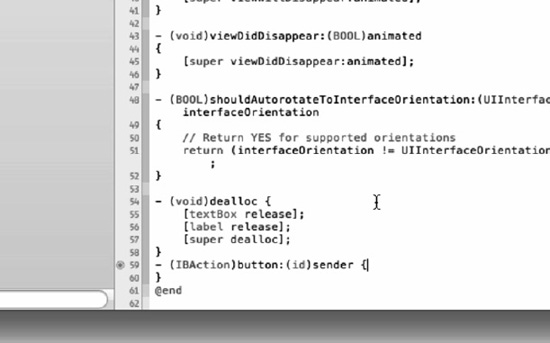
Figure 3–29. The raw IBAction button method, before you start programming it.
29. There are two items of interest for you here: first, what and where you are programming, and second, a roadmap that will guide you as you program your first chunk of code:
- Looking at what you are programming: You can see in Figures 3–22 through 24, that you have the method
(IBAction)button:(id)sender{…}, which looks pretty similar to the action instantiated when you dragged over an action connected to your button from the interface builder to your header file. The only difference is that in the implementation file you need to implement what needs to happen when a person presses this button. To do this, you substitute the semi-colon with curly braces, and it’s in these curly braces that you are going to instruct what exactly will happen when a person presses this button. - Your roadmap: Looking at Figure 3–29, your road map states that you will have two text strings that you should call
NameandOutput.Name,NSString, receives text that the user enters intotextBox. ClearOutput NSString,and then let it receive the text fromNSString. After placing it in front of “:says Hello World!”, it sends this to Label so the viewer can see it. Lastly, clean outOutput NSString.
The code is divided into 5 steps:
- Create strings to manage your text input and output
- Manipulate the text around
- Display your hard work
- Housekeeping
- Get rid of the keyboard
Step One: Create strings to manage your text input and output
First, you should type the two NSString statements in between the curly braces. What you’re doing is creating two strings of text called NSStrings, that you will call Name and Output. Make the contents of the NSString *Name contains the contents of the text that the user types into the textBox. Next, make the NSString *Output contain nothing, or in essence, clean it out by forcing “nil” into it. The “*” represent pointers that point to a memory address that will contain the contents of each NSString.
- (IBAction)button:(id)sender {

    NSString *Name = textBox.text;

    NSString *Output = Nil;

}
Step Two: Manipulate the text around
Underneath the two NSString statements, type out the Output line as shown below.
- (IBAction)button:(id)sender {

    NSString *Name = textBox.text;

    NSString *Output = Nil;

    Output = [[NSString alloc] initWithFormat:@"%@ says: 'Hello World!", Name];

}
With this typed out, look at the %@ in the following code
@"%@says: Hello World!", Name];
This is going to be written in progressively technical ways, such as:
- The
%@puts the stuff insideNamebefore the“says: Hello World!”. - The
%@puts the text located at a place in memory pointed to byName, and then places that text from the memory before the“says: Hello World!”. - The
%@puts the text located in memory by pointerName, and then places that text from the memory before the“says: Hello World!”. - The
%@places the string at*Namebefore the“says: Hello World!”.
OK, that wasn’t too bad. The descriptions went from totally non-geek text to gradually getting a little more geeky each time. In class, we play games where I challenge students to get in groups and try to do their own “road to geekdom” innovations. What I'm going to ask you to do, before you do the next one, is explain the above progression to a person close to you who knows nothing about computers. Read the four bullet points to them. When they cannot get it, explain it to them in YOUR WORDS. You will learn so much from this. Most of you will realize that they can already see that you’ve started the transformation from dude to geek.
OK. So moving on, I want you to focus on the [[NSString alloc] initWithFormat:@ in the line
[[NSString alloc] initWithFormat:@"%@ says: Hello World!", Name];
Here it goes:
- The
[[NSString alloc] initWithFormat:@allocates the text saying“somebody says: Hello World!”in a way that makes sense to human beings. - The
[[NSString alloc] initWithFormat:@allocates all those electrical signals in the iPhone’s microprocessor using the code that the clever people at Apple programmed in theirinitWithFormatcode, that converts the machine language representing“somebody says: Hello World!”into text that makes sense to human beings. - Once it has converted everything to say
“somebody says: Hello World!”into text, you store it inOutput, as shown in the following code
Output = [[NSString alloc] initWithFormat:@"%@ says: Hello World!", Name];
Step Three: Display your hard work
Next, you need to get the text that is being held in Output onto the screen of the user's iPad or iPhone. Students often tell me at this point that they think they’re done. Nope. Your text is just lying there inside your microprocessor. You want it out on the screen so the viewer can read it. Recall that you created a perfect place for it in Figure 3–13? Go there, and meet me back here.
Cool huh! You need to put the text lying in Outlet into Label. So type in
label.text = Output;
What you’ve done here is accessed something that is called the “text property,” set it to be whatever is in Outlet, and then dump it onto your screen inside Label.
- (IBAction)button:(id)sender {

    NSString *Name = textBox.text;

    NSString *Output = Nil;

    Output = [[NSString alloc] initWithFormat:@"%@ says: 'Hello World!", Name];

    label.text = Output;

}
Step Four: Housekeeping
You are not going into this now. But you need to stop memory leaks. One of the most common reasons for the iTunes store to reject your app is because it has memory leaks. This is too complex for now, and your brain is tired. Just know that the alloc you used means that you now need to release the memory. So write a comment for your own reminding, as you dig the code in later chapters.
//release the object"
Then, actually release it by typing
[Output release];


- (IBAction)button:(id)sender {

    NSString *Name = textBox.text;

    NSString *Output = Nil;

    Output = [[NSString alloc] initWithFormat:@"%@ says: 'Hello World!", Name];

    label.text = Output;

    [Output release];

}
Step Five: Get rid of the keyboard
Once the user enters their name and hits the Done button (see right hand image of Figure 3–12), you need to add a little code to make sure the keyboard is dismissed.
You do this by implementing a special kind of delegate method called textFieldShouldReturn. Right now, you do not have to worry about delegates, first responders, and so on. All I want you to know is that this code reassigns the first responder, your keyboard, and the text field that is active (typing in one’s name), which saves it in your toolbag and reuses it every time you need to wipe out the keyboard.
- (BOOL) textFieldShouldReturn:(UITextField *)theTextField{

    [textBox resignFirstResponder];

    return YES;

}

@end
I want you to feel proud of yourself! You’ve allowed me to guide you through some treacherous waters of Objective-C code, and even if you’re not feeling like you’ve absolutely wrapped your head around the code, no problem. Objective-C is an incredibly difficult language and the fact that you’re still reading this means you’re doing awesome. Remember that as you do more of this it all comes together and gets dialed in beautifully. For those of you who have understood what you’ve done so far in the way that I’m presenting it to you, congratulations!

Figure 3–30. Coding the delegate methodtextFieldShouldReturn.
30. Figure 3–30 shows the completed button method and the textFieldShouldReturn method being typed in with Xcode’s code completion doing its work. Once this is done you are finished coding. Yeah!
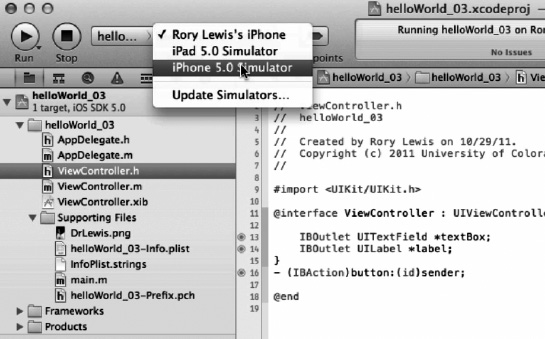
Figure 3–31. Make sure you will be running to the correct target.
31. First, let’s make sure that you have saved everything. Now, if you ran your last app to your iPad or to your actual iPhone, then you will want to make sure that you change the “target” to be the iPhone simulator, as shown in Figure 3–31.
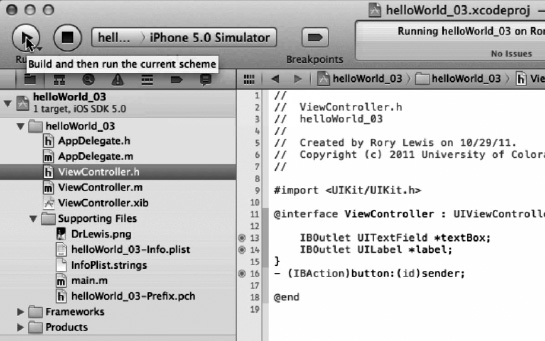
Figure 3–32. Let’s run it!
32. You have worked really hard on this one, and now it’s time to see the fruits of your work. Hit the Run button, as shown in Figure 3–32, and let’s see your app come to life!
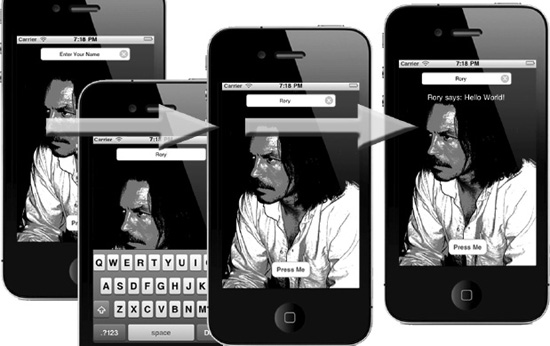
Figure 3–33. The four states of your app.
33. If you’re using your own picture then yours will obviously be in the background. Starting on the left hand side of Figure 3–32 and moving to the right:
- The first image shows the text box asking the user to enter their name.
- The instant one clicks in the text box, the text disappears and the keypad appears.
- The third image shows the state of your app once the user hits the Done button.
- The last image shows the final state of all your hard work, which appears when the user hits the Press Me button. Congratulations!
Digging the Code
In these reviews, we will go over some of the code we have written, and I will reference familiar code and explain the processes in more detail. Here, I will introduce you to more technical terms that you will use in future chapters and in communicating with other programmers.
Consider this analogy: In helloWorld_01 and helloWorld_02 I taught you how to get into a car, turn the ignition, press the accelerator, and steer as you moved forward. In helloWorld_03, I guided you with similar directions, but as you drove toward your destination, I explained how the car is a hybrid engine and that it has some gasoline components and some electrical components. We talked about classes and methods, strings, outlets, and actions.
Now you’ve arrived at our destination; you’ve completed helloWorld_03, and I will open the hood and show you how, when you pressed the accelerator, it either pumped gasoline into the engine, or sometimes used the electric motor. When you look under the hood, I’ll show you where these components are located. However, by the time you reach the end of the book, look under the hood, and dig the code, I will describe the amount of gasoline being squirted into the pistons by the carburetors, the exact torque and heat emission of the electric motor, and so on. Guess what—you’ll be able to handle it!
One last comment about this section that is really important: Digging the Code is a section that I encourage you to read without definitive understanding. It’s OK if you only partially “get it.” Of course, if you happen to attain full comprehension of the subject in all its details, well that’s great. What I suggest, however, is that you read these sections at the end of each chapter loosely because:
- I have received hundreds of emails from readers from the first edition of the book saying that knowing it was OK to blank out and not feel pressured to understand the code really worked out for them.
- Also, my students love it when at the end of each class, I make them turn off their Mac, put down their pens, Zen and zone out, and just casually listen to me. I’ve had students knocking on my office telling me in many colorful ways how the Zenning and zoning really worked for them.
Note that my research is in neurological acute brain injuries, where I study the brain and neural interconnectivity. This methodology of first connecting neurons and then infusing the deeper connective associations when the brain is relaxed is one that I’ve developed over the years. So, I want you to consider my former readers’ and students’ opinions about this matter and absorb my theorem.
NOTE: Becoming an eloquent, knowledgeable, and financially thriving coder takes neurological leaps, during states wherein your brain is open to absorbing new data without the hypothalamus releasing anxiety hormones that pollute the ability of your neurons to create new connections, which allows linking logic and code to ontological reasoning.
So Zen out, zone out, and read in a meditative state with no fear. When that voice says, “You’re not understanding it all,” say: “That’s OK, Dr. Lewis said so, now go away!” You will Zen and zone through:
- Nibs, Zibs, and Xibs
- Instances and Instantiation
- Methods
- Instance methods and class methods
- Header Files
- The Inspector Bar
- NSStrings
- Memory Management
Nibs, Zibs, and Xibs
Remember back in Figure 3–5, I instructed you to open your nib file. You could see that it was written “xib”, and to make it more confusing, a minority of coders call them “zib” files. Just ignore them, refer to xib files by pronouncing them as “nib.” At a recent conference in Denver, 360iDev for iPhone Developers, it was clear most of the presenters referred to .xib files as “nibs” not “zibs.” But no matter how we refer to them, it’s important for us to understand what’s going on with these files. What are they? Do we need them? Do you need to know how they work?
Do you recall, from Step 5, Figure 3–5, how you opened Interface Builder view when you clicked on that nib file? It was here that you saw your view and began dropping and dragging items onto your View Design area. What’s going on here?
It turns out that when you examine nib files at the level of Cocoa or Objective-C, you see that they contain all the information necessary to activate the UI (User Interface) files, transforming your code into a graphical iPhone or iPad work of art. It’s also possible to join separate nib files together to create more complex interactions, as you’ll see later in this book. But in order to follow along, you need to add two words to your vocabulary: “Instances” and “Instantiation.”
- Instances: All the information that resides in these files is put there so that it can create an instance of the buttons, the labels, the pictures, and so forth that you’ve entered. This collection of commands is plonked down and saved into your nib files to become the UI. The code and the commands taken together become real, and they are sensed by the user—seen or heard, or even felt.
- Instantiation: Remember in Step 29 and Figure 3–29, I explained that you can see that you have the method
- (IBAction)button:(id)sender{…}, which looks pretty similar to the action instantiated when you dragged over an action connected to your button from the Interface Builder to your header file in Figures 3–22 through 24? Well the term instantiate is sometimes used in a similar fashion when you first save a new project. The computer instantiates—makes real and shows you the evidence for—a project entity created by assigning it a body of subfiles. InhelloWorld_03, you saw how in Step 27 I asked you to go over to your nib, header, and implementation files that were colored dark grey? Well excuse me, how did these files get here? Did you program them or make them? Nope, Xcode instantiated these when you created your project. Xcode gave your project “arms and legs”: two AppDelegate files and two ViewController files.
NOTE: You are now manipulating these arm and legs to do cool stuff that we call apps, and sell them on the iTunes store.
We say that we’ve “created an instance” of something when we’ve told the computer how and when to grab some memory and set it aside for some particular process or collection of processes such that, when the parameters are all met, the user has an experience of this data (i.e., whatever was assigned in memory). Sometimes we refer to these collections or files of descriptions and commands as classes, methods, or objects. In this code-digging session, these terms might seem to run together and appear as synonyms, but this is not the case. As you read on, you will come to understand each term as a distinct coding tool or apparatus, each to be employed in a particular situation, relating to other entities in a grammatically correct way.
When we say that you created an instance of the buttons and labels in your nib file, what we’re really saying is that, when you run your code, a specific portion of your computer’s memory, known by its address, will take care of things in order to generate the user experience you have designed. Each time your application is launched on an iPhone or iPad, the interface is recreated by the orchestrated commands residing in your nib files. Consider the nib file associated with the action depicted in Figure 3–9. You dragged a button from the Library into the View window, and thus you created an instance of this button. If somebody were to ask you what that means, you might look them in the eye, with a piercing and enigmatic look, and say:
“By creating an instance of this button, I have instructed the computer to set aside memory in the appropriate.xibfile, which, upon the launching of my app, will appear and interact with the user, precisely as I have intended.”
Methods
The next concept I would like to explore a little more deeply is that of methods. As I did with nibs, I am only going to give you a high-level look this time. You’ve already used methods pretty extensively, so I’m simply going to tell you what you did.
Looking at Figure 3–23, after you dragged the button onto your header file, you changed it from an outlet to an action and clicked on the Connect button. Then you saw an instantiation of code appear
- (IBAction)button:(id)sender
I then suggested that to make things clearer, you could have named the method monkey, making it become
- (IBAction)monkey:(id)sender;
Here, you are instructing the computer to associate an action with a button.
- The first symbol in this piece of code is a minus sign (
−). It means thatmonkeyis something we call an instance method. - On the other hand, if you had entered a plus sign (
+) there, as in+ (IBAction), we would have called it a class method.
One symbol announces (to the processor) an instance, while another symbol announces a class. What these two statements have in common, though, is the method monkey. Furthermore, just by the name alone, you can see that this is an action that will be performed in Interface Builder. Yup, that’s what that IB in front of the Actions means. See how Steve Jobs was really saying to himself when he designed Cocoa and Objective-C on his NEXT computers, that he wanted Actions and called them IBActions, so as to remind himself and other coders who used his code that when we typed in IBAction it was for Actions used in Interface Builder.
Consider this analogy: a programmer says, “Here comes an app that will assist you in drawing a nice, pretty house.” That is a header type of announcement. Then, the programmer enters specific instructions for how the house will be constructed, how it will sit on/against the landscape, what kind of weather is in the background, and so on. “Draw a slightly curving horizon line one third from the bottom of the display, and midway on this, place a rectangle that is 4 × 7, on top of which is a trapezoid with a base length of…,” and so on. These specific, how-to instructions belong in the implementation file, for they describe the actual actions—the method—of drawing the house.
So, to connect your button to a method named hello, you added this code as shown in Figure 3–24.
- (IBAction)hello:(id)sender;
This created an instance of your hello method. Then, you created a place in memory to execute the code inside your hello method.
Header Files
Look at this code, not in terms of methods but instead from the dimension of it being a header file and how it relates to its implementation file. I want you to go back to the point in time after you dragged and dropped your items that I called “goodies” onto the header file. Looking back at Figure 3–24, I want you to focus more on the bold text.
NOTE: When naming things in code, you will represent “User Interface” with the initials UI. You will represent “Interface Builder” with the initials IB.
There are two things to note here. First, the @ symbol talks to the innermost part of Xcode, which transforms your code into actions, and second, that it’s got something essential and important to announce. In fact, we call any statement beginning with @ a “directive.” This @interface directive tells Xcode that you have interface stuff concerning helloWorld_03, and that the particulars will be enclosed within brackets {}.
Before you began dragging outlets into your code in Figure 3–16, notice how the opening bracket, “{” was empty! You had not said anything yet, right? You knew what you wanted to do, so you got the compiler’s attention with the @interface directive, by creating your IBOutlets (Interface Builder Outlets) to write on your UILabels (User Interface Labels) and to have a separate Action associated with your button.
The Inspector Bar
Back in Step 8, Figure 3–8, while briefly explaining the Inspector Bar, I said that we’d get into it a little more. So as promised, here is some insight as to how the Inspector Bar is set up.
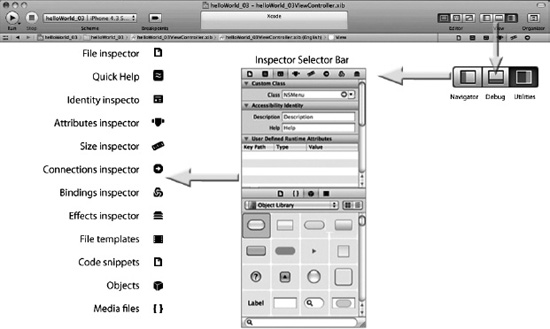
Figure 3–34. Focusing in on the Inspector Bar.
In Figure 3–33, I’ve recreated how I illustrate the Inspector Bar in class on the marker board. As you become familiar with the Xcode 4 environment, you will find yourself using the Inspector Selector Bar to choose a workspace that you will need at any phase of your coding. For now, let’s zoom in on the most intense view: the Utilities View. Clicking on Utilities View, as shown in the top right-hand of Figure 3–33, you will see how I’ve created a zoomed up version of the Inspector Selector Bar, with its submenus located to the left of the panel. Starting at the top:
- File inspector: This is where one manages file attributes such as name, type, and path within your project.
- Quick Help: Just what it says.
- Identity inspector: Gives access to deep stuff such as class names, access, and labels.
- Attributes inspector: For adjusting attributes available to an object.
- Size inspector: Allows you to tinker with an interface object’s initial size, position, and auto sizing.
- Connections inspector: Allows you to view the outlets and actions for your interface objects.
- Bindings inspector: For configuring bindings for view objects.
- Effects inspector: To adjust animation protocol such as transitions, fades, and other visual characteristics of selected objects.
- File templates: Common templates that you can drag from the library to the project navigator.
- Code snippets: Like clip art but for coders—snippets of source code that you can use by dragging into your files.
- Objects: You use these interface objects by directly dragging onto your nib file in the Interface Builder editor window.
- Media files: Just as it says, they are graphics, icons, and sound files that can be dragged directly to your nib file in the Interface Builder editor window.
NSStrings
Going back and digging a little deeper into the NSString statement in your implementation file, I went over this with sufficient detail while you wrote it. Here are five terms that I want you to associate about NSStrings with:
Outputis your returned valueOutput = [[NSString alloc] initWithFormat:@"%@ says: Hello World!", Name];- On the right-hand side of the equal sign is the message
Output = [[NSString alloc] initWithFormat:@"%@ says: Hello World!", Name]; NSStringallocis the receiverOutput = [[NSString alloc] initWithFormat:@"%@ says: Hello World!", Name];initWithFormatis the method nameOutput = [[NSString alloc] initWithFormat:@"%@ says: Hello World!", Name];@"%@ says: Hello World!"andNameare the parametersOutput = [[NSString alloc] initWithFormat:@"%@ says: Hello World!", Name];
More on Memory Management
At the end of Step 29, Figure 3–29, in “Step Four: Housekeeping,” we spoke a little about alloc and how you allocated memory and released it at critical times in your app. I want you to have one last look at the implementation code you wrote for the button, but view it in terms of memory leaks and management.
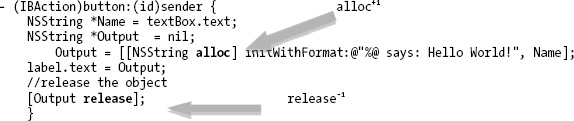
Looking above, you can see how you first allocated some memory for your string. This is represented by the superscript +1, to show that you have gone up one level and are allocating memory. Each time you go up one level, you need to also fall down one level by releasing that memory as shown by the −1 at the release. It’s really easy— when you alloc you need to release. In Objective-C, this is called reference counting. Where I see students suffer is those times that after they alloc they will also perform a retain. If you do find yourself having to retain some memory after you’ve allocated, then view it as [alloc+1] + [retain+1], which means that you have gone two, not one, levels up. This means that you need to release not once but twice. In summary:
- [alloc+1] needs + [release−1]
- [alloc+1] + [retain+1] needs [release−1] + [release−1]
Alright!
You’re still here! Awesome! Take a break for at least 6 hours, and don’t sweat over not getting all of the code you’ve been digging around in here. Hope you Zenned and zoned out beautifully. See you in Chapter 4.