
Chapter 3
Handling User Input
In the movie The Sound of Music, the governess Maria (played by Julie Andrews) teaches the Von Trapp children how to sing. In one scene, as she's introducing notes to the children, she teaches them a melody with note names that, while sounding good, has lyrics composed only of the names of notes: “Sol Do La Fa Mi Do Re....” One of the children, Brigitta, responds, “But it doesn't mean anything.” Maria responds, “So we put in words.” Right now, Graphique doesn't mean anything. It's just a user interface. In this chapter, we put in words. We put in the functionality that makes Graphique mean something. By the end of this chapter, Graphique will look like Figure 3–1. It will allow users to enter equations and graph them textually. It will be a functional application.
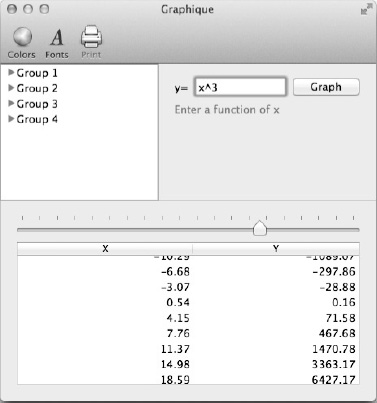
Figure 3–1. The Graphique application at the end of this chapter
Resizing the Views
Some people like their windows big, and some like them small. Some users have 30″ cinema displays, and some work from 11″ notebook screens. Sometimes people will want to see only the graph and hide the recent equations and the equation editor. Sometimes people will want to drag the split views around and resize the entire Graphique window. Maybe some people will want Graphique to take over their entire desktops. You can control and customize the resizing behavior of Graphique's window and views to improve how the user interacts with the application. In this section, you learn how to do that.
Resizing the Window
Open MainMenu.xib in Xcode and select the Graphique window. Show the Attributes inspector to see ways you can control the Graphique window's appearance and sizing capability. The Attributes inspector should match Figure 3–2.
You can see a slew of options, but the ones we focus on here are the Resize check box and the Full Screen drop-down, so locate those in the Attributes inspector. The Resize check box is currently checked. Uncheck that and run Graphique. The Graphique window looks as it did before, but as you move the mouse to the window sides or corners, you see that the mouse pointer no longer turns into a resizing arrow, and you can't resize the window. We obviously don't want to constrain our users to a single window size, so quit Graphique and recheck the Resize check box.
The other option we want to look at, Full Screen, is currently set to Unsupported. Full Screen support is new with Lion, but applications must explicitly specify this option to gain support for it. When you run Graphique, you see no Full Screen control in the upper-right corner of the window. Change this setting to Primary Window and run Graphique. You see that now the Graphique window has the Full Screen control in its upper right, which looks like two opposing arrows pointing northeast and southwest, as shown in Figure 3–3. Click this button to make Graphique fill your screen. We'll leave this setting so users can do the same when they run Graphique.

Figure 3–2. The Attributes inspector for the Graphique window

Figure 3–3. The Graphique window with Full Screen support
Constraining the Split View Sizes
As the Graphique application currently stands, users can resize the split views to dimensions that don't make sense. They can, for example, size the Equation Entry View so small that the text field and button no longer fit. Using the NSSplitViewDelegate protocol, you can control the minimum size of your split views and also whether double-clicking the splitter will collapse the view.
Constraining the Minimum Size
NSSplitViewDelegate has two methods for controlling the size of its views: splitView:constrainMinCoordinate:ofSubviewAt: and splitView:constrainMaxCoordinate:ofSubviewAt:. These methods receive the index of the view to the left of the divider, in the case of a vertical split view, or the index of the view above the divider, in the case of a horizontal split view. In your implementation of these methods, you return a float value that represents the minimum or maximum proposed value for the width or height of the view, as appropriate. For vertical split views, you return a width, and for horizontal split views, you return a height. For splitView:constrainMinCoordinate:ofSubviewAt:, you return a minimum, and for splitView:constrainMaxCoordinate:ofSubviewAt:, you return a maximum. To constrain the minimum width of a view to 100 pixels, for example, you'd add this method:
- (CGFloat)splitView:(NSSplitView *)splitView constrainMinCoordinate:(CGFloat)proposedMinimumPosition ofSubviewAt:(NSInteger)dividerIndex

{

  return 100.0;

}
To properly display the Equation Entry View, we must allow it to shrink only to 175 pixels. That allows 82 pixels for the Graph button, 30 pixels for the y= label, and 63 pixels for the text field and any padding.
Constraining the Maximum Size
Dragging a split view's divider prompts your delegate's method to be called to constrain its size. Because we want to set a minimum size for the right view (the Equation Entry View), we must prevent the divider from extending past a certain point. This means we must impose a maximum size constraint on the divider so that it does not go beyond its overall width minus the minimum width we want to impose on the Equation Entry View. To do this, make RecentlyUsedEquationsViewController the delegate for the vertical split view, and implement the splitView:constrainMaxCoordinate:ofSubviewAt: method to return a maximum size of the total width of the split view minus 175 pixels. Begin by declaring that RecentlyUsedEquationsViewController implements the NSSplitViewDelegate in RecentlyUsedEquationsViewController.h, as shown in Listing 3–1.
Listing 3–1. RecentlyUsedEquationsViewController.h
#import <Cocoa/Cocoa.h>


@class GroupItem.h;


@interface RecentlyUsedEquationsViewController : NSViewController <NSOutlineViewDataSource, NSSplitViewDelegate>

{

@private

  GroupItem *rootItem;

}


@end
At the top of RecentlyUsedEquationsViewController.m, use #define to avoid using a magic number:
#define EQUATION_ENTRY_MIN_WIDTH 175.0
implement the splitView:constrainMaxCoordinate:ofSubviewAt: method to get the overall width of the split view, subtract 175 pixels, and return the result, as shown in Listing 3–2.
Listing 3–2. Constraining the Maximum Width
# pragma mark - NSSplitViewDelegate methods


- (CGFloat)splitView:(NSSplitView *)splitView

constrainMaxCoordinate:(CGFloat)proposedMinimumPosition

ofSubviewAt:(NSInteger)dividerIndex

{

return splitView.frame.size.width -EQUATION_ENTRY_MIN_WIDTH;

}
Finally, go to GraphiqueAppDelegate.m, find where you create the RecentlyUsedEquationsViewController instance in the applicationDidFinishLaunching: method, and set the instance as the delegate for the vertical split view, as in Listing 3–3.
Listing 3–3. Setting the RecentlyUsedEquationsViewController Instance as the Vertical Split View Delegate
recentlyUsedEquationsViewController = [[RecentlyUsedEquationsViewController alloc]

initWithNibName:@"RecentlyUsedEquationsViewController" bundle:nil];

[self.verticalSplitView replaceSubview:[[self.verticalSplitView subviews]

objectAtIndex:0] with:[recentlyUsedEquationsViewController view]];

self.verticalSplitView.delegate = recentlyUsedEquationsViewController;
Run Graphique and drag the vertical divider left and right. You find that you can drag it only so far to the right before it stops, as shown in Figure 3–4, leaving enough room to render the Equation Entry View's label, text view, and button.

Figure 3–4. The vertical divider in the top split view moved to the right as far as it will go
Just as you're ready to check this item off your task list, however, you try resizing the window and discover that you can shrink the window smaller than 175 pixels wide, and the Equation Entry Viewgets crunched. The splitView:constrainMaxCoordinate:ofSubviewAt: method is called in response to moving the split view divider, not when resizing the window. What you must do is constrain the width of the window, which you learn how to do next.
Constraining the Window Size
To constrain the minimum overall window size and preserve the width of the Equation Entry View, you must do two things:
- Constrain the window size.
- Implement the
splitView:resizeSubviewsWithOldSize:fromNSSplitViewDelegate.
To address the first item, open MainMenu.xib, select Window – Graphique, and open the Size inspector. Check the box beside Minimum Size, and enter 175 for width and 200 for height, as shown in Figure 3–5.

Figure 3–5. Constraining the minimum size of the window
This will set the minimum size of the window's content, ignoring any borders or other chrome, to 175 pixels wide and 200 pixels tall.
If you build and run Graphique now, however, you see that the minimum size of the window is constrained but that the split view resizes proportionally and the Equation Entry View becomes too narrow, as shown in Figure 3–6.

Figure 3–6. The window size constrained but the Equation Entry Viewstill too narrow
When a split view resizes, it calls its delegate's splitView:resizeSubviewsWithOldSize: method, passing the size of the split view as it was before it was resized. In this method, you should adjust the sizes of the subviews inside the split view, taking into account the divider width. For our algorithm, we take the following approach:
- The Equation Entry View must be 175 pixels wide, less the divider width.
- As the window resizes, the Recent Equations View should stay the same size, and the Equation Entry View should grow or shrink.
- The Recent Equations View should shrink if it must to accommodate the Equation Entry View.
- We should try to make the Recent Equations View at least 100 pixels wide, as afforded by the window size and the Equation Entry View, unless it's been collapsed to zero width.
To accomplish this, add a #define for the preferred minimum width of the recently used equations view:
#define PREFERRED_RECENT_EQUATIONS_MIN_WIDTH 100.0
Next, add the code in Listing 3–4 to RecentlyUsedEquationsViewController.m.
Listing 3–4. splitView:resizeSubviewsWithOldSize:
- (void)splitView:(NSSplitView *)splitView resizeSubviewsWithOldSize:(NSSize)oldSize

{

  // Get the new frame of the split view

  NSSize size = splitView.bounds.size;


  // Get the divider width

  CGFloat dividerWidth = splitView.dividerThickness;


  // Get the frames of the recently used equations panel and the equation entry panel

  NSArray *views = splitView.subviews;

  NSRect recentlyUsed = [[views objectAtIndex:0] frame];

  NSRect equationEntry = [[views objectAtIndex:1] frame];


  // Set the widths

  // Sizing strategy:

  // 1) equation entry must be a minimum of 175 pixels minus the divider width

  // 2) recently used will stay at its current size, unless it's less than 100 pixels wide

  // 3) If recently used is less than 100 pixels, grow it as much as possible until it reaches 100

  float totalFrameWidth = size.width - dividerWidth;


  // Set recently used to the desired size (at least 100 pixels wide), or keep at zero

  // if it was collapsed

  recentlyUsed.size.width = recentlyUsed.size.width == 0 ? 0 : MAX(PREFERRED_RECENT_EQUATIONS_MIN_WIDTH,recentlyUsed.size.width);


  // Calculate the size of the equation entry based on the recently used width

  equationEntry.size.width = MAX((EQUATION_ENTRY_MIN_WIDTH - dividerWidth), (totalFrameWidth - recentlyUsed.size.width));


  // Now that the equation entry is set, recalculate the recently used

  recentlyUsed.size.width = totalFrameWidth - equationEntry.size.width;


  // Set the x location of the equation entry

  equationEntry.origin.x = recentlyUsed.size.width + dividerWidth;


  // Set the widths

  [[views objectAtIndex:0] setFrame:recentlyUsed];

  [[views objectAtIndex:1] setFrame:equationEntry];

}
Read through this method and its comments to understand what it's doing. This method gets the overall new size of the split view, calculates the sizes of the two views (the Equation Entry View and the Recent Equations View) according to the earlier rules, and sets the sizes into the views. Build and run Graphique and resize the window. You should see that you can stretch the window, which stretches the Equation Entry View, as shown in Figure 3–7. You can shrink the window, which should shrink the Equation Entry View and, eventually, the Recent Equations View, as shown in Figure 3–8. Finally, you should be able to stretch the window again and see that the Recent Equations View grows to 100 pixels (if it hasn't been collapsed to zero width) and then stops expanding, as shown in Figure 3–9.
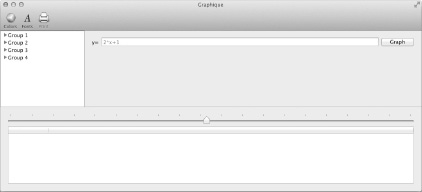
Figure 3–7. Resizing Graphique stretches the Equation Entry View

Figure 3–8 . Graphique with the Recent Equations View shrunk

Figure 3–9. Graphique with the Recent Equations View at 100 pixels
Collapsing a Subview
Before we move on from handling user interaction with our split views, we want to add one more touch: if the user double-clicks the vertical divider between the Recent Equations View and the Equation Entry View, we hide (or collapse) the Recent Equations View. To do this, we implement two methods from NSSplitViewDelegate:
splitView:canCollapseSubview:returns whether a particular split view can collapsesplitView:shouldCollapseSubview:forDoubleClickOnDividerAtIndex:is called when the user double-clicks a divider
When the user double-clicks a divider, splitView:shouldCollapseSubview:forDoubleClickOnDividerAtIndex: is called twice, once for the first view and once for the second. You should either return NO for both or return YES for only one, because the result of returning YES for both is undefined. If you return YES for a view, and splitView:canCollapseSubview: also returns YES for that view, then the view will collapse and disappear.
In our implementation for these methods, which we place in RecentlyUsedEquationsViewController.m, we return YES if the specified subview is the Recent Equations View. Add the code from Listing 3–5 to RecentlyUsedEquationsViewController.m.
Listing 3–5. NSSplitViewDelegate Methods to Allow Collapsing the Recent Equations View
- (BOOL)splitView:(NSSplitView *)splitView shouldCollapseSubview:(NSView *)subview forDoubleClickOnDividerAtIndex:(NSInteger)dividerIndex

{

  return subview == self.view;

}


- (BOOL)splitView:(NSSplitView *)splitView canCollapseSubview:(NSView *)subview

{

  return subview == self.view;

}
Build and run Graphique, and double-click the vertical divider between the Recent Equations View and the Equation Entry View, and the Recent Equations View should disappear, as shown in Figure 3–10.

Figure 3–10. Graphique with the Recent Equations View collapsed
Handling window and split view resizing can be a chore to do properly, but if implemented correctly, it can create a more friendly user experience.
Handling Button Presses
In the previous chapter, you learned how to use IBOutlet to attach Interface Builder UI components to variables in the code. In this section, we show you how to send events and call methods in your code from UI components.
The whole idea of the application is to graph an equation curve. So far, we've built the UI components that handle inputting the equation, but we haven't yet done anything with that equation. Let's change that. We want to be able to graph an equation when the user clicks the Graph button or when the user presses the Return key when the equation text field has the focus.
The Model-View-Controller Pattern
Apple, with the Cocoa framework, has done a great job staying consistent with the classic Model-View-Controller (MVC) design pattern. In essence, the MVC pattern states that responsibilities should be divided among three major components of the application. The model holds the data. The view displays the data. The controller makes decisions based on events. Events can be triggered by changes in the view (for example, the user clicks a button), but they could also be triggered by changes in the data or by other controllers in the application. Figure 3–11 shows how the components interact.
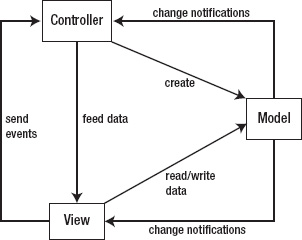
Figure 3–11. The Model-View-Controller pattern
Using IBAction
We are now ready to have our controller receive events. Methods that receive UI events all have a similar signature. Their return type must be IBAction, and they must have a single id argument. If you look closer at the documentation, you will notice that IBAction is actually defined as void. Similar to IBOutlet, IBAction is simply a marker that helps Interface Builder locate the method.
Since we want to receive an event from the Equation Entry View, the appropriate controller for receiving the event is EquationEntryViewController. Add a new method to that controller and call it equationEntered:. For now, we will make it print a statement in the Console when the event is activated. The method should like as shown here:
- (IBAction)equationEntered:(id)sender

{

  NSLog(@"Equation entered");

}
Don't forget to add -(IBAction)equationEntered:(id)sender; to EquationEntryViewController.h to make the method visible outside that class.
Next, open EquationEntryViewController.xib, select the Graph button, and open the Connections inspector. In the connections, you will notice the Sent Actions selector entry. Click the empty circle and drag to the File's Owner placeholder. A pop-up appears and shows your new method, as shown in Figure 3–12.

Figure 3–12. Linking a button to its action
Select the method and the link should be created, as illustrated in Figure 3–13.

Figure 3–13. The button linked to its action in the File's Owner
Save and launch the app. Every time you click the Graph button, the equationEntered: method executes and prints a statement in the log console.
To wire the Return key to the same action, go back to EquationEntryViewController.xib in Xcode, select the text field and the Connections inspector, and link the text field's selector entry to the equationEntered: method so that pressing Return will fire the same notification.
NOTE: Action methods require an argument typically named sender. The sender is, as its name implies, the component that has emitted the notification. In our case, sender is the button instance.
Creating the Model: Equation
When users enter equations, they do so in the form of strings of characters. To keep everything clean, it is usually best to create a data structure that will hold the data and also help access the data in a controlled manner. In our case, the data structure is an equation, so let's create a new subclass of NSObject called Equation with a convenience init: method that will accept a string in the form of an NSString. Create a new Objective-C class called Equation by selecting File from the menu. Be sure to make it a subclass of ![]() New
New ![]() New File...
New File...NSObject.
By creating a custom model class, we hide the fact that, for now at least, an equation is simply represented as a string. Find the code for the header file, Equation.h, in Listing 3–6, and the code for the implementation file, Equation.m, in Listing 3–7.
#import <Foundation/Foundation.h>


@interface Equation : NSObject

{

@private

  NSString *text;

}

@property (nonatomic, retain) NSString *text;


- (id)initWithString:(NSString*)string;


@end
Listing 3–7. Equation.m with its Custom init Method
#import "Equation.h"


@implementation Equation


@synthesize text;


- (id)initWithString:(NSString *)string

{

  self = [super init];

  if (self) {

    self.text = string;

  }

  return self;

}


- (NSString *)description

{

  return [NSString stringWithFormat:@"Equation [%@]", self.text];

}


@end
Our equation code would not be complete without a method to evaluate the equation for a given value. For simplicity, we assume that the variable is always named x in every equation. Edit Equation.h again to declare a new method:
- (float)evaluateForX:(float)x;
Implementing this method could be its own chapter. Between the use of grammars and semantic trees, there would be plenty to write. Here, we focus on implementing this method so that it is functional enough to help illustrate the rest of the examples in the book. Luckily for us, Mac OS X is based on the Unix operating system, which comes with the awk command. In this implementation, we leverage that command to do all the work. We don't dive into that code here; for further reading, review the NSTask documentation for launching programs from within your program.
Listing 3–8 shows Equation.h with the additional method, and Listing 3–9 shows Equation.m with the implementation of the method.
Listing 3–8. Equation.h with the evaluateForX: Method
#import <Foundation/Foundation.h>


@interface Equation : NSObject

{

@private

  NSString *text;

}

@property (nonatomic, retain) NSString *text;


- (id)initWithString:(NSString *)string;

- (float)evaluateForX:(float)x;


@end
Listing 3–9. Equation.m with the evaluateForX: Method
#import "Equation.h"


@implementation Equation


@synthesize text;


- (id)initWithString:(NSString*)string

{

  self = [super init];

  if (self) {

    self.text = string;

  }

  return self;

}


- (float)evaluateForX:(float)x

{

  NSTask *task = [[NSTask alloc] init];

  [task setLaunchPath: @"/usr/bin/awk"];


  NSArray *arguments = [NSArray arrayWithObjects: [NSString stringWithFormat:@"BEGIN { x=%f ; print %@ ; }", x, self.text], nil];

  [task setArguments:arguments];


  NSPipe *pipe = [NSPipe pipe];

  [task setStandardOutput:pipe];


  NSFileHandle *file = [pipe fileHandleForReading];


  [task launch];


  NSData *data = [file readDataToEndOfFile];


  NSString *string = [[NSString alloc] initWithData:data encoding: NSUTF8StringEncoding];

  float value = [string floatValue];
  return value;

}


- (NSString*)description

{

  return [NSString stringWithFormat:@"Equation [%@]", self.text];

}


@end
We pass the evaluateForX: method a float value for x, and it uses awk to calculate the value for y and return it as a float.
Communication Among Controllers
The Graphique application has three controllers at play: EquationEntryViewController, GraphTableViewController, and RecentlyUsedEquationsViewController. These three controllers must be able to exchange information to tie the application together. We tie them together through the application delegate. Because all three controllers are available as properties of the application delegate, any class that can get a hold of the application delegate can get a handle to any of the controllers. This setup is handy to facilitate the communication between controllers. It is the responsibility of GraphTableViewController to plot curves, for example, so once we have a new equation in our EquationEntryViewController instance, we want to tell our GraphTableViewController instance to draw it.
Add a new method called draw: to GraphTableViewController. For now, the method in GraphTableViewController.m should look this:
-(void)draw:(Equation*)equation

{

  NSLog(@"Draw equation: %@", equation);

  NSLog(@"value for x=4, y=%f", [equation evaluateForX:4.0]);

}
Later in this chapter, we'll substitute a real implementation. Make sure to also define this method in GraphTableViewController.h, as shown in Listing 3–10.
Listing 3–10. GraphTableViewController.m Declaring the New Draw Method
#import <Cocoa/Cocoa.h>

#import "Equation.h"


@interface GraphTableViewController : NSViewController


-(void)draw:(Equation*)equation;


@end
Declare a new IBOutlet property of type NSTextField in EquationEntryViewController.h. Call it textField and link it to the equation entry text field in Interface Builder as you learned how to do in the previous chapter. See Listing 3–11.
Listing 3–11. Adding an outlet to EquationEntryViewController.h
#import <Cocoa/Cocoa.h>


@interface EquationEntryViewController : NSViewController


@property (weak) IBOutlet NSTextField *textField;


- (IBAction)equationEntered:(id)sender;


@end
We want to call the draw: method from the equation entry controller, passing the Equation object created from the text in textField, when the Graph button is clicked. Edit the equationEntered: method in EquationEntryViewController to match Listing 3–12. Be sure to import Equation.h, GraphiqueAppDelegate.h, and GraphTableViewController.h for the names to resolve.
Listing 3–12. The equationEntered: Method Communicating with GraphTableViewController
- (IBAction)equationEntered:(id)sender

{

GraphiqueAppDelegate *delegate = NSApplication.sharedApplication.delegate;


  Equation *equation = [[Equation alloc] initWithString:[self.textField stringValue]];

  [delegate.graphTableViewController draw:equation];

}
In this implementation, we simply get ahold of the application delegate and send the equation to the appropriate controller. The application delegate serves as a bridge between the controllers.
In Graphique, we now allow the user to enter an equation, and we tell the appropriate controller to draw the equation, but we don't know whether the equation we're going to draw is valid. In the next section, we validate the user input.
Validating Fields
Field validation is not necessary for your application to function, but your users will expect a polished user interface and will reward you for your efforts with App Store comments leading to extra sales. You can't have a nice slick user interface without implementing field validation. By validating the input, you limit the possibilities for things to go wrong, and therefore you improve your users' satisfaction. In this section, we show you two options for validating: after the user submits the data and while the user is entering the data.
Validating After Submitting
In this section, we implement validation of the equation entry field. The validation will be invoked as the user clicks the Graph button and will display an error message when things go wrong.
Writing a Validator
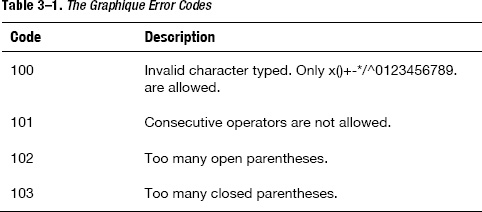
The first step of any validation process is to define the rules to validate. In our Graphique application, we use a small set of rules to keep things simple. Table 3–1 shows the possible errors and the codes we associate with them. Adding an error code with each error makes it easier for your users to report problems, especially if your application is translated into several languages.
Since we've been diligent about creating a model to hold our data (in other words, the Equation class), we should put our validator code inside our model. After all, what object knows more about equations than the Equation class itself? Open Equation.h and declare the following method:
- (BOOL)validate:(NSError**)error;
We also must implement the validate: method in Equation.m. The validate: method must do three things:
- Detect any errors
- Assign an error code and error message to any detected errors
- Produce an
NSErrorobject for a specified error code and error message
The third item, producing an NSError object for a specified error code and error message, represents a discrete piece of functionality and should be broken out to a separate method. We don't want code outside the Equation class to call this code, however, so we don't want to include this method in Equation's public interface. To achieve both these aims, putting this functionality into a method but hiding the method from outside the Equation class, we create a private category.
You can read more about categories in the Apple documentation at http://developer.apple.com/library/mac/#documentation/Cocoa/Conceptual/ObjectiveC/Chapters/ocCategories.html, but categories can be simply summed up as collections of methods that are added to a class at runtime. You could, for example, create a category that adds a method called romanNumeralValue: to NSNumber so that you can write code like this:
to get output like this:
2011-05-10 06:40:52.690 MMXI
In our case, we create a category containing a single method, produceError:withCode:andMessage:, and we declare the category not in a separate header file but at the top of Equation.m above this line:
@implementation Equation
This makes the method visible only for the Equation class, and we can call it just as if we'd declared the method normally in Equation.h. Open Equation.m and add the code shown in Listing 3–13. Note that we haven't shown the existing methods to save paper; don't remove them!
Listing 3–13. The Equation Validation Method and the Private Category
@interface Equation ()

-(BOOL)produceError:(NSError**)error withCode:(NSInteger)code

andMessage:(NSString*)message;

@end


@implementation Equation


// The rest of the implementation code . . .


- (BOOL)validate:(NSError **)error

{

  // Validation rules

  // 1. Only digits, letters '.', 'x', '(', ')', '+' , '-' , '*', '/', '^', ' ' allowed

  // 2. There should be the same amount of closing and opening parentheses

  // 3. no two consecutive operators


  // Counters for '(' and ')'

  NSUInteger open = 0;

  NSUInteger close = 0;


  NSString *allowedCharacters = @"x()+-*/^0123456789. ";


  NSCharacterSet *cs = [NSCharacterSet characterSetWithCharactersInString:allowedCharacters];

  NSCharacterSet *operators = [NSCharacterSet characterSetWithCharactersInString:@"+-/*^"];


  unichar previous = 0;


  for(NSUInteger i=0; i<text.length; i++)

  {

    unichar c = [text characterAtIndex:i];

    if(![cs characterIsMember:c])

    {

      // Invalid character
      return [self produceError:error withCode:100 andMessage:[NSString stringWithFormat:@"Invalid character typed. Only '%@' are allowed", allowedCharacters]];

    }

    else if(c == '(') open++;

    else if(c == ')') close++;


    if([operators characterIsMember:c] && [operators characterIsMember:previous])

    {

      // Two consecutive operators

      return [self produceError:error withCode:101 andMessage:@"Consecutive operators are not allowed"];

    }


    if(c != ' ') previous = c;

  }


  if(open < close)

{

    // Invalid character

    return [self produceError:error withCode:102 andMessage:@"Too many closed parentheses"];

  }

  else if(open > close)

  {

    // Invalid character

    return [self produceError:error withCode:103 andMessage:@"Too many open parentheses"];

  }


  return YES;

}


- (BOOL)produceError:(NSError**)error withCode:(NSInteger)code andMessage:(NSString*)message

{

  if (error != NULL)

  {

    NSMutableDictionary *errorDetail = [NSMutableDictionary dictionary];

    [errorDetail setValue:message forKey:NSLocalizedDescriptionKey];

    *error = [NSError errorWithDomain:@"Graphique" code:code userInfo:errorDetail];

  }

  return NO;

}
The implementation checks for the four rules we defined earlier in this section and produces the appropriate error with the appropriate error code when necessary.
Unit Testing
Unit testing refers to the practice of writing nonproduction code that exercises a portion of the application in order to validate that it functions as expected in an isolated environment. Different developers adopt unit testing to various degrees. Some developers insist on subjecting every single line of code to unit testing. Others are stubbornly resistant to writing any kind of unit testing code. We leave it to you to find the ideal amount of unit testing for your projects. Typically, however, algorithms are ideal candidates for unit tests. This is certainly true for our validation method.
When we created the Graphique project, Xcode generated a GraphiqueTests class in the GraphiqueTests folder. This is the main unit test harness for the application. Open GraphiqueTests.m and add one method for each test you want to run. Since we have four validation rules, we need to have at least five methods (although we encourage you to write more to test more cases). Our five cases represent a successful case and one failure case for each validation rule. For those failure cases, we check that we actually got a failure and that the failure is reporting the proper error code.
Remember our validation rules from Table 3–1. It's always best to not look at the code you're testing when writing the unit tests. It keeps them independent and unbiased.
Listing 3–14 shows how the methods are implemented. For every case where something we expected didn't happen, we invoke the STFail() function to report the unit test failure.
Listing 3–14. GraphiqueTests.m: Unit Tests for the Equation Validation Method
#import "GraphiqueTests.h"

#import "Equation.h"


@implementation GraphiqueTests


- (void)setUp

{

  [super setUp];

}


- (void)tearDown

{

  [super tearDown];

}


- (void)testEquationValidation

{

  NSError *error = nil;

  Equation *equation = [[Equation alloc] initWithString:@"( 3+4*7 /(3+ 4))"];

  if(![equation validate:&error])

  {

    STFail(@"Equation should have been valid");

  }

}


- (void)testEquationValidationWithInvalidCharacters

{

  NSError *error = nil;

  Equation *equation = [[Equation alloc] initWithString:@"invalid characters"];

  if([equation validate:&error])

  {

    STFail(@"Equation should not have been valid");
  }


  if([error code] != 100)

  {

    STFail(@"Validation should have failed with code 100 instead of %d", [error code]);

  }

}


- (void)testEquationValidationWithConsecutiveOperators

{

  NSError *error = nil;

  Equation *equation = [[Equation alloc] initWithString:@"2++3"];

  if([equation validate:&error])

  {

    STFail(@"Equation should not have been valid");

  }


  if([error code] != 101)

  {

    STFail(@"Validation should have failed with code 101 instead of %d", [error code]);

  }

}


- (void)testEquationValidationWithTooManyOpenBrackets

{

  NSError *error = nil;

  Equation *equation = [[Equation alloc] initWithString:@"((4+3)"];

  if([equation validate:&error])

  {

    STFail(@"Equation should not have been valid");

  }

  if([error code] != 102)

{

    STFail(@"Validation should have failed with code 102 instead of %d", [error code]);

  }

  }


- (void)testEquationValidationWithTooManyCloseBrackets

  {

  NSError *error = nil;

  Equation *equation = [[Equation alloc] initWithString:@"(4+3))"];

  if([equation validate:&error])

  {

    STFail(@"Equation should not have been valid");

  }


  if([error code] != 103)

  {

    STFail(@"Validation should have failed with code 103 instead of %d", [error code]);

  }

}


@end
NOTE: The STFail() function is used to report unit test failures, which is different from reporting validation failures. In the case of testing validation failures, we call STFail() when the code did not return an error as expected.
To launch the unit tests, you can use the shortcut ![]() +U. Alternatively, you can click and hold the Run button on the top-left corner of the Xcode window and select Build for Testing (it may say “Test” instead, depending on the build status) from the drop-down to start running the tests, as shown in Figure 3–14.
+U. Alternatively, you can click and hold the Run button on the top-left corner of the Xcode window and select Build for Testing (it may say “Test” instead, depending on the build status) from the drop-down to start running the tests, as shown in Figure 3–14.

Figure 3–14. The unit test launcher
When you run the test, you will get some failures, as illustrated in Figure 3–15, indicating something has gone wrong.
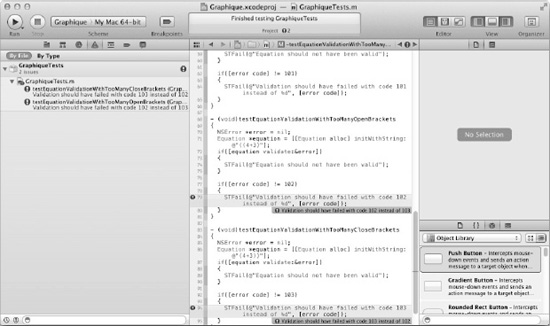
Figure 3–15. Unit test failures
The two errors are related to error codes 102 and 103 not being generated correctly. If you go back to Equation.m, you can find the logic for generating these two errors:
if(open < close)

{

  // Invalid character

  return [self produceError:error withCode:102 andMessage:@"Too many closed parentheses"];

}

else if(open > close)

{

  // Invalid character

  return [self produceError:error withCode:103 andMessage:@"Too many open parentheses"];

}
Whoops, we've swapped error code 102 (too many open brackets) and error code 103 (too many closed brackets). We apologize to those readers who did notice the problems before running the unit tests and thought we had made a mistake. As a reward for continuing to read this chapter, we clear up this confusion for you. Change the logic to return the right code, as shown here:
if(open < close)

{

  // Invalid character

  return [self produceError:error withCode:103 andMessage:@"Too many closed parentheses"];

}

else if(open > close)

{

  // Invalid character
  return [self produceError:error withCode:102 andMessage:@"Too many open parentheses"];

}
Now run the unit tests again. This time they should be successful, and the Console output should show something similar to the following example:
Executed 5 tests, with 0 failures (0 unexpected) in 0.000 (0.002) seconds
Displaying an Alert Window
So far, we've written our validation code and verified that it measures up to our expectations by using unit tests. It's now time to hook the validation code up to the user interface and display the error message when a problem occurs. Since we want validation performed when the user clicks the Graph button, we add our invocation to the validator in the equationEntered: method of the EquationEntryViewController class. When validation fails, we want to display a message box with the error code and message. Cocoa offers a convenient way to display message boxes using the NSAlert class.
Edit the equationEntered: method in EquationEntryViewController.m. For the alert delegate to work, you must add the alertDidEnd:returnCode:contextInfo: method. It is called when the user closes the NSAlert box. In our case, we don't want to do anything. It may be used to clear the input field. The code for both methods is shown in Listing 3–15.
Listing 3–15. The Code for Displaying Alerts
- (void)alertDidEnd:(NSAlert *)alert returnCode:(NSInteger)returnCode

        contextInfo:(void *)contextInfo

{


}


- (IBAction)equationEntered:(id)sender

{

  NSLog(@"Equation entered");

  GraphiqueAppDelegate *delegate = [NSApplication sharedApplication].delegate;


  Equation *equation = [[Equation alloc] initWithString: [self.textField stringValue]];


  NSError *error = nil;

  if(![equation validate:&error])

  {

    // Validation failed, display the error

    NSAlert *alert = [[NSAlert alloc] init];

    [alert addButtonWithTitle:@"OK"];

    [alert setMessageText:@"Something went wrong. "];

    [alert setInformativeText:[NSString stringWithFormat:@"Error %d: %@", [error code],[error localizedDescription]]];

    [alert setAlertStyle:NSWarningAlertStyle];


    [alert beginSheetModalForWindow:delegate.window modalDelegate:self didEndSelector:@selector(alertDidEnd:returnCode:contextInfo:) contextInfo:nil];

  }
  else

  {

    [delegate.graphTableViewController draw: equation];

  }

}
Launch the Graphique application, enter an invalid equation like 1++x, and click the Graph button. The validation error should appear as shown in Figure 3–16.

Figure 3–16. Validation error shown in an NSAlert message box
A Better Way: Real-Time Validation
Performing field validation is essential to providing good feedback to your users when they do something wrong, but your app will feel a lot more natural to the users if you can catch errors earlier and provide the feedback while they are doing something wrong. This section is dedicated to do just that.
Adding a Feedback Label
If we pop up an alert box every time the user types something wrong, this will undoubtedly generate a lot of frustration; users get scolded after they've done something wrong and have to then dismiss the alert. Instead, we can display the error message while they're typing in invalid equations by adding a label to the equation entry component that can hold the error message that we're currently displaying in an alert. This approach gives users real-time feedback on how they're misstepping in an unobtrusive way that doesn't require that they click an OK button. Open EquationEntryViewController.h and declare a new NSTextField property called feedback, as Listing 3–16 shows.
Listing 3–16. EquationEntryViewController.h with the New Feedback Text Field
#import <Cocoa/Cocoa.h>

#import "Equation.h"


@interface EquationEntryViewController : NSViewController


@property (weak) IBOutlet NSTextField *textField;

@property (weak) IBOutlet NSTextField *feedback;


- (IBAction)equationEntered:(id)sender;


@end
Edit EquationEntryViewController.m to synthesize the new property as well.
Catching Text Change Notifications
The next step is to catch notifications sent when the equation is typed so we can validate the equation. NSTextField is a subclass of NSControl, which automatically fires a notification each time its text changes that its delegate can catch by implementing the controlTextDidChange: method.
In EquationEntryViewController.m, simply implement the method as shown in Listing 3–17. This code creates an Equation object from the text in the text field and calls its validate: method. If the validate: method returns an error, the code puts the error message in the label you created for this purpose (note that you've created it in code only at this point; we'll add it to the user interface shortly). Otherwise, it clears the label.
Listing 3–17. The controlTextDidChange: Implementation
-(void)controlTextDidChange:(NSNotification *)notification

{

  Equation *equation = [[Equation alloc] initWithString: [self.textField stringValue]];


  NSError *error = nil;

  if(![equation validate:&error])

  {

    // Validation failed, display the error

    [feedback setStringValue:[NSString stringWithFormat:@"Error %d: %@", [error code],[error localizedDescription]]];

  }

  else

  {

    [feedback setStringValue:@""];

  }

}
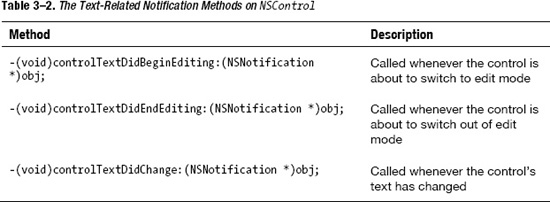
Table 3–2 shows the methods you can implement to catch text-related notifications on any subclass of NSControl.
Wiring It All Together in Interface Builder
So far, we've declared an attribute for our feedback panel and we've implemented the method needed to catch the change notifications, but we haven't tied the feedback panel to a component on the interface, and we have not set our controller as the entry field's delegate. Open EquationEntryViewController.xib to set this up.
First, resize the view to be tall enough to accommodate the feedback. Then, add a Wrapping Label object to the equation entry component, as shown in Figure 3–17. This will be our feedback label. Remove the title text and change the placeholder text to “Enter a function of x” or something helpful to the user. This placeholder text will appear whenever there is no title (that is, no validation error).

Figure 3–17. The equation entry component with a feedback label
Select the File's Owner (the controller in this case) and connect the feedback outlet to the newly added wrapping label, as illustrated in Figure 3–18.

Figure 3–18. Linking the feedback attribute to the UI component
The last step is to set the controller as the delegate for the equation entry field. Select the equation entry text field and link its delegate property to the File's Owner so that it matches the illustration in Figure 3–19.

Figure 3–19. Setting the text field delegate in Interface Builder
Launch the application and type in an invalid equation to see the real-time validation in action, as shown in Figure 3–20.

Figure 3–20. Real-time validation error
Graphing the Data
Everything we've done on the Graphique application to this point sets the stage for what we're going to do in this section: graph the data. Graphing data is Graphique's raison d'etre, and without this capability, all the beautiful layout and responsiveness to user input means naught. In this chapter, we graph the data textually in a table with two columns: the first column, labeled X, represents the domain, and the second column, labeled Y, shows the range. This means that for a given X value, you can see its corresponding Y value in the same row in the table. We show the graph with the domain -50 to 50, with a default interval between X values of one. Later in this chapter, we allow users to select the interval between X values.
We start by putting the labels on the graph table view and setting up the alignment of the columns. In Xcode, select GraphTableViewController.xib and expand the Objects view, drilling down until you see the two Table Column entries below the Table View, as shown in Figure 3–21. With the first Table Column entry selected and the Attributes inspector open, enter X in the Title field and click the Center alignment button. Drag the small blue dot between the X column and second column to the right to make both columns about the same size. Switch to the Identity inspector and enter X in the Identifier field.

Figure 3–21. Setting up the table columns in the Graph View
Next, you want to set the data in the columns to be right-aligned, so click the triangle beside the table column you just adjusted to display the Text Field Cell item below it, and select that Text Field Cell item. In the Attributes inspector, click the Right alignment button to right-align the cell. At this point, the view should look as it does in Figure 3–22.
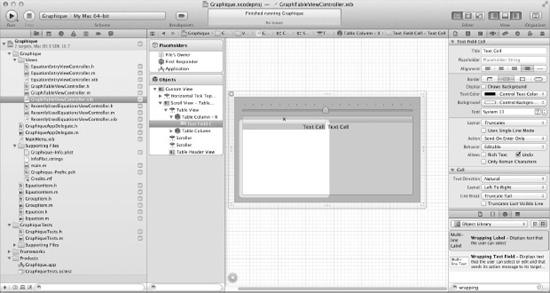
Figure 3–22. The X column set up properly
Move on to the second column and repeat the same steps, substituting Y for the label and the identifier for the column and making sure to set the alignment for the second column's Text Field Cell item as well. See Figure 3–23 for how the Graph View should now look.

Figure 3–23. The Graph View with the columns titled X and Y
Calculating and Caching the Data
When the user clicks the Graph button, we could simply store the equation and then calculate the X and Y values for the table each time the table needs to display them (for example, as the user scrolls more rows of the table into view). This would save us the up-front time of calculating all the values for the table but might reduce the smoothness of scrolling the table if the equation is sufficiently complex.
We also could set up a cache for the data, calculating the data for a row the first time the table displays that row and caching the results so that the next time the table must display that row we can pull the information from the cache rather than recalculate it. This is often a best-of-both-worlds approach: we don't spend a lot of time up front calculating data, and the table scrolls reasonably smoothly as we fill the cache and then absolutely smoothly once we're just pulling cached values.
The third approach we could take, and in fact the one we use in Graphique, is to just calculate all the values for the table when the user clicks the Graph button and cache them. Then, as the table needs to display any of the values, we feed them directly from the cache. We take this approach for the following reasons:
- When the user clicks the Graph button, they expect something compute-intensive to happen. They can live with some amount of unresponsiveness from the application while it complies with the request to graph the data. When users scroll the table, they expect the table to just scroll and would become frustrated if the table jerked or lagged.
- We plan to graph a relatively small number of points. The domain, as we stated earlier, goes from -50 to 50, or 101 points. Later in this chapter we allow users to adjust the interval between domain points as low as 0.10, but even if they go that low, we'll be calculating a maximum of 1,010 values, not hundreds of thousands or even millions.
- In the next chapter, we display an actual graph of the equation along the same domain of -50 to 50, so we will need all the values computed so we can display the entire graph.
Most problems have many approaches, and your duty as a developer is to explore those options and arrive at a solution that best meets your users' expectations.
For Graphique, we compute all the values when the user clicks the Graph button and store each one as a CGPoint, which is a struct that has an x value and a y value, both floats, which is perfect for our needs. We store them in an NSMutableArray, taking advantage of NSValue's ability to transform a CGPoint into an object, because NSMutableArray can store only objects, not primitive values like CGPoint. Each time the user clicks the Graph button, we clear out the cache, recompute all the values, and store them in the cache. Since we haven't yet set up the ability to talk to the table from the code, we don't yet tell the table to reload itself; we'll set that up later in the chapter.
Begin by creating an instance of NSMutableArray to serve as the cache. Open GraphTableViewController.h and add an NSMutableArray instance called values, as shown in Listing 3–18.
Listing 3–18. GraphTableViewController.h with the Cache Added
#import <Cocoa/Cocoa.h>

#import "Equation.h"


@interface GraphTableViewController : NSViewController


@property (nonatomic, retain) NSMutableArray *values;


-(void)draw:(Equation*)equation;


@end
Now, open GraphTableViewController.m, add a @synthesize line for the values member and adjust the initWithNibName: method to create the values array. Update the draw: method to fill the cache with the appropriate values for the equation. Note that we currently log the points to the console, because we haven't yet set up the table to display the values. See Listing 3–19.
Listing 3–19. The Updated GraphTableViewController.m
#import "GraphTableViewController.h"


@implementation GraphTableViewController


@synthesize values;


- (id)initWithNibName:(NSString *)nibNameOrNil bundle:(NSBundle *)nibBundleOrNil {

  self = [super initWithNibName:nibNameOrNil bundle:nibBundleOrNil];

  if (self) {

    self.values = [NSMutableArray array];

  }

  return self;

}


- (void)draw:(Equation*)equation

{

  // Clear the cache

  [values removeAllObjects];


  // Calculate the values

  for (float x = -50.0; x <= 50.0; x++)

  {

    float y = [equation evaluateForX:x];

    NSLog(@"Adding point (%0.2f, %0.2f)", x, y);

    [values addObject:[NSValue valueWithPoint:CGPointMake(x, y)]];

  }

}
Build and run Graphique, and enter 3*x+7 in the equation entry field. Click the Graph button, and inspect the Console. You should see output for all 101 points that looks like the few lines of output listed here:
2011-08-30 06:26:17.597 Graphique[37034:407] Adding point (-3.00, -2.00)

2011-08-30 06:26:17.603 Graphique[37034:407] Adding point (-2.00, 1.00)

2011-08-30 06:26:17.608 Graphique[37034:407] Adding point (-1.00, 4.00)

2011-08-30 06:26:17.614 Graphique[37034:407] Adding point (0.00, 7.00)

2011-08-30 06:26:17.619 Graphique[37034:407] Adding point (1.00, 10.00)

2011-08-30 06:26:17.624 Graphique[37034:407] Adding point (2.00, 13.00)

2011-08-30 06:26:17.630 Graphique[37034:407] Adding point (3.00, 16.00)
We are successfully calculating and caching data, but the table remains blank. Read the next section to understand how to fill the table with data.
Talking to the Table: Outlets and Delegates
You saw outlets in Chapter 2 when we created outlets for the NSSplitView instances called horizontalSplitView and verticalSplitView. As you may recall, we marked these outlets with the tag IBOutlet in the code so that Interface Builder could recognize them, and we connected the outlets in the code with actual NSSplitView instances created in Interface Builder. We're going to do the same thing with the table view in GraphTableViewController.xib, connecting it to an NSTableView instance variable in the GraphTableViewController class called graphTableView.
The other thing we're going to do to the GraphTableViewController class is to make it the delegate for the table view in GraphTableViewController.xib. Delegates are a frequently used design pattern in Cocoa, and they represent classes that conform to a known protocol that other classes can delegate functionality to. Table views use delegates for two major pieces of their functionality:
- Providing the data for the table to show (the
NSTableViewDataSourceprotocol) - Interacting with the table or customizing its view (the
NSTableViewDelegateprotocol)
Since we're just going to display data in the table for now, without providing any means for users to interact with the table (other than to scroll it), we can safely ignore the NSTableViewDelegate protocol, but we must implement the NSTableViewDataSource protocol to provide data for our graphTableView to display. This protocol has two methods we're going to implement: one that returns the number of rows in the table and one that returns the value for a specific cell (row and column) in the table.
Edit GraphTableViewController.h, declare that it implements the NSTableViewDataSource protocol, and add a member called graphTableView. The code should look like Listing 3–20.
Listing 3–20. GraphTableViewController.h
#import <Cocoa/Cocoa.h>


#import "Equation.h"


@interface GraphTableViewController : NSViewController <NSTableViewDataSource>


@property (nonatomic, retain) NSMutableArray *values;

@property (weak) IBOutlet NSTableView *graphTableView;


-(void)draw:(Equation*)equation;


@end
In GraphTableViewController.m, add a @synthesize line for graphTableView, and then open GraphTableViewController.xib. We're going to connect the table view instance in Interface Builder to the graphTableView instance in the code. Ctrl+drag from File's Owner to the table view, and in the resulting pop-up select graphTableView. Now, when GraphTableViewController.xib loads, the table view will be connected to the graphTableView instance.
Go back to GraphTableViewController.m to implement the NSTableViewDataSource protocol. The first method to implement returns the number of rows in the table, which should match the number of values in the values cache. The method looks like Listing 3–21.
Listing 3–21. Method to Return the Number of Rows in the Table
- (NSInteger)numberOfRowsInTableView:(NSTableView *)tableView

{

  return values.count;

}
The second method returns the value for a specific cell. The method is passed an NSInteger for the row the table needs the value for and an NSTableColumn instance representing the column the table is requesting the value for. Remember when we set the identifiers for the table columns to X and Y? That's what we use to determine which table column to return the value for. First, we pull the CGPoint instance for the row out of the cache, and then we get the value for the X or Y column, depending on which table column we've been passed. Note that we must return an object, not a primitive float. We could use NSNumber's numberWithFloat: method to convert the float value to an NSNumber object and return that, but instead we return an NSString so we can control how the return value is formatted in the table—in this case, with two digits after the decimal point. The method implementation looks like Listing 3–22.
Listing 3–22. Method for Returning a Cell's Value
- (id)tableView:(NSTableView *)aTableView objectValueForTableColumn:(NSTableColumn *)aTableColumn row:(NSInteger)rowIndex

{

  CGPoint point = [[values objectAtIndex:rowIndex] pointValue];

  float value = [[aTableColumn identifier] isEqualToString:@"X"] ? point.x : point.y;

  return [NSString stringWithFormat:@"%0.2f", value];

}
The last thing we must do to display data in the table is to update the draw: method to tell the table to reload after we've loaded the cache. We can also remove the log message that lists all the points, since we can now see the points in the table. The method now looks like Listing 3–23.
Listing 3–23. The Updated draw: Method
- (void)draw:(Equation*)equation

{

  // Clear the cache

  [values removeAllObjects];


  // Calculate the values

  for (float x = -50.0; x <= 50.0; x++)

  {

    float y = [equation evaluateForX:x];

    [values addObject:[NSValue valueWithPoint:CGPointMake(x, y)]];

  }

  [self.graphTableView reloadData];

}
At this point, you've updated the GraphiqueTableViewController class to be an adequate data source for graphTableView, but you haven't yet told graphTableView to use the GraphiqueTableViewController as its delegate. Open GraphTableViewController.xib, select the Table View, and open the Connections inspector. Drag from the circle to the right of dataSource to File's Owner to make that connection, as shown in Figure 3–24.

Figure 3–24. Connecting the data source for the table view
Build and run Graphique, enter 3*x+7 in the equation entry field, and click the Graph button. You should see your table fill with data, as shown in Figure 3–25. Enter various other equations in the equation entry field and click the Graph button after each one to see the table update with the new data.

Figure 3–25. The table with data
Graphique now successfully graphs data by displaying values in a table. Before we close this chapter, however, we add one more ability to the application: the ability to change the interval between X values. This is the subject of the next section.
Changing the Interval in the Domain
When we laid out the Graph Table View panel, we included both a table, which we just finished filling with data, and a Slider control that we said would allow users to change the interval between X values. We now fulfill our promise to implement that feature.
When we configured that slider, we set its range in the Attributes inspector in Interface Builder from 0.10 to 5.00. As the user slides the handle left and right and clicks the Graph button, we should update the interval between X values in the table. This will mean clearing the cache and recalculating the values for the table to show. We already have a method for clearing the cache, recalculating the values, and reloading the table data called draw:. We must now make two changes to the Graphique application:
- Default the slider's initial position to 1
- Update the calculation loop in the
draw:method to step by the selected interval instead of just the default of 1
To accomplish both these items, we take advantage of a Cocoa mechanism called key-value coding.
Using Key-Value Coding
Cocoa provides a mechanism called key-value coding (KVC) that allows you to set and get the value of a variable by its name, which we refer to as a key. Think of key-value coding as one entry in a map, hash, or dictionary. Suppose, for example, that you had a variable called foo. Its key is an NSString instance: @"foo", and we could set its value using code like this:
[self setValue:@"bar" forKey:@"foo"];
This would set the value of the variable foo to @"bar". We could get the value back out of foo by using this code:
[self valueForKey:@"foo"];
The value of this approach may not be immediately apparent, and we know all you compile-time safety advocates are squirming right now because compilers won't ensure that you spelled the name of the key correctly, but key-value coding can be a valuable approach to getting and setting values. You could, for example, use the same code to loop through a list of keys to set values on variables. The direct application for key-value coding for what we're doing, though, is what Cocoa calls binding. With binding, we can tie a graphical control—in our case, the slider—to a key, so that as we update the control, we update the value. Conversely, as we update the value, we update the control. Let's see how this works.
Open GraphTableViewController.h and add a CGFloat member called interval. Your file should match the code in Listing 3–24. Note that key-value coding works with objects, and CGFloat is just a primitive float, but Cocoa will take care of wrapping interval with the NSNumber object wrapper as necessary for getting and setting its value through key-value coding.
Listing 3–24. GraphTableViewController.h
#import <Cocoa/Cocoa.h>

#import "Equation.h"


@interface GraphTableViewController : NSViewController <NSTableViewDataSource>


@property (nonatomic, retain) NSMutableArray *values;

@property (weak) IBOutlet NSTableView *graphTableView;

@property (nonatomic, assign) CGFloat interval;


-(void)draw:(Equation*)equation;


@end
In GraphTableViewController.m, add an @synthesize line for interval, and in the initWithNibName: method, set its initial value to 1.0, as in Listing 3–25.
Listing 3–25. The initWithNibName: Method Updated to Set interval to 1
- (id)initWithNibName:(NSString *)nibNameOrNil bundle:(NSBundle *)nibBundleOrNil

{

  self = [super initWithNibName:nibNameOrNil bundle:nibBundleOrNil];
  if (self) {

    self.values = [NSMutableArray arrayWithCapacity:0];

    self.interval = 1.0;

  }

  return self;

}
Binding the Value to the Slider
This is where key-value coding gets fun. Open GraphTableViewController.xib, select the slider (make sure to select the Slider Cell object), and open the Bindings inspector. Expand the Value group (underneath the Value section), check the box by Bind to:, and select File's Owner from the drop-down, which binds the slider to the owning GraphTableViewController instance. Then, type self.interval in the Model Key Path field, as shown in Figure 3–26. The value of the slider is now bound to the instance variable interval through key-value coding, and changing one will change the other (and vice versa). To prove this, build and run the application. Before, the slider started right in the middle of its range at 2.5 (OK, not exactly the middle but awfully close). Now, it starts at 1.0, as shown in Figure 3–27.
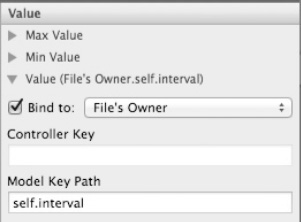
Figure 3–26. Selecting the variable to bind the slider to

Figure 3–27. Graphique with the slider bound to interval, set to 1.0
You can prove this by changing the initial value you set interval to in initWithNibName:. Set it to 5, for example, and build and run Graphique to see that the slider starts to the far right of its range. Note that you can set interval to values beyond the slider's range without ill effects. The slider will do its best to show the value of interval by moving to its appropriate extreme, and the interval will retain the value you set. Moving the slider, however slightly, will bring interval back into its range.
The last thing we must do to incorporate the slider into the Graphique application is to step the calculation loop by the value of interval. Update the draw: method to match Listing 3–26.
Listing 3–26. The draw: Method Incorporating the Interval
- (void)draw:(Equation*)equation

{

  // Clear the cache

  [values removeAllObjects];


  // Calculate the values

  for (float x = -50.0; x <= 50.0; x += interval)

  {

    float y = [equation evaluateForX:x];

    [values addObject:[NSValue valueWithPoint:CGPointMake(x, y)]];

  }

  [self.graphTableView reloadData];

}
Build and run Graphique. Push the slider to the far right, enter x^2-3 in the equation entry field, and click Graph. You should see an interval of 5 between X values, as shown in Figure 3–28. Now, push the slider to the far left and click Graph. The interval should now be 0.1, as shown in Figure 3–29.

Figure 3–28. A parabola with the interval set to 5.0
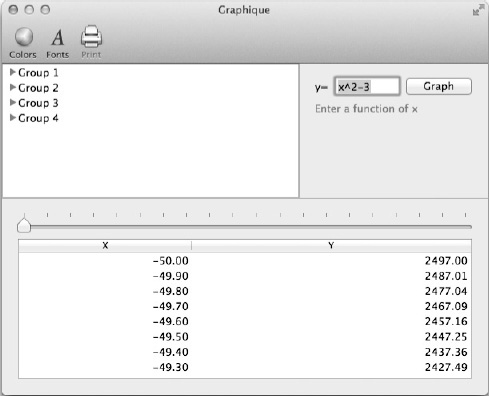
Figure 3–29. The same parabola with the interval set to 0.1
Binding the slider to the interval instance variable through key-value coding made the task of adjusting the interval simple.
Summary
If we were developing Graphique purely as an open source application, we'd call this version 0.1 and release it now. It's a working application that allows users to enter equations. It validates the equations. It displays appropriate error messages. It graphs the equations textually by showing the domain and corresponding range values. It even allows users to change the domain interval. It's ready to ship to the open source community to get feedback and invite other contributors.
The App Store community generally differs from the open source community, however. Whereas the open source community tends to be more technical and generally encourages early releases with limited functionality so that they can get involved in contributing code and shaping the direction of the application, the App Store community includes swaths of people who don't write code, don't want to mess with fledgling apps early in their development cycles, and want to use (and pay for) complete products. Graphique still lacks features important to a graphing calculator—say, for example, a graphical graph. In the next chapter, we add a graph and an improved equation entry field. Make no mistake, however: at this point, Graphique means something.