
Chapter 2
Laying Out the User Interface
The appearance of an application often conveys an indelible first impression on users' minds, whether positive or negative, that strongly influences whether the application becomes a hit or simply moves to the virtual trash. Providing an attractive and usable interface remains one of the hallmarks of top applications.
Mac OS X offers an array of user interface widgets that, when intelligently stitched together, fuse to provide stunning and useful interfaces. In this chapter, we explore some of these widgets and how to incorporate them into the Graphique application. The widgets we explore include the following:
- Labels, which display static text
- Text fields, which allow users to enter text
- Buttons, used to let users initiate some action
- Toolbars, which display a strip of buttons with images
- Split views, which divide a view into two separate views
- Sliders, which allow users to select a value by dragging a “thumb” across a range of values
- Tables, which display tabular data
This chapter focuses only on using Mac OS X's widgets to create the user interface, not on responding to user input or reacting to events. Chapter 3 will tackle those topics.
Through this chapter, you build an interface that displays three different views, separated by split views:
- A view to enter equations
- A table of x, y values for an equation
- A tree that shows recently used equations
At the end of the chapter, the Graphique application will look like Figure 2–1.
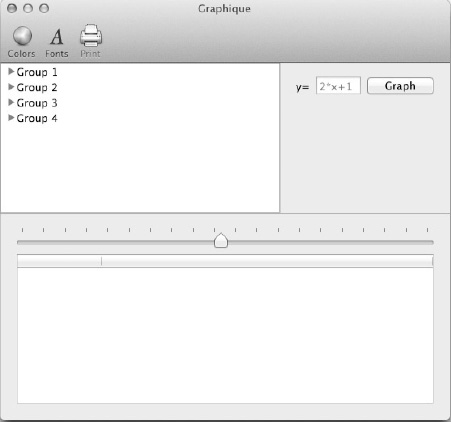
Figure 2–1. The Graphique application when the layout is complete
Creating the Split View
In the Graphique application, we want to give users a place to enter an equation. We also want to show users the graph that an equation generates. Finally, we want to show users a list of the equations they've already entered so that they can quickly retrieve equations and their resulting graphs. The user interface has one window, but we've outlined three different views that we want that window to display. Cocoa offers a class called NSSplitView that allows you to show two different views in the same window, with a movable separator between them. The separator can run horizontally or vertically, and you can also nest them to create multiple views in a window, all with movable separators between. We'll use the NSSplitView class to address the user interface needs of Graphique.
We refer to the three views that we want to display in the Graphique application like this:
- Equation Entry View: The place users can enter an equation
- Recent Equations View: The list of equations users have already entered
- Graph View: The graph represented by the equation in the Equation Entry View
We arrange these three views as shown in Figure 2–2, with a vertical separator, or splitter, between the Equation Entry View and the Recent Equations View, and a horizontal separator (splitter) between the top two views and the Graph View.
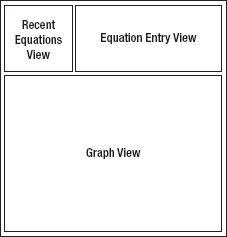
Figure 2–2. The layout of the Graphique user interface
Creating the Horizontal NSSplitView
To begin creating the desired view layout for Graphique, we first divide the window horizontally, with a view above and a view below and a movable separator between. Open MainMenu.xib in Xcode and select the Window – Graphique object from the Object hierarchy. You may need to click the button to show the Document Outline, as shown in Figure 2–3, to get your view to match ours. The Document Outline helps you understand the relationships among the various views.

Figure 2–3. The main Graphique window and the button to show the Document Outline
Expand the Window object in the Object hierarchy to see the View object it contains, and then select the View object, as shown in Figure 2–4.
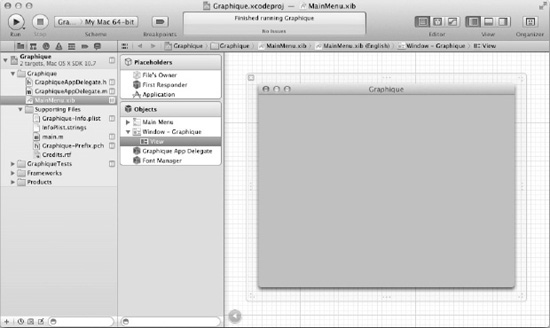
Figure 2–4. The main Graphique window with the view selected
Show the Utilities panel (on the right side of Xcode), show the Object Library in that panel, and type horizontal in the search field to show the Horizontal Split View object in the library, as Figure 2–5 shows. Drag a Horizontal Split View object onto the Graphique window and drop it. It should appear both in the Graphique window and in the Object view, below the view that's below the Graphique window, as shown in Figure 2–6. You should also see the two custom views that the split view contains.

Figure 2–5. The Horizontal Split View object in the Object Library
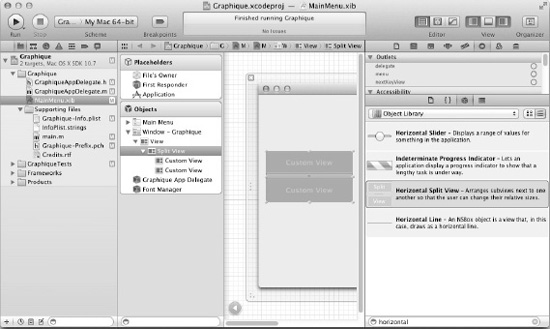
Figure 2–6. The Horizontal Split View object added to the view in the Graphique window
Now, resize the Horizontal Split View object to completely fill the window. We also want to make sure it continues to fill the window, even if the user resizes the window, so show the Size inspector and select all the springs and all the struts in the Autosizing view. In other words, click the two double-headed arrows inside the square and the four bars outside the square so they're all solid, as shown in Figure 2–7.

Figure 2–7. Setting the Horizontal Split View object to size with the window
Run the application. You should see a window split in half horizontally, as shown in Figure 2–8. Resize the window and make sure the split view continues to fill the view.

Figure 2–8. The Graphique application with a Horizontal Split View object
Creating the Vertical NSSplitView
The next step is to split the upper half of the Graphique window with a vertical split view. Go back to Xcode and drag a Vertical Split View object from the Object Library onto the upper half of the horizontal split view you just created. Drag and size it to fill the entire upper half of the horizontal split view, and select all its springs and struts in the Autosizing box so that it all looks like Figure 2–9.

Figure 2–9. Adding a Vertical Split View object
Again, build and run the application. You should see a window that looks like Figure 2–10. Resize the window to make sure the split views continue to fill the window, and move the splitters around to confirm that they move.

Figure 2–10. The Graphique application with both Horizontal and Vertical Split View objects
We want to take one more step before moving on. Those splitters seem so thick and heavy, and the trend in Mac OS X applications points to using thin splitters. Go back to Xcode and select the Horizontal Split View object in the object hierarchy, go to the Attributes inspector, and change the style from Pane splitter to Thin divider. Then, do the same for your Vertical Split View object. When you build and run the application, it should resemble Figure 2–11.

Figure 2–11. The Graphique application with thin dividers
You've created the structure of the Graphique application layout. Next, you must create the actual views that the splitters will divide and swap them for the placeholder views. Read on to the next section to understand how to do that.
Creating the Equation Entry Panel
So far, you've learned how to do some basic layout. The real power of Xcode comes from the ability to break down the user interface into components. In this section, we build our first version of the equation entry component. The purpose of this component is to allow the user to specify an equation to graph. There are two important reasons for creating a component instead of just adding more individual widgets to the MainMenu.xib file:
- Code reuse: Creating a clearly separated component allows you to reuse it in various contexts in your application. Think about the Cover Flow user interface component on your Mac. It is used in iTunes, but the same component is also used in Finder.
- Code isolation: All the code pertaining to your component's internal function is kept within the component and not in some generic controller class. This allows you to improve the component in the future without impacting the rest of the application. In Chapter 4, we put this in practice by enhancing the equation entry component.
For this first version, we keep the component trivial. We'll have a label with the text “y=” and a simple text entry field where the user will type the equation as a function of x.
Using NSViewController
If you come from an iOS development background, you are already familiar with the all-important UIViewController class. The NSViewController class was introduced with Mac OS 10.5 (Leopard). Although it sounds like a parallel with iOS's UIViewController, it is not nearly as central. It is meant to manage custom views but not necessarily receive events from them, as is customary in the iOS world. The primary function of the NSViewController class is to materialize custom views from XIB files so that you can use them in your code. The NSViewController controller has a view attribute that it populates from the XIB file automatically.
Creating a new custom user interface component consists of creating a new NSViewController subclass and laying out its view in Interface Builder.
To keep things organized, create a group to store all the custom components by going to Xcode and doing the following:
- Highlight the Graphique folder, and select File
 New New Group from the menu.
 - Call the new group Views.
- Select the new group and create a new class by selecting File New New File... from the menu.
- From the Mac OS X/Cocoa section, select Objective-C class, as illustrated in Figure 2–12, and click Next.
- On the following screen, enter
EquationEntryViewControllerfor Class and select or typeNSViewControlleras the superclass so it matches Figure 2–13. Click Next. - Make sure the Views group and the Graphique target are selected, and click Create.

Figure 2–12. Creating a new Objective-C class for the Equation Entry View controller

Figure 2–13. Making the new view a subclass of NSViewController
This process should have generated three files: EquationEntryViewController.h, EquationEntryViewController.m, and EquationEntryViewController.xib, as illustrated in Figure 2–14.
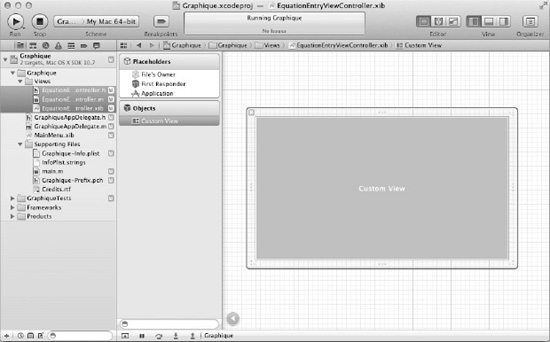
Figure 2–14. The generated files for the new custom component
Laying Out the Custom Equation Entry Component
Select EquationEntryViewController.xib to begin laying out its view. You can start dragging user interface components from the library onto it just like you did in the previous section. The only difference here is that you have isolated your custom component so you need to worry only about it and nothing else. This is code isolation.
If you select the File's Owner and look in the Identity inspector, you can see that the owner is the EquationEntryViewController class. Now select the Connections inspector tab and notice how the controller's view outlet is linked to the Custom View object. This is how the controller knows how to display its view.
Now let's finish laying things out. Add a label, a text field, and a push button. Change the label text to y= and the title on the push button to Graph. Size the view to fit, as shown in Figure 2–15. The user will be expected to type in a function of x and hit the Graph button in order for it to do anything useful. Handling events like button presses will be the focus of the next chapter. For now, we're simply planning and laying out our user interface.
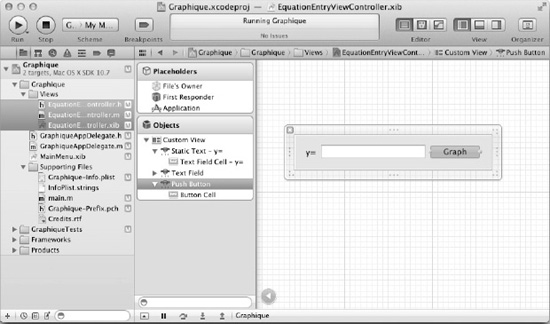
Figure 2–15. The simple custom equation entry component
A Primer on Automatic Reference Counting
Before moving on, you should understand what Automatic Reference Counting (ARC) is and what it means to Graphique. Introduced in Xcode 4.2, ARC eases some of the programming burden around memory management. Before the appearance of ARC, programmers dealt with a flood of program crashes and other issues related to how they handled allocating, retaining, releasing, and deallocating objects. Objective-C uses a retention count mechanism for determining whether to deallocate the memory for a given object, so the typical usage pattern for an object is as follows:
- Allocate the object in memory.
- Increment its retention count by sending it a
retainmessage. - When done using the object, decrement its retention count by sending it a
releasemessage. - If the retention count reaches zero, deallocate the object.
Though the pattern is straightforward, its execution often isn't. Several parts of the code in an application, including framework code not visible to the programmer, can retain objects. Programmers can neglect to send proper retain and release messages or can incorrectly assume that objects are being retained when they aren't, or vice versa. Also, objects can create cyclical retention graphs, preventing proper releases from occurring.
When an object doesn't receive enough release messages to decrement its retention count to zero, it's never deallocated, and memory leaks. When an object is used after its retention count reaches zero, the object has been deallocated and no longer owns that memory, causing the application to crash.
ARC wrests the burden of memory management from programmers and gives it instead to the compiler. At compile time, ARC determines the proper places to insert retain and release messages so that memory for all objects is properly managed. If you, as a programmer, try to sneak your own retain or release calls into your code, ARC refuses to compile your code until you remove those calls.
One other aspect of memory management you should understand: the difference between strong pointers and weak pointers. Strong pointers are retained, whereas weak pointers aren't. You'll see in the Graphique code throughout the book both types of pointers. Use weak pointers when you don't need to retain an object, usually because the object's lifetime exceeds the lifetime of the object using it, and when retaining it could cause a cyclical retention graph.
For more information on ARC, see its documentation at http://clang.llvm.org/docs/AutomaticReferenceCounting.html.
Using IBOutlet
Of course, we've now created a custom component, but we haven't used it anywhere, so it would never show if we ran the application. To use it, we simply need to add it to the right split view. The problem is that our application code currently has no knowledge of the split views because they were only defined in Interface Builder. We need a way to let Interface Builder feed this information into our code. Enter IBOutlet!
IBOutlet is a marker that has no runtime behavior, but it gives a way for Xcode to link user interface components to objects. We illustrate how to do this by linking the two split views we created in the previous section to objects in the code. This is a two-step process:
- Define the attribute that will hold a pointer to the user interface component.
- Link the widget to the attribute.
Open GraphiqueAppDelegate.h. Declare two new attributes of type NSSplitView and define them as properties just like you would do with any other non-UI property. Only this time, we add the IBOutlet attribute to the @property directive, as shown in Listing 2–1, to let Xcode know that they are meant for Interface Builder to see them.
Listing 2–1. GraphiqueAppDelegate.h
#import <Cocoa/Cocoa.h>


@interface GraphiqueAppDelegate : NSObject <NSApplicationDelegate>


@property (strong) IBOutlet NSWindow *window;

@property (weak) IBOutlet NSSplitView *horizontalSplitView;

@property (weak) IBOutlet NSSplitView *verticalSplitView;


@end
Now open GraphiqueApplicationDelegate.m to automatically generate the property accessors for the two new properties with the @synthesize directive:
@synthesize horizontalSplitView;

@synthesize verticalSplitView;
Now you are ready for the second step. Open MainMenu.xib and expand the Window - Graphique tree in the Document Outline to be able to see both split views. Select the Graphique App Delegate object and Ctrl+drag to the horizontal split view (the highest in the hierarchy). Let go of the mouse button and select horizontalSplitView. Do the same for the verticalSplitView instance, connecting it to the other split view. This step links the split views to the appropriate attributes in the GraphiqueAppDelegate class. Any time you access these attributes in your code, you will indeed be referring to the UI component you laid out in Interface Builder.
Hooking Up the New Component to the Application
Now that our code knows how to refer to the split views, you can add your custom equation entry component to the main window. Open GraphiqueAppDelegate.h and add a property for the equation entry component, as shown in Listing 2–2.
Listing 2–2. Adding an Equation Entry Component Property
#import <Cocoa/Cocoa.h>


@class EquationEntryViewController;


@interface GraphiqueAppDelegate : NSObject <NSApplicationDelegate>


@property (strong) IBOutlet NSWindow *window;

@property (weak) IBOutlet NSSplitView *horizontalSplitView;

@property (weak) IBOutlet NSSplitView *verticalSplitView;

@property (strong) EquationEntryViewController *equationEntryViewController;


@end
Open GraphiqueAppDelegate.m and add an import for EquationEntryViewController.h:
#import "EquationEntryViewController.h"
Remove the three NSLog calls that you added in Chapter 1, leaving the methods that contained them. Add a @synthesize directive for the equationEntryViewController property. Now, go to the applicationDidFinishLaunching: method, allocate the instance of the custom view controller, and indicate that you want it to be initialized from the XIB file using the initWithNibName:bundle: method:
self.equationEntryViewController = [[EquationEntryViewController alloc]

initWithNibName:@"EquationEntryViewController" bundle:nil];
NOTE: Remember that XIB files and NIB files are two different file formats to represent the same thing. NIBs were here first, and therefore you will notice that method names always refer to NIBs. Whenever they do, it's usually OK to specify a XIB file.
Now that we have an initialized controller, we can add it to the second spot in the vertical split view:
[self.verticalSplitView replaceSubview:[[self.verticalSplitView subviews]

objectAtIndex:1] with:equationEntryViewController.view];
NOTE: The subviews of each split view are organized in left-to-right order for vertical split views and top-to-bottom order for the horizontal split views. The first subview is at index zero.
The complete method should look like Listing 2–3.
Listing 2–3. Adding the Equation Entry View to the Application
- (void)applicationDidFinishLaunching:(NSNotification *)aNotification

{

  self.equationEntryViewController = [[EquationEntryViewController alloc]

initWithNibName:@"EquationEntryViewController" bundle:nil];

  [self.verticalSplitView replaceSubview:[[self.verticalSplitView subviews]

objectAtIndex:1] with:equationEntryViewController.view]];

}
Launch the application, and you should see something like Figure 2–16.
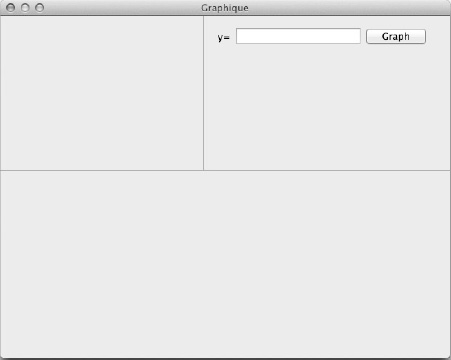
Figure 2–16. The Graphique application with a custom equation entry component
Resizing the Views Automatically
Split views can be resized by dragging the separator. Resize the vertical split pane, and notice how the equation editor just slides to follow the separator. This is a reasonable behavior, but it is not optimum because we are wasting space. When resizing a split pane, users usually expect one side to contract and the other side to expand to fill the available space if possible. Select EquationEntryViewController.xib, select the Text Field, and open the Size inspector, as illustrated in Figure 2–17.

Figure 2–17. The text field default size settings
The Size inspector has two sections—Control and View—that allow you to specify the size of the component. In the Control section, you can pick a smaller size for each control. You have the choice among Regular, Small, or Mini. This is particularly useful if you have limited room on your user interface. The View section is of particular importance to manage automatic component resizing.
The autosizing schema shows how the component behaves as its parent component changes size. The schema shows two nested rectangles. The inner rectangle represents the selected component, the Text Field component in this case. The outer rectangle represents the parent component. Inside the inner component are two two-headed arrows, one running vertically and one running horizontally. If an arrow is enabled, this component resizes in that direction to expand or contract when the parent component changes size. The links between the outer rectangle and the inner rectangle are anchors. In this case, the Text Field component is anchored to the top-left corner of the parent component and is not set to resize. This means it will simply slide to follow the top-left corner of its parent component.
The inner-rectangle arrows are often referred to as springs, and earlier versions of Interface Builder depicted them as springs. The outer-rectangle anchors are often called struts. We use the terms springs and struts in this book.
The desired behavior is to have the label follow the left side of the parent, make the Graph button follow the right side of the parent, and have the Text Field component fill the available space in between. Since it makes no sense to expand vertically, we anchor all the components to the top boundary of the parent container.
Select the Label component, and set the autosizing schema to anchor to the top left with no resizing, as shown in Figure 2–18. It may already be set this way, so you may not have to make any changes.
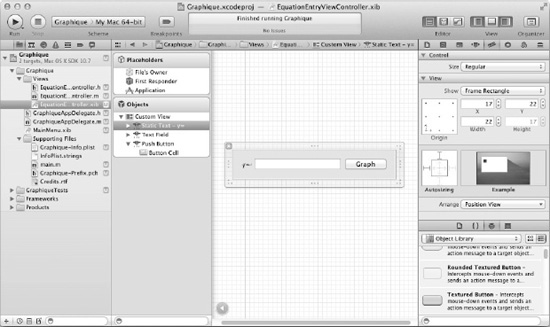
Figure 2–18. Anchoring a component to the top-left corner
Next, select the Graph button and anchor it to the top-right of its parent, as illustrated in Figure 2–19.

Figure 2–19. Anchoring a component to the top-right corner
Finally, select the Text Field component, and set its resizing strategy to expand horizontally to match Figure 2–20.
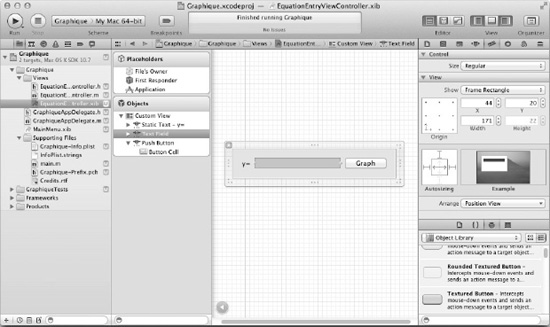
Figure 2–20. Automatically resizing to fill the available horizontal space
Launch the app and play around with the split pane separator. Notice how the equation editor resizes nicely to occupy the available space. If you size it too small, the display goes somewhat awry, but we'll fix that in Chapter 3.
Further Customizing the Components
Most Cocoa components can be customized via the Attributes inspector tab. To customize the text field in our custom view, select it and go to the Attributes inspector. In the Placeholder String field, type 2*x+1, as shown in Figure 2–21, to have the text field display a sample equation to users so they'll have a hint for what they should type in that field.

Figure 2–21. Specifying placeholder text
The placeholder string of a text field is text shown with a lighter color when nothing has been typed in the text field yet. It is used to give the user a hint of what is expected. Here, we want to show that the user is expected to type a function of x.
Launch the application again and see how the placeholder string behaves. It is shown before anything is typed, as illustrated in Figure 2–22, but disappears as soon as text is entered.
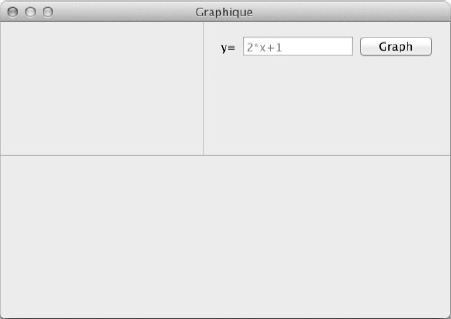
Figure 2–22. Graphique with the equation editor
Now you have a place for users to enter equations. Read the next section to add a place to display the results of an equation.
Creating the Graph Panel
We're stretching the truth a little when we call this next view a “graph” panel, because we're not yet ready to draw graphs in Graphique. Instead, we're going to create a view for displaying the equation's data as a table, with the domain in one column and the range in another. We also add a slider to allow people to adjust the domain interval that the table view displays. Once again, we're going to create a custom view but this time with two controls: the table view and the slider.
To begin, create a new class in the Views group, as you did in the previous section, called GraphTableViewController. As with the EquationEntryViewController class, make it an Objective-C class and a subclass of NSViewController. Xcode generates the three files you need: the header file, the implementation file, and the XIB or NIB file. Select GraphTableViewController.xib to open it in Interface Builder. You should see a view that says Custom View but is otherwise empty, as shown in Figure 2–23.
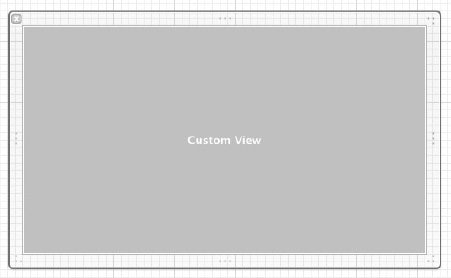
Figure 2–23. The empty Graph View
Adding the Horizontal Slider
That empty canvas begs for you to splash some art onto it, which you'll next do by dragging a Horizontal Slider object from the Object Library to the empty custom view. Drop it near the top of the view, using the helpful blue guides to position it, and make it span the width of the view. It should look like Figure 2–24.
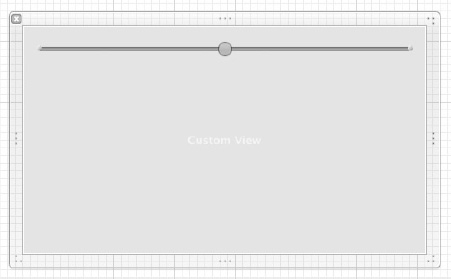
Figure 2–24. The view with a Horizontal Slider object added
We need to make some adjustments to the slider. First, we'll make the slider resize itself to span this view any time the view resizes, which happens when the user resizes the application window. With the horizontal slider selected, show the Size inspector. In the View section, find the Autosizing control and select the left, top, and right struts to anchor the slider to the left, top, and right of the view. Also, click the horizontal arrow inside the box (the spring) to make the slider stretch to fill the view. The Autosizing control should look like Figure 2–25.
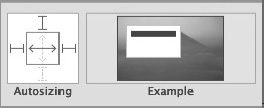
Figure 2–25. The autosizing configured for the horizontal slider
You also want to constrain the range of the horizontal slider to numbers that make sense for a domain interval. With the slider still selected, show the Attributes inspector, and in the Slider section, change the number of tick marks to 20. Set the minimum value to 0.10 and the maximum to 5.00, with the current set to 2.50. The Slider section should match Figure 2–26, and your view should look like Figure 2–27.
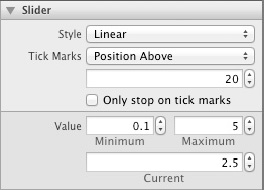
Figure 2–26. Constraining the horizontal slider
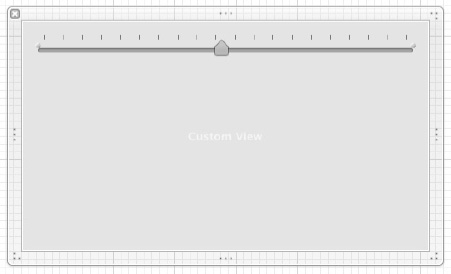
Figure 2–27. The horizontal slider after applying the constraints
With the slider in place and configured, we're halfway done creating the Graph View. In the next section, we add the table to complete the view.
Adding the Table View
Adding a table view to our custom view begins by dragging a Table View instance from the Object Library and dropping it on the view. Again, use the helpful blue lines to position and size it below the horizontal slider and to fill the rest of the view. Your view should look like Figure 2–28 when you're done.
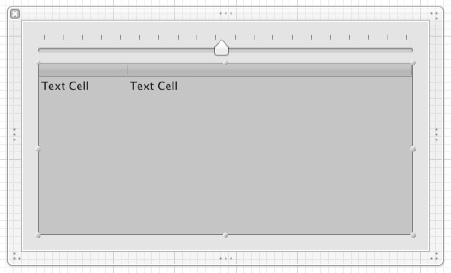
Figure 2–28. The view after adding a table view
The table looks perfectly positioned and sized now, but if the user were to resize the view by resizing the application window, the table would stay the same size and would no longer fill the part of the view allotted to it. To fix that, show the Size inspector, go to the Autosizing widget, and select the rop, left, bottom, and right struts, as well as both springs. The Autosizing widget should match Figure 2–29.

Figure 2–29. The Autosizing settings for the table view
Our custom view layout is complete. Next, we need to add it to the split view, which we do in the next section.
Adding the Graph Panel to the Application
To add the graph panel to the application, follow the pattern you used with the equation entry panel. This time, we want to swap it for the bottom view of the horizontal split view. Open GraphiqueAppDelegate.h and add a property for a GraphTableViewController instance, as shown in Listing 2–4.
Listing 2–4. Adding a GraphTableViewController Instance
#import <Cocoa/Cocoa.h>


@class EquationEntryViewController;

@class GraphTableViewController;


@interface GraphiqueAppDelegate : NSObject <NSApplicationDelegate>


@property (strong) IBOutlet NSWindow *window;

@property (weak) IBOutlet NSSplitView *horizontalSplitView;

@property (weak) IBOutlet NSSplitView *verticalSplitView;

@property (strong) EquationEntryViewController *equationEntryViewController;

@property (strong) GraphTableViewController *graphTableViewController;


@end
Go to GraphiqueAppDelegate.m, add an import statement for GraphTableViewController.h, and add a @synthesize directive for the graphTableViewController property. Edit the applicationDidFinishLaunching: method to create a GraphTableViewController instance and swap it for the horizontal split view's bottom view. The method should look like Listing 2–5.
Listing 2–5. Adding the Graph Table View to the Application
- (void)applicationDidFinishLaunching:(NSNotification *)aNotification

{

  self.equationEntryViewController = [[EquationEntryViewController alloc]

initWithNibName:@"EquationEntryViewController" bundle:nil];

  [self.verticalSplitView replaceSubview:[[self.verticalSplitView subviews]

objectAtIndex:1] with:equationEntryViewController.view];


  self.graphTableViewController = [[GraphTableViewController alloc]

initWithNibName:@"GraphTableViewController" bundle:nil];

  [self.horizontalSplitView replaceSubview:[[self.horizontalSplitView subviews]

objectAtIndex:1] with:graphTableViewController.view];

}
Build and run Graphique. You should see a window that looks like Figure 2–30. If you resize it, you should see the content in the custom views resize to fill their allotted spaces, as in Figure 2–31.
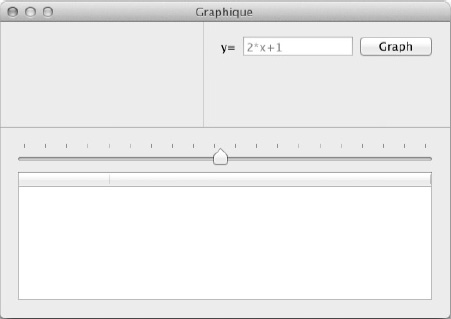
Figure 2–30. Graphique with the graph panel added
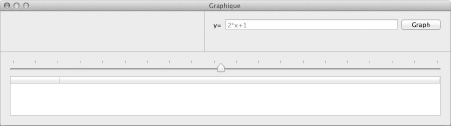
Figure 2–31. Graphique after resizing the window
The layout of the Graphique application is progressing. In the next section, we add the final panel, which shows the equations the user has already entered, to the split views.
Creating the Table of Recently Used Equations
The last major component of the application is the recently used equations. It provides a way for the user to get back to the equations that have been used in the past. We use this component to detail how to use the outline view, the Mac OS X implementation of a hierarchical tree view.
Just like we did for the other custom components, we create a new NSViewController subclass called RecentlyUsedEquationsViewController. This process creates the three new files you've come to expect. Figure 2–32 shows what you should see in Xcode.

Figure 2–32. The newly added RecentlyUsedEquationsViewController files
Open RecentlyUsedEquationsViewController.xib and add an Outline View component from the standard component library. Since we don't want to see the header, highlight the Outline View object, and deselect the Headers check box on the Attributes inspector. We also want to seeonly one column—the hierarchy—so change the number of Columns to one, as shown in Figure 2–33.

Figure 2–33. RecentlyUsedEquationsViewController with an NSOutlineView added
Select the Outline View component's parent, the Scroll View component right above it in the Document Outline. Open the Size inspector and select all the springs and struts so that the outline view fills the view, even after resizing, as you did with the graph table view, as shown in Figure 2–34.
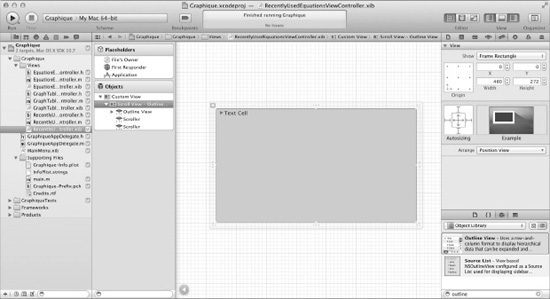
Figure 2–34. The Outline View component set to fill its parent view
As you did for the other two views you added, open GraphiqueAppDelegate.h and add a property for the recently used equations component, as shown in Listing 2–6.
Listing 2–6. Adding a Recently Used Equations Property
#import <Cocoa/Cocoa.h>


@class EquationEntryViewController;

@class GraphTableViewController;

@class RecentlyUsedEquationsViewController;


@interface GraphiqueAppDelegate : NSObject <NSApplicationDelegate>


@property (strong) IBOutlet NSWindow *window;

@property (weak) IBOutlet NSSplitView *horizontalSplitView;

@property (weak) IBOutlet NSSplitView *verticalSplitView;

@property (strong) EquationEntryViewController *equationEntryViewController;

@property (strong) GraphTableViewController *graphTableViewController;

@property (strong) RecentlyUsedEquationsViewController *recentlyUsedEquationsViewController;


@end
Complete the task by opening GraphiqueAppDelegate.m to attach the new component to the user interface. Import RecentlyUsedEquationsViewController.h, add the @synthesize directive for recentlyUsedEquationsViewController, and edit the applicationDidFinishLaunching: method to look like Listing 2–7.
Listing 2–7. Adding the Recently Used Equations View to the Application
- (void)applicationDidFinishLaunching:(NSNotification *)aNotification

{

  self.equationEntryViewController = [[EquationEntryViewController alloc]

initWithNibName:@"EquationEntryViewController" bundle:nil];

  [self.verticalSplitView replaceSubview:[[self.verticalSplitView subviews]

objectAtIndex:1] with:equationEntryViewController.view];


  self.graphTableViewController = [[GraphTableViewController alloc]

initWithNibName:@"GraphTableViewController" bundle:nil];

  [self.horizontalSplitView replaceSubview:[[self.horizontalSplitView subviews]

objectAtIndex:1] with:graphTableViewController.view];


  self.recentlyUsedEquationsViewController = [[RecentlyUsedEquationsViewController

alloc] initWithNibName:@"RecentlyUsedEquationsViewController" bundle:nil];

  [self.verticalSplitView replaceSubview:[[self.verticalSplitView subviews]

objectAtIndex:0] with:recentlyUsedEquationsViewController.view];

}
Outline views, just like table views, rely on a data source to provide data to display. Data sources for outline views have to comply with the NSOutlineViewDataSource protocol, which provides methods for describing the data to display. In this chapter, we want to show only how to display sample data, and we do not concern ourselves with how to retrieve it dynamically.
Our implementation will rely on two types of objects to represent the hierarchy. An equation node will represent one of the recently used equations, and a group node will be a node containing other nodes (think of it as a folder). We aren't yet defining the grouping criteria; this will come later when we put real data into the component.
Create a new class called EquationItem, a subclass of NSObject, with a method to return its text representation, as shown in Listing 2–8 and Listing 2–9.
Listing 2–8. EquationItem.h
#import <Foundation/Foundation.h>


@interface EquationItem : NSObject


-(NSString*)text;


@end
Listing 2–9. EquationItem.m
#import "EquationItem.h"


@implementation EquationItem


- (NSString*)text

{

    return @"2*x+4";

}


- (NSInteger)numberOfChildren

{

    return 0;

}


@end
For now, the equation is hard-coded, and an equation has no children. It is a leaf node in our hierarchy.
Now, create the GroupItem class to represent a group node, as shown in Listing 2–10 and Listing 2–11.
Listing 2–10. GroupItem.h
#import <Foundation/Foundation.h>


@interface GroupItem : NSObject

{

@private

  NSString *name;

  NSMutableArray *children;

}


@property (nonatomic, retain) NSString *name;


- (NSInteger)numberOfChildren;

- (id)childAtIndex:(NSUInteger)n;

- (NSString *)text;


- (void)addChild:(id)childNode;


@end
Listing 2–11. GroupItem.m
#import "GroupItem.h"


@implementation GroupItem


@synthesize name;


- (id)init

{

  self = [super init];

  if (self)

  {

    children = [[NSMutableArray alloc] init];

  }

  return self;

}


- (void)addChild:(id)childNode

{

  [children addObject:childNode];

}


- (NSInteger)numberOfChildren

{

  return children.count;

}


- (id)childAtIndex:(NSUInteger)n

{

  return [children objectAtIndex:n];

}


- (NSString *)text

{

  return name;

}


@end
Let's take a minute to go over the group item implementation. Just like the equation item, the group item has a method called numberOfChildren, but in this instance it relies on the array of children to evaluate its result. The array of children defined in the header file contains a list of subitems in the hierarchy. We build our hierarchy by creating a root node and adding items to it.
Creating the Data Source
Now that we have a data structure to hold our hierarchy, we define the data source to hook up to the outline view. Open RecentlyUsedEquationsViewController.h and make it implement the NSOutlineViewDataSource protocol, as shown in Listing 2–12. We also add a group item that represents the root node, which is going to be an invisible node holding the hierarchy together.
Listing 2–12. RecentlyUsedEquationsViewController.h Implementing the NSOutlineViewDataSource Protocol
#import <Cocoa/Cocoa.h>


@class GroupItem;


@interface RecentlyUsedEquationsViewController : NSViewController

<NSOutlineViewDataSource>

{

@private

  GroupItem *rootItem;

}


@end
For the data source to work, four methods must be implemented. For each of these methods, a nil item value serves to represent the root of the hierarchy, which we will interpret as the root item.
The first method returns the number of children the specified method has. It has the following signature:
The second method returns whether a given item can be expanded. Typically, this means the item has children. Its signature looks like this:
- (BOOL)outlineView:(NSOutlineView *)outlineView isItemExpandable:(id)item
The third method is responsible for returning the child of the given item at the specified index. It has this signature:
- (id)outlineView:(NSOutlineView *)outlineView child:(NSInteger)index ofItem:(id)item
Finally, the fourth method returns the text to display for the given item, in the specified column. In our case for the moment, we useonly one column. It uses this signature:
- (id)outlineView:(NSOutlineView *)outlineView objectValueForTableColumn:(NSTableColumn *)tableColumn byItem:(id)item
Open RecentlyUsedEquationsViewController.m and edit it to match Listing 2–13.
Listing 2–13. RecentlyUsedEquationsViewController.m Implementing the Data Source
#import "RecentlyUsedEquationsViewController.h"

#import "GroupItem.h"

#import "EquationItem.h"


@implementation RecentlyUsedEquationsViewController


- (id)initWithNibName:(NSString *)nibNameOrNil bundle:(NSBundle *)nibBundleOrNil

{

  self = [super initWithNibName:nibNameOrNil bundle:nibBundleOrNil];

  if (self)

  {

    rootItem = [[GroupItem alloc] init];


    for(int i=0; i<4; i++)

    {

      GroupItem *temp = [[GroupItem alloc] init];

      temp.name = [NSString stringWithFormat:@"Group %d", i+1];


      for(int j=0; j<5; j++)

      {

        EquationItem *item = [[EquationItem alloc] init];

        [temp addChild:item];

      }

      [rootItem addChild:temp];

    }

  }

  return self;

}


- (NSInteger)outlineView:(NSOutlineView *)outlineView numberOfChildrenOfItem:(id)item

{

  return (item == nil) ? [rootItem numberOfChildren] : [item numberOfChildren];

}


- (BOOL)outlineView:(NSOutlineView *)outlineView isItemExpandable:(id)item

{

  return (item == nil) ? ([rootItem numberOfChildren] > 0) : ([item numberOfChildren] >

0);

}


- (id)outlineView:(NSOutlineView *)outlineView child:(NSInteger)index ofItem:(id)item

{

  if (item == nil)

  {

    return [rootItem childAtIndex:index];

  }

  else

  {

    return [(GroupItem *)item childAtIndex:index];

  }

}


- (id)outlineView:(NSOutlineView *)outlineView objectValueForTableColumn:(NSTableColumn

*)tableColumn byItem:(id)item

{

  return (item == nil) ? @"" : [item text];

}


@end
In the initWithNibName:bundle: method, we initialize our data source by hard-coding all the data. The code creates the root item and creates four groups in it named Group1, Group2, Group3, and Group4. Inside each group, we create five equations. Note that in each data source method, we use rootItem everywhere the item is nil. This concludes the implementation of our data source.
Displaying the Data
The last step in getting the recently used equations view to work is to tell the outline view which data source it is supposed to use. To set this up, open RecentlyUsedEquationsViewController.xib, select the Outline View object, and go to the Connections inspector. Ctrl+drag the dataSource connection to the File's Owner placeholder, as illustrated in Figure 2–35.

Figure 2–35. Linking the outline view data source
By default, the File's Owner of a .XIB file is the corresponding .m file. You've just linked the Outline View object's data source to the controller instance. Launch the application to make sure it all looks right. Figure 2–36 shows what you should expect.
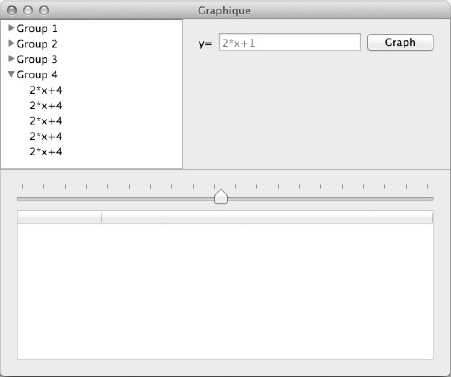
Figure 2–36. The running outline view with sample data
The split views are all filled with custom views. Many Mac OS X applications, however, offer a toolbar across the tops of their windows to provide quick access to frequently used operations. In the next section, we add a toolbar to Graphique.
Adding a Toolbar
Many applications offer a variety of tools across the top of the window, right below the title bar, represented by icons. These tools typically offer frequently used functions within the application, and providing them in the toolbar gives users quick access. Sometimes they duplicate functions that the menu provides but not always. In this section, we add a toolbar to Graphique. We don't change the stock toolbar icons yet, but we'll make changes during the course of the book as we unroll functionality for Graphique.
To add a toolbar to Graphique, select MainMenu.xib in Xcode to open it in the integrated Interface Builder, and then drag a Toolbar instance from the Object Library to the Graphique window. Drop it anywhere in the window, and it will magically jump to the top of the window and attach itself just below the title bar. Your window should look like Figure 2–37.
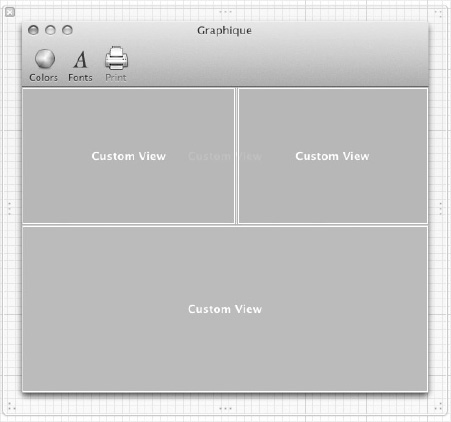
Figure 2–37. The Graphique window in Interface Builder after adding a toolbar
The stock toolbar comes with three tools: Colors, Fonts, and Print. If you build and run the application, you can see that clicking Colors brings up the standard color picker dialog, clicking Fonts brings up the standard font selection dialog, and clicking Print does nothing, because it's disabled. At this point, we're happy with the results. As we work through the book, we'll make the toolbar actually useful.
Summary
As you worked through this chapter, you used standard Mac OS X widgets and combined them to create an attractive, resizable, and functional user interface for the Graphique application. You saw how to combine standard widgets into custom views and how to display multiple custom views in a single window using split views. You learned about table views, outline views, struts and springs, placeholder text, and other Interface Builder topics. You built a great user interface.
Looks only go so far, however. At this point, Graphique looks good and resizes properly, and you can tell it to graph equations by entering them and clicking the Graph button. Like too many teenagers, however, Graphique ignores your requests and just slumps there on your screen, doing nothing. It's time to teach Graphique some manners and have it respond to user input—that's the subject of the next chapter.