
Chapter 4
Pimp My UI
At this point in its evolution, Graphique indeed means something. It does something. It's serviceable. It accepts an equation, evaluates it, and lists x, y values. It's also a little embarrassing: it's a graphing calculator that doesn't graph. That flaw is difficult to hide or gloss over. We can't really be proud of Graphique until it graphs equations.
The equation entry field is a little shameful, too, in a Notepad kind of way: monochromatic text, stiff syntax, and anemic validation. Before we can be proud of Graphique, we must provide a better equation editor.
In this chapter, we create graphs, and we improve the equation editor. By the time we're done, the UI for Graphique will look like Figure 4–1.
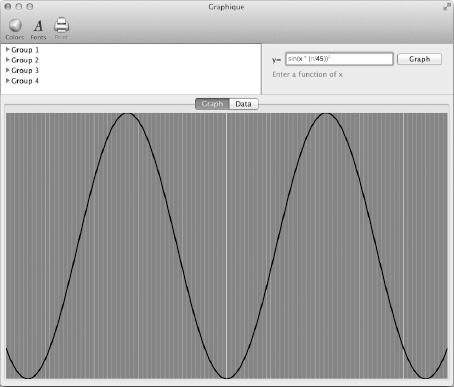
Figure 4–1. The Graphique application at the end of this chapter
Creating a Graph View
You've learned a lot about building user interfaces using Interface Builder (IB), but sometimes you should step off the beaten path and create user interface components that cannot be built by assembling the standard widgets that come with the platform. In this section, we go through the exercise of create a custom view that will trace our graph instead of just displaying a table of values as we've done thus far.
To create a custom view in Cocoa, you typically create a new class that subclasses the NSView class and implement the drawRect: method in order to paint your customized view on the screen.
Creating a Custom View
The first step is to create, inside the Views group, a new Cocoa Objective-C class called GraphView and make it a subclass of NSView. This will create the usual GraphView.h and GraphView.m files. Leave the implementation as is for now; we will get back to it shortly.
- Open
GraphTableViewController.xiband drag a new Custom View object to the Objects panel. The new custom view should be a top-level object, a sibling of the already existing Custom View object. - Select the new Custom View object and change the class to
GraphViewin the Identity inspector. Your setup should match Figure 4–2.
Figure 4–2. The GraphView in Interface Builder
Linking the New Custom View to the Controller
If you ran the application at this point, you would not notice anything different. This is because the GraphTableViewController's view is still set to the table view. For our purpose, we change the view to point to our new GraphView. This will activate GraphView and deactivate the table view. In the next section, we show you how to keep both views active, but for now we'll leave only GraphView active. Select the File's Owner and go to the Connections inspector. Change the view attribute to point to Graph View, as shown in Figure 4–3.
Figure 4–3. The controller pointing to a different view
You can try running the app again. This time nothing is displayed or graphed when you enter an equation. This is because you have linked the controller's view to the new GraphView, which doesn't yet have any code for painting anything. Before we get to the painting part, there is still a bit of wiring to do. First, we need to make sure the controller knows how to access the GraphView. Second, we need to make sure our GraphView knows how to get a hold of the data points it needs to plot.
Open GraphTableViewController.h and add a new IBOutlet property of type GraphView, as shown in Listing 4-1.
Listing4–1. GraphTableViewController.h with a Reference to GraphView
#import <Cocoa/Cocoa.h>


#import "Equation.h"


@class GraphView;
@interface GraphTableViewController : NSViewController <NSTableViewDataSource>


@property (nonatomic, retain) NSMutableArray *values;

@property (weak) IBOutlet NSTableView *graphTableView;

@property (nonatomic, assign) CGFloat interval;

@property (weak) IBOutlet GraphView *graphView;


-(void)draw:(Equation*)equation;


@end
Be sure to synthesize the new graphView property in the GraphTableViewController.m implementation file and add the appropriate import: #import "GraphView.h". Then go to GraphTableViewController.xib and follow the usual procedure for linking properties: select the File's Owner and open the Connections inspector. Link the graphView property to the Graph View object.
We now turn our attention to GraphView. The controller is responsible for calculating the points to plot. The view needs a way to get to where the points are stored. Open GraphView.h and add a new IBOutlet property of type GraphTableViewController, as shown in Listing 4-2.
Listing4–2. GraphView.h with a Handle to the Controller
#import <Cocoa/Cocoa.h>


@class GraphTableViewController;


@interface GraphView : NSView


@property (assign) IBOutlet GraphTableViewController *controller;


@end
Now open GraphView.m, import the GraphTableViewController.h header file, and synthesize the property, as shown in Listing 4-3.
Listing4–3. GraphView.m with the Synthesized Property
#import "GraphView.h"

#import "GraphTableViewController.h"


@implementation GraphView


@synthesize controller;


- (id)initWithFrame:(NSRect)frame

{

    self = [super initWithFrame:frame];

    if (self)

    {
        // Initialization code here.

    }


    return self;

}


- (void)drawRect:(NSRect)dirtyRect

{

  // Drawing code here.

}


@end
Go back to GraphTableViewController.xib. This time, select the Graph View object and go to the Connections inspector. Link the controller property to the File's Owner.
In order to make sure everything is linked properly, select File's Owner and verify that the connections match Figure 4–4.

Figure 4–4. The GraphTableViewController with all its connections
The last step to add the custom Graph View is to tell the custom view to repaint itself whenever a new equation has been entered. For this, we add a call to NSView's setNeedsDisplay: method in the controller, as shown in Listing 4-4.
Listing4–4. GraphTableViewController.m with a Call to Refresh the Custom View
-(void)draw:(Equation*)equation

{

  // Clear the cache

  [values removeAllObjects];


  // Calculate the values

  for (float x = -50.0; x <= 50.0; x += interval)

  {

    float y = [equation evaluateForX:x];

    [values addObject:[NSValue valueWithPoint:NSMakePoint(x, y)]];

  }

  [self.graphTableView reloadData];


  [self.graphView setNeedsDisplay:YES];

}
NOTE: We've kept the call to reload the table data as well. This is because we intend to show both graph views (table and plot) later in this section, so we keep them both up-to-date.
Plotting the Graph
Now that everything is properly wired, it is time to implement the drawing function. Cocoa calls the NSViewdrawRect: method when a custom view needs to be painted. The method is given an area that it deems dirty and needs repainting. The first time the view is painted, that area is the size of the view. If the view is resized, then the drawRect: method is called again with the new size. We simply override this method in GraphView in order to take control of the painting of our custom view.
In Cocoa, most of the drawing functions are done via the NSBezierPath class. This class provides a way to create paths to draw from the single line to complex parametric curves. In our graphic calculator, we simply draw lines between the sampled points of the curve.
Finding the Boundaries
To allow the view to resize cleanly, we want to scale the curve to fit neatly inside the view. In order to achieve this, we must go through all the points to determine the minimum and maximum values of the curve. Once we find the range and domain extremes, we use the view's dimension, through its bounds property, in order to compute the scaling factors. The code to do all this, shown in Listing 4-5, goes at the top of GraphView's drawRect: method.
Listing4–5. Computing the Horizontal and Vertical Scaling Factors
float minDomain = CGFLOAT_MAX;

float maxDomain = CGFLOAT_MIN;


float minRange = CGFLOAT_MAX;

float maxRange = CGFLOAT_MIN;


for (NSValue *value in controller.values)

{

  NSPoint point = [value pointValue];

  if(point.x < minDomain) minDomain = point.x;

  if(point.x > maxDomain) maxDomain = point.x;


  if(point.y < minRange) minRange = point.y;

  if(point.y > maxRange) maxRange = point.y;

}


float hScale = self.bounds.size.width / (maxDomain - minDomain);

float vScale = self.bounds.size.height / (maxRange - minRange);
Painting the Background
The next step consists in setting up the colors we want to use and painting the background. Colors are defined by the NSColor class, which offers several ways of defining a color. You have options to choose predefined colors like [NSColor whiteColor] or use component-based colors like RGBA (Red, Green, Blue, and Alpha transparency) using colorWithDeviceRed:green:blue:alpha:. In our case, we use RGBA colors. Painting the rectangular background is an easy task since the drawRect: method gives us the rectangular area to paint and Cocoa has the NSRectFill function already defined. Listing 4-6 shows how to set up the colors and paint the background. It sets up colors for the background, the axes, the grids, and the curve (or actual graph).
Listing4–6. Setting the Colors and Painting the Background
NSColor *background = [NSColor colorWithDeviceRed:0.30 green:0.58 blue:1.0 alpha:1.0];

NSColor *axisColor = [NSColor colorWithDeviceRed:1.0 green:1.0 blue:1.0 alpha:1.0];

NSColor *gridColorLight = [NSColor colorWithDeviceRed:1.0 green:1.0 blue:1.0 alpha:0.5];

NSColor *gridColorLighter = [NSColor colorWithDeviceRed:1.0 green:1.0 blue:1.0 alpha:0.25];

NSColor *curveColor = [NSColor colorWithDeviceRed:.0 green:0.0 blue:0 alpha:1.0];


[background set];

NSRectFill(dirtyRect);
Plotting the Graph
Now we're ready to start drawing the actual plot of our graph. In Cocoa, lines are defined using NSBezierPath just like any other paths. As you can probably imagine, a line (in the computer graphics sense of the term at least) is defined by a start and an end point. Mathematically oriented people would probably much rather call it a segment, but in Cocoa, it's a line. Let's take a look at what it takes to draw the domain axis.
First, we declare the new path:
NSBezierPath *domainAxis = [NSBezierPath bezierPath];
Next, we specific how thick we want the line to be. In our case, we're happy with a 1-pixel line:
[domainAxis setLineWidth:1];
Then it's just a matter of defining the beginning and the end of the line. Notice how we scale them using the scaling factors we defined earlier:
NSPoint startPoint = { 0, -minRange * vScale};

NSPoint endPoint   = { self.bounds.size.width, -minRange * vScale };

[domainAxis moveToPoint:startPoint];

[domainAxis lineToPoint:endPoint];
The last step is to define the color to use and then stroke the line:
[axisColor set];

[domainAxis stroke];
We repeat the same procedure for the range axis, adding a pretty background grid and even for the curve itself, where we draw lines between each point. Listing 4-7 shows the full drawRect: method.
Listing4–7. The GraphView's drawRect: Method to Plot the Graph
- (void)drawRect:(NSRect)dirtyRect

{

  // Step 1. Find the boundaries


  float minDomain = CGFLOAT_MAX;

  float maxDomain = CGFLOAT_MIN;


  float minRange = CGFLOAT_MAX;

  float maxRange = CGFLOAT_MIN;


  for (NSValue *value in controller.values) {

    NSPoint point = [value pointValue];

    if(point.x < minDomain) minDomain = point.x;

    if(point.x > maxDomain) maxDomain = point.x;


    if(point.y < minRange) minRange = point.y;

    if(point.y > maxRange) maxRange = point.y;

  }


  float hScale = self.bounds.size.width / (maxDomain - minDomain);

  float vScale = self.bounds.size.height / (maxRange - minRange);


  // Step 2. Paint the background


  NSColor *background  = [NSColor colorWithDeviceRed:0.30 green:0.58 blue:1.0 alpha:1.0];

  NSColor *axisColor = [NSColor colorWithDeviceRed:1.0 green:1.0 blue:1.0 alpha:1.0];

  NSColor *gridColorLight = [NSColor colorWithDeviceRed:1.0 green:1.0 blue:1.0 alpha:0.5];

  NSColor *gridColorLighter = [NSColor colorWithDeviceRed:1.0 green:1.0 blue:1.0 alpha:0.25];

  NSColor *curveColor = [NSColor colorWithDeviceRed:.0 green:0.0 blue:0 alpha:1.0];


  [background set];

  NSRectFill(dirtyRect);


  // Step 3. Plot the graph


  if(controller.values.count == 0) return;


  // Paint the domain axis

  {

    NSBezierPath *domainAxis = [NSBezierPath bezierPath];

    [domainAxis setLineWidth: 1];

    NSPoint startPoint = { 0, -minRange * vScale};

    NSPoint endPoint   = { self.bounds.size.width, -minRange * vScale };

    [domainAxis moveToPoint:startPoint];

    [domainAxis lineToPoint:endPoint];

    [axisColor set];

    [domainAxis stroke];

  }
  // Paint the range axis

  {

    NSBezierPath *rangeAxis = [NSBezierPath bezierPath];

    [rangeAxis setLineWidth: 1];

    NSPoint startPoint = { -minDomain * hScale, 0 };

    NSPoint endPoint   = { -minDomain * hScale, self.bounds.size.height };

    [rangeAxis moveToPoint:startPoint];

    [rangeAxis lineToPoint:endPoint];

    [axisColor set];

    [rangeAxis stroke];

  }


  // Paint the grid. Every 10 steps, we use a less transparent grid path for major lines

  {

    NSBezierPath *grid = [NSBezierPath bezierPath];

    NSBezierPath *lighterGrid = [NSBezierPath bezierPath];


    for(int col=minDomain; col<maxDomain; col++)

    {

      NSPoint startPoint = { (col - minDomain) * hScale, 0};

      NSPoint endPoint = { (col - minDomain) * hScale, self.bounds.size.height };

      if(col % 10 == 0)

      {

        [grid moveToPoint:startPoint];

        [grid lineToPoint:endPoint];

      }

      else

      {

        [lighterGrid moveToPoint:startPoint];

        [lighterGrid lineToPoint:endPoint];

      }

    }


    int vStep = pow(10, log10(maxRange - minRange)-2);

    if(vStep == 0) vStep = 1;


    for(int row=-vStep; row>=minRange; row -= vStep)

    {

      NSPoint startPoint = { 0, (row - minRange) * vScale};

      NSPoint endPoint = { self.bounds.size.width * hScale, (row - minRange) * vScale };


      if(row % (vStep*10) == 0)

      {

        [grid moveToPoint:startPoint];

        [grid lineToPoint:endPoint];

      }

      else

      {

        [lighterGrid moveToPoint:startPoint];

        [lighterGrid lineToPoint:endPoint];

      }

    }
    for(int row=vStep; row<maxRange; row += vStep)

    {

      NSPoint startPoint = { 0, (row - minRange) * vScale};

      NSPoint endPoint = { self.bounds.size.width * hScale, (row - minRange) * vScale };


      if(row % (vStep*10) == 0)

      {

        [grid moveToPoint:startPoint];

        [grid lineToPoint:endPoint];

      }

      else

      {

        [lighterGrid moveToPoint:startPoint];

        [lighterGrid lineToPoint:endPoint];

      }

    }


    [gridColorLighter set];

    [lighterGrid stroke];

    [gridColorLight set];

    [grid stroke];

  }


  // Paint the curve

  {

    NSBezierPath *curve = nil;


    for(NSValue *value in controller.values)

    {

      NSPoint point = [value pointValue];

      NSPoint pointForView = { (point.x - minDomain) * hScale, (point.y - minRange) * vScale };


      if(curve == nil)

      {

        curve = [NSBezierPath bezierPath];

        [curve setLineWidth:2.0];

        [curve moveToPoint:pointForView];

      }

      else

      {

        [curve lineToPoint:pointForView];

      }

    }


    [curveColor set];

    [curve stroke];

  }

}
Of course, paths don't all have to be lines. Notice in the previous listing how the curve path is defined. We put the entire path together by calling lineToPoint:, but the path is not actually drawn until we're out of the loop and call the stroke method. NSBezierPath instances are constructed using lines but also using other shapes like ellipses or rectangles.
Now that the custom view is implemented, you can start the app, enter an equation, and watch it be drawn, as illustrated in Figure 4–5.

Figure 4–5. Graphique with a plotted equation
Toggling Between Text and Graph
So far we've created two representations of an equation. First we built a UI component that displays the equation data in a table. We also built another UI component that graphically plots the equation. But we haven't been able to have both of them attached to the application at the same time so we can toggle between them. In this section, we bridge this gap by adding a tab view. Tab views are a type of view that is already outfitted with tab controls so you can navigate through sub views you attach to each tab. In this section, we replace the view of the GraphTableViewController with a tab view and set up two tabs, one for each representation of an equation.
Adding the Tab View
Start by opening GraphTableViewController.xib. We're first going to focus on making sure the anchors and resizing masks are properly set on the two existing views. Each of them should be set to resize in all directions and be anchored to all edges. This step is taken to ensure that the graph views will occupy all the space they can within the tab views, as shown in Figure 4–6.

Figure 4–6. The graph views set to maximize in all directions
The next step is to actually add the tab view, which will eventually become the view associated with the GraphTableViewController controller.
Find Tab View in the Object Library and drag it to the Objects panel as a sibling of the existing views, as illustrated in Figure 4–7.

Figure 4–7. Adding the tab view
Expand the Tab View item to reveal its structure, as depicted in Figure 4–8. By default, the tab view has two tabs. You can easily add more tabs by going to the Attributes inspector and increasing the number of tabs. For our goal, two tabs works just fine.
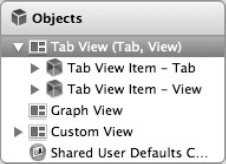
Figure 4–8. The expanded tab view structure
Adding the Views to the Tabs
We now need to place each of our equation views inside a tab. From the Objects panel, drag and drop the Graph View component onto the View component of the first tab. This will move that component inside the tab. Follow the same procedure with the Custom View component and place it inside the second tab. The resulting structure should look like Figure 4–9.
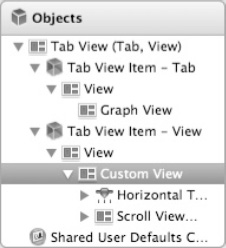
Figure 4–9. The new tab structure with the components in place
To make sure everything fits properly, select the Graph View object and go to the Size inspector tab. In the Arrange drop-down, select Fill Container Horizontally and Fill Container Vertically, as Figure 4–10 shows. This properly places the view in the Interface Builder designer so it looks right.
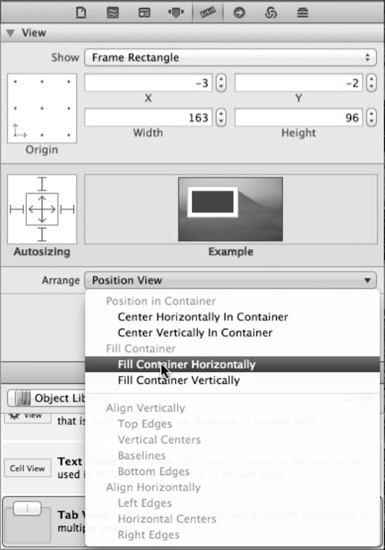
Figure 4–10. Automatically filling the container
Because the table view component has several UI components in it, it is faster to adjust them manually in the design panel. Resize the tab view to make it bigger so you see what you are doing and move the slider and table to the right position inside the Custom View. You can also use the Arrange drop-down again and then adjust manually. The resulting view should be similar to Figure 4–11.
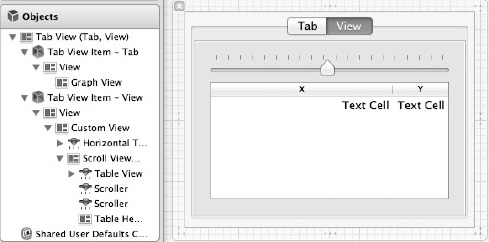
Figure 4–11. The table view properly set up inside its tab view
Each tab has a title that helps the user navigate and figure out what to expect from each tab. To change the tab's title, double-click the tab you want to rename and type the new name. We named our tabs Graph and Data.
Switching the Controller to the Tab View
Now that the individual views are in place, you want to switch the controller's view to the tab view. Select the File's Owner and open the Connections inspector. The view outlet should be attached to the Graph View. Remove that connection by clicking the x next to the connection. Once the connection is cleared, make the connection between the view outlet and the Tab View object by dragging from the empty circle to the Tab View object. The connections should be as shown in Figure 4–12.

Figure 4–12. The connection from the File's Owner to the tab panel
Launch the app, enter x*x*x for the equation, and click Graph. Then, select each tab, in turn, to see both the Graph View and the table view. They should match Figure 4–13 and Figure 4–14.

Figure 4–13. The Graphique application with tabs showing the Graph View
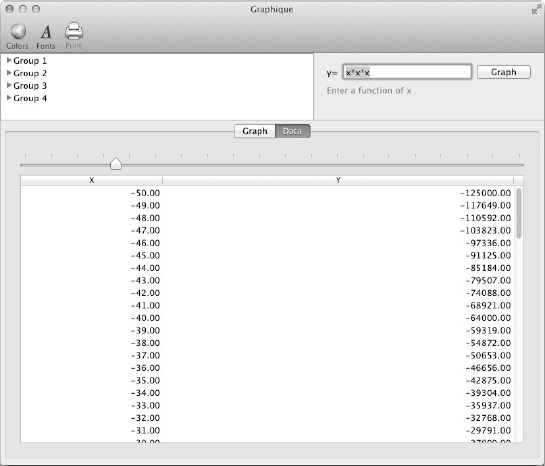
Figure 4–14. The Graphique application with tabs showing the table view
Creating a Smarter Equation Editor
We've given users a text field in which to type equations, and that text field works adequately. It's gotten us this far, after all. You wouldn't call it user-friendly or attractive, however. It's all-black text on a white background, for example, requiring users to look closely to differentiate operators from numbers. You can fool its validator by doing things like entering “)x+7(” so that the number of open parentheses match the number of closed ones, but they're out of order. Exponents stand the same height as other numbers rather than displaying in superscript. Implicit multiplication (for example, “2x” vs. “2*x”) doesn't work. We can improve this.
Over the rest of this chapter, we improve the equation entry editor by adding the following:
- Syntax coloring
- Parenthesis matching
- Inline error highlighting
- Support for trigonometric functions
- Implicit multiplication
- Superscript exponents
- Implicit exponents
- Symbols (pi and e)
These improvements will touch the equation entry field, the equation validator, and the equation evaluator, and they will require a fair amount of work to complete. Through the rest of this chapter, you'll build these improvements, and at the end of the chapter, you'll be rewarded by a better equation entry editor.
Adding Attributes to the Equation Entry Field
In most widget toolkits, text fields support a single text color, font, and text size. To get the fancy formatting that we want for our equation editor, you'd think you'd have to jettison the NSTextField instance and switch to a different widget like NSTextView. Don't leap to conclusions and dump the existing text field, however, because the Cocoa NSTextField widget supports the rich-text editing that our vision for the equation editor requires. We could certainly switch to a NSTextView control, but that control is designed for multiple-line entry. NSTextField is for single-line entry and supports all of the colors, fonts, and sizes we need.
The trick to changing colors, fonts, and sizes in the text field revolves around what Cocoa calls an attributed string, embodied in the NSAttributedString class, which is included in every NSControl instance. As its name indicates, an attributed string is a string with attributes—attributes such as color or size across specified ranges of text. To unveil the attributed string in a text field, either you must call setAllowsEditingTextAttributes:YES on the NSTextField instance or you must turn on Allows Rich Text in Interface Builder, as shown in Figure 4–15. Otherwise, any attributes you specify don't display, contrary to what the documentation for NSTextField's setAllowsEditingTextAttributes: suggests.
Turn on attributes for Graphique's equation entry field by selecting EquationEntryViewController.xib to open it in Interface Builder, selecting the equation text field, and checking Allows Rich Text in the Attributes inspector. By checking that box, we've transformed the plain and boring text field into a field capable of displaying all the cool attributes we have planned for it.

Figure 4–15. Setting the NSTextField to show rich text
Creating the Tokens
Most of the planned functionality for our improved equation entry editor relies on knowing what the individual pieces of the entered equation are—not just the individual characters but the groups of characters that go together and what they mean. To do this, we must parse or tokenize the equation into its individual tokens and then make decisions about things such as syntax coloring or implicit multiplication using those tokens. The kinds of tokens we support are as follows:
- Numbers
- Variables (only x)
- Operators (for example, + or -)
- Open parentheses
- Close parentheses
- Exponents
- Symbols
- Trigonometric functions (sine and cosine)
- Spaces
- Invalid input
Our strategy is to define an enum with these token types and then a token class that holds the token's type and its value. If, for example, the user enters the number 123, we create an instance of this token class that holds the token's type, which is a number, and the token's value, which is 123. In addition, the token class will hold a boolean field that stores whether this token is valid, since a token can be an valid type yet still be invalid, as in the case of an open parenthesis without a matching close parenthesis.
Create a new Cocoa Objective-C class called EquationToken as a subclass of NSObject. EquationToken.h, shown in Listing 4-8, creates the enum for the token types and declares properties for the token's type, value, and validity, as well as an initializer method that takes a type and value. You can see that the names for the token types unmistakably describe what they represent, which is a good practice that not only makes your code more understandable and maintainable but also lets you shirk documentation in most cases.
Listing4–8. EquationToken.h
#import <Foundation/Foundation.h>


typedef enum

{

  EquationTokenTypeInvalid = 0,

  EquationTokenTypeNumber,

  EquationTokenTypeVariable,

  EquationTokenTypeOperator,

  EquationTokenTypeOpenParen,

  EquationTokenTypeCloseParen,

  EquationTokenTypeExponent,

  EquationTokenTypeSymbol,

  EquationTokenTypeTrigFunction,

  EquationTokenTypeWhitespace,

} EquationTokenType;


@interface EquationToken : NSObject


@property (nonatomic) EquationTokenType type;

@property (nonatomic, retain) NSString *value;

@property (nonatomic) BOOL valid;


- (id)initWithType:(EquationTokenType)type andValue:(NSString *)value;


@end
EquationToken.m, shown in Listing 4-9, handles the getting and setting of these properties. It also initializes each token as valid, except for tokens of type EquationTokenTypeInvalid.
Listing4–9. EquationToken.m
#import "EquationToken.h"


@implementation EquationToken


@synthesize type;
@synthesize value;

@synthesize valid;


- (id)initWithType:(EquationTokenType)type_ andValue:(NSString *)value_

{

  self = [super init];

  if (self)

  {

    self.type = type_;

    self.value = value_;

    self.valid = (type_ != EquationTokenTypeInvalid);

  }

  return self;

}


@end
Building a class to store tokens is the easier half of the task to tokenize equations. Next, we have to actually parse or tokenize the equation, which we do next.
Parsing the Equation
We could build an EquationTokenizer class to tokenize the equation, but designing with fat models—a term that refers to model classes that also have the smarts to manipulate themselves, rather than rely on controller classes to manipulate them—seems more appropriate. In that vein, we'll build the tokenizing of an equation into the Equation class itself.
Before we start parsing the equation, however, we set up three arrays that hold special strings that we look for when parsing equations. These arrays hold the operators, the trigonometric functions, and the symbols we support, and we use them in our parsing routine to detect operators, trigonometric functions, and symbols. Create them as static arrays inside Equation.m, between the class extension and the start of the implementation, as shown in Listing 4-10.
Listing4–10. Declaring the Arrays in Equation.m
...

@interface Equation ()

- (BOOL)produceError:(NSError**)error withCode:(NSInteger)code andMessage:(NSString*)message;

@end


static NSArray *OPERATORS;

static NSArray *TRIG_FUNCTIONS;

static NSArray *SYMBOLS;


@implementation Equation

...
Initialize their contents inside the initialize: method, which is a class method that is called when a class loads. The OPERATORS array contains the operators we support: +, -, *, /, and ^. The TRIG_FUNCTIONS array contains the trigonometric functions we support: sine (sin) and cosine (cos). Finally, the SYMBOLS array contains the symbols we support: pi (both as the two character “pi” and the single character pi symbol, typed using Option+p) and e. Listing 4-11 shows the implementation of initialize:.
Listing4–11. The initialize: Method in Equation.m
+ (void)initialize

{

  OPERATORS = [NSArray arrayWithObjects:@"+", @"-", @"*", @"/", @"^", nil];

  TRIG_FUNCTIONS = [NSArray arrayWithObjects:@"sin", @"cos", nil];

  SYMBOLS = [NSArray arrayWithObjects:@"pi", @"e", @"u03c0", nil];

}
You'll see these arrays used later as you develop the method to parse and tokenize equations.
Now, declare a property in the Equation class called tokens that will hold all the parsed tokens. When an Equation object is initialized using the initWithString: method, we'll tokenize the equation's string and store it in the publicly accessible tokens array. Listing 4-12 shows the property in Equation.h.
Listing4–12. Equation.h with a tokens Property
#import <Foundation/Foundation.h>


@interface Equation : NSObject

{

@private

  NSString *text;

}

@property (nonatomic, strong) NSString *text;

@property (nonatomic, strong) NSMutableArray *tokens;


- (id)initWithString:(NSString*)string;

- (float)evaluateForX:(float)x;

- (BOOL)validate:(NSError **)error;


@end
You also must add a synthesize directive in Equation.m, like this:
@synthesize tokens;
Next, you add a method to do the tokenizing. This method will parse through the current equation, break it into its tokens, create the corresponding EquationToken instances, and put them in the tokens array. The declaration for the tokenizing method, which you put in the class extension in Equation.m, is shown in Listing 4-13.
Listing4–13. Declaring the tokenize: Method
@interface Equation ()

- (BOOL)produceError:(NSError**)error withCode:(NSInteger)code andMessage:(NSString*)message;

- (void)tokenize;

@end
Edit the initWithString: method to create the tokens array, and then call the tokenize: method, as shown in Listing 4-14.
Listing4–14. Initializing tokens
- (id)initWithString:(NSString *)string

{

  self = [super init];

  if (self)

  {

    self.text = string;

    self.tokens = [NSMutableArray array];

    [self tokenize];

  }

  return self;

}
Implementing the Method to Tokenize the Equation
Now, turn your attention to implementing the tokenize: method. We have some serious work to do. We must walk through the equations that users enter and turn them into tokens of one or more characters. Some of this gets a little messy, so we build the method for tokenizing the string in several steps through the next several sections, adding more parsing capabilities as we go.
At its core, tokenizing the equation means going through its characters, one by one, and creating tokens that represent the characters' types and values. Because some tokens can comprise multiple characters, however, we can't just walk through the string of characters one by one. Numbers, for example, can have multiple digits, and we should create a single token to represent the number 100, rather than three tokens (one for “1” and one for each “0”). Instead, we must read ahead into the string to create multicharacter tokens as appropriate. With that in mind, first import the EquationToken.h header into Equation.m:
#import "EquationToken.h"
Then, start creating the tokenize: method with the code in Listing 4-15.
Listing4–15. The Initial tokenize: Method
- (void)tokenize

{

  [tokens removeAllObjects];

  NSString *temp = @"";

  EquationToken *token = nil;

  for (NSUInteger i = 0, n = text.length; i < n; i++)

  {

    unichar c = [text characterAtIndex:i];

    temp = [temp stringByAppendingFormat:@"%C", c];


    // Something goes here


    [tokens addObject:token];

    temp = @"";
  }

}
This code creates an array to store all the tokens it will create and creates a temporary string variable to hold the one or more characters that represent the token. It creates a pointer variable to a token that it will use to temporarily hold the current token, before adding it to the array. Then, the code loops through the input string, stored in the member variable text, a character at a time, appending each character to the temp string. It clears the temp string before looping. This code is clean and straightforward, but it doesn't yet accomplish anything useful. See the comment “Something goes here”? We still must add code to recognize the characters being parsed and create the appropriate token.
Converting a String to a Token
To create the token, create a new method called newTokenFromString: that accepts a string and returns a corresponding token, with the corresponding token type and value. Since this method shouldn't belong to the public interface (no other code should create tokens), add the declaration to the class extension, as shown in Listing 4-16.
Listing4–16. Declaring newTokenFromString:
@interface Equation ()

- (BOOL)produceError:(NSError**)error withCode:(NSInteger)code andMessage:(NSString*)message;

- (void)tokenize;

- (EquationToken *)newTokenFromString:(NSString *)string;

@end
The implementation of newTokenFromString: creates a lowercase version of the string and then compares it with various known token values to determine what type of token to create. Remember, for example, the arrays we created for the operators, trigonometric functions, and symbols we support? We compare the specified string to the contents of these arrays to determine whether to create a token of one of those types. We also check for parentheses, variables (the letter “x”), numbers, or spaces. If the passed value matches none of these, we recognize it as an invalid token. Listing 4-17 shows the implementation for newTokenFromString:.
Listing4–17. newTokenFromString:
- (EquationToken *)newTokenFromString:(NSString *)string

{

  EquationTokenType type;

  string = [string lowercaseString];

  if ([OPERATORS containsObject:string])

  {

    type = EquationTokenTypeOperator;

  }

  else if ([TRIG_FUNCTIONS containsObject:string])

  {

    type = EquationTokenTypeTrigFunction;
  }

  else if ([SYMBOLS containsObject:string])

  {

    type = EquationTokenTypeSymbol;

  }

  else if ([string isEqualToString:@"("])

  {

    type = EquationTokenTypeOpenParen;

  }

  else if ([string isEqualToString:@")"])

  {

    type = EquationTokenTypeCloseParen;

  }

  else if ([string isEqualToString:@"x"])

  {

    type = EquationTokenTypeVariable;

  }

  // Digits are all grouped together in the tokenize: method, so just check the first character

  else if (isdigit([string characterAtIndex:0]) || [string characterAtIndex:0] == '.')

  {

    type = EquationTokenTypeNumber;

  }

  // Spaces are all grouped together in the tokenize: method, so just check the first character

  else if ([string characterAtIndex:0] == ' ')

  {

    type = EquationTokenTypeWhitespace;

  }

  else

  {

    type = EquationTokenTypeInvalid;

  }

  return [[EquationToken alloc] initWithType:type andValue:string];

}
Having a method to create the appropriate token from a string allows us to update the “Something goes here” comment in the tokenize: method to actually create the token, so remove the comment and add a call to newTokenFromString:, as in Listing 4-18.
Listing 4–18. Calling newTokenFromString: from the tokenize: Method
- (void)tokenize

{

  [tokens removeAllObjects];

  NSString *temp = @"";

  EquationToken *token = nil;

  for (NSUInteger i = 0, n = text.length; i < n; i++)

  {

    unichar c = [text characterAtIndex:i];

    temp = [temp stringByAppendingFormat:@"%C", c];


    token = [self newTokenFromString:temp];


    [tokens addObject:token];

    temp = @"";

  }

}
This is a good start; this implementation of tokenize: recognizes single-character tokens accurately: parentheses, variables, e, the single-character version of pi, operators, and numbers that happen to be a single digit. We're not ready, however, to release this version, or even test it, until we add support for multiple-character tokens. Although recognizing each kind of multiple-character token shares similar approaches, each requires some special handling that requires different code. We tackle each of these scenarios in turn, sacrificing some code optimization opportunities for the purpose of maintaining clarity.
Recognizing Numbers
As we walk through the characters of the input string, when we come across a digit character we want to continue to read characters and tack them onto our temp string until we come to the first nondigit character (or the end of the string). This way, we contain a valid, multidigit number in a single token. We also want to support decimals, so we treat a period like a digit. Our code for recognizing multidigit numbers is shown in Listing 4-19.
Listing4–19. Recognizing Multidigit Numbers
- (void)tokenize

{

  [tokens removeAllObjects];

  NSString *temp = @"";

  EquationToken *token = nil;

  for (NSUInteger i = 0, n = text.length; i < n; i++)

  {

    unichar c = [text characterAtIndex:i];

    temp = [temp stringByAppendingFormat:@"%C", c];


    // Keep all digits of a number as one token

    if (isdigit(c) || c == '.')

    {

      // Keep reading characters until we hit the end of the string

      while (i < (n - 1))

      {

        // Increment our loop variable

        ++i;

        // Get the next character

        c = [text characterAtIndex:i];

        // Test to see whether to continue

        if (isdigit(c) || c == '.')

        {

          // Append the character to the temp string

          temp = [temp stringByAppendingFormat:@"%C", c];

        }

        else

        {

          // Character didn't match, so back the loop counter up and exit

          --i;

          break;
        }

      }

    }


    token = [self newTokenFromString:temp];


    [tokens addObject:token];

    temp = @"";

  }

}
Notice that if we get to a nondigit or nonperiod character, we back up the loop counter by one so that the character we read isn't lost but rather is read the next time through the loop as we start reading a new token.
You might also notice that this code allows a number to have more than one decimal point, which shouldn't be valid. Rather than complicate this code with decimal point counting, however, we'll catch multiple decimal points later.
Grouping Spaces
Although some people can comfortably squash their equations together, with numbers, operators, parentheses, and any other characters mashed together without any spaces, others like their equations to breathe a little, inserting spaces between numbers and operators to increase readability. We shouldn't care about spaces and should treat these three equations identically:
x^2+2*x+7

x^2 + 2*x + 7

x ^ 2  +  2 * x  + 7
We should also lump multiple consecutive spaces into a single token with the type EquationTokenTypeWhitespace. To combine consecutive spaces, we can employ an algorithm that's nearly identical to our digit detection code. Listing 4-20 shows the addition of code to detect multiple spaces.
Listing4–20. Code to Recognize Multiple Spaces
- (void)tokenize

{

  [tokens removeAllObjects];

  NSString *temp = @"";

  EquationToken *token = nil;

  for (NSUInteger i = 0, n = text.length; i < n; i++)

  {

    unichar c = [text characterAtIndex:i];

    temp = [temp stringByAppendingFormat:@"%C", c];


    // Keep all digits of a number as one token

    if (isdigit(c) || c == '.')

    {

      // Keep reading characters until we hit the end of the string

      while (i < (n - 1))

      {
        // Increment our loop variable

        ++i;

        // Get the next character

        c = [text characterAtIndex:i];

        // Test to see whether to continue

        if (isdigit(c) || c == '.')

        {

          // Append the character to the temp string

          temp = [temp stringByAppendingFormat:@"%C", c];

        }

        else

        {

          // Character didn't match, so back the loop counter up and exit

          --i;

          break;

        }

      }

    }


    // Keep all spaces together

    else if (c == ' ')

    {

      // Keep reading characters until we hit the end of the string

      while (i < (n - 1))

      {

        // Increment our loop variable

        ++i;

        // Get the next character

        c = [text characterAtIndex:i];

        // Test to see whether to continue

        if (c == ' ')

        {

          // Append the character to the temp string

          temp = [temp stringByAppendingFormat:@"%C", c];

        }

        else

        {

          // Character didn't match, so back the loop counter up and exit

          --i;

          break;

        }

      }

    }


    token = [self newTokenFromString:temp];


    [tokens addObject:token];

    temp = @"";

  }

}
Read through this code and note the similarities to the digit detection code. We could try to do something clever to reduce the code duplication—Objective-C's relatively new support for blocks comes to mind—but we'll leave the code asis to keep things relatively simple.
We've now written code to recognize multicharacter digits and multiple consecutive spaces. We have two other multiple character token possibilities, however: trigonometric functions and symbols. We knock out those two token types in the next section.
Recognizing Trigonometric Functions and Symbols
Remember the arrays we created, called TRIG_FUNCTIONS and SYMBOLS, to hold the trigonometric functions and symbols we support? We're ready to use them now to detect whether the current token belongs to one of these groups. The approach for both these arrays is the same:
- Loop through the elements in the array.
- For each element, determine whether its length could fit in what remains of the input string.
- If the length fits, compare the element to the input string to see whether they match.
- If they match, move the index counter to the end of the matching string.
To compare the element to a piece of the input string, we use NSString's substringWithRange: method, which grabs a piece from the string using the specified range. Ranges specify a starting index and a length. To create the range, we use the NSMakeRange function, which takes an index and a length and returns an NSRange struct. The index we use is the current index, i, and the length is the length of the element we're comparing the input string to. The code to get the substring looks like this:
[text substringWithRange:NSMakeRange(i, [element length])];
One more thing we want to do when making the comparison: we want to normalize the case of the textso that both sin and SIN, for example, match sin (the sine trigonometric function). We use NSString's lowercaseString: method to convert the input substring to lowercase, which is the case we used for the elements in both TRIG_FUNCTIONS and SYMBOLS.
Listing 4–21 shows the growing tokenize: method with the code added to detect trigonometric functions and symbols.
Listing4–21. Detecting Trigonometric Functions and Symbols
- (void)tokenize

{

  [tokens removeAllObjects];

  NSString *temp = @"";

  EquationToken *token = nil;

  for (NSUInteger i = 0, n = text.length; i < n; i++)

  {

    unichar c = [text characterAtIndex:i];

    temp = [temp stringByAppendingFormat:@"%C", c];
    // Keep all digits of a number as one token

    if (isdigit(c) || c == '.')

    {

      // Keep reading characters until we hit the end of the string

      while (i < (n - 1))

      {

        // Increment our loop variable

        ++i;

        // Get the next character

        c = [text characterAtIndex:i];

        // Test to see whether to continue

        if (isdigit(c) || c == '.')

        {

          // Append the character to the temp string

          temp = [temp stringByAppendingFormat:@"%C", c];

        }

        else

        {

          // Character didn't match, so back the loop counter up and exit

          --i;

          break;

        }

      }

    }


    // Keep all spaces together

    else if (c == ' ')

    {

      // Keep reading characters until we hit the end of the string

      while (i < (n - 1))

      {

        // Increment our loop variable

        ++i;

        // Get the next character

        c = [text characterAtIndex:i];

        // Test to see whether to continue

        if (c == ' ')

        {

          // Append the character to the temp string

          temp = [temp stringByAppendingFormat:@"%C", c];

        }

        else

        {

          // Character didn't match, so back the loop counter up and exit

          --i;

          break;

        }

      }

    }


    // Check for trig functions

    for (NSString *trig in TRIG_FUNCTIONS)

    {

      if (trig.length <= (n - i) && [trig isEqualToString:[[text substringWithRange:NSMakeRange(i, trig.length)] lowercaseString]])

      {

        temp = trig;

        i += (trig.length] - 1);

        break;
      }

    }


    // Check for symbols

    for (NSString *symbol in SYMBOLS)

    {

      if (symbol.length <= (n - i) && [symbol isEqualToString:[[text substringWithRange:NSMakeRange(i, symbol.length)] lowercaseString]])

      {

        temp = symbol;

        i += (symbol.length - 1);

        break;

      }

    }


    token = [self newTokenFromString:temp];


    [tokens addObject:token];

    temp = @"";

  }

}
At this point, we've added all the code before the line that calls newTokenFromString:. We're ready to let that line of code run and create an EquationToken object from the input. We still have some cleanup to do after that call, though, which is outlined in the next few sections.
Recognizing Exponents
So far, our tokenizing recognizes all digits as number tokens. It should recognize some of these digits, however, as exponents. We recognize the following tokens as exponents instead of numbers:
- Numbers that immediately follow the ^ symbol (for example, ^2)
- Numbers that immediately follow a variable (for example, x2)
- Numbers that immediately follow a close parenthesis (for example, (x+3)2)
After we've created the current token, then we check to see whether we have a number token and then whether we should change it from a number type to an exponent type. To make the determination, we check whether we have a previous token and, if so, whether it matches any of the three rules listed earlier for exponents. The code to do this follows the line of code that creates the new token and is shown in Listing 4-22.
Listing4–22. Finding Exponents
- (void)tokenize

{

  [tokens removeAllObjects];

  NSString *temp = @"";

  EquationToken *token = nil;

  for (NSUInteger i = 0, n = text.length; i < n; i++)
  {

    unichar c = [text characterAtIndex:i];

    temp = [temp stringByAppendingFormat:@"%C", c];


    // Keep all digits of a number as one token

    if (isdigit(c) || c == '.')

    {

      // Keep reading characters until we hit the end of the string

      while (i < (n - 1))

      {

        // Increment our loop variable

        ++i;

        // Get the next character

        c = [text characterAtIndex:i];

        // Test to see whether to continue

        if (isdigit(c) || c == '.')

        {

          // Append the character to the temp string

          temp = [temp stringByAppendingFormat:@"%C", c];

        }

        else

        {

          // Character didn't match, so back the loop counter up and exit

          --i;

          break;

        }

      }

    }


    // Keep all spaces together

    else if (c == ' ')

    {

      // Keep reading characters until we hit the end of the string

      while (i < (n - 1))

      {

        // Increment our loop variable

        ++i;

        // Get the next character

        c = [text characterAtIndex:i];

        // Test to see whether to continue

        if (c == ' ')

        {

          // Append the character to the temp string

          temp = [temp stringByAppendingFormat:@"%C", c];

        }

        else

        {

          // Character didn't match, so back the loop counter up and exit

          --i;

          break;

        }

      }

    }


    // Check for trig functions

    for (NSString *trig in TRIG_FUNCTIONS)

    {
      if (trig.length <= (n - i) && [trig isEqualToString:[[text substringWithRange:NSMakeRange(i, trig.length)] lowercaseString]])

      {

        temp = trig;

        i += (trig.length - 1);

        break;

      }

    }


    // Check for symbols

    for (NSString *symbol in SYMBOLS)

    {

      if (symbol.length <= (n - i) && [symbol isEqualToString:[[text substringWithRange:NSMakeRange(i, symbol.length)] lowercaseString]])

      {

        temp = symbol;

        i += (symbol.length - 1);

        break;

      }

    }


    token = [self newTokenFromString:temp];


    // Determine if this should be an exponent

    // Check that we have a previous token to follow and that this is a number

    if (token.type == EquationTokenTypeNumber && !(tokens.count == 0))

    {

      // Get the previous token

      EquationToken *previousToken = [tokens lastObject];


      // If the previous token is a variable, close parenthesis, or the ^ operator, this is an exponent

      if (previousToken.type == EquationTokenTypeVariable ||

          previousToken.type == EquationTokenTypeCloseParen ||

          [previousToken.value isEqualToString:@"^"])

      {

        token.type = EquationTokenTypeExponent;

      }

    }


    [tokens addObject:token];

    temp = @"";

  }

}
You can see that this code does as we describe, changing the current token from a number type to an exponent type if any of the three exponent rules match. To verify that this code works, create a unit test for it by creating a new Cocoa Objective-C test case class, as shown in Figure 4–16, and click Next. Call the class ExponentTests and set the test type to Logic, as shown in Figure 4–17. Click Next, and save it in the GraphiqueTests folder, the GraphiqueTests group, and the GraphiqueTests target.

Figure 4–16. Creating a test case
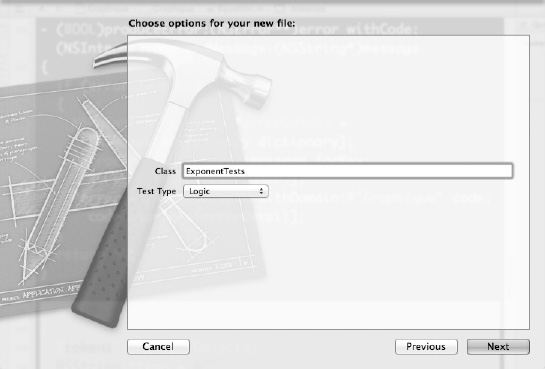
Figure 4–17. Naming the test class and setting its type
The header file, shown in Listing 4-23, declares a single method called testExponents:.
Listing4–23. ExponentTests.h
#import <SenTestingKit/SenTestingKit.h>


@interface ExponentTests : SenTestCase


- (void)testExponents;


@end
In the implementation of testExponents:, create an equation with tokens of various types, including both numbers and exponents, and verify that the numbers stay numbers and the exponents become exponents. Listing 4-24 shows the implementation.
Listing4–24. ExponentTests.m
#import "ExponentTests.h"

#import "Equation.h"

#import "EquationToken.h"


@implementation ExponentTests


-(void)testExponents

{

  Equation *equation = [[Equation alloc] initWithString:@"32x2+(x+7)45+3^3"];

  NSArray *tokens = equation.tokens;


  STAssertTrue(tokens.count == 14, NULL);


  EquationToken *token = nil;


  token = [tokens objectAtIndex:0];

  STAssertEquals(EquationTokenTypeNumber, token.type, NULL);

  STAssertEqualObjects(@"32", token.value, NULL);


  token = [tokens objectAtIndex:2];

  STAssertEquals(EquationTokenTypeExponent, token.type, NULL);

  STAssertEqualObjects(@"2", token.value, NULL);


  token = [tokens objectAtIndex:7];

  STAssertEquals(EquationTokenTypeNumber, token.type, NULL);

  STAssertEqualObjects(@"7", token.value, NULL);


  token = [tokens objectAtIndex:9];

  STAssertEquals(EquationTokenTypeExponent, token.type, NULL);

  STAssertEqualObjects(@"45", token.value, NULL);


  token = [tokens objectAtIndex:11];

  STAssertEquals(EquationTokenTypeNumber, token.type, NULL);

  STAssertEqualObjects(@"3", token.value, NULL);


  token = [tokens objectAtIndex:13];

  STAssertEquals(EquationTokenTypeExponent, token.type, NULL);

  STAssertEqualObjects(@"3", token.value, NULL);

}


@end
Run your tests using ![]() +U and verify that they all pass. Assuming they do, you have successfully implemented exponent recognition.
+U and verify that they all pass. Assuming they do, you have successfully implemented exponent recognition.
Creating a Stack for Parenthesis Matching
Effectively matching parentheses turns out to be a problem with a straightforward solution, as described in such sites as www.ccs.neu.edu/home/sbratus/com1101/lab4.html. To summarize, an approach that works cleanly and simply is as follows:
- Create a stack.
- Read through your input, character by character.
- If the current character is an open parenthesis, push it onto your stack.
- If the current character is a close parenthesis and you have an open parenthesis at the top of your stack, pop the open parenthesis and match it with this close parenthesis.
- Any close parentheses without corresponding open parentheses on the stack are unmatched.
- Any remaining open parentheses on the stack, once you've read all the input, are unmatched.
To implement our parenthesis matching, then, we start by creating a stack. A stack stores and retrieves a collection of data in a last in, first out (LIFO) approach: a “retrieve” operation returns the most recently stored object. Storing an object in a stack is typically called pushing the object onto the stack, and retrieving the object from the stock is usually called popping it off the stack. Popping an object off the stack both retrieves it from the stack and deletes it from the stack. A typical stack class, then, supports a push and a pop operation. Some stack implementations also support a peek operation that returns the most recently stored object but doesn't delete it from the stack, and some support an operation for determining whether the stack is currently empty (contains no data). Which operations does the Cocoa stack class support? None at all—Cocoa has no stack class!
Luckily, however, writing a stack class is fairly simple, especially because you can leverage Cocoa's NSMutableArray class to do all the storage and retrieval. In this section, we create a stack class called Stack and incorporate it into the equation editor to do the parenthesis balancing.
Creating the Stack Class
Start creating your stack by creating a new Cocoa Objective-C class called Stack that derives from NSObject. This class will offer three operations:
push, to push an object onto the stackpop, to pop an object off the stackhasObjects, to determine whether the stack has any objects
In addition to declaring methods for these three operations in Stack.h, you also must declare the NSMutableArray private member for storing and retrieving data. Listing 4-25 shows the code for Stack.h.
Listing4–25. Stack.h
#import <Foundation/Foundation.h>


@interface Stack : NSObject {

@private

  NSMutableArray *stack;

}


- (void)push:(id)anObject;

- (id)pop;

- (BOOL)hasObjects;


@end
The implementation file, Stack.m, creates the stackNSMutableArray member in its init: method. The Stack class's push: method adds the passed object to the end of stack. The pop: method retrieves the last object from stack, deletes the object from stack, and then returns the object. Finally, the hasObjects: method returns whether the stack has any objects using NSMutableArray's count: method. Listing 4-26 shows Stack.m.
Listing4–26. Stack.m
#import "Stack.h"


@implementation Stack


- (id)init

{

  self = [super init];

  if (self)

  {

    stack = [NSMutableArray array];

  }

  return self;

}


- (void)push:(id)anObject

{

  [stack addObject:anObject];
}


- (id)pop

{

  id anObject = [stack lastObject];

  [stack removeObject:anObject];

  return anObject;

}


- (BOOL)hasObjects

{

  return [stack count] > 0;

}


@end
See how simple that was? The NSMutableArray class takes care of the tricky parts of storage and retrieval.
Before we incorporate Stack into the equation editor, however, we should test it to ensure it works as we expect. Read on to the next section to see how to write automated unit tests for Stack.
Testing the Stack Class
To test the Stack class, create a test case that pushes 1,000 objects onto a stack, makes sure the stack isn't empty, and then pops the objects off the stack, one at a time, and verifies that the 1,000 pushed objects are popped in reverse order. Finally, verify that after all 1,000 objects are popped off the stack, the stack is empty. Create a new Cocoa Objective-C test case class called StackTests, making it a Logic-type test and making sure to add it to the GraphiqueTests folder and the GraphiqueTests target but not the Graphique target. Declare a method called testPushAndPop: in StackTests.h so that it matches Listing 4-27.
Listing4–27. StackTests.h
#import <SenTestingKit/SenTestingKit.h>


@interface StackTests : SenTestCase


- (void)testPushAndPop;


@end
StackTests.m implements the testPushAndPop: method as outlined earlier, pushing NSString objects that reflect their index number (0–999) in the stack so that we can easily verify that they're popped off in the correct order (999 through 0). See Listing 4-28.
Listing4–28. StackTests.m
#import "StackTests.h"

#import "Stack.h"
@implementation StackTests


- (void)testPushAndPop

{

  Stack *stack = [[Stack alloc] init];

  for (int i = 0; i < 1000; i++)

  {

    [stack push:[NSString stringWithFormat:@"String #%d", i]];

  }

  STAssertTrue([stack hasObjects], @"Stack should not be empty after pushing 1,000 objects");


  for (int i = 999; i >= 0; i--)

  {

    NSString *string = (NSString *)[stack pop];

    NSString *comp = [NSString stringWithFormat:@"String #%d", i];

    STAssertEqualObjects(string, comp, NULL);

  }

  STAssertFalse([stack hasObjects], @"Stack should be empty after popping 1,000 objects");

}


@end
Run your tests using ![]() +U and verify that they all pass. Now you can feel confident that
+U and verify that they all pass. Now you can feel confident that Stack is ready to handle its parenthesis-balancing chores.
Balancing Parentheses Using Stack
You're ready to implement the parenthesis-matching algorithm in the tokenize: method. Start by importing the Stack.h header at the top of Equation.m:
#import "Stack.h"
In the tokenize: method, create a Stack instance. Then, after the exponent-detection code, include code that uses the Stack instance to perform parenthesis matching. This code should set each new open parenthesis as invalid, because it's not yet matched, and set it to valid only when it's matched to a close parenthesis. Listing 4-29 contains the updated tokenize: method.
Listing4–29. Parenthesis Matching
- (void)tokenize

{

  [tokens removeAllObjects];

  Stack *stack = [[Stack alloc] init];


  NSString *temp = @"";

  EquationToken *token = nil;

  for (NSUInteger i = 0, n = text.length; i < n; i++)

  {

    unichar c = [text characterAtIndex:i];

    temp = [temp stringByAppendingFormat:@"%C", c];


    // Keep all digits of a number as one token
    if (isdigit(c) || c == '.')

    {

      // Keep reading characters until we hit the end of the string

      while (i < (n - 1))

      {

        // Increment our loop variable

        ++i;

        // Get the next character

        c = [text characterAtIndex:i];

        // Test to see whether to continue

        if (isdigit(c) || c == '.')

        {

          // Append the character to the temp string

          temp = [temp stringByAppendingFormat:@"%C", c];

        }

        else

        {

          // Character didn't match, so back the loop counter up and exit

          --i;

          break;

        }

      }

    }


    // Keep all spaces together

    else if (c == ' ')

    {

      // Keep reading characters until we hit the end of the string

      while (i < (n - 1))

      {

        // Increment our loop variable

        ++i;

        // Get the next character

        c = [text characterAtIndex:i];

        // Test to see whether to continue

        if (c == ' ')

        {

          // Append the character to the temp string

          temp = [temp stringByAppendingFormat:@"%C", c];

        }

        else

        {

          // Character didn't match, so back the loop counter up and exit

          --i;

          break;

        }

      }

    }


    // Check for trig functions

    for (NSString *trig in TRIG_FUNCTIONS)

    {

      if (trig.length <= (n - i) && [trig isEqualToString:[[text substringWithRange:NSMakeRange(i, trig.length)] lowercaseString]])

      {

        temp = trig;

        i += (trig.length - 1);

        break;

      }

    }
    // Check for symbols

    for (NSString *symbol in SYMBOLS)

    {

      if (symbol.length <= (n - i) && [symbol isEqualToString:[[text substringWithRange:NSMakeRange(i, symbol.length)] lowercaseString]])

      {

        temp = symbol;

        i += (symbol.length - 1);

        break;

      }

    }


    token = [self newTokenFromString:temp];


    // Determine if this should be an exponent

    // Check that we have a previous token to follow and that this is a number

    if (token.type == EquationTokenTypeNumber && !(tokens.count == 0))

    {

      // Get the previous token

      EquationToken *previousToken = [tokens lastObject];


      // If the previous token is a variable, close parenthesis, or the ^ operator, this is an exponent

      if (previousToken.type == EquationTokenTypeVariable ||

          previousToken.type == EquationTokenTypeCloseParen ||

          [previousToken.value isEqualToString:@"^"])

      {

        token.type = EquationTokenTypeExponent;

      }

    }


    // Do parenthesis matching

    if (token.type == EquationTokenTypeOpenParen)

    {

      // Set the new open parenthesis to invalid, as it's not yet matched,

      // and push it onto the stack

      token.valid = NO;

      [stack push:token];

    }

    else if (token.type == EquationTokenTypeCloseParen)

    {

      // See if we have a matching open parenthesis

      if (![stack hasObjects])

      {

        // No open parenthesis to match, so this close parenthesis is invalid

        token.valid = NO;

      }

      else

      {

        // We have a matching open parenthesis, so set it (and this close parenthesis)

        // to valid and pop the open parenthesis off the stack

        EquationToken *match = [stack pop];
        match.valid = YES;

      }

    }


    [tokens addObject:token];

    temp = @"";

  }

}
Detecting Multiple Decimal Points
We said before that you still must catch numbers with multiple decimal points and mark them as invalid. To do this, add code that splits any number tokens into components separated by decimal points. If you have more than two such components (the number before the decimal point and the number after), the token is invalid. Listing 4–30 shows the tokenize: method with this code added.
Listing4–30. Detecting Multiple Decimal Points
- (void)tokenize


{

  [tokens removeAllObjects];

  Stack *stack = [[Stack alloc] init];


  NSString *temp = @"";

  EquationToken *token = nil;

  for (NSUInteger i = 0, n = text.length; i < n; i++)

  {

    unichar c = [text characterAtIndex:i];

    temp = [temp stringByAppendingFormat:@"%C", c];


    // Keep all digits of a number as one token

    if (isdigit(c) || c == '.')

    {

      // Keep reading characters until we hit the end of the string

      while (i < (n - 1))

      {

        // Increment our loop variable

        ++i;

        // Get the next character

        c = [text characterAtIndex:i];

        // Test to see whether to continue

        if (isdigit(c) || c == '.')

        {

          // Append the character to the temp string

          temp = [temp stringByAppendingFormat:@"%C", c];

        }

        else

        {

          // Character didn't match, so back the loop counter up and exit

          --i;

          break;

        }

      }

    }
    // Keep all spaces together

    else if (c == ' ')

    {

      // Keep reading characters until we hit the end of the string

      while (i < (n - 1))

      {

        // Increment our loop variable

        ++i;

        // Get the next character

        c = [text characterAtIndex:i];

        // Test to see whether to continue

        if (c == ' ')

        {

          // Append the character to the temp string

          temp = [temp stringByAppendingFormat:@"%C", c];

        }

        else

        {

          // Character didn't match, so back the loop counter up and exit

          --i;

          break;

        }

      }

    }


    // Check for trig functions

    for (NSString *trig in TRIG_FUNCTIONS)

    {

      if (trig.length <= (n - i) && [trig isEqualToString:[[text substringWithRange:NSMakeRange(i, trig.length)] lowercaseString]])

      {

        temp = trig;

        i += (trig.length - 1);

        break;

      }

    }


    // Check for symbols

    for (NSString *symbol in SYMBOLS)

    {

      if (symbol.length <= (n - i) && [symbol isEqualToString:[[text substringWithRange:NSMakeRange(i, symbol.length)] lowercaseString]])

      {

        temp = symbol;

        i += (symbol.length - 1);

        break;

      }

    }


    token = [self newTokenFromString:temp];


    // Determine if this should be an exponent

    // Check that we have a previous token to follow and that this is a number

    if (token.type == EquationTokenTypeNumber && !(tokens.count == 0))

    {

      // Get the previous token
      EquationToken *previousToken = [tokens lastObject];


      // If the previous token is a variable, close parenthesis, or the ^ operator, this

is an exponent

      if (previousToken.type == EquationTokenTypeVariable ||

          previousToken.type == EquationTokenTypeCloseParen ||

          [previousToken.value isEqualToString:@"^"])

      {

        token.type = EquationTokenTypeExponent;

      }

    }


    // Do parenthesis matching

    if (token.type == EquationTokenTypeOpenParen)

    {

      // Set the new open parenthesis to invalid, as it's not yet matched,

      // and push it onto the stack

      token.valid = NO;

      [stack push:token];

    }

    else if (token.type == EquationTokenTypeCloseParen)

    {

      // See if we have a matching open parenthesis

      if (![stack hasObjects])

      {

        // No open parenthesis to match, so this close parenthesis is invalid

        token.valid = NO;

      }

      else

      {

        // We have a matching open parenthesis, so set it (and this close parenthesis)

        // to valid and pop the open parenthesis off the stack

        EquationToken *match = [stack pop];

        match.valid = YES;

      }

    }


    // Numbers with more than one decimal point are invalid

    if (token.type == EquationTokenTypeNumber && [[token.value componentsSeparatedByString:@"."] count] > 2)

    {

      token.valid = NO;

    }


    [tokens addObject:token];

    temp = @"";

  }

}
The tokenize: method is now complete.
Before congratulating yourself too much, however, you should test it. You've already tested the code for the exponent recognition and the stack. In the next section, you write tests to exercise the rest of the tokenize: method.
Testing the Tokenizer
Create a new Cocoa Objective-C test case class called EquationTokenizeTests, with the Logic test type, and put it in the GraphiqueTests folder, group, and target. Declare all the test methods in EquationTokenizeTests.h that you'll create in this chapter, as well as a helper method that you'll use to test both the type and the value of a specified token. Listing 4–31 shows the code for EquationTokenizeTests.h.
Listing4–31. EquationTokenizeTests.h
#import <SenTestingKit/SenTestingKit.h>

#import "EquationToken.h"


@interface EquationTokenizeTests : SenTestCase


- (void)testSimple;

- (void)testExponent;

- (void)testExponentWithCaret;

- (void)testExponentWithParens;

- (void)testWhitespace;

- (void)testTrigFunctionsAndSymbols;

- (void)testParenthesisMatching;

- (void)testInvalid;

- (void)helperTestToken:(EquationToken *)token type:(EquationTokenType)type

value:(NSString *)value;


@end
In EquationTokenizeTests.m, implement the helperTestToken:type:value method to test the specified token's type and value against the specified type and value. Listing 4–32 shows the EquationTokenizeTests.m file.
Listing4–32. EquationTokenizeTests.m
#import "EquationTokenizeTests.h"

#import "Equation.h"


@implementation EquationTokenizeTests


- (void)helperTestToken:(EquationToken *)token type:(EquationTokenType)type

value:(NSString *)value

{

  STAssertEquals(token.type, type, NULL);

  STAssertEqualObjects(token.value, value, NULL);

}


@end
Now we're ready to write tests. The next few sections add tests, one at a time. Each of the tests creates an equation, parses it into its tokens, and verifies the number of tokens. It also verifies that each token has the expected type and value.
Testing Simple Equations
Start by testing a simple equation: 22*x-1. This equation should parse into five tokens:
- The number 22
- The multiplication operator
- The variable x
- The subtraction operator
- The number 1
Listing 4–33 shows the method.
Listing 4–33. Testing a Simple Equation
- (void)testSimple

{

  Equation *equation = [[Equation alloc] initWithString:@"22*x-1"];

  NSArray *tokens = equation.tokens;

  STAssertTrue(tokens.count == 5, NULL);

  [self helperTestToken:[tokens objectAtIndex:0] type:EquationTokenTypeNumber value:@"22"];

  [self helperTestToken:[tokens objectAtIndex:1] type:EquationTokenTypeOperator value:@"*"];

  [self helperTestToken:[tokens objectAtIndex:2] type:EquationTokenTypeVariable value:@"x"];

  [self helperTestToken:[tokens objectAtIndex:3] type:EquationTokenTypeOperator value:@"-"];

  [self helperTestToken:[tokens objectAtIndex:4] type:EquationTokenTypeNumber value:@"1"];

}
Testing Exponents
The next three methods test exponents. The first, testExponent:, tests the case of an exponent following a variable, x. The next, testExponentWithCaret:, tests the case of an exponent in the more traditional location: after a caret. Finally, testExponentWithParens: tests that an exponent is detected when it follows a close parenthesis. Add the code in Listing 4–34 to EquationTokenizeTests.m.
Listing 4–34. Testing Exponents
- (void)testExponent

{

  Equation *equation = [[Equation alloc] initWithString:@"x2"];

  NSArray *tokens = equation.tokens;

  STAssertTrue(tokens.count == 2, NULL);

  [self helperTestToken:[tokens objectAtIndex:0] type:EquationTokenTypeVariable value:@"x"];

  [self helperTestToken:[tokens objectAtIndex:1] type:EquationTokenTypeExponent value:@"2"];
}


- (void)testExponentWithCaret

{

  Equation *equation = [[Equation alloc] initWithString:@"x^2"];

  NSArray *tokens = equation.tokens;

  STAssertTrue(tokens.count == 3, NULL);

  [self helperTestToken:[tokens objectAtIndex:0] type:EquationTokenTypeVariable value:@"x"];

  [self helperTestToken:[tokens objectAtIndex:1] type:EquationTokenTypeOperator value:@"^"];

  [self helperTestToken:[tokens objectAtIndex:2] type:EquationTokenTypeExponent value:@"2"];

}


- (void)testExponentWithParens

{

  Equation *equation = [[Equation alloc] initWithString:@"(3x+7)2"];

  NSArray *tokens = equation.tokens;

  STAssertTrue(tokens.count == 7, NULL);

  [self helperTestToken:[tokens objectAtIndex:0] type:EquationTokenTypeOpenParen value:@"("];

  [self helperTestToken:[tokens objectAtIndex:1] type:EquationTokenTypeNumber value:@"3"];

  [self helperTestToken:[tokens objectAtIndex:2] type:EquationTokenTypeVariable value:@"x"];

  [self helperTestToken:[tokens objectAtIndex:3] type:EquationTokenTypeOperator value:@"+"];

  [self helperTestToken:[tokens objectAtIndex:4] type:EquationTokenTypeNumber value:@"7"];

  [self helperTestToken:[tokens objectAtIndex:5] type:EquationTokenTypeCloseParen value:@")"];

  [self helperTestToken:[tokens objectAtIndex:6] type:EquationTokenTypeExponent value:@"2"];

}
Testing Whitespace
We want to verify that spaces are collapsed into a single token, so we write a test that uses an equation that has multiple consecutive spaces. Listing 4–35 contains the whitespace test.
Listing 4–35. Testing Whitespace
- (void)testWhitespace

{

  Equation *equation = [[Equation alloc] initWithString:@"x   +   7"];

  NSArray *tokens = equation.tokens;

  STAssertTrue(tokens.count == 5, NULL);

  [self helperTestToken:[tokens objectAtIndex:0] type:EquationTokenTypeVariable value:@"x"];

  [self helperTestToken:[tokens objectAtIndex:1] type:EquationTokenTypeWhitespace value:@"   "];
  [self helperTestToken:[tokens objectAtIndex:2] type:EquationTokenTypeOperator value:@"+"];

  [self helperTestToken:[tokens objectAtIndex:3] type:EquationTokenTypeWhitespace value:@"   "];

  [self helperTestToken:[tokens objectAtIndex:4] type:EquationTokenTypeNumber value:@"7"];

}
Testing Trigonometric Functions and Symbols
Listing 4–36 contains the testTrigFunctionsAndSymbols: method, which tests for sine, cosine, pi (both as “pi” and π), and e.
Listing 4–36. Testing Trigonometric Functions and Symbols
- (void)testTrigFunctionsAndSymbols

{

  Equation *equation = [[Equation alloc]

initWithString:@"sin(0.3)+cos(3.3)+pi+e+u03c0"];

  NSArray *tokens = equation.tokens;

  STAssertTrue(tokens.count == 15, NULL);

  [self helperTestToken:[tokens objectAtIndex:0] type:EquationTokenTypeTrigFunction value:@"sin"];

  [self helperTestToken:[tokens objectAtIndex:1] type:EquationTokenTypeOpenParen value:@"("];

  [self helperTestToken:[tokens objectAtIndex:2] type:EquationTokenTypeNumber value:@"0.3"];

  [self helperTestToken:[tokens objectAtIndex:3] type:EquationTokenTypeCloseParen value:@")"];

  [self helperTestToken:[tokens objectAtIndex:4] type:EquationTokenTypeOperator value:@"+"];

  [self helperTestToken:[tokens objectAtIndex:5] type:EquationTokenTypeTrigFunction value:@"cos"];

  [self helperTestToken:[tokens objectAtIndex:6] type:EquationTokenTypeOpenParen value:@"("];

  [self helperTestToken:[tokens objectAtIndex:7] type:EquationTokenTypeNumber value:@"3.3"];

  [self helperTestToken:[tokens objectAtIndex:8] type:EquationTokenTypeCloseParen value:@")"];

  [self helperTestToken:[tokens objectAtIndex:9] type:EquationTokenTypeOperator value:@"+"];

  [self helperTestToken:[tokens objectAtIndex:10] type:EquationTokenTypeSymbol value:@"pi"];

  [self helperTestToken:[tokens objectAtIndex:11] type:EquationTokenTypeOperator value:@"+"];

  [self helperTestToken:[tokens objectAtIndex:12] type:EquationTokenTypeSymbol value:@"e"];

  [self helperTestToken:[tokens objectAtIndex:13] type:EquationTokenTypeOperator value:@"+"];

  [self helperTestToken:[tokens objectAtIndex:14] type:EquationTokenTypeSymbol value:@"u03c0"];

}
Testing Parenthesis Matching
We already wrote code to test our stack implementation that the parenthesis matching uses, but you also should test the parenthesis matching directly. You already know from previous tests that you can detect parentheses as tokens, so this test doesn’t use the helperTestToken:type:value: method. Instead, it tests the validity of the parenthesis tokens, including tests for both valid and invalid parentheses. It’s in Listing 4–37.
Listing 4–37. Testing Parenthesis Matching
- (void)testParenthesisMatching

{

  {

    Equation *equation = [[Equation alloc] initWithString:@"()"];

    NSArray *tokens = equation.tokens;

    STAssertTrue(tokens.count == 2, NULL);

    STAssertTrue(((EquationToken *)[tokens objectAtIndex:0]).valid, NULL);

    STAssertTrue(((EquationToken *)[tokens objectAtIndex:1]).valid, NULL);

  }

  {

    Equation *equation = [[Equation alloc] initWithString:@"(())"];

    NSArray *tokens = equation.tokens;

    STAssertTrue(tokens.count == 4, NULL);

    STAssertTrue(((EquationToken *)[tokens objectAtIndex:0]).valid, NULL);

    STAssertTrue(((EquationToken *)[tokens objectAtIndex:1]).valid, NULL);

    STAssertTrue(((EquationToken *)[tokens objectAtIndex:2]).valid, NULL);

    STAssertTrue(((EquationToken *)[tokens objectAtIndex:3]).valid, NULL);

  }

  {

    Equation *equation = [[Equation alloc] initWithString:@"()()"];

    NSArray *tokens = equation.tokens;

    STAssertTrue(tokens.count == 4, NULL);

    STAssertTrue(((EquationToken *)[tokens objectAtIndex:0]).valid, NULL);

    STAssertTrue(((EquationToken *)[tokens objectAtIndex:1]).valid, NULL);

    STAssertTrue(((EquationToken *)[tokens objectAtIndex:2]).valid, NULL);

    STAssertTrue(((EquationToken *)[tokens objectAtIndex:3]).valid, NULL);

  }

  {

    Equation *equation = [[Equation alloc] initWithString:@")("];

    NSArray *tokens = equation.tokens;

    STAssertTrue(tokens.count == 2, NULL);

    STAssertFalse(((EquationToken *)[tokens objectAtIndex:0]).valid, NULL);

    STAssertFalse(((EquationToken *)[tokens objectAtIndex:1]).valid, NULL);

  }

  {

    Equation *equation = [[Equation alloc] initWithString:@"())"];

    NSArray *tokens = equation.tokens;

    STAssertTrue(tokens.count == 3, NULL);

    STAssertTrue(((EquationToken *)[tokens objectAtIndex:0]).valid, NULL);

    STAssertTrue(((EquationToken *)[tokens objectAtIndex:1]).valid, NULL);

    STAssertFalse(((EquationToken *)[tokens objectAtIndex:2]).valid, NULL);

  }

  {
    Equation *equation = [[Equation alloc] initWithString:@"(()))("];

    NSArray *tokens = equation.tokens;

    STAssertTrue(tokens.count == 6, NULL);

    STAssertTrue(((EquationToken *)[tokens objectAtIndex:0]).valid, NULL);

    STAssertTrue(((EquationToken *)[tokens objectAtIndex:1]).valid, NULL);

    STAssertTrue(((EquationToken *)[tokens objectAtIndex:2]).valid, NULL);

    STAssertTrue(((EquationToken *)[tokens objectAtIndex:3]).valid, NULL);

    STAssertFalse(((EquationToken *)[tokens objectAtIndex:4]).valid, NULL);

    STAssertFalse(((EquationToken *)[tokens objectAtIndex:5]).valid, NULL);

  }

}
Testing Invalid Cases
You also should test for invalid cases. Listing 4–38 contains a testInvalid: method that tests for an array of invalid tokens and an invalid number (two decimal points).
Listing 4–38. Testing Invalid Cases
- (void)testInvalid

{

  Equation *equation = [[Equation alloc] initWithString:@"invalid0.3.3"];

  NSArray *tokens = equation.tokens;

  STAssertTrue(tokens.count == 8, NULL);

  [self helperTestToken:[tokens objectAtIndex:0] type:EquationTokenTypeInvalid

value:@"i"];

  [self helperTestToken:[tokens objectAtIndex:1] type:EquationTokenTypeInvalid

value:@"n"];

  [self helperTestToken:[tokens objectAtIndex:2] type:EquationTokenTypeInvalid

value:@"v"];

  [self helperTestToken:[tokens objectAtIndex:3] type:EquationTokenTypeInvalid

value:@"a"];

  [self helperTestToken:[tokens objectAtIndex:4] type:EquationTokenTypeInvalid

value:@"l"];

  [self helperTestToken:[tokens objectAtIndex:5] type:EquationTokenTypeInvalid

value:@"i"];

  [self helperTestToken:[tokens objectAtIndex:6] type:EquationTokenTypeInvalid

value:@"d"];

  [self helperTestToken:[tokens objectAtIndex:7] type:EquationTokenTypeNumber

value:@"0.3.3"];

  STAssertFalse(((EquationToken *)[tokens objectAtIndex:7]).valid, NULL);

}
Run all these tests to verify that they all pass. Congratulations—your tokenizing work is complete!
Showing the Equation
You’ve set the equation entry field to show rich text, and you’ve tokenized the equations, but you haven’t yet integrated the tokenizing into the equation entry field. You also haven’t done anything about syntax highlighting or pushing exponents to superscript. In this section, you integrate the tokenize: routine into the equation entry controller, adding syntax highlighting and exponent superscripting while you’re at it.
Many syntax highlighting applications allow users to configure the colors used for various bits of text, and some even allow users to create and share themes of colors that span all the various token types. We’ve opted not to be so accommodating, choosing the simpler route of hard-coding the colors. Hard-coding the colors directly into the EquationToken instances themselves is tempting, but EquationTokens really are model objects, and color is a view attribute, so instead we’re going to put color under the control of the EquationEntryViewController object. This way, EquationTokens don’t have any control over how they’re displayed, and different views can display them differently with respect to colors or fonts.
Setting the Colors
You want to control both the foreground colors and the background colors for the tokens. For the foreground colors, create a dictionary called COLORS that uses the type of the token as the key and an NSColor instance as the value. For the background colors, use white for everything except invalid tokens, for which you use red. Start by implementing the foreground colors. Open EquationEntryViewController.m and import the EquationToken.h header:
#import "EquationToken.h"
Declare a static NSDictionary instance:
static NSDictionary *COLORS;
Fill the dictionary in the class’s initialize: method. Because NSDictionary requires objects for keys and the type field of an EquationToken instance is an enum, which is a primitive int, convert the type to an NSNumber instance, which is an object, before using it as a key. Listing 4–39 shows the initialize: method.
Listing 4–39. Filling the Colors Dictionary
+ (void)initialize

{

  COLORS = [NSDictionary dictionaryWithObjectsAndKeys:

    [NSColor whiteColor],   [NSNumber numberWithInt:EquationTokenTypeInvalid],

    [NSColor blackColor],   [NSNumber numberWithInt:EquationTokenTypeNumber],

    [NSColor blueColor],    [NSNumber numberWithInt:EquationTokenTypeVariable],

    [NSColor brownColor],   [NSNumber numberWithInt:EquationTokenTypeOperator],

    [NSColor purpleColor],  [NSNumber numberWithInt:EquationTokenTypeOpenParen],

    [NSColor purpleColor],  [NSNumber numberWithInt:EquationTokenTypeCloseParen],

    [NSColor orangeColor],  [NSNumber numberWithInt:EquationTokenTypeExponent],

    [NSColor cyanColor],    [NSNumber numberWithInt:EquationTokenTypeSymbol],

    [NSColor magentaColor], [NSNumber numberWithInt:EquationTokenTypeTrigFunction],

    [NSColor whiteColor],   [NSNumber numberWithInt:EquationTokenTypeWhitespace],

    nil];

}
We’re somewhat arbitrary in our color selections, so feel free to change them. Notice, though, that the code uses NSDictionary’s dictionaryWithObjectsAndKeys: static method, which takes entries in value, key order. Notice also that the code converts the EquationToken types to objects using NSNumber’s numberWithInt: method.
Now it’s time to colorize the equation strings.
Colorizing the Equation
Each time the user types in the equation entry field, the controlTextDidChange: method in EquationEntryViewController fires. Graphique currently uses that method to validate the equation. Now, you’ll add code to that method to colorize the equation. Earlier in this chapter, we discussed Cocoa’s attributed strings. At long last, we’re ready to use them to add color attributes to the equation.
The existing controlTextDidChange: method creates an equation instance from the text in the equation text field. Now, it will create a mutable attributed string from the text in the equation text field, add color attributes to the mutable attributed string, and set the mutable attributed string back into the equation text field. When these steps complete, the equation entry will have syntax highlighting colors.
To add the color attributes, loop through all the tokens in the equation, using an index variable, i, to keep track of where the current token is in the attributed string. For each token, create a range (an NSRange instance) that corresponds to the range of characters that the current token occupies in the attributed string. Look up the proper foreground color for the token in the COLORS dictionary and set the foreground color using this code:
// Add the foreground color

[attributedString addAttribute:NSForegroundColorAttributeName value:[COLORS

objectForKey:[NSNumber numberWithInt:token.type]] range:range];
The addAttribute:value:range adds an attribute to an attributed string. The first parameter specifies the type of attribute to add, which in this case is NSForegroundColorAttributeName, meaning a foreground color attribute. The second parameter, value, specifies the value for the attribute, which in this case is the NSColor value corresponding to the current token’s type. Finally, the range parameter specifies the range in the attributed string to which to apply the attribute you’re adding.
Make a similar call to set the background color, only this time use NSBackgroundColorAttributeName for the first parameter. Determine the color by checking the valid member of token, passing a white color if the token is valid and a red color if the token is not valid. The call looks like this:
// Add the background color

[attributedString addAttribute:NSBackgroundColorAttributeName value:token.valid ?

[NSColor whiteColor] : [NSColor redColor] range:range];
Listing 4–40 shows the updated controlTextDidChange: method that colorizes the equation.
Listing 4–40. Colorizing the Equation
- (void)controlTextDidChange:(NSNotification *)notification

{

  Equation *equation = [[Equation alloc] initWithString: [self.textField stringValue]];


  // Create a mutable attributed string, initialized with the contents of the equation

text field

  NSMutableAttributedString *attributedString = [[NSMutableAttributedString alloc] initWithString:[self.textField stringValue]];


  // Variable to keep track of where we are in the attributed string

  int i = 0;


  // Loop through the tokens

  for (EquationToken *token in equation.tokens)

  {

    // The range makes any attributes we add apply to the current token only

    NSRange range = NSMakeRange(i, [token.value length]);


    // Add the foreground color

    [attributedString addAttribute:NSForegroundColorAttributeName value:[COLORS objectForKey:[NSNumber numberWithInt:token.type]] range:range];


    // Add the background color

    [attributedString addAttribute:NSBackgroundColorAttributeName value:token.valid ? [NSColor whiteColor] : [NSColor redColor] range:range];


    // Advance the index to the next token

    i += [token.value length];

  }

  // Set the attributed string back into the equation entry field

  [self.textField setAttributedStringValue:attributedString];


  NSError *error = nil;

  if(![equation validate:&error])

  {

    // Validation failed, display the error

    [feedback setStringValue:[NSString stringWithFormat:@"Error %d: %@", [error

code],[error localizedDescription]]];

  }

  else

  {

    [feedback setStringValue:@""];

  }

}
You haven’t run the application in awhile, but now is a good time. Build and run Graphique and start typing an equation. Experiment with both valid and invalid equations. You should see your equations in color, which is difficult to show with grayscale screenshots, but Figure 4–18 shows a sample equation with a parenthetical problem. You’ll also notice an error message complaining that you’ve typed an invalid character—the letters in “sin.” You’ll fix that later this chapter.
Figure 4–18. A syntax-colored equation
Superscripting Exponents
If you type an exponent in the equation entry field, however, whether implicit (follows a variable or a close parenthesis) or explicit (follows a caret), you’ll notice that it isn’t superscripted at all, as shown in Figure 4–19. All three instances of “2” in that equation are exponents, as evidenced by their orange foreground color. To make them appear in superscript, we must add attributes to our attributed string to superscript them.
Figure 4–19. Exponents that don’t display as superscript
An attributed string supports an attribute called NSSuperscriptAttributeName that sounds tempting but in practice doesn’t provide enough display control for our needs. Its documentation says its value parameter is an NSNumber containing an integer, but it doesn’t tell you how far upward that integer will shift your superscripted attribute. Playing with this attribute shows that you want a little better control in how far your superscripted text is offset from the baseline. Fortunately, attributed strings offer an attribute type named NSBaselineOffsetAttributeName, whose value parameter is documented to take an NSNumber containing a floating-point value that represents the points to offset the text from the baseline.
Moving the text upward is insufficient, however; it should also shrink by setting an NSFontAttributeName attribute. You could play with absolute values for both the text size and the baseline offset, but you may want to change the size of the equation entry field’s font (and in the next chapter, you indeed do). It’s better, instead, to make the exponent text a percentage of the current text’s size and move it off the baseline some percentage of the size as well. Because you can get the size of the current text, you can easily accomplish this. For exponents, then, make them half the height of the other text and move them halfway up the baseline.
The place to add the code to superscript the exponents is right after setting the background color but before advancing the index to the next token. This code should first determine whether the current token is an exponent and, if it is, perform the following actions in this sequence:
- Calculate the height of the exponent and baseline shift by multiplying the text height by 0.5.
- Set the exponent’s font to a system font with the size calculated.
- Shift the exponent’s baseline upward by the size calculated.
Listing 4–41 shows the updated controlTextDidChange: method with the code to superscript the exponents.
Listing 4–41. Superscripting the Exponents
- (void)controlTextDidChange:(NSNotification *)notification

{

  Equation *equation = [[Equation alloc] initWithString: [self.textField stringValue]];


  // Create a mutable attributed string, initialized with the contents of the equation

text field

  NSMutableAttributedString *attributedString = [[NSMutableAttributedString alloc] initWithString:[self.textField stringValue]];


  // Variable to keep track of where we are in the attributed string

  int i = 0;


  // Loop through the tokens

  for (EquationToken *token in equation.tokens)

  {

    // The range makes any attributes we add apply to the current token only

    NSRange range = NSMakeRange(i, [token.value length]);


    // Add the foreground color

    [attributedString addAttribute:NSForegroundColorAttributeName value:[COLORS objectForKey:[NSNumber numberWithInt:token.type]] range:range];


    // Add the background color

    [attributedString addAttribute:NSBackgroundColorAttributeName value:token.valid ? [NSColor whiteColor] : [NSColor redColor] range:range];


    // If token is an exponent, make it superscript

    if (token.type == EquationTokenTypeExponent)

    {

      // Get the height of the rest of the text

      CGFloat height = [[textField font] pointSize] * 0.5;


      // Set the exponent font height

      [attributedString addAttribute:NSFontAttributeName value:[NSFont systemFontOfSize:height] range:range];


      // Shift the exponent upwards

      [attributedString addAttribute:NSBaselineOffsetAttributeName value:[NSNumber numberWithInt:height] range:range];

    }


    // Advance the index to the next token

    i += [token.value length];

  }

  // Set the attributed string back into the equation entry field

  [self.textField setAttributedStringValue:attributedString];


  NSError *error = nil;

  if(![equation validate:&error])

  {

    // Validation failed, display the error

    [feedback setStringValue:[NSString stringWithFormat:@"Error %d: %@", [error

code],[error localizedDescription]]];

  }
  else

  {

    [feedback setStringValue:@""];

  }

}
Now run the application and type the same equation. Your exponents should be smaller and should shift upward, as shown in Figure 4–20.
Figure 4–20. The exponents, smaller and shifted upward
The equation entry field now stands complete, but you still must integrate it into the validator and tell the graphing evaluation how to interpret things like implicit multiplication. Keep reading to finish integrating the equation entry field into the application.
Updating the Validator
The equation entry field has grown from its humble beginnings, but the validator hasn’t kept pace. For example, it flags the trigonometric functions as invalid, shown in Figure 4–21, even though you’ve explicitly added support for them. It’s fooled by invalid parenthesis matching like “)(” as well, shown in Figure 4–22, even though you’ve built a better parenthesis matcher. It’s time for an upgrade.
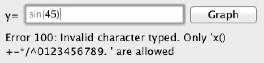
Figure 4–21. The old validator flagging sin() as invalid
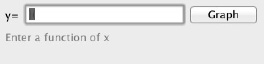
Figure 4–22. The old validator fooled by invalid parentheses
Happily, you can use the newly tokenized equation to do the validation. Remember that each token stores whether or not it’s valid inside its valid member? You can loop through the tokens in the equation and test each token’s valid member to enforce validation.
You’ve also expanded the list of acceptable characters to include trigonometric functions and the symbols pi and e, so you should update the message for invalid entry. Refer to the comment in the validate: method, which is in Equation.m, and update the requirements for the first rule:
// Validation rules
// 1. Only digits, operators, variables, parentheses, trigonometric functions, and symbols allowed

// 2. There should be the same amount of closing and opening parentheses

// 3. no two consecutive operators
Gut the rest of the validate: method and add the code to loop through the equation’s tokens and test each for validity. If we get an invalid token, test its type to see what error code to return: 102 for an invalid open parenthesis, 103 for an invalid close parenthesis, and 100 for all other invalid tokens.
To enforce rule #3, no two consecutive operators, store a pointer to the previous token in the loop, so you can test for back-to-back operators. Listing 4–42 shows the updated validate: method.
Listing 4–42. The Updated validate: Method
- (BOOL)validate:(NSError**)error

{

  // Validation rules

  // 1. Only digits, operators, variables, parentheses, trigonometric functions, and symbols allowed

  // 2. There should be the same amount of closing and opening parentheses

  // 3. no two consecutive operators


  NSString *allowed = @"x, 0-9, (), operators, trig functions, pi, and e";

  EquationToken *previousToken = nil;

  for (EquationToken *token in self.tokens)

  {

    if (!token.valid)

    {

      if (token.type == EquationTokenTypeOpenParen)

      {

        return [self produceError:error withCode:102 andMessage:@"Too many open parentheses"];

      }

      else if (token.type == EquationTokenTypeCloseParen)

      {

        return [self produceError:error withCode:103 andMessage:@"Too many closed parentheses"];

      }

      else

      {

        return [self produceError:error withCode:100 andMessage:[NSString stringWithFormat:@"Invalid character typed. Only %@ are allowed", allowed]];

      }

    }

    if (token.type == EquationTokenTypeOperator && previousToken.type == EquationTokenTypeOperator)

    {

      return [self produceError:error withCode:101 andMessage:@"Consecutive operators

are not allowed"];

    }

    previousToken = token;

  }

  return YES;
}
After updating the validate: method, run the Graphique tests and verify that they all still pass. They all should, because you’ve enforced the same rules and returned the same error codes for the same conditions. Now, run Graphique and enter some invalid input. You can see that the rules are all applied as you’d expect. See, for example, Figure 4–23, which shows some invalid input.
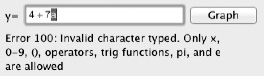
Figure 4–23. Invalid input validated by our new validator
Updating the Evaluator
You’ve expanded the range of what’s considered valid input in the equation entry field. You’ve added implicit multiplication, implicit exponents, and the symbols pi and e. The graphing function still works as long as equations don’t use these additions, but any equation that uses the additional functionality doesn’t graph properly. Compare, for example, the graph for x^2 in Figure 4–24 with the graph for x2 in Figure 4–25. They should be identical, but they obviously differ.

Figure 4–24. The graph for x^2

The graph for x^2 shows a nice parabola. The graph for x2 remains starkly blank. Although both the parser and the validator recognize the 2 as an exponent, the evaluator doesn’t.
As you’ll recall, the evaluator uses awk to evaluate the equation, passing the text of the equation entry field to awk as the equation. To add support for implicit multiplication, implicit exponents, and symbols, you must alter the equation that we send to awk. Do that in a method called expand:. Declare this method in the class extension at the top of Equation.m, as shown in Listing 4–43.
Listing 4–43. Declaring the expand: Method
@interface Equation ()

- (BOOL)produceError:(NSError**)error withCode:(NSInteger)code andMessage:(NSString*)message;

- (void)tokenize;

- (EquationToken *)newTokenFromString:(NSString *)string;

- (NSString *)expand;

@end
In the implementation of expand:, build an equation string by iterating through the equation’s tokens. When you detect that a particular token requires special handling, inject any special handling into the expanded string. When you’re done iterating through the equation’s tokens, return the expanded string.
The following are the special cases you must adjust for:
- For implicit exponents, if the current token is an exponent and the previous token isn’t already a ^ operator, insert a ^ operator before appending the exponent.
- For implicit multiplication, if the current token is an open parenthesis and the previous token is a variable or a number, insert a * operator before appending the open parenthesis.
- Also for implicit multiplication, if the current token is a variable or a symbol and the previous token is a number, insert a * operator before appending the variable or symbol.
- For pi (whether “pi” or “π”), put in the value
M_PIfrommath.hinstead. - For e, put in the value
M_Efrommath.hinstead.
See Listing 4–44 for the implementation of the expand: method.
Listing 4–44. The expand: Method
- (NSString *)expand

{

  NSMutableString *expanded = [NSMutableString string];


  EquationToken *previousToken = nil;

  for (EquationToken *token in self.tokens)

  {

    // Get the value of the current token

    NSString *value = token.value;


    if (previousToken != nil)

    {

      // Do implicit exponents

      if (token.type == EquationTokenTypeExponent && ![previousToken.value isEqualToString:@"^"])

      {

        [expanded appendString:@"^"];

      }


      // Do implicit multiplication when token is an open parenthesis

      if (token.type == EquationTokenTypeOpenParen && (previousToken.type == EquationTokenTypeVariable || previousToken.type == EquationTokenTypeNumber))

      {

        [expanded appendString:@"*"];

      }


      // Do implicit multiplication when token is a variable or symbol

      if ((token.type == EquationTokenTypeVariable || token.type == EquationTokenTypeSymbol) && previousToken.type == EquationTokenTypeNumber)

      {
        [expanded appendString:@"*"];

      }

    }


    // Convert pi

    if ([value isEqualToString:@"pi"] || [value isEqualToString:@"u03c0"])

    {

      value = [NSString stringWithFormat:@"%f", M_PI];

    }


    // Convert e

    if ([value isEqualToString:@"e"])

    {

      value = [NSString stringWithFormat:@"%f", M_E];

    }


    // Append the current token's value, which we may have adjusted

    [expanded appendString:value];


    // Keep a pointer to the previous token

    previousToken = token;

  }

  return expanded;

}
You now must change your code in two places in Equation.m to call the expand: method:
- In
evaluateForX:, where it builds the equation string to pass toawk - In
description:, where it returns the equation string it’s graphing
Listing 4–45 shows the updated methods.
Listing 4–45. The Updated evaluateForX: and description: Methods
- (float)evaluateForX:(float)x

{

  NSTask *task = [[NSTask alloc] init];

  [task setLaunchPath: @"/usr/bin/awk"];


  NSArray *arguments = [NSArray arrayWithObjects: [NSString stringWithFormat:@"BEGIN {

x=%f ; print %@ ; }", x, [self expand]], nil];

  [task setArguments:arguments];


  NSPipe *pipe = [NSPipe pipe];

  [task setStandardOutput:pipe];


  NSFileHandle *file = [pipe fileHandleForReading];

  [task launch];


  NSData *data = [file readDataToEndOfFile];


  NSString *string = [[NSString alloc] initWithData:data encoding:

NSUTF8StringEncoding];

  float value = [string floatValue];
  return value;

}


- (NSString *)description

{

  return [NSString stringWithFormat:@"Equation [%@]", [self expand]];

}
Now, run Graphique again, and try some equations with pi, e, implicit multiplication, and implicit exponents. Figure 4–26 shows the graph for the equation “2x2 + 3(x + pi)3.”
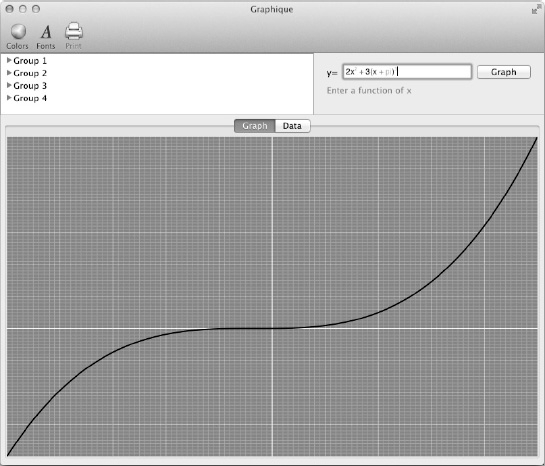
Figure 4–26. The updated equation validator with implicit exponents, implicit multiplication, and pi
Put a breakpoint on the first line of the evaluateForX: method and click the Graph button. Execution will stop at that line of code, and in the debugger window, type the following:
po self
and hit Enter. You’ll see the expanded equation, as shown here:
(gdb) po self

Equation [2*x^2 + 3*(x + 3.141593)^3]
Summary
Programmers often speak disdainfully about improved user interfaces, calling them “eye candy” and haughtily referring to themselves as “back-end programmers.” You can ride disdain for UI to obscurity, or you can focus on improving the UI for your programs so that they’re easier to use and they provide more value. They say a picture is worth 1,000 words, and we can see that a graph is worth more than 101 values in a table. You gain much more understanding about an equation from a graph than from a textual list of values.
Graphique’s improved equation editor makes equations easier to enter and understand as well. By colorizing the equations and matching their syntax to how people normally phrase equations, we minimize barriers for end users and invite them to use and experiment with Graphique.