
Chapter 5
User Preferences and the File System
Every time you launch Graphique, it starts over. Any equations you've entered disappear. Any graphs you've created, however clever or stunning, vanish. Graphique has no permanence. This might be fine for utility or one-shot applications, but users expect more out of applications like Graphique. They expect to be able to recall recent work or preserve output. They also expect to be able to set some preferences to customize behavior. In this chapter, we add some permanence to Graphique.
One of the things we do in this chapter is finally use the Fonts and Colors toolbar items to allow users to set the font used to enter equations and the color used to draw the line of the graph. We also implement the Preferences menu item so that users can decide whether the Graph view or the Data view appears first when Graphique launches.
We introduce you to writing data to the file system by allowing users to export their graphs as image files, so they can keep their graphs, post them to Flickr, or tweet them.
At the end of this chapter, Graphique will look like Figure 5–1. What's more, it will have permanence.

Figure 5–1. Graphique with permanence
Managing User Preferences
Major operating systems provide ways for applications to store user preferences, or settings, so that users can configure applications to look or behave a certain way and have them continue to look and behave that way any time they're launched. Microsoft Windows, for example, provides the system registry and an API on top of it to store user preferences. Linux and the various Unix flavors traditionally use dot files, which are hidden files whose names start with a dot (for example, .vimrc) that are stored in a user's home directory and contain the user preferences. Despite being a Unix-based operating system, OS X provides yet another way to store user preferences: user defaults, also known as user preferences, that are stored in property lists, which are binary XML files with a .plist extension and are often called plist files. They're usually found in a user's home directory, under the Library/Preferences directory, and use the applications' bundle identifiers and names in their file names. You can find one for Xcode, for example, called com.apple.Xcode.plist. Depending on whether you've clicked any toolbar buttons in Graphique, you may find that one for Graphique already exists. If it does, it's called book.macdev.Graphique.plist. You'll recognize book.macdev.Graphique as the bundle identifier you entered when you first created the project in Chapter 1.
Opening a property list file in most text editors reveals some recognizable strings like NSObject splattered among a load of gibberish, forcing you to admit that these files do indeed use a binary format. Apple provides an editor for these files as part of the Developer Tools called Property List Editor. Like Interface Builder, it was a stand-alone tool before Xcode 4's release but now comes integrated with Xcode. It displays a property list's values inside a two-column table. Other options for editing plist files exist as well: BBEdit and TextWrangler, two text editors offered by Bare Bones Software ( http://barebones.com), decode the binary data from the file and display the file as if it were normal XML. Fat Cat Software offers a specialized property list editor called PlistEdit Pro (www.fatcatsoftware.com/plisteditpro/) that offers both a structured editor and a text editor. You can use Xcode's Property List Editor or one of the third-party offerings to edit these files. Take care when editing these files, however, because messing them up can cause some applications not to launch and can even cause problems with the operating system. It's no coincidence that Apple doesn't provide tools for nondevelopers to edit these files.
What Apple does provide to all users, however, is a command-line tool called defaults. This tool allows you to both read and write user defaults. To see the defaults tool work, go to a terminal prompt and type the following:
defaults read com.apple.dock
You'll see some output that reflects your preferences for the Dock that comes with OS X. The output on one of our machines, for example, starts like this:
{

    autohide = 1;

    "checked-for-launchpad" = 1;

    "mod-count" = 55;

    orientation = left;

    "persistent-apps" =     (

    );
We can change preferences settings in the property list files by passing write instead of read as the first argument to defaults and specifying what we want to change. We could, for example, turn off autohide for our Dock by typing the following:
defaults write com.apple.dock autohide -boolean NO
This will change the value in the property list file, and to make it take effect, you must restart the Dock by typing this:
killall Dock
Preferences in OS X applications can be set through the defaults tool, but most applications offer GUI screens as well to read and write user preferences. In this chapter, we let users set their preferences for the font used for the equation entry editor. We use the toolbar button that Graphique already sports, Fonts, to control this setting. We use the Colors toolbar button to allow users to change the color for the line drawn in the graph. We also create a custom preference panel that will appear when users select Graphique from the application menu that lets users set the initial tab (Graph or data) to display when Graphique is launched.![]() Preferences...
Preferences...
Understanding NSUserDefaults
Apple provides the defaults tool for command-line preference interaction and the NSUserDefaults class for programmatically interacting with user preferences. The NSUserDefaults class allows you to get and set user preferences much as you get and set values in a dictionary object, and it reduces the property list file to an implementation detail. You as a programmer don't have to know anything about property list files to use NSUserDefaults (although understanding them comes in handy when debugging issues with your code).
To use NSUserDefaults, you call the standardUserDefaults: class method, which returns the current user's NSUserDefaults instance, which represents that user's defaults database. You then call type-specific getter and setter methods on the NSUserDefaults instance to get and set preference values as you need them. For example, the following code sets the default (for some fictional application) for the key TwitterName to the string @hoop33, the default for the key MaxTweets to the number 75, and the default for the key CheckAutomatically to the boolean YES :
NSUserDefaults *userDefaults = [NSUserDefaults standardUserDefaults];

[userDefaults setObject:@"@hoop33" forKey:@"TwitterName"];

[userDefaults setInteger:75 forKey:@"MaxTweets"];

[userDefaults setBool:YES forKey:@"CheckAutomatically"];
You can read the defaults back using this code:
NSUserDefaults *userDefaults = [NSUserDefaults standardUserDefaults];

NSString *twitterName = [userDefaults stringForKey:@"TwitterName"];

NSInteger maxTweets = [userDefaults integerForKey:@"MaxTweets"];

BOOL checkAutomatically = [userDefaults boolForKey:@"CheckAutomatically"];
Persisting Default Values
NSUserDefaults uses a caching mechanism to reduce disk access, so you can read and write user preference values in your applications without worrying about impacting I/O performance. NSUserDefaults takes care of periodically flushing the cache to disk. We'll verify this later in this chapter when we set a user default and then use the defaults tool from the command line to read Graphique's property list file from disk to see a delay before the value appears. If you want to flush the cache yourself, call NSUserDefaults 's synchronize: method directly, like this:
NSUserDefaults *userDefaults = [NSUserDefaults standardUserDefaults];

[userDefaults synchronize];
Understanding Search Domains
Up to now, we've used the words preferences and defaults interchangeably without justifying ourselves. In the real world, preferences means settings that the user has specifically indicated that he or she wants, while defaults means sensible settings that the programmer has set up beforehand to be used in lieu of any user-set preferences. In Apple-world, however, preferences and defaults mean the same thing, and indeed the class is called NSUserDefaults, not NSUserPreferences. To understand this, you must understand what Apple calls search domains.
When you set up a user defaults object using code like this:
NSUserDefaults *userDefaults = [NSUserDefaults standardUserDefaults];
Cocoa sets up a search list in a specific order for accessing default values. Each item in the search list is called a domain, and when applications access preference values through the userDefaults object, Cocoa starts at the top of the search list, looking for a value that matches the key specified. When it finds a match, it returns the value. If it doesn't find a match, it returns nil. The domain order in the search list is as follows:
- Command-line arguments, which are passed in the format
-key value - The application's property list file
- Global defaults
- Language-specific defaults for any of the user's preferred language settings
- Registered defaults, which are temporary defaults registered by the application
You'll rarely use command-line arguments for anything other than occasional debugging, because users launch their apps through LaunchPad, the Dock, the Finder, or a quick-launcher like Alfred, QuickSilver, or LaunchBar, so they don't as a rule pass any command-line arguments. We've covered the second search domain, the application's property list file, and will continue to do so in the chapter. Your application may use some global settings, and we're not going to go into language-specific settings. Registered defaults, however, are worth exploring a little deeper.
If the search has arrived at registered defaults, it means that no command-line default has been set, the user hasn't specified anything in the application property list, no global default has been set, and no language-specific setting has been specified. We're at the end of the line, but before the search drops off the cliff into nil, registered defaults allow us as programmers to apply sensible defaults for any properties we read. So, instead of writing code like this:
NSUserDefaults *userDefaults = [NSUserDefaults standardUserDefaults];

NSString *importantSetting = [userDefaults stringForKey:@"Important"];

if (importantSetting == nil)

{

  // Whoa -- nothing has been set for this important value!

  // Set it to a reasonable default so our application doesn't crash

  importantSetting = @"ReasonableDefault";

}
we can instead register a default and be guaranteed that we'll get that value returned if no other value trumps it earlier in the search chain, so that the code to get the value is simply this:
NSUserDefaults *userDefaults = [NSUserDefaults standardUserDefaults];

NSString *importantSetting = [userDefaults stringForKey:@"Important"];
To register defaults, you call the registerDefaults: method on your NSUserDefaults instance, passing a dictionary of keys and values. You normally do this in your application delegate's class method initialize:, which is called when your application delegate's class loads. This is an example of registering defaults:
+ (void)initialize

{

  NSUserDefaults *userDefaults = [NSUserDefaults standardUserDefaults];

  NSDictionary *appDefaults = [NSDictionary dictionaryWithObject:@"ReasonableDefault"

forKey:@"Important"];

  [userDefaults registerDefaults:appDefaults];

}
Note that any defaults you register aren't persisted to disk, in the application's property list file or elsewhere. They're a volatile fallback mechanism to provide sensible defaults, so should stay in your code, in your application delegate's initialize: method, as long as your application relies on sensible default values.
Resetting Defaults to Reasonable Values
NSUserDefaults provides a static method called resetStandardUserDefaults: that is often mistaken as a method to rid the application's property list file of any defaults the user has set. That's not at all what this method does. Instead, it flushes the defaults cache and unloads it so that a subsequent call to standardUserDefaults: reloads the cache with the default search order. This can be useful if you alter the domain search order for any reason and need to reset it, but since you probably won't, we don't cover that in this book.
What you really are aiming for when you want to reset any user settings to reasonable defaults is to delete any defaults they've set in the application's property list and allow searches to fall through to your registered defaults. To delete a default, call the removeObjectForKey: method on your NSUserDefaults instance, passing the name of the key you want to remove. To reset the “Important” default to use our registered default, for example, you'd use this code:
NSUserDefaults *userDefaults = [NSUserDefaults standardUserDefaults];

[userDefaults removeObjectForKey:@"Important"];
Now, searches for the Important key won't find a match in the application's property list domain and will fall through to the registered default.
Setting the Font for the Equation Entry Field
Armed with an understanding of NSUserDefaults, we're ready to allow users to set the font used in the equation entry field and have that setting persist through subsequent launches of Graphique. When we built the user interface for Graphique, we added a toolbar at the top of the Graphique window that includes a Fonts toolbar button. You may have tried clicking that button; if you haven't, click it now. When you click the Fonts toolbar button, the Font panel displays, as shown in Figure 5–2. The fonts listed on your machine will differ, depending on what fonts you've installed, but the panel itself should match.

Figure 5–2. The Fonts panel
The menu for Graphique also includes a way to open the Fonts panel: Format . If you select that menu item, you should see the same Fonts panel you saw when you clicked the Fonts toolbar button. To understand how Graphique knows to display the Fonts panel, let's start by dissecting the ![]() Font
Font ![]() Show Fonts
Show FontsShow Fonts menu item. Select MainMenu.xib in Xcode to open it in Interface Builder, and then drill down into the Format menu item. Once you've selected that, open the Connections inspector. Your Xcode should resemble Figure 5–3.![]() Font
Font ![]() Show Fonts
Show Fonts

Figure 5–3. Inspecting the connections of the Show Fonts menu item
In the Sent Actions section, you see that the orderFrontFontPanel: selector is connected to Font Manager. Font Manager is an object that Xcode created for us when we created the Graphique project, and you can find it in the object hierarchy in MainMenu.xib (shown as the last item in Figure 5–4). It's of type NSFontManager, which you can verify in the Identity inspector, and it's connected to five menu items, as the Connections inspector (shown in Figure 5–5) shows: the Show Fonts menu item that we already looked at and the menu items for Bold, Italic, Smaller, and Bigger.
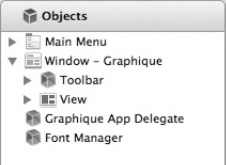
Figure 5–4. The Font Manager object
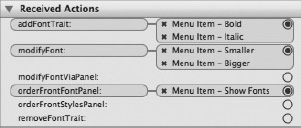
Figure 5–5. The Font Manager's connections
As you'd expect, the orderFrontFontPanel: selector is a method on NSFontManager that opens the Fonts panel, if it's not already open, and brings it to the front. You'd expect the Fonts toolbar item to be wired the same way, but if you select the Fonts toolbar item in the object hierarchy in Interface Builder and open the Connections inspector, you'll find no connections. Open the Attributes inspector instead, and you'll see that it lists its identifier as NSToolbarShowFontsItem, as shown in Figure 5–6.
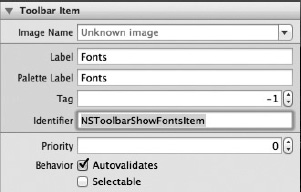
Figure 5–6. The attributes for the Fonts toolbar item, including the NSToolbarShowFontsItem identifier
When the toolbar detects that an item with this identifier is clicked, it knows to tell the Font Manager to open the Fonts panel. This is a standard toolbar item that comes with Cocoa.
Responding to Font Changes
After users display the Fonts panel, they can change the selected font. We must detect that change and update two things: the user preferences and the font used in the equation entry field. By updating the user preferences, we ensure that the user's selected font persists through application launches. By updating the font used in the equation entry field, we let the user see the chosen font.
When the selected font in the Fonts panel changes, the application's shared NSFontManager instance sends a message called changeFont: up what's called the responder chain. Think of the various objects that comprise your application as a line of eager customer service representatives ready to respond to your needs. When messages are sent to this line, each representative, or object, has the opportunity either to respond to the message or to ignore it and let the next object in line have the opportunity to respond. The message then continues to travel down the line until either someone responds or it passes the last object in line, typically your application delegate. This is a fairly typical pattern in event-oriented programming.
The entire responder chain doesn't always get the opportunity to respond to each message, because the message doesn't always start at the “front” of the line. Where the message starts depends on what currently has the focus in the application. The selected object is called the First Responder (which, like an unruly customer service representative, it can refuse to become, but let's not get too carried away with the metaphor), and the message starts there and works its way up the hierarchy. Understanding this is crucial to implementing our font-changing code. If, for example, we put our code to handle the font change in the equation entry controller, our code would get the changeFont: message only if the equation entry controller, or one of the objects it contains (such as the equation entry text field), has the focus. If the focus is currently anywhere else in the application, users could change the font in the Fonts panel and nothing would happen, which would lead to frustration and bug reports. Instead, we want the equation font to change in response to Fonts panel selection changes, no matter where the focus is in the application. We'll put our code, then, in our application delegate, so we'll always get the message.
We have one more hurdle to jump, though. As we said before, when the user changes the selected font in the Fonts panel, the changeFont: message is sent. We can put code to handle that message in our application delegate, and it would look something like this:
- (void)changeFont:(id)sender

{

  // Handle the font change

}
This works as long as the equation entry field doesn't have the focus. If the user is typing in the equation entry field, however, and then changes the font in the Fonts panel, nothing happens. Our changeFont: selector doesn't get called, and the font in the equation entry field remains the same. When the equation entry field has the focus, you see, it becomes the First Responder, and it swallows the changeFont: message and doesn't pass it on for our application delegate's implementation to handle. It's a little confusing why this happens, because it's an instance of NSTextField, as you'll recall, which has no changeFont: selector in its object hierarchy. When the equation entry field has the focus, however, Cocoa automatically overlays it with what it calls a field editor to handle the text entry and editing chores. This field editor is an NSTextView instance, which inherits from NSText, which implements changeFont: and swallows the message.
To help us avoid this pitfall, NSFontManager allows us to change the selector it calls when the font changes to anything of our choosing, so we can prevent the field editor from stealing our font change messages and can handle all font changes in our application delegate. We'll take advantage of this ability in the initialize: method of our application delegate after we set up the user defaults. Add this code in Listing 5–1 to GraphiqueAppDelegate.m to get the user defaults, register a reasonable font, and change the selector called when the font selection changes to changeEquationFont:.
Listing 5–1. Registering a Font in the User Defaults and Changing the Font Change Selector
+ (void)initialize

{

  // Get the user defaults

  NSUserDefaults *userDefaults = [NSUserDefaults standardUserDefaults];


  // Set the font to a reasonable choice and convert to an NSData object

  NSFont *equationFont = [NSFont systemFontOfSize:18.0];

  NSData *fontData = [NSArchiver archivedDataWithRootObject:equationFont];


  // Set the font in the defaults

  NSDictionary *appDefaults = [NSDictionary dictionaryWithObject:fontData forKey:@"equationFont"];

  [userDefaults registerDefaults:appDefaults];


  // Change the action for the Font Panel so that the text field doesn't swallow the

changes

  [[NSFontManager sharedFontManager] setAction:@selector(changeEquationFont:)];

}
You'll notice that we had to convert the NSFont to an NSData object, because NSUserDefaults doesn't support NSFont instances, but it does support NSData instances.
Implementing changeEquationFont:
The next step is to implement the changeEquationFont: method to get the user defaults, pull out its existing equation entry font, and ask the NSFontManager (stored in the sender object passed to changeEquationFont:) to convert it to the new selected font. Then, the implementation should store the new font in the user defaults and tell the equation entry controller to update itself to use the new font. You'll find this code in Listing 5–2.
Listing 5–2. Responding to Font Selection Changes
- (void)changeEquationFont:(id)sender

{

  // Get the user defaults

  NSUserDefaults *userDefaults = [NSUserDefaults standardUserDefaults];


  // Get the user's font selection and convert from NSData to NSFont

  NSData *fontData = [userDefaults dataForKey:@"equationFont"];

  NSFont *equationFont = (NSFont *)[NSUnarchiver unarchiveObjectWithData:fontData];


  // Convert the font to the new selection

  NSFont *newFont = [sender convertFont:equationFont];


  // Convert the new font into an NSData object and set it back into the user defaults

  fontData = [NSArchiver archivedDataWithRootObject:newFont];

  [userDefaults setObject:fontData forKey:@"equationFont"];


  // Tell the equation entry field to update to the new font

  [self.equationEntryViewController controlTextDidChange:nil];

}
Applying the New Font
The final step for responding to font changes is to actually use the new font in the equation entry field. In the controlTextDidChange: method in EquationEntryViewController.m, we already decorate the text with colors and exponent sizing. We'll augment this method to get the selected font from the user defaults and add a font attribute with the new font to the entire string. We also use the font manager's setSelectedFont:isMultiple: method to make sure that the font selected in the Fonts panel is the same font we're using in the equation entry field. That code looks like this:
// Get the user defaults

NSUserDefaults *userDefaults = [NSUserDefaults standardUserDefaults];


// Get the selected font

NSData *fontData = [userDefaults dataForKey:@"equationFont"];

NSFont *equationFont = (NSFont *)[NSUnarchiver unarchiveObjectWithData:fontData];


// Set the selected font in the font panel

[[NSFontManager sharedFontManager] setSelectedFont:equationFont isMultiple:NO];


// Set the font for the equation to the selected font

[attributedString addAttribute:NSFontAttributeName value:equationFont range:NSMakeRange(0, [attributedString length])];
We also change the code for the exponents to use the selected font. It looks like this:
// Calculate the height of the exponent as half the height of the selected font

CGFloat height = [equationFont pointSize] * 0.5;


// Set the exponent font height

[attributedString addAttribute:NSFontAttributeName value:[NSFont fontWithName:equationFont.fontName size:height] range:range];
Finally, we adjust the height of the text field to fit the selected font, like this:
// Adjust the height of the equation entry text field to fit the new font size

NSSize size = [textField frame].size;

size.height = ceilf([equationFont ascender]) - floorf([equationFont descender]) + 4.0;

[textField setFrameSize:size];
The method now looks like Listing 5–3.
Listing 5–3. The controlTextDidChange: Method
-(void)controlTextDidChange:(NSNotification *)notification

{

  Equation *equation = [[Equation alloc] initWithString: [self.textField stringValue]];


  // Create a mutable attributed string, initialized with the contents of the equation

text field

  NSMutableAttributedString *attributedString = [[NSMutableAttributedString alloc] initWithString:[self.textField stringValue]];


  // Get the user defaults

  NSUserDefaults *userDefaults = [NSUserDefaults standardUserDefaults];


  // Get the selected font

  NSData *fontData = [userDefaults dataForKey:@"equationFont"];

  NSFont *equationFont = (NSFont *)[NSUnarchiver unarchiveObjectWithData:fontData];


  // Set the selected font in the font panel

  [[NSFontManager sharedFontManager] setSelectedFont:equationFont isMultiple:NO];


  // Set the font for the equation to the selected font

  [attributedString addAttribute:NSFontAttributeName value:equationFont

range:NSMakeRange(0, [attributedString length])];


  // Variable to keep track of where we are in the attributed string

  int i = 0;


  // Loop through the tokens

  for (EquationToken *token in equation.tokens)

  {

    // The range makes any attributes we add apply to the current token only

    NSRange range = NSMakeRange(i, [token.value length]);


    // Add the foreground color

    [attributedString addAttribute:NSForegroundColorAttributeName value:[COLORS objectForKey:[NSNumber numberWithInt:token.type]] range:range];


    // Add the background color

    [attributedString addAttribute:NSBackgroundColorAttributeName value:token.valid ? [NSColor whiteColor] : [NSColor redColor] range:range];


    // If token is an exponent, make it superscript

    if (token.type == EquationTokenTypeExponent)

    {

      // Calculate the height of the exponent as half the height of the selected font

      CGFloat height = [equationFont pointSize] * 0.5;
      // Set the exponent font height

      [attributedString addAttribute:NSFontAttributeName value:[NSFont

fontWithName:equationFont.fontName size:height] range:range];


      // Shift the exponent upwards

      [attributedString addAttribute:NSBaselineOffsetAttributeName value:[NSNumber numberWithInt:height] range:range];

    }


    // Advance the index to the next token

    i += [token.value length];

  }


  // Adjust the height of the equation entry text field to fit the new font size

  NSSize size = [textField frame].size;

  size.height = ceilf([equationFont ascender]) - floorf([equationFont descender]) + 4.0;

  [textField setFrameSize:size];


  // Set the attributed string back into the equation entry field

  [self.textField setAttributedStringValue:attributedString];


  // Clean up

  [attributedString release];


  NSError *error = nil;

  if(![equation validate:&error])

  {

    // Validation failed, display the error

    [feedback setStringValue:[NSString stringWithFormat:@"Error %d: %@", [error

code],[error localizedDescription]]];

  }

  else

  {

    [feedback setStringValue:@""];

  }

  [equation release];

}
Build and run Graphique, bring up the Fonts panel, and change the font. You can see that, wherever your focus, you can change the selected font and see the new font in the equation entry panel. Figure 5–7, for example, shows the equation entry field using the Marker Felt font.
Figure 5–7. The equation entry field using the Marker Felt font
Setting the Line Color
Clicking the Colors button in Graphique's toolbar displays the color selection panel, as shown in Figure 5–8. Programming the color selection panel resembles programming the font selection panel, so you'll be able to transfer many of the concepts you just learned to selecting colors.
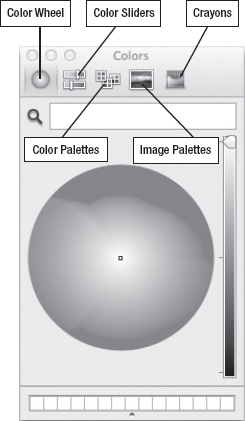
Figure 5–8. The color selection panel
Understanding Color Selection Modes
You'll notice in Figure 5–8 the five icons across the top of the color selection panel. Each of those icons represents a different color selection mode. The standard modes are as follows:
- Color Wheel
- Color Sliders
- Color Palettes
- Image Palettes
- Crayons
Each mode represents a different interface to select the same thing: a color. Although all five modes are available by default, you can restrict the Colors panel to display only some of these, and you can also create your own custom color selection modes. In Graphique, we demonstrate mode restriction by restricting the color selection to Crayons mode. To restrict the mode, you call NSColorPanel 's static setPickerMask: method, passing one or more mode masks bitwise OR'ed together. To restrict the Colors panel to Color Wheel and Color Palettes modes, for example, you'd code the following:
Note that you must make this call before any Colors panel instances have been created. If you display a Colors panel after calling the preceding code, it looks like Figure 5–9.
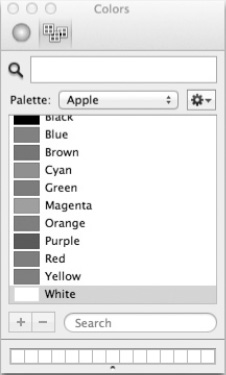
Figure 5–9. A Colors panel with only two modes
Displaying the Color Selection Panel
Clicking the Colors toolbar item passes the identifier NSToolbarShowColorsItem to the toolbar, which you can see in the Attributes inspector. This is similar to how the Fonts toolbar item passes the NSToolbarShowFontsItem identifier. When this identifier is passed, Cocoa knows to display the color selection panel.
For our implementation, we start by registering a reasonable user default for the line color: black. We also set the Colors panel to Crayons-only mode. Update the initialize: method in GraphiqueAppDelegate.m accordingly, as shown in Listing 5–4.
Listing 5–4. The updated initialize: Method
+ (void)initialize

{

  // Get the user defaults

  NSUserDefaults *userDefaults = [NSUserDefaults standardUserDefaults];


  // Set the font to a reasonable choice and convert to an NSData object

  NSFont *equationFont = [NSFont systemFontOfSize:18.0];

  NSData *fontData = [NSArchiver archivedDataWithRootObject:equationFont];
  // Set the color to a reasonable choice and convert to an NSData object

  NSColor *lineColor = [NSColor blackColor];

  NSData *colorData = [NSArchiver archivedDataWithRootObject:lineColor];


  // Set the font and color in the defaults

  NSDictionary *appDefaults = [NSDictionary dictionaryWithObjectsAndKeys:fontData, @"equationFont", colorData, @"lineColor", nil];

  [userDefaults registerDefaults:appDefaults];


  // Change the action for the Font Panel so that the text field doesn't swallow the changes

  [[NSFontManager sharedFontManager] setAction:@selector(changeEquationFont:)];


  // Set the Colors panel to show only Crayons mode

  [NSColorPanel setPickerMask:NSColorPanelCrayonModeMask];

}
You'll notice that, as with the font, we had to convert the NSColor object to an NSData object before storing in the user defaults. You'll also notice that the key we use for the color is lineColor.
Responding to Color Changes
When users click a new color in the color selection panel, a changeColor: message is sent up the responder chain, similar to how the font selection panel sends a changeFont: message. As with the changeFont: message, however, the equation entry field swallows the changeColor: message when it has focus. Since we want to have the color selection always refer to the graph's line, we must change the message sent when the color changes so we can always catch it in our application delegate.
We must deal with one more twist, however—we must call NSColorPanel 's setTarget: method to set the target for our color change messages to be the application delegate. This means that, unlike with changing the font change messages, we can't make this change in the initialize: method. The initialize: method is a class method, called before our GraphiqueAppDelegate instance is created. We want our GraphiqueAppDelegate instance to be the target for our color change messages, because we have to tell the graph instance to redraw itself to the new color. Update the applicationDidFinishLaunching: method, adding code to set the target for color changes to the application delegate instance, and to set the action for when the color selection changes to changeGraphLineColor:. Stick these two lines of code at the end of that method:
[[NSColorPanel sharedColorPanel] setTarget:self];

[[NSColorPanel sharedColorPanel] setAction:@selector(changeGraphLineColor:)];
Add a declaration for the changeGraphLineColor: method to GraphiqueAppDelegate.h :
- (void)changeGraphLineColor:(id)sender;
We'll catch this message in our application delegate, store the new color in the user defaults, and then tell the graph view to redraw itself. Add a changeGraphLineColor: method to GraphiqueAppDelegate.m that matches Listing 5–5.
Listing 5–5. The changeGraphLineColor: Method
- (void)changeGraphLineColor:(id)sender

{

  // Set the selected color in the user defaults

  NSData *colorData = [NSArchiver archivedDataWithRootObject:[(NSColorPanel *)sender color]];

  [[NSUserDefaults standardUserDefaults] setObject:colorData forKey:@"lineColor"];


  // Tell the graph to redraw itself

  [self.graphTableViewController.graphView setNeedsDisplay:YES];

}
NOTE: As of Mac OS X Lion and the use of Automatic Reference Counting (ARC), you can no longer have forward declarations in your code. Be sure to import GraphView.h at the top of GraphiqueAppDelegate.m so the compiler knows what class we are talking about.
The last thing we must do is update the drawRect: method in GraphView.m to use the selected color. The existing code, which looks like this, sets the line color (stored in the variable curveColor) to black:
// Set the color scheme

NSColor *background  = [NSColor colorWithDeviceRed:0.30 green:0.58 blue:1.0 alpha:1.0];

NSColor *axisColor = [NSColor colorWithDeviceRed:1.0 green:1.0 blue:0.0 alpha:1.0];

NSColor *gridColorLight = [NSColor colorWithDeviceRed:1.0 green:1.0 blue:1.0 alpha:0.5];

NSColor *gridColorLighter = [NSColor colorWithDeviceRed:1.0 green:1.0 blue:1.0

alpha:0.25];

NSColor *curveColor = [NSColor colorWithDeviceRed:.0 green:0.0 blue:0 alpha:1.0];
Change the code to instead read the color from the user defaults, like this:
// Set the color scheme

NSColor *background  = [NSColor colorWithDeviceRed:0.30 green:0.58 blue:1.0 alpha:1.0];

NSColor *axisColor = [NSColor colorWithDeviceRed:1.0 green:1.0 blue:0.0 alpha:1.0];

NSColor *gridColorLight = [NSColor colorWithDeviceRed:1.0 green:1.0 blue:1.0 alpha:0.5];

NSColor *gridColorLighter = [NSColor colorWithDeviceRed:1.0 green:1.0 blue:1.0

alpha:0.25];


// Get the line color from the user defaults

NSData *colorData = [[NSUserDefaults standardUserDefaults] dataForKey:@"lineColor"];

NSColor *curveColor = (NSColor *)[NSUnarchiver unarchiveObjectWithData:colorData];
Now you can build and run Graphique and, with a graph showing, open the color selection panel and select a new color. You'll see the line color immediately update to the new selection. Figure 5–10 shows the graph with the Snow crayon selected.
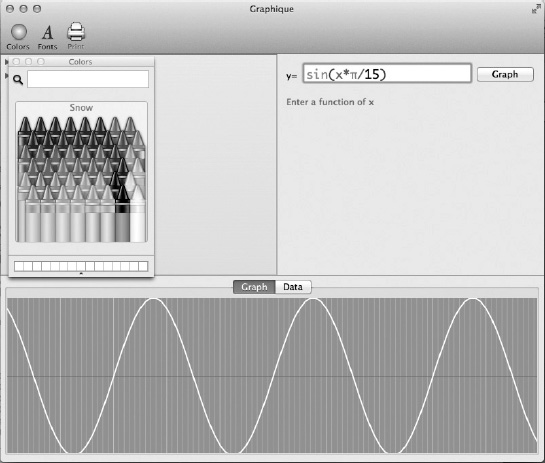
Figure 5–10. The graph with the Snow crayon selected
Creating a Custom Preferences Panel
Most OS X applications provide a menu item called Preferences that, when selected, shows a panel that allows users to set custom preferences. Graphique has a menu item called Preferences, but it's grayed out since we've provided no such preferences panel. In this section, we create a preference panel that displays when users select the Preferences menu item. It contains a single check box to determine whether the initial view for a rendered equation is the table view or the Graph view, and it looks like Figure 5–11.
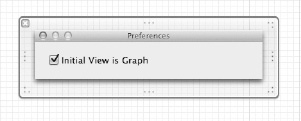
Figure 5–11. The Preferences panel
Creating the Preferences View
We'll start by creating the code to control the preferences view. Create a new Objective-C class in your Views group, make it a subclass of NSWindowController, and call it PreferencesController. In this class, we want to create an outlet for a check box that determines whether the initial view is the graph and create an action that responds when the user checks or unchecks that check box. The header file, PreferencesController.h, is shown in Listing 5–6.
Listing 5–6. PreferencesController.h
#import <Cocoa/Cocoa.h>


@interface PreferencesController : NSWindowController

{

  NSButton *initialViewIsGraph;

}


@property (nonatomic, retain) IBOutlet NSButton *initialViewIsGraph;


-(IBAction)changeInitialView:(id)sender;


@end
The implementation file for the PreferencesController does three things:
- In the
init:method, it loadsPreferencesController.xib. - When the Preferences panel appears, it retrieves the value for the initial view from the user defaults and updates the check box accordingly.
- When the user checks or unchecks the check box, it determines the state of the check box and updates the user defaults.
The code for PreferencesController.m, shown in Listing 5–7, implements the behavior for step 2 in the windowDidLoad: method, which is called when the Preferences window loads. The action method changeInitialView: implements the behavior for step 3.
Listing 5–7. PreferencesController.m
#import "PreferencesController.h"


@implementation PreferencesController


@synthesize initialViewIsGraph;


- (id)init

{

  self = [super initWithWindowNibName:@"PreferencesController"];

  return self;

}


- (void)windowDidLoad

{

  [super windowDidLoad];
  // Get the user defaults

  NSUserDefaults *userDefaults = [NSUserDefaults standardUserDefaults];


  // Set the checkbox to reflect the user defaults

  [initialViewIsGraph setState:[userDefaults boolForKey:@"InitialViewIsGraph"]];

}


- (IBAction)changeInitialView:(id)sender

{

  // Get the user defaults

  NSUserDefaults *userDefaults = [NSUserDefaults standardUserDefaults];


  // Set the user defaults value for the initial view

  [userDefaults setBool:[initialViewIsGraph state] forKey:@"InitialViewIsGraph"];

}


@end
Now we're ready to create the actual user interface with the check box.
Create a new Empty Interface Builder document, as shown in Figure 5–12, and call it PreferencesController.xib. Open PreferencesController.xib in Xcode and drag a Panel object onto the blank canvas. Next, drag a Check Box object onto the Panel object and change its text to “Initial View is Graph.” Resize the Panel object to get rid of most of the empty space. Open the Attributes inspector and change the Window Title to Preferences and uncheck the Resize box. Your view should look like Figure 5–13.
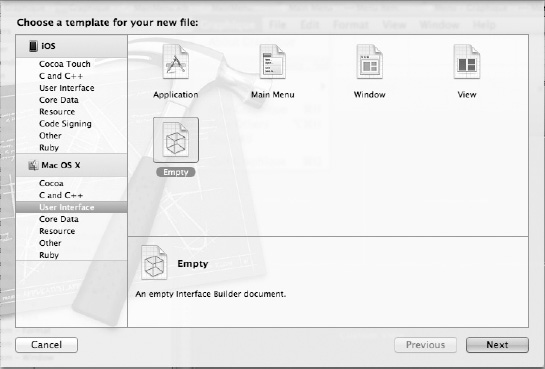
Figure 5–12. Selecting an Empty Interface Builder document

Figure 5–13. The view for PreferencesController
With PreferencesController.xib still open, select File's Owner, open the Identity inspector, and select PreferencesController as the class, as shown in Figure 5–14.

Figure 5–14. File's Owner set to PreferencesController
Now you can Ctrl+drag from the check box to File's Owner, select the changeIntialView: action, and then Ctrl+drag from File's Owner to the check box and select the initialViewIsGraph outlet. Finally, Ctrl+drag from File's Owner to the panel itself and select the window outlet. If you forget this step, the Preferences panel will display the first time you select the Preferences menu item (when we get that far), but once you've closed it, it won't display anymore, no matter how often you select the Preferences menu item.
We've now wired our user interface to the PreferencesController class, but we haven't yet done anything to make the PreferencesController user interface display. Read on to close that loop.
Displaying the Preferences Panel
To display the preferences panel we've created, we must tell our application delegate about it and wire it to the Preferences menu item in MainMenu.xib. Open GraphiqueAppDelegate.h and add a forward declaration for the PreferencesController class, a PreferencesController member to the interface, and a PreferencesController property. Also, add an action method to display the preferences panel. See Listing 5–8.
Listing 5–8. Updating GraphiqueAppDelegate.h for PreferencesController
#import <Cocoa/Cocoa.h>

#import <CoreData/CoreData.h>


@class EquationEntryViewController;

@class GraphTableViewController;

@class RecentlyUsedEquationsViewController;

@class PreferencesController;


@interface GraphiqueAppDelegate : NSObject <NSApplicationDelegate>
@property (strong) IBOutlet NSWindow *window;

@property (weak) IBOutlet NSSplitView *horizontalSplitView;

@property (weak) IBOutlet NSSplitView *verticalSplitView;

@property (strong) EquationEntryViewController *equationEntryViewController;

@property (strong) GraphTableViewController *graphTableViewController;

@property (strong) RecentlyUsedEquationsViewController *recentlyUsedEquationsViewController;

@property (strong) PreferencesController *preferencesController;


- (void)changeGraphLineColor:(id)sender;

-(IBAction)showPreferencesPanel:(id)sender;


@end
In GraphiqueAppDelegate.m, import PreferencesController.h, add a @synthesize line for the preferencesController instance, and then implement the showPreferencesPanel: method. This method should instantiate the preferencesController instance, if it hasn't already been instantiated, and then display the preferences panel. See the code in Listing 5–9.
Listing 5–9. The Method to Show the Preferences Panel
- (IBAction)showPreferencesPanel:(id)sender

{

  // Create the preferences panel if we haven't already

  if (preferencesController == nil)

  {

    preferencesController = [[PreferencesController alloc] init];

  }


  // Show the panel

  [preferencesController showWindow:self];

}
All that's left to display the preferences panel is to wire it to the Preferences menu item. Open MainMenu.xib, select the Preferences menu item, Ctrl+drag to the Graphique App Delegate instance, and select showPreferencesPanel:, as shown in Figure 5–15.

Figure 5–15. Wiring showPreferencesPanel: to the Preferences menu item
Build and run Graphique, and then select Preferences… from the menu. The Preferences window displays, as shown in Figure 5–16.

Figure 5–16. The Preferences panel
Check the box, and quit the application to flush the cache. Then, open a Terminal instance and type the following:
defaults read book.macdev.Graphique
Among the output, you should see a line like this:
InitialViewIsGraph = 1;
The Preferences panel is working and is writing the preferences to the user defaults. The last step in implementing the custom preference is to actually heed its setting in the application.
Using the Custom Preference
To use the custom preference, we must tell Graphique to check the value for the InitialViewIsGraph setting in the user defaults and select the appropriate tab. Note that this happens only on user startup; once a user starts interacting with the application, entering equations and selecting tabs, we leave automatic tab setting alone.
To programmatically select a tab, we need a handle to the tab view in the Graph view. Open GraphTableViewController.h and add an NSTabView property called tabView. Listing 5–10 shows the updated code file.
Listing 5–10. GraphTableViewController.h
#import <Cocoa/Cocoa.h>


#import "Equation.h"


@class GraphView;


@interface GraphTableViewController : NSViewController <NSTableViewDataSource>


@property (nonatomic, retain) NSMutableArray *values;

@property (weak) IBOutlet NSTableView *graphTableView;

@property (nonatomic, assign) CGFloat interval;

@property (weak) IBOutlet GraphView *graphView;

@property (weak) IBOutlet NSTabView *tabView;


- (void)draw:(Equation *)equation;


@end
In GraphTableViewController.m, add a @synthesize line for tabView, and then create an implementation of awakeFromNib: that will automatically be called when the user interface loads. In this method, you get a handle to the user defaults, you read the value for InitialViewIsGraph, and you select the appropriate tab using tabView 's selectTabViewItemAtIndex: method. Listing 5–11 shows the code for the awakeFromNib: method.
Listing 5–11. The awakeFromNib: Method That Selects the Proper Tab
- (void)awakeFromNib

{

  // Get the user defaults

  NSUserDefaults *userDefaults = [NSUserDefaults standardUserDefaults];


  // Determine which tab to select based on the user defaults

  NSInteger selectedTab = [userDefaults boolForKey:@"InitialViewIsGraph"] ? 0 : 1;


  // Select the proper tab

  [tabView selectTabViewItemAtIndex:selectedTab];

}
Finally, connect the Tab View object in Interface Builder to the tabView property by selecting GraphTableViewController.xib in Xcode, Ctrl+dragging from File's Owner to the Tab view, and selecting tabView from the pop-up. Your custom preference should now function as expected. Launch Graphique, open the Preferences panel, and deselect the check box. Close Graphique and then relaunch it. The Data tab should be selected, as shown in Figure 5–17. You can reselect the check box in the Preferences panel and relaunch Graphique to see the Graph tab selected.
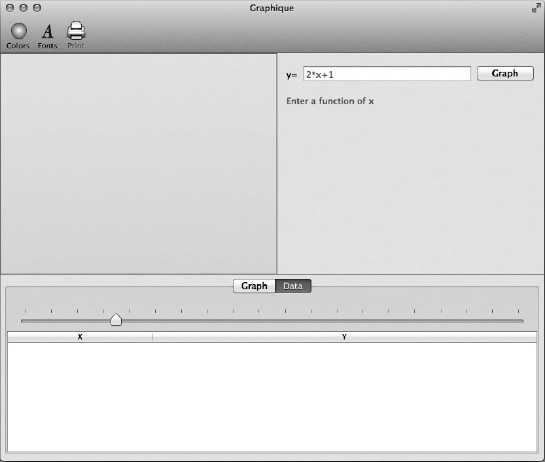
Figure 5–17. Graphique with the Data tab initially selected
Using the Local File System
One of the major advantages of running a desktop application is access to local resources. Some common local resources are CPU, memory, and also the file system. The file system used to be synonymous with access to the hard drive. Nowadays, file systems are much more than that. Yes, you can access the local hard drive. But you can also access any mounted remote drives such as Dropbox or WebDAV accounts. All of the access protocols are unified under one file manager API that we review in this section. We then utilize the newly acquired knowledge in Graphique to export graphs as images.
Browsing the File System
In Objective-C, the overt interface to the file system is the NSFileManager class. This is the class that gives access to the usual file manipulations. The NSFileManager class makes no assumption about what it finds on the file system, so it calls everything (folders, files, symbolic links, and so on) items.
Enumerating Through the Mounted Volumes
To browse the file system, you first need to know what volumes are mounted, and that is done through a simple NSFileManager call:
NSFileManager *fm = [NSFileManager defaultManager];


NSArray *mountedDisks = [fm mountedVolumeURLsIncludingResourceValuesForKeys:nil options:NSVolumeEnumerationSkipHiddenVolumes];

NSLog(@"Found %lu volumes", mountedDisks.count);

for(NSURL *path in mountedDisks)

{

  NSLog(@"	%@", path);

}
Running the previous code will provide you with a list of URLs representing the mounted volumes on your system:
FileSystem[32607:903] Found 6 volumes

FileSystem[32607:903]   file://localhost/

FileSystem[32607:903]   file://localhost/Volumes/Backup/

FileSystem[32607:903]   file://localhost/Volumes/jdoe/

FileSystem[32607:903]   file://localhost/Volumes/Media/

FileSystem[32607:903]   file://localhost/Volumes/Data/

FileSystem[32607:903]   file://localhost/Volumes/jdoe_HomeDir/
Each URL can be used as the starting point for further exploration.
Enumerating Through a Folder
Let's pretend you created a folder called MyData directly in your home directory using Finder and copied a few files in there, as shown in Figure 5–18.

Figure 5–18. A directory with sample files
You would list its contents and whether each item is a file or directory using the following code:
NSFileManager *fm = [NSFileManager defaultManager];


NSString* path = [NSHomeDirectory() stringByAppendingPathComponent: @"MyData"];

NSArray *list = [fm contentsOfDirectoryAtURL:[NSURL URLWithString:path] includingPropertiesForKeys:nil options:NSDirectoryEnumerationSkipsHiddenFiles error:nil];


NSLog(@"Found %lu items", list.count);

for(NSURL *itemURL in list) {

  BOOL isDirectory;

  [fm fileExistsAtPath:[itemURL path] isDirectory:&isDirectory];


  NSLog(@"	%@, directory? %@", [itemURL path], (isDirectory ? @"Yes" : @"No"));

}
NOTE: We've used the NSHomeDirectory function to find the current user's home directory. There are other similar predefined functions such as NSHomeDirectoryForUser or NSTemporaryDirectory.
If you've created the content as previously illustrated, then the output would be similar to the output shown here:
FileSystem[34747:903] Found 3 items

FileSystem[34747:903]   /Users/michael/MyData/Image0001.TIF, directory? No

FileSystem[34747:903]   /Users/michael/MyData/Image0002.TIF, directory? No

FileSystem[34747:903]   /Users/michael/MyData/Others, directory? Yes
Notice how only two out of the four image files are listed. This is because the two others are inside the Others directory, and if you wanted to list them, you'd have to recurse through the subdirectories.
Writing to the File System
Writing a file to the file system is just as simple. Both NSString and NSData have methods for writing content to the file system. To write a text file to the file system, the code would look as shown here:
NSString *myText = @"This is sample text I would like to store in a file.";

NSString* path = [NSHomeDirectory() stringByAppendingPathComponent: @"MyData"];

NSString *filePath = [path stringByAppendingPathComponent:@"sample.txt"];

[myText writeToFile:filePath atomically:YES encoding:NSStringEncodingConversionAllowLossy error:nil];
This works fine when the data to write is a string. If the data is binary, however, you must use the NSData class. In this case, the code is very similar:
NSData *myData = ... // Obtain some data

NSString* path = [NSHomeDirectory() stringByAppendingPathComponent: @"MyData"];

NSString *filePath = [path stringByAppendingPathComponent:@"sample.data"];

[myData writeToFile:filePath atomically:YES];
NOTE: Both writeToFile: methods have an atomically parameter. When that parameter is set to YES, the file content is first written to a temporary location. When the writing is complete, the temporary file is then moved to the new location. This preserves the integrity of the file in case of system interruption during the write operation. If that parameter is set to NO, then the content is written directly to the final location. In the event of an interruption, the file is left in an incomplete state.
Reading from the File System
Reading from the file system is obviously equally as important as writing. This is such a common task that Apple has, once again, added convenience methods to the NSString and NSData classes.
To read the sample.txt file back into a string, use the following code:
NSString* path = [NSHomeDirectory() stringByAppendingPathComponent: @"MyData"];

NSString *filePath = [path stringByAppendingPathComponent:@"sample.txt"];

NSString *myText = [NSString stringWithContentsOfFile:filePath encoding:NSStringEncodingConversionAllowLossy error:nil];

NSLog(@"Result: %@", myText);
Similarly, the data file can be read using the following:
NSString* path = [NSHomeDirectory() stringByAppendingPathComponent: @"MyData"];

NSString *filePath = [path stringByAppendingPathComponent:@"sample.data"];

NSData *myData = [NSData dataWithContentsOfFile:filePath];
Exporting Graphs as Images
Now that we know how to interact with the file system, we put our newly acquired knowledge to the test. We add a new item in the menu that allows us to export a graph as a PNG image. Upon selecting the menu item, a save dialog will open so that the user can select the export location.
Creating an Image from a View
Before doing anything else, we need to make sure the GraphTableViewController is able to produce an image representation of its current graph. Open GraphTableViewController.h and declare a new method:
-(NSBitmapImageRep*)export;
Now open GraphTableViewController.m so we can implement the new method we just declared. This is done by painting the image into a bitmap cache and returning that cache.
-(NSBitmapImageRep*)export

{
  NSSize mySize = graphView.bounds.size;


  NSBitmapImageRep *bir = [graphView bitmapImageRepForCachingDisplayInRect:graphView.bounds];

  [bir setSize:mySize];

  [graphView cacheDisplayInRect:graphView.bounds toBitmapImageRep:bir];


  return bir;

}
Next, open GraphiqueAppDelegate.h and declare a new selector to receive the menu item action:
-(IBAction)exportAs:(id)sender;
Then edit GraphiqueAppDelegate.m to implement the new method:
-(IBAction)exportAs:(id)sender

{

  // Obtain the image representation

  NSBitmapImageRep* imageRep = [graphTableViewController export];


  // Create the PNG representation

  NSData *data = [imageRep representationUsingType: NSPNGFileType properties: nil];


  // Create the Save As... dialog

  NSSavePanel *saveDlg = [NSSavePanel savePanel];

  [saveDlg setAllowedFileTypes:[NSArray arrayWithObject:@"png"]];


  // Open the dialog and save if the user selected OK

  NSInteger result = [saveDlg runModal];

  if (result == NSOKButton)

  {

    [data writeToURL:saveDlg.URL atomically:YES];

  }

}
Calling the setAllowedFileTypes: method allows you to specify the file extension for the files you are saving. In this case, we chose png. If the users provide a different extension, they are automatically prompted to clarify whether they really want to use a different extension, as Figure 5–19 shows.
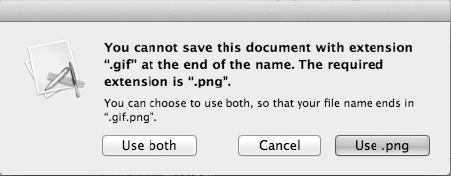
Figure 5–19. An alert generated when the wrong file extension is selected
Adding the Export Graph Menu Item
Our next task is to add the new menu item. Open MainMenu.xib and expand the File menu, as shown in Figure 5–20.
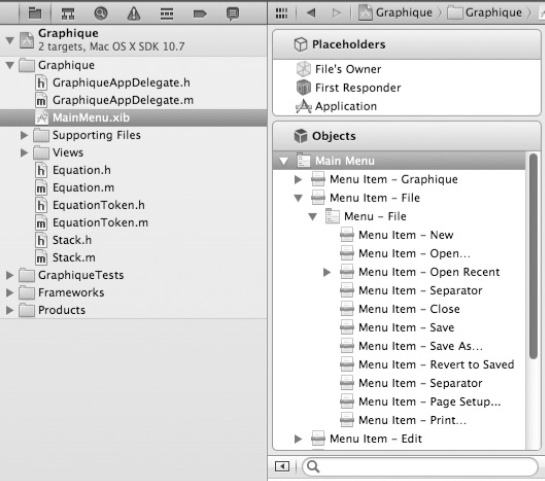
Figure 5–20. The File menu item expanded
Find Separator Menu Item in the Object Library and drag it inside the expanded File menu. Then find Menu Item and drag it into the File menu as well, as illustrated in Figure 5–21.

Figure 5–21. The new menu item
Open the Attributes inspector and change the menu item title to Export As..., as shown in Figure 5–22.
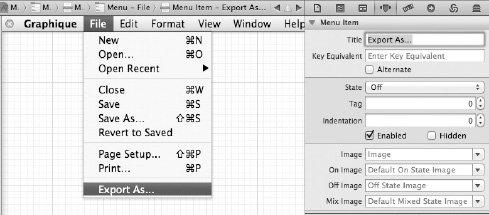
Figure 5–22. The Export As… menu item
In the Objects pane, you should already have the Graphique App Delegate object. Ctrl+drag from the Export As... menu item to the Graphique App Delegate object to link the action to the exportAs: method. The connection should be visible in the Connections Inspector, as shown in Figure 5–23.

Figure 5–23. The Export As... item linked
Run the application to test all you've done. Once the application starts, enter an equation and plot it. Then select File ![]()
Export As... to see the Save As dialog, as shown in Figure 5–24.
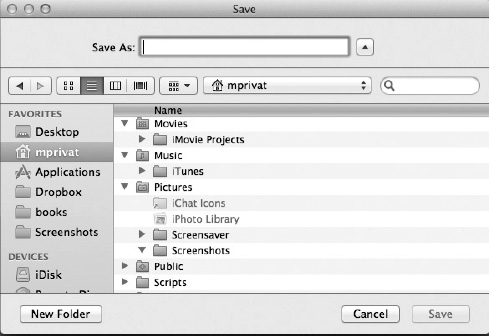
Figure 5–24. The Save As dialog for exporting graphs
Summary
In this chapter, you learned how to take the application to the next level by adding some level of persistence. You should have a good understanding of managing user preferences and accessing the file system. Graphique now remembers the user's preference by using NSUserDefaults, and we've used these preferences with colors and fonts. It also export graphs as an image to the file system using the NSFileManager API.
Using the file system is great for storing unstructured data, such as an image. But it gets a bit more complicated to manage efficiently when the data is structured and has to be editable and even searchable. This is where you need to step up to a persistence framework that can handle structured data. In the next chapter, we expand our persistence capabilities by looking into the Core Data framework.