
C H A P T E R 9
![]()
Advanced XNA Framework Development
In this chapter, we continue with our discussion of game development. Chapter 1 provided a basic overview of game development. In Chapter 8, we took the sample code from Chapter 1 and turned it into a structured 2D game, leveraging the AppHub Game Screen Management sample to provide a menu system and a GameScreen class to help manage the various screens that users expect to have, such as a main menu, options menu, and the game play screen. We covered 2D animation and encapsulated our game play using a GameObject class to represent the enemy alien ships, missiles, and the hero ship.
In this chapter we add a few key enhancements to the AlienShooter game. We take a copy of the code from the Chapter 8 solution and add support for saving and loading the game, as well as tombstoning support. We wrap up with a basic particle system to simulate explosions when the hero ship shoots down an alien enemy ship.
We discussed in Chapter 3 and 4 how developers can call nonvisual APIs across frameworks where Silverlight can call XNA's Gesture API and XNA can call Silverlight Web APIs. In Windows Phone 7.5, Microsoft added the capability to combine rendering technologies as well. In this chapter I cover how to render Silverlight and XNA UI on the same surface, opening up many unique possibilities for application developers.
We then shift gears with an introduction to 3D game development, covering key 3D concepts, a little bit of 3D math, and then the 3D programming model provided by XNA Game Studio. We follow this with an exploration of augmented reality possibilities by combining 3D rendering with the camera sensor and shared graphic rendering.
AlienShooter Enhancements
In this section we add support for functionality you would expect to see if this was a real Windows Phone game. We first implement how to load and save game state. We modify the main menu game screen to have both New Game and Resume Game menu items in the event that previous game state is present.
We next implement tombstoning support so that the user is restored to the main menu screen and has a chance to click Resume to restart game play. The last section covers how to create a basic particle system that simulates explosions when a hero ship missile collides with an alien enemy spaceship.
Load and Save Game State
For our game, we automatically save game state when the user backs out of the GameplayScreen with a game in progress. The main menu screen is modified to include both New Game and Resume Game menu options that will resume an existing game if saved state is present. Automatic save keeps things simple and is a typical state management approach for many game developers.
We set about modifying the MainMenuScreen class, renaming the playGameMenuEntry object to newGameMenuEntry and adding another MenuEntry named resumeGameMenuEntry. Here is the modified constructor MainMenuScreen():
public MainMenuScreen()

  : base("Main Menu")

{

  // Create our menu entries.

  MenuEntry newGameMenuEntry = new MenuEntry("New Game");

  MenuEntry optionsMenuEntry = new MenuEntry("Game Options");

  // Hook up menu event handlers.

  newGameMenuEntry.Selected += newGameMenuEntrySelected;

  optionsMenuEntry.Selected += OptionsMenuEntrySelected;

  // Add entries to the menu.

  MenuEntries.Add(newGameMenuEntry);

  MenuEntries.Add(optionsMenuEntry);


  // Only display resume game menu option

  //if saved state is present.

  using (IsolatedStorageFile gameStorage = IsolatedStorageFile.GetUserStoreForApplication())

  {

    if (gameStorage.FileExists(AlienShooterStateFileName))

    {

      MenuEntry resumeGameMenuEntry = new MenuEntry("Resume Game");

      resumeGameMenuEntry.Selected += resumeGameMenuEntry_Selected;

      MenuEntries.Add(resumeGameMenuEntry);

    }

  }

}
We want to display the Resume Game menu option only when there is game state present, so in the MainMenu there is a FileExists check to determine if game state is present. We add a using System.IO.IsolatedStorage statement to the top of MainMenuScreen.cs as well as a constant declaration of the state filename to wire things up:
const string AlienShooterStateFileName = "AlienShooter.dat";
We modify the new-game-selected event handler, named newGameMenuEntrySelected, to delete any saved game state since a new game is desired:
void newGameMenuEntrySelected(object sender, PlayerIndexEventArgs e)

{

  //

  using (IsolatedStorageFile gameStorage = IsolatedStorageFile.GetUserStoreForApplication())

  {

    if (gameStorage.FileExists(AlienShooterStateFileName))

    {

      gameStorage.DeleteFile(AlienShooterStateFileName);

    }

  }
  LoadingScreen.Load(ScreenManager, true, e.PlayerIndex,

                      new GameplayScreen());

}
This sets things up for the GameplayScreen to load saved state or start a new game depending on what option is chosen in the MainMenuScreen UI. In the GameplayScreen object we create two new public methods to load and save state. For load state, we do the following:
- Check for saved state; if not present, initialize the variables as before.
- If saved state is present, restore saved state and begin game play.
To save state, we use a System.IO.StreamWriter object. We don't use object serialization, because we need to instantiate the GameObject classes normally, just like when LoadContent is called. Instead, we simply save off the important state values to a text file in Isolated Storage such as the Position and Velocity vector values, the status board game score and remaining lives, and so on. The SaveAlienShooterState method always deletes the file first before saving. Also, the method does not save state if the game is over. Listing 9-1 shows the GameplayScreen.SaveAlienShooterState method.
Listing 9-1. GameplayScreen.SaveAlienShooterState
public void SaveAlienShooterState()

{

  //Only save game if not GameOver

  using (IsolatedStorageFile gameStorage =

    IsolatedStorageFile.GetUserStoreForApplication())

  {

    //Overwrite existing saved game state

    if (gameStorage.FileExists(AlienShooterStateFileName))

    {

      gameStorage.DeleteFile(AlienShooterStateFileName);

    }

    if (!statusBoard.GameOver)

    {

      using (IsolatedStorageFileStream fs =

        gameStorage.OpenFile(AlienShooterStateFileName,

                              System.IO.FileMode.Create))

      {

        using (StreamWriter streamWriter = new StreamWriter(fs))

        {

          //Only serialize interesting state

          //Other state MUST be initialized each time

          streamWriter.WriteLine(heroShip.Position.X);
          streamWriter.WriteLine(heroShip.Position.Y);

          streamWriter.WriteLine(heroShip.Velocity.X);

          streamWriter.WriteLine(heroShip.Velocity.Y);

          streamWriter.WriteLine(statusBoard.Score);

          streamWriter.WriteLine(statusBoard.Lives);

          for (int i = 0; i < maxEnemies; i++)

          {

            streamWriter.WriteLine(enemies[i].Alive);

            streamWriter.WriteLine(enemies[i].Position.X);

            streamWriter.WriteLine(enemies[i].Position.Y);

            streamWriter.WriteLine(enemies[i].Velocity.X);

            streamWriter.WriteLine(enemies[i].Velocity.Y);

          }

          streamWriter.Flush();

          streamWriter.Close();

        }

      }

    }

  }

}
The GameplayScreen.LoadAlienShooterState method instantiates the GameObjects and classes, that is, the heroShip.statusBoard GameStatus object, and the enemies alien ship collection. This code was cut from the GameplayScreen.LoadContent method and pasted into the GameplayScreen.LoadAlienShooterState method shown in Listing 9-2.
Listing 9-2. GameplayScreen.LoadAlienShooterState Method
public void LoadAlienShooterState()

{

  using (IsolatedStorageFile gameStorage = IsolatedStorageFile.GetUserStoreForApplication())

  {

    //Initialize all objects as before

    enemies = new List<AlienGameObject>();

    for (int i = 0; i < maxEnemies; i++)

    {

      enemies.Add(new AlienGameObject(alienShooterSpriteSheet, "spaceship", screenRect));

    }


    //Initialize Player Object

    heroShip = new UserGameObject(alienShooterSpriteSheet, "heroship", screenRect, maxMissiles);

    heroShip.Position = new Vector2(screenRect.Width / 2, 720);

    heroShip.LoadContent(content);

    //Initialize Status Board

    statusBoard = new GameStatusBoard(gameFont);

    statusBoard.LoadContent(content);


    //Set saved state on objects

    if (gameStorage.FileExists(AlienShooterStateFileName))

    {

      using (IsolatedStorageFileStream fs =

      gameStorage.OpenFile(AlienShooterStateFileName, System.IO.FileMode.Open))

      {

        using (StreamReader streamReader = new StreamReader(fs))

        {

          heroShip.Position = new Vector2(

            (float)Convert.ToDouble(streamReader.ReadLine()),

            (float)Convert.ToDouble(streamReader.ReadLine()));

          heroShip.Velocity = new Vector2(

            (float)Convert.ToDouble(streamReader.ReadLine()),

            (float)Convert.ToDouble(streamReader.ReadLine()));
          statusBoard.Score = Convert.ToInt32(streamReader.ReadLine());

          statusBoard.Lives = Convert.ToInt32(streamReader.ReadLine());

          for (int i = 0; i < maxEnemies; i++)

          {

            enemies[i].Alive = Convert.ToBoolean(streamReader.ReadLine());

            enemies[i].Position = new Vector2(

              (float)Convert.ToDouble(streamReader.ReadLine()),

              (float)Convert.ToDouble(streamReader.ReadLine()));

            enemies[i].Velocity = new Vector2(

              (float)Convert.ToDouble(streamReader.ReadLine()),

              (float)Convert.ToDouble(streamReader.ReadLine()));

          }

          streamReader.Close();

        }

      }

    }

  }

}
The Save and Load code isn't the most elegant code you will ever see but it is simple and works fine. With this code in place, when you hit the Back hardware button when playing the game, you get a Resume menu item. Figure 9-1 shows the updated MainMenuScreen class UI.

Figure 9-1. Updated main menu screen with Resume Game menu option
If you play the game until all of your lives are consumed and then hit the Back button, the Resume Game menu option is not present, because there isn't any saved state.
One issue that remains is, if you are playing the game and then hit the Start button and then the Back button, the game resets to a new game on the GameplayScreen UI. What we want to happen is for state to be saved and the game to resume back on the main menu screen, so that the user has a chance to get ready to play and then tap the Resume Game menu option. We cover how to implement tombstone support in the next section.
Tombstone Support
Adding tombstone support to your XNA Framework game is different from adding tombstone support in Silverlight. In Silverlight, the Deactivated and Activated events only fire when tombstoning and returning from tombstoning respectively. In Silverlight, these events do not fire when launching (the Launching event) nor when closing (the Closing event).
In the XNA Framework, the OnDeactivation (tombstoning) and OnActiviation (returning from tombstone) events also fire when launching and closing the game, making it difficult to distinguish tombstoning events from regular launching/closing events.
To detect tombstoning events, you can use the PhoneApplicationService class available in the Microsoft.Phone.dll assembly. You must also add a reference to System.Windows.dll as well, or a compilation error will occur. Add a using Microsoft.Phone.Shell statement to the top of AlienShooterGame.cs (the default name is game1.cs in a new project). In the AlienShooterGame() constructor (the default name is Game1() in a new project), add this code at the end to hook the Activated and Deactivated events:
//Implement tombstoning support globally if managing

//multiple state objects across game gamescreens

PhoneApplicationService.Current.Activated += AlienGame_Activated;

PhoneApplicationService.Current.Deactivated += AlienGame_Deactivated;
You can then implement tombstoning for the application in the corresponding event handlers in AlienShooterGame.cs:
void AlienGame_Activated(object sender, ActivatedEventArgs e)

{

  //Globally handle return from tombstoning here

}


void AlienGame_Deactivated(object sender, DeactivatedEventArgs e)

{

  //Globally handle tombstoning here

}
Where to store game state? As with Silverlight, you can store transitional state in the PhoneApplicationService.Current.State Dictionary object, as in this example:
PhoneApplicationService.Current.State[enemies] = enemies;
The other bit of information available to you is the PhoneApplicationService.Current.StartupMode property, which can have a value of StartupMode.Launch or StartupMode.Activate. This can be useful if you need to detect whether starting up a new application instance (StartupMode.Launch) or returning from tombstone (StartupMode.Activate) down within the game screens. Note that there isn't a corresponding way to check for deactivation. Only the PhoneApplicationService.Deactivated can help there.
For the AlienShooter game, we add code in the AlienGame_Deactivated method to find the GameplayScreen and call the SaveAlienShooterState method. Here is the updated code:
void AlienGame_Deactivated(object sender, DeactivatedEventArgs e)

{

  //Globally handle  tombstoning here

  GameScreen[] screens = screenManager.GetScreens();

  foreach (GameScreen screen in screens)

    if (screen is GameplayScreen)

    {

      (screen as GameplayScreen).SaveAlienShooterState();

    }

}
We update the AlienGame_Activated method to load the MainMenuScreen upon restore from tombstoning, as shown here:
void AlienGame_Activated(object sender, ActivatedEventArgs e)

{

  //Globally handle return from tombstoning here

  if (!screenManager.DeserializeState())

  {

    // Activate the first screens.

    // Resume at Main Menu so that user isn't caught off guard

    screenManager.AddScreen(new BackgroundScreen(), null);

    screenManager.AddScreen(new MainMenuScreen(), null);

  }

}
There isn't anything else to show for game save/load or tombstoning. Run the code and play around with the functionality, including tombstoning the game. As you will see, the functionally works pretty well and has the feel of a “real” Windows Phone game.
One thing that is missing from the game play is explosions when the missiles collide with the enemy alien space ships. A particle system can assist with implementing “random” looking stuff flying around like you would expect if something is blowing up or smoking from a missile strike.
Particle System
A particle system randomly generates points or small area sprites with a random velocity and rotation, as well as a lifetime, such that the points fly out and then disappear much like you see in Hollywood movie effects. Particle systems can be very simple or extremely sophisticated, capable of generating water effects, fire, smoke, and explosions. AppHub includes a simple particle system that generates smoke and fire for explosions or to show damage. Here is a link to the sample:
http://create.msdn.com/en-US/education/catalog/sample/particle
Modifying AlienShooter
In the AlienShooter project we add a folder named ParticleSystem and copy the following files from the AppHub Particle Sample into the new folder in the AlienShooter project, updating the namespace to AlienShooter.ParticleSystem:
ParticleSystem.csParticle.csExplosionSmokeParticleSystem.csExplosionParticleSystem.csSmokePlumeParticleSystem.cs
The Particle System classes sample have some ties to the game project so the classes are refactored a bit to fit within the AlienShooter project. The ParticleSystem classes are dependent on the SpriteBatch being part of the Game class instance. In our case, the Game.Components collection in the AlienShooterGame instance is accessed to grab the screenManager object, which then makes ScreenManager.SpriteBatch accessible to the particle system classes:
((ScreenManager)game.Components[0]).SpriteBatch.Draw
Notice that the assumption is that the ScreenManager is the first Component added with the index of 0 in the Components collection, so it is something to be aware of.
Another modification required is to add the smoke.bmp and explosions.png content files to a new folder named ParticleSystem in the AlienShooter content project. The path values in the Particle System class files are updated by adding ParticleSystem/ path info in front of filenames so that the ContentManager can find them.
The random number-related helper functions were moved from the game class into the ParticleSystem classes directly, helping to encapsulate the functionality better within the classes themselves. Another option is to make the random number helper members a part of the ScreenManager object, which could be useful in other situations when a GameScreen instance may need a random number for game functionality. Either way, once all of the housekeeping updates to the code are completed, we can now implement explosions and smoke for the AlienShooter game.
Adding Explosions and Smoke to AlienShooter
Once all of the modifications are completed to incorporate the AppHub Particle Sample code into the AlienShooter project, it is brain-dead simple to add support for explosions and smoke plume in the game. In AlienShooterGame.cs, three additional fields are added:
ExplosionSmokeParticleSystem explosionSmokeParticleSystem;

ExplosionParticleSystem explosionParticleSystem;

SmokePlumeParticleSystem smokePlumeParticleSystem;
The first two are for the explosion, one for the smoke, the other for the fire. The third field added is for the smoke plume. In the AlienShooterGame class constructor, the particle system classes are instantiated and then added to the Game.Components collection:
explosionSmokeParticleSystem = new ExplosionSmokeParticleSystem(this, 2);

Components.Add(explosionSmokeParticleSystem);
explosionParticleSystem = new ExplosionParticleSystem(this, 1);

Components.Add(explosionParticleSystem);

smokePlumeParticleSystem = new SmokePlumeParticleSystem(this, 8);

Components.Add(smokePlumeParticleSystem);
The numbers represent the number of particles. Running on a device, you will see that if you set the number too high it will directly affect frame rate and game performance can suffer.
Now that we have our particle system DrawableComponents configured, it is time to add explosions and smoke plume support to the GameplayScreen. We will add an explosion (both smoke and fire) each time an enemy alien ship is shot down. We will add a smoke plume to the hero ship when a life is lost due to a kamikaze enemy alien ship collision. Since this involves collision detection, you are right to guess that the code to draw the explosions and smoke is added there. Listing 9-3 has the updated CheckForCollisions method.
Listing 9-3. GameplayScreen.LoadAlienShooterState Method
private void CheckForCollisions()

{

  //Checking for two major collisions

  //1 - Has an in flight missile intersected an alien spaceship - score 5 pts

  for (int i = 0; i < heroShip.MaxNumberofMissiles; i++)

    if (heroShip.Missiles[i].Alive)

      for (int j = 0; j < maxEnemies; j++)

        if ((enemies[j].Alive) &&

            (enemies[j].BoundingRect.Intersects(heroShip.Missiles[i].BoundingRect)))

        {

          statusBoard.Score += 5;

          //Display Explosion

((ExplosionSmokeParticleSystem)ScreenManager.Game.Components[1]).AddParticles(enemies[j].Position);

((ExplosionParticleSystem)ScreenManager.Game.Components[2]).AddParticles(enemies[j].Position);

          enemies[j].ResetGameObject();

          heroShip.Missiles[i].ResetGameObject();

          }

  //2 - Has an alien spaceship intersected the hero ship - deduct a life

  for (int j = 0; j < maxEnemies; j++)

    if ((enemies[j].Alive) && (enemies[j].Position.Y > 600) &&

        (enemies[j].BoundingRect.Intersects(heroShip.BoundingRect)))

    {

      statusBoard.Lives -= 1;

((SmokePlumeParticleSystem)ScreenManager.Game.Components[3]).AddParticles(heroShip.Position);

      for (int i = 0; i < maxEnemies; i++)

        enemies[i].ResetGameObject();

      for (int i = 0; i < heroShip.MaxNumberofMissiles; i++)

        heroShip.Missiles[i].ResetGameObject();

    }

}
Essentially, the desired particle system DrawableComponent instance is grabbed from the AlienShooterGame.Components collection and the correct position Vector2 is passed into the AddParticles method. Here is the call to draw a smoke plume at the hero ship's Position property:
((SmokePlumeParticleSystem)ScreenManager.Game.Components[3]).AddParticles(heroShip.Position);
Note the use of the number index. If the value is incorrect you will get an invalid cast exception at runtime. Figure 9-2 shows an explosion and smoke plume in action.

Figure 9-2. Explosion and smoke plume
I won't go into the actual particle system sample code; I'll leave that as an exercise for the reader, but you will see that it isn't terribly complicated code, which is pretty amazing given the robust effects that are provided. If anything, you may want to simplify the code in a real game to minimize performance impact. Try running the game on a device and you will see the frame rate drop occasionally if too many explosions occur at the same time. In the next section we convert the AlienShooter project to use XNA Framework Shared Graphics to render parts of the UI with Silverlight, specifically the menu and the HUD.
AlienShooter with Silverlight
In this section we port AlienShooter to a shared graphics rendering project. Create a new project named AlienShooterSL based on the “Windows Phone Silverlight and XNA Application” template. The AlienShooter in Chapter 9 leverages the Game Management sample from AppHub. Begin updating it for Silverlight in the AlienShooterSL project by copying over the assets except for the Game Management assets, since Silverlight will be our menu.
We next bring over all of the code into the AlienShooterSL project except for the GameScreen and ScreenManager classes. Bring over the InputState class in the GameManagement folder, as it is a convenient means to handle input. We fix up the namespaces and remove the code specific to game management. One limitation that jumps out is the lack of support for GameObject instances, which is used by the ParticleSystem classes. To work around this, we pass in the main GameTimer object from the game page named AlienShooterGamePage.xaml, located in the screens folder, into the constructor for the base class ParticleSystem:
protected ParticleSystem(GameTimer timer, int howManyEffects)

{

  this.gameTimer = timer;

  this.howManyEffects = howManyEffects;

  contentManager = contentManager = (Application.Current as App).Content;


  gameTimer.Update += new EventHandler<GameTimerEventArgs>(gameTimer_Update);

  gameTimer.Draw += new EventHandler<GameTimerEventArgs>(gameTimer_Draw);

  Initialize();

  LoadContent();

}
When inheriting from GameObject, descendant classes are automatically plugged in to the Update and Draw loop. In the shared graphics rendering version, event handlers are wired up to the main GameTimer instance in the constructor. This plugs the ParticleSystem class and its descendants into the GameTimer game loop.
The other change is to pass in the GameTimerEventArgs class into the Draw and Update methods for GameObjects instead of the GameTime class. Otherwise, in terms of layout and organization, the code migrates over pretty easily, looking more like the Chapter 8 AlienShooter solution without the Game Management code but with the added Particle System intact. Instead we have Silverlight wrapping the game screen to provide UI for functionality like Settings, Menu, and so on.
We update MainPage.xaml with a space background and three text buttons, New Game, Resume Game, and Settings, as shown in Figure 9-3.
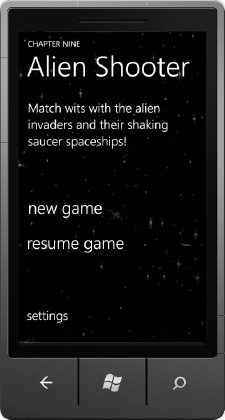
Figure 9-3. The new Silverlight menu
Create a fake settings page and put it into the screens folder with AlienShooterGamePage.xaml. We then pass a query parameter with a key value of “start” so that the AlienShooterGamePage page can determine whether to start a new game or resume an existing game by processing the query parameter in the OnNavigatedTo method. The query string value is passed into the LoadAlienShooterState method, which actually handles whether to load state or not.
The next modification is to change the HUD display from XNA graphics to Silverlight graphics. Because of the modular nature of the code, almost all of the changes were in the GameStatusBoard object. The one change in the HUD display is that the parameters passed into the constructor changed from a SpriteFont to a UIElement, Height, and Width values. The rest of the changes are internal. Listing 9-4 shows the code leveraging a UIElement Renderer.
Listing 9-4. GameStatusBoard Class with Silverlight Rendering
using System;

using Microsoft.Devices;

using Microsoft.Xna.Framework;

using Microsoft.Xna.Framework.Audio;

using Microsoft.Xna.Framework.Content;

using Microsoft.Xna.Framework.Graphics;

using System.Windows;

using System.Windows.Controls;
using System.Windows.Media;


namespace AlienShooterSL.GameObjects

{

  class GameStatusBoard

  {

    UIElementRenderer HUDRenderer;

    private SoundEffect _alienExplosionSoundEffect;

    private SoundEffect _heroShipDamageSoundEffect;

    private VibrateController _vibrateController = VibrateController.Default;

    private TimeSpan _vibrateTimeSpan = TimeSpan.FromMilliseconds(400);

    //Status Board related fields

    private bool _displayMessage;

    private TextBlock _scoreText;

    private TextBlock _messageText;

    private TextBlock _livesText;


    public GameStatusBoard(UIElement element, int width, int height)

    {

      HUDRenderer = new UIElementRenderer(element, width, height);

      _scoreText = ((Grid)element).FindName("ScoreValueText") as TextBlock;

      _messageText = ((Grid)element).FindName("MessageText") as TextBlock;

      _livesText = ((Grid)element).FindName("LivesValueText") as TextBlock;

      Score = 0;

      Lives = 3;

    }


    #region Properties

    private int _score;

    public int Score

    {

      get { return _score; }

      set

      {

        _score = value;

        _scoreText.Text = Convert.ToString(_score);

        if (_alienExplosionSoundEffect != null)

          _alienExplosionSoundEffect.Play();

      }

    }


    private int _lives;

    public int Lives

    {

      get { return _lives; }

      set

      {

        _lives = value;

        if (_heroShipDamageSoundEffect != null)

        {

          _heroShipDamageSoundEffect.Play();
          _vibrateController.Start(_vibrateTimeSpan);
        }

      }

    }


    public bool GameOver { get; set; }

    #endregion


    #region Methods

    public void LoadContent(ContentManager content)

    {

      _alienExplosionSoundEffect =

        content.Load<SoundEffect>("SoundEffects/Explosion");

      _heroShipDamageSoundEffect =

        content.Load<SoundEffect>("SoundEffects/HeroShipDamage");

    }


    public void Update(GameTimerEventArgs GameTime)

    {

      switch (Score)

      {

        case 50: _displayMessage = true;

          _messageText.Text = "Nice Start!";

          break;

        case 60: _displayMessage = false;

          break;

        case 100: _displayMessage = true;

          _messageText.Text = "Keep It Up!";

          break;

        case 120: _displayMessage = false;

          break;

        default: break;

      }


      switch (Lives)

      {

        case 3: _livesText.Foreground = new SolidColorBrush(Colors.Green);

          _livesText.Text = "3";

          break;

        case 2: _livesText.Foreground = new SolidColorBrush(Colors.Yellow);

          _displayMessage = true;

          _messageText.Text = "Warning!";

          _livesText.Text = "2";

          break;

        case 1: _livesText.Foreground = new SolidColorBrush(Colors.Red);

          _displayMessage = true;

          _messageText.Text = "Danger!";

          _livesText.Text = "1";

          break;

        case 0: _livesText.Foreground = new SolidColorBrush(Colors.Red);

          _displayMessage = true;

          _messageText.Text = "Game Over!";

          _livesText.Text = "0";
          GameOver = true;

          break;

      }

    }


    public void Draw(GameTimerEventArgs gameTime, SpriteBatch spriteBatch)

    {

      HUDRenderer.Render();

      spriteBatch.Draw(HUDRenderer.Texture,

        Vector2.Zero, Microsoft.Xna.Framework.Color.White);

    }

    #endregion

  }

}
Figure 9-4 shows the new Silverlight-based HUD.
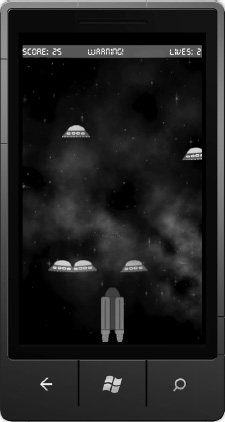
Figure 9-4. Silverlight-based HUD
This completes the coverage of the AlienShooter sample. What is great about this sample is that you can simply take it in whole, find and replace namespaces if desired to match your game, and essentially rewrite the GameplayScreen class and GameObject descendants to reflect your game logic. Otherwise, the Game Screen Manager, save and load, tombstoning, and particle system effects are available for use in your game immediately, though you will have to customize the actual code to save and load the correct state for your game.
In the next section we completely shift gears and provide an overview of the 3D game development capabilities available within the XNA Framework. The section won't make you a complete expert, but it will provide you with enough knowledge and understanding to dive into 3D game development if you find you cannot resist the allure of matrix mathematics and 3D model manipulation.
3D Game Development
The rest of this chapter covers 3D game development with XNA Game Studio. The goal is to provide you with the knowledge and understanding of how to develop 3D games, covering the fundamental principles, a little bit of 3D math, and the 3D programming model provided by the XNA Framework. In the next section, we cover the fundamentals of 3D development.
![]() Note Many of the 2D concepts I have covered so far still apply in 3D game development as well, such as applying velocity, collision detection, and so on. This section focuses on drawing 3D models and some of the additional considerations related to 3D rendering.
Note Many of the 2D concepts I have covered so far still apply in 3D game development as well, such as applying velocity, collision detection, and so on. This section focuses on drawing 3D models and some of the additional considerations related to 3D rendering.
3D Game Concepts
Hopefully by now, if you have read this book straight through—or at the very least have read the XNA Framework-related sections in Chapter 1, Chapter 3, and all of Chapter 8—you have a solid understanding of 2D game development. Programming in 2D is similar in process to hand-drawing a cartoon on paper. You can draw a scene in 2D that makes objects appear near or in the background, providing perspective that models the 3D real world. 3D game development results in the same 2D projection on a flat 2D screen, however, the path to rendering is very different.
![]() Tip It is not possible to cover 3D game development in a single chapter, so I recommend Windows Phone Game Development (Apress, 2010) by Adam Dawes if you want to explore 3D game development in more detail.
Tip It is not possible to cover 3D game development in a single chapter, so I recommend Windows Phone Game Development (Apress, 2010) by Adam Dawes if you want to explore 3D game development in more detail.
In 3D game development, you create a 3D world using wireframe models with a skin over the wireframe that is a 2D texture. The view into the world is similar to viewing the real world behind a camera, where the front aspect of an object is visible and the back of an object is not; however, the back of an object still exists. As an example, Figure 9-5 shows a sample 3D rendering named Pac Man displayed in Caligari trueSpace with views from different angles.
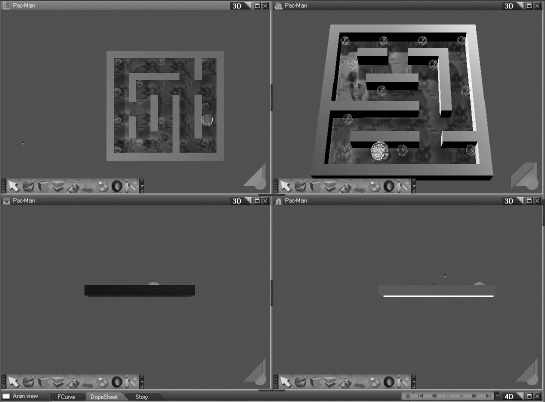
Figure 9-5. 3D model rendered in Caligari trueSpace
You can spin, rotate, and zoom in on the model to get a different view of the environment. Just as in the real world, any view you pick is translated into a 2D rendering. However, with 3D game development, as hardware grows more powerful, the 3D model and rendering comes closer and closer to the real world. With the power of matrix mathematics, 3D vectors, and algorithms, a game developer can fly around a 3D model of an imaginary world, resulting in an immersive experience.
Modeling the Real World
For 3D game development, you mathematically create the camera view on the loaded model. As a user manipulates a game controller or tilts a phone in a mobile game experience, the Accelerometer readings can be measured and the movement is translated to affect the camera view in the model.
A 3D world can be quite expansive, so much so that trying to render an entire world model will bog down even the most powerful graphics cards. Just like viewing the real world through a camera, developers mathematically create a view that consists of a boxed 3D area that is rendered, called the frustum.
The frustum consists of a near plane, a far plane, left and right plane that boxes an area of view, as shown in Figure 9-6.

Figure 9-6. Frustum area of a view
Notice that some objects are shown outside of the frustum; this means that if the scene is rendered, those objects would not be shown. If the user moves the camera closer in, the people would come into view. Likewise, moving the camera toward the cars could begin to bring in the building in the background. Notice in Figure 9-6 that the developer could decide to make the frustum longer, with the near plane in front of the crowd of people and behind the buildings. As mentioned before, this could overload the graphics card, resulting in frame rate loss, especially in a high-speed racing game. This is the essence of 3D game development, building out a model and rendering it in such a way that user movement feels “natural” within the game.
3D Coordinate Systems
The XNA Framework is engineered to work with the modeling techniques discussed in the previous section, modeling the real world via 3D coordinate systems and mathematics to project a view of a 3D experience to a game player. At the heart of 3D is the coordinate system.
Remember in 2D game development that the 2D origin (X,Y) is in the upper left-hand corner of the screen with positive X going left to right and positive Y going top to bottom. In 3D game development, the origin (0,0,0) can be at the center of a car model, or it could be at an arbitrary place in the overall 3D world. In reality, there are multiple 3D origins that are relatively positioned to each other. A model has a 3D origin that runs through the center of the model or could be centered at the bottom of the model, depending on what makes most sense for the game at that time. You can rotate around the model origin, and the model would spin like a top.
Likewise, the overall world will have an origin as well. You can also rotate a model about the 3D world origin like a planet orbiting the sun in our Solar System. These concepts will be explored as we proceed in this chapter, but it is important to break your mind free from the comfort of the rigid 2D coordinate system.
One aspect of coordinate systems that needs to be consistent is how the three axes (X,Y,Z) are oriented. In 3D game development, this is called either a right-handed or a left-handed coordinate system. Figure 9-7 shows the two coordinate systems taken from the DirectX documentation on MSDN.
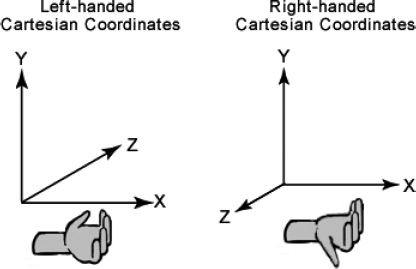
Figure 9-7. Left-handed and right-handed coordinate systems
So the idea is you can use your hand to remember the direction of the positive Z access. Point your fingers in the direction of the positive X axis and curl your fingers up toward the positive Y axis, and your thumb points in the direction of the positive Z axis.
The XNA Framework is a right-handed coordinate system, meaning that the Z axis is positive coming out of the screen. There are many programming models including DirectX that are left-handed systems, so be cognizant of the coordinate convention when reviewing sample code and documentation.
Rendering 3D Primitives
Modern graphics hardware is optimized to render triangles. You can take it on to prove it to yourself by reviewing a 3D mathematics text, but any 3D object can be modeled to have smooth edges with enough triangles. Zoom in close enough on a model and the edges can look jagged, but that does not stray too far from reality in this case either. As an example, a golf ball is round with bumps, but if you view it close enough you can see the imperfections, and take comfort in blaming your errant golf swing on the golf ball's imperfections and not your golf skills.
This is another aspect of 3D game development that is art as much as science, managing how many triangles you try to push through the graphics processor unit (GPU) versus rendering quality at different zoom levels. More triangles sounds better, but if the frame rate drops too far over a period of time, a game can become unplayable.
We will work with 3D models in a bit, but let's start out by working with just a few triangles to dip our toe into the water of 3D game development. In the Chapter 9 solution, the XNA3DPrimitives project sample demonstrates programming with triangles, which we will walk through now.
Creating 3D Primitives
You don't generally create a 3D game using triangle primitives, but we go through the exercise to define key concepts of 3D development with the XNA Framework. In the end, when you render a 3D model created by a graphics artist, you are rendering bunches of triangles that have been predefined, so the concepts covered in this section translate right over to working with models. To render a 3D scene in the XNA Framework, follow these steps:
- Load your content; in this case, a set of triangles defined as vertex collections where each vertex is one of the three points on a triangle.
- Load any textures that will render over the triangles; in this case, to provide a “skin” that is stretched over the triangle points.
- Pass the content to a vertex buffer containing the triangles that the GPU can render.
- Define the shader effect that will do the rendering.
- Modify the
Updatemethod as you did in 2D development to apply translation, rotation, and so on. - Render the vertex buffer using the shader effect in the
Drawmethod.
In the next section, we go through creating a 3D cube that is rendered to the screen.
From Triangles to Objects
We create a new project named XNA3DPrimitives in the Chapter 9 solution, where we go through the previously covered process in detail. We will draw a 3D cube and apply a color to the cube wireframe. We will then manipulate different aspects of drawing and movement to help you understand how 3D development works.
A cube has six square sides connected at 90 degree angles. Figure 9-8 shows how a cube consists of 12 triangles with two triangles per cube face.

Figure 9-8. Building a cube with triangles
Each side has six indices (three per triangle) and four vertices per cube face, representing each corner of the face. When thinking about positioning each cube face, remember that an object can have a coordinate system that goes through the geometric center. In the case of a cube, it is easily to visualize positioning each face on a 3D axis as shown in Figure 9-9.
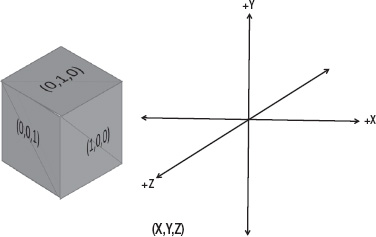
Figure 9-9. Positioning each cube face on a 3D axis
Notice the vector information in Figure 9-9, indicating which axis matches each cube face. Here is a full list of the “normal” vectors for each face, which is a Vector3 that shoots straight out of each cube face at a 90 degree angle (really shooting straight out of the two triangles that make up the cube face):
- (1,0,0): Positive X axis cube face
- (-1,0,0): Negative X axis cube face
- (0,1,0): Positive Y axis cube face
- (0,-1,0): Negative Y axis cube face
- (0,0,1): Positive Z axis cube face
- (0,0,-1): Negative Z axis cube face
3D game developers use normal vectors to figure out positioning between triangles, objects, and so on. As an example, if you want to figure out how to move an object sideways, you figure out the normal to the front and top vectors to give you the “sideways pointing” vector. Mathematically, the cross product can find the normal vector between two vectors. As an example, the Z axis is the normal vector to the Y axis and X axis. The Y axis is the normal to the X axis and Z axis, and the X axis is the normal vector to the Y and Z axes.
Figure 9-9 makes it easy to visualize the normal vector between the X, Y, and Z axes. It is a little bit of math to calculate the normal vector between two vectors. Luckily, the Vector3.Cross method takes two vectors and finds the normal vector for the two vectors passed in to the method call. Now we can proceed with building the cube. We add a method call to CreateCubeObject in the Game.LoadContent() method. We will build up the cube object in the CreateCubeObject method.
To render the cube we use two buffers: one that contains the vertex information and the other that contains the index information. Index information allows you to reuse vertex information. For example, when two triangles form a square such as a cube face, two points are shared between the triangles. While you could repeat the vertex information and have duplicates, for a large model this consumes precious memory and should be avoided. One way to avoid duplicates is to store only unique vertices in the vertex buffer and use an index buffer to represent the triangles that are drawn. Figure 9-10 shows how the vertex buffer relates to the index buffer.
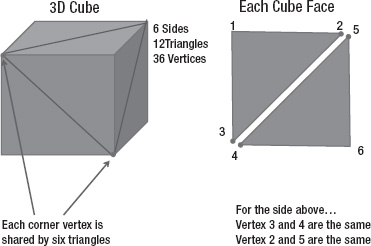
Figure 9-10. Vertex buffer and index buffer relationship
In looking at just the side on the top in Figure 9-10, the index buffer would have six slots to represent the two triangles, with three vertices each. However, the vertex buffer would only store four unique vertices. Here is what the vertex and index buffers would look like moving left to right around the side shown on the top in Figure 9-10:
- Vertex buffer: 1,2,3,6 (Vertices 4 and 5 are duplicates and removed)
- Index buffer: 1,2,3,2,6,3 (Always six vertices for two triangles)
The actual drawing is done using the index buffer, because it fully represents each triangle with three vertices per triangle. When the GPU needs the three points to draw the triangle, it looks up the actual vertex in the vertex buffer based on the index buffer with some vertices used multiple times.
In our example, to draw the left / bottom triangle, the GPU uses vertices 1, 2, and 3. To draw the right/top triangle, the GPU uses 2, 6, and 3, reusing two vertices. Although in our example the memory savings may seem trivial, for a large complex model the savings can be significant.
Creating the Cube
Now that you have an understanding of how the vertex buffer relates to the index buffer, we return to the code to use this knowledge to create the cube object. Five new members are added to the Game1 class:
VertexBuffer vertexBuffer;

IndexBuffer indexBuffer;


//Lists and variables used to construct vertex and index buffer data

List<VertexPositionNormalTexture> vertices = new List<VertexPositionNormalTexture>();

List<ushort> indices = new List<ushort>();

float size = 3;
The vertices and indices List objects are used to construct the primitive cube model. Once the cube is constructed, the data is loaded into the vertexBuffer and indexBuffer members using the SetData method call. Once loaded, the vertexBuffer and indexBuffer objects are passed to the graphics device (the GPU) for rendering using the specified lighting effect. We cover lighting and drawing in a bit. First let's construct the cube model using the vertices and indices List objects in the CreateCubeObject method, which is called in the Game1.LoadContent method after the texture is loaded and shown in Listing 9-5.
Listing 9-5. The Game1.CreateCubeObject Method
private void CreateCubeObject()

{

  // A cube has six faces, each one pointing in a different direction.

  Vector3[] normals =

        {

            new Vector3(0, 0, 1),

            new Vector3(0, 0, -1),

            new Vector3(1, 0, 0),

            new Vector3(-1, 0, 0),

            new Vector3(0, 1, 0),

            new Vector3(0, -1, 0),

        };


  // Create each face in turn.

  foreach (Vector3 normal in normals)

  {

    // Get two vectors perpendicular to the cube face normal and

    //perpendicular to each other

    Vector3 triangleSide1 = new Vector3(normal.Y, normal.Z, normal.X);

    Vector3 triangleSide2 = Vector3.Cross(normal, triangleSide1);

    // Six indices (two triangles) per face

    indices.Add((ushort)(vertices.Count + 0));

    indices.Add((ushort)(vertices.Count + 1));

    indices.Add((ushort)(vertices.Count + 2));


    indices.Add((ushort)(vertices.Count + 0));

    indices.Add((ushort)(vertices.Count + 2));

    indices.Add((ushort)(vertices.Count + 3));


    // Four vertices per cube face

    vertices.Add(new VertexPositionNormalTexture(

      (normal - triangleSide1 - triangleSide2) * size / 2, normal,Vector2.One));

    vertices.Add(new VertexPositionNormalTexture(

      (normal - triangleSide1 + triangleSide2) * size / 2, normal,Vector2.One));

    vertices.Add(new VertexPositionNormalTexture(

      (normal + triangleSide1 + triangleSide2) * size / 2, normal,Vector2.One));

    vertices.Add(new VertexPositionNormalTexture(

      (normal + triangleSide1 - triangleSide2) * size / 2, normal,Vector2.One));

  }

}
The CreateCubeObject starts by creating the six vectors that represent each side of the cube. Each vector is normal to a cube face, positioned along a 3D axis as shown in Figure 9-9 earlier.
With each normal vector, two additional normal vectors are created that are perpendicular to the normal vector and to each other. These two new vectors named triangleSide1 and triangleSide2 are used to find the four vertices that represent the cube face corner vertices that are added to the vertices List. The indices List is updated to add vertex references in the correct order so that the object can be rendered properly.
Graphics Objects and the Effect Class
We next construct and initialize the graphics objects and buffers to render our cube primitive. We declare an effect object of type BasicEffect at the top of Game1.cs. With XNA 4.0, Microsoft defined several built-in effects classes that draw objects without having to resort to High Level Shader Language (HLSL) coding. Windows Phone does not support HLSL, so we do not dive into HLSL development, but in short the language allows developers to directly program the GPU to create dazzling visual effects.
Not being able to program in HLSL may seem like a major limitation, but the built-in Effect class descendants provide several benefits:
- Cross-platform support is simplified by using the
Effectclass objects. This is known as the “reach” profile in XNA Game Studio 4.0. - The
Effectclass objects are highly configurable, allowing a wide range of visual effects programming in C#. - Developers do not have to learn yet another language in HLSL.
Table 9-1 has a list of available effect classes in XNA Game Studio 4.0.
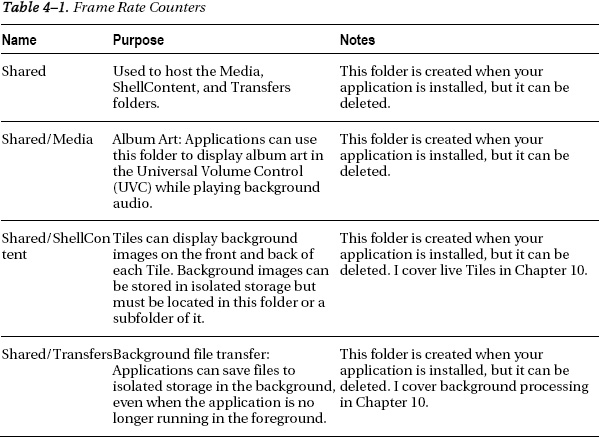
Each Effect class in Table 9-1 has several configurable “knobs” that provide developers a wide range of control without having to delve into HLSL. This link has more information and samples on the various available Effect classes:
http://create.msdn.com/en-us/education/catalog/?contenttype=0&devarea=14&sort=2
The ConstructGraphicsObjectsForDrawingCube method initializes the graphics objects and the BasicEffect object:
private void ConstructGraphicsObjectsForDrawingCube()

{

  // Create a vertex buffer, and copy the cube vertex data into it

  vertexBuffer = new VertexBuffer(graphics.GraphicsDevice,

                                  typeof(VertexPositionNormalTexture),

                                  vertices.Count, BufferUsage.None);

  vertexBuffer.SetData(vertices.ToArray());

  // Create an index buffer, and copy the cube index data into it.

  indexBuffer = new IndexBuffer(graphics.GraphicsDevice, typeof(ushort),

                                indices.Count, BufferUsage.None);

  indexBuffer.SetData(indices.ToArray());

  // Create a BasicEffect, which will be used to render the primitive.

  basicEffect = new BasicEffect(graphics.GraphicsDevice);

  basicEffect.EnableDefaultLighting();

  basicEffect.PreferPerPixelLighting = true;

}
The vertex and index data calculated in the CreateCubeObject method are loaded into the vertexBuffer and indexBuffer objects, respectively. The BasicEffect is instantiated next. We discuss effects in more detail later, but essentially the BasicEffect object provides the environmental effects for the scene such as lighting and shading.
Drawing the Cube
To draw the cube we need several additional member variables that are added at the top of Game1.cs.
float yaw = .5f;

float pitch = .5f;

float roll = .5f;

Vector3 cameraPosition = new Vector3(0, 0, 10f);
The last method related to our cube is the Game1.DrawCubePrimitive method listed here:
private void DrawCubePrimitive (Matrix world, Matrix view, Matrix projection, Color color)

{

  // Set BasicEffect parameters.

  basicEffect.World = world;

  basicEffect.View = view;

  basicEffect.Projection = projection;

  basicEffect.DiffuseColor = color.ToVector3();

  basicEffect.Alpha = color.A / 255.0f;


  GraphicsDevice graphicsDevice = basicEffect.GraphicsDevice;

  // Set our vertex declaration, vertex buffer, and index buffer.

  graphicsDevice.SetVertexBuffer(vertexBuffer);

  graphicsDevice.Indices = indexBuffer;


  foreach (EffectPass effectPass in basicEffect.CurrentTechnique.Passes)

  {
    effectPass.Apply();

    int primitiveCount = indices.Count / 3;

    graphicsDevice.DrawIndexedPrimitives(

      PrimitiveType.TriangleList, 0, 0,vertices.Count, 0, primitiveCount);

  }

}
The DrawCubePrimitive method is called in the Game1.Draw method. This method instantiates the graphicsDevice object and passes in the calculated vertex and index information for rendering. Depending on the effect used, one or more passes are executed to create the scene, drawing the triangle primitives using the graphicsDevice.DrawIndexedPrimitives method.
The cube is ready for rendering within a 3D scene. We next move to incorporating the cube code into an XNA Framework game.
The Game Class
To draw a 3D scene a developer needs to set up a coordinate system and create a camera to view the rendered scene.
The Camera
We need to create a camera that will be a view into our 3D world of triangles that is rendered by the GPU. Right-click on the XNA3DPrimitives project and select Add ![]() New Item
New Item ![]() XNA Game Studio 4.0
XNA Game Studio 4.0 ![]() Game Component. Name the new game component
Game Component. Name the new game component Camera and click Add. Remember from our discussion above that the Camera object has a position within the model world, looks in a particular direction, and has a view defined by the frustum. We modify the constructor to take three parameters: cameraUpVector, cameraPosition, and cameraDirection all of type Vector3.
The cameraPosition and cameraDirection parameters orient the Camera. As an example, if flying an airplane in the first person, you bank right to turn right, so it would make sense to have the Camera Up Vector oriented 45 degrees to the right through the turn. The camera direction defines the viewing frustum and will be oriented to look toward our triangles when drawn to the screen.
The Camera GameComponent object will need two public properties: View and Projection, of type Matrix. Don't worry about what it means to define these terms as a Matrix type—it isn't critical. It is more important to think of the concepts above as we define them programmatically.
![]() Tip If you desperately want to understand the math behind 3D game development, and eventually you will need to understand it if you pursue 3D game development, I recommend reading 3D Math Primer for Graphics and Game Development (Jones & Bartlett Publishers, 2002) by Fletcher Dunn and Ian Parberry.
Tip If you desperately want to understand the math behind 3D game development, and eventually you will need to understand it if you pursue 3D game development, I recommend reading 3D Math Primer for Graphics and Game Development (Jones & Bartlett Publishers, 2002) by Fletcher Dunn and Ian Parberry.
The Matrix class has a static method called CreatePerspectiveFieldOfView that defines the frustum for the GPU. This method call takes four parameters:
fieldOfViewaspectRationearPlaneDistancefarPlaneDistance
The fieldOfView parameter defines the angle width of the field of view for the frustum in radians, not degrees. Remember from geometry that 360 degrees equals 2pi radians, 180 degrees equals pi radians, and 90 degrees equals pi/2 radians. The MathHelper class defines these values for you so you can pass in MathHelper.PiOver4 to define a field of view of 45 degrees, which is a good starting point for most games.
The aspectRatio parameter is defined by the ratio of the screen width divided by screen height. The Game object has these values in this format: Game.Window.ClientBounds.Width/Game.Window.ClientBounds.Height.
The nearPlaneDistance parameter defines how far in front of the Camera object the near plane from Figure 9-6 is defined. A good starting point is one for our example, but in a real game you may not want the near plane to include every object in front of the Camera object. Lastly, the farPlaneDistance parameter defines the far plane, that is, the how far into the distance the camera can “see” past the near plane.
Now that we have defined the frustum box, we need to orient the frustrum box in a particular direction to look at the triangles that we are going to draw in just a bit. The handy Matrix class defines a static method named CreateLookAt that defines the direction that the Camera is facing. It takes three parameters:
- Camera Position
- Camera Direction
- Camera Up Vector
The CreateLookAt parameters match the three parameters that are passed into the Camera GameComponent object that we defined above so we pass them into the method call as shown in Listing 9-6.
Listing 9-6. The Camera GameComponent Class
using Microsoft.Xna.Framework;

namespace XNA3DPrimitives

{

  public class Camera : Microsoft.Xna.Framework.GameComponent

  {

    public Camera(Game game, Vector3 position, Vector3 direction, Vector3 upVector)

      : base(game)

    {

      // Initialize frustum matrix

      Projection = Matrix.CreatePerspectiveFieldOfView(

          MathHelper.PiOver4,

          this.Game.GraphicsDevice.Viewport.AspectRatio,

          1, 20);
      // Initialize "look at" matrix

      View = Matrix.CreateLookAt(position, direction, upVector);

    }


    public Matrix View { get; private set; }

    public Matrix Projection { get; private set; }


    public override void Initialize()

    {


      base.Initialize();

    }


    public override void Update(GameTime gameTime)

    {


      base.Update(gameTime);

    }

  }

}
We next update the Game1 class to include our new Camera object and use it to call the cube-related methods to render the cube in a scene.
Rendering the Cube Scene
To leverage the Camera object we add it to Game1.cs in the Game1.Initialize method:
protected override void Initialize()

{ // Initialize camera

  camera = new Camera(this, cameraPosition,

      Vector3.Zero, Vector3.Up);

  Components.Add(camera);

  base.Initialize();

}
We update the DrawCubePrimitive method to leverage the Camera object. The method now just takes two parameters. Here is a snippet of the first part of the method where the changes are in effect:
private void DrawCubePrimitive (Matrix world,  Color color)

{

  // Set BasicEffect parameters.

  basicEffect.World = world;

  basicEffect.View = camera.View;

  basicEffect.Projection = camera.Projection;

  basicEffect.DiffuseColor = color.ToVector3();

  basicEffect.Alpha = color.A / 255.0f;

…
The basicEffect object now gets its View and Projection properties from the Camera object in the DrawCubePrimitive method. Here is the Game1.Draw method that renders the cube:
protected override void Draw(GameTime gameTime)

{

  GraphicsDevice.Clear(Color.CornflowerBlue);

  // TODO: Add your drawing code here

  Matrix world = Matrix.CreateFromYawPitchRoll(yaw, pitch, roll);

  DrawCubePrimitive (world, Color.Orange);

  // Reset the fill mode renderstate.

  GraphicsDevice.RasterizerState = RasterizerState.CullCounterClockwise;

  base.Draw(gameTime);

}
The World coordinate is obtained from configured, yaw, pitch, and role values at the top of Game1.cs, resulting in the rendered cube shown in Figure 9-11.
float yaw = .5f;

float pitch = .5f;

float roll = .5f;
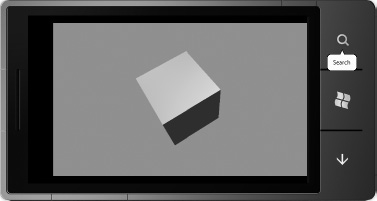
Figure 9-11. Rendered cube with configured color
The scene is static, which is a bit boring. Let's add some movement to the scene in the next section via yaw, pitch, and roll.
Adding Movement
In the previous section, the cube object is positioned using the world Matrix object, which is created using the Matrix.CreateFromYawPitchRoll(yaw, pitch, roll) static method call. The world Matrix object is passed to the DrawCubePrimitive method and assigned to the basicEffect.World property to render the object with the configured yaw, pitch, and roll applied to its coordinates. Figure 9-12 describes these parameters visually.
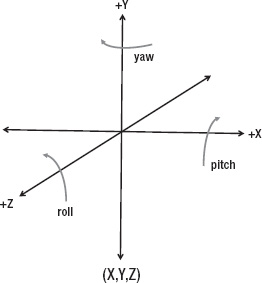
Figure 9-12. Yaw, pitch, and roll
We apply a simple way to manipulate the object by updating the yaw, pitch, and roll members in the Update method shown here:
protected override void Update(GameTime gameTime)

{

  // Allows the game to exit

  if (GamePad.GetState(PlayerIndex.One).Buttons.Back == ButtonState.Pressed)

    this.Exit();

  float time = (float)gameTime.TotalGameTime.TotalSeconds;

  yaw = time * 0.5f;

  pitch = time * 0.5f;

  roll = time * 0.5f;


  base.Update(gameTime);

}
The gameTime.TotalGameTime.TotalSeconds value is fairly small, as it is the elapsed time between frames. Applying the modification on each call to Update results in smooth animation. A screenshot doesn't do it justice, so run the sample code to observe the lighting provided by the BasicEffect instance when rendering the object as it rotates.
Now that we have covered 3D programming basics and rendering 3D objects generated from triangle primitives in code, we can move on to rendering rich 3D models, building on the 3D game development concepts presented so far.
Rendering 3D Models
A 3D model consists of triangle primitives, but is generally created in a third-party tool, such as Softimage Mod Tool, Daz Studio 3D, blender, or Caligari trueSpace, to name a few of the freely available modeling tools. Paint.NET is a free tool to create 2D textures. Professional modeling tools for purchase are Autodesk's 3ds Max, Autodesk's Maya, and Adobe's Creative Suite for texture creation. XNA Game Studio 4.0 supports importing 3D models in both Autodesk .fbx and DirectX .x formats generated from any of these tools.
Creating 3D models is beyond scope of this book. Instead we leverage models available under the MS-PL license up at AppHub, located at http://create.msdn.com. I've grabbed the spaceship.fbx file from the samples located at AppHub and the background texture from the AlienShooter project, adding them to the content project for a new project named XNA3DModels in the Chapter 9 code solution.
Movable Camera
For the new project named XNA3DModels we need a Camera object to view the 3D scene and model. In the previous sample the Camera was fixed in location. In this sample we create a Camera that can create the appearance of movement based on user input.
![]() Tip The
Tip The Camera Projection or field of view does not change; think of that aspect of the Camera as fixed, like looking through a pair of binoculars. The Camera.View property is the direction that the binoculars are pointed and can change based on user input.
For this sample, we demonstrate shifting the View property of the Camera based on Accelerometer input. For more information on the Accelerometer sensor, refer to Chapter 3.
We start with a copy of the Camera class from the XNA3DPrimitives project. Properties for View, Position, and Up are added to the Camera class. We also add a private variable named direction of type Vector3 that is calculated by taking the target Vector3 (the spaceship model) and subtracting the Position Vector3. The Projection property is calculated as before.
The Up Vector3 value is set to Vector3.Up as before and the View property is recalculated each time it is accessed via this read-only property declaration:
public Matrix View

{

  get { return Matrix.CreateLookAt(Position, Position+direction, Up); }

}
The recalculation is necessary since the Camera Position and direction values will change based on user input in the Camera.Update method. Listing 9-7 has the Camera source code.
Listing 9-7. Updated Camera Class with Support for User Input
using System;

using Microsoft.Devices.Sensors;

using Microsoft.Xna.Framework;


namespace XNA3DModels

{

  public class Camera : Microsoft.Xna.Framework.GameComponent

  {

    #region private members

    //Camera properties

    Vector3 direction;

    Vector3 Up;


    //Accelerometer input

    Accelerometer accelerometer;

    AccelerometerReading currentReading;


    //Movement parameters

    float speed = 100f;

    //Yaw movement

    float maxLeftRight = MathHelper.PiOver4 / 10;

    float stepLeftRight = MathHelper.PiOver4 / 10000;

    float currentLeftRight = 0;

    #endregion


    public Camera(Game game, Vector3 position, Vector3 target, Vector3 upVector)

      : base(game)

    {

      Position = position;

      direction = target - position;

      direction.Normalize();

      Up = upVector;


      // Initialize frustum matrix, which doesn't change

      Projection = Matrix.CreatePerspectiveFieldOfView(

          MathHelper.PiOver4,

          this.Game.GraphicsDevice.Viewport.AspectRatio,

          1, 20000);

      currentReading = new AccelerometerReading();

    }


    public Matrix View

    {

      get { return Matrix.CreateLookAt(Position, Position + direction, Up); }

    }

    public Matrix Projection { get; private set; }
    public Vector3 Position { get; private set; }
    public void ResetPosition()

    {

      Position = new Vector3(0, 1000, 15000);

      direction = Vector3.Zero - Position;

      direction.Normalize();

      Up = Vector3.Up;

    }


    public override void Initialize()

    {

      accelerometer = new Accelerometer();

      accelerometer.ReadingChanged += accelerometer_ReadingChanged;

      accelerometer.Start();

      base.Initialize();

    }


    public override void Update(GameTime gameTime)

    {

      ApplyThrust();

      ApplySteering();

      base.Update(gameTime);

    }


    private void ApplySteering()

    {

      if ((Math.Abs(currentLeftRight) < maxLeftRight) &&

    (Math.Abs(currentReading.Y) > .4))

      {

        direction = Vector3.Transform(direction,

                    Matrix.CreateFromAxisAngle(Up, currentLeftRight));

        if (currentReading.Y > .2)

        {

          currentLeftRight += stepLeftRight;

          if (currentLeftRight < 0)

            currentLeftRight = currentLeftRight * -1;

        }

        if (currentReading.Y < -.2)

        {

          currentLeftRight -= stepLeftRight;

          if (currentLeftRight > 0)

            currentLeftRight = currentLeftRight * -1;

        }

      }

    }


    private void ApplyThrust()

    {

      //Travel forward or backwards based on tilting

      //device forwards or backwards (Z axis for Accelerometer)

      if (currentReading.Z < -.65)

        Position += direction * speed;

      if (currentReading.Z > -.5)
        Position -= direction * speed;

                                               }


    protected override void OnEnabledChanged(object sender, System.EventArgs args)

    {

      if (this.Enabled)

        accelerometer.Start();

      else

        accelerometer.Stop();

      base.OnEnabledChanged(sender, args);

    }


    private void accelerometer_ReadingChanged(

      object sender, AccelerometerReadingEventArgs e)

    {

      currentReading.X = e.X;

      currentReading.Y = e.Y;

      currentReading.Z = e.Z;

      currentReading.Timestamp = e.Timestamp;


#if DEBUG

      System.Diagnostics.Debug.WriteLine("X: " + e.X);

      System.Diagnostics.Debug.WriteLine("Y: " + e.Y);

      System.Diagnostics.Debug.WriteLine("Z: " + e.Z);

#endif


    }

  }


  class AccelerometerReading

  {

    public double X { get; set; }

    public double Y { get; set; }

    public double Z { get; set; }

    public DateTimeOffset Timestamp { get; set; }

  }

}
User input is based on Accelerometer sensor input. Z axis accelerometer value changes, that is, tilting the phone forward and backward in landscape orientation, will move the Camera object closer or further in the direction it is pointed; think of it as thrust. Tilting the phone left or right, that is, changing the Y axis accelerometer, steers the Camera left or right. The hard-coded values used to manage user input were derived empirically based on the spaceship model size, projection size, and so on. Finding the right balance based on all the factors in a game are part of the art of providing good game play.
In Listing 9-7 you can find the code to wire up the accelerometer, also covered in Chapter 3. The OnEnabledChanged event shown here is overridden to allow starting and stopping the Accelerometer object readings based on whether the GameComponent is enabled:
protected override void OnEnabledChanged(object sender, System.EventArgs args)

{

  if (this.Enabled)

    accelerometer.Start();
  else

    accelerometer.Stop();


  base.OnEnabledChanged(sender, args);

}
This is a good programming practice to do, so that collecting Accelerometer input does not needlessly run the battery down. The Camera class also contains a ResetPosition method for testing purposes in the event that you fly off into 3D space and want to get back to a known good position for the movable Camera object.
The Update method in Listing 9-7 calls to private methods, ApplyThrust and ApplySteering. ApplyThrust is pretty straightforward. It adjusts the Position of the Camera along the direction the Camera object is pointing, moving the Camera backwards and forwards.
The ApplySteering method detects changes in the left/right tilt of the phone and applies the change to the currentLeftRight float value. This is used to calculate a new value for direction with this line of code:
direction = Vector3.Transform(direction,

            Matrix.CreateFromAxisAngle(Up, currentLeftRight));
This handy piece of code applies a transform to the direction Vector3 object. The transform matrix is calculated by taking the Up Vector3 value and an angle in radians that is based on the tilt of the phone. Now that the Camera class is updated, we move on to creating a new class for 3D game objects and a 3D game object coordinator class.
3D Game Object Management
In the AlienShooter 2D game, we created a class named GameObject to represent the sprite objects in the game. In the XNA3DModels project we create a class named GameObject3D to represent 3D model objects. We also create a SceneManager class that can manage multiple GameObject3D instances as part of a 3D game.
GameObject3D Class
The GameObject3D class is pretty simple. Just as GameObject took a 2D sprite Texture2D object, GameObject3D takes a Model instance loaded from the content project. In our case, that is the spacehip.fbx sample spaceship object located in the XNA3DModelsContent project Models folder. We haven't delved too deeply yet into what a model is, except that it is a computer generated object created by a graphics designer using a tool similar to the tools listed at the beginning of the section titled “3D Game Development” earlier in this chapter. The XNA Game Studio 4.0 documentation covers this in detail at this link:
http://msdn.microsoft.com/en-us/library/dd904249.aspx
Figure 9-13 is taken from the above page and describes the relationships between the Model, Mesh and Bones objects.

A Model object is made up of many vertices and materials organized into a set of meshes. In the XNA Framework, a model is represented by the Model class. A model contains one or more meshes, each of which is represented by a ModelMesh class. Each mesh is associated with one bone represented by the ModelBone class. Notice the familiar VertextBuffer and IndexBuffer that makes up the ModelMesh, which is essentially a collection of triangles under the covers.
The bone structure is set up to be hierarchical to make controlling each mesh (and therefore the entire model) easier. At the top of the hierarchy, the model has a Root bone to specify the overall position and orientation of the model. Each ModelMesh object contains a ParentBone and one or more ModelBone. You can transform the entire model using the parent bone as well as transform each individual mesh with its bone.
To animate one or more bones, update the bone transforms during the render loop by calling Model.CopyAbsoluteBoneTransformsTo Method, which iterates the individual bone transforms to make them relative to the parent bone. To draw an entire model, loop through a mesh drawing each sub mesh. It is through transforming bones over time that a Model can appear to walk, rotate, fly, and so on in a 3D game. With that background out of the way, Listing 9-8 shows how to work with a Model in code when rendering.
Listing 9-8. The GameObject3D class
using Microsoft.Xna.Framework.Graphics;

using Microsoft.Xna.Framework;


namespace XNA3DModels.Models

{

  class GameObject3D

  {

    Matrix[] boneTransforms;

    public GameObject3D(Model m)

    {
      SpaceshipModel = m;

      boneTransforms = new Matrix[SpaceshipModel.Bones.Count];

    }


    public Matrix World

    {

      get { return Matrix.Identity; }

    }

    public Model SpaceshipModel { get; protected set; }

    public void Update()

    {


    }


    public void Draw(Camera camera)

    {

      SpaceshipModel.CopyAbsoluteBoneTransformsTo(boneTransforms);

      foreach (ModelMesh mesh in SpaceshipModel.Meshes)

      {

        foreach (BasicEffect be in mesh.Effects)

        {

          be.World = World * mesh.ParentBone.Transform;

          be.Projection = camera.Projection;

          be.View = camera.View;

          be.TextureEnabled = true;

          be.EnableDefaultLighting();

          be.PreferPerPixelLighting = true;

        }

        mesh.Draw();

      }

    }

  }

}
Notice that we pass the Camera object into the Draw method to ensure that the Model is rendered within the coordinates of the Camera. Just like when we rendered primitives in the XNA3DPrimitives project, an Effect class is used to apply textures and provide lighting. In the next section we cover the SceneManager class that manages GameObject3D objects.
SceneManager Class
The SceneManager class inherits from the DrawableGameComponent class. It maintains a collection of GameObject3D objects in a Generic List collection. As a minimum it loops through each object and calls the Update and Draw methods for all managed objects as shown in Listing 9-9.
Listing 9-9. The SceneManager class
using System.Collections.Generic;

using Microsoft.Xna.Framework;

using Microsoft.Xna.Framework.Graphics;
namespace XNA3DModels.Models

{

  public class SceneManager : DrawableGameComponent

  {

    List<GameObject3D> gameObjects3D = new List<GameObject3D>();

    public SceneManager(Game game)

      : base(game)

    {

    }


    public override void Initialize()

    {

      base.Initialize();

    }


    protected override void LoadContent()

    {

      gameObjects3D.Add(new GameObject3D(Game.Content.Load<Model>("Models/spaceship")));

      base.LoadContent();

    }


    public override void Update(GameTime gameTime)

    {

      for (int i = 0; i < gameObjects3D.Count; ++i)

      {

        gameObjects3D[i].Update();

      }


      base.Update(gameTime);

    }


    public override void Draw(GameTime gameTime)

    {

      for (int i = 0; i < gameObjects3D.Count; i++)

      {

        gameObjects3D[i].Draw(((Game1)Game).Camera);

      }

      base.Draw(gameTime);

    }

  }

}
The SceneManager class provides support for managing numerous GameObject3D classes and can be the basis for creating a more complex application in combination with the GameObject3D and Camera classes we have covered so far. We now pull all of the previous pieces together to complete the XNA3DModels project sample in the next section.
XNA3DModels Game Class
The Game class Game1.cs is updated to have three additional private members at the top:
SceneManager sceneManager ;

Texture2D backgroundTexture;

GestureSample gestureSample ;
A SceneManager instance is added as well as a Texture2D to display a background image. The GestureSample field is used to obtain a touch screen gesture by the user. If a Tap gesture is detected, the Camera.ResetPosition method is called to reposition the Camera in front of the rendered 3D model.
The Camera object is declared as a public property to the Game1 class so that it can be passed into the Draw method of GameObject3D instances. Here is the Camera and SceneManager initialization code in the Game1 class:
protected override void Initialize()

{

  // Initialize Camera

  Camera = new Camera(this, new Vector3(0, 1000, 15000),

      Vector3.Zero, Vector3.Up);

  Components.Add(Camera);

  //Initialize SceneManager

  sceneManager = new SceneManager(this);

  Components.Add(sceneManager);


  TouchPanel.EnabledGestures = GestureType.Tap;

  base.Initialize();

}
The code also enables the Tap gesture so that the user can reset the Camera position. The Update method is modified to call the HandleInput method shown here:
private void HandleInput()

{

  if (TouchPanel.IsGestureAvailable)

  {

    gestureSample = TouchPanel.ReadGesture();

    if (gestureSample.GestureType == GestureType.Tap)

      Camera.ResetPosition();

  }

}
The only other code modified in the Game1 class is to load the backgroundTexture and draw the backgroundTexture using a SpriteBatch object as before. Note that you can intermingle 2D code to render textures and screen text with 3D code. Figure 9-14 shows the rendered spaceship model against a space background.

Figure 9-14. 3D Rendered spaceship model
You should run the sample on a phone to test out the Accelerometer input. While this sample isn't super exciting, it demonstrates how to render basic 3D models in the XNA Framework, including a few classes to help you get started with 3D game development.
In the next section we demonstrate how to integrate 3D development with augmented reality in a Silverlight application using Windows Phone OS 7.1 Shared Graphics capabilities, which we cover in depth in Chapter 8 and above. In the next section we add a twist of integrating 3D XNA Framework graphics with augmented reality using the Camera sensor covered in Chapter 3.
3D Augmented Reality
In this section I cover how to render a 3D model in space using the Camera sensor as a viewfinder and the Motion sensor for positioning. The idea is that you could geo-reference the model and make it clickable on screen to bring up additional details. Scenarios would be a 3D model representation of a city's downtown area, a theme park, or any other idea that you can come up with.
XAML Code
I cover 3D model rendering above and I covered both the Camera and Motion sensor in Chapter 3, so this section dives right into the sample code. We add a new project named AR_3D_App to the Chapter 9 solution. Rename GamePage.xaml to the more appropriate ARPage.xaml and add a Rectangle object named ARViewFinder in a Grid named layoutRoot to the XAML. A VideoBrush is added to the Rectangle as this is where the Camera sensor output will display. Also change the supported orientation from Portrait to Landscape. Here is the XAML from ARPage.xaml:
<Grid Name="LayoutRoot">

  <Rectangle Name="ARViewFinder" >

    <Rectangle.Fill>

      <VideoBrush x:Name="cameraVideoBrush" />

    </Rectangle.Fill>

  </Rectangle>

</Grid>
With the XAML out of the way, we need to bring in the sensors by adding a reference to Microsoft.Devices.Sensors as well as two using clauses:
using Microsoft.Devices.Sensors;

using Microsoft.Devices;
Add two fields at the top of ARPage.xaml to prepare for the Camera viewfinder rendering:
PhotoCamera photoCamera;

UIElementRenderer uierCamera;
In the OnNavigatedTo method of ARPage.xaml, we add code to connect the Camera sensor video out with the VideoBrush assigned to the Fill property of the Rectangle and instantiate the UIElementRender:
//Set up the Camera Sensor for AR

cameraSensor = new PhotoCamera();

cameraVideoBrush.SetSource(cameraSensor);

//Set width and height for landscape

cameraOutputRenderer = new UIElementRenderer(LayoutRoot,

  SharedGraphicsDeviceManager.Current.GraphicsDevice.Viewport.Width,

  SharedGraphicsDeviceManager.Current.GraphicsDevice.Viewport.Height);
We update the OnDraw event handler to render the UIElement named cameraOutputRenderer:
private void OnDraw(object sender, GameTimerEventArgs e)

{

  SharedGraphicsDeviceManager.Current.GraphicsDevice.Clear(Color.Black);

  //Render the Camera Output

  cameraOutputRenderer.Render();

  spriteBatch.Begin();

  spriteBatch.Draw(cameraOutputRenderer.Texture, Vector2.Zero, Color.White);

  spriteBatch.End();

}
That completes the setup of the Silverlight and Camera Sensor rendering code. Now let's switch to the XNA Framework rendering.
Rendering the 3D Model in Space
To start, we add the 3D model to the AR_3D_AppLibContent project. This is the model we will render in space. Imagine creating an AR shooter game with 3D flying saucers as targets and you get the idea of what is possible. We need to add several fields to ARPage.xaml.cs to lay the groundwork for the XNA rendering:
Model flyingSaucerModel;

Motion motionSensor;

Matrix deviceRotation;

Quaternion deviceQuaternion;

Vector3 position = new Vector3(0f, 0f, 3f);

Matrix world, view, projection;
You have seen all of these types before except, possibly the Quaternion. The Motion sensor API can return a Quaternion to indicate the position, orientation, and rotation of the device. It is leveraged in the OnUpdate event in ARPage.xaml.cs to get the device position, orientation, and rotation data:
private void OnUpdate(object sender, GameTimerEventArgs e)

{

  //Check to ensure Motion Sensor is available

  if (Motion.IsSupported && motionSensor.IsDataValid)

  {

    deviceRotation = motionSensor.CurrentValue.Attitude.RotationMatrix;

    Quaternion q = motionSensor.CurrentValue.Attitude.Quaternion;

    deviceQuaternion = new Quaternion(q.X, q.Z, q.Y, q.W);

  }

}
The remaining code is in the OnDraw method, shown in full here:
private void OnDraw(object sender, GameTimerEventArgs e)

{

  SharedGraphicsDeviceManager.Current.GraphicsDevice.Clear(

    Microsoft.Xna.Framework.Color.Black);

  Vector3 PhoneForward =

    -new Vector3(deviceRotation.M13, deviceRotation.M23, deviceRotation.M33);

  Vector3 cameraPosition = new Vector3(0, 0, 0);

  // Phone up is always X (in device coordinates)

  // Get it in earth coordinates:

  Vector3 PhoneUp =

    new Vector3(deviceRotation.M11, deviceRotation.M21, deviceRotation.M31);

  // Change of coordinates for XNA:

  Vector3 cameraFront = new Vector3(PhoneForward.X, PhoneForward.Z, -PhoneForward.Y);

  Vector3 cameraUp = new Vector3(PhoneUp.X, PhoneUp.Z, -PhoneUp.Y);

  Matrix viewMatrix =

    Matrix.CreateLookAt(cameraPosition, cameraPosition + cameraFront, cameraUp);

  Matrix worldMatatrix =

    Matrix.CreateWorld(Vector3.Zero, Vector3.Backward, Vector3.Up);

  worldMatatrix *= Matrix.CreateTranslation(position);

  Matrix projMatrix =

    Matrix.CreatePerspectiveFieldOfView((float)(MathHelper.PiOver4 / 1.5f),

    SharedGraphicsDeviceManager.Current.GraphicsDevice.Viewport.AspectRatio,

    0.1f, 10000f);

  //Render the Camera Output

  cameraOutputRenderer.Render();

  spriteBatch.Begin();

  spriteBatch.Draw(cameraOutputRenderer.Texture, Vector2.Zero, Color.White);

  spriteBatch.End();


  Matrix[] transforms = new Matrix[flyingSaucerModel.Bones.Count];

  flyingSaucerModel.CopyAbsoluteBoneTransformsTo(transforms);

  foreach (ModelMesh mesh in flyingSaucerModel.Meshes)

  {

    foreach (BasicEffect effect in mesh.Effects)

    {

      effect.EnableDefaultLighting();

      effect.View = viewMatrix;

      effect.World = worldMatatrix;

      effect.Projection = projMatrix;
    }

    mesh.Draw();

  }

}
As you can see, Windows Phone 7.5 offers near unlimited opportunities to build incredibly rich augmented reality applications. In the next section I provide a quick tour of a very important tool for game development, the Windows Phone Profiler.
Windows Phone Profiler
Windows Phone 7 was a bit of a black box to developers when it shipped in the Fall of 2010. There were APIs to track memory usage but that was about it as far as application profiling was concerned. Luckily with the new Windows Phone Developer Tools for Windows Phone OS 7.1, there is an integrated Profiler available to help you find trouble spots in your application. For most games, resource management is always a challenge, and the Windows Phone Profiler is a great tool to test performance in your games.
Open the Chapter 9 solution if not already open and set the AlienShooter game as the startup project. Go to the Debug menu in Visual Studio and select the Start Windows Phone Performance Analysis menu item. In the window that appears, select Memory as shown in Figure 9-15.

Figure 9-15. Performance Analysis Configuration
Set the deployment to Windows Phone Device, Release configuration, and then click Launch Application. Running performance analysis in the Emulator is not recommended. Play the game for a bit, and the memory analysis looks pretty good as shown in Figure 9-16.
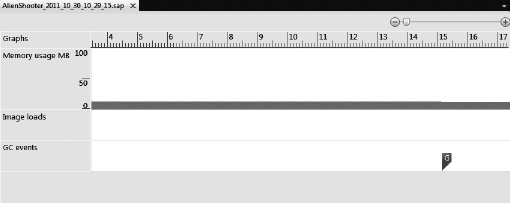
Figure 9–16. Performance analysis results for memory
I am careful to minimize allocations within the game loop and reuse objects. The memory analysis demonstrates the benefits. Go to the Debug menu, and select the Start Windows Phone Performance Analysis option, and this time leave it on Execution. After running the tests there are no warnings, as shown in Figure 9-17.
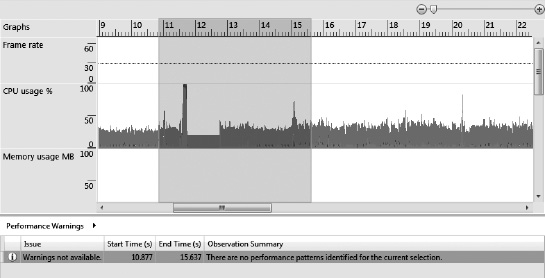
Figure 9-17. Performance analysis results for execution
The UI is encapsulated within the view, so it takes a bit of orientation to understand how to navigate the Windows Phone Profiler. Notice the text Performance Warnings with the arrow to the right. Click on the arrow in the UI to bring up two menu items, titled Frames and CPU Usage, to allow deeper analysis when a warning is shown below in the issues section. You can select the issue and then explore the Performance Warnings menu to drill into the issue to see CPU Time, Frames, Function call tree, and other metrics to identify the problem.
Conclusion
In this chapter, we started off by adding the finishing touches to the 2D AlienShooter project, including support for loading and saving the game as well as support for tombstoning. We also added a basic particle system to the 2D AlienShooter project to have nice explosions when missiles strike enemy alien space ships. Next we converted the AlienShooter to a shared graphics rendering sample, including switching the HUD to Silverlight UI. I then covered some of the issues with this approach, such as the lack of DrawableGameComponents and how to work around it.
We switched gears and provided an introduction to 3D game development with extensive coverage of 3D game development concepts. We next moved on to two 3D game sample projects. The first sample demonstrated 3D concepts by rendering triangles to form a cube. The second sample rendered a 3D Model that also had a movable Camera controlled by the user via the Accelerometer sensor. The third 3D sample showed how easy it is to pull in the Camera sensor in a shared graphics application to render an object in 3D space in an augmented reality application.
Finally I covered the Windows Phone Profiler and game development. It is a critical tool to help you understand performance of your code. It also shows the benefits of reusing objects and thoughtful memory allocation to minimize garbage collection and high CPU managing memory.