
C H A P T E R 1
![]()
Introduction to Windows Phone and Marketplace
Windows Phone, updated in Windows Phone 7.5, presents an exciting opportunity for developers to build and monetize mobile applications. It represents a major new investment into mobile computing by Microsoft, and in many ways is a major break from the past. To build applications for Windows Phone, it is important to understand its target consumer audience and design philosophy.
Up until roughly 2007, Windows Mobile was a growing, well-received platform targeting primarily enterprise users. Windows Mobile was taking share from competitors such as Palm and going head-to-head with RIM Blackberry, but overall it was considered fairly successful. The release of the iPhone and its consumer focus and applications store it turned the mobile device market on its head, and was a major wake-up call for Microsoft. Tack on the surge by Google's Android operating system, and the Smartphone market became hyper-competitive.
Windows Phone represents a sea change in approach by Microsoft toward mobile computing. Although Windows Mobile 6.x and earlier resembles a miniaturized version of desktop Windows, with its iconic Start screen, Windows Phone is very different with a user interface that is more similar to the ZuneHD interface – on steroids.
When the ZuneHD was introduced, it received positive feedback from critics, but it wasn't highly marketed toward consumers. It also did not have a third-party application Marketplace. Still, it was an opportunity for Microsoft to try out new mobile computing concepts on a mass audience of a few million users.
Learning from its own stumbles, taking what works from Zune, and then looking at the existing mobile landscape, Microsoft came up with Windows Phone with a dramatically different user experience from Windows Mobile, a new mobile development paradigm, and a completely different approach in the market.
With Windows Phone, Microsoft makes the end-user consumer the top priority, whereas in the past, with Windows Mobile, the original equipment manufacturer (OEM) was Microsoft's primary customer. This does not mean that Microsoft is OEMing the device directly. Instead, Microsoft spec'd out the hardware and software for the platform such that OEMs can take that specification as a basis for further innovation. OEMs can build devices with or without a keyboard, or with slightly different physical sizes, different screen types, and additional features like a camera and more storage, to name a few options.
Windows Phone devised have an 800 · 480 screen resolution, the exact same user interface and APIs, and the same range of sensors no matter what the OEM or Mobile Operator. This means that developers can build an application and be confident that it will run on all available devices.
![]() Note Microsoft has stated that it may add a new screen resolution in the future and will provide guidance and tooling to ease development and ensure applications can run on all screens.
Note Microsoft has stated that it may add a new screen resolution in the future and will provide guidance and tooling to ease development and ensure applications can run on all screens.
New Windows Phone 7.5 devices can include a Gyroscope sensor and s compass sensor available via APIs. I cover hardware in more detail later in the chapter. This may make you nervous as a developer, but the Windows Phone product team provides a software layer in the “Motion Sensor” that abstracts out the lack of Gyroscope hardware in Windows Phone RTM devices. I cover the Motion Sensor in more detail in Chapter 3 and Chapter 9.
From a software standpoint, the programming model for Windows Phone is very different from Windows Mobile. With Windows Mobile, developers created applications with either C++ or .NET Windows Forms via the .NET Compact Framework. For Windows Phone, the available programming models are Silverlight and the XNA Framework. In Windows Phone 7, Silverlight and the XNA Framework could call non-visual APIs. Windows Phone 7.5 includes “Shared Graphics,” which allows Silverlight and XNA Framework graphics, which is covered in Chapter 9.
I cover the new software and capabilities in more detail in the following sections, but first let's answer the question of why develop for Windows Phone.
Why Should I Care?
As a developer, you may wonder whether you should invest in building applications for Windows Phone. The answer is “yes!” Windows Phone offers unique application features and integration to developers, allowing you to build amazing user experiences. I cover more on that in the next section as well as Marketplace, but let's first discuss market potential.
Smartphone Growth and the Nokia Partnership
The mobile phone has become a major computing platform, experiencing incredible growth. As I write this, Smartphone shipments make up approximately 10% of the mobile phone market worldwide, which includes feature phones, etc. It is expected that the share of Smartphone devices will grow to 70% of the market over the next three or four years.
Much of the growth potential is still ahead. A new or remade player in the market, such as Android and Windows Phone, can come on to the scene and capture the imagination of both developers and consumers with the right level of marketing and engineering commitment. Android has become a major player in the market along with iOS. Windows Phone is set to become a major player as well with the partnership with Nokia, a worldwide leader in the Smartphone market. The partnership demonstrates Microsoft's commitment to move into the market.
With the Nokia partnership, Nokia has committed to building phones based on the Windows Phone operating system. Nokia brings a world-class organization, a worldwide retail presence, and amazing hardware engineering to Windows Phone.
Nokia announced that it will launch its Windows Phone in six European nations in 2011, increasing the worldwide development opportunity for Windows Phone developers, given Nokia's strong presence worldwide.
In March of 2011, IDC predicted that Windows Phone will overtake iPhone and BlackBerry by 2015 (http://seattletimes.nwsource.com/html/technologybrierdudleysblog/2014627927_idc_windows_phone_to_overtake.html).
In April of 2011, Gartner predicted Windows Phone will overtake Blackberry in 2013 and will overtake iPhone in 2015 (http://wmpoweruser.com/gartner-predicts-windows-phone-7-will-overtake-blackberry-in-2013-overtake-iphone-in-2015/?utm_source=twitterfeed&utm_medium=twitter).
While these are third-party predictions, it is a decisive break from previous predictions regarding Windows Mobile. Time will tell how this story unfolds, but there is no doubt that the Nokia partnership is a major upheaval of the Smartphone marketplace in favor of Windows Phone. As a developer you do not want to miss out on this worldwide opportunity and market.
The Mobile Market
The Smartphone segment of the mobile device market is expected to continue significant double-digit growth in the foreseeable future. This growth stems from new users purchasing devices as well as existing function phone and feature phone users moving to Smartphones. Despite the hype, it is way too early to suggest that one platform or another has “won” the Smartphone war. There is plenty of new growth to be had in the market before competing platforms will need to focus on taking share from one another.
Take Android as an example. It has stormed onto the market and has outsold iOS devices so far in 2011. Regarding Windows Phone, Microsoft CEO Steve Ballmer claims that his company is “all-in” with respect to commitment to the mobile market and Windows Phone. The partnership with Nokia announced in early 2011 demonstrates the high-level of commitment and desire needed to bring a robust third ecosystem to market.
In describing my perspective on what Windows Phone means to Microsoft, I like to use an analogy. When Microsoft first introduced the Xbox game console, the general consensus in the market was that the Sony PlayStation had “won” the market and there was no way the Xbox could catch up. Today, I don't think anyone would question Microsoft's investment or commitment with respect to the Xbox 360. Likewise, who would have guessed that Nintendo would have made a comeback like it did with the Wii? Competition is a wonderful thing for consumers. Expect even more competition and dynamism in the mobile device market!
Current Microsoft Developers
If you are an existing .NET Framework, Silverlight, or XNA Game Studio developer, you are well on your way to having the skills needed to create great Windows Phone applications. However, there are many unique aspects to mobile device development, as well as features that are specific to Windows Phone, that require new skills. This book will present to you the information you need to bring your existing skills to bear on this new and exciting platform and to build great mobile application experiences.
![]() Note Windows Phone development initially supported C# only at launch. Since launch, Microsoft has added support for Visual Basic .NET development for both Silverlight applications and XNA Framework game development.
Note Windows Phone development initially supported C# only at launch. Since launch, Microsoft has added support for Visual Basic .NET development for both Silverlight applications and XNA Framework game development.
If you are new to Silverlight and XNA Game Studio, I spend time in this chapter introducing you to the basic concepts in these technologies to get you started. Combine this chapter with the online references available, and you will have the necessary foundation to proceed with the rest of this text. If you are an experienced Silverlight developer, you can skip Chapter 2 and parts of Chapters 4 and 5 that cover topics familiar to Silverlight developers.
If you are an existing Windows Mobile developer, you have a great depth of understanding of .NET and deep knowledge of mobile development considerations as well. This book will help you bring your existing knowledge to Silverlight and XNA Game Studio so that you can port your existing applications to Windows Phone.
Non-Microsoft Developers
If you are an existing mobile developer on another platform, this book will help you bring your mobile development skills to bear on Windows Phone. Windows Phone applications are written in C#, which is similar to the Java language and has roots in C, so many of the language constructs will be straightforward. For additional information on C# in general, check out the Apress title Beginning C# 2010: From Novice to Professional, Second Edition, by Adam Freeman.
It is challenging to write a “Pro” book and not cover some of the fundamentals. It is for this reason that I spend an entire chapter on Silverlight development to quickly help experienced mobile developers who are new to Silverlight to get started. Don't worry, though, there are plenty of advanced topics to help you build a world-class application.
Windows Phone Platform Overview
In this section, I provide an overview of the design philosophy behind Windows Phone. I also cover the available development model to familiarize you with underlying platform architecture and developer capabilities.
Phone Design Philosophy
When Microsoft introduced Windows Phone, its executives spoke about “integrated experiences” and “smart design.” Without a doubt, Windows Phone presents a unique user interface as compared to other current Smartphone operating systems, as shown in Figure 1–1.

Figure 1–1. Windows Phone Start screens
The Windows Phone Start screen presents a lot of information in a clear fashion. Information and content is presented in a straightforward, easy to navigate manner without distraction. Controls have a minimalistic feel, allowing the user to focus on the content. Your applications should take the same approach.
Also shown in Figure 1–1 are several top-level tile icons pointing to the built-in “hubs,” such as the People, Office, Pictures, Zune, Marketplace, and Xbox LIVE hubs. The hubs are the built-in, top-level panoramic experiences, meaning they scroll left and right to present content in a rich fashion. Figure 1–2 shows the pictures hub. Notice that the focus is on the content, not “chrome.”
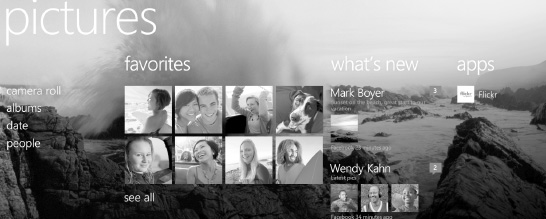
Figure 1–2. Windows Phone pictures hub Panorama experience
Figure 1–2 shows a wide view of the full user interface width of the Panorama experience. A user swipes left and right to view content in addition to scrolling up and down on each viewable section. Hubs provide an integrated view on data. For example, if you register an Exchange, Facebook, Twitter, LinkedIN, and Windows Live account, photos from social networks are pulled together into a single integrated view under “what's new” in the pictures hub. Photos from the camera roll are shown as well as applications that work with the pictures hub such as Flickr and Photobucket. This allows the user to explore images from all sources as well as know which applications can enhance the picture hub experience.
The Panorama control is a single page for all Panorama panes. There is a little bit of “peek” on the right that shows the next Panorama pane to indicate that you should swipe left or right with only a single heading visible at any time. In addition to Panorama, the other major navigation paradigm is called Pivot Outlook on Windows Phone, and it uses a Pivot control as the main landing page. The Pivot control is virtualized, designed to display large amounts of data. The Pivot shows multiple headers to indicate that you should swipe left and right, and it does not have the “peek” like the Panorama. Figure 1–3 shows an example Pivot interface running in the Emulator.

Figure 1–3. Windows Phone Pivot experience
In the application shown in Figure 1–3, the users touches the categories at the top, such as profile, what's new, and so on, to switch between lists of data. Selecting an item displays the details. The Pivot experience provides a great navigation experience for displaying large amounts of categorized or filtered data.
The Panorama and Pivot experiences are all part of the Metro UI design language, which is the underlying design approach for all of the Windows Phone built-in experiences. The controls available when developing for Windows Phone are skinned for Metro by default. You will see more of this in the “Silverlight Framework” section of this chapter.
Of course, you are not limited to Panorama or Pivot for application design and navigation. Windows Phone supports Pages as well for a details view of content. Most applications will support just one Panorama at most and then navigate to either a Pivot for a full list of content and then on to a Page to view content details. The key is to present a nice, clean information architecture to users.
I cover application user interface design in more detail in Chapter 3, but it is important to have an understanding of the platform philosophy up front in order to help you start to think about your application in terms of what it means to be a Windows Phone application. For more information on Windows Phone design philosophy, please check out the design resources available at http://msdn.microsoft.com/en-us/library/ff637515%28VS.92%29.aspx, or simply search for “design resources for Windows Phone” in your favorite Web search engine.
Hardware Capabilities
Unlike the iPhone or Blackberry, Microsoft does not produce the phone directly. Instead, Microsoft has chosen to continue to partner with mobile device OEMs in order to scale production and to promote differentiation. However, unlike with Windows Mobile 6.x and its predecessors, Microsoft has taken a more hands-on approach in specifying the underlying hardware such as chipset, CPU, GPU, Camera, Sensors, minimum memory, and so on, in addition to authoring many of the drivers.
![]() Note Microsoft announced a major Windows Phone partnership with Nokia to produce Windows Phone devices. Predications are that this partnership will propel Windows Phone market share to 2nd or 3rd worldwide over the next couple of years.
Note Microsoft announced a major Windows Phone partnership with Nokia to produce Windows Phone devices. Predications are that this partnership will propel Windows Phone market share to 2nd or 3rd worldwide over the next couple of years.
OEMs are still free to innovate in terms of providing additional capabilities such as a physical keyboard, additional memory, and storage, but the underlying consistency ensures that applications work well across device manufactures, which greatly simplifies the efforts required of developers.
Every Windows Phone device has the following capabilities:
- Capacitive 4-point multi-touch screen
- DirectX 9 hardware acceleration
- Digital camera
- Accelerometer
- Assisted GPS
- Compass sensor (optional)
- Light sensor
- Proximity Sensor
- Gyroscope Sensor (optional for new Windows Phone 7.5 devices)
Windows Phone hardware includes a powerful ARM v7 “Cortex/Scorpion” CPU at launch and a Qualcomm MSM8655 in Windows Phone codename “Mango,” a powerful NVidia Tegra GPU, a minimum of 256 MB of RAM, and 8 GB or more of flash storage. Windows Phone includes a large WVGA (800 × 480) display at launch.
At some point in the future Windows Phone will also be available with an HVGA (480 × 320) display to provide for additional hardware differentiation. Microsoft will provide tools and guidance to assist developers with creating applications that support both resolutions. However, as you learn more about Silverlight (XAML + .NET), you will be well on your way to correctly writing applications that work well on both resolutions.
For XNA Framework-based games, the Windows Phone's powerful hardware scaler can assist with scaling assets as needed, whether to allow sharing of assets with Xbox and PC versions of a game or to assist with scaling assets for the HVGA version of Windows Phone when it becomes available at some point after initial launch.
Software Capabilities
Windows Phone includes two programming models: the Silverlight and XNA Frameworks. With Windows Phone 7.5 Silverlight for Windows Phone jumps up to match the Silverlight 4 framework. Figure 1–4 illustrates the iconic breakdown shown by Microsoft when discussing the Windows Phone Application Platform at Mix, TechReady, and pretty much any other setting.
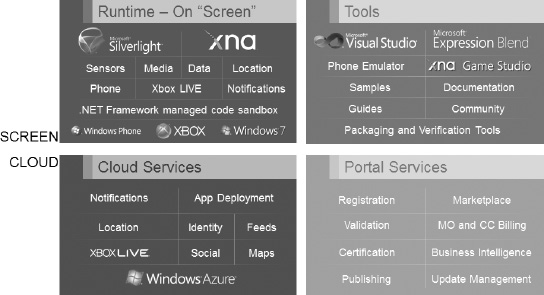
Figure 1–4. Windows Phone application platform
The upper left-hand corner of Figure 1–4 lists the two major programming models, Silverlight and XNA Framework, with the various integration points developers can take advantage of. Note that all of the underlying capabilities are accessible from either Silverlight or XNA Framework. All of these capabilities run inside the .NET Framework common language runtime in a sandboxed environment.
![]() Tip The consumer brand name for Windows Phone codename ‘Mango' is Windows Phone 7.5. The operating system name is Windows Phone OS 7.1, and the tools are Windows Phone OS 7.1 Developer Tools. I will refer to all three throughout the book, but they are the same platform/tools set.
Tip The consumer brand name for Windows Phone codename ‘Mango' is Windows Phone 7.5. The operating system name is Windows Phone OS 7.1, and the tools are Windows Phone OS 7.1 Developer Tools. I will refer to all three throughout the book, but they are the same platform/tools set.
The upper right-hand corner of Figure 1–4 lists the two primary tools you use to create Windows Phone applications, Visual Studio 2010 and Expression Blend 4. Visual Studio 2010 is the development tool most developers are familiar with already. XNA Game Studio sits inside of Visual Studio 2010 via a plug-in for game development.
A critically important tool listed in the upper right-hand corner is the Windows Phone Emulator. The Windows Phone Emulator is a virtual machine that allows developers to create applications and games without having a physical device. If you have a touch-enabled monitor, the emulator will pick up touch interactions as if running on a device.
With Windows Phone 7.5, the emulator now includes built-in location and accelerometer, which I cover in the next section
![]() Tip Microsoft limits the Phone Emulator to a single processor and injects sleep events to better simulate actual device performance, but generally performance will be better in the emulator than on a device, because there are far more resources available on a desktop PC. It is therefore important to periodically test your application on a real device.
Tip Microsoft limits the Phone Emulator to a single processor and injects sleep events to better simulate actual device performance, but generally performance will be better in the emulator than on a device, because there are far more resources available on a desktop PC. It is therefore important to periodically test your application on a real device.
In Figure 1–4, the lower left-hand corner of the diagram represents code that you access in the cloud, such as notification services and location services that Microsoft provides, as well as custom-code you write to support your application such as web services, REST data, and so on.
The lower right-hand corner of in Figure 1–4 contains a reference to the tools that help you ship and promote your applications, primarily the Windows Marketplace for Mobile, or Marketplace for short.
Now that I covered a high-level overview of the application platform, let's dive into the programming models, Silverlight and XNA Framework. You build user experiences in Silverlight via Xml Application Markup Language (XAML) with a C# code-behind model with the .NET Framework. XAML is the serialization format of the UI elements added to the form. Since XAML is well-formed XML, it provides excellent tooling and validation support. It is also a namespace-based human-editable serialization format, allowing developers to easily modify XAML by hand.
The UI for Silverlight can be created in both Visual Studio and Expression Blend 4 for Windows Phone, though Expression Blend 4 can make some design operations such as animations and data binding much easier to code visually.
XNA Framework applications, on the other hand, are developed purely in C# or VB.NET code in Visual Studio, though there are third-party frameworks that can assist with game development through visually designing levels and the like Figure 1–5 provides a high-level breakdown of Silverlight vs. XNA Framework.
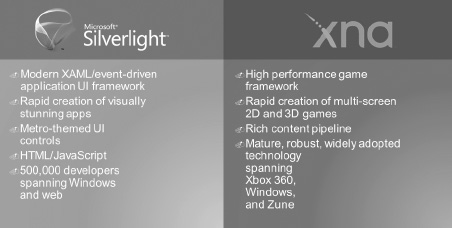
Figure 1–5. Windows Phone application programming frameworks
Both Silverlight and XNA Framework share the same application model built on top of the .NET Common Language Runtime (CLR) allowing access to libraries across frameworks. So, a Silverlight application can access the audio APIs available in XNA Framework. Likewise, an XNA Framework application can access remote server access APIs available Silverlight.
With Windows Phone 7.5 developers can also draw Silverlight and XNA to the same canvas, enabling 3D visualization in Silverlight applications as well as enabling XAML-based menus for XNA games. I cover the shared programming model in Chapter 9.
Windows Phone 7.5
The Windows Phone 7.5 update, previously codenamed “Mango,” brings to Windows Phone 500 new features for consumers and more than 1,500 new APIs, new hardware with new sensors, and new tools for developers. The next couple of sections provide more detail on these features.
Consumer Features
Windows Phone 7.5 adds many new features for consumers to Windows Phone such as Threaded conversations called Threads. Threads allow a consumer to switch between texting, Facebook chat, and Windows Live Messenger all within the same conversation. Groups allow you to group contacts into personalized Live Tiles to see the latest status update and quickly send a text, email, or IM to the group right from the start screen.
In addition to Facebook, Windows Phone 7.5 now includes Twitter and LinkedIn social networks integrated into the people hub. Email now allows you to view multiple email accounts in one linked inbox. Also, all Office applications can now save data to SkyDrive. There are many other UI and feature improvements for end users, but I wanted to highlight some of the key features in the Windows Phone 7.5 update. In the next section, I highlight key developer features.
Developer Features
Windows Phone OS 7.1 and the Windows Phone OS 7.1 SDK include many new features that greatly increase the options a developer has to build unique and differentiated applications. Windows Phone OS 7.1 now includes multitasking that allows applications to run in the background while preserving battery life and performance. Fast app switching allows end users to quickly switch between apps without a full tombstone. I cover multitasking in Chapter 10.
App Connect allows applications to integrate with search results and hubs such as the music+videos hub and pictures hub. An example of search integration is if a user searches for movies, an application that shows movie times can register and be shown as part of the search results, offering unique opportunities to promote applications. App Connect is covered in Chapter 7. Here is a short list of additional features available for developers:
- Background Agents: Timed or on idle, live agents that update tiles, Background audio, and Background file transfer
- Enhanced Phone Framework: Allows access to phone data such as calendar and contacts
- Silverlight 4 compatibility including sockets
- More tasks and choosers, deeper access to user data, create alarms and reminders, etc.
- Performance improvements and new tools such as the improved emulator and the new profiler
- Local Database support
- Improved Push Notification and Live Tile experience with deep linking to application content
- Internet Explorer 9 for mobile with full support for HTML5
Windows Phone Developer Tools
The Windows Phone Developer Tools are a free download available from App Hub at http://create.msdn.com. The tools include Visual Studio 2010 Express for Windows Phone, XNA Game Studio 4, and Expression Blend 4 for Windows Phone – all you need in a single free download.
If you are currently a Visual Studio 2010 Professional or later developer, fear not – you will not lose access to all of your favorite features available in the Professional or later products. When you install the Windows Phone Developer Tools over Visual Studio 2010 Professional or later, the tool simply folds into the existing installation with no loss of functionality.
Download the tools from http://create.msdn.com and install the tools to prepare for the next two sections. The next section provides an overview of the Silverlight Tools and Framework. This book primarily focuses on building applications in Silverlight, but with Windows Phone 7.5 and “Shared Graphics,” the lines are blurred between the frameworks. This is because Shared Graphics allows the Silverlight and XNA UI to be composited together on screen providing unique capabilities to Windows Phone. Therefore, the section following that one covers XNA Game Studio in detail to introduce Silverlight developers to the XNA Framework programming model.
Silverlight Tools and Framework Overview
In general, Silverlight is Microsoft's cross-web browser, cross-platform, and cross-device plug-in for delivering.NET Framework-based rich interactive applications for the Web and the Windows desktop. Silverlight has developed into a powerful programming model that consists of XAML + .NET capable of building everything from rich media applications like the NBC Olympics and CBS March Madness a few years ago to building mission-critical Line-Of-Business applications in corporations.
Silverlight for Windows Phone
Windows Phone brings the Silverlight programming model, XAML + .NET, to Windows Phone. Silverlight on Windows Phone 7.5 is based on Silverlight 4. There are some notable differences between Silverlight for the desktop and Silverlight for Windows Phone:
- Silverlight for Windows Phone applications are deployed via Marketplace on the device and via the Zune client. Silverlight applications are not deployed from the Web or side-loaded from a PC to Windows Phone.
- Silverlight for Windows Phone applications do not run in IE Mobile. Silverlight applications run directly on the phone via a host process in isolation from one another. If you are a Silverlight developer, you can think of it as a Silverlight out-of-browser application only – applications do not run in a browser.
- Some Silverlight Framework APIs are not applicable to Windows Phone. One example is the APIs that enable Silverlight in the web browser to communicate with the host browser. Because Silverlight does not run in the browser on Windows Phone, these APIs are not applicable.
- Silverlight for Windows Phone includes additional functionality to make underlying device capabilities available to developers such as the built-in sensors, tasks, and choosers to enable selecting a contact, send an SMS or email, and so on.
Despite these differences, the vast majority of the.NET Framework for Silverlight is compatible between Silverlight for the Web/desktop and Silverlight for Windows Phone.
Hello for Windows Phone
Now that you have a high-level overview of the application platform and programming model, let's dive a little bit deeper into Silverlight development with the Windows Phone Developer Tools. We start first with an overview of Visual Studio 2010.
Silverlight development was available in Visual Studio 2005 and 2008; however, support for Silverlight really shines in Visual Studio 2010, making it a first-class citizen development technology with great tooling support. I also provide a very high-level overview of Expression Blend, now in its fourth version and included as a free download for Windows Phone development as part of the Windows Phone Developer Tools.
Visual Studio 2010 Tour
Once you have the Windows Phone Developer Tools installed, fire up Visual Studio 2010 and select File New Project… to bring up the New Project dialog. Select Silverlight for Windows Phone on the left of the dialog and then select Windows Phone Application. Enter a name and location and then click OK to create it.
After the project is created, double-click on MainPage.xaml in the Solution Explorer tool window on the right to bring up the main application form or page. Figure 1–6 shows the UI with key items highlighted.
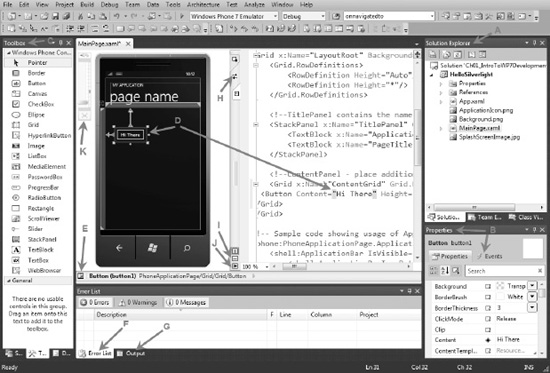
Figure 1–6. Windows Phone Silverlight for Windows Phone design-time
Table 1–1 explains the identified items in the figure. If you are an experienced .NET developer, some of these may be obvious to you, but other items may not be so familiar.
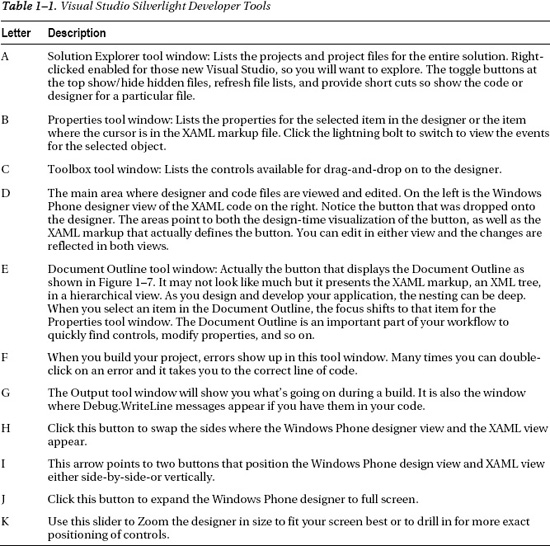
Figure 1–7 shows the Document Outline tool window. Once you start using it as part of your development workflow, you will find it invaluable for anything but the most trivial projects.
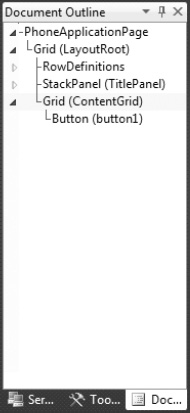
Figure 1–7. Document Outline tool window
Now that I have provided a quick tour of Visual Studio 2010 for Windows Phone development, let's dive in with some code. Add a button toward the top middle portion of the form. Double-click on the button to create the default event handler for the control, which is the Click event for a Button control. Doing so creates the following event handler that is edited to adjust the content for the button:
private void button1_Click(object sender, RoutedEventArgs e)

{

  (sender as Button).Content = "Hi There Reader";

}
We can reference the button by name, button1, created by default. In the above code, since the button1 is also the sender, we simply cast sender to button and set the Content property. A question you may be asking is how is the event handler associated with the Button object? The answer is via the XAML markup for button1, shown here:
<Button Content="Hi There" Height="72" HorizontalAlignment="Left" Margin="47,101,0,0"

Name="button1" VerticalAlignment="Top" Width="160" Click="button1_Click" />
All of the XAML was automatically generated when the control was dropped onto the designer surface except for the value configured in Content property and this line of code that associates the event handler in the MainPage.xaml.cs code-behind with the Click event for the control:
Click="button1_Click"
You can also generate event handlers by editing XAML directly. Drag another button on to the design-surface below the first. Change the Width property to Auto for this button, more on that later. Next go to the markup and type Click= inside of the <Button …> markup for the second Button control. Figure 1–8 shows the IntelliSense pop-up.
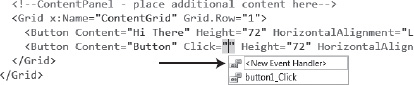
Figure 1–8. XAML IntelliSense
You can arrow up or down in the pop-up window shown in Figure 1–8 to select an existing event handler, or simply type Tab to generate a new event handler into the code-behind file named button2_Click by default. We copy the same code from the first event handler into the second event handler and click F5 or the green arrow in the toolbar in Visual Studio to run the application the emulator as shown in Figure 1–9.
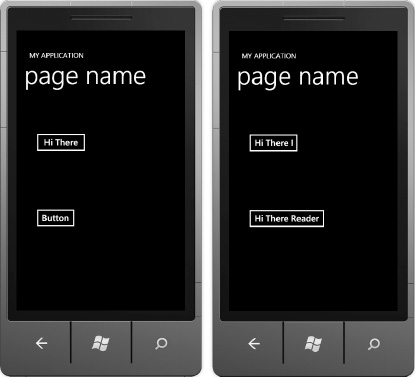
Figure 1–9. HelloSilverlight application in the emulator
In Figure 1–9, the image on the left shows the initial state, and the image on the right shows the state after clicking both buttons. Notice that the text is clipped on the top button while the bottom button automatically expanded. Remember that when I added the second button the Width was set to Auto. By setting the Width to Auto, we rely on the Silverlight layout system to determine the appropriate width for the control. I cover the layout system in more detail in Chapter 2.
Expression Blend 4 for Windows Phone Tour
Expression Blend is a relatively new tool available from Microsoft. It was first introduced with Windows Presentation Foundation as the user experience design tool. I discussed XAML as part of the overview in this section and a little bit during the walkthrough in the previous section, but to reiterate, the UI Markup language for WPF and Silverlight is Xml Application Markup Language XAML, It has great tooling support provided in both Visual Studio and Expression Blend, which I cover here.
Expression Blend is positioned as a designer tool, more for a technical designer who takes mock-ups from Adobe Photoshop or another drawing tool and turns it into XAML. Expression Blend 4 can import from Adobe Photoshop as well as Adobe Illustrator files to help jumpstart from mock-up to XAML. Figure 1–10 shows the Expression Blend 4 UI with the Ch01_IntroToWPDevelopment solution open.
![]() Tip If you are a designer, please check out the Windows Phone Design Resources available at
Tip If you are a designer, please check out the Windows Phone Design Resources available at http://msdn.microsoft.com/en-us/library/ff637515(VS.92).aspx. It includes design guidance as well as templates for Adobe Photoshop to help jumpstart Windows Phone design efforts.
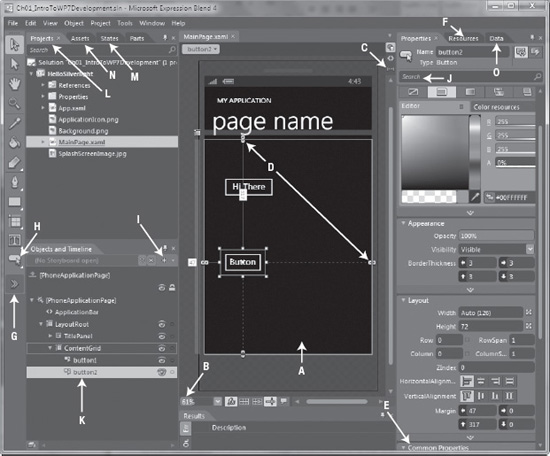
Figure 1–10. HelloSilverlight application in Expression Blend
Figure 1–10 shows Expression Blend 4 with a simple project opened in order to provide an overview of the tool's major features. Table 1–2 provides a quick description of the lettered arrows.

Expression Blend has many features that developers and designers will want to take advantage of, such as design-time data, animations, visual states, UI templates, and control templates.
This completes the quick overview of the Silverlight tools and programming model. I will cover user interface development in both Visual Studio and Expression Blend in more detail in Chapters 2 and 5.
As mentioned previously, with Windows Phone 7.5 developers can render a Silverlight and XNA Framework UI to create unique application experiences. To help introduce Silverlight developers to XNA Framework development, I spend a bit more time on XNA Game Studio development as part of this chapter to cover the fundamentals. I also cover the XNA Framework in Chapter 3 related to input and in Chapter 4 related to the programming model. Chapters 8 and 9 cover 2D game development, XNA Shared Graphics capabilities, and 3D game development to help professional developers understand how to get started with this great capability.
XNA Game Studio and Framework Overview
XNA Game Studio and game development with the Xbox LIVE Hub are major features of Windows Phone. The XNA Framework for Windows Phone is part of XNA Game Studio 4.0, which is a plug-in for Visual Studio 2010 that enables developers to create games for Windows, Xbox and Windows Phone.
The XNA Framework enables developers to write applications, primarily games, using managed .NET Framework code. The XNA Framework is consistent across the target platforms mentioned previously, allowing the developer to account for differences between input and display for the target platform.
Applications targeting a specific platform will have unique user input capabilities, such as the mouse and keyboard for the desktop, Xbox controller for Xbox and on the desktop if a USB controller is connected. For Windows Phone, the primary input is the touch screen and sensors. Otherwise, much of the code for a cross-platform game would be exactly the same.
Although Chapter 3 focuses on user input that applies to both Silverlight and the XNA Framework, this book has more chapters focused on Silverlight overall. Therefore, I would be remiss to not cover XNA Game Studio in this chapter to introduce you to XNA Framework development, especially with the ability to integrate Silverlight and XNA rendering now available in Windows Phone 7.5. To that end, this section will provide an XNA Game Studio overview to help provide background on the tools and a little bit on the platform. Chapters 9 and 10 are dedicated to XNA Game Studio, covering both 2D and 3D game development.
![]() Note This book does not go into game development theory in heavy detail, because it is an incredibly broad topic that would consist of several courses at a university. You could easily purchase multiple books that cover an individual aspect of game development theory such as books completely focused on 3D math, game physics, artificial intelligence, game engine design, and so on. Instead I focus on providing an introduction to XNA Framework concepts including a game object model for game development in addition to advanced application development with shared graphics rendering in Windows Phone 7.5
Note This book does not go into game development theory in heavy detail, because it is an incredibly broad topic that would consist of several courses at a university. You could easily purchase multiple books that cover an individual aspect of game development theory such as books completely focused on 3D math, game physics, artificial intelligence, game engine design, and so on. Instead I focus on providing an introduction to XNA Framework concepts including a game object model for game development in addition to advanced application development with shared graphics rendering in Windows Phone 7.5
What this book does provide you with is an understanding of the mechanics of game development so that you could port an existing game that you developed for another platform to Windows Phone, incorporate existing XNA Game Studio samples located at http://create.msdn.com, as well as apply game development theory obtained through additional reading into your own Windows Phone games.
Hello XNA for Windows Phone
When you install the Windows Phone Developer Tools it includes XNA Game Studio, with a dedicated template folder XNA Game Studio 4.0 in the Visual Studio 2010 New Project dialog to create either a Windows Phone game or a Windows Phone game library assembly.
All game development is done non-visually through code. You do not use Expression Blend to create games unless building the game experience in Silverlight. This makes the Emulator that much more important for XNA Framework game development. The good news is that the Windows Phone Emulator is hardware accelerated on the Windows Vista or Windows 7 development machine, enabling a great game development experience with the emulator to visually see the game in action without having to always deploy to a device. In the Windows Phone 7.5 tools update, the emulator now includes visual accelerometer simulation, which I demonstrate in Chapter 3.
![]() Tip Several third-party game engines have ported their visual tools and frameworks to XNA Game Studio with support for Windows Phone. The App Hub partner link has more information here:
Tip Several third-party game engines have ported their visual tools and frameworks to XNA Game Studio with support for Windows Phone. The App Hub partner link has more information here: http://create.msdn.com/en-us/resources/partners
In Visual Studio, let's create a new project and call it HelloXNA in our existing Chapter 1 code solution. Right-click on the solution explorer and select Add… New Project, select Windows Phone Game (4.0), and then type HelloXNA as the project name. Be sure to right-click on the new HelloXNA project and set it to the startup project for the solution if is not already.
After the project is created, you can see that the project layout is very different from a Silverlight project, as shown in Figure 1–11.

Figure 1–11. XNA Game Studio default project layout
Notice in Figure 1–11 there are actually two projects listed, HelloXNA and HelloXNAContent. The primary project with the output remains the HelloXNA project. The HelloXNAContent project is the content project for the HelloXNA project, which I cover in the next section.
Game Content
As noted in the previous paragraph, the content project is where the content is located – the sprites, textures, 3D models, and so on for the game. Sprites and textures generally refer to 2d images you move around the screen (sprites) and the background or surface image (textures). In our sample we create three simple .tga files to represent a background texture for the simple game, a spaceship sprite, and a hero ship sprite that the user controls and a missile sprite that is fired from the hero ship. Figure 1–12 shows the content project layout, as well as the properties for the hero ship sprite.
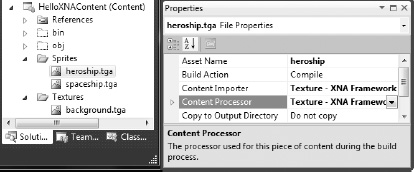
Figure 1–12. HelloXNAContent project files
Notice in Figure 1–12 that the heroship.tga image file has an AssetName, a Content Importer and Content Processor properties. The Content Importer and Content Processor property automatically selected when the content is added. Internally, the XNA Framework stores content assets in a custom compressed format so it uses content importers and processors to import external content into the internal format. XNA Game Studio ships with several built-in converters for common content listed here, with explanations for the less than obvious converters:
- Effect: DirectX High Level Shader Language (HLSL) .fx file (not supported on Windows Phone)
- AutoDesk FBX: .AutoDesk file format for three dimensional models
- Sprite Font Description
- MP3 Audio File
- Texture: Essentially a bitmap
- WAV Audio File
- WMA Audio File
- WMV Video File
- XACT Project: XACT is a DirectX audio tool for building rich game audio
- X File: DirectX 3D model file
- XML Content
You can create custom content importers as well as purchase third-party converters for file formats not available out of the box. However, in most cases the previous list supports the vast majority of content and content creation tools available.
The other property for content is the AssetName, which is based on the filename without the extension. When you load content into your game you load it via the AssetName property shortly.
![]() Tip Make friends with a graphic artist if you are not very artistic. Content is just as important, if not more so then the coding in a game. There are third-party content providers that sell content you can tweak as well as higher graphic artist talent on a contractual basis. Programmer art won't cut it.
Tip Make friends with a graphic artist if you are not very artistic. Content is just as important, if not more so then the coding in a game. There are third-party content providers that sell content you can tweak as well as higher graphic artist talent on a contractual basis. Programmer art won't cut it.
The Game Loop
Let's continue to explore the code and functionality in the HelloXNA project by exploring the default game loop code. When learning to build games, development centers on the game loop summarized here:
- Load the game content and related objects.
- Update the object's state.
- Draw the object to the screen.
The XNA Framework provides a typical game loop development model consisting of initial content load, followed by repeated calls to the update, and draw methods. By default the XNA Framework game loop is fixed-step game loop at 30 frames per second with each frame represented by calls to draw and update. It is set to 30 frames per second (fps) to be aligned with the refresh rate of the hardware. You can change the frame rate to 60 fps using the following code:
GraphicsDeviceManager.SynchronizeWithVerticalRetrace = false;

game.TargetElapsedTime = FromSeconds (1/60f);
However, if you increase the frame rate, it will impact battery performance with possibly minimal tangible benefit. One way around this is to call update twice per each draw call by creating a custom game loop. This would be the recommended course of action over adjusting the frame rate above 30 frames per second.
Now let's dive in to the code. When we created the HelloXNA game project, it generates a code file Game1.cs, which is the main code file and includes the game loop logic. Listing 1–1 has the full code listing for reference.
Listing 1–1. Generated Game1.cs
using System;

using System.Collections.Generic;

using System.Linq;

using Microsoft.Xna.Framework;

using Microsoft.Xna.Framework.Audio;

using Microsoft.Xna.Framework.Content;

using Microsoft.Xna.Framework.GamerServices;

using Microsoft.Xna.Framework.Graphics;

using Microsoft.Xna.Framework.Input;

using Microsoft.Xna.Framework.Input.Touch;

using Microsoft.Xna.Framework.Media;


namespace HelloXNA

{

  /// <summary>

  /// This is the main type for your game

  /// </summary>

  public class Game1 : Microsoft.Xna.Framework.Game

  {

    GraphicsDeviceManager graphics;

    SpriteBatch spriteBatch;


    public Game1()

    {

      graphics = new GraphicsDeviceManager(this);

      Content.RootDirectory = "Content";


      // Frame rate is 30 fps by default for Windows Phone.

      TargetElapsedTime = TimeSpan.FromTicks(333333);

    }


    /// <summary>

    /// Allows the game to perform any initialization it needs to before starting to run.
    /// This is where it can query for any required services and load any non-graphic

    /// related content.  Calling base.Initialize will enumerate through any components

    /// and initialize them as well.

    /// </summary>

    protected override void Initialize()

    {

      // TODO: Add your initialization logic here


      base.Initialize();

    }


    /// <summary>

    /// LoadContent will be called once per game and is the place to load

    /// all of your content.

    /// </summary>

    protected override void LoadContent()

    {

      // Create a new SpriteBatch, which can be used to draw textures.

      spriteBatch = new SpriteBatch(GraphicsDevice);


      // TODO: use this.Content to load your game content here

    }


    /// <summary>

    /// UnloadContent will be called once per game and is the place to unload

    /// all content.

    /// </summary>

    protected override void UnloadContent()

    {

      // TODO: Unload any non ContentManager content here

    }


    /// <summary>

    /// Allows the game to run logic such as updating the world,

    /// checking for collisions, gathering input, and playing audio.

    /// </summary>

    /// <param name="gameTime">Provides a snapshot of timing values.</param>
    protected override void Update(GameTime gameTime)

    {

      // Allows the game to exit

      if (GamePad.GetState(PlayerIndex.One).Buttons.Back == ButtonState.Pressed)

        this.Exit();


      // TODO: Add your update logic here


      base.Update(gameTime);

    }


    /// <summary>

    /// This is called when the game should draw itself.

    /// </summary>

    /// <param name="gameTime">Provides a snapshot of timing values.</param>

    protected override void Draw(GameTime gameTime)

    {

      GraphicsDevice.Clear(Color.CornflowerBlue);


      // TODO: Add your drawing code here


      base.Draw(gameTime);

    }

  }

}
Listing 1–1 is insightful reading to help you understand the game loop implementation in XNA Game Studio. The comments help you understand what to do where in the game loop code but we briefly cover the methods here starting with the constructor for Game1 in Listing 1–1. The constructor initializes a reference to the GraphicsDeviceManager, which represents the graphics device. It also sets the content root directory to the Content folder, which is where all of our content will reside. Finally it sets the frame rate to 30 fps.
The Initialize() method is where developers query for required game services. Game services are objects defined by a custom Interface you create that you want to access for the entire life of the game. It is a way to expose an object, such as a 3D camera object, to many other objects. I demonstrate game services in Chapters 8 and 9.
I'm sure you can guess what the LoadContent() method does. It is called once per game with the idea that you load all of your content upfront so as to not impact the game loop timing by loading content on the fly in the middle of a frame.
For a game with a lot of content, this may not make the best use of resources. In this case, the game can be broken up into levels and a developer can dynamically load content at the start of each level. Users won't mind waiting a few seconds up front as the level loads, as long as the return is better game play during the level by pre-loading the content.
After loading the content in the LoadContent method, the next method in Listing 1–1 is the UnLoad method. While you have to explicitly load content in LoadContent, the opposite is not required. Any content that you load in the LoadContent method is automatically managed by XNA Framework. However, for any content that you load dynamically and that is not explicitly managed by a ContentManager object. An example object is a DynamicVertexBuffer that requires the Dispose() method to be called. Otherwise, content that is loaded by ContentManager will automatically be unloaded either when the game exits or if a developer manually removes a GameComponent object. A GameComponent is an XNA Framework feature that allows a developer to encapsulate a complex game object into the game loop in an object oriented way. I cover GameComponents in Chapter 9.
As mentioned, the Update and Draw() methods are the heart of the game loop. The default Update method checks to see if the user pushes the hard key Back button on the Windows Phone device. If so, the game exits. The other code calls base.Update(gameTime to allow the minimum game loop logic to occur. The Update method takes one parameter of type GameTime. The GameTime type contains a snapshot of game timing state that can be used by variable step (real time) or fixed-step (game time) games. The GameTime object has three properties all of type TimeSpan:
ElapsedGameTime: The amount of time since the last call to theUpdatemethod.IsRunningSlowly:A Boolean value. If it has a value oftrue, this indicates that theElapsedGameTimeis running longer than theTargetElapsedTimefor the game loop. The game should do something to speed up processing in the Update method such as reducing calculations; otherwise the game frame rate will potentially decrease by skipping calls to theDrawmethod.TotalGameTime:The amount of time since the start of the game.
Developers can use these values to perform game-related calculations, such as when a grenade object should explode after it was initially tossed, as an example.
When developing a game, always keep in mind that games, videos, movies, and so on all depend on tricking the human eye into believing that it is watching continue motion. In general, 30 fps is the minimum before the human eye starts to perceive that it is not watching continuous motion. I mentioned the two types of game loops, fixed-step and variable step. The type of game loop affects how a developer manages the user perception of motion, which we dig into in the next two sections.
Fixed-Step Game Loop
A fixed-step game loop tries to call its Update method at a regular interval, providing a fixed chunk of time for the developer to perform calculations in Update before drawing the scene. The fixed-step game loop is the default for XNA Framework. For the Xbox and Windows, the default frame rate is 60 fps in a fixed-step game loop, which means that Update is called every 1/60 of a second.
For Windows Phone, the default frame rate for a fixed-step game is 1/30 of a second, which aligns with the hardware screen refresh rate. Visually, a higher frame rate does not provide significant benefit, but it would impact battery life more.s
Based on this information, the value TargetElapsedTime from the gameTime parameter for Update (and Draw) will have a value of 1/30 of a second for the value of its TimeSpan. The Update and Draw methods are called every 1/30 of a second, unless IsRunningSlowly returns true. In that case, the call to Draw is skipped so that Update catches up, resulting in a reduced frame rate.
![]() Note When the game pauses in the debugger, the Update method is not called until the debugger resumes the game.
Note When the game pauses in the debugger, the Update method is not called until the debugger resumes the game.
Variable-Step Game Loop
In this type of game, Update and Draw are called continuously without regard for the value set to the TargetEllapsedTime property resulting in a variable frame rate. With the fixed refresh rate for the screen of 30 fps, there may not be much gained by a viable-step loop without potentially negatively impacting battery performance.
Now that you have background on XNA Game Studio development, how content is loaded, and the game loop, let's dive in and create a simple game.
Implement the Game
In this section we start with the default game loop code generated when we created the HelloXNA project to create a simple space ship shooter game. Our game will be a simple top-down shooter where alien space ships attempt to strike the hero ship. The hero ship can shoot missiles at the alien ships to cause them to explode. Score is based on the number of alien ships blown up.
Now that we have an understanding of the game play, let's get started. We alternate between coding and background detail as we develop the game to explain key concepts. In the Game1.cs code file we declare four variables of type Texture2D named HeroShip, SpaceShip, Missile, and BackgroundImage that are initialized in the LoadContent method:
HeroShip = this.Content.Load<Texture2D>("Sprites/heroship");

SpaceShip = this.Content.Load<Texture2D>("Sprites/spaceship");

Missile = this.Content.Load<Texture2D>("Sprites/missile");

BackgroundImage = this.Content.Load<Texture2D>("Textures/background");
Since these assets are loaded by a ContentManager object, we do not need to worry about releasing the objects in the UnloadContent method. The ContentManager will take care of that for us when it goes out of scope.
Now that we loaded the content, we next cover modifications to the Update() and Draw() methods. We cover Draw first because we want to draw the background on the screen. To actually do the drawing to the graphics device you use a SpriteBatch object.
By default, the XNA Game Studio project template creates a member named spritePatch of type SpriteBatch. Within the Draw method, you first call spriteBatch.Begin then spriteBatch. Draw any number of times, and then spriteBatch.End. It is more efficient for the graphics hardware to draw to the back buffer as a batch and then draw to the back buffer to the device as opposed to drawing items one at a time directly to the graphics device. SpriteBatch.Begin method sets up the back buffer and the call to SpriteBatch.End indicates that the batch is ready to be drawn to the device.
spriteBatch.Begin();

spriteBatch.Draw(BackgroundImage,graphics.GraphicsDevice.Viewport.Bounds, Color.White);

spriteBatch.End();
Figure 1–13 shows the background image in the Emulator.
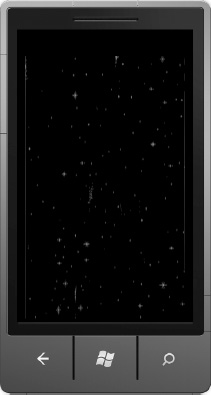
Figure 1–13. Drawing the background in the Emulator
The background is static for our simple game so we are finished with it. We covered Begin and End for the SpriteBatch class but not the Draw method, which has several overloads that look intimidating at first, taking rectangle objects, rotation, scale, etc.
All overloads of the Draw method have a couple of parameters in common in that all of the overloads take a Texture2D (the image to draw) and a position to draw it either in the form of a Vector2 or a Rectangle object. I cover SpriteBatch.Draw in detail in Chapter 8, but we will cover the specific overloads we use to build the game as we go along. For the background image shown in Figure 1–13, we draw with this overload:
spriteBatch.Draw(BackgroundImage,graphics.GraphicsDevice.Viewport.Bounds, Color.White);
BackgroundImage is the Texture2D to be drawn. For the place to draw the texture, we pass in the Rectangle size of the entire screen, which is defined by graphics.GraphicsDevice.Viewport.Bounds. We could hard-code the values to be the shipping screen resolution of 800 × 480. However, we do not want to hardcode this value, because at some point in the future an additional screen resolution will be introduced that is 480 × 320. The last parameter in this Draw method overload allows you to tint Texture2D in a particular color. Color.White represents no tint at all.
Now let's shift over to the Update method. It is in the Update method where calculations are performed to determine where the alien ship, space ship, and missile should be drawn. In addition to the variable representing the sprite image, we also need variables to track the position and speed of the objects as well. First let's have a quick discussion on vectors.
When Windows Phone initially hits the market, the screen resolution is 800 pixels in height and 480 pixels in width. In XNA Framework, the 2D coordinate system puts 0,0 in the upper left hand corner of the screen with the positive X direction flowing to the right and positive Y direction flowing down the screen, as shown in Figure 1–14.

Figure 1–14. The Windows Phone Portrait 2D Cartisian Plane
![]() Note The XNA Framework expects your game to appear in wide-screen or landscape mode by default. It is possible to build a game that runs vertically as well—I cover how in Chapter 8.
Note The XNA Framework expects your game to appear in wide-screen or landscape mode by default. It is possible to build a game that runs vertically as well—I cover how in Chapter 8.
A Vector2 consists of an X and Y component that represents a direction and magnitude from the origin. As an example, since the screen is 480 pixels wide, the X axis represented as a Vector2 would have zero for the Y component, and 480 for the X component like this (480,0). Likewise, a Vector2 that represents the Y axis would have zero for the X component and 800 for the Y component like this (0,800).
A Vector2 can represent either a position or a speed. As a position, you set the X and Y component to be the values you want to place an object on the Cartesian plane. As an example, to place the upper left-hand corner of a sprite or image in the middle of the screen, you would set the sprites position to this value (240,400), which is half the screen width and height respectively.
![]() Tip When you position a sprite, it is always relative to the upper left-hand corner of the sprite, which is considered (0,0) in terms of height and width for the sprite. If you don't take this into account and think you are positioning the center of a sprite, it will be off by half the height of the sprite toward the bottom and half the width of the sprite to the right.
Tip When you position a sprite, it is always relative to the upper left-hand corner of the sprite, which is considered (0,0) in terms of height and width for the sprite. If you don't take this into account and think you are positioning the center of a sprite, it will be off by half the height of the sprite toward the bottom and half the width of the sprite to the right.
Position is pretty straightforward in a 2D plane. Representing Speed as a Vector2 is similar except that the Vector2 is interpreted by its magnitude or length and direction. Imagine an arrow with its tail at position (0,0) and its head at (X,Y) such as (10,10) on a 2D plane, as illustrated in Figure 1–15.
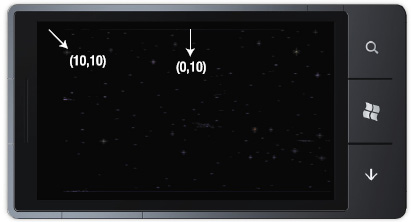
Figure 1–15. Vectors in a 2D plane
If the imaginary Vector2 (0,10) represents a speed, it means that the object is moving straight down at 10 pixels per frame. If the Vector2 (10,10) represents a speed, it means that for each frame, the object is moving 10 pixels to the right and 10 pixels down. Figure 1–16 depicts a ball that has a position of (300, 160). A speed Vectors2 (50,50) is applied to the ball in a given frame.
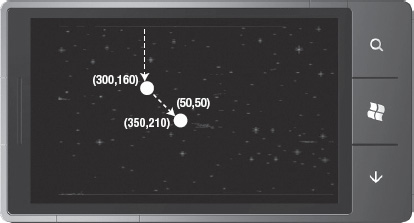
Figure 1–16. Applying speed to an object via vector addition
Applying a speed of (50,50) redirects the ball to a southeastern direction in the plane, giving a new position of (350, 210) for the ball. We know this intuitively because X is positive to the right and Y is positive in the down position, so the Vector2 (50,50) moves the ball 50 pixels to the right and 50 pixels down. Note that we could just as easily have a speed of (-50, 50), which would intuitively move the ball to the southwest direction.
Now that you have a basic understanding of position and speed as Vector2 objects, let's go back to the XNA Game Studio project. We will perform speed and position calculations in the Update method. We also need to check to see if an object has either collided with another object/sprite, or if the object collided with an edge of the screen.
If it an object collides with an object we can do several things. If the object is a golf club and the other object represents a golf ball, a developer would want to simulate the club connecting with the ball and send it flying in the opposite direction based on the ball and club Vector2 position, the angle of impact. Another example action upon a collision is that if the collision is between an alien space ship and a missile fired from the player's space ship, the game could simulate an explosion and the alien space ship disappears from the screen.
Speaking of the player space ship, the other key component handed in the Update method is user input, which is also calculated using Vector2 objects. For Windows Phone user input can be in the form of a screen tap, a gesture, or the accelerometer as the major game input methods.
With the background on the screen coordinate system and Vector2D objects out of the way, you should have a pretty good idea of what the code will look like in the Update method in pseudo code:
- Handle User Input
- Apply User Input to objects
- Update Position of objects
- Detect Object and Edge Collisions
- Determine the final state and position of all objects
A key point to consider is that if the Update method takes too long the Game loop will decide to skip a call to the Draw method, resulting in dropped frames. Keep this in mind when writing code in the Update method.
![]() Note Performance considerations in game development are covered in more detail in Chapters 8 and 9.
Note Performance considerations in game development are covered in more detail in Chapters 8 and 9.
Armed with an understanding of what we need to do in the Update method in general, let's dive into coding the game logic. We need to add a couple of member variables to represent the position and speed for our game objects, which include the hero ship, the enemy space ship, and the missile. We need to track each object's position, and speed so we declare six additional variables:
//Define Speed and Position vectors for objects that move

Vector2 HeroShipPosition;

Vector2 HeroShipSpeed;

Vector2 SpaceShipPosition;

Vector2 SpaceShipSpeed;

Vector2 MissilePosition;

Vector2 MissileSpeed;
We initialize these values in a separate method named InitializeObjects executed in LoadContent just after we load the related sprite images.
private void InitializeObjects()

{

  //Initialize Positon and Speed

  SpaceShipPosition = new Vector2(

    graphics.GraphicsDevice.Viewport.Width / 2 - SpaceShip.Width / 2, -SpaceShip.Height);

  SpaceShipSpeed = new Vector2(0, 2); // 2 pixels / frame "down"


  //Center hero ship width wise along the X axis

  //Place hero ship with 20 pixels underneath it in the Y axis

  HeroShipPosition = new Vector2(

    graphics.GraphicsDevice.Viewport.Width / 2 - HeroShip.Width / 2,

    graphics.GraphicsDevice.Viewport.Height - HeroShip.Height - 20f);

  HeroShipSpeed = Vector2.Zero;


  //Center Missile on Space Ship and put it 50 pixels further down

  //off screen "below" hereoship

  MissilePosition = HeroShipPosition +

    new Vector2(HeroShip.Width / 2 - Missile.Width / 2, HeroShip.Height + 20f);

  MissileSpeed = new Vector2(0, -6); // 6 pixels / frame "up"


}
I mentioned this earlier but it is worth restating: when you draw a sprite, the position provided to the Draw method is the origin of the sprite when drawn meaning that the provided position becomes the upper left-hand corner of the sprite. In order to draw the alien spaceship and hero spaceship centered width-wise on the screen, we subtract half of the sprite's width from the position so that the middle of the sprite is centered on the screen.
I already covered how to draw in the Draw method, and we are already drawing the background, which was easy to position since it fills the entire screen. We haven't written the code to draw the hero ship, the alien spaceship, or the missile. Since we now have position information for these objects to reference in the form of the initialized variables, let's update the Draw method. We add these three lines of code to the Draw method right after we draw the background image:
spriteBatch.Draw(SpaceShip, SpaceShipPosition, Color.White);

spriteBatch.Draw(Missile, MissilePosition, Color.White);

spriteBatch.Draw(HeroShip, HeroShipPosition, Color.White);
Figure 1–17 shows the results.
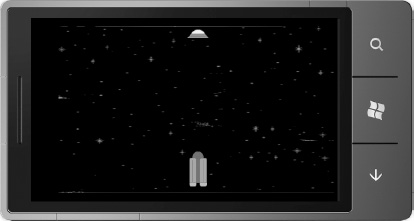
Figure 1–17. Sprite Initial Position
We are pretty much down with the Draw method for our simple game and will focus on the Update method to make the game interactive. The first thing we do is add the basic update formula for all three objects to the Update method:
HeroShipPosition += HeroShipSpeed;

SpaceShipPosition += SpaceShipSpeed;

MissilePosition += MissileSpeed;
If you run the game right now, you will see the enemy spaceship move down the screen and the missile move up the screen at a slightly faster rate. Figure 1–18 shows a snapshot of the movement.
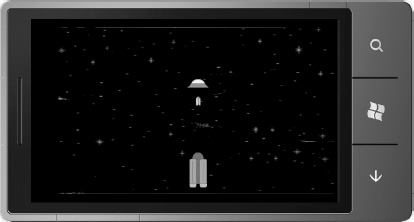
Figure 1–18. Moving Sprites
While pretty cool, it doesn't do much. The sprites pass through each other and then fly off to infinity in the up direction for the missile and the down direction for the alien spaceship. We can make a couple of modifications to make it somewhat more interesting as well as explain a couple of concepts.
The first modification that we make is edge detection. In the Update Method we type CheckScreenBoundaryCollision(gameTime); and then right-click on it and select Generate Method Stub.
In the newly generated method, we check to see if the missile, which has a default speed of -4 pixels / frame in the Y direction, has flown off the top of the screen, which would be a negative Y value. Since the alien space ship drops straight down at 2 pixels per frame, we check to see if it has a Y value greater than the screen height. Here is the method:
private void CheckScreenBoundaryCollision(GameTime gameTime)

{

  //Reset Missile if off the screen

  if (MissilePosition.Y < 0)

  {

    MissilePosition.Y = graphics.GraphicsDevice.Viewport.Height -

                        HeroShip.Height;

  }


  //Reset enemy spaceship if off the screen

  //to random drop point

  if (SpaceShipPosition.Y >

          graphics.GraphicsDevice.Viewport.Height)

  {

    SpaceShipPosition.Y = -2*SpaceShip.Height;
  }

}
Notice that we avoid using actual number values. As an example, we could use 480 instead of graphics.GraphicsDevice.Viewport.Height, but when the second screen resolution becomes available the game will break, because screen height in landscape mode will be 320.
The second modification to the game is to detect collisions between the alien spaceship and the missile. We create a new method, CheckForCollisions(gameTime; as before and edit the generated stub. There are many different algorithms available to detect for collisions with different levels of accuracy. The most accurate method is to compare for equality each point of the first image with every possible point in the other image. While most accurate, it is also the most CPU intensive and time consuming.
A simple method to check for collisions is to use bounding boxes. The idea is to wrap an object in a rectangle and check for collisions. The rectangle is based on the maximum length and width of the object. This can be inaccurate for irregular shapes, but costs much less in terms of CPU and time. In our simple game we generate two Rectangle objects that wrap the alien spaceship and the missile and then call the Intersects method to detect a collision. Here is the code:
private void CheckForCollisions(GameTime gameTime)

{

  //Alien and Missile

  Rectangle AlienRec = new Rectangle((int)SpaceShipPosition.X,

              (int)SpaceShipPosition.Y,SpaceShip.Width, SpaceShip.Height);

  Rectangle MissileRec = new Rectangle((int)MissilePosition.X,

              (int)MissilePosition.Y,Missile.Width, Missile.Height);


  if (AlienRec.Intersects(MissileRec))

  {

    SpaceShipPosition.Y = -2*SpaceShip.Height;

    MissilePosition.Y = graphics.GraphicsDevice.Viewport.Height - HeroShip.Height;

  }

}
We create the two Rectangle objects and then check for collision by calling if (AlienRec.Intersects(MissileRec)) and then update position similar to when there is a screen edge collision.
We now have an application that shows a dropping alien spaceship intersected by a missile over and over again. While not the most functional game, specifically because it doesn't incorporate user input or interactivity at all, it allows us to demonstrate key concepts for XNA Game Studio without inundating you with new concepts. Listing 1–2 shows the full code for our incomplete game.
Listing 1–2. Modified Game1.cs
using System;

using System.Collections.Generic;

using System.Linq;

using Microsoft.Xna.Framework;

using Microsoft.Xna.Framework.Audio;

using Microsoft.Xna.Framework.Content;

using Microsoft.Xna.Framework.GamerServices;

using Microsoft.Xna.Framework.Graphics;

using Microsoft.Xna.Framework.Input;

using Microsoft.Xna.Framework.Input.Touch;

using Microsoft.Xna.Framework.Media;


namespace HelloXNA

{

  /// <summary>

  /// This is the main type for your game

  /// </summary>

  public class Game1 : Microsoft.Xna.Framework.Game

  {

    GraphicsDeviceManager graphics;

    SpriteBatch spriteBatch;


    //Define Texture2D objects to hold game content

    Texture2D HeroShip;

    Texture2D SpaceShip;

    Texture2D BackgroundImage;

    Texture2D Missile;


    //Define Speed and Position vectors for objects that move

    Vector2 HeroShipPosition;

    Vector2 HeroShipSpeed;

    Vector2 SpaceShipPosition;

    Vector2 SpaceShipSpeed;

    Vector2 MissilePosition;

    Vector2 MissileSpeed;


    public Game1()

    {

      graphics = new GraphicsDeviceManager(this);
      Content.RootDirectory = "Content";


      // Frame rate is 30 fps by default for Windows Phone.

      TargetElapsedTime = TimeSpan.FromTicks(333333);


    }


    /// <summary>

    /// Allows the game to perform any initialization it needs to before starting to run.

    /// This is where it can query for any required services and load any non-graphic

    /// related content.  Calling base.Initialize will enumerate through any components

    /// and initialize them as well.

    /// </summary>

    protected override void Initialize()

    {

      // TODO: Add your initialization logic here


      base.Initialize();

    }


    /// <summary>

    /// LoadContent will be called once per game and is the place to load

    /// all of your content.

    /// </summary>

    protected override void LoadContent()

    {

      // Create a new SpriteBatch, which can be used to draw textures.

      spriteBatch = new SpriteBatch(GraphicsDevice);


      HeroShip = this.Content.Load<Texture2D>("Sprites/heroship");

      SpaceShip = this.Content.Load<Texture2D>("Sprites/spaceship");

      Missile = this.Content.Load<Texture2D>("Sprites/missile");

      BackgroundImage = this.Content.Load<Texture2D>("Textures/background");


      InitializeObjects();

    }


    private void InitializeObjects()

    {

      //Initialize Positon and Speed

      SpaceShipPosition = new Vector2(

        graphics.GraphicsDevice.Viewport.Width / 2 - SpaceShip.Width / 2, -SpaceShip.Height);

      SpaceShipSpeed = new Vector2(0, 2); // 2 pixels / frame "down"


      //Center hero ship width wise along the X axis

      //Place hero ship with 20 pixels underneath it in the Y axis

      HeroShipPosition = new Vector2(

        graphics.GraphicsDevice.Viewport.Width / 2 - HeroShip.Width / 2,

        graphics.GraphicsDevice.Viewport.Height - HeroShip.Height - 20f);

      HeroShipSpeed = Vector2.Zero;


      //Center Missile on Space Ship and put it 50 pixels further down
      //off screen "below" hereoship

      MissilePosition = HeroShipPosition +

        new Vector2(HeroShip.Width / 2 - Missile.Width / 2, HeroShip.Height + 20f);

      MissileSpeed = new Vector2(0, -6); // 6 pixels / frame "up"


    }


    /// <summary>

    /// UnloadContent will be called once per game and is the place to unload

    /// all content.

    /// </summary>

    protected override void UnloadContent()

    {

      // TODO: Unload any non ContentManager content here

    }


    /// <summary>

    /// Allows the game to run logic such as updating the world,

    /// checking for collisions, gathering input, and playing audio.

    /// </summary>

    /// <param name="gameTime">Provides a snapshot of timing values.</param>

    protected override void Update(GameTime gameTime)

    {

      // Allows the game to exit

      if (GamePad.GetState(PlayerIndex.One).Buttons.Back == ButtonState.Pressed)

        this.Exit();


      // TODO: Add your update logic here

      CheckScreenBoundaryCollision(gameTime);

      CheckForCollisions(gameTime);


      HeroShipPosition += HeroShipSpeed;

      SpaceShipPosition += SpaceShipSpeed;

      MissilePosition += MissileSpeed;


      base.Update(gameTime);

    }


    private void CheckForCollisions(GameTime gameTime)

    {

      //Alien and Missile

      Rectangle AlienRec = new Rectangle((int)SpaceShipPosition.X,

                  (int)SpaceShipPosition.Y, SpaceShip.Width, SpaceShip.Height);

      Rectangle MissileRec = new Rectangle((int)MissilePosition.X,

                  (int)MissilePosition.Y, Missile.Width, Missile.Height);


      if (AlienRec.Intersects(MissileRec))

      {

        SpaceShipPosition.Y = -2 * SpaceShip.Height;

        MissilePosition.Y = graphics.GraphicsDevice.Viewport.Height - HeroShip.Height;

      }

    }
    private void CheckScreenBoundaryCollision(GameTime gameTime)

    {

      //Reset Missile if off the screen

      if (MissilePosition.Y < 0)

      {

        MissilePosition.Y = graphics.GraphicsDevice.Viewport.Height -

                            HeroShip.Height;

      }


      //Reset enemy spaceship if off the screen

      //to random drop point

      if (SpaceShipPosition.Y >

              graphics.GraphicsDevice.Viewport.Height)

      {

        SpaceShipPosition.Y = -2 * SpaceShip.Height;

      }

    }


    /// <summary>

    /// This is called when the game should draw itself.

    /// </summary>

    /// <param name="gameTime">Provides a snapshot of timing values.</param>

    protected override void Draw(GameTime gameTime)

    {

      GraphicsDevice.Clear(Color.CornflowerBlue);


      // TODO: Add your drawing code here

      spriteBatch.Begin();

      spriteBatch.Draw(BackgroundImage, graphics.GraphicsDevice.Viewport.Bounds, Color.White);

      spriteBatch.Draw(SpaceShip, SpaceShipPosition, Color.White);

      spriteBatch.Draw(Missile, MissilePosition, Color.White);

      spriteBatch.Draw(HeroShip, HeroShipPosition, Color.White);

      spriteBatch.End();


      base.Draw(gameTime);

    }

  }

}
In this section I provided an introduction to the XNA Framework. I cover programming in XNA Game Studio in detail in Chapters 9 and 10, including adding much more interactivity to what we started here in Chapter 1. The next section provides a high-level overview of the Windows Marketplace for Mobile.
The Windows Phone Marketplace
There are many reasons a developer like you wants to build an application for Windows Phone, create a unique user experience, port an existing application to Windows Phone, etc. To make your creation available to customers, you submit it to App Hub at http://create.msdn.com.
App Hub Registration
Registering for the App Hub is a straightforward process, which you can do at http://create.msdn.com. For a company, registration can take a couple of weeks to fully complete because Microsoft vets the identity for companies via GeoTrust. The timeline is partially dependent on actions by you, such as clicking the email link to validate your email address and providing the necessary documentation to GeoTrust in a timely manner. GeoTrust validation is not required if registering as an individual, greatly simplifying and speeding registration for independent developers.
![]() Tip Once you register with a Windows Live ID, you cannot change it. If registering for a company, you probably don't want to lose your personal Windows Live ID so register with a new Live ID, such as
Tip Once you register with a Windows Live ID, you cannot change it. If registering for a company, you probably don't want to lose your personal Windows Live ID so register with a new Live ID, such as [email protected], that is not tied to an individual.
For companies, publisher verification ensures that consumers can feel confident that the publisher is who they say they are. This protects the consumer from a nefarious publisher impersonating their bank as a way to obtain a user's account information.
Registration costs $99 as of this writing, but check App Hub for the latest at http://create.msdn.com. As an example, students can register for free via the DreamSpark Program. Once registered, it allows you as the publisher to submit an unlimited number of for pay applications and 100 certification events for free applications. As of this writing, each additional certification event is $20 per application. Updates to free applications are no-charge certification events unless the application fails certification during the update.
![]() Tip If you are a member of one of Microsoft's “Spark” programs such as BizSpark for startup business or DreamSpark for the academic community, you may be eligible for a reduced or possibly free Marketplace registration.
Tip If you are a member of one of Microsoft's “Spark” programs such as BizSpark for startup business or DreamSpark for the academic community, you may be eligible for a reduced or possibly free Marketplace registration.
Microsoft is continuously updating policies to better serve its developer community. The App Hub FAQ is a great place to start for the most recent updates: http://create.msdn.com/en-US/home/faq.
Submitting Applications to Marketplace
When you submit an application to Marketplace, the estimated average time for an application to be approved is five days, though it is usually quicker. Microsoft validates the application against the criteria set forth in the MSDN documentation “Windows Phone Application Certification Requirements” available for review at http://create.msdn.com. The documentation covers application policy guidelines, content policy guidelines, and application certification requirements.
Windows Phone Marketplace Test Kit
The Windows Phone OS 7.1 Developer Tools includes the new Windows Phone Marketplace Test Kit. You can run the same exact tests and evaluate against the same criteria that the Microsoft certification team does. This can help ensure a smooth transition to publishing. If you work at a company publishing mobile apps, point your QA and test team to this tool.
The Marketplace Test Kit is integrated with Visual Studio. Open or create a Windows Phone project that targets Windows Phone OS 7.1 or later. Select the project you want to test in the Solution Explorer, right-click, and select Open Marketplace Test Kit. The test kit opens a new tab in Visual Studio named Marketplace Test Kit. The kit includes Automated Tests, Monitored Tests, and Manual Tests. Explore the Marketplace Test Kit in Visual Studio to understand how this wonderful tool works and can help you build high-quality applications.
Beta Testing Your Application
New in Windows Phone OS 7.1, developers can now conduct a beta test with their applications prior to releasing in Marketplace. This allows you to make your application available to a set of end users to try and test your app before making your application generally available. It is free to submit your application for beta distribution. This is a great way to get “real world” feedback.
Users can install and test your application via a “hidden link” to the application. This is also a great way to get reviewers excited about your application by inviting them to participate in the beta test.
Submitting your application for beta distribution does not put your app through the full certification process. Instead, it goes through an automated certification process resulting in quicker publication for beta distribution.
You decide who can participate in your application beta by submitting up to 100 beta tester email addresses. Once the application goes through automated publication, beta testers receive an email with a link to install the application via Marketplace.
The submission process for beta testing is via App Hub at http://create.msdn.com. Select the Private Beta Test option to get started.
Targeted Application Distribution
Targeted Application Distribution is the process of releasing your application through App Hub while keeping it hidden in the Windows Phone Marketplace. You can send the link to your application to a targeted set of users. Only those users who have the link to the application can install it; however, nothing can prevent them from sharing the link with others. Anyone who has the link can install the application.
With targeted application submission, the application will not show up in Marketplace or Marketplace search. You submit to App Hub just like you would for a normal distribution. At the end of submission there are multiple publication options including an option titled “As soon as it is certified, but make it hidden.” Select this option for targeted application distribution.
Making Money
The application publisher sets the price of the application. As the publisher you collect 70% of the revenue and Microsoft keeps 30% for paid applications, which is in line with other application store revenue models. The 30% primarily covers the costs of marketplace, certification costs, and so on.
Microsoft also provides an advertising-based revenue model offering for Windows Phone. You are not required to use Microsoft's advertising offering but it does provide a very easy way to take advantage of advertising revenue.
![]() Note Currently the advertising control and pubCenter are only supported in the United States. Microsoft will add support to the following 18 countries by the end of 2011: Australia, Belgium, Canada, Denmark, Finland, France, Germany, Hong Kong, India, Italy, Japan, Mexico, Netherlands, Norway, Spain, Sweden, Switzerland, and the United Kingdom.
Note Currently the advertising control and pubCenter are only supported in the United States. Microsoft will add support to the following 18 countries by the end of 2011: Australia, Belgium, Canada, Denmark, Finland, France, Germany, Hong Kong, India, Italy, Japan, Mexico, Netherlands, Norway, Spain, Sweden, Switzerland, and the United Kingdom.
The Microsoft Advertising SDK is discussed in detail as part of Chapter 6.
An important component to getting paid is potential application reach. At initial availability, Windows Phone currently support 5 languages; English, French, Italian, German and Spanish, otherwise known as EFIGS. App Hub supports application purchases in 16 countries at launch with payout to developers in 30 countries listed here:
- Australia
- Austria
- Belgium
- Brazil
- Canada
- Denmark
- Finland
- France
- Germany
- Greece
- Hong Kong
- India
- Ireland
- Italy
- Japan
- Luxembourg
- Mexico
- Netherlands
- New Zealand
- Norway
- Poland
- Portugal
- Russia
- Singapore
- Spain
- Sweden
- Switzerland
- Taiwan
- United Kingdom
- United States
In order to participate and sell your applications and get paid, you must be registered in Marketplace and have a bank account for one of these countries. With Windows Phone 7.5, App Hub supports 19 new countries: Brazil, Chile, Colombia, Czech Republic, Denmark, Finland, Greece, Hungary, India, Japan, Netherlands, Norway, Poland, Portugal, Russia, South Africa, South Korea, Sweden, and Taiwan. With Windows Phone 7.5 you can build apps for the world!
App Hub adds seven new developer markets that can submit apps: Chile, Colombia, Czech Republic, Hungary, Israel, South Africa, and South Korea. In addition, App Hub is localized for Korean and Simplified Chinese in addition to English and Japanese. As you can see, Microsoft is investing in the platform and marketplace to maximize your investment.
Marketing Matters
Making money is more than setting a price. As part of the submission process, the developer supplies the detailed description, screen shots, and marketing art for items like the background panorama for the Marketplace hub. Your tile icon is determined by the background.png file that is part of your Visual Studio Windows Phone project so be sure to update it so that it looks good on the Windows Phone Start screen. The applicationicon.png file is the smaller icon displayed in the App List. Figure 1–19 shows the App List in the emulator.
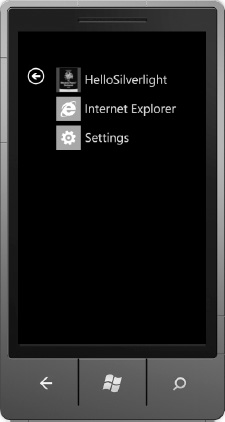
Figure 1–19. App list
The marketing art for Marketplace is incredibly important because that is what the end-user sees when viewing your application in Marketplace on the device. Also, if you study successful applications on other platforms, the mobile ISV generally includes four people or roles, a business person, a marketing person, and a couple of developers. Someone has to wear the marketing hat to promote the application beyond App Hub, such as via Social Networking channels, outreach to application review web sites, and so on. The most successful applications are those with a great business plan and great marketing behind them.
Windows Phone Web Marketplace
New in Windows Phone 7.5, users can go to the Windows Phone Web Marketplace at WindowsPhone.com to explore and purchase applications. You can now have a direct link to the web marketplace on your application web site as well. Figure 1–20 shows the new Web Marketplace's home page.
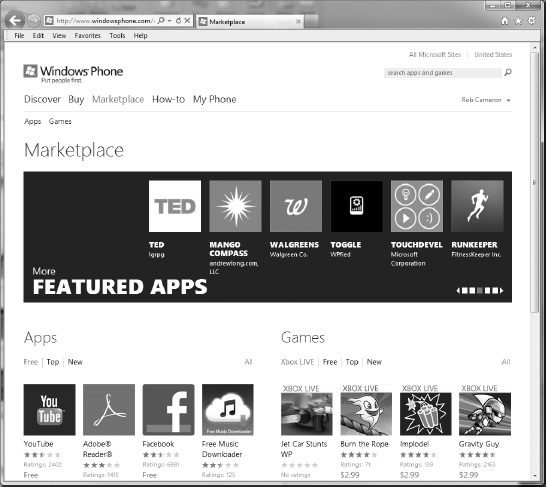
Figure 1–20. Windows Phone Web-based Marketplace
You can filter the search by category on the left as well as filter using the headers across the top such as 100 Newest paid apps, and so on. Clicking on an application or game provides additional details on the application as well as a deep link for the Windows Phone desktop marketplace, which is covered in the next section.
Windows Phone Marketplace on the PC
Windows Phone does not connect to your PC via Microsoft's ActiveSync or Windows Mobile Device Center. If you happen to own a Microsoft Zune media player, then you are already familiar with the Windows Phone Marketplace on the PC, which is the Zune client software available at http://Zune.net. Figure 1–21 shows a game found using the built-in Search functionality.

Figure 1–21. Windows Phone Application in the Zune client
The Zune client provides the full Microsoft Zune experience for Windows Phone, including ZunePass if you are a subscriber. In addition to the media content such as music, videos, TV, and movies, end-users can browse and select applications for download using the Zune client for their Windows Phone device. If the device is tethered either via USB or connected over a wireless network, the application will download via PC. Otherwise, if the device is not connected to the PC the application will download the next time the user launches Marketplace on his or her device.
The Windows Phone Marketplace is the only mechanism available to install an application on Windows Phone. It is not possible to “side load” an application on to a Windows Phone device outside of the Windows Phone Marketplace mechanisms unless registered in App Hub and using the Windows Phone Developer Registration tool.
An important function provided by the Zune client is that it allows a developer to deploy code to a connected device from Visual Studio 2010 or Expression Blend 4 for Windows Phone. I cover how to do that in the section titled “Limited Distribution of Applications” later in this chapter.
Marketplace on the Device
Marketplace on the device is a top-level hub experience that provides a one-stop shop location to find applications and games that are not managed Xbox LIVE titles.
![]() Note Premium Xbox LIVE games can be found in Xbox LIVE Hub. We cover Windows Phone game development in Chapters 9 and 10.
Note Premium Xbox LIVE games can be found in Xbox LIVE Hub. We cover Windows Phone game development in Chapters 9 and 10.
Figure 1–22 shows a mockup of the Marketplace panorama where you can see the featured app, which in this example is the eBay application. You also see categories, popular apps, what's new, and all of the featured applications. Selecting a featured app places its panoramic image as the background for the marketplace hub. In this example the eBay application is selected and its corresponding image is what is shown in the background. As a developer you can provide the panoramic art when you submit your application to Marketplace.

Figure 1–22. Windows Phone Marketplace hub
When you select an application, the application details page is displayed. An example is shown in Figure 1–23. (AP Mobile is a free application as of this writing. This image is just representative of the Marketplace details page.)
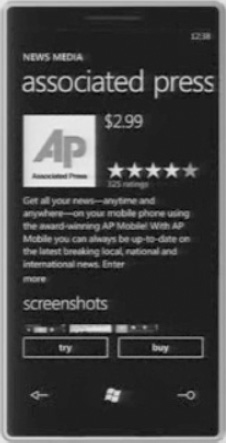
Figure 1–23. Example Marketplace application details page
The application details view provides the following information to the consumer:
- Publisher and detailed product information
- Price and Try Before You Buy
- Application screenshots
- Access to user ratings and application reviews
- Size and available options for downloading (PC or Wi-Fi only for apps greater than 20 MB vs. Over-The-Air)
- List of related applications if any
- Optionally, game content ratings for games
- More apps by the developer publisher
This information allows consumers to make an informed decision on whether to download and purchase an application. Purchasing is enabled two-ways that are self-explanatory:
Users can make a purchase with just two taps, Buy and then a Confirm Download dialog. Mobile Operator billing provides a great user experience to end-users as the application purchase simply shows up on their monthly bill. Microsoft has found that mobile operator billing increases the likelihood of a purchase transaction by 300%.
Once purchased and downloaded, the application is available in the application list or App List to the right of the Start screen. End-users can choose to pin your application to the bottom of the Start screen by clicking and holding the application icon in the app listing selecting “Add to Quick Launch.” When you download a game, it will appear in the Xbox LIVE Hub.
![]() Note Applications cannot pin themselves automatically to the Start screen quick launch area. Only users can pin an application to the Start screen.
Note Applications cannot pin themselves automatically to the Start screen quick launch area. Only users can pin an application to the Start screen.
Supported Business Models
This is a very important and common question asked of Microsoft: what are the supported business models? Microsoft supports four business models in the App Hub:
- Paid
- Try Before Buy
- Ad-Funded
- Free
A Paid business model is very straightforward. You set a price and get paid. Try Before Buy is the concept of end users trying a free version and then purchasing the full version of the application. To take advantage of Trial mode, it is a very simple API call:
using Microsoft.Phone.Marketplace;
Instantiate a LicenseInformation object to gain access to the IsTrial() method call:
if (licenseInfo.IsTrial())

{

     ….//Only show level one

}
As the developer, you determine how the trial application functions relative to the fully paid application.
Ad-funded is where you plug your application into your own or a third-party advertising network. As users download and use your application, they view the advertisements as they go and you get paid for views, clicks-throughs, and the like, similar to on the Web. “Free” isn't really a business model per se, but it can be if the free application enables access to an existing subscription available via the web. As an example, if a newspaper or music services offers a paid Web-based subscription, they can extend that subscription to Windows Phone for free to their existing subscribers enabling anytime access via the phone.
Search, Browse, and Discover Applications
The Windows Phone Marketplace provides several types of content that users can select from such as Applications, Games, Premium Xbox LIVE Games, music, and special applications from either the Mobile Operator or the OEM who manufactured the device that a user can download.
When a user selects a category such as Featured, the panorama jumps to a Pivot experience to let a user navigate through the different categories available to make it easy for the user to filter, search, and discover applications.
When in the Marketplace app on the phone, click the Search hardware button to search within Marketplace. You can also search within the Zune marketplace windows client.
Application and Game Updates
Within the on-device marketplace in the content area of the hub users can find a list available application updates. If consumer purchases and downloads your application and you as the publisher provide an updated version in marketplace, you can make the update available automatically to your end-user installed-base and it will be listed on the Marketplace hub as an application update.
As the developer you can provide details on the update to the end-user such as bug fixes, improved performance, additional game levels, and so on, so that your installed base understands what the update provides them.
Connecting with Your End Users
When a user purchases and installs your application, it appears in the App List or Xbox LIVE Hub. The end-user can choose to make your app a favorite and pin it to the Start screen. It initially appears at the bottom of the list but end users can move it up towards the top by tap and holding the tile, then dragging it to the desired location.
Stay Connected to Users via Live Tiles
Developers can enable Live Tiles in your application so that when your end-users pin the application to the Start screen, they can receive notifications and updates dynamically directly on the application for a richer, more connected, experience. These updates include changing the background image, a count value, and a title. The update is delivered via the Windows Phone Push Notification Services, covered in Chapter 10.
Temp Users to Purchase with Try Before You Buy
The Windows Phone Developer tools and the Windows Phone application framework provides a trial API that allows developers to call IsTrial within the application to find out if the user has actually purchased the application or whether the application is still in trial mode. This API connects to marketplace under the covers to make this determination. This means that the trial version is the same application as the full version.
You as the publisher/developer get to determine what type of trial as well as how long the trial period lasts. For type of trial, you can determine if it is time based, based on levels, and so on. Trial applications are a powerful way to let users try the app and then convert them to paying customers.
Limiting Distribution of Applications
Once an application is published on Marketplace, it can be downloaded by any Windows Phone user. A common question is how to make an application available to a limited number of users. The next sections answer that.
Deploy an Application to Your Phone for Testing
Probably the most limited distribution for an application is deploying an application to your phone, whether a pre-production developer device or a retail phone purchased after launch. The process to developer unlock a device requires three steps:
- Register at
http://create.msdn.com. - Install the Zune Client and connect your device.
- Launch the Windows Phone Developer Registration tool in the Windows Start screen.
I covered registration at create.msdn.com and the Zune client already. The last step is achieved by installing the Windows Phone Developer Tools download. Once installed, a Windows Start Menu folder titled Windows Phone Developer Tools is created. Navigate there to launch the Windows Phone Developer Registration tool shown in Figure 1–24 for a device that has already been registered.
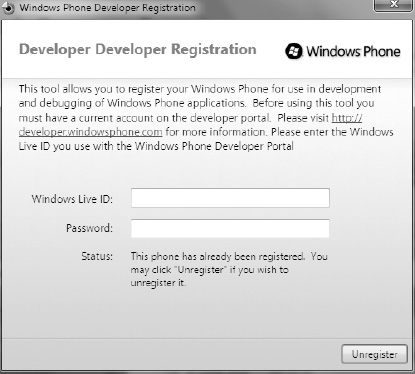
Figure 1–24. The Windows Phone Developer Registration tool
Ensure that the Zune client is open and your Windows Phone device is connected before proceeding. Next enter your Windows Live ID and Password you used when you registered in marketplace at http://create.msdn.com and click Register. Upon success, you can now deploy code to your device.
Table 1–3 shows a list of possible error codes and related cause when deploying applications to a device either via Visual Studio or the Developer Registration tool.
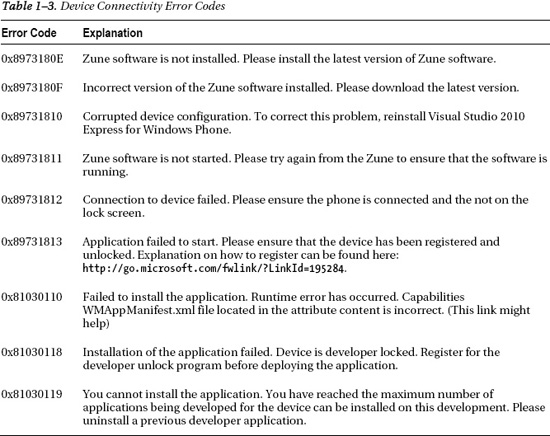
Limit Availability to Beta Testers
With Windows Phone 7.5, App Hub now supports beta distribution, which enables developers to distribute pre-certified applications to a group of up to 100 access controlled beta testers for up to 90 days. This distribution method gives you the opportunity to test apps with a hand-picked set of beta testers more quickly and build high-quality apps before publishing them in Marketplace.
Enterprise Applications in Marketplace
Initially at launch, the App Hub does not provide a way for an enterprise to create and distribute a custom Line of Business (LOB) type application to only its employees. Microsoft has publically stated that they will enable this capability at some point in the future after Windows Phone launch.
Windows Phone 7.5 offers targeted distribution, which enables you to distribute applications through Marketplace in a hidden state, where they are not discoverable via browsing or searching Marketplace. To enable targeted users to access your hidden app you simply share the deep-link to the app with the users you want to have access via email, text, or other mechanism. Unlike beta distribution, you may distribute your app to as many users as desired and publish publicly in Marketplace at any time.
![]() Note Targeted distribution links are not DRM'd, meaning anyone who has the link can access the application.
Note Targeted distribution links are not DRM'd, meaning anyone who has the link can access the application.
With that said, an enterprise can choose to publish an application to Marketplace via targeted distribution but have the application require a password to enable functionality. Perhaps a retail store enterprise wants to create an application for its in-store employees. The retail store enterprise could create and submit the application to the Marketplace, making it available to download for anyone.
If a non-employee gains access to the link, they would not have a username and password to log in. The application could be written in such a way to allow a non-employee to browse the retailer's catalog or even make in-store pickup purchases. While this scenario may not be an option for enterprise, it may be workable for many enterprises as an interim step.
Conclusion
In this chapter I provided an overview of Windows Phone, the platform. I introduced the application platform and the two major programming models: Silverlight and XNA Framework. I then dove deeper into XNA Framework programming model to balance out technology coverage as we dive into Silverlight development over the next several chapters. Finally, I covered the Marketplace so that you have a solid understanding of how to publish and monetize applications that you create. In the next chapter I will cover user interface development for Windows Phone using XAML and .NET.