
C H A P T E R 10
![]()
Building Top-Rated Applications for Windows Phone
In this chapter, I provide a summary of best practices that you should adopt in your Windows Phone applications. I’ve covered many topics along the way to help guide you on how to build Windows Phone applications. This chapter builds on the previous chapters, highlighting the critical points to help you maximize your opportunity on Windows Phone. The next few sections briefly touch on various topics to provide a quick reference as you consider how to proceed with developing your application through to publishing to AppHub.
I then cover Windows Phone OS 7.1 features that will differentiate your applications and improve your application ratings by end-users. Features like globalization, localization, live tiles, multi-tasking, and push notifications are features that I could have rolled into previous chapters, but I decided to save them for last. Many applications do not go the extra mile to add these features, providing you an opportunity to take your application to the next level. This chapter will help you get started.
Design First
I covered Expression Blend and design in Chapters 1 and 2, but there is much more on the topic that can fill many books by itself. As a developer, you should focus on information architecture, which I covered in Chapter 2. Laying out your screens and mapping the data to display will greatly save you from re-engineering work later.
Remember that a Panorama is not the application. It is the highlights—items like favorites, popular or trending topics, a menu, and content you want to put in front of the user right away. The Panorama is the magazine cover that makes you want to pick up the magazine and dive in more deeply. Keep the Panorama snappy, light, and beautiful.
If the latter is a difficult proposition, that is, if like me you are not artistic, check out the Internet for imagery you can purchase at a reasonable price. I did a quick search and found www.shutterstock.com with images at various price points but many other sites abound. It can make the difference.
For more on Window Phone and design, check out these great tutorials up on .toolbox:
www.microsoft.com/design/toolbox/school/tutorials.aspx
Use the Right Architecture
With Windows Phone 7.5 and Silverlight 4 compatibility, building applications with the right architecture becomes easier with full support for Commanding. I am not one to adopt architecture for its own sake by any means, and I would not make a recommendation to waste your time, but I have seen many developers fail the first time they build an XAML-based application because of a lack of understanding of MVVM and data binding.
With XAML-based development, understanding data binding through and through along with the Model-View-ViewModel architecture is critical. It is the way XAML is designed to work, leveraging data binding for everything from showing data, to determining state, as well as application execution flow. It is why I spend time on the topic in Chapters 2, 6, and 7. Keep researching, experimenting, and studying until MVVM feels as natural to you, as does coding in C#. To put it another way, you’ll know MVVM when building applications using MVVM feels right and not like a chore.
Code for the Best User Experience
By coding for the best user experience, I am referring to the nonvisual aspects of user experience. Examples are to use the Dispatcher and BackgroundWorker classes to do work in the background, taking work off the UI thread. Both are covered in Chapter 2. Another example of coding for UX is to use the PerformanceProgressBar class to show activity as data loads.
A key topic in this area is state management through the Application Execution Life Cycle and Fast Application Switching, which I cover in Chapter 4. There are a few scenarios that most developers will need to handle as part of their Windows Phone application development related to tombstoning. However, many developers don’t bother, because they either are intimidated by it or think it isn’t a big deal. To end users, correctly handling tombstoning data is a big deal, and failure to do so may lead to poor end-user ratings.
In this section I cover three key tombstone scenarios that every developer needs to know:
PanoramaPivotListbox
In this section I don’t cover how to handle the Application Execution Lifecycle Events in detail, because I covered the topic in Chapter 4 but as a quick refresher, there is an application-wide state dictionary and a page-specific state dictionary where you can save and load state:
- Application-Wide State:
PhoneApplicationService.Current.State - Page-Specific State:
PhoneAppilcationPage.State
You save state in the PhoneApplicationPage.OnNavigatedFrom method and you restore state in the PhoneApplicationPage.OnNavigatedTo method.
In this section I focus on how to save and then reposition controls from a UX standpoint.
The code sample is TombstoneUX, which is part of the Chapter 10 solution. It contains four pages, one for each item listed above. Data bound to sample data, the sample demonstrates how to save and restore the UX state so that controls are repositioned.
Panorama Tombstone
For the Panorama control, it is a matter of restoring the position of the control to the PanoramaItem that the user was last viewing. So if the user was on the third Panorama item, visits the Start menu, tombstones, and then returns, the Panorama control should be restored back to the last PanoramaItem that was viewed, in this case the third. There is a SelectedIndex property that you can use to determine the current PanoramaItem in view. To position the Panorama, you set Panorama.DefaultItem to the desired PanoramaItem. Here is the code to save the Panorama position in the OnNavigatedFrom method:
protected override void OnNavigatedFrom(System.Windows.Navigation.NavigationEventArgs e)

{

  this.State["Pano"] = Panorama1.SelectedIndex;

  base.OnNavigatedFrom(e);

}
Here is the code to restore the position from the OnNavigatedTo method:
protected override void OnNavigatedTo(System.Windows.Navigation.NavigationEventArgs e)

{

  if (this.State.Keys.Contains("Pano"))

    Panorama1.DefaultItem = Panorama1.Items[(int)this.State["Pano"]];

  base.OnNavigatedTo(e);

}
Run the application, swipe over to a PanoramaItem, and click Start ![]() Back. You will land on the correct PanoramaItem. It is not very mysterious once you see how to handle tombstoning.
Back. You will land on the correct PanoramaItem. It is not very mysterious once you see how to handle tombstoning.
Pivot Tombstone
For the Pivot control, saving and restoring the position of the PivotItem in view of the user is aided by the Pivot.SelectedIndex property, which identifies the PivotItem in view. This greatly simplifies the code needed to save and restore the last PivotItem in view prior to tombstoning. Here is the code to save the position from the OnNavigatedFrom method:
protected override void OnNavigatedFrom(System.Windows.Navigation.NavigationEventArgs e)

{

  this.State["Pano"] = Pivot1.SelectedIndex;

  base.OnNavigatedFrom(e);

}
Here is the code to restore the position from the OnNavigatedTo method:
protected override void OnNavigatedTo(System.Windows.Navigation.NavigationEventArgs e)

{

  if (this.State.Keys.Contains("Pano"))

    Pivot1.SelectedIndex = (int)this.State["Pano"];

  base.OnNavigatedTo(e);

}
ListBox Tombstone
For the ListBox control, you may be tempted to use the SelectedIndex property, similar to what I just covered with the Pivot control. However, remember that selection in a ListBox is not really a behavior used in Windows Phone; tapping an item is the usual navigation method.
The ListBox requires a similar approach as with the Panorama, accessing the control tree to obtain the ScrollViewer’s position to save and restore when tombstoned. Here is the code to save the position from the OnNavigatedFrom method:
protected override void OnNavigatedFrom(System.Windows.Navigation.NavigationEventArgs e)

{

  this.State["listBox1"] = ((ScrollViewer)VisualTreeHelper.GetChild(listBox1,

0)).VerticalOffset;

  base.OnNavigatedFrom(e);

}
Here is the code to restore the position from the OnNavigatedTo method:
protected override void OnNavigatedTo(System.Windows.Navigation.NavigationEventArgs e)

{

  if (this.State.Keys.Contains("listBox1"))

    ((ScrollViewer)VisualTreeHelper.GetChild(listBox1,

0)).ScrollToVerticalOffset((double)this.State["listBox1"]);

  base.OnNavigatedTo(e);

}
To test out tombstoning with the ListBox, I created some sample data so that we have something to scroll. Run the app, scroll down the list, and click Start ![]() Back. You should land back down the list where you had scrolled earlier.
Back. You should land back down the list where you had scrolled earlier.
Globalization and Localization
At launch, Windows Phone supported the English, French, Italian, and German languages, otherwise known as EFIGs. At Mobile World Congress 2011, Microsoft announced that more languages and markets would be added in 2011. Microsoft has added language support for the following: Brazilian, Portuguese, Chinese (simplified and traditional), Czech, Danish, Dutch, Finnish, Greek, Hungarian, Japanese, Korean, Norwegian, Polish, Portuguese, Russian, and Swedish.
To support East Asian languages, four new fonts have been added that support regular and bold style:
- DengXian: Simplified Chinese
- Microsoft MHei: Traditional Chinese
- Yu Gothic: Japanese
- Microsoft NeoGothic: Korean
In addition to rendering text, Windows Phone also supports new keyboard languages, including the following: Brazilian Portuguese, Czech, Danish, Dutch, Finnish, Greek, Hungarian, Indonesian, Japanese, Korean, Malaysian, Norwegian, Polish, Portuguese, Russian, Simplified Chinese, Swedish, Traditional Chinese, Turkish, and Ukrainian.
As an end-user, having an application render in your native language greatly enhances the appeal of the application when published to worldwide marketplaces. Globalizing and localizing your applications increases the usability of your application more than any other feature and will increase your potential market opportunity as well.
The Windows Phone Marketplace allows users to buy apps in the following 35 countries: Australia, Austria, Belgium, Brazil, Canada, Chile, Colombia, Czech Republic, Denmark, Finland, France, Germany, Greece, Hong Kong, Hungary, India, Ireland, Italy, Japan, Korea, Mexico, Netherlands, New Zealand, Norway, Poland, Portugal, Russia, Singapore, South Africa, Spain, Sweden, Switzerland, Taiwan, United Kingdom, and the United States.
![]() Tip Even if you don’t think you will localize your application, I recommend following the process anyway. Once you do decide to localize, it will be much easier to add multi-language support later.
Tip Even if you don’t think you will localize your application, I recommend following the process anyway. Once you do decide to localize, it will be much easier to add multi-language support later.
There is money to be had taking the extra mile to at least globalize your application, but I recommend going all the way and localizing your application as much as possible when it makes sense. If you are building a game or application that can be fun and interesting in any language—go for it! Get in early and dominate, say, the Hungarian marketplace. As Windows Phone grows, especially with the recent announcements of two new devices by Nokia targeting the world, your market opportunity and potential profits can grow as well.
![]() Note The .NET Framework has long supported globalization and localization, so if you are familiar with how these are handled in .NET, then you are already prepared to apply those skills to your Windows Phone application.
Note The .NET Framework has long supported globalization and localization, so if you are familiar with how these are handled in .NET, then you are already prepared to apply those skills to your Windows Phone application.
Globalization
Globalization is the process of adapting your application to the user's cultural and business environment. Displaying data such as date information and numbers in a way that is familiar to the user and correctly handling user input are two examples of globalization. This link to the MSDN documentation details supported culture codes, such as en-US for USA, formatting and sorting rules, and international phone features as background:
http://msdn.microsoft.com/en-us/library/hh202918(v=VS.92).aspx
In the next section I cover how to globalize an application written using the MVVM architecture.
Globalization Steps
Let’s now go through the steps to globalize an application using MVVM. I’ve added a sample called GlobalizedApp to the Chapter 10 solution that is based on the MvvmLight (WP71) project template, where we will add globalization features first and then localization.
Remember that globalization is not necessarily about displaying application data in the local language. Rather, it is focused on displaying dates, currency, and calendar information in a format familiar to users.
A culture code is a group of settings that apply for a particular group of users based on language and country. A culture code consists of a double-quoted five-character string in the format of a two-letter language code, a dash, and a two-letter country code as described in the previous section.
The CultureInfo class represents a culture code and the related group of settings. Here is an example:
CultureInfo cultureInfo = new CultureInfo(“fr-FR”) ;

Thread.CurrentThread.CurrentCulture = cultureInfo;
When you set the culture on the thread, it makes the culture-specific settings available to your application, tailored for the current culture code. The user can also change the Display Language and Region Format for their device by going to Settings ![]() System
System ![]() Region+Language Option, so you should check the current Culture Info on the main thread upon launching your application so that you can tailor to the culture code automatically.
Region+Language Option, so you should check the current Culture Info on the main thread upon launching your application so that you can tailor to the culture code automatically.
In the GlobalizedApp project, we update the IDataService to return a list of culture code values via a new method named GetCultureInfo. we also add two methods, SaveCultureSetting and LoadCultureSetting to persist the user’s language selection. Listing 10-1 shows the updated DataService class that implements this interface.
Listing 10–1. The Updated DataService class
using System;

using System.Collections.Generic;

using System.IO.IsolatedStorage;


namespace GlobalizedApp.Model

{

  public class DataService : IDataService

  {

    IsolatedStorageSettings settings;


    public DataService()

    {

      settings = IsolatedStorageSettings.ApplicationSettings;

    }


    public void GetData(Action<DataItem, Exception> callback)

    {

      // Use this to connect to the actual data service


      var item = new DataItem("Welcome to Globalized App.");

      callback(item, null);

    }


    public void GetCultureOptions(Action<List<string>, Exception> callback)

    {

      List<string> cultureList = new List<string>(){

        "cs-CZ", "da-DK","nl-NL","en-GB","en-US","fi-FI",

        "fr-FR","de-DE","el-GR","hu-HU","it-IT", "ja-JP","ko-KR","nb-NO",
        "pl-PL","pt-BR","pt-PT","ru-RU","es-ES","sv-SE","zh-CN", "zh-TW"

      };

      callback(cultureList, null);

    }


    public void SaveCultureSetting(string cultureCode)

    {

      settings["cultureCode"] = cultureCode;

    }


    public string LoadCultureSetting()

    {

      string cultureCode = string.Empty;

      settings.TryGetValue<string>("cultureCode", out cultureCode);

      return cultureCode;

    }

  }

}
In the MainViewModel we add a set of properties that we will use to display data that changes based on the current culture code, named CurrentCulture, PurchaseDate, PurchaseAmount, and ShippingDate using the MVVMLight property code snippet. The CurrentCulture property represents the currently configured culture value. The other properties are fake properties just to show the culture-specific formatting. We also add a property to MainViewModel named CultureCodes listed here:
public const string CultureCodesPropertyName = "CultureCodes";

private List<string> _cultureCodes = null;

public List<string> CultureCodes

{

  get

  {

    return _cultureCodes;

  }


  set

  {

    if (_cultureCodes == value)

    {

      return;

    }


    _cultureCodes = value;

    _cultureCodes.Sort();

    RaisePropertyChanged(CultureCodesPropertyName);

  }

}
The CultureCodes property will be populated via the DataService.GetCultureOptions method. Note in the setter for the CultureCodes that we call the LINQ Sort method to put the values in alphabetical order, though given that this set of strings doesn’t change much, we could have hard-coded the order in the DataService.GetCultureOptions method instead.
Add a folder named View to the project and add a new MvvmView project item named Settings.xaml and point the DataContext for the Settings.xaml page to the MainViewModel class.
Open the project in Blend and switch to the Data tab. Drag the CultureCodes collection from the Data tab onto the Settings.xaml page, and it adds a ListPicker to the page. The MainViewModel has two properties of interest for the Settings page. The first MainViewModel property of interest is CurrentCultureCode, which is the current Culture configured for the application, whether the default or by the user. The other property of interest is CultureCodes, which consists of the available culture codes on the platform.
The ListPicker.ItemsSource property data binds to the CultureCodes collection. This means that when the user taps on the value, it expands out to a full list of available options for easy selection. Where this gets interesting is that we also want the selected value to propagate back to the CurrentCultureCode property so that the MainViewModel can track the user’s preferred culture.
The key step is to configure the ListPicker’s SelectedItem property to have two-way data binding enabled and data bind it to the CurrentCultureCode property. So, when the user selects a new culture, it updates the SelectedItem property, which then updates the MainViewModel.CurrentCultureCode property. Here is the XAML for the ListPicker on the Settings page:
<toolkit:ListPicker ItemsSource="{Binding CultureCodes}"

  SelectedItem="{Binding CurrentCultureCode, Mode=TwoWay}"

  FullModeItemTemplate="{StaticResource CultureInfoDataTemplate}"/>
![]() Tip Remember that the default data binding is
Tip Remember that the default data binding is OneWay, so if you need to follow this pattern you must explicitly set TwoWay data binding when your application requires it.
Another feature of the Settings UI is that it displays a message to exit and reload the application to allow the language changes to take effect. The TextBlock that displays the message data binds its Visibility property to the MainViewModel.ShowCultureChangeMessage property of type bool. A simple converter named VisibilityConverter in the Converter folder converts between the Visibility and bool data types, making the TextBlock visible if true, and Collapsed if false. Figure 10-1 shows the Settings view.
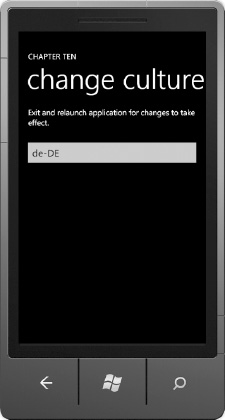
Figure 10–1. Settings View after a Language Change
Now that we have our Settings UI working properly, let’s wire up the MainViewModel to be culture-aware. We add a using System.Globalization statement to the top of the MainViewModel code file and declare a variable of type CultureInfo named cultureInfo. The CutureInfo type provides the formatting needed for dates, calendar, and currency based on the current culture. We use this class to properly format the MainViewModel property values for the current culture.
MainPage.xaml data binds to the MainViewModel class, displaying several MainViewModel properties as shown in Figure 10-2.
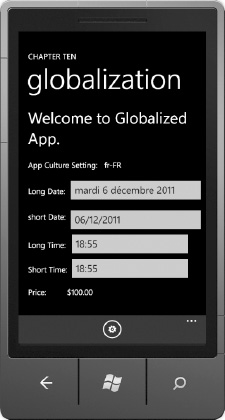
Figure 10–2. MainPage.Xaml View in French Culture Info
The emulator is configured for the French language and the locale of France. While the UI is not localized, the date of December 6 is displayed correctly for the French language. This was very easy to accomplish via data binding, with the ability to specify a StringFormat option for the TextBlock Binding object and ValueStringFormat for the DatePicker controls. This property allows you to specify a formatting string directly with the binding that automatically adjusts for the language. Here is the XAML for the “Long Date” DatePicker control:
<toolkit:DatePicker HorizontalAlignment="Left" Margin="110,178,0,0"

x:Name="datePicker1" VerticalAlignment="Top" Width="358"

Value="{Binding ShippingDate}" ValueStringFormat="{}{0:D}" />
The ValueStringFormat value is configured with a capital ‘D,’ which represents the long date format string formatter object. A capital ‘C’ StringFormat value represents a numerical value as Currency. A lower-case ‘d’ represents the short date format, and as you would guess, capital ‘T’ and lowercase ‘t’ represent long and short time string formatting options.
The last bit of code to cover for the GlobalizedApp example is the MainViewModel .CurrentCultureCode property and the MainViewModel constructor. Here is the CurrentCultureCode property:
public string CurrentCultureCode

{

  get

  {
    return _currentCultureCode;

  }


  set

  {

    if (_currentCultureCode == value)

    {

      return;

    }


    _currentCultureCode = value;

    _dataService.SaveCultureSetting(_currentCultureCode);

    RaisePropertyChanged(CurrentCultureCodePropertyName);

    ShowCultureChangeMessage = true;

    //Update the current thread's culture

    cultureInfo = new CultureInfo(_currentCultureCode);

    Thread.CurrentThread.CurrentCulture = cultureInfo;

    Thread.CurrentThread.CurrentUICulture = cultureInfo;

  }

}
The CurrentCultureCode property setter persists the configured culture by calling the _dataService.SaveCultureSetting(currentCultureCode) method. This method is shown in Listing 10-1 earlier, persisting the value using the IsolatedStorageSettings.ApplicationSettings object. The rest of the property switches the culture code for the Thread.Current thread.
The MainViewModel constructor retrieves the CultureInfo setting from IsolatedStorageSettings.ApplicationSettings if present and configures Thread.Current to the user’s chosen language and locale:
_dataService = dataService;

if (!this.IsInDesignMode)

{

  if (_dataService.LoadCultureSetting() != null)

  {

    cultureInfo = new CultureInfo(_dataService.LoadCultureSetting());

    Thread.CurrentThread.CurrentCulture = cultureInfo;

    Thread.CurrentThread.CurrentUICulture = cultureInfo;

  }

  else

  {

    cultureInfo = Thread.CurrentThread.CurrentCulture;

  }

  CurrentCultureCode = cultureInfo.Name;

}
The rest of the code in the MainViewModel constructor loads data values as shown in previous MVVM examples. Now that I have demonstrated how to globalize an application, let’s take the next step and localize the app.
Localization
Localization always sounds harder than it is from a development perspective, but it is the process of adapting your application to a specific local market by having all of the text strings, the Application Bar, and the Application Title display in the local language.
Localization takes globalization to the next level. In addition to formatting dates, currency, and calendar info to the correct format, it also includes displaying application text in the local language based on the currently set culture code.
Background
The key to implementing localization is to build your application from the start with localization. It is certainly possible to add it later, but it will be worth the effort and save you time to do it from the start. The critical step is to separate resources, in this case the text string, from your code. Also, when building out a back-end Web API for your application, include a parameter for Culture Code such as en-US. While your application may only support en-US initially, designing for localization up-front will save you time in the long run so that your feeds are ready to provide information in multiple languages You’ll just need change the culture code to the desired language.
![]() Tip When building your user interface, allow for about 40% more characters to display in the visible space. Some languages, like German, can easily exceed space allocated for the same phase in English. The Windows Phone Metro Design Language encourages space, so take advantage of this design guidance for localization as well.
Tip When building your user interface, allow for about 40% more characters to display in the visible space. Some languages, like German, can easily exceed space allocated for the same phase in English. The Windows Phone Metro Design Language encourages space, so take advantage of this design guidance for localization as well.
Be careful when parameterizing strings. Localize the entire string, not just the parameter. Also use numerical parameters, like “Each %1 %2” instead of “Each %s %s.” This way the order is interchangeable depending each language’s needs.
When you place strings in resource files, identify each string using a unique value, which will stay the same regardless of which language is selected. Translating strings correctly is probably the most challenging aspect unless you happen to be multilingual and have lived in each culture to know the nuances of the local language. You can edit the strings directly within Visual Studio by opening the resource files directly. Resource files are in XML format, so they can be more easily edited by nondevelopers.
For applications that have a large number of strings, there are localization tools available for .NET that can take the XML files and present them in a way for nondevelopers to more easily edit them. Another option is to use a localization vendor for applications that contain a large volume of strings in many different languages. This is the easiest but also the more costly option.
Localization Steps
In this section I cover the steps a developer takes to correctly localize an application. I’ve added a new sample to the Chapter 10 solution named LocalizedApp and copied over the contents of the GlobalizedApp project, fixing up the namespaces and title. This application will serve as the basis for the LocalizedApp project. In the next two subsections I cover how to localize the application and then how to localize the application title.
App Localization
We first set the neutral language for the application assembly by right-clicking on the LocalizedApp project in the Solution Explorer and selecting Properties. On the Application tab, click the Assembly Info button as shown in Figure 10-3.
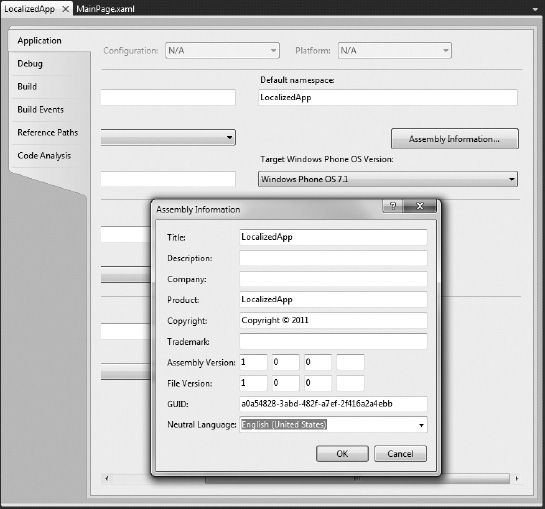
Figure 10–3. Configuring en-US as the neutral language for the project
We next need to add fr-FR as a supported culture in the project file by right-clicking the LocalizedApp project and selecting the Unload Project option. Next, right-click the unloaded project and select the Edit LocalizedApp.csproj menu option. Add fr-FR to the SupportedCultures element like this:
<SupportedCultures>fr-FR</SupportedCultures>
To add support for multiple cultures in the project file, separate the entries with a semicolon.
The next step is to create the resources themselves. Right-click the LocalizedApp project and select Add ![]() New Item to bring up the New Item dialog. Scroll down the list, select Resources File, and give it a name of
New Item to bring up the New Item dialog. Scroll down the list, select Resources File, and give it a name of AppResources.resx. Edit the strings for the application UI as shown in Figure 10-4.
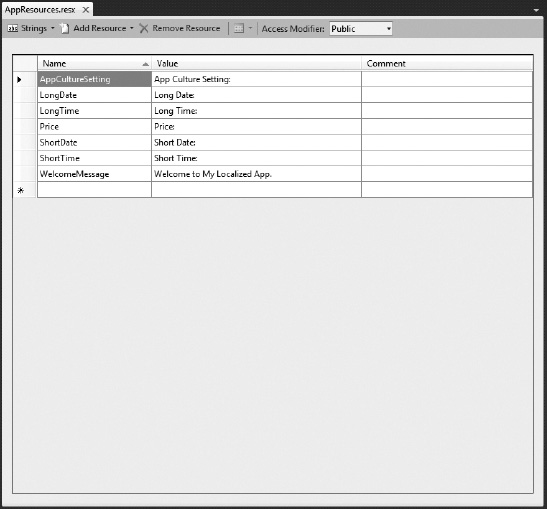
Figure 10–4. Default UI Strings in AppResources.resx
I’ve also set the Access Modifier to Public for the resources as shown in Figure 10-4. Make a copy of AppResources.resx and rename the copy AppResources.fr-FR.resx, editing the strings using Bing Translator and a little experience with the French language. Figure 10-5 has the updated strings.
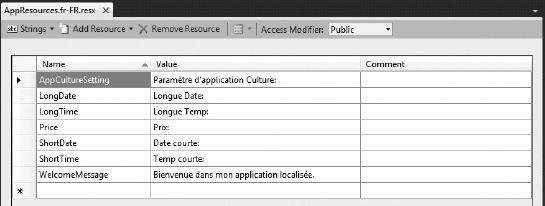
Figure 10–5. Fr-FR UI strings in AppResources.fr-FR.resx
We next add a new property to the MainViewModel, defined like this:
private AppResources _localizedResources = new AppResources();

public AppResources LocalizedResources

{

  get

  {

    return _localizedResources;

  }

}
This property creates an instance of the currently loaded resource strings. Next we bind the various TextBlock labels using Expression Blend. Here is an example for the Welcome Message Textblock:
<TextBlock Text="{Binding LocalizedResources.WelcomeMessage, Mode=OneWay}"

Style="{StaticResource PhoneTextNormalStyle}" FontSize="40" TextWrapping="Wrap"

TextAlignment="Left" Width="436" Margin="12,0,12,422" />
The individual text strings are accessible for data binding via the LocalizedResources properties,—LocalizedResources.LongDate, LocalizedResources.ShortDate, and so on. While it is a bit of extra typing, having all of the resource strings hang off of one property does not clutter up the MainViewModel. Figure 10-6 shows the results when you run the application in the emulator configured for the French language.
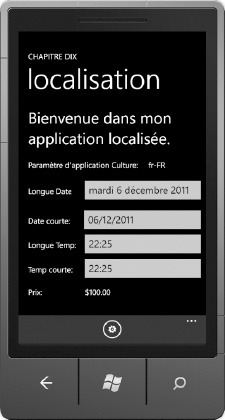
Figure 10–6. Globalized and localized application UI
Localize the Application Title
The next item to cover is how to localize the application title. To get started, I’ve added a new project to the Chapter 10 Solution named AppResLib, of type Win32 Project under the Other LanguagesVisual C++ folder. In the Project Wizard, click Next to get to the Application Settings step. Choose DLL and check Empty Project, and then click Finish.
![]() Tip if you don’t have access to Visual Studio with C++, check out this blog post for a sample tool to help localize the application title: http://patrickgetzmann.wordpress.com/wp7-localize/
Tip if you don’t have access to Visual Studio with C++, check out this blog post for a sample tool to help localize the application title: http://patrickgetzmann.wordpress.com/wp7-localize/
Once the project is added to the Chapter 10 solution, right-click on the AppResLib project and select Properties. Expand the Configuration Properties ![]() Linker
Linker ![]() Advanced. For the No Entry Point option, choose Yes /NOENTRY. We are creating a native resource library that contains resource strings for the application Title and Tile Title.
Advanced. For the No Entry Point option, choose Yes /NOENTRY. We are creating a native resource library that contains resource strings for the application Title and Tile Title.
Expand the AppResLib project, right-click the Resource Files folder, select Add, and then choose “Resource” When the Add Resource dialog appears, double-click String Table to create the strings. Figure 10-7 shows how they should look.

Figure 10–7. Native string table configured for French
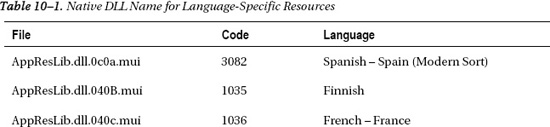
I created the English version first, compiled the DLL and then copied the DLL, named AppResLib.dll, to the LocalizedApp project folder. This native DLL represents the application Title and Tile Title properties for the neutral language. I then edited the Caption values shown in Figure 10-7 to reflect the French version and compiled the DLL again but this time I renamed it AppResLib.dll.040c.mui for the French version.
![]() Tip The release and debug folders containing
Tip The release and debug folders containing AppResLib.dll are at the same folder level as all of the other folders, so don’t be alarmed if you dig into the AppResLib project folder and don’t see the DLL file. Instead, navigate one folder up from the AppResLib project folder to find the output folders containing the DLL.
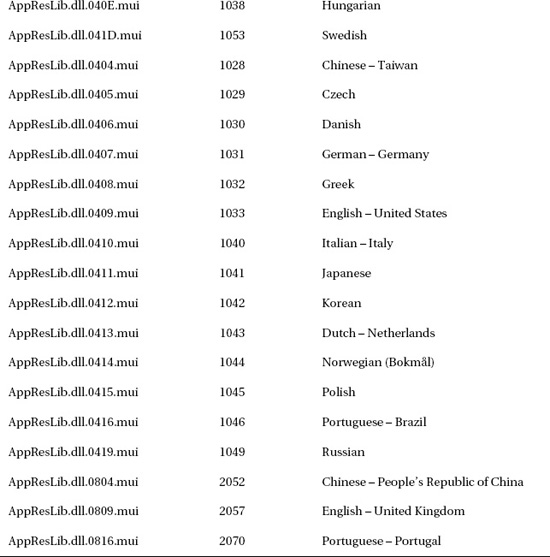
Each language has a unique file name appended to AppResLib.dll. In this case, .040c.mui is appended for the French version. Table 10-1 shows the correct filenames for other languages.
Go back to the LocalizedApp project, click the button to view hidden files, and add the AppResLib.dll and AppResLib.dll.040c.mui to the project. Make sure that both native DLLs are configured as content in the LocalizedApp project.
The final step is to edit the WMAppManifest.xml file for the LocalizedApp project to obtain the application title and tile title from the native DLL resources. At the top of WMAppManifest.xml, change the <App> <Title> property to this value:
Title="@AppResLib.dll, -100"
Toward the bottom of the WMMAppManifest.xml file under <Tokens> | <PrimaryToken> | <TemplateType5> <Title> change the value of the Title element to this:
<Title>@AppResLib.dll, -200</Title>
When you run the application in the emulator and switch between English and French, the application Title and Tile Title switch over as well. Figure 10-8 shows the App Title and Tile Title for French.

Figure 10–8. Localized Application Title and Tile Title for French
This concludes coverage of globalization and localization of Windows Phone applications. Neither is very difficult once you see it demonstrated. Both globalization and localization fit nicely with MVVM and the built-in data binding support, simplifying the effort needed to bring your application to new markets.
Right-to-Left Flow Direction
One topic I should touch on is support for languages that do not flow left-to-right. You can now set the direction of content and layout of each control to flow from right to left. This enables you to develop Windows Phone applications in languages such as Hebrew and Arabic. You set the flow direction via the FlowDirection property on the UI controls.
Live Tiles API
A tile is a link to an application pinned to the Start menu. When you first use a Windows Phone, you see a bunch of tiles pinned to the Start menu. Windows Phone users have an option of pinning additional applications to the Start menu, as well as rearranging how tiles appear. Windows Phone users LOVE live tiles because they present useful information at a glance.
Tile Update Details
Previously with Windows Phone 7, developers could update live tiles via Microsoft Push Notifications Services (MPNS) or via the ShellTileSchedule pull subscription. MPNS allowed developers to update the Application Tile title, background image, and count. ShellTileSchedule allows developers to update the Background image only. Both of these topics are covered later in the chapter, but Windows Phone 7.5 greatly enhances what developers can do when updating tiles.
![]() Note The ShellTileSchedule API has not changed much. However, MPNS has been greatly enhanced to take advantage of Windows Phone OS 7.1 features available in Windows Phone 7.5. Both are covered below.
Note The ShellTileSchedule API has not changed much. However, MPNS has been greatly enhanced to take advantage of Windows Phone OS 7.1 features available in Windows Phone 7.5. Both are covered below.
Windows Phone OS 7.1 adds support for Secondary Tiles in addition to the Application Tile. When a user pins an application to the Start menu, it is the Application Tile. From within the application, developers can give the user the ability to pin a Secondary Tile to the Start menu. While the Application Tile always launches a new instance of the application landing on its primary or home screen, a Secondary Tile can have a “deep link” that the app can process and navigate to a specific screen designated by the application developer.
Windows Phone OS 7.1 improvements offer many customizations to Live Tiles, allowing developers to provide a more tailored experience. Developers can update both the front and back of the tile. The Windows Phone OS 7.1 provides a nice “Tile flip” animation to allow the user to see the front and back of the tile without any additional work on your part, though the animation cannot be customized.
On the front-side of the tile you can update the tile title, background image, and count. On the back-side of the tile, developers can update the tile title, background image, and content. Figure 10-9 shows the available customizations.

Figure 10–9. Available tile customizations
The top image in Figure 10-9 shows an example front side of a tile. The Title font-size cannot be changed and the text does not wrap, fitting about 15 characters across. The Count can have any value between 1 and 99. A value of zero causes the Count to not show. The BackgroundImage points to an image; details are provided below.
The bottom image in Figure 10-9 shows an example back side of a tile. The Back Title does not word wrap and can display about 15 characters like the Front Title. The Back Background image has the same specs as the front-side Background image, detailed in the next subsection. The BackContent is unique to the back of the tile and can hold approximately 40 characters of text before truncating.
Tile Images
Tile images are a great part of the Live Tile experience for consumers. Tile images can be either .jpg or .png files. If the image is a .png and thus has transparency, the theme color will show through, for an interesting effect. Tiles are 173 × 173 pixels in size. If the image is a different size it will be stretched.
You can retrieve images from a remote server, but the image size must be less than 80 KB or they will not be downloaded. Windows Phone expects tile images to download in 30 seconds or less. If the BackgroundImage or BackBackgroundImage images do not download (because the image is either too large or takes too long to download), none of the other properties will be set on the tile.
![]() Caution HTTPS cannot be used to download remote images for tiles.
Caution HTTPS cannot be used to download remote images for tiles.
An important consideration for Secondary Tiles is that when creating a Secondary Tile the BackgroundImage and BackBackgroundImage images must be created using a local resource initially. Updates to the Secondary and Application Tile can be done using a local or remote image resource. Local resources can come from the XAP package or from isolated storage. If the URI references an image in isolated storage, the image must be stored in the SharedShellContext folder so that the operating system can grab the image.
Coding with Tiles
The relevant API when working with Tiles is the ShellTile API. The ShellTile API allows you to create, delete and update Secondary Tiles. The Primary Tile can only be pinned or removed by the user, but you can use the ShellTile API to update the Application Tile.
To get started, I’ve created a new project named ShellTileAPISample in the Chapter 10 solution. MainPage.xaml is configured with a short menu, containing one option to update the Application Tile and the other to work with a Secondary Tile. Clicking one of the TextBlock controls navigates to a page in the pages folder, either AppTile.xaml or SecondaryTile.xaml depending on which one you tap.
Application Tile
The AppTile.xaml page allows the user to update the Application Tile (Primary Tile) properties described in the previous section and illustrated in Figure 10-9. Figure 10-10 shows the AppTile.xaml UI in the emulator.

Figure 10–10. Application Tile update UI
Update any one of the properties and tap the checkmark in the Application Bar to update the Application Tile (primary tile). The Application Tile is always the first tile, so this line of code obtains a reference to the Application Tile, even if not pinned:
ShellTile TileToFind = ShellTile.ActiveTiles.First();
For any of the data, setting it to an empty string (or zero for count) will clear the property. This code in AppTile.xaml.cs updates the Application Tile based on the entered data:
StandardTileData NewTileData = new StandardTileData

{

  Title = textBoxTitle.Text,

  BackgroundImage = new Uri(textBoxBackgroundImage.Text, UriKind.Relative),

  Count = newCount,

  BackTitle = textBoxBackTitle.Text,

  BackBackgroundImage = new Uri(textBoxBackBackgroundImage.Text, UriKind.Relative),

  BackContent = textBoxBackContent.Text

};

ApplicationTile.Update(NewTileData);
That’s it for the Application Tile. The Secondary Tile is similar except that it can include a deep link.
Secondary Tiles
The SecondaryTile.xaml page allows the user to create and delete Secondary Tiles as well as update the properties described in the previous section and illustrated in Figure 10-9. Figure 10-11 shows the SecondaryTile.xaml UI in the emulator.
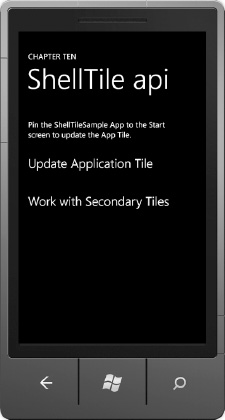
Figure 10–11. Secondary Tile update UI
In SecondaryTile.xaml, the OnNavigatedTo override finds the Secondary Tile based on the deep link URI defined by the NavigationUri property. This line of code attempts to find the Secondary Tile:
ShellTile SecondaryTile = ShellTile.ActiveTiles.FirstOrDefault(x =>

x.NavigationUri.ToString().Contains("TileKeyData=FromTile"));
If the tile is pinned, a reference will be found. The OnNavigatedTo method also checks to see if the QueryString contains the TileKeyData key. If it does, it means that the page was launched from the Secondary Tile:
if (NavigationContext.QueryString.ContainsKey("TileKeyData"))

  DeepLinkDataText.Text = this.NavigationContext.QueryString["TileKeyData"];
The checkBoxDisplaySecondaryTile_Checked creates the Secondary Tile when checked and deletes the Secondary Tile when unchecked. Note that adding a tile requires that the code be executed within a user-initiated event such as clicking a Button or checking a CheckBox control. Updating and deleting Secondary Tiles can occur on a non-UI initiated event or background process.
While AppTile.xaml.cs updated the Application Tile in one event handler shown above, SecondaryTile.xaml.cs allows you to update individual items on the Secondary Tile. Each event handler is similar to the following, which updates the Count property for the Secondary Tile:
private void buttonSetCount_Click(object sender, RoutedEventArgs e)

{

  ShellTile SecondaryTile = ShellTile.ActiveTiles.FirstOrDefault(

    x => x.NavigationUri.ToString().Contains("TileKeyData=FromTile"));

  if (SecondaryTile != null)

  {

    int newCount = 0;

    if (textBoxCount.Text != "")

    {

      newCount = int.Parse(textBoxCount.Text);

    }


    StandardTileData UpdatedTileData = new StandardTileData

    {

      Count = newCount

    };


    SecondaryTile.Update(UpdatedTileData);

  }

}
The rest of the event handlers in SecondaryTIle.xaml.cs are similar to this one. As you can see, working with tiles is straightforward and flexible.
Multi-Tasking and Background Processing
In this section I cover the new background processing capabilities introduced in Windows Phone OS 7.1. The Scheduled Tasks and Background Agent APIs allow you to execute application code in the background, even when the application is not running. Leveraging background processing enables your application to do several things to delight users:
- Build more responsive applications in certain scenarios; for example, you can improve load time by updating cached data in the background and loading from cache first.
- Update Live Tiles so that the content remains interesting to users.
- Provide deeper phone integration such as with the Background Audio Agent and integration with the volume control.
Microsoft sat down with developers and asked them to provide feedback on the types of background processing they needed. The product team took the feedback and boiled it down to key scenarios that maximize usefulness to developers without sacrificing performance and battery life for end-users. In the next section I cover the various capabilities available to developers.
Background agent development is straightforward and well-documented on MSDN. This section provides an overview, as I would be remiss if I didn’t cover the topic. The subsections point to relevant links into the MSDN documentation so that you can pull down the sample and quickly get started.
Agents
Each application can have one background agent. The agent can be registered as a PeriodicTask, a ResourceIntensiveTask, or as both types of tasks. An application’s Agent runs on a schedule, based on what type of Task is registered, which we cover in a bit, but only one instance of an agent runs at a time.
The base class for an Agent is BackgroundAgent. When the agent is launched, the OS calls the OnInvoke method. In this method, the application determines which type of ScheduledTask it is running as and it executes under the constraints for that type of Scheduled Task.
When the Agent completes execution, it calls the NotifyComplete or Abort event to notify the OS that it has completed. Calling NotifyComplete indicates success while calling Abort indicates failure to perform the task. Calling Abort sets IsScheduled to false. When the application is launched it can check the IsScheduled property to determine whether Abort was called.
Types of Scheduled Tasks
While Scheduled Tasks and Background Agents allow an application to execute code in the background even when the application is not running, Windows Phone does not support unconstrained background processing to optimize for performance and battery, learning many valuable lessons from Windows Mobile.
There are several different types of Scheduled Tasks, optimized for different scenarios with different behaviors and constraints. The variability is around scheduling and duration for Scheduled Tasks, described here:
PeriodicTask:Periodic agents run for small amounts of time on a regularly recurring interval. Scenarios include location upload and performing small amounts of data synchronization.ResourceIntensiveTask:Resource-intensive agents run for a fairly long period of time if the phone meets a certain set of requirements for processor activity, power source, and network connections. This scenario is focused on synchronizing large amounts of data when the device is not actively being used by the user and the phone is plugged in.
Constraints for All Scheduled Tasks
There are a few constraints to understand when working with Scheduled Tasks. Studying the constraints will save you a lot of confusion when something isn’t working.
There is a list of unsupported APIs that you cannot call from a Scheduled Task. Calling these APIs will result in an exception and may cause the application to fail certification. The Marketplace Test Kit can help you detect if your Agent is calling unsupported APIs. This link details the unsupported APIs:
http://msdn.microsoft.com/en-us/library/hh202962(v=VS.92).aspx
Both PeriodicTask and ResourceIntensiveTask agents cannot use any more than 6 MB of memory. Audio Agents are restricted to 15MB. Agents that exceed these memory limits are terminated.
Your application’s Agent expires after two weeks if the user does not launch your application within two weeks since last run. You set the ExpirationTime property on the Agent to set it to expire, but again, it cannot be any more than two weeks.
![]() Tip Any time your application runs, update the schedule for your application’s Agent out two more weeks to ensure that the background agent is not removed by the Windows Phone OS 7.1.
Tip Any time your application runs, update the schedule for your application’s Agent out two more weeks to ensure that the background agent is not removed by the Windows Phone OS 7.1.
Finally, if your agent fails to run successfully two consecutive times due to exceeding the memory quota or any other unhandled exception, the Agent becomes unscheduled. The application can reschedule the Agent when it is run in the foreground.
Periodic Task Constraints
PeriodicTask Agents run every 30 minutes on average, but the time can be anywhere from 20 to 40 minutes as the operating system optimizes execution for battery life. An Agent running as a PeriodicTask can run for 25 seconds, though it could be terminated due to memory limits, and so on.
Windows Phone 7.5 has a Battery Saver option that the user can enable in low battery conditions. A PeriodicTask may not run if battery Saver mode is enabled. This is a good thing for the end-user experience when users are most likely optimizing how they use their phone and not running many applications in low battery mode.
There is another battery-related constraint in that there is a hard limit on the number of PeriodicTask Agents. On some devices it can be as low as six Agents. There is a warning related to this limit where Windows Phone will tell the user that they have multiple background agents running. Also, a user can go to Settings, swipe over to Applications, and select Background Tasks to see a list of applications with background agents available.
Resource Intensive Task Constraints
ResourceIntensiveTask Agents require that the phone is plugged in to a power source to run and the phone must be on a WiFi or Ethernet connection through the PC. The power-level of the phone must be greater than 90% and the device screen must be locked.
ResourceIntensiveTask Agents also do not run if there is an active phone call. If the Agent tries to make a Socket call using the AssociateToNetworkInterface API and force the connection over either MobileBroadbandGSM or MobileBroadbandCDMA network, the call will fail.
One thing to note, if the user unplugs the phone while a ResourceIntensiveTask Agent is running, it is terminated immediately. Also, your ResourceIntensiveTask may never run if the user does not have a WiFi connection when it is being charged up, so you should not rely on this functionality for critical application functions.
Coding with Periodic Agents
Start by creating a new project named PeriodicAgent using the “Windows Phone Scheduled Task Agent” project template in the Chapter 10 solution. This creates the Background Agent. We also need to create a Windows Phone Application to manage the Background Agent. I’ve added a new Windows Phone project named PeriodicAgentApp to the Chapter 10 solution, which is the application that manages the Background Agent.
Each application can have only one ScheduledTaskAgent registered at a time. So as a developer you can create a single background agent instance and register it in WMAppManifest.xml. The following example XML registers a background agent:
<Tasks>

  <DefaultTask Name="_default" NavigationPage="MainPage.xaml" />

  <ExtendedTask Name="BackgroundTask">

    <BackgroundServiceAgent Specifier="ScheduledTaskAgent" Name="LiveTilesAgent" Source="LiveTilesAgent" Type="LiveTilesAgent.ScheduledAgent" />

  </ExtendedTask>

</Tasks>
You can schedule this background agent as both a resource-intensive agent and a periodic agent. When you call the scheduling APIs from your application, it infers that the background agent you want to schedule is the agent registered in WMAppManifest.xml as shown above.
If your application uses both a ResourceIntensiveTask and a PeriodicTask, you can check the type of the ScheduledTask object that is passed into the OnInvoke method to determine for which task the agent is being invoked and branch your code execution as necessary.
For a coding sample, please check-out the MSDN sample here:
http://go.microsoft.com/fwlink/?LinkId=219088
This code registers both a Periodic and Resource-intensive agent and can serve as a template for your own applications. There isn’t much beyond what is in the documentation to cover regarding Background Agent implementation.
Background File Transfer Service
The BackgroundTransferService class can transfer, both upload and download, data between your application and the Internet in the background. Transfer requests are created and configured using the BackgroundTransferService class.
Each application can have up to five requests queued at any given time. Adding an additional transfer request will result in an exception. Note that you must remove requests manually after they are completed.
To demonstrate how to work with the Background File Transfer Service, check out the MSDN documentation sample available here:
http://go.microsoft.com/fwlink/?LinkId=219083
The sample shows you how to use the Background Transfer Service to schedule and manage background file transfers and is based on this walkthrough: How to: Implement Background File Transfers for Windows Phone.
http://msdn.microsoft.com/en-us/library/hh202959(v=VS.92).aspx
Background Audio
Beginning in Windows Phone OS 7.1, developers can write applications that play audio even when an application is not running. Audio will play under lock screen where the user can control the audio playback using the Universal Volume Control (UVC), having the same experience as the built-in audio player.
All media on Windows Phone is played through the Zune Media Queue. Background Audio applications send commands to the Zune Media Queue to set the current track as well as play, pause, fast forward, and rewind the audio. This is done via the BackgroundAudioPlayer class with the Instance object communicating with the Zune Media Queue to manage audio playback.
![]() Tip Check out this link that details the supported media codecs on Windows Phone:
Tip Check out this link that details the supported media codecs on Windows Phone: http://msdn.microsoft.com/en-us/library/ff462087(v=VS.92).aspx
Mentioned above, the UVC is the built-in audio UI available in the lock screen when audio is playing. The UVC also controls the Zune Media Queue. Your application manages the playlist, while the user can use the UVC to manage playback for seamless integration with Windows Phone.
There are two methods available to play Audio available to developers, the AudioPlayerAgent, and the AudioStreamingAgent, which are covered next.
AudioPlayerAgent
The AudioPlayerAgent allows you to manage a playlist by passing a URI containing the address of the audio file to the Zune Media Queue to set the current track. The URI can be local or remote. To implement a playlist application, your project should contain a Windows Phone application and another project based on the “Windows Phone Audio Playback Agent” project template, which includes a class that inherits from AudioPlayerAgent.
At runtime, the AudioPlayerAgent class implementation runs in the background and makes calls into the BackgroundAudioPlayer, which interfaces with the Zune Media Queue to play the audio. When the playlist completes, call the NotifyComplete event so that the OS can safely shut down the AudioPlayerAgent. For more information on building an Audio playlist application, please check out the source code at this link:
http://msdn.microsoft.com/en-us/library/ff431744(v=VS.92).aspx
AudioStreamingAgent
The other mechanism available to developers to create a background audio application is via the AudioStreamingAgent class. You implement all of the same pieces of the Playlist Application as well as the AudioStreamingAgent, which inherits from MediaStreamSource covered in Chapter 7. For more information on building an Audio streaming application, please check-out the source code at this link:
http://msdn.microsoft.com/en-us/library/ff431744(v=VS.92).aspx
Microsoft Push Notification Services
In this section we cover how Microsoft push notifications work, when to use notifications, and how to add push notifications to your application. First we start with an overview of how Microsoft push notifications work.
Microsoft Push Notification Services (MPNS) provides a facility to connect your Windows Phone application to the server without requiring continuous polling by the application. Polling works and is functional, but if an application is continuously polling and the server response is “nothing to download,” the application is potentially consuming battery without any user benefit.
![]() Note Push notifications are not a new concept in the industry. Other platforms include push notification services as well.
Note Push notifications are not a new concept in the industry. Other platforms include push notification services as well.
Another challenge with polling is that Windows Phone does not support multitasking for third-party applications running on the device. Therefore, for an application to poll for data it must remain in the foreground as the active application. While not letting any third-party application drain the battery by polling for data in the background helps to enhance the end-user experience, applications still need to be able to react to application data and status changes even when not running.
Raw Push Notification Description
Microsoft Push Notification Services raw push notifications send the actual data to the application but only if the application is running in the foreground. You can use raw notifications in addition to tile and toast notifications to send information directly to your application. It can be up to 1kb in size. The idea is to send a toast that something has happened and then send a raw notification to the application so that it can display the corresponding data when the application is launched.
Toast Push Notification Description
Microsoft Push Notification Services allows an application to receive notifications that data has been updated or application status has changed even when the application is not running. When a toast notification is received, the user receives a “toast,” which is a little pop-up across the top of the screen that the user can click on, resulting in launching your application. Figure 10–12 shows a sample toast notification from the MSDN documentation.

Figure 10–12. Example toast notification
The toast notification is system-generated. It displays over any application running, whether the Start screen or running application. If the application that expects to receive the notification is running, the toast notification is not displayed, but because the application is already running, the application simply processes and displays the data directly.
An important user experience consideration is to use toast notifications sparingly and with flexible configuration settings to help the user tune which notifications they are interested in receiving. The reason is that toast notifications are disruptive, appearing over any running application, even an action game.
![]() Note First-party applications such as the phone dialer and other built-in applications can multitask with a running third-party application, as well as with other first-party applications.
Note First-party applications such as the phone dialer and other built-in applications can multitask with a running third-party application, as well as with other first-party applications.
Tile Notification
Another type of notification is a tile notification, which updates the application tile if, and only if, the user decided to pin your application’s tile to the Windows Phone Start screen. Tile notifications can consist of a value for the tile Title value, a Count value (between 1 and 99), as well as a 173 × 173 background image for the tile. There are not any additional customizations available but with a little bit of server-side work your application can dynamically generate custom images for the tile background, which we cover later in the chapter.
How Microsoft Push Notifications Work
For MPNS to work by sending important data to the user’s phone, there must be some sort of server-side component to the Windows Phone application receiving the notification. Essentially, MPNS is a proxy between the server-side component of your solution and the Windows Phone application component. Figure 10–13 provides a graphical representation of how MPNS works.
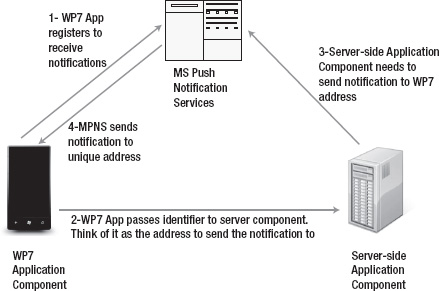
Figure 10–13. Microsoft Push Notification Services process flow
The user via their Windows Phone initiates the request to MPNS, which receives the request and passes a URI back to the application. The application then passes the URI to the server-side application component along with information on which notifications the user would like to receive, such as scores for their favorite sports team.
The server-side component now has all the information it needs, the “address” to send the notification to via MPNS as well as the criteria the user has chosen for what notifications the user would like to receive.
Getting Started with Push Notifications
Note from Figure 10–13 that there is a server-side component that you must create in order to support push notifications. The server-side component performs the following two primary tasks:
- Receive registration requests and subscription criteria (for example, send me a notification for breaking news regarding my favorite sports team) from the Windows Phone application.
- Perform subscription matching and then send push notification requests to MPNS.
http://msdn.microsoft.com/en-us/library/ff402537(v=VS.92).aspx
Also, there is a full set of Windows Phone labs including labs on push notifications available here:
www.microsoft.com/downloads/en/details.aspx?displaylang=en&FamilyID=ca23285f-bab8-47fa-b364-11553e076a9a
For this section, I want to focus on the Windows Push Notification Server Side Helper Library created by the Microsoft evangelism team to assist developers quickly implement push notification services. The library supports sending all three push notification messages available, specifically Raw, Tile, and Toast. The library abstracts out the complexity of implementing push notifications to just a few lines of code for your application.
To get started, obtain a copy of the Push Notification Server Side Helper for WP7 “Recipe” from this link:
http://create.msdn.com/en-us/education/catalog/article/pnhelp-wp7
The sample code included with the download provides a very powerful example of how to work with the library. It includes a “server” application as a Windows Presentation Foundation client. A real application could be a Windows Service or similar construct on other platforms.
What’s great about the sample is that it demonstrates a dialog between the client and the server. For example, the client keeps the server aware of whether the user has pinned the Application Tile. Once the user has pinned the tile, the server-side application is made aware and prepares to send tile updates. Even just switching tabs on the server-side WPF application results in UI updates via RAW notifications on the Windows Phone application. Run the sample to see it in action.
For a more simplified view of Microsoft Push Notification Services, especially if your server-side code is not based on ASP.NET, check out these three samples in the MSDN Documentation:
- Tile Notification Sample:
http://go.microsoft.com/fwlink/?LinkId=219079 - Toast Notification Sample:
http://go.microsoft.com/fwlink/?LinkId=219080 - Raw Notification Sample:
http://go.microsoft.com/fwlink/?LinkId=219081
All the samples include a simple ASP.NET project that demonstrates the message format, which could easily be ported to another back-end technology such as JSP, PHP, and so on.
Updating Application Tile via Web URI Subscription
Microsoft has done research that indicates end-users like applications that support the Live Tiles feature. It promotes “at a glance” information delivery, such as when the Outlook tile indicates the number of unread messages. As mentioned in the previous section, Microsoft Push Notification Services provides fine-grained control over tile updates for maximum personalization.
There are situations where an ISV develops an application that doesn’t need full push notification functionality but the ISV would still like to support tile updates. Windows Phone provides a client-side pull API that allows an application to update its pinned tile on a predefined basis of every hour, every day, or every week. No other update schedule is available. Delivery times will vary within the specified schedule; this means that if an application registers for a tile update on a daily basis, the tile update can happen at any time within that time period. Still, this can provide a simple way to add a Live Tile to an application.
The API that provides this functionality is the Microsoft.Phone.Shell.ShellTileSchedule API, which takes a URI to a web service or image located on a web site as well as an interval setting. Listing 6–15 shows the code.
Listing 6–15. ShellTileNotificationSample MainPage.xaml.cs
using System;

using Microsoft.Phone.Controls;

using Microsoft.Phone.Shell;


namespace ShellTileNotificationSample

{

  public partial class MainPage : PhoneApplicationPage

  {

    // Constructor

    public MainPage()

    {

      InitializeComponent();

    }

    //store as global variable so that the schedule

    //can be Started and Stopped.

    private ShellTileSchedule shellTileSchedule;

    private void StartShellTileAppBarBtn_Click(object sender, EventArgs e)

    {

      StartShellTileSchedule();

    }


    private void StartShellTileSchedule()

    {

      shellTileSchedule = new ShellTileSchedule();

      shellTileSchedule.Recurrence = UpdateRecurrence.Interval;

      shellTileSchedule.Interval = UpdateInterval.EveryHour;

      shellTileSchedule.StartTime = DateTime.Now;

      shellTileSchedule.RemoteImageUri =

        new Uri(@"http://apress.com/resource/bookcover/9781430232193?size=medium");

      shellTileSchedule.Start();

    }


    private void StopShellTileAppBarBtn_Click(object sender, EventArgs e)

    {

      if (shellTileSchedule != null)

        shellTileSchedule.Stop();

    }

  }

}
Create a private variable for the ShellTileSchedule instance so that you can stop it at a later time if the user decides for some reason to turn off Live Tile updates. In this example, two Application Bar buttons, titled start and stop, control the schedule. Once the tile is pinned it can take up the full interval time before it is updated.
Tile updates do not occur if the phone is in an idle state, meaning the screen is off or the lock screen is visible. As soon as the screen is on and unlocked, the tile will update. Figure 10–14 shows the updated tile.
Figure 10–14. Live tile update
The image at the URI must be less than 80KB in size with a maximum download time of 15 seconds. If the API cannot download the image within 15 seconds three consecutive times the schedule will be removed.
You can have more than one ShellTileSchedule available in your application, although only one schedule can be active at a time. As an example, let’s say you are building an application that provides news coverage for all 32 NFL football teams. You could create 32 URIs that are updated with team-specific content and present a menu to the user that says something like “which team would you like to get live tile updates for?” Once the user selects a team, your app creates the corresponding ShellTileSchedule to that team’s URI, and voila! Customized live tile updates with just a few lines of code.
Conclusion
In this chapter I’ve covered some of the key features that can set your application apart as a top application such as live tiles, background processing, and push notifications. By now you should have a deep understanding of Windows Phone development to tackle these technologies head on.
I’ve also covered globalization and localization of Windows Phone applications. The samples leverage MVVM in order to demonstrate how localization and globalization fit within this architecture. Once you’ve gone through these sections, there is no reason not to build applications for the world and expand your market potential.