
Chapter 34
Communicating via the Internet
The expectation is that most, if not all, Android devices will have built-in Internet access. That could be Wi-Fi, cellular data services (EDGE, 3G, 4G, etc.), or possibly something else entirely. Regardless, most people—or at least those with a data plan or Wi-Fi access—will be able to get to the Internet from their Android phone.
Not surprisingly, the Android platform gives developers a wide range of ways to make use of this Internet access. Some offer high-level access, such as the integrated WebKit browser component. If you want, you can drop all the way down to using raw sockets. In between, you can leverage APIs—both on-device and from third-party JARs—that give you access to specific protocols: HTTP, XMPP, SMTP, and so on.
The emphasis of this book is on the higher-level forms of access: the WebKit component, discussed in Chapter 15, and Internet-access APIs, discussed in this chapter. As busy coders, we should be trying to reuse existing components wherever possible, versus rolling our own on-the-wire protocol.
REST and Relaxation
Android does not have built-in SOAP or XML-RPC client APIs. However, it does have the Apache HttpClient library baked in. You can either layer a SOAP/XML-RPC layer atop this library or use it “straight” for accessing REST-style web services. For the purposes of this book, REST-style web services are considered simple HTTP requests for ordinary URLs over the full range of HTTP verbs, with formatted payloads (XML, JSON, etc.) as responses.
More expansive tutorials, FAQs, and HOWTOs can be found at the HttpClient web site (http://hc.apache.org/). Here, we'll cover the basics, while checking the weather.
HTTP Operations via Apache HttpClient
The first step to using HttpClient is, not surprisingly, to create an HttpClient object. The client object handles all HTTP requests on your behalf. Since HttpClient is an interface, you will need to actually instantiate some implementation of that interface, such as DefaultHttpClient.
Those requests are bundled up into HttpRequest instances, with different HttpRequest implementations for each different HTTP verb (e.g., HttpGet for HTTP GET requests). You create an HttpRequest implementation instance, fill in the URL to retrieve and other configuration data (e.g., form values if you are doing an HTTP POST via HttpPost), and then pass the method to the client to actually make the HTTP request via execute().
What happens at this point can be as simple or as complicated as you want. You can get an HttpResponse object back, with a response code (e.g., 200 for OK), HTTP headers, and the like. Or, you can use a flavor of execute() that takes a ResponseHandler<String> as a parameter, with the net result being that execute() returns just the String representation of the response body. In practice, this is not a recommended approach, because you really should be checking your HTTP response codes for errors. However, for trivial applications, like book examples, the ResponseHandler<String> approach works just fine.
For example, let's take a look at the Internet/Weather sample project. This implements an activity that retrieves weather data for your current location from the National Weather Service. (Note that this probably works only for geographic locations in the United States.) That data is converted into an HTML page, which is poured into a WebKit widget for display. Rebuilding this demo using a ListView is left as an exercise for the reader. Also, since this sample is relatively long, we will show only relevant pieces of the Java code here in this chapter, though you can always download the full source from the CommonsWare web site.
To make this a bit more interesting, we use the Android location services to figure out where we are…sort of. The full details of how that works are provided in Chapter 39.
In the onResume() method, we toggle on location updates, so we will be informed where we are now and when we move a significant distance (10 kilometers). When a location is available—either at the start or based on movement—we retrieve the National Weather Service data via our updateForecast() method:
private void updateForecast(Location loc) {

  String url=String.format(format, loc.getLatitude(),

                         loc.getLongitude());

  HttpGet getMethod=new HttpGet(url);


  try {

    ResponseHandler<String> responseHandler=new BasicResponseHandler();

    String responseBody=client.execute(getMethod,

                                     responseHandler);

    buildForecasts(responseBody);
    String page=generatePage();


    browser.loadDataWithBaseURL(null, page, "text/html",

                               "UTF-8", null);

  }

  catch (Throwable t) {

    android.util.Log.e("WeatherDemo", "Exception fetching data", t);

    Toast

      .makeText(this, "Request failed: "+t.toString(), Toast.LENGTH_LONG)

      .show();

  }

}
The updateForecast() method takes a Location as a parameter, obtained from the location update process. For now, all you need to know is that Location sports getLatitude() and getLongitude() methods that return the latitude and longitude of the device's position, respectively.
We hold the URL to the National Weather Service XML in a string resource, and pour in the latitude and longitude at runtime. Given our HttpClient object created in onCreate(), we populate an HttpGet with that customized URL, and then execute that method. Given the resulting XML from the REST service, we build the forecast HTML page, as described next, and pour that into the WebKit widget. If the HttpClient blows up with an exception, we provide that error as a Toast.
Note that we also shut down the HttpClient object in onDestroy().
Parsing Responses
The response you get will be formatted using some system—HTML, XML, JSON, or whatever. It is up to you, of course, to pick out the information you need and do something useful with it. In the case of the WeatherDemo, we need to extract the forecast time, temperature, and icon (indicating sky conditions and precipitation) and generate an HTML page from it.
Android includes the following parsers:
- Three XML parsers: the traditional W3C DOM (
org.w3c.dom), a SAX parser (org.xml.sax), and the XML pull parser (discussed in Chapter 23) - A JSON parser (
org.json)
You are also welcome to use third-party Java code, where possible, to handle other formats, such as a dedicated RSS/Atom parser for a feed reader. The use of third-party Java code is discussed in Chapter 33.
For WeatherDemo, we use the W3C DOM parser in our buildForecasts() method:
void buildForecasts(String raw) throws Exception {

  DocumentBuilder builder=DocumentBuilderFactory

                           .newInstance()

                           .newDocumentBuilder();

  Document doc=builder.parse(new InputSource(new StringReader(raw)));
  NodeList times=doc.getElementsByTagName("start-valid-time");


  for (int i=0;i<times.getLength();i++) {

    Element time=(Element)times.item(i);

    Forecast forecast=new Forecast();


    forecasts.add(forecast);

    forecast.setTime(time.getFirstChild().getNodeValue());

  }


  NodeList temps=doc.getElementsByTagName("value");


  for (int i=0;i<temps.getLength();i++) {

    Element temp=(Element)temps.item(i);

    Forecast forecast=forecasts.get(i);


    forecast.setTemp (new Integer(temp.getFirstChild().getNodeValue()));

  }


  NodeList icons=doc.getElementsByTagName("icon-link");


  for (int i=0;i<icons.getLength();i++) {

    Element icon=(Element)icons.item(i);

    Forecast forecast=forecasts.get(i);


    forecast.setIcon(icon.getFirstChild().getNodeValue());

  }

}
The National Weather Service XML format is curiously structured, relying heavily on sequential position in lists versus the more object-oriented style you find in formats like RSS or Atom. That being said, we can take a few liberties and simplify the parsing somewhat, taking advantage of the fact that the elements we want (start-valid-time for the forecast time, value for the temperature, and icon-link for the icon URL) are all unique within the document.
The HTML comes in as an InputStream and is fed into the DOM parser. From there, we scan for the start-valid-time elements and populate a set of Forecast models using those start times. Then, we find the temperature value elements and icon-link URLs and fill those in to the Forecast objects.
In turn, the generatePage() method creates a rudimentary HTML table with the forecasts:
String generatePage() {

  StringBuilder bufResult=new StringBuilder("<html><body><table>");


  bufResult.append("<tr><th width="50%">Time</th>"+

                    "<th>Temperature</th><th>Forecast</th></tr>");


  for (Forecast forecast : forecasts) {

    bufResult.append("<tr><td align="center">");

    bufResult.append(forecast.getTime());

    bufResult.append("</td><td align="center">");
    bufResult.append(forecast.getTemp());

    bufResult.append("</td><td><img src="");

    bufResult.append(forecast.getIcon());

    bufResult.append(""></td></tr>");

  }


  bufResult.append("</table></body></html>");


  return(bufResult.toString());

}
The result looks like Figure 34–1.
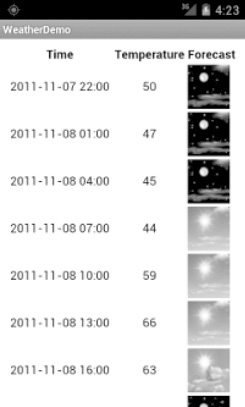
Figure 34–1. The WeatherDemo sample application
NOTE: You will have to set your location in Eclipse if you are using the emulator. Open the DDMS perspective with Window ![]()
Open Perspective ![]()
Other ![]()
DDMS. Select your emulator in the Devices ![]()
Name panel, and then set your emulator's location in the Emulator Control panel using the Longitude and Latitude boxes. When you are ready, click Send. You will need to do this each time the application is launched.
Stuff to Consider
If you need to use SSL, bear in mind that the default HttpClient setup does not include SSL support. Mostly, this is because you need to decide how to handle SSL certificate presentation: Do you blindly accept all certificates, even self-signed or expired ones? Or do you want to ask users if they really want to use some strange certificates?
Similarly, HttpClient, by default, is designed for single-threaded use. If you will be using HttpClient from some other place where multiple threads might be an issue, you can readily set up HttpClient to support multiple threads.
For these sorts of topics, you are best served by checking out the HttpClient web site for documentation and support.
AndroidHttpClient
Starting in Android 2.2 (API level 8), you can use the AndroidHttpClient class, found in the android.net.http package. This is an implementation of the HttpClient interface, like DefaultHttpClient. However, it is preconfigured with settings that the core Android team feels make sense for the platform.
What you gain are the following:
- SSL management
- A direct way to specify the user agent string, which is supplied in your call to the static
newInstance()method to get an instance ofAndroidHttpClient - Utility methods for working with material compressed via GZIP, for parsing dates in HTTP headers, and so on
What you lose is automatic cookie storage. A regular DefaultHttpClient will cache cookies in memory and use them on subsequent requests where they are needed. AndroidHttpClient does not. There are ways to fix that, by using an HttpContext object, as is described in the AndroidHttpClient documentation.
Also, AndroidHttpClient prevents you from using it on the main application thread—requests can be made only on a background thread. This is a feature, even if some people might consider it to be a bug.
Since this class is available only in Android 2.2 and beyond, it may not make sense to do much with it until such time as you are supporting only API level 8 or higher.
Leveraging Internet-Aware Android Components
Wherever possible, use built-in Android components that can handle your Internet access for you. Such components will have been fairly rigorously tested and are more likely to handle edge cases well, such as dealing with users on Wi-Fi who move out of range of the access point and fail over to mobile data connections (e.g., 3G).
For example, the WebView widget (introduced in Chapter 15) and the MapView widget (covered in Chapter 40) both handle Internet access for you. While you still need the INTERNET permission, you do not have to perform HTTP requests or the like yourself.
This section outlines some other ways you can take advantage of built-in Internet capability.
Downloading Files
Android 2.3 introduced a DownloadManager, designed to handle a lot of the complexities of downloading larger files, such as:
- Determining whether the user is on Wi-Fi or mobile data and, depending on which, whether the download should occur
- Handling when the user, previously on Wi-Fi, moves out of range of the access point and fails over to mobile data
- Ensuring the device stays awake while the download proceeds
DownloadManager itself is less complicated than the alternative of writing all of it yourself. However, it does present a few challenges. In this section, we will examine the Internet/Download sample project that uses DownloadManager.
The Permissions
To use DownloadManager, you will need to hold the INTERNET permission. Depending on where you elect to download the file, you may also need the WRITE_EXTERNAL_STORAGE permission.
However, at the time of this writing, if you lack sufficient permissions, you may get an error complaining that you are missing ACCESS_ALL_DOWNLOADS. This appears to be a bug in the DownloadManager implementation. It should be complaining about the lack of INTERNET or WRITE_EXTERNAL_STORAGE, or both. You do not need to hold the ACCESS_ALL_DOWNLOADS permission, which is not even documented as of Android 3.0.
For example, here is the manifest for the Internet/Download application:
<?xml version="1.0" encoding="utf-8"?>

<manifest xmlns:android="http://schemas.android.com/apk/res/android"

package="com.commonsware.android.download" android:versionCode="1"

android:versionName="1.0">

   <!-- <uses-permission android:name="android.permission.ACCESS_ALL_DOWNLOADS" /> -->

   <uses-permission android:name="android.permission.INTERNET"/>

   <uses-permission android:name="android.permission.WRITE_EXTERNAL_STORAGE"/>

   <application android:label="@string/app_name" android:icon="@drawable/cw">

       <activity android:name="DownloadDemo" android:label="@string/app_name">

           <intent-filter>

               <action android:name="android.intent.action.MAIN"/>
               <category android:name="android.intent.category.LAUNCHER"/>

           </intent-filter>

       </activity>

   </application>

 <supports-screens android:largeScreens="true" android:normalScreens="true" android:smallScreens="true" android:anyDensity="true"/>

</manifest>
NOTE: You need to make sure your emulator is configured with an SD card for this example. Open the Android SDK and AVD Manager and select your emulator, and then click Edit. You can then set the size of the SD card your emulator uses for storage. If you resize an existing SD card image, note that AVD will delete your existing SD card image, so you should first back up anything of value you wish to keep.
The Layout
Our sample application has a simple layout, consisting of three buttons:
- One to kick off a download
- One to query the status of a download
- One to display a system-supplied activity containing the roster of downloaded files
<?xml version="1.0" encoding="utf-8"?>

<LinearLayout

  xmlns:android="http://schemas.android.com/apk/res/android"

  android:orientation="vertical"

  android:layout_width="fill_parent"

  android:layout_height="fill_parent"

  >

  <Button

    android:id="@+id/start"

    android:text="Start Download"

    android:layout_width="fill_parent"

    android:layout_height="0dip"

    android:layout_weight="1"

    android:onClick="startDownload"

  />

  <Button

    android:id="@+id/query"

    android:text="Query Status"

    android:layout_width="fill_parent"

    android:layout_height="0dip"

    android:layout_weight="1"

    android:onClick="queryStatus"

    android:enabled="false"

  />

  <Button

    android:text="View Log"

    android:layout_width="fill_parent"

    android:layout_height="0dip"
    android:layout_weight="1"

    android:onClick="viewLog"

  />

</LinearLayout>
Requesting the Download
To kick off a download, we first need to get access to the DownloadManager. This is a system service. We can call getSystemService() on any activity (or other Context), provide it the identifier of the system service we want, and receive the system service object back. However, since getSystemService() supports a wide range of these objects, we need to cast it to the proper type for the service we requested.
So, for example, here is a line from onCreate() of the DownloadDemo activity where we get the DownloadManager:
mgr=(DownloadManager)getSystemService(DOWNLOAD_SERVICE);
Most of these managers have no close(), release(), or goAwayPlease() sort of methods—we can just use them and let garbage collection take care of cleaning them up.
Given the DownloadManager, we can now call an enqueue() method to request a download. The name is relevant—do not assume that your download will begin immediately, though oftentimes it will. The enqueue() method takes a DownloadManager.Request object as a parameter. The Request object uses the builder pattern, in that most methods return the Request itself, so we can chain a series of calls together with less typing.
For example, the topmost button in our layout is tied to a startDownload() method in DownloadDemo, shown here:
public void startDownload(View v) {

  Uri uri=Uri.parse("http://commonsware.com/misc/test.mp4");


  Environment

    .getExternalStoragePublicDirectory(Environment.DIRECTORY_DOWNLOADS)

    .mkdirs();


  lastDownload=

    mgr.enqueue(new DownloadManager.Request(uri)

                .setAllowedNetworkTypes(DownloadManager.Request.NETWORK_WIFI |

                                       DownloadManager.Request.NETWORK_MOBILE)

                .setAllowedOverRoaming(false)

                .setTitle("Demo")

                .setDescription("Something useful. No, really.")

                .setDestinationInExternalPublicDir(Environment.DIRECTORY_DOWNLOADS,

                                                "test.mp4"));


  v.setEnabled(false);

  findViewById(R.id.query).setEnabled(true);

}
We are downloading a sample MP4 file, and we want to download it to the external storage area. To do the latter, we are using getExternalStoragePublicDirectory() on Environment, which gives us a directory suitable for storing a certain class of content. In this case, we are going to store the download in Environment.DIRECTORY_DOWNLOADS, though we could just as easily have chosen Environment.DIRECTORY_MOVIES, since we are downloading a video clip. Note that the File object returned by getExternalStoragePublicDirectory() may point to a not-yet-created directory, which is why we call mkdirs() on it, to ensure the directory exists.
We then create the DownloadManager.Request object, with the following attributes:
- We are downloading the specific URL we want, courtesy of the
Urisupplied to theRequestconstructor. - We are willing to use either mobile data or Wi-Fi for the download (
setAllowedNetworkTypes()), but we do not want the download to incur roaming charges (setAllowedOverRoaming()). - We want the file downloaded as
test.mp4in the downloads area on the external storage (setDestinationInExternalPublicDir()).
We also provide a name (setTitle()) and description (setDescription()), which are used as part of the notification drawer entry for this download. The user will see these when they slide down the drawer while the download is progressing.
The enqueue() method returns an ID of this download, which we hold onto for use in querying the download status.
Keeping Track of Download Status
If the user taps the Query Status button, we want to find out the details of how the download is progressing. To do that, we can call query() on the DownloadManager. The query() method takes a DownloadManager.Query object, describing what download(s) we are interested in. In our case, we use the value we got from the enqueue() method when the user requested the download:
public void queryStatus(View v) {

  Cursor c=mgr.query(new DownloadManager.Query().setFilterById(lastDownload));


  if (c==null) {

    Toast.makeText(this, "Download not found!", Toast.LENGTH_LONG).show();

  }

  else {

    c.moveToFirst();


    Log.d(getClass().getName(), "COLUMN_ID: "+

          c.getLong(c.getColumnIndex(DownloadManager.COLUMN_ID)));

    Log.d(getClass().getName(), "COLUMN_BYTES_DOWNLOADED_SO_FAR: "+

          c.getLong(c.getColumnIndex(DownloadManager.COLUMN_BYTES_DOWNLOADED_SO_FAR)));

    Log.d(getClass().getName(), "COLUMN_LAST_MODIFIED_TIMESTAMP: "+

          c.getLong(c.getColumnIndex(DownloadManager.COLUMN_LAST_MODIFIED_TIMESTAMP)));

    Log.d(getClass().getName(), "COLUMN_LOCAL_URI: "+
          c.getString(c.getColumnIndex(DownloadManager.COLUMN_LOCAL_URI)));

    Log.d(getClass().getName(), "COLUMN_STATUS: "+

          c.getInt(c.getColumnIndex(DownloadManager.COLUMN_STATUS)));

    Log.d(getClass().getName(), "COLUMN_REASON: "+

          c.getInt(c.getColumnIndex(DownloadManager.COLUMN_REASON)));


    Toast.makeText(this, statusMessage(c), Toast.LENGTH_LONG).show();

  }

}
The query() method returns a Cursor, containing a series of columns representing the details about our download. There are a series of constants on the DownloadManager class outlining what is possible. In our case, we retrieve (and dump to LogCat) the following:
- The ID of the download (
COLUMN_ID) - The amount of data that has been downloaded to date (
COLUMN_BYTES_DOWNLOADED_SO_FAR) - What the last-modified timestamp is on the download (
COLUMN_LAST_MODIFIED_TIMESTAMP) - Where the file is being saved to locally (
COLUMN_LOCAL_URI) - What the actual status is (
COLUMN_STATUS) - What the reason is for that status (
COLUMN_REASON)
There are a number of possible status codes (e.g., STATUS_FAILED, STATUS_SUCCESSFUL, and STATUS_RUNNING). Some, like STATUS_FAILED, may have an accompanying reason providing more details.
What the User Sees
The user, upon launching the application, sees our three buttons, as shown in Figure 34–2.
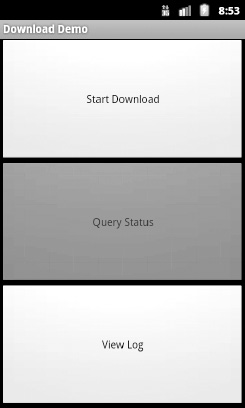
Figure 34–2. The DownloadDemo sample application, as initially launched
Clicking the first button disables the button while the download is going on, and a download icon appears in the status bar (though it is a bit difficult to see, given the poor contrast between Android's icon and Android's status bar), as shown in Figure 34–3.
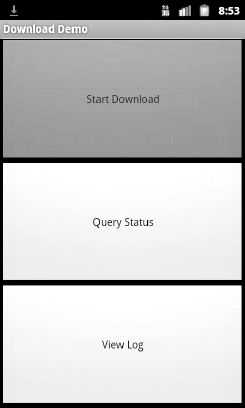
Figure 34–3. The DownloadDemo sample application, performing a download
Sliding down the notification drawer shows the user the progress of the download in the form of a ProgressBar widget, as shown in Figure 34–4.
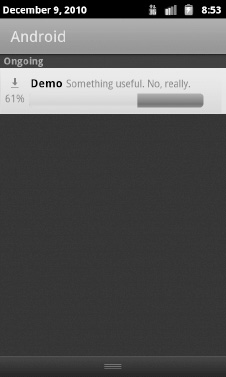
Figure 34–4. The notification drawer, during a download using DownloadManager
Tapping the entry in the notification drawer returns control to our original activity, where the user sees a Toast, as shown in Figure 34–5.
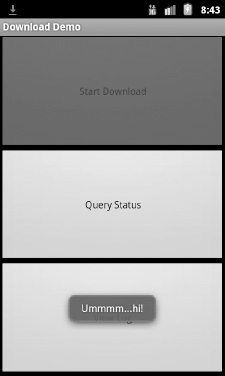
Figure 34–5. The DownloadDemo sample application, after coming to the foreground from the notification
If the user taps the middle button during the download, a Toast will appear indicating that the download is in progress, as shown in Figure 34–6.
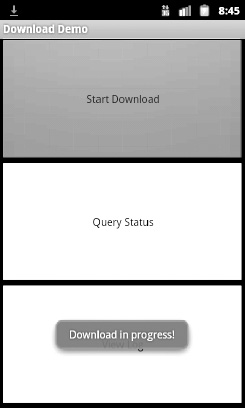
Figure 34–6. The DownloadDemo sample application, showing the status mid-download
Additional details are also dumped to LogCat, visible via DDMS or adb logcat:
12-10 08:45:01.289: DEBUG/com.commonsware.android.download.DownloadDemo(372):

 COLUMN_ID: 12

12-10 08:45:01.289: DEBUG/com.commonsware.android.download.DownloadDemo(372):

 COLUMN_BYTES_DOWNLOADED_SO_FAR: 615400

12-10 08:45:01.289: DEBUG/com.commonsware.android.download.DownloadDemo(372):

 COLUMN_LAST_MODIFIED_TIMESTAMP: 1291988696232

12-10 08:45:01.289: DEBUG/com.commonsware.android.download.DownloadDemo(372):

 COLUMN_LOCAL_URI: file:///mnt/sdcard/Download/test.mp4

12-10 08:45:01.299: DEBUG/com.commonsware.android.download.DownloadDemo(372):

 COLUMN_STATUS: 2

12-10 08:45:01.299: DEBUG/com.commonsware.android.download.DownloadDemo(372):

 COLUMN_REASON: 0
Once the download is complete, tapping the middle button will indicate that the download is, indeed, complete, and final information about the download is emitted to LogCat:
12-10 08:49:27.360: DEBUG/com.commonsware.android.download.DownloadDemo(372):

 COLUMN_ID: 12

12-10 08:49:27.360: DEBUG/com.commonsware.android.download.DownloadDemo(372):
 COLUMN_BYTES_DOWNLOADED_SO_FAR: 6219229

12-10 08:49:27.370: DEBUG/com.commonsware.android.download.DownloadDemo(372):

 COLUMN_LAST_MODIFIED_TIMESTAMP: 1291988713409

12-10 08:49:27.370: DEBUG/com.commonsware.android.download.DownloadDemo(372):

 COLUMN_LOCAL_URI: file:///mnt/sdcard/Download/test.mp4

12-10 08:49:27.370: DEBUG/com.commonsware.android.download.DownloadDemo(372):

 COLUMN_STATUS: 8

12-10 08:49:27.370: DEBUG/com.commonsware.android.download.DownloadDemo(372):

 COLUMN_REASON: 0
Tapping the bottom button brings up the activity displaying all downloads, including both successes and failures, as shown in Figure 34–7.
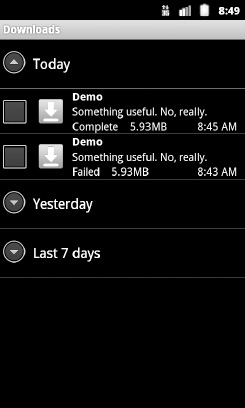
Figure 34–7. The Downloads screen, showing everything downloaded by the DownloadManager
And, of course, the file is downloaded. In Android 2.3, in the emulator, our chosen location maps to /mnt/sdcard/Downloads/test.mp4.
Limitations
DownloadManager works with HTTP URLs, but not HTTPS (SSL) URLs. This is unfortunate, as more and more sites are switching to SSL encryption across the board, to deal with various security challenges. Hopefully, in the future, DownloadManager will have more options here.
If you display the list of all downloads, and your download is among them, it is a really good idea to make sure that some activity (perhaps one of yours) is able to respond to an ACTION_VIEW Intent on that download's MIME type. Otherwise, when the user taps the entry in the list, they will get a Toast indicating that there is nothing available to view the download. This may confuse users. Alternatively, use setVisibleInDownloadsUi() on your request, passing in false, to suppress it from this list.
Continuing Our Escape from Janky Code
The rule is simple: do not access the Internet from the main application thread. Always use a background thread with HttpClient, HttpUrlConnection, or any other Internet access API you wish to use.
StrictMode, introduced in an earlier chapter, will warn you if you attempt to access the Internet on the main application thread. AndroidHttpClient will simply crash if you attempt to make web requests on the main application thread. However, these capabilities are available only in newer versions of Android. That being said, there are ways to have StrictMode in your application but use it only in newer versions of Android using conditional class loading—this technique was covered earlier in this book.