
![]()
Installation and Agent Deployment
by Gokhan Atil
In this chapter, you will learn how to create a repository database and install Oracle Enterprise Manager Cloud Control 12c. If you have any experience with installing Enterprise Manager Grid Control (the ancestor of Cloud Control), you’ll see that EM12c comes with a smarter installation wizard, so the installation is much easier.
EM12c consists of three components: Oracle Management Service (OMS), Oracle Management Agents (management agents), and Oracle Management Repository (management repository).
This chapter’s demonstration of the installation and agent deployment uses three servers:
- cloudcontrol12.testdomain.com: Oracle Management Service will be installed to this server.
- repositorydb.testdomain.com: This database server will host the management repository.
- target.testdomain.com: Management agents will be deployed to this target server.
All of these servers are running Oracle Linux 5.8 (64-bit) as well as the GNOME desktop environment and the X Window System.
Although you can install both the management repository and OMS on same server, we prefer to install the management repository on a separate server. If you’re planning to install both on the same server, you should accommodate the requirements for both installations.
We recommend that you use a Domain Name System (DNS) server to solve the hostnames of the servers. If you do not have a DNS server, you need to enter the hostnames and corresponding IPs of all targets into /etc/hosts on the Oracle Management Server. You also need to enter the hostname/IP address of OMS into the /etc/hosts file on all target servers (to which you’ll deploy the management agent).
It’s also important to use fully qualified hostnames. A fully qualified domain name (FQDN) is a complete domain name for a server. It contains both a hostname and a domain name to specify its exact location in the DNS hierarchy. For example, cloudcontrol12.testdomain.com is a fully qualified hostname. At least ensure that your Oracle Management Server has a fully qualified hostname.
Oracle Enterprise Manager Cloud Control 12c can fetch the latest patch information from My Oracle Support for your servers and can create service requests for incidents. Therefore, we recommend that you enable Oracle Management Service to reach the My Oracle Support web site. If you don’t want to allow your servers to directly access the Internet, you can set up a proxy server to make the My Oracle Support web site accessible to OMS.
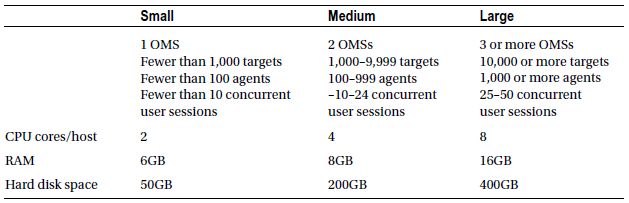
This section describes the hardware requirements for installing OMS, the management repository, and management agents.
As you can see in Table 2-1, the hardware requirements for OMS depend on the number of targets you have and the number of agents you’ll deploy.
Table 2-1. Hardware Requirements for OMS

Hardware Requirements for Management Repository
Hardware requirements for the repository database also depend on the number of agents and targets, as shown in Table 2-2.
Table 2-2. Hardware Requirements for the Management Repository
Hardware Requirements for Management Agents
Each agent deployment requires approximately 1GB of free hard disk space. Although management agents do not consume large amounts of CPU or RAM, we do not recommend deploying agents to systems with less than 512MB of RAM.
![]() Tip The hardware requirements in the preceding sections may change from version to version, so you should check the actual requirements in the Oracle Enterprise Manager Cloud Control Basic Installation Guide.
Tip The hardware requirements in the preceding sections may change from version to version, so you should check the actual requirements in the Oracle Enterprise Manager Cloud Control Basic Installation Guide.
Installing Management Repository
In this section, you’ll download and install Oracle Database 11gR2 on the server named repositorydb.testdomain.com.
It’s possible to use one of the certified databases: 11.2.0.3, 11.2.0.2, 11.2.0.1, 11.1.0.7, or 10.2.0.5. If you already have a database server for the repository database, you can skip to the installation of Oracle EM12c.
![]() Tip You can find an up-to-date list of certified databases for Enterprise Manager Cloud Control on My Oracle Support: https://support.oracle.com/epmos/faces/CertifyHome. You may want to use an Oracle Real Application Clusters (RAC) database for high availability.
Tip You can find an up-to-date list of certified databases for Enterprise Manager Cloud Control on My Oracle Support: https://support.oracle.com/epmos/faces/CertifyHome. You may want to use an Oracle Real Application Clusters (RAC) database for high availability.
Using the Oracle-Validated RPM Package and YUM
In order to install Oracle Database 11gR2 on Oracle Linux, your system needs to meet a few prerequisites. Using the oracle-validated RPM package, you can complete most of the preinstallation configuration tasks including creating a user and groups. Using this package is the recommended way to install all the Oracle prerequisites on Oracle Linux. You can download the RPM package from the Oracle web site, or you can use the YUM package manager. Oracle provides a free public yum server that you can use even if you don’t buy support from Oracle.
To use the Oracle public yum server, you first need to download and copy the appropriate yum configuration file in place, by running the following commands as ROOT:
- Oracle Linux 4, update 6 or newer
- [root@repositorydb ∼]# cd /etc/yum.repos.d
- [root@repositorydb ∼]# mv Oracle-Base.repo Oracle-Base.repo.disabled
- [root@repositorydb ∼]# wget http://public-yum.oracle.com/public-yum-el4.repo
- Oracle Linux 5
- [root@repositorydb ∼]# cd /etc/yum.repos.d
- [root@repositorydb ∼]# wget http://public-yum.oracle.com/public-yum-el5.repo
- Oracle Linux 6
- [root@repositorydb ∼]# cd /etc/yum.repos.d
- [root@repositorydb ∼]# wget http://public-yum.oracle.com/public-yum-ol6.repo
Open the yum public-yum*.repo configuration file in a text editor. Locate the section in the file for the repository you plan to update from—for instance, [el5_base]—and change enabled=0 to enabled=1.
Save the file and start using yum:
[root@repositorydb ∼]# yum install oracle-validated
For Oracle Linux 6, you need to install the oracle-rdbms-server-11gR2-preinstall package instead of the oracle-validated package:
[root@repositorydb ∼]# yum install oracle-rdbms-server-11gR2-preinstall
You can also manually download the oracle-validated package for Red Hat Enterprise Linux 5 from the following link: https://oss.oracle.com/el5/oracle-validated/.
After you install oracle-validated, you need to set the password for the ORACLE user. Be sure that you also set up YUM and install the oracle-validated package for the OMS server.
Creating Oracle User and Groups
If you do not want to use the oracle-validated package, you can create the required groups and user manually. Log in as ROOT and run the following commands:
[root@repositorydb ∼]# groupadd oinstall
[root@repositorydb ∼]# groupadd dba
[root@repositorydb ∼]# useradd -g oinstall -G dba oracle
[root@repositorydb ∼]# passwd oracle
After the last command, enter the password for the ORACLE user.
Setting Kernel Parameters
The Oracle Database 11gR2 installer can detect and fix errors on kernel parameters, so you can run the installer and let it create scripts to set required parameters. If you want to configure kernel parameters without the help of the installer, make a backup of /etc/sysctl.conf and then use any text editor to edit the file so that it includes lines similar to the following:
fs.aio-max-nr = 1048576
fs.file-max = 6815744
kernel.shmall = 2097152
kernel.shmmax = 4536870912
kernel.shmmni = 4096
kernel.sem = 250 32000 100 128
net.ipv4.ip_local_port_range = 9000 65500
net.core.rmem_default = 262144
net.core.rmem_max = 4194304
net.core.wmem_default = 262144
net.core.wmem_max = 1048576
These are recommended values for Oracle Database. If any of the current values are bigger than the recommended value, use the bigger value.
![]() Tip On 64-bit Linux systems, kernel.shmmax can be set to a maximum of 1 byte less than the physical memory.
Tip On 64-bit Linux systems, kernel.shmmax can be set to a maximum of 1 byte less than the physical memory.
Enter the following command to set the current values of the kernel parameters in /etc/sysctl.conf:
[root@repositorydb ∼]# /sbin/sysctl -p
Creating Required Directories
The Oracle base directory must have at least 5GB of free disk space. Enter commands to the following to create the recommended subdirectories and set the appropriate owner, group, and permissions on them:
[root@repositorydb ∼]# mkdir -p /u01/app/
[root@repositorydb ∼]# chown -R oracle:oinstall /u01/app/
[root@repositorydb ∼]# chmod -R 775 /u01/app/
Installing the Oracle Database Software
To install the database software, you need to download the installation files, unzip them, and then run the installer. All the steps are laid out in this section.
You can download the Oracle database software from the Oracle Technology Network (OTN). The software is available in zip files. Here’s the link for Oracle Database:
www.oracle.com/technetwork/database/enterprise-edition/downloads/index.html
We also recommend downloading and installing the latest patch set of Oracle Database software from My Oracle Support.
After you download the installation files, copy them to a directory that the ORACLE user can access, and then switch to the ORACLE user and unzip them:
[oracle@repositorydb ∼]$  unzip linux_11gR2_database_1of2.zip
[oracle@repositorydb ∼]$  unzip linux_11gR2_database_2of2.zip
After unzipping the files, you will see a newly created directory named database. Open this directory and run the installer:
[oracle@repositorydb ∼]$ cd database
[oracle@repositorydb ∼]$ ./runInstaller
When the installer starts, complete the following steps:
- The first installer step is Configure Security Updates, shown in Figure 2-1. You may prefer not to enter My Oracle Support (MOS) credentials because you will be able to follow all security updates by using Cloud Control. So deselect the I Wish to Receive Security Updates option and click Next. The installer warns about the importance of receiving critical security updates, but ignore the warning.

Figure 2-1. The Oracle Database installer
- The Download Software Updates step, shown in Figure 2-2, appears. If your database server has Internet access, you should enter your MOS credentials to download and apply the latest patches. (In this example, we’ll skip this step and apply critical patch set updates manually.) After selecting the appropriate option, click Next.
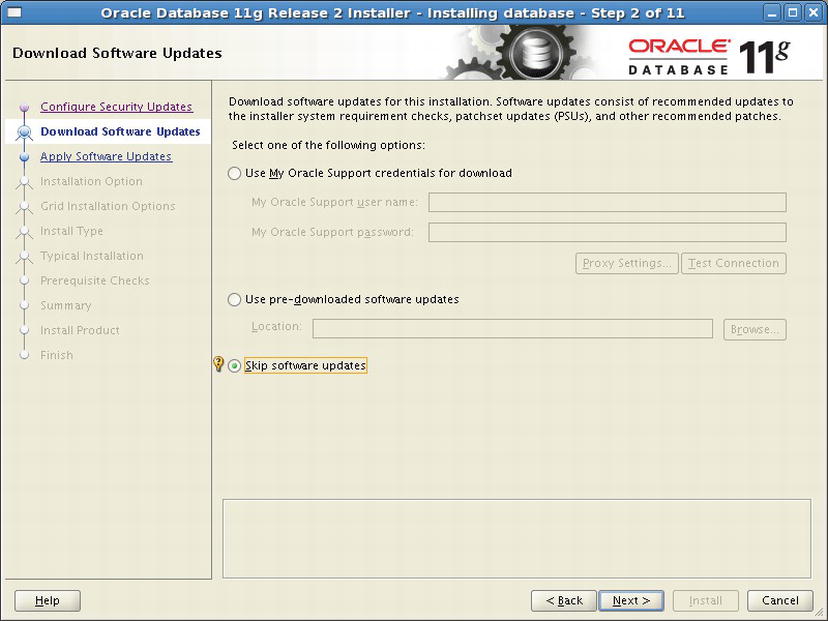
Figure 2-2. Options for downloading software updates
- For the Select Installation Option step, shown in Figure 2-3, select Install Database Software Only. Then click Next.
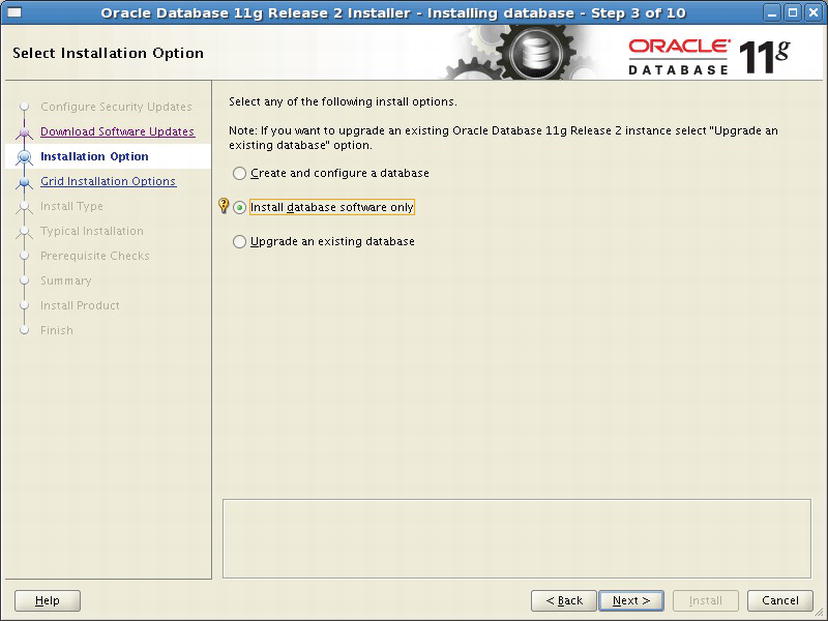
Figure 2-3. Installation options
- In the Grid Installation Options step, shown in Figure 2-4, select Single Instance Database Installation. Then click Next. (If you wanted to create the OEM repository database as an Oracle RAC database, you would select the second or third option.)

Figure 2-4. Grid installation options
- Select English for the default language, as shown in Figure 2-5.
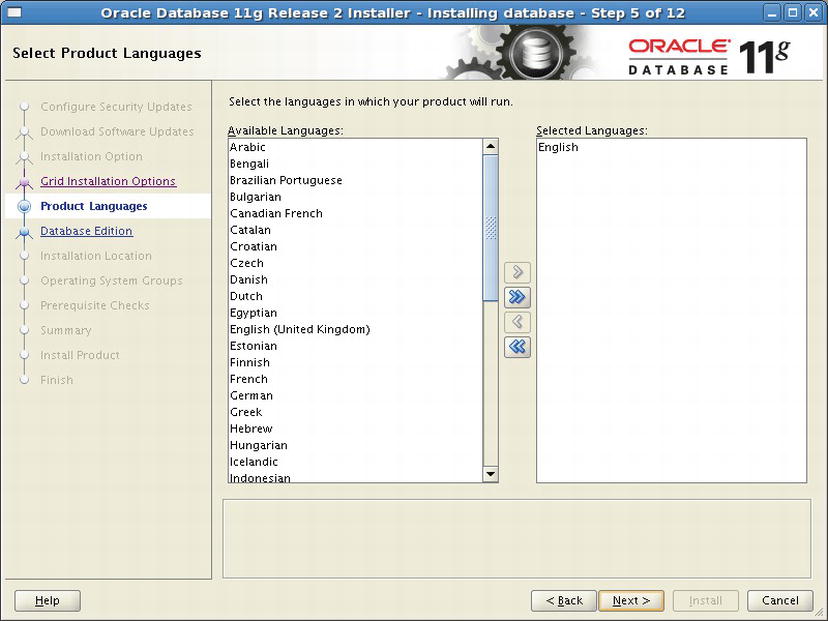
Figure 2-5. Language options
- Now you’re ready to select a database edition. This server will be used only as the repository database of Oracle Enterprise Manager Cloud Control, so you don’t need to pay a license fee for Oracle Database. Select Enterprise Edition, as shown in Figure 2-6, and click Next.

Figure 2-6. Selecting the database edition
- The Specify Installation Location step appears, as shown in Figure 2-7. You created /u01/app for Oracle Database, so enter /u01/app/oracle for the Oracle base directory. The installer will determine the Oracle home according to the Optimal Flexible Architecture (OFA). Out-of-place upgrades have always been a best-practice recommendation, but starting with Oracle Database 11.2.0.2, patch set installations are all out of place by default. So you may prefer to enter the full version in the path, such as /u01/app/oracle/product/11.2.0.3/dbhome_1.

Figure 2-7. Installation location
- Enter (or just accept) the Inventory Directory and click Next, as shown in Figure 2-8.

Figure 2-8. Creating the inventory directory
- For the Privileged Operating System Groups step, shown in Figure 2-9, accept the defaults and click Next. Oracle checks the prerequisites in the following step. If it doesn’t find any errors, the installer advances to the Summary step.

Figure 2-9. Operating system groups
- Review the Summary screen, shown in Figure 2-10. Click the Install button if the information onscreen seems OK.
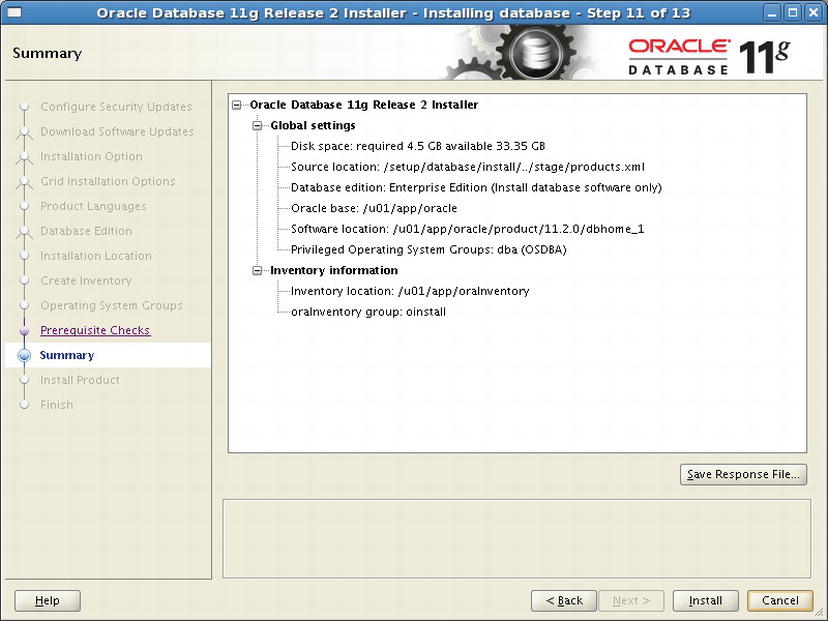
Figure 2-10. Summary
- At the end of the installation, you need to execute some configuration scripts. Log in as ROOT to the server in another terminal session and run the scripts. Then click OK to finish the installation (see Figure 2-11).

Figure 2-11. Executing the configuration scripts
Creating the Repository Database
Now that you have installed the Oracle Database software, you will create the management repository database. Connect to the repository server, set the Oracle home, and run dbca:
[oracle@repositorydb ∼]$ . oraenv
ORACLE_SID = [oracle] ? oracle
ORACLE_HOME = [/home/oracle] ? /u01/app/oracle/product/11.2.0/dbhome_1
The Oracle base has been set to /u01/app/oracle
[oracle@repositorydb ∼]$ dbca
When you run dbca, the Database Configuration Assistant Welcome screen appears. Click Next to pass the screen and then complete the following steps:
- For the Operations step, shown in Figure 2-12, select Create a Database and then click Next.
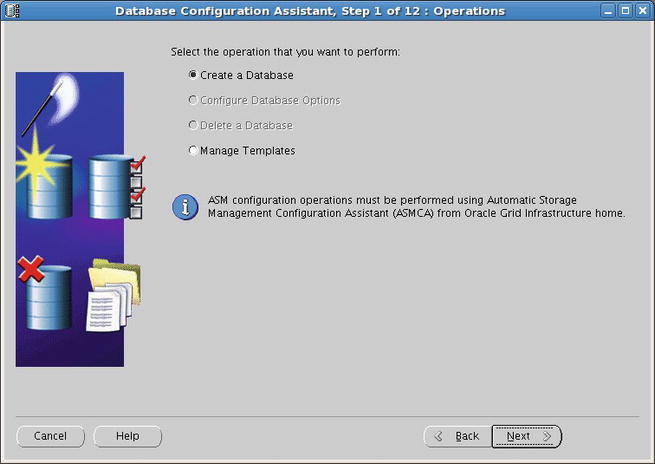
Figure 2-12. Database Configuration Assistant
- For the Database Templates step, shown in Figure 2-13, you can select General Purpose or Custom Database. We recommend that you select Custom Database because it will prevent the installation of some SYSMAN objects in the database. Otherwise, you have to remove these objects from the database before you can use it as the management repository database. Click Next.

Figure 2-13. Database templates
- The Database Identification step appears, as shown in Figure 2-14. Enter the global database name, and the installer will set the SID according to that name. Click Next.

Figure 2-14. Database identification
- For the Management Options step, shown in Figure 2-15, deselect Configure Enterprise Manager and then click Next.

Figure 2-15. Management options
- Enter the passwords for SYS and SYSTEM users in the Database Credentials step, shown in Figure 2-16, and then click Next. Oracle recommends entering a password with a minimum of eight characters, including at least one uppercase letter, one lowercase letter, and one digit.

Figure 2-16. Database credentials
- Accept the defaults for the database file locations and click Next.
- You can enable archiving now in the Recovery Configuration step, shown in Figure 2-17, or you can enable it later. Set the Fast Recovery Area (FRA) destination and size, and then click Next.

Figure 2-17. Recovery options
- For the Database Content step, shown in Figure 2-18, deselect all components, because you do not need them for the repository database. Then click the Standard Database Components button.
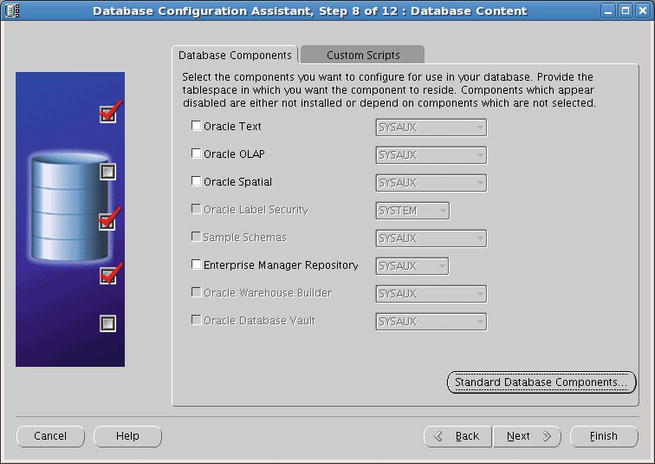
Figure 2-18. Database content
- In the Standard Database Components dialog box, deselect Oracle Multimedia and Oracle Application Express, as shown in Figure 2-19. Click OK to close the dialog box and then click Next to advance to the next step.
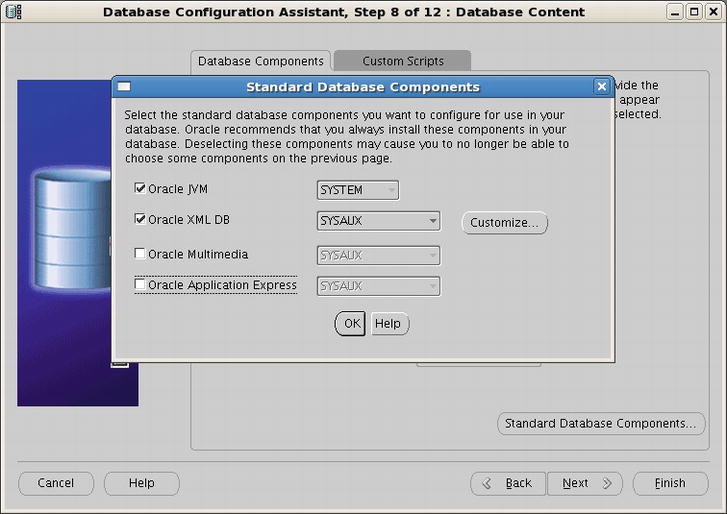
Figure 2-19. Standard database components
- While setting the memory (see Figure 2-20), ensure that total memory (SGA_max_size + PGA_aggregate_target) set for the database will not exceed 75 percent of the total physical memory of the system. Otherwise, the system will start using the swap device. We recommendthat you do not use the memory_target parameter with Enterprise Manager. Next click the Character Sets tab.

Figure 2-20. Memory parameters
- For the Initialization Parameters step, shown in Figure 2-21, select Use Unicode (AL32UTF8). Set the National Character Set option to any UTF-supported character set, such as AL16UTF16 or UTF8. Then click Next.

Figure 2-21. Database character set
- The Database Storage step appears, as shown in Figure 2-22. The management repository’s redo log file size should be a minimum of 300MB. Set the File Size option to 300MB for all three redo log groups, and then click Next.

Figure 2-22. Database storage
- Click the Finish button to review the configuration and create the database (see Figure 2-23).

Figure 2-23. Creation options
After you create the database, connect to it by using SQL*Plus, run the following commands, and then restart the database:
ALTER SYSTEM SET pga_aggregate_target=1G SCOPE=SPFILE;
ALTER SYSTEM SET shared_pool_size=600M SCOPE=SPFILE;
ALTER SYSTEM SET job_queue_processes=20 SCOPE=SPFILE;
ALTER SYSTEM SET log_buffer=10485760 SCOPE=SPFILE;
ALTER SYSTEM SET open_cursors=300 SCOPE=SPFILE;
ALTER SYSTEM SET processes=500 SCOPE=SPFILE;
ALTER SYSTEM SET session_cached_cursors=200 SCOPE=SPFILE;
EXEC dbms_auto_task_admin.disable('auto optimizer stats collection',null,null);
Now that the management repository is ready, it’s time to install Oracle Enterprise Manager. You’ll do the rest of the operation on your second server named cloudcontrol12.testdomain.com.
Installing Oracle Enterprise Manager 12c
Enterprise Manager has two installation options: Simple and Advanced. When using advanced mode, it’s possible to select the preconfigured plug-ins, so that’s the mode used in this section.
We highly recommend installing the oracle-validated package on the server that will host the Oracle Management Service. If you don’t install it, you will need to do a lot of manual configuration, including creating a user and setting kernel parameters. Despite using the oracle-validated or preinstall package, the Oracle Enterprise Manager Installation Wizard will check the prerequisites and can provide scripts to fix kernel parameters (and missing libraries) if it finds omissions.
Creating the Oracle User and Groups
If you didn’t install the oracle-validated package, you should create the ORACLE user manually. Log in as the ROOT user and issue the following commands:
[root@cloudcontrol12 ∼]# groupadd oinstall
[root@cloudcontrol12 ∼]# useradd -g oinstall oracle
[root@cloudcontrol12 ∼]# passwd oracle
After the last command, enter a password for the ORACLE user. As the ROOT user, you are allowed to choose any password, even one that doesn’t obey the password complexity rules. The system will warn if you do so, but will let you proceed.
Creating Required Directories
The Oracle base directory must have at least 5GB of free disk space. Log in as ROOT and enter commands similar to the following to create the recommended subdirectories and set the appropriate owner, group, and permissions on them:
[root@cloudcontrol12 ∼]# mkdir -p /u01/app/
[root@cloudcontrol12 ∼]# chown -R oracle:oinstall /u01/app/
[root@cloudcontrol12 ∼]# chmod -R 775 /u01/app/
Installing Oracle Enterprise Manager
You can download the Enterprise Manager Cloud Control software from OTN. The software is available in zip files. Here’s the link for Oracle Enterprise Manager:
www.oracle.com/technetwork/oem/enterprise-manager/overview/index.html
After you download the installation files, copy them to a directory that the ORACLE user can access, and then switch to the ORACLE user and unzip them:
[oracle@cloudcontrol12 ∼]$ unzip em12_linux64_disk1of2.zip -d cloudsetup
[oracle@cloudcontrol12 ∼]$ unzip em12_linux64_disk2of2.zip -d cloudsetup
Make sure that no environmental variable related to the database (ORACLE_HOME, ORACLE_SID, or ORACLE_BASE) is set prior to installation. Oracle also recommends to set umask to 022. Change the directory to cloudsetup and run the installer:
[oracle@cloudcontrol12 ∼]$ umask 022
[oracle@cloudcontrol12 ∼]$ cd cloudsetup
[oracle@cloudcontrol12 ∼]$ ./runInstaller
When the Enterprise Manager installer starts, follow these steps:
- For the My Oracle Support Details step, shown in Figure 2-24, enter your credentials if you want to receive security updates. Then click Next.
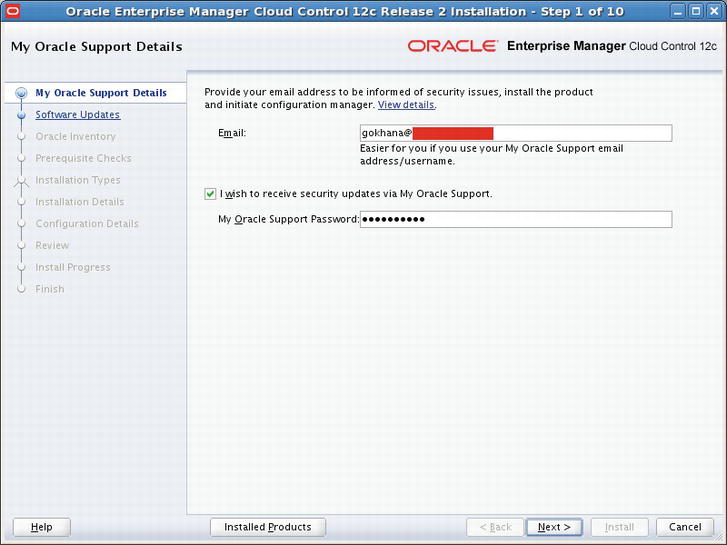
Figure 2-24. Oracle Enterprise Manager installer
- In the next step, enter your My Oracle Support credentials (again) and then click Search for Updates. In this example, you can see that a patch is available (see Figure 2-25). You may see different patches in your situation. Click Next and then click OK to accept the warning about restarting the installer.

Figure 2-25. Software updates
- After the installer restarts, continue to the next step, shown in Figure 2-26. Enter a directory for Inventory Location and select the group you created for the ORACLE user. When you click Next, the installer checks the prerequisites.

Figure 2-26. Oracle inventory
- Make sure that all prerequisite checks have the status Succeeded, as shown in Figure 2-27, and then click Next.

Figure 2-27. Prerequisites check
- Select Create a New Enterprise Manager System and then select Advanced (see Figure 2-28). Click Next.

Figure 2-28. Installation types
- For the Installation Details step, shown in Figure 2-29, enter the Middleware Home Location as /u01/app/Middleware, the Agent Base Directory as /u01/app/agent, and your Host Name. Then click Next.

Figure 2-29. Installation details
- In the Plug-in Deployment step, shown in Figure 2-30, select the management plug-ins you want to configure. It’s also possible to add or remove the management plug-ins after you install Enterprise Manager. Click Next.

Figure 2-30. Plug-in deployment
- The Oracle Management Service is the main application of the Enterprise Manager and it needs a WebLogic application server to run. In the next step, shown in Figure 2-31, choose a username and password for the WebLogic server and a password for the node manager. Please keep this information safe. It can be required to troubleshoot problems related to WebLogic. Click Next.

Figure 2-31. Weblogic Server configuration
- Enter the connection info of the repository database and select the deployment size (see Figure 2-32). The installer checks the database settings according to the deployment size. Click Next.

Figure 2-32. Database connection details
- The installer creates the required database user and the tablespaces in the repository database. For the Repository Configuration Details step, shown in Figure 2-33, enter a password for the SYSMAN user, modify the directory locations if needed, and enter a registration password that will be used for securing agent communications. Click Next.
 Note If you are configuring the management repository on a database that uses Oracle Automatic Storage Management (ASM) for storage, then when you specify the data file location, only the disk group is used for creating the tablespaces. For example, if you specify +DATA/mgmt.dbf, only +DATA is used for creating the tablespaces on ASM, and the exact location of the data file on the disk group is decided by Oracle Managed Files.
Figure 2-33. Repository configuration details
- Check the ports that will be allocated for the Oracle Enterprise Manager (see Figure 2-34). You can modify them, but keep in mind that the port numbers must be higher than 1024 and lower than 65535.

Figure 2-34. Port configuration details
- Review the configuration (see Figure 2-35). When satisfied with the configuration, click Install to start the installation.
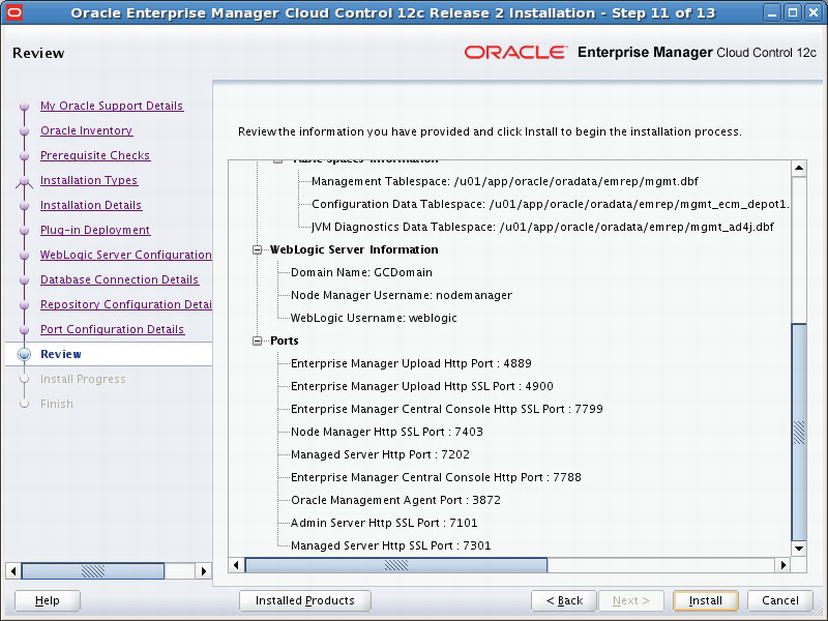
Figure 2-35. Installation review
- At the end of the installation, you need to execute some configuration scripts. Log in as ROOT to the server in another terminal session and run the scripts (see Figure 2-36). Then click OK to finish the installation.

Figure 2-36. Executing configuration scripts
- Review the information, as shown in Figure 2-37, and click Close to complete the Oracle Enterprise Manager Cloud Control 12c installation.

Figure 2-37. Installation completed
- You now can log in to Enterprise Manager Cloud Control, as shown in Figure 2-38.
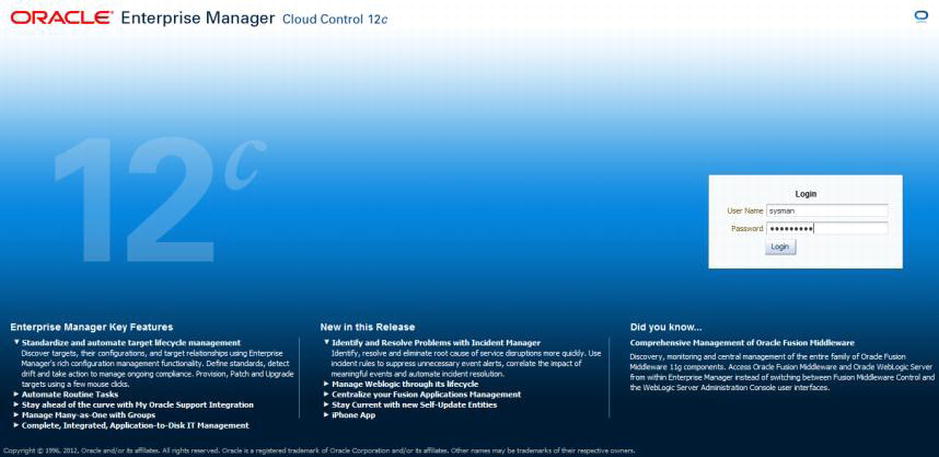
Figure 2-38. Login screen of Oracle Enterprise Manager
The Oracle Management Agent is one of the core components of Enterprise Manager Cloud Control. If you want to monitor a target (such as a database or an application server) running on a host, you need to convert the host to a managed host by deploying a management agent. Then you can discover the targets running on that host and add them to the Enterprise Manager system.
There are several ways to deploy agents:
- Using the Add Host Targets Wizard
- Using an RPM file
- Using the AgentPull script
- Using the agentDeploy script
The following sections describe these options.
Using the Add Host Targets Wizard
Using the Add Host Targets Wizard is the easiest way to deploy a management agent. It’s especially useful for the mass-deployment of management agents. Oracle also recommends using this wizard. Follow these steps:
- Log in to the Enterprise Manager Cloud Control console.
- From the Setup menu, choose Add Target
 Add Targets Manually, as shown in Figure 2-39.
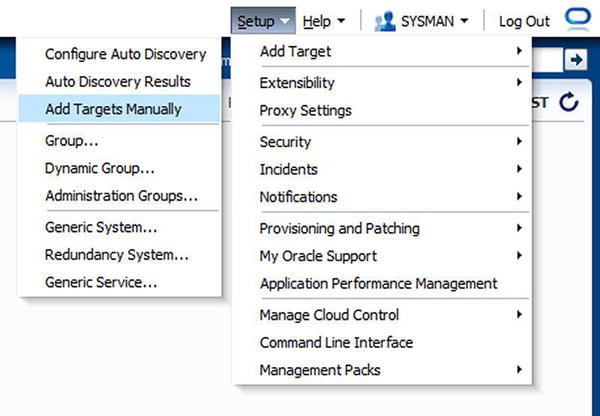
Figure 2-39. Add Hosts Wizard
- Select the Add Host Targets radio button and then click the Add Host button, as shown in Figure 2-40.

Figure 2-40. Adding targets manually
- To be able to monitor the repository database, deploy a management agent to the repositorydb.testdomain.com server. Click the Add button with the plus sign, enter the hostname, and then select the OS of the target server. For this example, we installed Enterprise Manager on Linux x64 and didn’t download any additional agent software, so for now, we can deploy agents only for Linux 64-bit servers (see Figure 2-41). Click Next.

Figure 2-41. Adding host targets
- Enter the directory where the agent software will be installed. Click the blue plus sign next to the Named Credential option to add a credential for the host. In the Create New Named Credential dialog box that displays, give the credential a meaningful name and then click OK to save it (see Figure 2-42).

Figure 2-42. Creating a new named credential
- Using named credentials provides an additional layer of security. An administrator can create named credentials for operators so they can use the login information without knowing the actual username and password associated with it. Click Next to review the configuration details, shown in Figure 2-43.
Tip Oracle recommends configuring privilege delegation (i.e., giving sudo permission to the management agent user).

Figure 2-43. Review of agent installation
- Click the Deploy Agent button in the upper right of the console to start the deployment process.
Agent deployment is completed (see Figure 2-44). Now you can add nonhost targets that are on this server (such as Oracle Database) to the Enterprise Manager system.
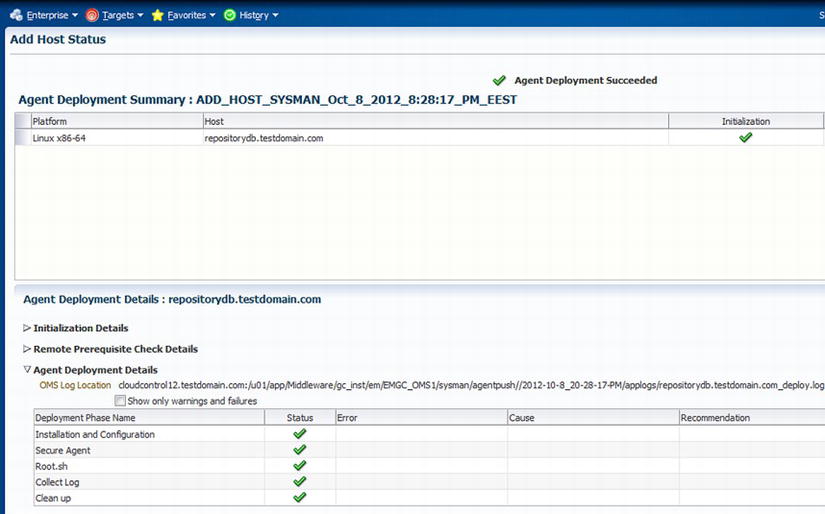
Figure 2-44. Agent deployment summary
As mentioned before, the Add Host Targets Wizard is the recommended way to deploy agents. However, if your target hosts do not have SSH service enabled, or if you want to delegate agent installation to system administrators, you may use other methods such as creating an RPM package of agents, or using AgentPull or agentDeploy scripts.
Using RPM
This section outlines the process for deploying the agent via RPM. Follow these steps:
- To be able to create RPM packages, you need to create the directory /usr/lib/oracle on the OMS server, if it doesn’t exist already. Log in as the ROOT user and run the following commands:
[root@cloudcontrol12 ∼]# mkdir /usr/lib/oracle
[root@cloudcontrol12 ∼]# chmod 777 /usr/lib/oracle - Install the rpm-build package on the OMS host:
[root@cloudcontrol12 ∼]# yum install rpm-build - Log in to the OMS host as the ORACLE user, and log in to the OMS using EMCLI:
[oracle@cloudcontrol12 ∼]$ /u01/app/Middleware/oms/bin/emcli login -username=sysman Note The user SYSMAN is the default Super Administrator account of Oracle Enterprise Manager. - Synchronize EMCLI:
[oracle@cloudcontrol12 ∼]$ /u01/app/Middleware/oms/bin/emcli sync - List the platforms for which the management agent software is available on the OMS host:
[oracle@cloudcontrol12 ∼]$ /u01/app/Middleware/oms/bin/emcli get_supported_platforms
Getting list of platforms ...
Check the logs at /u01/app/Middleware/gc_inst/em/EMGC_OMS1/sysman/emcli/setup/.emcli/agent.log
About to access self-update code path to retrieve the platforms list..
Getting Platforms list  ...
-----------------------------------------------
Version = 12.1.0.2.0
Platform = Linux x86-64
-----------------------------------------------
Platforms list displayed successfully. - As you see, only the Linux x64 agent is available right now. You can always download additional agents by using the Self Update screen of Enterprise Manager.
- Issue the following command to create and download the RPM file of the management agent from the Oracle Software Library to a directory on the OMS host:
[oracle@cloudcontrol12 ∼]$ /u01/app/Middleware/oms/bin/emcli get_agentimage_rpm
-destination=/home/oracle -platform="Linux x86-64" -version=12.1.0.2.0
...
Agent Image copied successfully...
Creation of RPM started...
RPM creation successful.
Agent image to rpm conversion completed successfully - You can copy the RPM put in the /home/oracle directory on the OMS server to the target system in order to deploy the agent. We assume that you have already created a user for the agent on the target system. If you installed the oracle-validated package on the target system, the ORACLE user and OINSTALL group are already created.
[oracle@cloudcontrol12 ∼]$ scp oracle-agt-12.1.0.2.0-1.0.x86_64.rpm
[email protected]:/home/oracle/
[email protected]'s password:
oracle-agt-12.1.0.2.0-1.0.x86_64.rpm 59% 133MB 15.4MB/s 00:05 ETA - Log in as ROOT on the target system and install the RPM:
[root@target ∼]# cd /home/oracle
[root@target ∼]# rpm –i oracle-agt-12.1.0.2.0-1.0.x86_64.rpm - Now you need to edit the /usr/lib/oracle/agent/agent.properties file according to your Enterprise Manager installation and run /etc/init.d/oracle-agt:
[root@target ∼]# vi /usr/lib/oracle/agent/agent.properties
OMS_HOST=cloudcontrol12.testdomain.com
OMS_PORT=7799
AGENT_REGISTRATION_PASSWORD=<registration_password>
AGENT_USERNAME=oracle
AGENT_GROUP=oinstall
AGENT_PORT=3872
ORACLE_HOSTNAME=target.testdomain.com
[root@target ∼]# /etc/init.d/oracle-agt RESPONSE_FILE=/usr/lib/oracle/agent/agent.properties - Check whether the agent is up:
[oracle@target ∼]$ /usr/lib/oracle/agent/core/12.1.0.2.0/bin/emctl status agent
Oracle Enterprise Manager Cloud Control 12c Release 2
Copyright (c) 1996, 2012 Oracle Corporation.  All rights reserved.
---------------------------------------------------------------
Agent Version     : 12.1.0.2.0
OMS Version       : 12.1.0.2.0
Protocol Version  : 12.1.0.1.0
Agent Home        : /usr/lib/oracle/agent/agent_inst
Agent Binaries    : /usr/lib/oracle/agent/core/12.1.0.2.0
Agent Process ID  : 5323
Parent Process ID : 5283
Agent URL         : https://target.testdomain.com:3872/emd/main/
Repository URL    : https://cloudcontrol12.testdomain.com:4900/empbs/upload
Started at        : 2012-10-12 03:44:47
Started by user   : oracle
Last Reload       : (none)
Last successful upload                       : 2012-10-12 03:47:06
Last attempted upload                        : 2012-10-12 03:47:06
Total Megabytes of XML files uploaded so far : 0.01
Number of XML files pending upload           : 0
Size of XML files pending upload(MB)         : 0
Available disk space on upload filesystem    : 91.52%
Collection Status                            : Collections enabled
Heartbeat Status                             : Ok
Last attempted heartbeat to OMS              : 2012-10-12 03:47:00
Last successful heartbeat to OMS             : 2012-10-12 03:47:00
Next scheduled heartbeat to OMS              : 2012-10-12 03:48:00

---------------------------------------------------------------
Agent is Running and Ready
As you see, the agent is deployed and running successfully.
Using the AgentPull Script
To use the AgentPull script, follow these steps:
- You need to create a user for the management agent, create the required directories, and give permission to the new management agent user. In this example, you will create the ORACLE user, so log in as ROOT and run the following commands:
[root@target ∼]# groupadd oinstall
[root@target ∼]# groupadd dba
[root@target ∼]# useradd -g oinstall -G dba oracle
[root@target ∼]# passwd oracle
[root@target ∼]# mkdir -p /u01/agent
[root@target ∼]# chown -R oracle:oinstall /u01/agent
If there’s already an ORACLE user (and you want to use it for the management agent), you don’t need to drop and re-create it.
- After you create the mandatory directories, open an X Window session as the ORACLE (management agent) user and download the AgentPull script from the OMS.
If the target host runs on a Unix box, access the following URL from the host:
https://<OMS_HOST>:<OMS_PORT>/em/install/getAgentImageFor example:
https://cloudcontrol12.testdomain.com:7799/em/install/getAgentImageIf the destination host runs on Microsoft Windows, access the following URL from the host, which adds ?script=bat to the end of the previous URL:
https://cloudcontrol12.testdomain.com:7799/em/install/getAgentImage?script=bat - It’s also possible to download the AgentPull.sh script with curl or wget. To download the script using wget, issue the following commands. Notice that you download getAgentImage, and then change the name to AgentPull.sh.
[root@target ∼]# wget
https://cloudcontrol12.testdomain.com:7799/em/install/getAgentImage
--no-check-certificate
[root@target ∼]# mv getAgentImage AgentPull.sh
To download via curl, issue the following command:
[root@target ∼]# curl "
https://cloudcontrol12.testdomain.com:7799/em/install/getAgentImage
" --insecure -o agentPull.sh
Note The preceding wget and curl examples actually download a file named getAgentImage. The file is then renamed after the download (wget) or as part of the downlad process (curl). The file is renamed to AgentPull.sh. - Make the AgentPull.sh script executable:
[oracle@target ∼]$ chmod +x AgentPull.sh - Check available platforms:
[oracle@target ∼]$ ./AgentPull.sh -showPlatforms
Platforms       Version
Linux x86-64 12.1.0.2.0 - To use the AgentPull script, create a response file—for example, agent.rsp (in any location on the destination host, preferably in the same directory as the AgentPull script):
[oracle@target ∼]$ vi agent.rsp
LOGIN_USER=sysman
LOGIN_PASSWORD=<sysman_password>
PLATFORM="Linux x86-64"
VERSION=12.1.0.2.0
AGENT_REGISTRATION_PASSWORD=<registration_password> - Then run the AgentPull script:
[oracle@target ∼]$ ./AgentPull.sh RSPFILE_LOC=/home/oracle/agent.rsp AGENT_BASE_DIR=/u01/agent - After the script successfully completes, open a new terminal window, log in as ROOT, and run the configuration scripts (the locations of the scripts are written in the output of AgentPull.sh):
[root@target ∼]# /u01/agent/core/12.1.0.2.0/root.sh
Finished product-specific root actions.
/etc exist
Finished product-specific root actions.
[root@target ∼]# /u01/app/oraInventory/orainstRoot.sh
Changing permissions of /u01/app/oraInventory
Adding read,write permissions for group,Removing read,write,execute permissions for world.
Changing groupname of /u01/app/oraInventory to oinstall.
The execution of the script is complete
After you execute the script, agent deployment is completed.
Using the agentDeploy Script
To deploy a management agent by using the agentDeploy script, follow these steps:
- Create a user for the management agent, create the required directories, and give permission to the management agent user. We assume that you are creating the ORACLE user, so log in as ROOT and run the following commands:
[root@target ∼]# groupadd oinstall
[root@target ∼]# groupadd dba
[root@target ∼]# useradd -g oinstall -G dba oracle
[root@target ∼]# passwd oracle
[root@target ∼]# mkdir -p /u01/agent
[root@target ∼]# chown -R oracle:oinstall /u01/agent
If there’s an already existing ORACLE user (and you want to use it for the management agent), you don’t need to drop and re-create it.
- Log in to the OMS host as the ORACLE user, and log in to OEM using EMCLI:
[oracle@cloudcontrol12 ∼]$ /u01/app/Middleware/oms/bin/emcli login -username=sysman - Synchronize EMCLI:
[oracle@cloudcontrol12 ∼]$ /u01/app/Middleware/oms/bin/emcli sync - List the platforms for which the management agent software is available on the OMS host:
[oracle@cloudcontrol12 ∼]$ /u01/app/Middleware/oms/bin/emcli get_supported_platforms
Getting list of platforms ...
Check the logs at /u01/app/Middleware/gc_inst/em/EMGC_OMS1/sysman/emcli/setup/.emcli/agent.log
About to access self-update code path to retrieve the platforms list..
Getting Platforms list  ...
-----------------------------------------------
Version = 12.1.0.2.0
Platform = Linux x86-64
-----------------------------------------------
Platforms list displayed successfully. - Download the management agent software to a directory on the OMS host:
[oracle@cloudcontrol12 ∼]$ /u01/app/Middleware/oms/bin/emcli get_agentimage
-destination=/home/oracle -platform="Linux x86-64" -version=12.1.0.2.0 - The command downloads the core management agent software to the destination directory (/home/oracle). For example, for Linux x86-64, you will see the file 12.1.0.2.0_AgentCore_226.zip.
- Transfer this file to the target server:
[oracle@cloudcontrol12 ∼]$ scp 12.1.0.2.0_AgentCore_226.zip
[email protected]:/home/oracle/ - Log in to the target server and extract the zip file:
[oracle@target ∼]$ unzip 12.1.0.2.0_AgentCore_226.zip -d agentsetup
Archive:  12.1.0.2.0_AgentCore_226.zip
  inflating: agentsetup/unzip
  inflating: agentsetup/agentDeploy.sh
  inflating: agentsetup/agentimage.properties
  inflating: agentsetup/agent.rsp
 extracting: agentsetup/agentcoreimage.zip
extracting: agentsetup/12.1.0.2.0_PluginsOneoffs_226.zip - Enter the agentsetup directory and edit the agent response file:
[oracle@target ∼]$ cd agentsetup/
[oracle@target agentsetup]$ vi agent.rsp - Enter the following values:
OMS_HOST=cloudcontrol12.testdomain.com
EM_UPLOAD_PORT=4900
AGENT_REGISTRATION_PASSWORD=<registration_password>
AGENT_INSTANCE_HOME=/u01/agent
AGENT_PORT=3872
b_startAgent=true
ORACLE_HOSTNAME=target.testdomain.com
s_agentHomeName="agent12gR2" - Run the agentDeploy.sh script to deploy the agent:
./agentDeploy.sh RESPONSE_FILE=/home/oracle/agentsetup/agent.rsp AGENT_BASE_DIR=/u01/agent - After the script successfully completes, open a new terminal window, log in as ROOT, and run the configuration script (the location of the script is written in the output of agentDeploy.sh):
[root@target ∼]#  /u01/agent/core/12.1.0.2.0/root.sh
Finished product-specific root actions.
/etc exist
Finished product-specific root actions. - Check the agent’s status:
[oracle@target agentsetup]$ /u01/agent/core/12.1.0.2.0/bin/emctl status agent
Oracle Enterprise Manager Cloud Control 12c Release 2
Copyright (c) 1996, 2012 Oracle Corporation.  All rights reserved.
---------------------------------------------------------------
Agent Version     : 12.1.0.2.0
OMS Version       : 12.1.0.2.0
Protocol Version  : 12.1.0.1.0
Agent Home        : /u01/agent
Agent Binaries    : /u01/agent/core/12.1.0.2.0
Agent Process ID  : 14620
Parent Process ID : 14578
Agent URL         : https://target.testdomain.com:3872/emd/main/
Repository URL    : https://cloudcontrol12.testdomain.com:4900/empbs/upload
Started at        : 2012-10-12 06:10:12
Started by user   : oracle
Last Reload       : (none)
Last successful upload                       : 2012-10-12 06:12:57
Last attempted upload                        : 2012-10-12 06:12:57
Total Megabytes of XML files uploaded so far : 0.01
Number of XML files pending upload           : 0
Size of XML files pending upload(MB)         : 0
Available disk space on upload filesystem    : 89.15%
Collection Status                            : Collections enabled
Heartbeat Status                             : Ok
Last attempted heartbeat to OMS              : 2012-10-12 06:13:26
Last successful heartbeat to OMS             : 2012-10-12 06:13:26
Next scheduled heartbeat to OMS              : 2012-10-12 06:14:26

---------------------------------------------------------------
Agent is Running and Ready
So the agent is installed and running.
Summary
In this chapter, you learned how to install the management repository and Oracle Enterprise Manager Cloud Control. You also learned various agent deployment methods. After deploying agents, you may discover targets (such as Oracle Database, Middleware, and applications) on hosts.