
![]()
Interacting with the EM12c Console
by Niall Litchfield
Oracle Enterprise Manager is a product of many capabilities, but this book focuses on technology management and administration. To that end, Enterprise Manager must make administration and management tasks simpler, more consistent, and faster than the task would be when just utilizing the raw capabilities of the underlying technology. This chapter will help you achieve this by introducing you to Enterprise Manager’s main user interface, the web console.
This chapter consists, therefore, of the following components:
- A brief history of the limitations of previous releases
- An overview of how EM12c addresses those limitations
- A review of the menu structures that you will use to navigate the console
- A brief discussion of the customization facilities supplied with the product
Along the way, you will learn how to configure Enterprise Manager to interact effectively with Oracle’s support portal, My Oracle Support. You will also learn how to configure notifications and control the use of additional cost management packs, and will become familiar with the console as your administration home.
A Brief History of EM
Oracle Enterprise Manager started life in July 2002 as Java-based client application for managing Oracle Database 9.2. With the release of Oracle Database 10g, this application was reimagined as a web-based management interface, largely focused on the database, but with the ability to manage Oracle databases that spanned multiple physical hosts—the g in 10g stood for grid and the database-centric management product was to become known as Enterprise Manager Grid Control. Grid Control provided database administration staff with three key features that were a significant advantage in managing clustered environments, and in managing a variety of databases across an enterprise. These were as follows:
- An administrator could manage distributed environments as one rather than as a collection of targets.
- The state of the whole Oracle database estate could be seen in a single screen.
- It introduced the ability to manage target types other than just the Oracle Database, especially to the growing Oracle Application Server market.
These advantages significantly improved the life of an administrator compared with the previous fragmented, host-based management that tended to dominate the database world at the time. There was, of course, one other advantage that made Enterprise Manager Grid Control attractive to organizations running Oracle its implementation required (and still requires) no additional license cost.
![]() Tip Enterprise Manager does make easily available several additional cost features, either embedded in the base product or sold separately. You will look at how to control management access later in the chapter. It is important to be clear that when using, for example, the Performance pages discussed in Chapter 9, you are using a separately licensed feature and not the free base product. As you will see when we discuss management pack access, you can use the Packs for This Page link to determine the necessary license for any currently active page.
Tip Enterprise Manager does make easily available several additional cost features, either embedded in the base product or sold separately. You will look at how to control management access later in the chapter. It is important to be clear that when using, for example, the Performance pages discussed in Chapter 9, you are using a separately licensed feature and not the free base product. As you will see when we discuss management pack access, you can use the Packs for This Page link to determine the necessary license for any currently active page.
As Oracle expanded its product offering through the 2000s into middleware, applications, and beyond, it became apparent that an enterprise-wide management tool would be a great advantage, and a source of additional revenue for Oracle. Each of the products that Oracle sold, however, tended to have both built-in management capabilities and internal teams that were experts in the management of their particular technology stack. Oracle settled on a solution by ensuring that the existing teams developed management functionality for their product within the Enterprise Manager product stack.
As we approached the end of that decade, Oracle’s former database management product had become a fully fledged enterprise technology management product, allowing management of all Oracle products and a few third-party products via a centralized management console. There were, however, at least two structural problems with the product as it matured:
- Technology stack
- Interface
The technology stack in use for the 10.x series of Enterprise Manager was Oracle’s old J2EE application server platform, Oracle Internet Application Server. Oracle had effectively given up on this platform a couple of years previously with the purchase of the BEA WebLogic product line. The 11.x release of Grid Control migrated the existing Grid Control product to the newer WebLogic technology stack, and integrated the database-derived Grid Control interface with the newly developed Fusion Middleware Control that used Oracle’s own Application Development Framework (ADF). Enterprise Manager since 11g, therefore, has used the software stack shown in Figure 4-1. This architecture is likely to be current for at least the next five years.

Figure 4-1. Oracle Enterprise Manager technology stack
However, all the technologies that Grid Control is able to manage advance, and all at different rates, and in some cases at rates and directions outside the control of Oracle Corporation. The monolithic design of previous Enterprise Manager releases meant that the product was, almost by design, permanently behind the release cycle of monitored products. This situation meant that customers could patch monitored targets to address production issues and then find that they could not obtain support for monitoring issues because the patched release was not certified with the enterprise management product. Oracle has addressed this issue, and others, with the plug-in architecture of EM12c.
![]() Note We are familiar with a project to implement Oracle Enterprise Manager 11g for a UK-based enterprise with an installed estate of RAC, WebLogic, SOA, and E-Business Suite. EM 11g was specifically chosen because of its support for SOA, which was a key technology for the client. However, EM certification permanently lagged behind the SOA releases, and this led to significant support issues for the client when Oracle Support would not take service requests because the four-digit version number of the WebLogic server was one patch set ahead of the certified version. We expect the plug-in nature of support for managed targets to address this issue.
Note We are familiar with a project to implement Oracle Enterprise Manager 11g for a UK-based enterprise with an installed estate of RAC, WebLogic, SOA, and E-Business Suite. EM 11g was specifically chosen because of its support for SOA, which was a key technology for the client. However, EM certification permanently lagged behind the SOA releases, and this led to significant support issues for the client when Oracle Support would not take service requests because the four-digit version number of the WebLogic server was one patch set ahead of the certified version. We expect the plug-in nature of support for managed targets to address this issue.
Interface
The visual interface for Grid Control had always been in the hands of the development teams providing the underlying management functionality. This had two large consequences. First, the interface design was, to put it charitably, old-fashioned. The original product was released in early 2004, which almost certainly means that it started development life sometime between 2001 and 2003. It’s worth remembering what web interfaces were like in the early part of this century; the Grid Control product had usability issues, but it was by no means alone. Figure 4-2 shows the old-style interface, essentially a white page full of links arranged broadly by feature area.

Figure 4-2. Old-style interface
A good GUI has, among other things, the following characteristics:
- Clarity: It’s easy to find what you want.
- Consistency: Similar tasks are done in similar ways.
- Efficiency: Tasks are quickly and easily achieved.
Grid Control was a letdown in all of these areas, primarily because of its interface design and poor navigation in the product. The prime paradigm for the database pages was that of a categorized list of links. This led to a text-heavy set of pages with links sometimes located in surprising places—for example, the AWR interface, which you might expect to find on the Performance tab, was in fact located on the Server tab of the main database management screen. Overall, the choice and layout of links was more reminiscent of small, community ad sites such as Craigslist rather than a task-oriented management application.
This decision mattered, probably more than the designers imagined, because of the principle that a good UI should be clear. The old Grid Control interface left even experienced hands at times clicking from tab to tab and link to link, trying to find pages that they knew were listed somewhere. The product was also littered with odd artifacts that were never really addressed; for example, the server management screen for databases had two distinct links labeled JOBS that would take the user to separate pages, one for the database scheduler and one for the Enterprise Manager scheduler. There was no link to the job scheduler with which most DBAs of the time were familiar, DBMS_JOB.
![]() Note One particularly annoying aspect of the Grid Control interface was the inconsistent arrangement of columns at the bottom of each page. The columns were more or less common but arranged in a different order on each tab. Thus the location of the monitoring configuration link depended on which tab was active at the time.
Note One particularly annoying aspect of the Grid Control interface was the inconsistent arrangement of columns at the bottom of each page. The columns were more or less common but arranged in a different order on each tab. Thus the location of the monitoring configuration link depended on which tab was active at the time.
Second, the interface design was inconsistent between products. Switching from database to application server management gave you whole new interface paradigms. For example, context menus appeared in parts of the product but not others, and the plug-ins used to provide graphical displays were different. This inconsistency in appearance and style actively hindered users familiar with one part of the product from finding the appropriate functionality when they were required to manage a different technology with the product.
The following figures illustrate these problems well. Both are performance management pages, one for the database and one for a J2EE application server, but they might as well come from different products. Figure 4-3 represents the current performance of a database instance. The page uses area charts extensively to represent CPU and I/O load on the instance and to categorize current activity. By contrast, Figure 4-4, which is the nearest equivalent WebLogic page, primarily uses line charts to represent current activity, allows extensive customization of the information presented, and has an entirely different look and feel. For administrators with responsibility for multiple areas, this constant changing of interface actively interfered with the effectiveness with which they could operate.

Figure 4-3. Database Performance home page

Figure 4-4. WebLogic Server Performance home page
Like many other web developers of the time, those responsible for Grid Control had to contend with a variety of browsers with a range of capabilities. However, as you have seen, Oracle’s product had significant shortcomings in the areas of consistency and efficiency—the core features of an excellent GUI. These are all addressed by the Cloud Control release.
At this point, you are probably wondering why this chapter has spent several pages on previous releases. This material is presented so you have the appropriate background to help you understand the design decisions of the Enterprise Manager team in creating the interface for this new product, which can seem overwhelming and overly complicated at first. The EM12c user interface has been entirely redesigned from the ground up, and addresses almost all of the concerns surrounding the previous generations of the product. This inevitably means that even experienced administrators must face a learning curve. Helping you through this curve is the main focus of this chapter.
![]() Note The only areas of EM12c that could still use significant improvement are browser compatibility (Google Chrome/Chromium has some rendering issues, for example) and integration with browser navigation—for example, the Back button.
Note The only areas of EM12c that could still use significant improvement are browser compatibility (Google Chrome/Chromium has some rendering issues, for example) and integration with browser navigation—for example, the Back button.
Cloud Control uses the following main UI features to allow the user to interact efficiently, clearly, and consistently with the product. The primary navigation element is no longer the hyperlink, but a menu system, combined with various wizards for multistep tasks. The net result of all this work is that it is now much more appropriate to describe Enterprise Manager as a web-based application rather than as a web-based management interface.
Cloud Control provides three distinct menu bars:
- Cloud Control menu bar (Figure 4-5)

Figure 4-5. Cloud Control menu bar
- Navigation menu bar (Figure 4-6)

Figure 4-6. Navigation menu bar
- Target Management menu bar (Figure 4-7)

Figure 4-7. Target Management menu bar
The following sections discuss the roles that each menu bar plays in your operation of the Cloud Control product. Once you have established a clear understanding of these roles, the location of any given feature should be clear, and the way in which you interact with that feature should be consistent and effective.
![]() Note There are no documented names for these menu bars in the Oracle documentation, so these terms are used throughout this chapter.
Note There are no documented names for these menu bars in the Oracle documentation, so these terms are used throughout this chapter.
The Cloud Control menu bar, located at the top-right side of the screen, is used for managing Cloud Control itself. This menu bar contains a useful Help menu and a short menu for personalizing system options for your administration account. However, the primary menu is the Setup menu. You will use this menu extensively to manage access and operation of the Enterprise Manager installation. The Setup menu is divided into five sections, as shown in Figure 4-8.

Figure 4-8. Setup menu
The Setup menu illustrates some of the issues the application designers have had rationalizing and streamlining the application, and we expect further work in this area as the product matures. The menu does provide access to all of the system-wide features that you need in order to set up and maintain the Enterprise Manager application in one location, but there is no clear rationale for the location of some of these items. Rather than running through the menu item by item, we will look at the uses of this menu for the most common tasks that you will be required to carry out as an administrator.
The administration tasks we will walk through are as follows:
- Security management
- My Oracle Support integration
- Network proxy configuration
- Configuration of notifications and alerts
- Controlling management pack access
We do not cover incident management (see Chapter 12 for that), or more-advanced features such as product extensibility and the command-line interface. This chapter is intended primarily to orient you to the basic layout of the console and the essential operations you will initially perform.
Starting with this release, Oracle has centralized a lot of the security management in the product. To operate effectively, you will need to spend some time configuring the credentials that you require. In particular, you will need to administer the areas of security included in Table 4-1.
Table 4-1. Securable Items Within Cloud Control
| Area | Purpose | Example |
|---|---|---|
| Enterprise Manager administrator | User access to EM | SYSMAN |
| Enterprise Manager roles | Rights within EM | PUBLIC |
| Named credentials | Target access | NC_DB_ORCL_SYS |
| Preferred credentials | Target access | NC_DB_ORCL_SYSTEM |
| Monitoring credentials | Agent access to targets | DBSNMP |
In addition, you will probably want to set up a privilege delegation scheme so that necessary rights for administration are cascaded through a simple hierarchy of roles and rotation of agent registration passwords. These items, however, are highly dependent on the organization and security requirements of the enterprise for which you work and so lie outside the scope of this book.
The core concept here is that of named credentials. These preconfigured authentication credentials allow users and administrators to access various managed targets in a secure fashion without remembering a plethora of username/password combinations. The time you spend setting these up will seem rather tedious, especially in a large environment, but it is well worth it in terms of time saved in day-to-day operations and in allowing end users appropriately privileged access without disclosing passwords. You should set up the named credentials by using an account that is unlikely to be removed. (For example, you could use SYSMAN to own all named credentials and then grant access to named administrators.) This concept of a credential set to which administrators have access is a big step forward in security and will likely be welcomed by your internal security administrators. On the downside, you are likely to end up having to walk them through this process and explain access control, which is now more complicated than previously.
![]() Tip We strongly suggest that you implement a naming convention for credentials, because you will have a lot of credentials to manage. One example is to use NC_<TARGETTYPE>_<TARGETNAME>_<USER> to indicate the user and targets to which the credentials apply. This works for an environment in which passwords differ between targets, but your setup may vary.
Tip We strongly suggest that you implement a naming convention for credentials, because you will have a lot of credentials to manage. One example is to use NC_<TARGETTYPE>_<TARGETNAME>_<USER> to indicate the user and targets to which the credentials apply. This works for an environment in which passwords differ between targets, but your setup may vary.
The first security administration task is to add administrator accounts. Once this is done, you can define and assign roles and set up access.
This section outlines the process for adding a new administrator account. If you haven’t yet created a dedicated administration account for yourself, you might want to follow along with the following exercise.
You will need the items of information shown in Table 4-2. You may want to make a table like this for your own use when adding administrators.
Table 4-2. New Administrator Details
| Item | Purpose | Example |
|---|---|---|
| Username | Identify the user | JOE_DBA |
| Password | For authentication | Welcome1 |
| E-mail address | Mail for notifications | [email protected] |
Follow these steps to add a new administrator account:
- To start the wizard, choose Setup
 Security Administrators. A screen displays, listing all the administration accounts on the system. If this is the first administrator that you add, you’ll see the page in Figure 4-9.

Figure 4-9. Security Wizard
- Click the Create button. Then fill in the basic details about the administrator, as shown in Figure 4-10. (This is where your table will come in handy.) Note that adding the e-mail address will automatically create a 24×7 notification schedule. You will adjust this later.
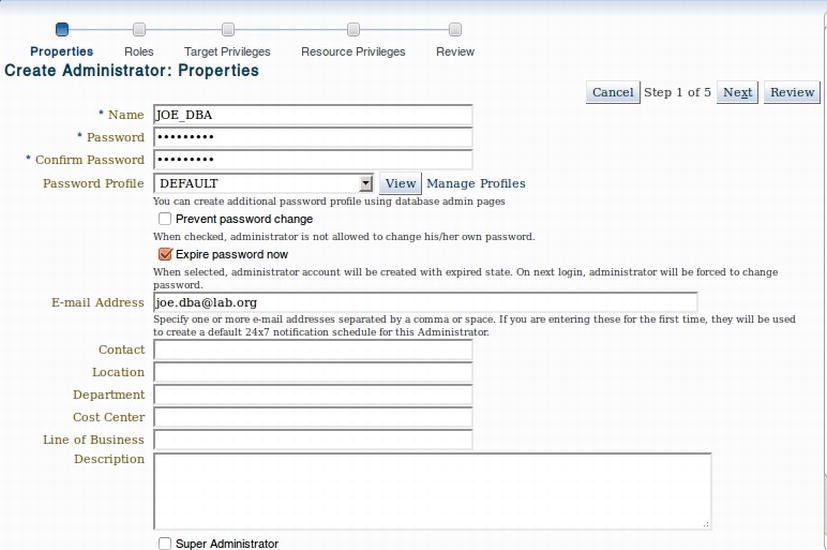
Figure 4-10. Administrator details
- Click Next. Then select the Enterprise Manager roles that this administrator will take. You will learn more about roles in the next section. For now, notice that the range of roles is extensive and introduces role-based management for a wide variety of administration tasks. In this example, just use the default roles that come with the product (see Figure 4-11). Each repository-based user that you create is actually a database account on the repository database. You can manage profiles and resources by using the built-in resource and profile management of the database.
 Tip At the very least, we suggest utilizing the password complexity and expiration options of the database to ensure that your EM administrator accounts follow your corporate policies.
Figure 4-11. Adding roles
- For now, click Next. You are presented with the screen in Figure 4-12, in which you can assign privileges for the user, both across the enterprise and to specific targets.

Figure 4-12. Target privilege assignment
- Click Next. The configuration screen shown in Figure 4-13presents you with the various Enterprise Manager Resource types that the administrator can manage. For example, you can ensure that the administrator can view and edit patching plans for deploying patches across the enterprise.
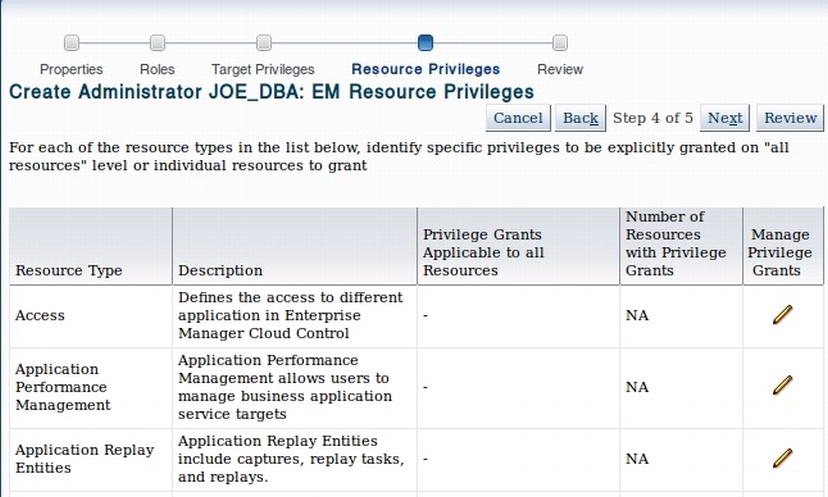
Figure 4-13. Resource allocation
- Click Next. On the following screen, review the administrator creation. Then click Finish.
Creating a Role for Access Control
Once you have your administrator accounts set up correctly and have tested login access for the users themselves, you should use Enterprise Manager roles to configure role-based access control. On the Role Management home page, you will see the built-in EM12c roles and the various management operations that you can carry out.
A role is a named set of privileges, both on targets and on Enterprise Manager functionality. Thus, a role could define, for example, the rights necessary to manage a particular target type, or to perform an Enterprise Manager operation such as requesting a new self-service database. In addition, roles can contain other roles. Role design is, therefore, a core part of any effective Cloud Control deployment, but will be dependent on the specifics of your enterprise.
You will walk through an example by creating a database administrator role that will have rights appropriate for this job role. You can follow along in the next exercise. As you will see, the wizard allocates privileges in the following order: Roles, Target, Resource.
![]() Tip In general, try to define roles that match job roles or tasks in your organization. In addition, use an appropriate naming convention—for example, you might use the LDAP directory group names that define your operating system security.
Tip In general, try to define roles that match job roles or tasks in your organization. In addition, use an appropriate naming convention—for example, you might use the LDAP directory group names that define your operating system security.
To create your Database Administrator role, perform the following steps:
- On the Role Management page, click Create. The wizard in Figure 4-14 appears. Avoid the temptation to skip adding a description. Future administrators will be greatly aided by a useful description that indicates the privileges wrapped up in the role as well as the business purpose for which it was designed.
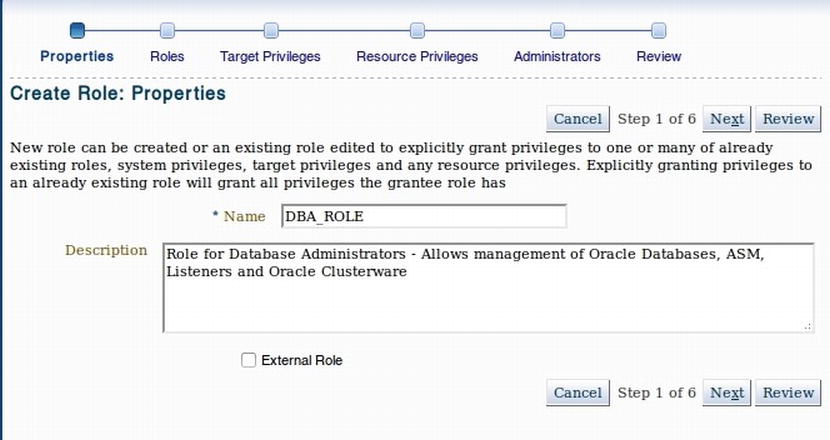
Figure 4-14. Role Creation Wizard—step 1
- Click Next. Then add the EM12c roles that you require. In this example, you add the discovery operator roles, as well as the patch administrator role that allows full administration of the patch lifecycle (see Figure 4-15).

Figure 4-15. Role Creation Wizard—step 2
- Click Next. The resource management right allocations screen opens. The critical section of this screen, shown in Figure 4-16, is on the far right and is labeled Manage Privilege Grants. Click the pencil icon for each category of privilege and assign rights individually. In this case, add all rights under the Target Discovery Framework to allow your DBA to manage target discovery.

Figure 4-16. Role Creation Wizard—step 3
- Finally, you add any existing users to the role. In this case, add Joe_DBA. To make the assignment, move the administrators from the left-hand to the right-hand list box, as illustrated in Figure 4-17. Click Next to move through the wizard.

Figure 4-17. Role Creation Wizard—step 4
- Finally, click Review and then Finish, and you have created your new role.
![]() Note Oracle provides the PUBLIC role specifically for customization suitable for all users of the EM installation.
Note Oracle provides the PUBLIC role specifically for customization suitable for all users of the EM installation.
Configuration of Support Integration
Enterprise Manager is closely integrated with the My Oracle Support site available to all customers with a support contract. It isn’t uncommon to find customer sites that do not set up this integration, however. This is a significant mistake. Fortunately, the Cloud Control menu bar makes the required tasks straightforward.
Configuring integration with My Oracle Support offers the following key advantages that will make your life supporting Oracle significantly easier:
- Enhanced incident and problem reporting
- Access to the support knowledge base from within Enterprise Manager
- Patch lifecycle management
Integration with support requires the following to be set up, access from the OMS to the My Oracle Support site, proxy configuration, and My Oracle Support credentials. In addition, you can optionally assign managed targets to different customer support identifiers (CSIs) by linking them to an administrator account for that CSI.
In most organizations, access to the Internet from the corporate network is controlled by the use of a proxy server. This server is designed as an intermediary to both facilitate and control access to resources on the Internet. In this case, the resources you require access to are the My Oracle Support web portal and the various Oracle and third-party servers that provide services that Oracle customers can request as part of a support contract. In this section, you will walk through a proxy configuration. If your organization has a proxy server that automatically authenticates users via a Microsoft Active Directory domain, you will probably want to read the upcoming section “Using the NTLMAPS Proxy” as a workaround.
Configuring Proxy Server Access
Complete the following steps to configure the proxy server:
- Select Proxy Settings from the Setup menu. The screen in Figure 4-18 appears.

Figure 4-18. Proxy details
- Enter the details of your proxy server, or the NTLMAPS proxy you have configured as an alternative, together with any necessary authentication. Test access to updates.oracle.com using the Test button.
- You will also likely want to ensure that Agent to OMS communication doesn’t use the proxy. To do this, choose the No Proxy option at the bottom of the page, as shown in Figure 4-19.

Figure 4-19. Excluding agents from proxy access
- The final step is to configure MOS credentials. This can and should be done for SYSMAN, perhaps using a generic account owned by the organization (for example, [email protected] ). This can be done by using the Set Credentials menu option shown in Figure 4-20.

Figure 4-20. Configuring My Oracle Support credentials
![]() Note If you have multiple CSIs with Oracle, perhaps because you are a third-party support company, you can assign different CSIs to various targets, and then each administrator will be able to obtain support on only the systems they are entitled to in accordance with their contract. You set this up via the Support Identifier Assignment option.
Note If you have multiple CSIs with Oracle, perhaps because you are a third-party support company, you can assign different CSIs to various targets, and then each administrator will be able to obtain support on only the systems they are entitled to in accordance with their contract. You set this up via the Support Identifier Assignment option.
Although simple proxy authentication using challenge/response is simple to set up, over the years there have been a number of bugs associated with proxy configuration in Enterprise Manager. The product is definitely improving in this regard; however, you may still have problems authenticating to enterprise proxy servers that use NTLM to automatically authenticate users—a fairly common configuration given the ubiquity of Active Directory in the marketplace as an authentication repository. This is because NTLM proxy servers are not supported by Cloud Control. Instead, the official Oracle recommendation is to allow various oracle.com sites to be exempt from the corporate proxy configuration.
The NTLM Authentication Proxy Server (NTLMAPS) is a proxy server—essentially a smart Python script and some open source NTLM libraries that redirect requests for Internet URIs to an upstream or parent proxy server. It adds appropriate browser headers if required and, crucially for EM12c purposes, authenticates correctly against the upstream proxy server with NT credentials. The project which is licensed under the GNU General Public License and so is cost free can be found at http://ntlmaps.sourceforge.net/.
![]() Caution This section covers the setup of an alternative solution that uses a lightweight open source dedicated proxy. If you choose to use this option, make sure that you gain the consent of your network administrators.
Caution This section covers the setup of an alternative solution that uses a lightweight open source dedicated proxy. If you choose to use this option, make sure that you gain the consent of your network administrators.
This means we can run our own proxy server that doesn’t require Cloud Control to know about Active Directory authentication and still authenticate against the corporate proxy with all the corporate security rules in place. To install, download and unzip the distribution to /opt/ntlmaps. If you are on RedHat or something similar, Python is already available as part of the standard distribution. Otherwise, you’ll also need to install Python. NTLMAPS uses a configuration file, server.cfg. You’ll need to enter values for the following:
- PARENT_PROXY: The IP address of the parent server
- PARENT_PORT: The port on which the parent listens
- USER: The configured Active Directory name
- PASSWORD: The configured AD password for the user
- NT_DOMAIN: The NT domain name
Once this is done, start the proxy server manually for the time being by executing the supplied script, python main.py. By default, NTLMAPS uses port 5865. This should probably be acceptable. Whichever route you take, you should now configure Internet access for the OMS server(s) using the NTLMAPS address as the proxy address in step 2 in the preceding “Configuring Proxy Server Access” section. Once the proxy is working OK, the next step is to configure a Linux service by using chkconfig. The script I use is an open source script available in the code repository for this book.
One of the major roles for Enterprise Manager is to trigger alerts when managed targets encounter an event that requires attention. Classic examples of this occur when a web server is down or when a data store is running out of space as data is added. Enterprise Manager splits this task into two distinct phases: alerting and notification. Both areas are configurable from the Cloud Control menu bar.
The alert phase is concerned with recording the occurrence of a particular event, usually driven by a certain metric. This information becomes visible on the target home page after processing by the management server. The fact that alerts fire but do not necessarily raise alarms for administrators is a common cause of confusion for users new to the product.
The notification phase, by contrast, is the process of sending the details of the alert by some method to allow an appropriate administrator to respond to the alert condition. For example, a DBA might be paged to let her know that a database’s system tablespace is dangerously low on space and that she should add space to the tablespace urgently. Notifications traditionally take place via e-mail, but they can also be routed via SNMP, perhaps to an operational control center, by PL/SQL procedures that a DBA or database developer might write or by running an operating system command (perhaps a shell script) on the management server.
Once you have successfully installed Enterprise Manager and while logged in using the SYSMAN account, one of your first tasks should be to add a notification method that can be used to notify the administrators you set up. In this example, you will use e-mail, because that is by far the most common method encountered in real installations. To start the process, choose Setup ![]() Notifications
Notifications ![]() Notification Methods, as shown in Figure 4-21.
Notification Methods, as shown in Figure 4-21.

Figure 4-21. Notification methods
The screen in Figure 4-22 then displays. You can use this screen to set up the details of the corporate e-mail server(s), together with any authentication credentials that are required. The mail servers that you use must be configured to allow SMTP communication. You will probably need to ask your mail administrator which to use, because many corporate e-mail configurations allow only SMTP from specific servers, and they may require the account that you configure to authenticate to be a member of a specific group.

Figure 4-22. SMTP server details
By default, Enterprise Manager provides two e-mail templates for delivering notification of events. These are known as long- and short-format e-mails. You will probably want to customize these, especially to ensure that your e-mail client has rules configured to process the e-mails efficiently. To customize the e-mail format, you choose Customize Email Formats from the Notifications submenu (shown earlier in Figure 4-21). This presents you with the screen in Figure 4-23, which defaults to showing the long format for metric alerts, though you can change this with the drop-downs at the top of the screen.
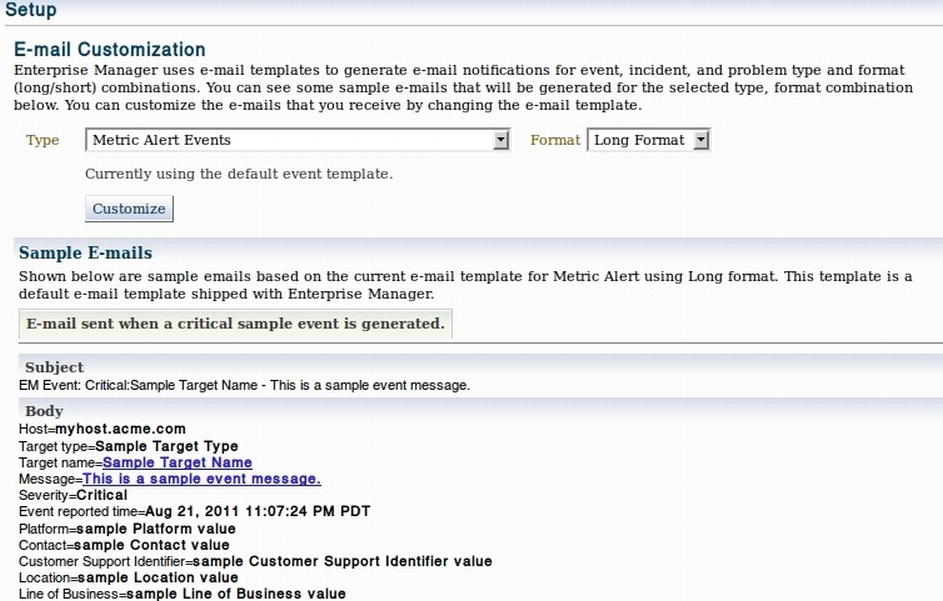
Figure 4-23. E-mail customization
As you can see, the long format is well named, providing nearly every available piece of information that you might require. Unfortunately, it’s almost impossible to read. You might then choose to look at the short format, shown in Figure 4-24, especially if these messages are to be delivered to a mobile device such as a cell phone or pager. Unfortunately, this format takes brevity to the absolute limit, not even including the metric details that caused the alert. This is a design feature specifically limiting the message to fewer than 155 characters. This limit is intended to allow SMS sending, though provider limits and character sets for SMS may be more limited than this (many for example, limit you to 140 characters). You will undoubtedly, therefore, wish to customize one or the other of these formats for production use.

Figure 4-24. Short-format notifications
![]() Tip We suggest you start with the short format and expand it, rather than removing from the long format.
Tip We suggest you start with the short format and expand it, rather than removing from the long format.
Customization is a relatively simple process, consisting of configuring a mix of plain text and placeholders that are substituted at runtime with attributes from the alert (for example, target name or alert timestamp). Comments can be prefixed with the -- character combination in the same way that SQL statements can. In addition, conditional logic can be applied in order to include relevant details, perhaps if this is a repeat notification. There is as yet no capability for creating new alert templates, so you are stuck with the two mail formats. This limitation can, however, be effectively worked around by careful use of the conditional logic feature together with appropriate attributes. For example, it is possible to define different short-response templates for Production and QA based on target deployment type. Figure 4-25 shows an example defining all alert types, including repeats for Production but only one regular mail for QA.
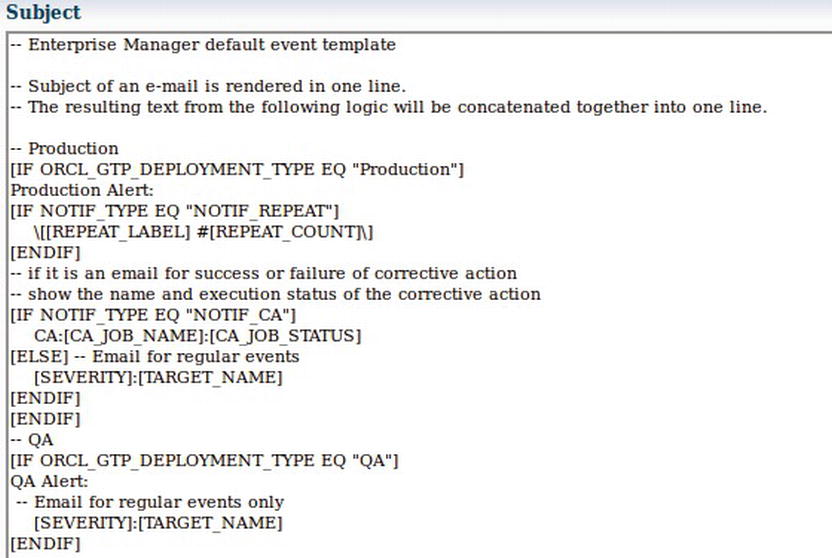
Figure 4-25. Use of conditional formatting logic
One of the major objections customers often have to implementing Oracle Enterprise Manager is the perceived cost involved. This is despite the fact that Enterprise Manager itself is a completely free product. The product does, however, expose in an easy-to-use fashion premium functionality that is licensed by target. This functionality is contained in management packs. Because the GUI makes it simple for administrators to access functionality for which they are not licensed, one of the tasks you should perform fairly shortly after implementation is to configure management pack access for your targets. This is done from the Cloud Control menu.
To begin the process, choose Management Packs from the Setup menu. Its submenu has four options, shown in Figure 4-26.

Figure 4-26. Management pack configuration menu
The Management Pack Access option allows you to enable—or more important, disable—premium functionality for which you haven’t paid and are therefore not entitled to use. Figure 4-27 shows the screen that displays the options.

Figure 4-27. Restricting access to management packs
The Management Packs submenu’s License Information item takes you to a long list of the various management packs and plug-ins you can buy to aid in the administration and management of Oracle products. These packs and plug-ins extend the functionality of Enterprise Manager and/or the base product in order to provide an enhanced management experience.
In addition, the submenu’s Packs for This Page option now provides a pop-up detailing the management packs that are needed to access a given EM page. This feature is available throughout the product. For example, clicking this menu option on the Database Performance home page produces the dialog box shown in Figure 4-28.

Figure 4-28. Packs for This Page example showing required management packs
![]() Note The Packs for This Page feature regrettably doesn’t provide pack access information at the same granular level as enabling the textual management pack labels did in previous releases.
Note The Packs for This Page feature regrettably doesn’t provide pack access information at the same granular level as enabling the textual management pack labels did in previous releases.
The Navigation menus, used for navigating the console interface itself, are located in the blue navigation bar at the top of each screen. There are four menus, which allow for quick navigation to the following:
- Enterprise-wide locations
- Target-based administration pages
- Saved locations (or favorites)
- Visited locations (or history)
The menu bar appears as in Figure 4-29. In addition, the Navigation bar also contains a search box on the right side of the screen (not shown in the figure).

Figure 4-29. Navigation menu bar entries
These menus are always available to you, no matter where you have navigated within the product. The chief advantage of this is that you will always have a consistent method available for navigating quickly and easily to the location of your choice.
The Enterprise menu, shown in Figure 4-30, contains the items you need for an overall view of the health of your enterprise, as well as various items that don’t naturally fit into the target-based menu.

Figure 4-30. The Enterprise menu
Next you’ll learn about the menu’s various options, and then take a little time to look at the reporting options that are available to you.
Exploring the Enterprise Menu
The Summary item takes you to the overall summary view of the enterprise, which gives at-a-glance current-state information for all managed targets to which you have access. For those familiar with previous product releases, this is the traditional home page.
The Monitoring submenu provides you with several enterprise-wide options for reviewing and standardizing monitoring and management across the enterprise. So, for example, this menu is the starting point for defining monitoring templates and corrective actions. This area is covered in Chapter 7. For now, note that this submenu provides a route to one-stop configuration of monitoring and automatic fault correction.
The Job submenu is the interface for the built-in Enterprise Manager job scheduler. This centralized job scheduling system allows you to run a variety of standardized jobs on managed targets across your enterprise. For example, it is possible to define standardized Recovery Manager (RMAN) backup scripts and deploy the same script across all databases in the enterprise. The job interface is covered in Chapter 11.
![]() Tip You will have to decide whether the EM12c job system provides enough flexibility and reliability in your environment, or whether alternative job scheduling systems meet your requirements. In general, if you have an existing enterprise scheduler, we would recommend using that. If you have the usual collection of somewhat uncontrolled shell scripts, we would suggest that EM12c provides an opportunity for centralization and simplification.
Tip You will have to decide whether the EM12c job system provides enough flexibility and reliability in your environment, or whether alternative job scheduling systems meet your requirements. In general, if you have an existing enterprise scheduler, we would recommend using that. If you have the usual collection of somewhat uncontrolled shell scripts, we would suggest that EM12c provides an opportunity for centralization and simplification.
The Reports submenu is designed to help you produce reports based on the centralized repository data that you accumulate through the operation of Oracle Enterprise Manager. This information provides much of the additional value of a centralized repository for management data. We cover the detailed functionality of this menu at the end of this section.
The next submenu is Configuration, which allows you to collect and compare configuration details for the managed targets in your organization. This allows you to ensure that, for example, you have the same operating system package versions installed on two similar hosts. This menu is where the configuration management capabilities of the product show through.
Next is the Compliance submenu. Compliance refers to the extent to which the actual configuration of a particular target conforms to a predefined standard for that type of configuration item. This area of the product has seen some significant improvement with 12c. In previous releases, all that could be achieved was to compare a managed target against a single, uneditable, predefined set of best practices. This had significant drawbacks, either because the predefined policy was too restrictive or because it wasn’t restrictive enough. The best example of the latter is an organization that is subject to Payment Card Industry (PCI) standards. Figure 4-31 shows the Compliance submenu.
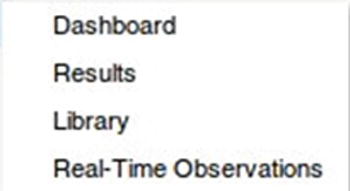
Figure 4-31. The Compliance submenu
A full coverage of target compliance is beyond the scope of this chapter. There are some basic concepts to get you started, however. Oracle envisages that, in line with industry practice, you define a set of standard practices (for example, that you will use Automatic Storage Management (ASM) for your database storage requirements, or that database listeners won’t use the default port of 1521). These are managed individually as compliance standard rules. You then group a set of related rules into a corporate standard for, typically, a target type. So you might roll up your ASM standard together with a standard that states you will not use bigfile tablespaces and one that requires locally managed tablespaces with a uniform extent size into a Database Storage Standard. Finally, you can group related standards into a compliance framework. In our example, we might create a storage standard as described earlier, and a database password standard to comply with corporate password policy. These can then both be grouped together to form a Database Compliance framework for your organization. As of this release, the standards and policy rules are editable for your organization. In addition, Oracle ships several compliance frameworks with supporting standards and rules.
![]() Note This one change means that the compliance capability of Enterprise Manager that was rarely used in previous releases should now be on your to-investigate list.
Note This one change means that the compliance capability of Enterprise Manager that was rarely used in previous releases should now be on your to-investigate list.
The rules, standards, and frameworks that you create form a Compliance Library. You can review this from the Library link in the Compliance menu. Enterprise Manager then allows you to ensure compliance in two ways. First, a compliance score is calculated as a weighted average of the results of evaluating your compliance standard rules against a managed target. This score shows up on the target and enterprise home pages. Second, a compliance officer can view target status interactively and use the Enterprise Manager reporting framework to maintain corporate assurance that standards are being complied with, and that variations from standards are addressed, either by corrective action or by documentation of the reasons for noncompliance.
The Enterprise menu’s Provisioning and Patching option is the entry point to EM’s provisioning and patching capabilities. As those capabilities are covered in Chapter 6, we do not go into that functionality here.
The next item is called Quality Management, but this is, in my view, a misnomer. The submenu shown in Figure 4-32 contains links to a variety of added-value options for the Database and WebLogic products. As these items are separately licensed, we don’t cover these in this introduction to the Enterprise Manager interface.
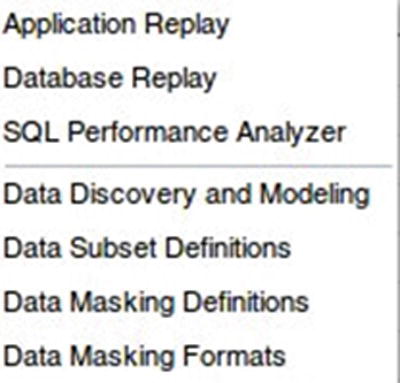
Figure 4-32. Quality management
The last item we will look at in any detail is the My Oracle Support submenu. This provides access to four commonly used areas of Oracle’s online support tool. These are Service Requests, Knowledge Base, Certification Information, and the My Oracle Support community forums. For any of these to work, you need to have configured support integration as described earlier. I personally use only the Service Requests option, because the other informational areas (knowledge base and community content) are, once My Oracle Support connectivity is established, directly searchable from the search box at the top right of the Navigation bar.
![]() Note One aspect of the support integration that may surprise you is that support pages are displayed from the now-retired Flash interface to My Oracle Support. We expect this to change in future updates to the product.
Note One aspect of the support integration that may surprise you is that support pages are displayed from the now-retired Flash interface to My Oracle Support. We expect this to change in future updates to the product.
Finally, at the foot of the menu, looking suspiciously as through the designers couldn’t find a better place, are the Chargeback and Consolidation Planning features. These advanced features are outside the scope of this chapter.
Overall, the Enterprise menu gives you access to product- or enterprise-wide functionality and is the place you should look for configuring or accessing enterprise management functionality. Before you leave this section, though, you’ll look at the reporting capabilities of the product in a little more depth.
Configuring Reports
Enterprise Manager is in a transitional stage at the time of this writing, moving away from Information Publisher, which was the technology available in prior releases, towards Business Intelligence Publisher reporting, which offers greatly enhanced formatting, scheduling, and distribution options. With 12c Release 2, you have two distinct options, the first is a link to Information Publisher reports. (These are the only option available prior to 12c Release 2), but have been superseded by BI Publisher Reports. Oracle provides an embedded license for BI Publisher with Enterprise Manager, and this is clearly the way forward. At the moment, however, there are some restrictions, which we hope to see relaxed in future releases.
Currently, only BI Publisher 11.1.0.6 (yes, that’s four decimal places of release number) is supported, and then only when loaded into the same WebLogic domain as Cloud Control. For all practical purposes, this means that you will either have to extend the domain to include a new BI Publisher server, or install BI Publisher onto the existing OMS servers. Either of these is a significant investment in complexity and management—and indeed come with additional CPU, memory, and disk requirements. Hopefully, in the future, the reliance on the same domain can be relaxed, and the BI Publisher templates can be installed either into an existing corporate BI Publisher environment or a stand-alone BI Publisher instance. Finally, Oracle currently offers no guarantee of backward compatibility for BI Publisher reports that you develop. This book, therefore, does not cover BI Publisher reports because we consider these restrictions to mean that it would be unwise to adopt BI Publisher at the time of writing.
If Information Publisher reports are chosen, you will be presented with a list of predefined reports, organized by category, which will look something like the alphabetically presented list in Figure 4-33.

Figure 4-33. Information Publisher out-of-the-box reports
These reports are grouped in predefined categories. The complete list is shown in Figure 4-34. To produce this listing, choose Collapse All and then click the arrow next to Information Publisher Reports.

Figure 4-34. Available report categories
You cannot edit the predefined reports, but you can use the Create Like functionality to produce customized versions. To illustrate this principle, you will use the built-in Oracle Database Monthly Space Usage Report as the basis of a new daily space usage report. To find the report, expand the reports list so it looks like Figure 4-35.
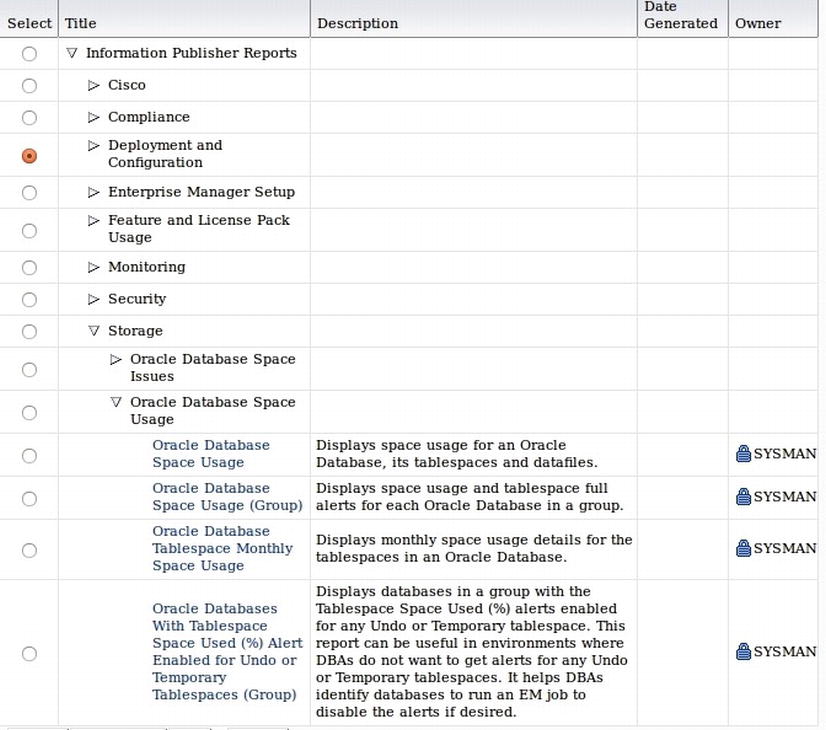
Figure 4-35. Space Usage Report customization
Select the Monthly Space Usage Report and click Create Like. You will see a screen like the one in Figure 4-36. You can customize all the editable properties of this report and you must customize the report title.
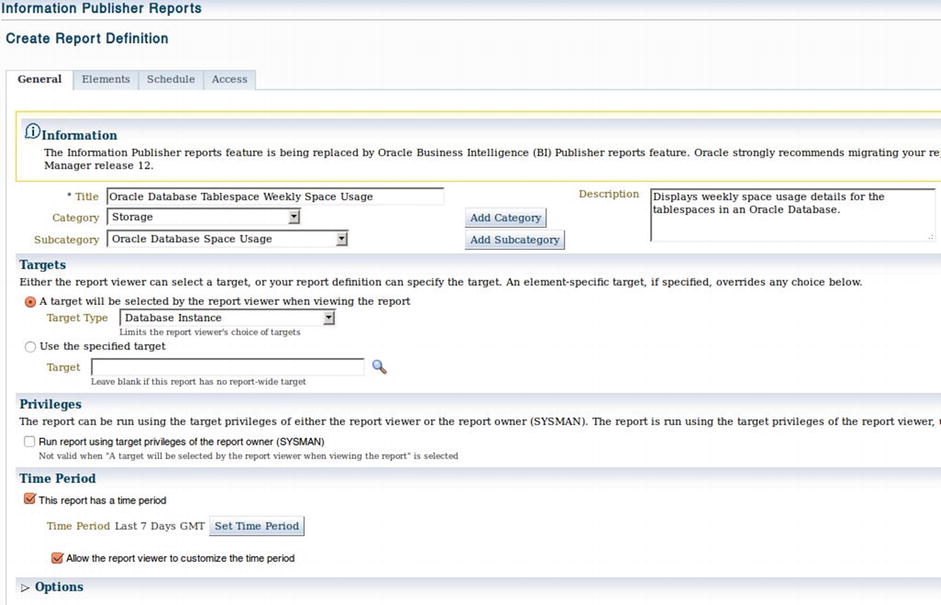
Figure 4-36. Initial report settings
Update all the existing references to Monthly to refer to your new analysis period (in this example, you would use Weekly). In addition, choose Set Time Period and change from 31 days to 7. When you have finished, the report should resemble Figure 4-37.

Figure 4-37. Weekly Space Management Report
Next, ignore the Elements tab for the moment and then click Schedule. This tab allows you to configure the report to run weekly on a Sunday and e-mail to an appropriate address (see Figure 4-38). This scheduling of reports so that they are in the in-box of administrators or management is a big advantage of centralizing the reporting functionality along with the management repository. I suggest that you save copies of sent reports and purge after a sensible timeframe that allows comparison across time so that you can answer questions such as “What happened at this time last year?”

Figure 4-38. Two-year retention of Weekly Space reports
The Targets menu gives you, as the name suggests, quick access to summary information about targets by type. The available target types vary according to the plug-ins you chose to install. Figure 4-39 shows an example.

Figure 4-39. Targets menu
The All Targets option, or keyboard shortcut, takes you to a searchable list of targets organized in various ways. The screen looks similar to Figure 4-40.

Figure 4-40. All Targets option
In addition to searching by target type, you can view targets by software version, target status, hardware platform, or operating system. This screen is faster if you want to review several targets of the same type or status; if you are searching for a specific target, you would likely do better to use the standard search box on the Navigation bar, which will achieve the same result.
The next section of the menu covers groups, services, and systems, which are three ways of viewing and managing a collection of managed targets as one. You will need to understand the differences and uses of each of these constructs in order to make effective use of the platform.
A group is a logical organization of a set of targets. For example, you might classify all production databases as a group, or all hosts in a specific data center. The effective use of groups is covered in Chapter 7. For now, all you need to know is that you can group logically related items and then view summary information about the group rather than the individual targets. Figure 4-41 shows the sort of information you will see by default for a group (in this case, of database instances).

Figure 4-41. Group information
You may at this point be thinking something along the lines of, “That’s great; I can group all the devices that make up my important application installation together and view these as a single group.” Although this is true, it is likely that what is really required is a system. A system is defined by the service or services it provides. The formal definition is as follows:
Systems come in several flavors, according to the services they provide. If you navigate to the systems page, you will see several predefined systems, including the WebLogic domain that runs the Enterprise Manager Service. Systems management is a comprehensive area of management and configuration, since Enterprise Manager allows you to define interdependencies and component roles and so on. The power of defining systems correctly comes into its own with the root-cause analysis and service-level analysis that Enterprise Manager offers for managed systems. The home page for a database system looks like Figure 4-42 (we use the Enterprise Manager repository database system, so you can compare it with your installation).

Figure 4-42. A database system
Services is the final menu option in this group and the basis of the service-level management capabilities of Enterprise Manager. A service is simply defined as the provision of a useful function to one or more users. This is pretty similar to the widely used ITIL definition, which focuses on the delivery of useful outcomes to customers. Systems as previously defined can deliver services, but you can also define services that are not based on systems (perhaps you don’t own or monitor the IT infrastructure that provides them). The exact list of types of services available for monitoring in Enterprise Manager depends on the plug-ins in your installation.
The next set of menu items simply consists of home pages for the various managed target types for which you have monitoring configured. For example you might have entries for Hosts, Databases, and Middleware. Clicking any of these entries simply takes you to a view of your managed estate, filtered for all targets of the specified type. Each page allows you to view existing targets of that specific type, add new ones by way of the discovery process, or remove old ones at the end of the target’s useful life.
![]() Tip If your job role is as a dedicated administrator for a specific type of target—for example, if you are a Fusion Middleware administrator—you are better off choosing and, if necessary, customizing an appropriate home page.
Tip If your job role is as a dedicated administrator for a specific type of target—for example, if you are a Fusion Middleware administrator—you are better off choosing and, if necessary, customizing an appropriate home page.
Finally, in this menu you have links to applications that are under management. These are not supplied target types, but rather are built up by you from monitored components. This functionality is complex and site- and application-specific. The subject is covered in the documentation set Oracle® Enterprise Manager Cloud Control Getting Started with Oracle Fusion Middleware Management, available at http://docs.oracle.com/cd/E24628_01/install.121/e24215/bussapps.htm#sthref170.
The next menu looks at first sight redundant. This is the Favorites menu, which initially looks like Figure 4-43. As such, it duplicates the in-browser favorites functionality that you already have. Clearly, you likely will not gain a tremendous amount of value by adding Cloud Control favorites here if you can also utilize the built-in browser functionality.
Figure 4-43. Favorites menu
If, however, you configure support integration, and like the authors have already collected a wide range of favorites in the My Oracle Support interface, you will find that these are available to you directly from the Enterprise Manager Favorites menu. Figure 4-44 shows settings from an account that has many Oracle E-Business 11.5.10 favorites associated with it.

Figure 4-44. Displaying My Oracle Support favorites in EM
The History menu merely gives you access to a history of recently accessed pages. This helps when using a browser Back button would take you through a task flow rather than to a genuine previous page. Other than this, we can find no use for the menu that the browser history doesn’t give.
On the right-hand side of the Navigation bar is a search box that allows you to search both Enterprise Manager and My Oracle Support (MOS) directly from within the product interface. The search box’s default scope is Search Target Name, but the drop-down list enables you to change the scope to, for example, Oracle patches or the My Oracle Support knowledge base. As an example, suppose you cannot recall exactly how the ADR retention policies work in recent versions of Oracle Database. You surmise that this information ought to be available in the knowledge base within MOS. You therefore select Search Knowledge Base from the drop-down menu and enter a query, as shown in Figure 4-45.
![]()
Figure 4-45. Searching the knowledge base from within Cloud Control
Assuming that you have configured support access, you will be taken to the results of your query. In our case, the exact document we want is the first hit (see Figure 4-46). You can, if necessary, modify your search criteria in the normal MOS way to narrow down or expand your results.

Figure 4-46. Knowledge base search results in Enterprise Manager
The range of sources for the search drop-down corresponds directly to the list of searchable sources in the My Oracle Support Flash interface.
All of the menu items discussed previously are available throughout Enterprise Manager and provide the consistent, coherent, and always available navigation paradigm for the management product. Additionally, each plug-in, whether supplied by Oracle or a third party, is responsible for providing management menu bars for the target types for which it provides manageability services. To illustrate the general features, we will use the Oracle Database plug-in because we assume most readers are somewhat familiar with database administration. Each managed target type provides menus on its target-specific menu bar, some of which will be consistent with the menus presented here, and some of which will be target-type specific and expose manageability interfaces appropriate to that target type alone.
As you recall from the introduction, previous Enterprise Manager releases had somewhat inconsistent interfaces, with the design down to individual product groups and a variety of paradigms employed, from the database team’s list of links to the highly menu-driven approach adopted by the Fusion Middleware team. With this release, the individual products utilize the approach pioneered by the Fusion Middleware team. The home page for a database target, for example, looks like Figure 4-47.

Figure 4-47. Database home page
The Target Management menu bar for an Oracle database has five submenus: Oracle Database, Performance, Availability, Schema, and Administration. These are illustrated at the top of Figure 4-47.
The leftmost menu, known as the target type menu, is common throughout the product and gives access to various configuration items for the target. It is always labeled for the target type (Oracle Database, WebLogic Server, and so on). Any further menus are the responsibility of the plug-in for that target type. To illustrate this, compare the Database home page with that for the Enterprise Manager WebLogic Administration Server, shown in Figure 4-48. The menus for performance, availability, and so on have been lost, because the manageability for these features is exposed in a different way by the underlying product. However, the target type menu is still there, this time labeled WebLogic Server.

Figure 4-48. Home page for a WebLogic administration server
The target type menu items, as shown in Figure 4-49, are designed for quick access to controlling the monitoring, configuration, and reporting for the target. Here you can change or set up both monitoring and alerting. In addition, the menu may offer the ability to control the state of the target—for example, to shut it down—as well as various informational and reporting options. The following sections discuss key options from this menu.
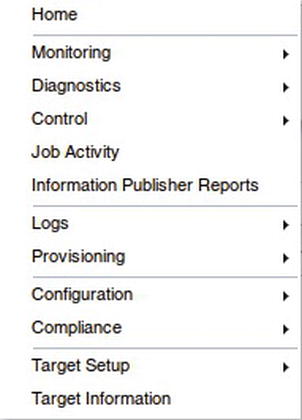
Figure 4-49. The target type menu
The Monitoring submenu contains at least the following items relating to metric collection and reporting:
- User Defined Metrics: User-created metrics for this target type
- All Metrics: All metrics for this target type
- Metric Collection Settings: Whether and how often to collect the metric
- Metric Collection Errors: Errors encountered when collecting metrics
Figure 4-50 shows the Monitoring submenu for a WebLogic server, illustrating these and WebLogic-specific options. The use of these options is reasonably self-explanatory, while the actual metrics vary by target type. Figure 4-51 shows the result of selecting All Metrics for a database target. This gives you access to the full range of metrics available for this target. We have sorted by category to make the list easier to view, because databases have a very large number of potential metrics.

Figure 4-50. The Monitoring submenu
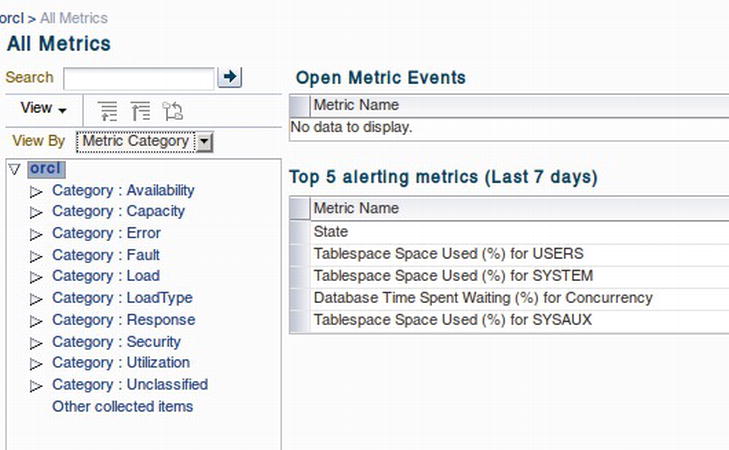
Figure 4-51. Available metrics for a database target
![]() Note We also get an immediate trend for top-five alerting metrics plus any open metric events. This is a neat improvement on the way the same information was presented previously.
Note We also get an immediate trend for top-five alerting metrics plus any open metric events. This is a neat improvement on the way the same information was presented previously.
If you expand the Capacity category and click on a tablespace used metric, you see the common metric configuration page, shown in Figure 4-52, allowing you to set the frequency of collection and upload interval. This functionality is common to all metrics for all managed targets. A management metric in this case is just a data point of interest—for example, the amount of free space in an Oracle tablespace. The metrics are collected by the agent at the configured frequency and uploaded every so many collections (in this case, every time).
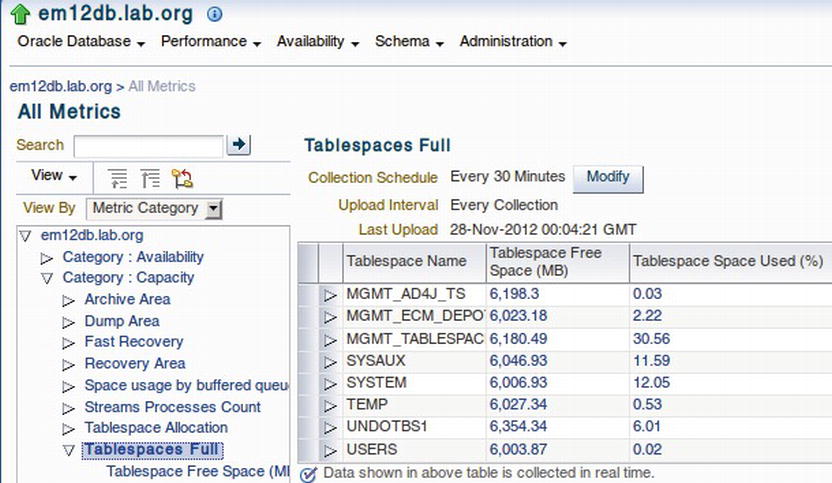
Figure 4-52. Tablespaces Full metric details
The available metrics vary by target type, but the configuration of the collection and upload is common across the product. The prime reason, of course, for collecting metrics is to allow analysis and alerting to take place. In Enterprise Manager, for historic reasons, alerting has a specific technical meaning that is different from common English usage. Specifically, an alert occurs when a metric crosses a threshold set by an administrator (this may have to occur for several collections in a row to avoid false positives). There is no association between an alert occurring and an administrator being notified.
The Metric and Collection Settings menu offers a different view of the metric collection configuration, grouping metrics by type, and allowing you to change the schedule for collecting the value of the metric and to define thresholds for that metric that represent warning or critical states for the collected metric. Figure 4-53 illustrates this interface for a database target.

Figure 4-53. Metric and collection settings
Notifications are configured on a per administrator basis by using the Setup menu located on the Cloud Control menu bar described earlier. The configuration of alert thresholds on a per target basis can be performed here.
![]() Note As described in Chapter 7, you will mostly use monitoring templates to set alert thresholds. The Monitoring menu provides a method to override these where necessary. Once you have set up your metrics and your alerting, make sure to periodically review the target for any metric collection errors using the Metric Collection Errors menu item.
Note As described in Chapter 7, you will mostly use monitoring templates to set alert thresholds. The Monitoring menu provides a method to override these where necessary. Once you have set up your metrics and your alerting, make sure to periodically review the target for any metric collection errors using the Metric Collection Errors menu item.
Some, but not all, target types use the Diagnostics submenu to give you access to the Oracle Support Workbench and Health Check monitors. I expect the range of targets supplying this submenu to grow with time. This provides a handy way to package your support incidents and upload them to support, as well as to compare the existing state of your infrastructure with published Oracle practices.
For a database target, this submenu allows access to the Support Workbench, which allows you to package incidents detected by the Advanced Diagnostic Repository and upload these to support. Figure 4-54 shows an ORA-0600 error appearing for an EM repository database target.

Figure 4-54. Support Workbench
This interface allows you to manage an incident with support and integrate the progress of that incident against the managed target. The full screen provides a graphic view of incident timelines and the way in which ADR has linked incidents to problem records (see Figure 4-55).

Figure 4-55. Incident occurrence
Target State and Notification Control
The Control submenu gives you two basic functionalities and should be available for all target types (see Figure 4-56). The first is the ability simply to start or stop the managed target by using the target-specific appropriate procedures. Just below this, though, is the ability to set or manage blackouts. A blackout is a predefined period during which normal monitoring and alerting is suspended, and optionally during which management tasks do not run. The blackout feature allows you to take account of planned downtime (for example, for monthly operating system security patch application without receiving a blizzard of notifications of target state-change alerts as the managed hosts shut down and restart).
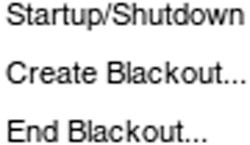
Figure 4-56. The Control submenu
Clicking Create Blackout opens the Create Blackout wizard, shown in Figure 4-57. As you can see, the blackout functionality is quite extensive and can apply to composite targets (most commonly a host and all targets running on that host).

Figure 4-57. Create Blackout welcome screen
![]() Tip Don’t use blackouts to hide alerts that you don’t want or know how to investigate. This always leads to missing alerts that you should have picked up. Instead, use blackouts only for planned maintenance.
Tip Don’t use blackouts to hide alerts that you don’t want or know how to investigate. This always leads to missing alerts that you should have picked up. Instead, use blackouts only for planned maintenance.
The target type menu also provides a handy Logs submenu for reviewing the system logs associated with various targets (see Figure 4-58). The menu itself is common to all targets, but the available level of detail depends on the nature of the target and the plug-in designer. In the case of a database, for example, the Logs submenu gives you access to review the alert.log file, to review all recorded errors, and to manage trace files.

Figure 4-58. Database diagnostic log access
By contrast, a web server target simply provides a single Logs option that allows you to search for and view log messages based on criteria (see Figure 4-59).

Figure 4-59. Searching application server logs
One place that you will definitely spend some time is in the Target Setup submenu, shown in Figure 4-60. This is where you will configure both the monitoring credentials and the metadata about the target, which you can use for grouping and access control.
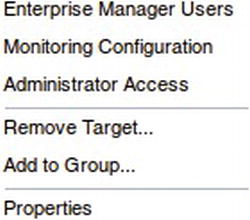
Figure 4-60. Target Setup submenu
To configure the account with which you monitor a target, select Monitoring Configuration. The actual details supplied vary by target type. Figure 4-61 shows the screen for a database target. As you can see, you are required to enter the monitoring account details (in the case of a database, Username, Password, Port, Role, and SID/Service_Name).

Figure 4-61. Required database monitoring details
Similarly, for other targets you will likely need names, passwords, and ports for the monitoring of the individual target-monitoring infrastructure.
The first indication that you will have that Cloud Control is designed to be customized to the requirements of the individual administrator comes at the very first login. After logging in, you will be presented with a page that offers you the chance to choose a home page based on one of a number of predefined job roles. Most readers of this book will probably want to choose one of two of the choices. If you primarily work as a database administrator or developer, you will likely choose the Databases page. If you work in operations or support, you may want to start from the Incidents page, which is focused for staff managing operational incidents in the enterprise.
![]() Note You don’t have to choose any home page at this stage, and we recommend that you don’t. Instead, review all of the available pages for an appropriate starting point for your role. You can then tailor your home page more specifically at a later point.
Note You don’t have to choose any home page at this stage, and we recommend that you don’t. Instead, review all of the available pages for an appropriate starting point for your role. You can then tailor your home page more specifically at a later point.
As the primary audience for this book consists of database professionals, we concentrate on the database-specific pages as an example for this section, unless otherwise noted. However, everything said here applies throughout the product. Figure 4-62 illustrates the home page for a database target.
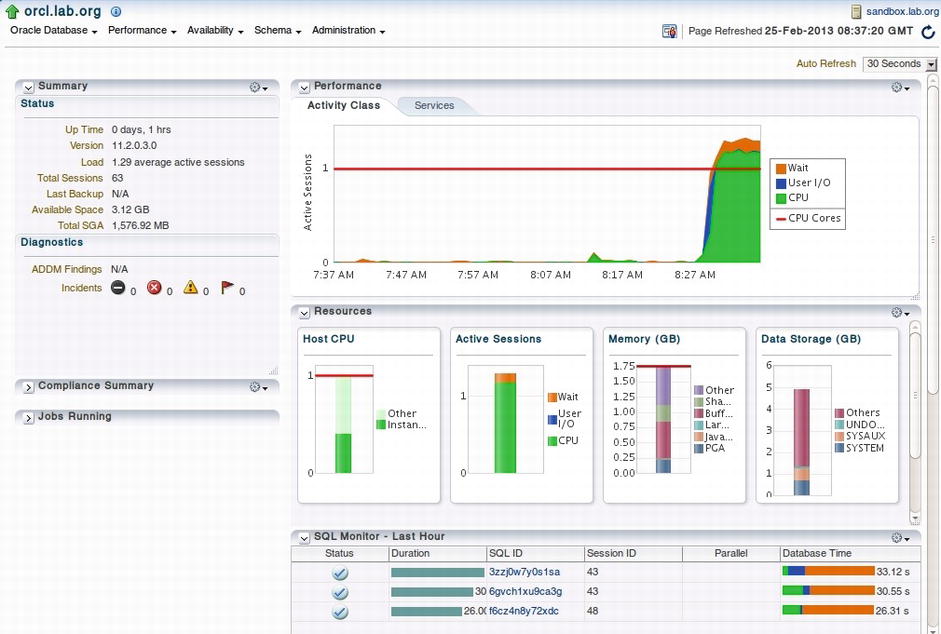
Figure 4-62. Database home page
Each page in Enterprise Manager is divided into several regions. Each region can be further customized by the end user. As an example, we will take the Database Summary region and remove the compliance summary, which is not hugely helpful.
To start the customization, click the Personalize This Page icon, located at the top right, next to the last refresh time for the page (see Figure 4-63). This will add menus to the page, allowing you to customize the page and each region. In this case, click the spanner icon at the top-right side of the Summary region.
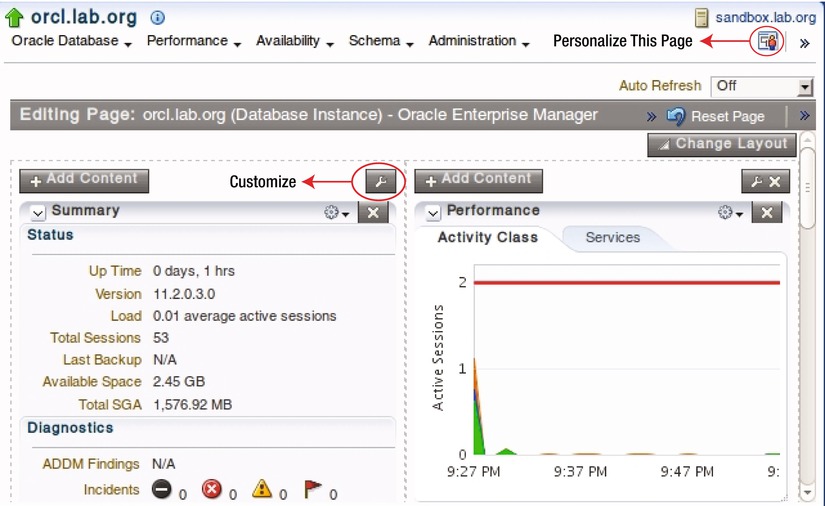
Figure 4-63. Home page in Editing mode
You are then presented with a customization dialog box like the one in Figure 4-64. We simply removed the Compliance Summary section from view, but you can experiment with the various style and display options available to significantly personalize the page to your corporate standards or personal taste.

Figure 4-64. Customizing the Summary component
You should be aware that the options for customizing pages depend on the plug-in supplying the page. Thus the exact customization options may vary among apparently similar regions.
Summary
This chapter introduced you to the new interface and some of the basic tasks that you need to master in order to derive the manageability benefits of the Enterprise Manager product. You have learned about the roles of the Cloud Control, Navigation, and Target Management menus. Along the way, you have learned how to set up Enterprise Manager security, set up the powerful integration with My Oracle Support, and configure notifications. You’ve taken a brief tour around the navigation functionality. Finally, you’ve looked at the target setup functionality and learned how to configure monitoring and review diagnostic logs.