
![]()
by Bobby Curtis and Anand Akela
Oracle engineered systems are sets of pre-integrated hardware and software aimed at reducing the complexity and cost of enterprise infrastructures while increasing the productivity and performance of critical business systems. A few of the engineered systems are designed for specific functions within the enterprise. For example, the Oracle Exadata Database Machine was originally designed for data warehousing, yet its current release has been expanded to support both data warehousing and online transaction processing (OLTP). Other engineered systems serve a more general purpose. For example, the Oracle Database Appliance provides a two-node Real Application Cluster s(RAC)–ready solution for small to medium businesses.
Engineered systems include the complete hardware infrastructure (such as servers, storage, and networking) that would normally be separate entities in traditional configurations. These engineered systems also come with a complete software stack that runs the system out of the box. The unification of hardware and software at this level allows for fast implementation cycles.
In this chapter, you will take a look at engineered systems and how they can be managed with Oracle Enterprise Manager 12c, as well as how these systems can be viewed and monitored.
Types of Engineered Systems
Before you dive into how to manage engineered systems, let’s look at a summary of the engineered systems that Oracle provides:
- Oracle Exadata Database Machine: Provides extreme performance, by off-loading queries to the storage-cell layer, for all database applications including OLTP and data warehousing. Ideal platform for consolidating database workloads to the private cloud or to a data center.
- Oracle Exalogic Elastic Cloud: Provides blazing-fast performance for enterprise applications (Java, Oracle applications, or third-party applications) and middleware to help businesses perform faster, whether in the data center or in the cloud.
- Oracle SPARC SuperCluster T4-4: Provides a general-purpose solution that delivers high performance, availability, scalability, and security across Oracle and third-party applications. Ideal for consolidating diverse environments, this engineered system is powered by the new SPARC T4 processor and Oracle Solaris 11. Offers the benefits of both the Oracle Exadata Database Machine and Oracle Exalogic Elastic Cloud in a single engineered system.
- Oracle Database Appliance: Provides an excellent in-the-box solution for midrange database workloads. Designed to help the small to midsize businesses or individual business units deploy an enterprise-level solution in record time.
- Oracle Exalytics In-Memory Machine: Provides the first engineered system for in-memory analysis for business intelligence (BI) modeling, forecasting, and planning applications, along with advanced data visualization for actionable insight to large data sets.
- Oracle Big Data Appliance: Provides optimized hardware and software to deliver a complete, easy-to-deploy solution for acquiring, organizing, and loading unstructured data into Oracle Database.
- Sun ZFS Storage Appliance: Provides robust, efficient, and fast data storage for customers using network-attached storage (NAS) for enterprise applications, virtualization, private/public cloud deployments, storage consolidation, and data protection.
Oracle Enterprise Manager provides comprehensive management of Oracle engineered systems throughout the lifecycle of the applications or databases deployed on these systems. There are four stages in the engineered systems lifecycle, as shown in Figure 8-1:
- Planning and setup of the engineered systems
- Testing the engineered systems for deployment
- Managing for optimal performance and efficiency
- Maintaining for compliance and functionality improvements
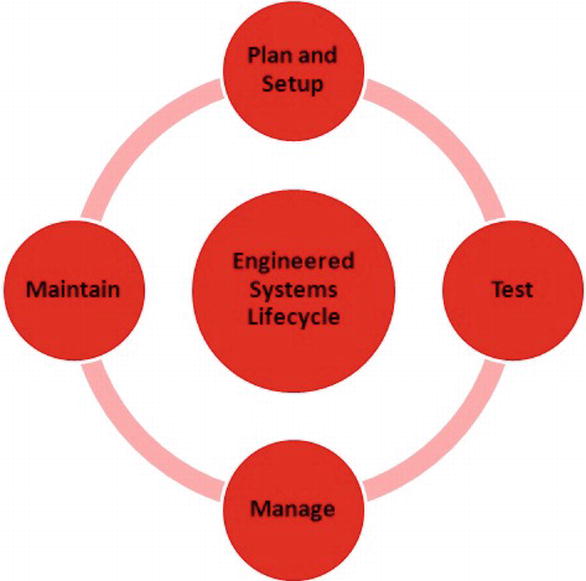
Figure 8-1. Engineered systems lifecycle
Although all the Oracle engineered systems share this lifecycle and can be managed from Oracle Enterprise Manager 12c, the examples throughout this chapter are for the Oracle Exadata Database Machine.
Supported Hardware and Software
Before delving into the various phases of the engineered system lifecycle, it is good to understand which hardware and software is supported by EM12c. The following Exadata Database Machine configurations are supported with plug-ins for 12.1.0.1, 12.1.0.2, and 12.1.0.3:
- V2
- X2-2
- X2-8
- X3-2
- X3-8
- Partitioned
Parts of the supported configurations are the components that come with the Exadata Database Machine. These components are supported in EM12c:
- Exadata Storage Server Software 11g Release 2 (11.2.2.3.0 through 11.2.3.2)
- InfiniBand Switch Release 1.1.3.0.0 to 1.3.3.2.0
- Integrated Lights Out Manager (ILOM), 3.0.9.27.a r58740
- ILOM IPMItool Release 1.8.10.3 (for Oracle Linux)
- ILOM IPMItool Release 1.8.10.4 (for Oracle Solaris)
- Avocent MergePoint Unity KVM Switch Release 1.2.8
- Power Distribution Unit Release 1.04
- Cisco—Cisco IOS Software, Catalyst 4500 L3 Switch Software (cat4500-IPBASE-M), Version 12.2(46)SG, RELEASE SOFTWARE (fc1)
With every new revision of an Oracle product, some items become desupported. The Exadata Database Machine has a few desupported hardware components. The following hardware configurations have been desupported with Oracle Enterprise Manager 12c or 12c Bundle Pack 1 (BP1):
- V1 hardware
- Super Clusters
- Expansion rack
- Multirack Exadata Database Machine
![]() Note In the Exadata plug-in releases 12.1.0.1 and 12.1.0.2, using client network hostnames for compute nodes as Oracle Enterprise Manager target names is not supported. This is supported in the 12.1.0.3 plug-in.
Note In the Exadata plug-in releases 12.1.0.1 and 12.1.0.2, using client network hostnames for compute nodes as Oracle Enterprise Manager target names is not supported. This is supported in the 12.1.0.3 plug-in.
With the evolution of technology, hardware standards change and provide new ways of performing tasks. Engineered systems, especially the Oracle Exadata Database Machine, are susceptible to these changes. EM12c’s plug-in architecture was designed to work with not only the software stack but also the hardware stack. Moving forward, this plug-in architecture will allow for changes in existing engineered systems and future releases of the hardware.
After an Oracle Exadata Database Machine arrives on site and has been acclimated to its surroundings, it can be configured with the network. The next task is to set up monitoring for the machine with EM12c.
![]() Note The Oracle Exadata Database Machine is a complex piece of enterprise infrastructure. Its compact design makes it susceptible to condensation if it is not acclimated to its environment. We recommend letting it sit on site for 48 to 72 hours before plugging it in for configuration.
Note The Oracle Exadata Database Machine is a complex piece of enterprise infrastructure. Its compact design makes it susceptible to condensation if it is not acclimated to its environment. We recommend letting it sit on site for 48 to 72 hours before plugging it in for configuration.
Although EM12c can monitor Exadata out of the box, you still need to plan and configure monitoring before deploying applications to the Exadata and using its capabilities. Typically, the following steps are performed in order to configure the Exadata for proactive monitoring:
- Install the management agents to compute nodes.
- Launch autodiscovery.
- Specify component credentials.
- Review configurations and complete setup.
After following these simple steps to discover Oracle Exadata Database Machine components, the configuration can be completed in a few minutes.
Installing the Management Agent
As with anything in Oracle Enterprise Manager, the first step starts with deploying the management agents to the Oracle Exadata compute nodes and then pushing the Oracle Exadata plug-in to the agents.
![]() Note Oracle Exadata monitoring, like monitoring any other target in EM12c, is done through a set of plug-ins that is deployed at the management server and the agents.
Note Oracle Exadata monitoring, like monitoring any other target in EM12c, is done through a set of plug-ins that is deployed at the management server and the agents.
Figure 8-2 shows how the EM12c agent interacts with the Exadata plug-in and other components of the Exadata Database Machine.

Figure 8-2. Oracle Enterprise Manager 12c agent and Exadata plug-in
Deploying the management agent to the compute nodes is done the same way as deploying the agent through Oracle Enterprise Manager for any other host target. The preferred method is to push the agent from Enterprise Manager. This process is discussed in more detail in Chapter 2.
Once the management agents and Exadata plug-ins have been deployed, you can perform automatic discovery of targets to pull the Exadata components into EM12c.
As with many targets types in EM12c, there is a wizard-driven discovery for Exadata. Exadata hardware can be added automatically through this wizard. To access the wizard from the Enterprise Manager home page, choose Setup ![]() Add Targets
Add Targets ![]() Add Targets Manually. The page that you land on should look like Figure 8-3.
Add Targets Manually. The page that you land on should look like Figure 8-3.

Figure 8-3. Add Targets Manually page
Once on the Add Targets Manually page, select the radio button for adding a Non-Host target. This enables you to then select the Oracle Exadata Database Machine option from the drop-down menu. Finally, click the button to use the guided discovery process.
This takes you to the Oracle Exadata Database Machine Discovery page, shown in Figure 8-4. Here you have the option of either adding a new database machine with associated hardware or discovering newly added hardware. After selecting an option, click the Discover Targets button.

Figure 8-4. Oracle Exadata Database Machine Discovery page
Specifying Component Credentials
After clicking the Discover Targets button, EM12c launches the Database Machine Discovery Wizard, shown in Figure 8-5. The wizard will walk you through the ten steps needed to add an Exadata Database Machine to EM12c. During each of the discovery steps, the user is requested to provide login credentials for the various Oracle Exadata components such as Exadata cells and InfiniBand switches.

Figure 8-5. Database Machine Discovery Wizard
As you work through the discovery wizard, on the SNMP Subscription step (Figure 8-6), it is best to enable SNMP subscriptions on the cell and InfiniBand switch targets. This allows the management agent to automatically receive SNMP traps from the components being monitored.

Figure 8-6. SNMP Subscription step
Reviewing Configuration and Completing Setup
Finally, when the wizard completes, you will be on the Review screen, shown in Figure 8-7. Verify all information before clicking Submit and finishing the discovery wizard. You then land on the Target Creation Summary page; click OK. This brings you to the Target Promotion page, where the targets are now displayed as managed targets.
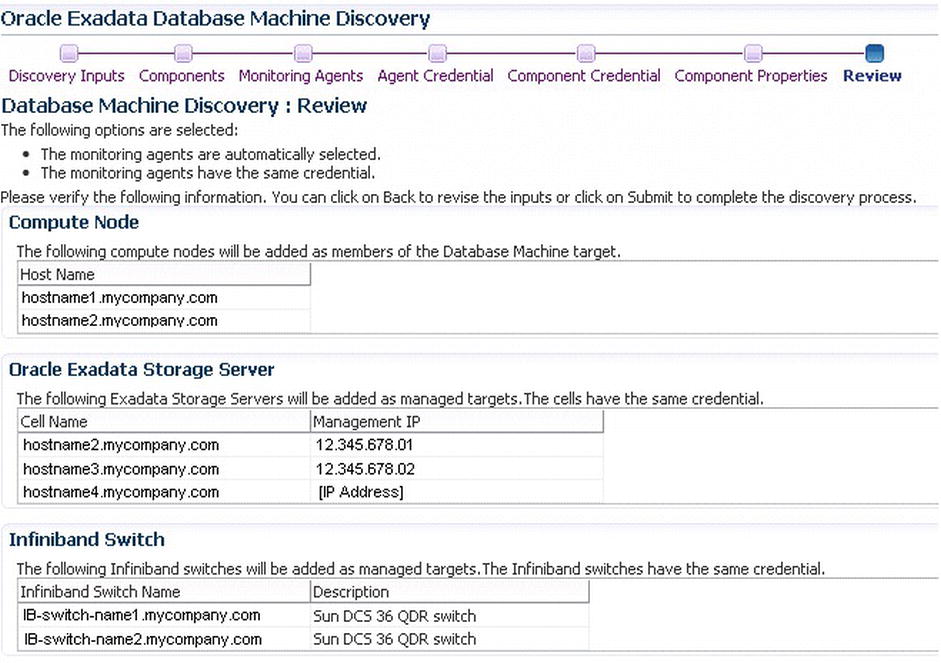
Figure 8-7. Exadata Database Machine Discovery Review page
After the Exadata monitoring is set up, EM12c can provide a unified view of Oracle Exadata hardware and software, as shown in Figure 8-8. You can also see a detailed view of all of its components, such as the InfiniBand switches, storage cells, and so forth.

Figure 8-8. Oracle Exadata schematic view
![]() Note In addition to the automatic discovery process, an automation kit is available to help speed up the discovery. This kit simplifies the process of deploying the agent on each of the compute nodes by allowing the agent to be pushed to all compute nodes in one go.
Note In addition to the automatic discovery process, an automation kit is available to help speed up the discovery. This kit simplifies the process of deploying the agent on each of the compute nodes by allowing the agent to be pushed to all compute nodes in one go.
More information on downloading and configuring the automation kit can be located in Doc ID: 1440951.1 in My Oracle Support.
You can see the availability information for each component in the schematic view. The Overview section at the top shows the summary of incidents and availability information for all targets within the database machine. It also has the option to display the temperature for each component. The target navigation bar on the left of the schematic view allows drilling down to any particular component of your choice. The schematic display also supports viewing multiple Exadata nodes that are connected to each other using the same InfiniBand network.
If you have more than one Exadata Database Machine in Oracle Enterprise Manager, they can be monitored from a high-level view by using the Groups framework. Using this framework, you can create a management dashboard that provides a single consolidated view of performance and usage metrics across many Oracle engineered systems and their components.
When you’re migrating or upgrading your applications to the Oracle engineered systems, you need to think about any potential impacts on response time and throughput of the application. Also, you need to understand all the dependencies and potential risks that may affect the application and plan for comprehensive testing within the environment to mitigate any of those risks associated with the migration.
For a typical migration and deployment onto an engineered system, such as the Oracle Exadata Database Machine, you could consider the following three-step process:
- Identify applications to be migrated.
- Create a test environment.
- Validate application performance.
The following sections cover each of these steps.
Identifying Applications to Be Migrated
As discussed in Chapter 5, Oracle Enterprise Manager Consolidation Planner can be used to help identify resources that could benefit from consolidation. Consolidation Planner can also be a valuable tool when looking to move to an engineered system. The data collected by EM12c can be leveraged to help derive business and technical requirements to validate consolidation plans to an engineered system. Additionally, Consolidation Planner can be used to analyze various migrations or upgrade scenarios and identify application concerns that need to be addressed before a migration.
Each consolidation scenario takes three inputs:
- Details of the pre-consolidation environment
- Technical, business, or compliance constraints
- Details of the destination environment
![]() Note When creating a consolidation project as outlined in Chapter 5, you can optionally choose to generate three preconfigured consolidation scenarios to add to the project. These out-of-the-box scenarios represent conservative, aggressive, and medium consolidation schemas.
Note When creating a consolidation project as outlined in Chapter 5, you can optionally choose to generate three preconfigured consolidation scenarios to add to the project. These out-of-the-box scenarios represent conservative, aggressive, and medium consolidation schemas.
Once you have a consolidation project (P2P) created for moving a physical machine to an Exadata Database Machine, you can create a custom scenario to identify any applications that may be affected by the consolidation. In order to create a scenario, you have to use Consolidation Planner, which is accessible from the Enterprise menu. Once Consolidation Planner is open, highlight the desired P2P project and click the Create Scenario menu item, as shown in Figure 8-9. This opens the Create Scenario Wizard to allow a customer scenario to be defined.

Figure 8-9. Creating a scenario from Oracle Consolidation Planner
When the Create Scenario Wizard starts, the default name of the scenario will be similar to the name of the project that it is associated with.
The first step of the Create Scenario Wizard is Resources, shown in Figure 8-10. Here you can specify scenario details, such as the name and description. You can also specify the resource requirements. Resource type(s), applicable days, time intervals, and the consolidation algorithm for estimating resource requirements can be defined as well. After providing all the resource requirements, click the Estimate Requirements button to show the requirements for the source server(s).

Figure 8-10. Defining resources in the Create Scenario Wizard
As you move through the wizard, you need to select servers that are compatible only with each other. Servers that are compatible should be consolidated together. On the Constraints screen, you have the options of specifying server properties, server configurations, and conditions that are requirements within your consolidation plan. Once all the constraints have been specified, the Preview Effect of Constraints option will be enabled and you will be able to see any incompatible servers. Figure 8-11 shows the Constraints screen with constraints defined.

Figure 8-11. Specifying constraints in the Create Scenario Wizard
Clicking the Preview Effect of Constraints button opens a dialog box that shows the servers that are incompatible with the target server, as you can see in Figure 8-12. If there are any incompatible servers, adjust the constraints until there are none.

Figure 8-12. Incompatibilities of servers
After resolving any incompatibilities, the wizard moves you to the Targets Planning screen. Here you can identify destination candidates for the consolidation. By default, Oracle Enterprise Manager assumes you want to consolidate to a half-rack of Exadata Database Machine. Other options are available for Exadata Database Machine, along with generic servers or even using existing servers. In sticking with your examples of Exadata Database Machine, let’s go with a full rack, as shown in Figure 8-13. On this screen, you can allocate the maximum resource utilization on the destination servers.

Figure 8-13. Setting options for destination servers in the Create Scenario Wizard
Once you have selected your planned target, it is time to map the source server to the destination servers. Since you stayed with the example of Exadata Database Machine, the Create Scenario Wizard is using automapping for our destination server (see Figure 8-14).

Figure 8-14. Mapping servers in the Create Scenario Wizard
![]() Note On the Targets Planning screen, if you selected Use Existing Servers, you can manually override the automatic mapping by selecting a list of destination servers that correspond to the source servers.
Note On the Targets Planning screen, if you selected Use Existing Servers, you can manually override the automatic mapping by selecting a list of destination servers that correspond to the source servers.
On the Review screen, the wizard lists all the items that have been selected throughout the wizard. At this point, you have two options: you can save the scenario as a template or you can submit it to begin gathering the required information. Once the scenario has been submitted, Oracle Enterprise Manager will give you a confirmation message, as shown in Figure 8-15.

Figure 8-15. Confirmation of the submission
After the scenario job is completed, Consolidation Planner will generate a report and recommend an optimal consolidation plan. As you can see in Figure 8-16, it also details how consolidated workloads would perform on target servers.

Figure 8-16. Consolidation Planner’s output for the scenario
Just as Consolidation Planner is good for identifying how to consolidate physical resources to virtual ones, this valuable tool provides important information that can be helpful when considering moving physical servers to newer physical servers. Making a move to any engineered system by using Consolidation Planner can easily be scoped, identified, and executed with confidence.
After your scenario has completed running and yielded results that are acceptable, it is time to identify the applications to move and the details of the engineered system where the application will be moved to. You will need to create a test environment, which should mirror your target destination to some degree, to test and mitigate all potential risks associated with the migration.
As in any testing environment, storing a lot of data can be expensive, so idea subsets of data should be used. Oracle has developed two approaches to this concern: the Test Data Management Pack and the Oracle Application Testing Suite.
The Test Data Management Pack allows for data subsetting, data discovery, and modeling. The data subsetting functionality enables you to create a referentially intact subset of data on production, development, and test systems. Subsetting data for testing purposes makes testing easier by allowing you to select a percentage, 1% or 5%, of data required.
Other features in this pack enable you to do the following:
- Create/edit subset definitions
- Preview the subset details and space estimates
- Define and execute pre- and post-subset scripts
- Execute the subset definition across targets
- Export/import subset definitions
The second option is the Oracle Application Testing Suite, which is an extension to EM12c and enables the same features as the Test Data Management Pack. The Oracle Application Testing Suite addresses all the same concerns and provides a complete suite to create the test environment and perform the tests as needed.
![]() Note More information on Oracle Application Testing Suite can be found at http://otn.oracle.com under Enterprise Manager.
Note More information on Oracle Application Testing Suite can be found at http://otn.oracle.com under Enterprise Manager.
As the complexity of applications increases, especially in shared computing environments such as the cloud, access to sensitive data increases. Access to this data, such as social security numbers, can be limited by masking it between environments. The Oracle Data Masking Pack replaces the original sensitive data with realistic-looking scrubbed data that has the same type of characteristics as the original. This enables organizations to share fully masked data and still be in compliance with both internal corporate governance and government regulations.
The Data Masking Pack enables you to do the following:
- Create or use masking definitions
- Mask real application testing workloads
- Define format libraries for reuse
- Export/import masking templates
- Export/import format libraries
EM12c, through the Data Masking Pack, introduced the ability to discover data dependency and modeling. This functionality allows you to discover data models and sensitive data in your environment so that you can protect them through data masking. Using Oracle’s FAST (Find, Assess, Secure, and Test) methodology to implement data masking, you can create a test environment on Oracle Exadata that has all the sensitive information masked before proceeding with the next step of validating the performance of the system.
Additional data-masking features enable you to do the following:
- Create/edit application data models
- Manually define applications, schemas, and tables
- Use out-of-the-box metadata collection drivers for customer and packaged applications
- Define sensitive columns manually or by using sensitive column discovery
- Classify sensitive columns by sensitive types
- Define and manage sensitive types
- Export and import application data models
- Verify and associate definitions with multiple targets
These management packs allow you to define and extract test data that can be used in creating environments for testing on a variety of engineered systems and generic system platforms. Overall, these management packs help in defining, refining, and giving realistic testing results for migrations and consolidation efforts.
Validating Application Performance
After establishing your testing environment, you need to perform tests to validate that performance is acceptable compared to current production loads. Three tools that Oracle has developed to help with validating application performance are Database Replay, SQL Performance Analyzer, and SQL Tuning Sets. All of these capabilities are part of the Real Application Testing (RAT) suite. RAT is an option available with Oracle Database. RAT offers an ideal solution for validating production load performance in test environments.
The Database Replay feature provides the ability to capture production workloads, including online and batch workloads, and replay them against a test environment. It enables DBAs to test system changes, dependencies, and timings without the use of customized testing scripts. This saves both time and effort by reducing the time it takes to test, hence reducing overall testing cost. EM12c supplements RAT functionality by simplifying the process of saving and transferring the captured workload and performance data to the test system, setting up the test system, and replaying them via its central console.
![]() Note In order to use the features of Real Application Testing (RAT), you must purchase licenses. The only exception is SQL Tuning Sets, which can be licensed under either Oracle Tuning Pack or RAT.
Note In order to use the features of Real Application Testing (RAT), you must purchase licenses. The only exception is SQL Tuning Sets, which can be licensed under either Oracle Tuning Pack or RAT.
EM12c also introduced Application Replay, functionality similar to Database Replay, for the middle tier. Application Replay provides the most efficient, optimized, and highest-quality testing for validating application infrastructure changes for all Web and packaged Oracle applications.
The SQL Performance Analyzer helps to predict and prevent SQL execution performance problems. It provides a detailed view of the impact of environment changes by running the SQL statements serially before and after the changes. It also generates a clear, detailed report outlining the impact on the workload due to the system change as well as the set of regressed SQL statements. The Oracle Enterprise Manager 12c Tuning Advisor supplements SQL Performance Analyzer and provides recommendations to optimize and tune the SQL statements for the best possible performance.
SQL Tuning Sets are groupings of SQL statements that serve as input to Automatic Database Diagnostic Monitor (ADDM)), SQL Tuning Advisor, or SQL Access Advisor. They are database objects that include one or more SQL statements with their associated execution statistics and context. These tuning sets are used to help the DBA perform automatic tuning of SQL statements and they can be exported to test systems where they can be evaluated and improved.
The three tools discussed in this section—Database Replay, SQL Performance Analyzer, and SQL Tuning Sets—were produced by Oracle to provide a methodological way for testing database loads. These tools work well individually. And together they provide a powerful way to monitor any environment, especially engineered systems.
After the database or application has been deployed in production, it’s important to ensure that the applications perform optimally and meet the service levels expected. The integrated view of Oracle Exadata’s hardware and software components in the EM12c console allows DBAs to navigate from the database performance page to the Oracle Exadata system health page. When Exadata is running correctly without issues, the system health button attached to the database is green. When Oracle Enterprise Manager detects an error, the system health button turns red, indicating a problem may be impacting the database availability.
There can be many reasons (for example, load imbalance, ASM-related problems, cell failures, cell configuration issues, or network-related failures) that can impact Exadata performance. EM12c can help troubleshoot and diagnose those problems in Exadata and other engineered systems. Automatic Database Diagnostic Monitor (ADDM) and Automatic Workload Repository (AWR) functionalities of the database are key tools to performance analysis with the Exadata Database Machine.
ADDM is a core part of the diagnostic infrastructure in the Oracle database. ADDM starts off with the analysis of snapshots based on key workload metrics taken within the database. These snapshots include critical performance information pertaining to the database kernel and the database workload as well as at the operating system level. ADDM runs on a regular basis, and it analyzes this information and makes recommendations on problems that it identifies.
For example, when there are SQL load issues, the SQL Advisors make recommendations on how to tune the SQL statements. Also when there are I/O or CPU issues, ADDM gives advice on system resource optimization. And if you are running a RAC, ADDM analyzes your complete RAC infrastructure, including the interconnect, and offers advice on how to improve overall performance.
AWR is a built-in repository, contained within the SYSAUX tablespace, that every Oracle database maintains about operational statistics. AWR is the foundation for all self-management functionality in the Oracle database. It is the primary source of information that keeps historical information on the Oracle database and how it is being used. The AWR repository and associated snapshots enable the database to make decisions that are specifically tailored for the environment it is operating in.
EM12c introduced a new tool to explore the Active Session History (ASH) data. ASH Analytics allows DBAs to analyze performance data across various performance dimensions. This ability to create filters on various dimensions really simplifies the identification of performance issues.
![]() Note Active Session History (ASH) is a PL/SQL package that has to be installed before it can be used. More information on ASH can be found in Chapter 9.
Note Active Session History (ASH) is a PL/SQL package that has to be installed before it can be used. More information on ASH can be found in Chapter 9.
As shown in Figure 8-17, the drop-down menu of ASH Analytics allows administrators to explore performance data by using predefined performance dimension hierarchies.

Figure 8-17. Active Session History ( ASH ) Analytics
The ASH Analytics feature can be used on any Oracle 11g database running on an Oracle Exadata Database Machine or on a non-Oracle platform. For example, by using the Wait event dimension, you can zero down onto Oracle Exadata specific wait events and resolve performance-related issues.
I/O Resource Manager
The Exadata I/O Resource Manager (IORM) is another key capability of Oracle Exadata that guarantees a database gets the minimal amount of I/O as defined in the resource plan at each storage server. Let’s take an example of an Exadata environment where multiple applications and databases are running.
Figure 8-18 shows the Exadata storage server grid view, where you can see that the IORM is not enabled and the CRM database is not getting enough I/O resources since the DW database is hogging a lot of them. The DW database is a legitimate database, and you can’t simply kill the process because it’s consuming a lot of resources. You will need to find a more creative way to address the problem.

Figure 8-18. Exadata storage server grid with IORM not enabled
In Exadata, you can manage the allocation of I/O resources by enabling the IORM. You could configure the I/O allocation manually to allocate a fixed amount of I/O resources. You could also select predefined templates with fixed I/O allocations.
As you can see in Figure 8-19, we currently have IORM disabled; additionally, we do not have any internal interdatabase plans or disk I/O objectives enabled. To enable IORM, you need to change the desired setting and then click the Update All button. This enables all the changes selected, and the Exadata will start allocating resources by the defined I/O resource plan. There are predefined I/O templates that can be implemented as well.

Figure 8-19. IORM settings
After enabling the IORM and allocating the resources needed, any performance bottlenecks should dissipate. When setting up an IORM plan, makes sure that the percentages allocated to resources meet service-level agreements (SLAs) that have been defined.
After the application is deployed to production on an Oracle engineered system and you have ensured that the resources are optimally shared or assigned to databases, you also need to maintain the configuration within the environment. EM12c helps you ensure compliance across all components by using the Compliance Framework to evaluate the hosts and databases. The Compliance Framework proactively looks at the monitored environment and notifies you of potential environmental issues and associated patches needed.
Along with the Compliance Framework within EM12c, other robust solutions exist for maintaining the monitored environment configuration:
- Comprehensive Configuration Management
- Defect Diagnostics
- Automated Patching Solution
Although you will find a lot more details about these EM12c features in the rest of the book, let’s look at them in little more detail in the context of Oracle engineered systems.
Compliance Framework
EM12c provides a hierarchical approach to managing standards across targets to include Exadata Database Machines. The Compliance Framework consists of three core components that can be managed and reused:
- Compliance Framework
- Compliance standards
- Compliance rules
The Compliance Framework is used to provide an aggregate of the compliance scores that are derived from the compliance standards. There can be more than one framework, depending on requirements needed to be complied with. Figure 8-20 shows the Compliance Dashboard, which is used to ensure that compliance is being followed with associated scores.

Figure 8-20. Compliance Dashboard
The compliance standards are the only part of the Compliance Framework that is associated with a managed target. The compliance rules are rules that are associated with the compliance standard. Once the compliance standard is associated with a target, the rules within the standard are executed against the target and stored in the Oracle Management Repository.
The results of the associated framework can be viewed from a high level on the Compliance Dashboard, as shown in Figure 8-20. For a more detailed view of the results, these compliance standards can be drilled into from the dashboard. Figure 8-21 show a more detailed view of the Security Recommendations Oracle standard.

Figure 8-21. Compliance standard result detail
The Compliance Framework’s associated standards and rules are a good way to keep a high-level view on the configurations within the infrastructure. This framework can be applied across all versions of hardware, including Oracle engineered systems.
EM12c offers configuration management capabilities for Exadata, other engineered systems, and generic systems. Configuration management enables you to collect detailed information from a target, which is normally a large and rarely changing collection of information with nontrivial structure. These collections are collected rarely when compared to performance metrics. Configuration data should be affected only by administrators explicitly making changes to the target. Examples of changes that an administrator can make are patching or reconfiguring the target, such as changing file permissions on the Oracle home directory.
Configuration management within EM12c provides a number of features, including these:
- Infrequent collection of a relatively large set of related configuration data (daily)
- On-demand refresh and scheduled refresh of the configuration information
- Comparison of configurations to discover how they differ across targets
- Storage of configurations in the management repository as saved snapshots for later viewing, comparison, and other operations related to configurations
- Export of configurations into files and importing such files back into Enterprise Manager as saved snapshots
- Historical change tracking
- Powerful searches across all the configuration information in the enterprise or a subset of targets
- Triggering associates due to relationships to related targets
When looking for configurations through the Enterprise Manager user interface, configuration information can be found by right-clicking the target in All Targets and choosing Configuration ![]() Last Collected. Figure 8-22 illustrates how to access the configuration information for a target.
Last Collected. Figure 8-22 illustrates how to access the configuration information for a target.

Figure 8-22. Accessing configuration data
Once you are on the last configuration page for the target, you are presented with a navigation tree on the left side of the screen and a series of tabs on the right side. These structures enable you to navigate the current configuration information associated with the target. Each target type will present a different navigation tree; the tab on the right will stay the same. Figure 8-23 shows an example of the latest configuration for an Oracle 11g database.

Figure 8-23. Lastest configuration for an Oracle database
When looking at the configuration for a database, a DBA can monitor and enforce the configurations of parameters associated with the initialization file (spfile), OS parameters, and cell configuration within Exadata or any other database. Configuration enforcement can be done by comparing two hosts that have the same configuration to identify any issues on one of the hosts. Comparison of configurations can also be done against a target’s saved configuration, considered the gold standard, to determine whether any drift exists within the target’s configuration.
![]() Tip Comparing target configurations or using a gold image for comparison requires a large amount of data. It is best to run comparisons during nonpeak hours.
Tip Comparing target configurations or using a gold image for comparison requires a large amount of data. It is best to run comparisons during nonpeak hours.
Oracle Enterprise Manager can also compare the configurations of multiple Exadata Database Machines. Capabilities such as change history tracking or configuration management inventory help with configuration compliance as well. Oracle Enterprise Manager continuously captures the change events in the Oracle Exadata and can also generate comprehensive reports for configuration changes with details including what, when, and where the changes were done and by whom.
On many levels, change management can be used to identify current settings, compare changes, and track changes back to when they changed. Change management is a tool that not only DBAs, but also the whole IT department, will love.
Oracle Enterprise Manager offers a great solution for troubleshooting problems and diagnosing defects anywhere within the IT stack. The Support Workbench and Incident Manager are key components to EM12c capabilities for defect diagnostics.
The Support Workbench interacts with the advanced fault diagnostic infrastructure of the Oracle database for detecting, diagnosing, and resolving problems in the Exadata Database Machine. It offers an easy-to-use graphical interface to investigate reports and resolve the problems in the Exadata infrastructure. It helps minimize the time to resolve any problem by packaging diagnostic data using IPS, helping obtain a support request number, and uploading the IPS package to Oracle Support. It supports viewing and reporting of incidents with correlated packaging from the database, Automatic Storage Management (ASM) through to Exadata.
Figure 8-24 shows the Support Workbench for an Exadata cell. If there was an issue, you could gather all the files needed through this interface and report the incident to Oracle for resolution.

Figure 8-24. Support Workbench for an Exadata cell
One of the best features that EM12c has introduced is a centralized incident console called Incident Manager. Incident Manager enables the administrator to track, diagnose, and resolve incidents that can be an event or closely correlated events that represent an observed issue. Figure 8-25 shows the main console for Incident Manager.

Figure 8-25. Incident Manager console
The goal of incident management is to enable administrators to monitor and resolve service disruptions as quickly and efficiently as possible. Instead of managing the numerous discrete events that may occur due to any service disruptions, incident management allows you to manage a smaller number of more meaningful incidents based on business priority.
Incident Manager also leverages My Oracle Support knowledge base articles and documentation to accelerate the problem diagnosis and resolution. Additionally, Incident Manager now allows you to assign ownership, acknowledge an incident, set priority for an incident, track an incident’s status, and escalate or defer the incident. Using help-desk connectors, Incident Manager can also generate notifications of an incident or open a help-desk ticket.
Figure 8-26 shows the subsection where additional information of the incident can be viewed. The tabs within this section provide general information on the incident, associated events, associated MOS notes, updates that have happened to the incident, and whether any other related events have happened.

Figure 8-26. Incident Manager detail subsection
![]() Note For the My Oracle Support Knowledge tab to function, My Oracle Support needs to be set up with MOS credentials through the Setup menu within Oracle Enterprise Manager.
Note For the My Oracle Support Knowledge tab to function, My Oracle Support needs to be set up with MOS credentials through the Setup menu within Oracle Enterprise Manager.
Between the Support Workbench and Incident Manager, EM12c has come with some robust and flexible options for identifying, troubleshooting, and resolving issues that can occur within an Exadata Database Machine. These diagnostic tools can be taken further and used with the help-desk ticketing software by extension with management connectors.
To minimize application downtime, it is important to make sure that all recommended patches are applied in a timely manner. Patching can be a complex and time-consuming activity. EM12c addresses this concern by automating the deployment of patches, using the Lifecycle Management Pack, to ensure that patches are applied to your Oracle Exadata Database Machine or any other engineered systems. The Lifecycle Management Pack automates the deployment of Oracle patches for Oracle databases and infrastructure components including Grid Infrastructure (Clusterware, ASM, and Oracle RAC).
With the integrated interface to My Oracle Support, Oracle Enterprise Manager can analyze, recommend, and download the patches needed for your environment. You can then apply them to your test environment and promote them to a staging area, deploy them into production, and verify that they were applied correctly.
In environments where Oracle Real Application Clusters are deployed, certain patches can be applied in a rolling fashion to each node in the cluster to eliminate the need for downtime to patch. Real Application Cluster deployment procedures are used to orchestrate shutdown, patching, and startup across nodes in a rolling manner to minimize downtime.
Summary
EM12c offers comprehensive management capabilities of engineered systems. Although the applications and databases run on the engineered systems pretty similarly to how they do on a stand-alone system, the tighter integration of hardware and software brings additional administration and management capabilities. Oracle Enterprise Manager addresses those capabilities and provides seamless management from a single console that manages the complete Oracle stack throughout the IT lifecycle.