
![]()
Software Library, Patching, and Provisioning
by Bobby Curtis
One of the main benefits of using Oracle Enterprise Manager 12c is its ability to help database, system, and application administrators save time and automate the processes required to manage the Oracle database lifecycle. Patching and provisioning of resources is essential to daily operations and maintenance of critical business systems across the enterprise. Through the Database Lifecycle Management Pack, administrators are given tools to help eliminate manual and time-consuming tasks related to discovery, initial provisioning, patching, configuration management, and ongoing change management. In this chapter, you will take a look at the Software Library and the components of the Database Lifecycle Management Pack needed to implement the patching and provisioning options for EM12c.
Software Library
One of the core features in EM12c is the Oracle Software Library. This is the core repository that stores software entities such as agent software, patches, virtual appliance images, gold images, application software, and their associated scripts. Additionally, the Software Library allows you to maintain versions, maturity levels, and states of the various software entities stored. Figure 6-1 gives you the general look and feel of the Software Library console.

Figure 6-1. Software Library console
To access the Software Library console page, you choose Enterprise ![]() Provisioning and Patching
Provisioning and Patching ![]() Software Library. In the Software Library console, there are two types of folders: the folders marked with a lock are Oracle-owned folders, and folders without a lock are user-owned folders. (Folders with and without locks can be seen in Figure 6-1.)
Software Library. In the Software Library console, there are two types of folders: the folders marked with a lock are Oracle-owned folders, and folders without a lock are user-owned folders. (Folders with and without locks can be seen in Figure 6-1.)
Oracle-owned folders (and subfolders) are those that ship with EM12c by default. These folders will appear in the Software Library console after the Software Library is configured. User-owned folders are top-level folders that users create to organize the software entities within the Software Library.
![]() Note The Software Library, once configured, contains a series of numbered directories that can be confusing to look at when first reviewed. According to the Oracle Enterprise Manager team, the numbered folders in the Software Library structure were designed to keep everyone focused on the GUI interface.
Note The Software Library, once configured, contains a series of numbered directories that can be confusing to look at when first reviewed. According to the Oracle Enterprise Manager team, the numbered folders in the Software Library structure were designed to keep everyone focused on the GUI interface.
Using the Software Library yields a lot of advantages for administrators, including the following:
- Facilitates patching and provisioning tasks in both modes, online and offline
- Supports referenced file locations, allowing administrators to leverage existing IT infrastructures (file servers, web servers, and storage systems) to store and stage software entities for patching and provisioning activities
- Allows for organization of software entities into logical folders for efficient management
As mentioned earlier, the Software Library is the core repository for everything within EM12c, when it comes to patching and provisioning. We have briefly discussed how to get to the Software Library console, the types of folders that can be configured within the library, and its advantages. What we haven’t discussed yet is how to configure the Software Library so it can be used. Let’s take a look at that now.
Configuring the Software Library
Before you can start using the Software Library, you must set it up through the Software Library Administration console. A Software Library must consist of at least one upload file location on the host where the Oracle Management Server (OMS) is running. A storage location in the Software Library represents a directory that is either uploaded to the library or generated and saved by some user-owned processes.
There are three options for upload file locations when configuring the Software Library: an OMS Shared Filesystem, OMS Agent Filesystem, or Referenced File Location. These are the only supported storage options for setting up the Software Library. Let’s take a quick look at these options:
- OMS Shared Filesystem: This location is required to be shared (or mounted) across all the OMS hosts.
- OMS Agent Filesystem: Using this option, ensure that you have a preferred or name credential for the OMS host set.
- Referenced File Location: This option allows you to leverage the organization’s existing IT infrastructure for sourcing software binaries and scripts. Referenced File Locations support three storage options:
- HTTP: An HTTP storage location represents a base URL that acts as the source of files that can be referenced.
- NFS: An NFS storage location represents an exported filesystem directory on a server. The server does not need to be the OEM host target.
- Agent: An agent storage location is similar to the OMS Agent Filesystem option, but an OEM agent can monitor any host. The agent can be configured to serve the files located on that host.
To configure the Software Library, you need to decide on the upload file location. In many of the configurations I have done, I use the OMS Shared Filesystem for the Software Library, because it is simple to set up and is local to the OMS. Let’s take a look at how to set up this type of share for the Software Library.
![]() Note When setting up the Software Library, no matter the type of location you use, the question of size comes to mind. How large is the Software Library supposed to be? What do I need to preallocate for the Software Library? You should allocate as much space as you think is going to be used. I’ve always recommended a starting size between 5GB and 50GB. This is due to the agent software needing to be downloaded into the Software Library before deployment.
Note When setting up the Software Library, no matter the type of location you use, the question of size comes to mind. How large is the Software Library supposed to be? What do I need to preallocate for the Software Library? You should allocate as much space as you think is going to be used. I’ve always recommended a starting size between 5GB and 50GB. This is due to the agent software needing to be downloaded into the Software Library before deployment.
To access the Software Library Administration console, you choose Setup ![]() Provisioning and Patching
Provisioning and Patching ![]() Software Library. Figure 6-2 shows the menu path to this location.
Software Library. Figure 6-2 shows the menu path to this location.

Figure 6-2. Accessing the Software Library from the Setup menu
In the Software Library Administration console, you will immediately see two tabs that help you distinguish between the upload locations on the OMS and the referenced locations. To set up an OMS Shared Filesystem location, you need to stay on the Upload File Locations tab. Here, the Storage Type drop-down menu gives you the option of either an OMS Shared Filesystem or an Agent Shared Filesystem (see Figure 6-3).

Figure 6-3. Software Library Administration console
Now, because you are going to use the OMS Shared Filesystem for our Software Library, you need to ensure that you have a location on the local host to store the Software Library. Once this directory structure has been identified, you can add the filesystem to OEM. While in the Software Library Administration console, click the Add menu option. This opens a dialog box that allows you to name the Software Library and identify the location on the OMS server (see Figure 6-4).

Figure 6-4. Adding an OMS Shared Filesystem location
Click the OK button, and the creation of the Software Library begins. The library lists the location that you created with the Add menu command and the status of library, as shown in Figure 6-5.

Figure 6-5. Software Library name, status, and location
As I mentioned earlier, if you were to go and look at the location where the Software Library populates its initial entries, you would see only a bunch of folders with numbers. This is designed to keep the Software Library clean and prevent anyone from modifying the library from outside OEM. Figure 6-6 gives an example of the file structure.

Figure 6-6. Software Library file structure
At this point, you have walked through how easy it is to configure the Software Library within EM12c. Once the library is complete, it is ready to be used for all the software entities that you configured it for. A good first test of the Software Library is to download the agent software that you will need for your enterprise systems. Agent software download and installation was covered in Chapter 2.
Using Software Library Entities
Now that the Software Library is configured, you want to use the entities that can be found in the library. To do this, you need to access the Software Library home page by choosing Enterprise ![]() Provisioning and Patching
Provisioning and Patching ![]() Software Library, as shown in Figure 6-7.
Software Library, as shown in Figure 6-7.
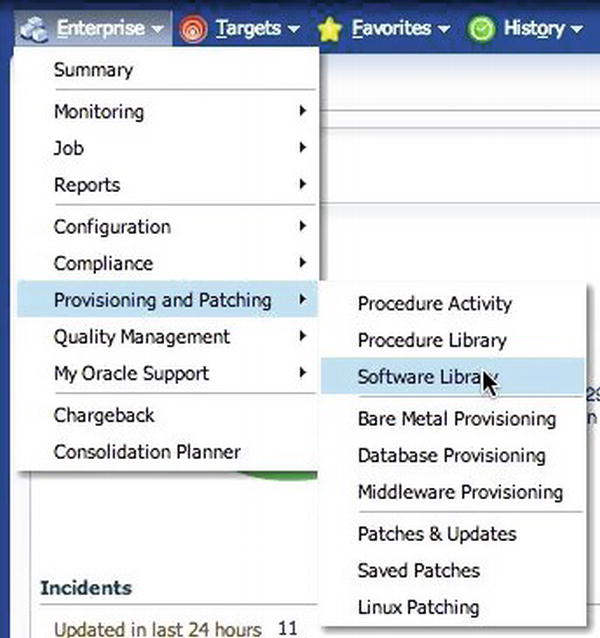
Figure 6-7. Software Library home page
When working with entities in the Software Library, it is important to remember that there are two, broadly classified types: Oracle-owned entities and custom entities. Each entity has its own purpose and usage within the Software Library. Table 6-1 describes these entity types.
Table 6-1. Entities in the Software Library
Numerous lifecycle management tasks make use of the entities in the Software Library. Such tasks include patching and provisioning deployment procedures, which are covered later in this chapter. Figure 6-8 shows how patching and provisioning deployment procedures use the Software Library.

Figure 6-8. Patching and provisioning deployment procedures using the Software Library
Performing Tasks via the Software Library Home Page
When on the Software Library home page, it is helpful and handy to work with entities that are available to the Software Library user. The tasks that can be performed from the library home page are as follows:
- Organizing entities
- Creating entities
- Customizing entities
- Managing entities
As you look at these tasks, keep in mind that managing entities within the Software Library is initially simple. However, depending on the complexity of your organization and environment, the Software Library can become time-consuming to maintain. Knowing what the Software Library will be used for will help simplify maintenance tasks.
Organizing entities within the Software Library is simply a process of creating folders within the library. The folder structure can be as simple or as complex as your organization would like to make it. Figure 6-9 shows an example.

Figure 6-9. Software Library home page
From the Actions menu on the menu bar, you choose Create Folder, as shown in Figure 6-10. Note that additional commands from this menu are grayed out. These commands can be performed on existing folders after they are created. For now, let’s focus on the Create Folder command.

Figure 6-10. Create Folder menu command
After selecting the Create Folder command, a dialog box appears, allowing you to specify the name of the folder (see Figure 6-11). Additionally, you can provide a description of the folder. These details will show up in the Software Library and help you quickly identify the folder you created. Notice that the Parent Folder option is grayed out. This is the default behavior. The text in this box will change based on the selection you make in the folder structure below it. By default, the parent folder is /Software Library.

Figure 6-11. Create Folder dialog box
Click OK. If the folder is created successfully, you will receive a confirmation, as shown in Figure 6-12. You will also be able to see the folder in the tree structure under the folder you specified as the parent folder.
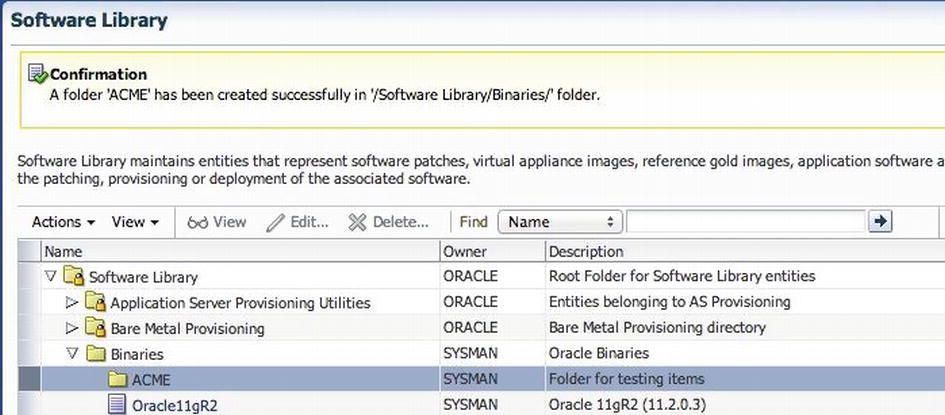
Figure 6-12. Folder created in the Software Library
![]() Note After a folder is created, the only person with the privilege to delete that folder is its owner or a Super Administrator.
Note After a folder is created, the only person with the privilege to delete that folder is its owner or a Super Administrator.
Creating Entities
Entities are certified software binaries that are stored in the Software Library. An entity can be any software that includes patches, virtual appliance images, reference gold images, application software, and their associated directive scripts. As noted earlier, there are two, broadly defined entity types: Oracle-owned and custom. From within the Software Library, you can create two basic types of custom entities:
- Generic components
- Directives
Let’s take a look at how to create both types within the Software Library.
Generic components consist of a broad range of software items that can be created as entities. These entities enable you to define an installation process that will be used within the lifecycle framework for patching or provisioning. The list of generic components includes the following:
- Configuration template
- Database template
- Generic component
- Installation media
- Java EE application
- Oracle Application Server
- Oracle Clusterware Clone
- Oracle Database Software Clone
- Oracle Middleware Home Gold Image
- PDB template
- WebLogic domain provisioning profile
To create generic components in the Software Library, you need to select a custom folder that is not an Oracle-owned folder. You need to create this custom folder if it has not already been established (see the “Organizing Entities” section earlier). After you have selected the custom folder in the Software Library, the Actions menu’s Create Entity option and associated submenus become enabled. Choose Actions ![]() Create Entity
Create Entity ![]() Component, as shown in Figure 6-13. The submenu items Directives and Bare Metal Provisioning are also available; we will discuss directives shortly. Provisioning of bare metal systems is not discussed in this chapter, because it is outside the scope of database patching.
Component, as shown in Figure 6-13. The submenu items Directives and Bare Metal Provisioning are also available; we will discuss directives shortly. Provisioning of bare metal systems is not discussed in this chapter, because it is outside the scope of database patching.

Figure 6-13. The Actions ![]() Create Entity options
Create Entity options
Selecting the Component option opens a dialog box where you can select the type of component you want to create. As listed earlier, there are many options. Choose the entity you would like to create and then click Continue, as shown in Figure 6-14.

Figure 6-14. Choosing the type of component
Clicking the Continue button takes you to the Create Generic Component: Describe page, shown in Figure 6-15. On this page, you can define specifics such as the component’s name, description, and other attributes. You can also add attachments to the component if desired. Attachments can be anything from a readme file to licensing information. If you are going to add attachments, make sure the files are 2MB or smaller. Additionally, you can add notes about the component. However, be cautious, because notes cannot be removed.

Figure 6-15. Describing the component
What you will notice about this page is that Oracle Enterprise Manager places you into a wizard to help you create the component. There are four additional steps that may or may not have to be configured. It all depends on what you are trying to do with the component. What is interesting at this point is that on the Set Directives screen, shown in Figure 6-16, you can add directives to tell the component to follow specific steps. We will dive more into directives in a moment.

Figure 6-16. Setting directives
When finished adding items through the wizard, you have the opportunity to review the configurations that you provided. Figure 6-17 shows the Review screen, which is cropped for readability and shows the option buttons out of their normal context. The interesting thing about the Review screen is that you have two options for saving the component: Save, or Save and Upload. Both buttons will save your component; however, the second one will also upload your component to the Software Library.

Figure 6-17. Reviewing and saving the generic component
The Save and Upload button automatically uploads your new component to the Software Library. After the component is saved to the library, you are returned to the Software Library home page. At the top of the page, you can see that a confirmation message is displayed and your new component is listed in the folder you identified when creating the component (see Figure 6-18).

Figure 6-18. Confirmation of the created generic component and its location
Creating DirectivesDirectives:
Now that you understand what generic components are, let’s take a look at directives. Directivesare entities in the Software Library that represent a set of instructions that can be performed. These entities are used to associate scripts with software components and images. These scripts contain the directions on how to interpret and process the contents of a particular software component or image.
When setting up directives, you have to use the same interface as you use for generic components. To create a directive, you start at the Software Library home page (choose Enterprise ![]() Provisioning and Patching
Provisioning and Patching ![]() Software Library). Remember, in order to create a new directive, you need to select a custom folder that is not owned by Oracle.
Software Library). Remember, in order to create a new directive, you need to select a custom folder that is not owned by Oracle.
To start creating a new directive, you will use the Actions menu in the Software Library. This is the same menu that you used to create a generic component. However, this time you choose Actions ![]() Create Entity
Create Entity ![]() Directive, as shown in Figure 6-19.
Directive, as shown in Figure 6-19.

Figure 6-19. Creating a new directive
The Create Directives wizard then displays. First, the wizard wants you to describe the type of directive this is going to be by placing you on the Describe page, shown in Figure 6-20. The only required information on this page is the Name, Description, and Other Attributes for the entity. As with generic components, you can associate files and notes with the directive by adding files or notes in the Attachments and Notes areas.
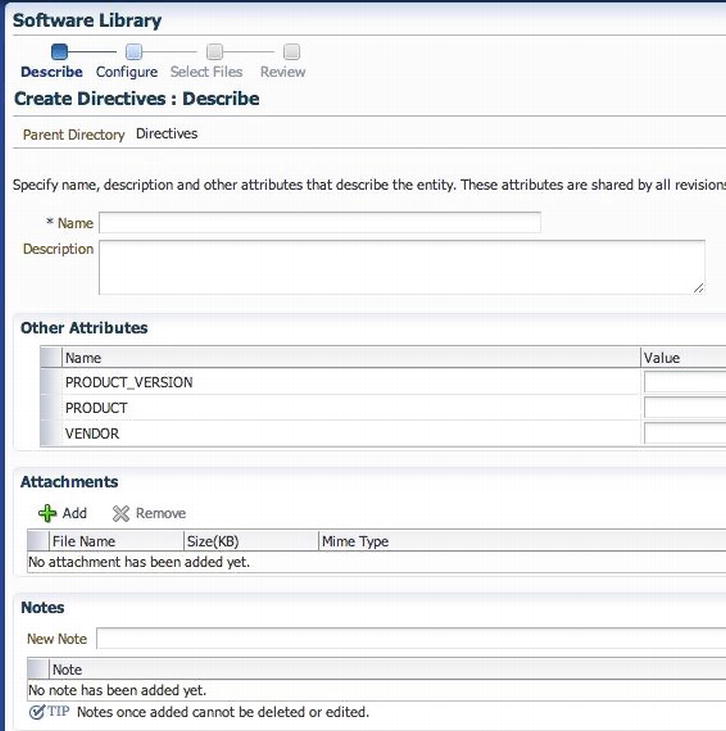
Figure 6-20. Describing the directives
The other thing you may notice are the wizard steps at the top of the page. There are fewer steps required to create a directive than a generic component. Fill in the required fields and then click Next to move to the next screen of the wizard.
As noted earlier, directives are entities that perform a set of instructions on a software package within the Software Library. On the Configure page, shown in Figure 6-21, you have the option of adding command-line arguments and properties associated with the directive. If you have nothing to add for command-line arguments, or the type of properties you want, you can click Next.

Figure 6-21. Configuring the directives
Command-line arguments are just that—arguments that can be passed as if you were using a script. Arguments can include variables that can be set later, a prefix, and suffix. The prefix and suffix text are appended before and after the property value to produce the command-line argument.
![]() Note The following is a command-line argument example:
Note The following is a command-line argument example:
./test.sh –user={username}
The prefix is -user=, and the property is username.
To set up a command-line argument, you click the Add button. A dialog box appears, allowing you to configure the argument prefix, property name, and argument suffix, as shown in Figure 6-22. The nice thing about this dialog box is that it tells you specifically what you need to provide, unlike other dialog boxes.

Figure 6-22. Adding command-line arguments
After all the arguments that you want set are in place, click OK. This adds the argument to the Configure page. As you add more arguments, the command line starts to build under them. Figure 6-23 shows that we added two arguments, and the command line is created for us.
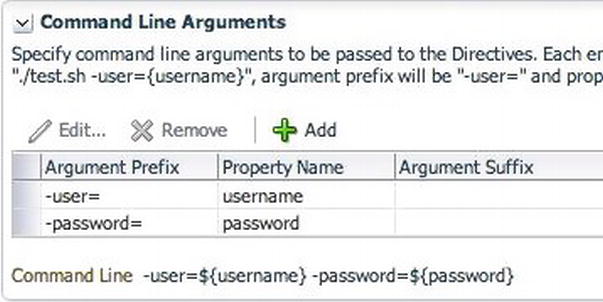
Figure 6-23. Command line built with arguments added
After all the arguments are added for the directive, you need to tell the directive what type of script will be running. This is accomplished on the same page, in the Configuration Properties section. You need to tell the directive that you will use either Perl or Bash. Additionally, if the script needs to run with elevated privileges, you can direct that by clicking the Run Privileged box. Figure 6-24 shows the Run Privileged check box selected for a Bash script.

Figure 6-24. Configuration properties for a directive
Now that you have configured all the items you would like on the Configure page for the directive, you can move on by clicking Next. The wizard brings you to the Select Files screen.
On this screen, you are presented with two radio buttons, which enable you to either upload the files needed for the directive or to refer to them by location. These two options are much like the options you had when initially creating the Software Library; the same rules apply:
- Upload Files: Use this option if you want to upload some entity files from the local filesystem or agent machine to the selected destination location.
- Refer Files: This option allows you to enter the source location details, since you are not uploading anything to the Software Library.
Select the Upload Files option, as shown in Figure 6-25.

Figure 6-25. Selecting files to upload
Next you need to select the destination location. Select the magnifier icon next to the upload location under Specify Destination. This opens the dialog box where you can choose either an OMS Shared Filesystem or an OMS Agent Filesystem. What appears by default is the location specified when setting up the Software Library (see Figure 6-26). Select the Software Library and click OK.

Figure 6-26. Selecting the upload location
Next you need to specify our source files. These are the script files that are needed for the directive to perform its job. These files can be uploaded either from the local host or from a remote host via a remote transfer process such as secure copy.
![]() Note If uploading from the local filesystem, the file size limitation is 25MB. If uploading from a remote filesystem, the Save and Upload action will submit a file transfer to move the remote files to the upload location.
Note If uploading from the local filesystem, the file size limitation is 25MB. If uploading from a remote filesystem, the Save and Upload action will submit a file transfer to move the remote files to the upload location.
To add files in the Specify Source location, you need to click the Add button. This opens the dialog box for selecting and adding a file (see Figure 6-27). Select the file you would like to add, provide the name for the file, and click OK. By default, the name of the file is added to the Name text box.

Figure 6-27. Adding a file to the directive
After you click OK, the file is added to the Specify Source section of the Select Files page, shown in Figure 6-28. Notice that the name, size, and mime type are listed for the file. If there is more than one file for this directive, a drop-down box enables you to select the main file. In this example, you are using only one file; by default, that will be the main file. Click Next to complete the creation of the directive.

Figure 6-28. Specifying source files
When the directive is complete, the wizard drops you back in the Software Library with a confirmation message stating that the creation was successful. At this point, you will be able to find the directive you created. Figure 6-29 displays the confirmation message.

Figure 6-29. Completion of a new directive
After the directive is completed, it is like any other entity in the Software Library. It can be viewed, edited, or deleted by the owner who created it or by a Super Administrator.
Maintaining Entities in the Software Library
As with any software, maintenance tasks need to be attended to. The entities in the Software Library are no exception. We have discussed how to create and add both a generic entity and a directive entity. Now you’re ready to learn about maintaining the entities.
Many maintenance tasks on entities can be performed from the Software Library. We do not go into depth on these here. More information on these tasks can be found in the Oracle documentation; this section provides only a listing of items that can be accomplished.
![]() Note Oracle documentation for EM12c Cloud Control is located here: http://docs.oracle.com/cd/E24628_01/index.htm.
Note Oracle documentation for EM12c Cloud Control is located here: http://docs.oracle.com/cd/E24628_01/index.htm.
Maintenance tasks for entities are as follows:
- Granting or revoking privileges
- Moving entities
- Changing entity maturity
- Adding notes to entities
- Adding attachments to entities
- Viewing, editing, and deleting entities
- Searching entities
- Exporting/importing entities
- Staging files associated with an entity
![]() Note Starting with version 12.1.0.2 of EM12c, you can use either the GUI or the command-line interface to perform the preceding tasks.
Note Starting with version 12.1.0.2 of EM12c, you can use either the GUI or the command-line interface to perform the preceding tasks.
Maintaining the Software Library
Just as we maintain the entities in the Software Library, we have to maintain the health and functionality of the Software Library itself. Only the Software Library administrator or a designer who has administration access can do the following:
- Perform periodic maintenance tasks
- Reimport Oracle-owned entity files
- Remove (and migrate) the Software Library storage location
- Purge deleted entity files
- Back up the Software Library
All of these tasks are critical to the proper functioning of the Software Library.
Performing Periodic Maintenance Tasks
To keep the Software Library functioning properly, the following tasks must be performed on a regular basis:
- Refreshing the Software Library to compute the free and used disk space
- Purging deleted entities to conserve disk space
- Checking the configured Software Library locations to ensure that they are accessible
Reimporting Oracle-Owned Entity Files
Reimporting Oracle-owned entity files is not a periodic activity. This process should be used only when needing to recover metadata files that are owned by Oracle. This should be done in only two situations:
- If you delete the filesystem location where the metadata was imported
- If the import job submitted while creating the first upload location fails
To reimport the metadata of Oracle-owned files, access the Software Library Administration page under Setup. From the Actions menu, choose Re-Import Metadata, as shown in Figure 6-30. This submits a job that will reimport the metadata.

Figure 6-30. Reimporting metadata
![]() Note Reimporting metadata applies only to the Oracle-owned files, which means all entity files that ship with the OEM product by default. User-owned entity metadata cannot be recovered through the Re-Import functionality.
Note Reimporting metadata applies only to the Oracle-owned files, which means all entity files that ship with the OEM product by default. User-owned entity metadata cannot be recovered through the Re-Import functionality.
Removing (and Migrating) the Software Library Storage Location
There may come a time when you need to move the Software Library from its current storage location to a new location. This can happen for any number of reasons. For example, you might need more storage space.
Only Software Library Storage Administrators have the required permissions to delete a storage location. Before a storage location can be deleted, you will be prompted to choose an alternate location to migrate the files to. Next, a migration job will be submitted and the current location will be marked inactive. After the migration job is complete, the old storage location will be deleted.
To delete the current storage location, you follow these steps:
- Access the Software Library Administration page (Setup
 Provisioning and Patching Software Library).
 - Select the storage location. Then click Migrate and Remove.
- In the confirmation box, click Remove to submit the job. Upon successful completion, the old storage area will be removed from the table.
Starting with EM12c, entities can be purged from the Software Library when no longer needed. The purge jobs can now be scheduled, as well, in the Purge Deleted Entities Files dialog box, shown in Figure 6-31. To schedule a job to purge entities from the Software Library, follow these steps:
- Access the Software Library Administration page (Setup Provisioning and Patching Software Library).
- Select the storage location and then click Purge from the Actions menu.
- Enter all the details needed for the job and click OK. Upon successful completion, all deleted entities will be removed from the Software Library.

Figure 6-31. Scheduling a purge of entities
Backing Up the Software Library
Until now, we have spent a lot of time defining the Software Library, what it is used for, and how to add entities to it. Since we have spent a lot time setting up the Software Library, the last thing we want to do is back it up. However, just like any other Oracle product, backups are critical to ensure recoverability in the event of a disaster.
Backing up the Software Library is actually done when you back up the Oracle Enterprise Manager itself. Backing up the Oracle Enterprise Manager is covered in detail in Chapter 13.
Patching
Patching is one of the most important phases in the lifecycle of a product. It enables us to keep our software products updated with bug and security fixes. Throughout the year, Oracle releases several types of patches to help maintain our products. However, patching also has always been the most challenging lifecycle phase, because it often is complex, risky, time-consuming, and requires downtime for applications. Although we can use several approaches to patching our databases, the challenge of minimizing downtime or outages unfortunately remains the same.
In this section, you will learn how patches should be managed within EM12c. Additionally, you will look at configuring Enterprise Manager to use My Oracle Support and review the overall process of patching within the Enterprise Manager environment.
Patch Management
Before diving into the new features of patch management within EM12c, you need to understand the challenges that were faced before. Table 6-2 lists the patching approaches and their associated challenges.
Table 6-2. Current Patching Tools and Challenges

Oracle Enterprise Manager addresses the challenges listed in Table 6-2 with its much-improved patch management solution that delivers maximum ease with minimum downtime. The new patch management solution offers the following benefits:
- Integrated patching workflow with My Oracle Support Therefore, you see recommendations, search patches, and roll out patches all using the same user interface.
- Complete, end-to-end orchestration of patching workflow using patch plans, including automated selection of deployment procedures and analysis of the patch conflicts. Therefore, minimal manual effort is required.
- Clear division of responsibilities between designers and operators - Designers can focus on creating patch plans, testing them on a test system, and saving them as patch templates. Operators can focus on creating patch plans out of the template for rolling out the patches on a production system.
- Easy review of patches for applicability in your environment, validation of patch plans, and automatic receipt of patches to resolve validation issues.
- Saving successfully analyzed or deployable patch plans as patch templates, which contain a predetermined set of patches and deployment options saved from the source patch plan.
- Out-of-place patching for stand-alone (single-instance) database targets and Oracle Grid Infrastructure targets that are part of Oracle Exadata.
- Flexible patching options such as rolling and parallel, both in offline and online mode.
Configuration of My Oracle Support
Before we can truly discuss some of the new patching options, Oracle Enterprise Manager (OEM) has to be integrated with My Oracle Support (MOS). Oracle has done a good job of integrating the two interfaces, making it easier for us to find patches within MOS from the Oracle Enterprise Manager interface.
To set up My Oracle Support within Oracle Enterprise Manager, our MOS credentials need to be added to OEM. This can be accomplished by choosing Setup ![]() My Oracle Support
My Oracle Support ![]() Set Credentials, as shown in Figure 6-32.
Set Credentials, as shown in Figure 6-32.
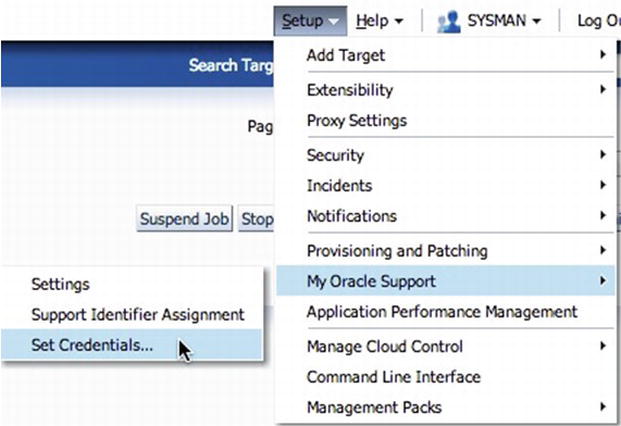
Figure 6-32. Setting credentials for My Oracle Support
Clicking this menu command lands you on the My Oracle Support Preferred Credentials page. Here you enter your single sign-on login needed for MOS, as shown in Figure 6-33. Then click Apply. (Next to the Apply button is the Remove button. If you want to remove your MOS credentials from OEM, the Remove button does that.)

Figure 6-33. Setting My Oracle Support preferred credentials
After adding your MOS account information to OEM, you can begin to look for patches and updates from within Enterprise Manager.
Patch Plans
Patch plans help you create a consolidated list of patches that you want to apply as a group to one or more targets. Patch plans have states that map to key steps in the deployment process. Oracle Enterprise Manager supports creating patches in two forms:
- Patch sets
- Patches (one-off)
- Interim patches that contain a single bug fix or a collection of bug fixes provided as required.
- Diagnostic patches, intended to help diagnose or verify a fix or a collection of bug fixes.
- Patch set updates (PSUs).
- Critical patch updates (CPUs), now known as security patch updates (SPUs).
![]() Note You cannot add both patch sets and patches to the same patch plan. Instead, you can have a patch plan for patch sets and another patch plan for patches.
Note You cannot add both patch sets and patches to the same patch plan. Instead, you can have a patch plan for patch sets and another patch plan for patches.
Patches can be added to a target in a plan only if the patch has the same release and platform as the target to which it is being added. A warning will be raised if you try to add a patch that is different from the product associated with the target. However, the warning will not prevent you from adding the patch to the plan. You can include any patch for any target in a patch plan. The plan will validate any patches against your environment and check for conflicts with the installed patches.
Depending on the patches added to the patch plan, Oracle automatically selects the appropriate deployment procedure to be used for applying the patches.
By using patch plans, we can simplify the identification and deployment of patches for many environments. This greatly increases our flexibility in patching by helping us identify any potential conflicts before actually patching environments.
![]() Note Patch plans are currently not available for patching hardware systems or operating systems. If patching an Oracle Grid Infrastructure target, which is part of Oracle Exadata, you can add only one patch (Oracle Exadata) per patch plan. For all other targets, you can add as many patches as you want, as long as the patches are of the same release and platform as the targets being patched.
Note Patch plans are currently not available for patching hardware systems or operating systems. If patching an Oracle Grid Infrastructure target, which is part of Oracle Exadata, you can add only one patch (Oracle Exadata) per patch plan. For all other targets, you can add as many patches as you want, as long as the patches are of the same release and platform as the targets being patched.
There are two basic types of patch plans: deployable and nondeployable.
- It contains only patches of the same type (homogenous patches).
- It contains targets that are supported for patching, are similarly configured, and are of the same product type, platform, and version.
- There are no conflicts within the plan.
- Any patch plan that does not meeting the preceding conditions for deployment is a nondeployable plan. Any patch plan that is nondeployable cannot deploy patches using the patch plan. You can perform some analysis and checks, download patches, and manually apply them.
Now that you understand what a patch plan is and the two types of plans, let’s quickly walk through creating a patch plan for applying a CPU patch. In this section, you’ll walk through all the steps needed to create a patch plan that can be used for either a patch set or one-off deployment.
To create a patch plan, you need to start on the Patches & Updates page in Oracle Enterprise Manager. Navigate to this page by choosing Enterprise ![]() Provisioning and Patching
Provisioning and Patching ![]() Patches & Updates, as shown in Figure 6-34. This page looks exactly like the My Oracle Support (MOS) page. The only difference is that the page is being accessed from within Enterprise Manager.
Patches & Updates, as shown in Figure 6-34. This page looks exactly like the My Oracle Support (MOS) page. The only difference is that the page is being accessed from within Enterprise Manager.

Figure 6-34. Patches & Updates from the Enterprise menu
On this page, you will start creating the patch plan by looking at Patch Recommendations (see Figure 6-35).
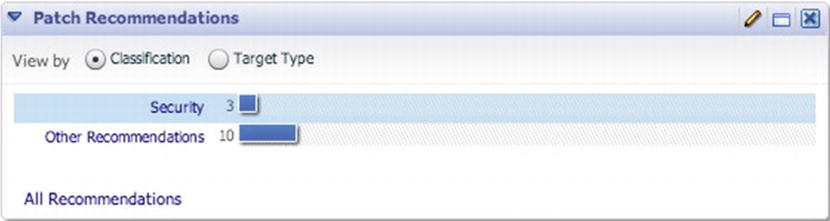
Figure 6-35. Patch recommendations on the Patches & Updates page
![]() Note Unless you have created patch plans in the past, the Plans section on the Patches & Updates page will be empty.
Note Unless you have created patch plans in the past, the Plans section on the Patches & Updates page will be empty.
This section of the page contains two radio buttons. By default, the Classification button is selected. What is more important within this dialog box are the recommendations that Oracle is making. In the example shown in Figure 6-36, it appears that we have security patches waiting. Let’s add these to a plan.

Figure 6-36. Patch Recommendations screen
Click the Security link, and you are taken to the Patch Recommendations page shown in Figure 6-36. This page provides a list of patches that are recommended, along with the target they are recommended for. Select the check box next to the patch name, and a dialog box opens, enabling you to download the patch directly to your desktop or to add it to a patch plan.
Because you are going to add this patch to a patch plan, click the Add to Plan drop-down menu, as shown in Figure 6-37. This menu enables you to add the patch to a new or existing plan. Choose the Add to New option, and a dialog box opens, allowing you to name the plan (see Figure 6-38).

Figure 6-37. Add to Plan menu

Figure 6-38. The Create New Plan dialog box
Name the plan and click Create Plan. If you want to add more than one patch, select both the patches first and then add them to the plan.
![]() Note Patches can be added to the plan later, if needed.
Note Patches can be added to the plan later, if needed.
Reviewing the Plan and Deployment
After the plan has been created, you can review it by clicking View Plan. You can also view the plan from the Patches & Updates page; the new plan is listed in the Plans window, shown in Figure 6-39. Clicking the plan name enables you to review the plan in detail.

Figure 6-39. Reviewing the plan from Patches & Updates
Remember, a patch plan is nothing but a collection of patches that you want to apply to a target or targets. The plan review is a five-step process, which you can view on the left side of the screen. By default, the review starts on step 2, where you can add patches to the plan if desired (see Figure 6-40). If you take a step back and click step 1, Plan Information, you can modify the name of the plan, set a deployment date, and add a plan description. You can also add permissions to the plan that will either grant Full or View permissions to various Enterprise Manager roles.

Figure 6-40. Step 2 of reviewing the plan
You add patches to the plan in step 2 by clicking the Add Patch button. After the analysis, the result may require patches to be added to the plan.
You will notice that the plan is deployable (although this is not shown in Figure 6-40, this indication appears at the top-right corner). If there is nothing you want to change or add within the plan, you can click Review and end the wizard without doing steps 3 through 5.
![]() Note The Full permission allows for the role to validate the plan. The View permission does not allow validation of the plan.
Note The Full permission allows for the role to validate the plan. The View permission does not allow validation of the plan.
Clicking Next at the bottom of the Patches screen takes you to step 3, Deployment Options, as shown in Figure 6-41. This screen contains a lot of configurable items that may or may not have to be changed. Reviewing all these options is critical for a successful patch plan.

Figure 6-41. Deployment options (partial screen)
In the Where to Stage option, you can specify the location where the patch is either downloaded to and/or stored for patching purposes. By default, patches will be downloaded and stored at the location specified by %em_emstagedir%. The staging location for the patches needs to be writable by the host, which is going to access the patch.
The How to Patch section provides two options for patching: Out of Place and In Place. The hyperlink to the side explains each choice:
- Out of Place: Uses less downtime and keeps your old Oracle home available for recovery
- In Place: Requires bringing down all databases in the Oracle home during installation of the patches
Both are good choices, depending on your required service level agreements (SLAs) or organizational policies. Oracle recommends out-of-place patching, because it basically clones your existing Oracle home and gives you the ability to back out any changes you do not want by returning to the old Oracle home.
Additional sections on the Deployment Options page are What to Patch, Customization, Recoverability, Rollback, and Oracle Home Credentials. Each section needs to be reviewed and verified prior to completing the review of the patch plan.
After verifying and configuring all options in step 3, click Next to move to step 4, Validation. In this step, Oracle Enterprise Manager checks the patches in the plan against previously installed patches for conflicts. This check is performed against the target inventory for conflicts. The validation takes many factors into account, and may take more than 10 minutes to complete. These validations include checks against the Oracle home for readiness, space requirements for the home, OPatch version validation, and other checks such as cluster node connectivity (if patching a RAC environment).
Figure 6-42 shows what the screen looks like before validation is done. Click the Analyze button to begin the validation of the patches against targets for the patch plan. While the validation is running, you can move off this screen and return to it later.

Figure 6-42. Step 4: Validation
After the validation starts, the message above the Analyze button changes, providing additional information on the process. You can get a detailed view by clicking Show Detailed Progress Here. You may notice that the analysis includes quite a few checks: verifying that the targets are supported for patching; verifying normal and elevated user credentials; verifying target tools, commands, permissions, and upgrades to OPatch; staging the selected patches; and then running the prerequisite checks for patching. If all the prerequisites pass, the patch is seen as Ready for Deployment.
Any issues that the patching may have will show up at this point. For example, if a patch conflict exists, a replacement or merge patch may be required. If a replacement or merge patch is not available, you can request such a patch directly from this screen.
If any issues need to be resolved, they will be listed under the Issues to Resolve heading. Anything that the analysis recommends to be added will be listed under Added from Analysis. General messages will be under Informational Messages. After reviewing all these messages, you can click the Review button.
Reviewing and Deploying the Plan
At this point, you are ready to move directly to step 5, Review & Deploy. You can reach this step by either clicking the Review button in step 4 or clicking Review & Deploy on the left side of the screen.
On the Review & Deploy page, the patch plan is described in detail along with the targets that will be affected by the plan. If additional targets have been discovered after the analysis, they will be added to the Impacted Targets list. In our case, two additional listeners were found and added, because they run out of the same Oracle home that we are preparing to patch.
The patches that are going to be applied to the Oracle home are listed on this page as well. The important thing to look for is a status of Conflict Free. In our case with CPUAPR2013, we have no conflicts with the patch. Figure 6-43 shows a subset of the Review & Deploy screen indicating that the plan is ready for deployment.

Figure 6-43. The Review & Deploy step
Earlier, in step 3, you configured the patch plan to use in-place patching. This means that an outage will occur after this patch plan is deployed. Click the Deploy button to immediately start the deployment of the patch. The screen changes to Deployment in Progress. A background job starts, and the database is taken offline for patching.
After the deployment is complete, the Review & Deploy screen will show a status of Deployment Successful, as shown in Figure 6-44. If a deployment is not successful, the Review & Deploy screen will indicate that the deployment failed and provide information related to the failure.

Figure 6-44. The deployment is successful
After a deployment is successful for a target, the patch plan cannot be reused for additional targets. To use the patch plan for more targets, the plan needs to be saved as a patch template. At the bottom of the Review & Deploy screen is the Save as Template link, which enables you to save the patch plan as a template. We discuss templates in the next section.
As previously mentioned, a patch plan can be saved as a plan template. This can be initiated at the bottom of the Deployment Successful page. Before you can create a plan template, you need to make sure that the patch plan you want to use was successfully analyzed and deployed.
As with any type of template, there will be no target associated with the template, which makes the template available to be applied against multiple targets. Inside the plan template, the Create Plan button can be used to create a new plan based on the template and can be repeatedly applied against multiple targets.
Before you create a template, you need to make sure that the patch plan you want to use has been successfully deployed. This can be done from the Patches & Updates page, accessed by choosing Enterprise ![]() Provisioning and Patching
Provisioning and Patching ![]() Patches & Updates. On this screen, all the patch plans are listed in the Plans list. What you are looking for is a status of Deployed Successfully, as shown in Figure 6-45.
Patches & Updates. On this screen, all the patch plans are listed in the Plans list. What you are looking for is a status of Deployed Successfully, as shown in Figure 6-45.

Figure 6-45. Successful plan deployment
Once you have a successful patch plan, you can create a template based on that plan. First, you click the plan name that was successful. This brings you back to the Review & Deploy page for the patch plan. At the top of the page, notice a lock with an explanation about the plan being locked. At this point, you need to create a template to use this plan against other targets.
At the bottom of the Review & Deploy page is the Save as Template link. Click this link, and you are presented with a dialog box asking for the name of the template (see Figure 6-46). Enter a name that describes the patch plan that will be used against other targets.

Figure 6-46. Create New Plan Template dialog box
Click the Create Template button, and the template is created. At the top of the Patches & Updates screen, you can see a message that states it has been created. This same message contains a View Template link. Click that link to access the Edit Template Wizard. This wizard is similar to the Create Plan Wizard discussed earlier. There are only three steps to editing a template.
The first step is Plan Information. On this page, you can add or modify the template name, set a plan deployment date, and add a description (see Figure 6-47). Click Next to move on to the next step of the wizard.

Figure 6-47. The first step of the Edit Template Wizard: Plan Information
The second step of the template wizard lists the patches associated with the template. Because the patch plan has already been successfully deployed, the patches have already been added to the template. It is not possible to add more patches to a template; any new patches have to be applied and validated through the patch plan process. Figure 6-48 shows the patches added to the template. Click Next at the bottom of the screen.

Figure 6-48. Step 2 of the Edit Template Wizard: Patches
Step 3 provides deployment options similar to those available for a patch plan. However, there are no targets associated with the template. Just as you did with the patch plan, select the desired deployment options for the template. These options are taken from the options you previously used when creating the patch plan. You can keep what you previously selected or make new selections, as shown in Figure 6-49.

Figure 6-49. Step 3 of the Edit Template Wizard: Deployment Options
When you are finished making selections, click Exit Wizard at the bottom of the page. This brings you back to the Deployment Successful page. At this point, you need to return to the Patches & Updates page to see whether the template is listed in the Plans window (see Figure 6-50).

Figure 6-50. Plans window listing templates
The patches that are deployed using patch plans or templates are stored in the Software Library. You can see what patches are stored in the Software Library from the Saved Patches location: choose Enterprise ![]() Provisioning and Patching
Provisioning and Patching ![]() Saved Patches. Figure 6-51 shows the listing of saved patches currently in the Software Library.
Saved Patches. Figure 6-51 shows the listing of saved patches currently in the Software Library.

Figure 6-51. Saved patches in the Software Library
On the Saved Patches page, you can perform various operations. You can manually upload and remove patches if needed. You can also access the readme files for the associated patches. These features make it easier to work with offline patching if there is no connection to the Internet from the Oracle Management Server and need to download the patches manually.
For more information on offline patching, refer to the Oracle Enterprise Manager Lifecycle Management Administrator’s Guide 12c Release 2 (12.1.0.2) at the following URL:
http://docs.oracle.com/cd/E24628_01/em.121/e27046/pat_mosem_new.htm#BABBIEAI
Additional Patching Procedures
Additional patching procedures can be used for deployments of patches. You can access these procedures by choosing Enterprise ![]() Provisioning and Patching
Provisioning and Patching ![]() Procedure Library and then searching for patches in the Search Text Fields text box (see Figure 6-52).
Procedure Library and then searching for patches in the Search Text Fields text box (see Figure 6-52).

Figure 6-52. Procedure Library (partial listing)
As you can see, many additional patching procedures are available, such as Clone and Patch Oracle Database, Patch Application Server, and parallel and rolling patches. With all these options, Oracle Enterprise Manager is a valuable tool in helping administrators patch their environments.
EM12c supplies some new roles out of the box that are specific to patching: EM_PATCH_ADMINISTRATOR, EM_PATCH_DESIGNER, and EM_PATCH_OPERATOR. These roles need to be granted to the administrators who are responsible for patching activities.
To view these roles within Oracle Enterprise Manager, choose Setup ![]() Security
Security ![]() Roles. Then search for the keyword patch. This brings up all the roles associated with patching (see Figure 6-53).
Roles. Then search for the keyword patch. This brings up all the roles associated with patching (see Figure 6-53).
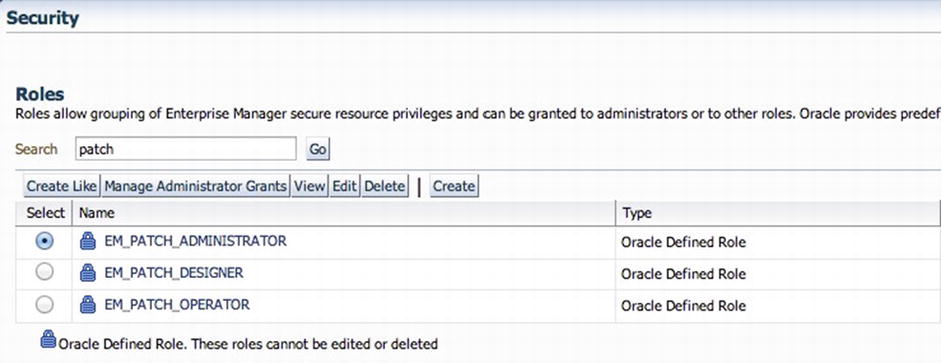
Figure 6-53. Patching roles located under Security
Let’s take a look at these roles as defined for patching:
- EM_PATCH_ADMINISTRATOR: This is the role for creating, editing, deploying, deleting, and granting privileges for any patch plan in Enterprise Manager. This role can also grant privileges to other administrators after creating them. This is a full privilege access role to any patch plan and template within Enterprise Manager. This role should be given out on a limited basis.
- EM_PATCH_DESIGNER: This role can create and view any patch plan. This role is normally used in the identification of patches across the patching lifecycle (development, testing, and production). This role would be assigned to a senior DBA in an organization. This role has the ability to create patch plans and templates and grant privileges to those plans to EM_PATCH_OPERATORS.
- EM_PATCH_OPERATORS: This is a role for deploying patch plans. This role is very limited in that is can only deploy patch plans. It has no privileges to create or modify any patch plans or templates. This role is ideal for junior DBAs of an organization.
These new patching roles enable administrators to provide a division of work between many layers of a department while making sure that patches are applied on a consistent schedule.
Provisioning is another important part of the lifecycle offered with Cloud Control. It allows us to provision database options, such as single-instance Oracle databases and Oracle Real Application Cluster databases; extend or delete nodes from Real Application Clusters, Oracle Real Application Clusters One; and upgrade single-instance databases in an automated manner.
Overview of Database Provisioning
First, let’s take a general look at database provisioning. Figure 6-54 shows the provisioning solution in a hierarchical view.

Figure 6-54. Hierarchical view of provisioning
There are a few features that you need to understand before moving on. These features are the following:
- Designer and operator roles: Cloud Control offers designer and operator roles for administrators for provisioning. These clearly defined roles give you the capability to lock down the deployment procedure inputs to provide standard deployment configurations.
- Locking-down feature in the designer role: This feature of provisioning enables the designers to lock down a set of variables, such as host target, credentials, and the Oracle home to be provisioned in the deployment procedure. This enables the standardization and minimizes errors in the configurations for mass deployments. The operator can deploy the procedure that was saved by the designer in the procedure library.
- Provisioning profiles and database templates: Provisioning profiles are used in provisioning to ensure standardization in deployments and minimize errors.
- Creating databases using Cloud Control: You can create databases directly from the Cloud Control console. This is to ensure that databases can be provisioned and created from a single interface.
- Easy-to-navigate database provisioning wizards: Designers and operators can easily use and navigate through the Database Provisioning Wizard in Cloud Control.
- Self Update: The Self Update feature is used to automatically download and install updates to your provisioning entities.
- Database Provisioning console for all database provisioning activities: The Database Provisioning console is the central starting point for database provisioning activities. The console displays information about provisioning setup, profiles, deployment procedures, and any information about getting started with provisioning.
To access the Database Provisioning console, you choose Enterprise ![]() Provisioning and Patching
Provisioning and Patching ![]() Database Provisioning. You will notice additional provisioning options for Bare Metal and Middleware; these are used to provision servers and middleware targets. Just to be clear, we are focusing on database provisioning in this chapter. Figure 6-55 shows the upper portion of the Database Provisioning console.
Database Provisioning. You will notice additional provisioning options for Bare Metal and Middleware; these are used to provision servers and middleware targets. Just to be clear, we are focusing on database provisioning in this chapter. Figure 6-55 shows the upper portion of the Database Provisioning console.

Figure 6-55. Database Provisioning console
Supported Targets and Deployment Procedures
Now that you have a starting point for database provisioning, what can you provision? How do you provision? Cloud Control enables you to perform database provisioning by using deployment procedures. A deployment procedure is a set of predefined steps that run in sequence to complete the provisioning tasks. Table 6-3 lists procedures that are offered and used to provision databases from within Cloud Control.
Table 6-3. Deployment Procedures used for Database Provisioning

With the deployments procedures that are in Table 6-3, there are a variety of use cases. There are far too many to discuss in this chapter, so we will focus on a single-instance Oracle database provisioning for the remainder of this chapter.
Setup for Database Provisioning
Using the Provisioning options in Oracle Enterprise Manager Cloud Control, you can provision Oracle databases, Oracle Real Application Clusters databases, and Oracle Real Application Clusters One databases by using templates, installation media, database entities, or provisioning profiles to standardize deployments.
Creating a Provision Profile
A provision profile is an entity that contains software bits and configuration details. When a profile is created from an existing installation, it provides flexibility in cloning of an Oracle database. We can create database templates by using provisioning profiles. Using a provisioning profile enables standardization within deployments. Provisioning profiles reduce the need to reschedule deployments by avoiding errors and increase efficiency of deployment procedures. Let’s review how to create a provision profile.
To create a provision profile, you need to access the Provision Database console by choosing Enterprise ![]() Provisioning and Patching
Provisioning and Patching ![]() Database Provisioning. At the top of the Profiles section is a Create button. Click this button, shown in Figure 6-56, to start the Database Provisioning Profile Wizard, a four-step wizard that walks you through the creation of a provisioning profile.
Database Provisioning. At the top of the Profiles section is a Create button. Click this button, shown in Figure 6-56, to start the Database Provisioning Profile Wizard, a four-step wizard that walks you through the creation of a provisioning profile.

Figure 6-56. Clicking the Create button
The Database Provisioning Profile Wizard starts at step 1, which asks for a reference target (see Figure 6-57). This is the target you want to use to build the provisioning profile. Click the search icon and select the target you want to use. Then click Next to move on.
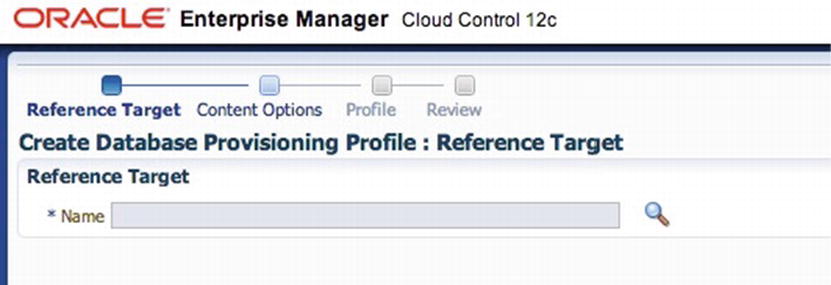
Figure 6-57. Reference target
Now you are presented with components specific to the target. These components will be included in the provision profile (see Figure 6-58). Depending on the reference target, you can choose to either leave these items or remove them from the profile.

Figure 6-58. Reference target components
On the right-hand side of the Reference Target page is the Credentials section, shown in Figure 6-59. You need to select either Preferred Credentials or Named Credentials. If you need to add these credentials, use the Setup ![]() Security function. Chapter 4 covers how to add credentials to the security modules. If everything is set, click Next.
Security function. Chapter 4 covers how to add credentials to the security modules. If everything is set, click Next.

Figure 6-59. Credentials section
The second step in creating the provision profile is Content Options, shown in Figure 6-60. This step performs a backup using RMAN, if needed. If the database is in ARCHIVELOG mode, a hot backup can be performed. If not, a cold backup will be done. Click Next.

Figure 6-60. Content options
The Profile page, shown in Figure 6-61, is the third step in creating a provision profile. At this point, you can edit or retain the defaults on the page. The storage location for this profile is also defined in the Software Library Storage section. This shows that we will be storing this provision profile in the Software Library for later use. Not listed in Figure 6-62 is the schedule and working directory windows. These areas can be changed as needed. Click Next.

Figure 6-61. Profile page
The final step is the Review page, shown in Figure 6-62. As with other review pages, you can review your choices here before hitting Submit. Click Submit to create the profile.

Figure 6-62. Reviewing the profile
After the job has been submitted and created, ensure that the provisioning profile appears in the Database Provisioning page.
![]() Note The provisioning job that is submitted will create the gold image of the database that was selected for the profile.
Note The provisioning job that is submitted will create the gold image of the database that was selected for the profile.
Another way to provision an Oracle database is to upload the installation media into the Software Library. The installation media can then be pushed out to target systems by using deployment procedures. Let’s look at how to create and upload installation media to the Software Library.
Before you can upload installation media into the Software Library, you need to download the media from Oracle. Media files can be downloaded from the Oracle Technology Network (OTN), My Oracle Support (MOS), or Oracle’s E-Delivery portal.
![]() Note From the Oracle Technology Network, anyone can download the software. If you have a valid customer support identifier (CSI), you can access E-Delivery and download from there, as well.
Note From the Oracle Technology Network, anyone can download the software. If you have a valid customer support identifier (CSI), you can access E-Delivery and download from there, as well.
You need to pull down the zip files for the Oracle database to a temporary directory on the host you are working from. These files are located on disk 1 and disk 2 of the media downloaded from Oracle. Then follow these steps:
- After the files from disk 1 and 2 are downloaded, navigate to the temporary location where they were saved. These files need to be unzipped by using a zip tool that is available on the system. Then combine these two files into a single zipped file.
- Open the Software Library by choosing Enterprise Provisioning and Patching Software Library. In the Software Library, select the directory where you want to create the installation media for the database.
- With the directory selected for the binaries, you need to create a new entity under this folder. From the Actions menu in the Software Library, choose Create Entity, as shown in Figure 6-63.

Figure 6-63. Creating a new entity in the Software Library
- Next you need to upload the installation media as a new entity in the Software Library. This process is similar to the steps used earlier in this chapter, except you choose Installation Media when selecting the component (see Figure 6-64). Click Continue.

Figure 6-64. Creating aninstallation media entity
- On the Describe page, the only input required for Installation Media is the name. All other information on this page is optional. Click Next.
- On the Configure page, you indicate the components of the installation media, as shown in Figure 6-65. These settings cannot be changed after the media has been uploaded to the Software Library. Click Next.

Figure 6-65. Specifications for the installation media components
- Next is the Select Files page, where you will select the single zip file created earlier for the database binaries. By default, the Upload Files option is selected. Under the specified destination, we need to select the upload location where we want to place our zip file. Click the search icon to open the Select Upload Location dialog box, shown in Figure 6-66.

Figure 6-66. Selecting the upload location
- Since we have only one Software Library, click OK. The location selected will be reflected on the Select Files page. Then in the Specify Source section, click the Add button and select the zip file that you would like to upload to the Software Library (see Figure 6-67). Click Next.

Figure 6-67. Select Files page
- Finally, on the Review page, you can review all the options you selected and then click Save and Upload. This uploads our zip file into the Software Library. After the upload is complete, you just need to verify that the file is uploaded where you expected it to be.
Thus far, you have seen how to create a provision profile and create installation media. Now let’s take a look at how to provision a database by using one of these methods. For this example, you will use the installation media created in the “Creating Installation Media” section. Remember that Oracle Enterprise Manager can be used to provision many types of targets through tools such as Database Provisioning, Bare Metal Provisioning, and Middleware Provisioning. To get started in the provisioning of a database, you need to open the Database Provisioning console; choose Enterprise ![]() Provisioning and Patching
Provisioning and Patching ![]() Database Provisioning.
Database Provisioning.
From the Database Provisioning page, you will use deployment procedures to provision a database. Because we are provisioning a single database, select Provision Oracle Database and click the Launch button, as shown in Figure 6-68. At this point, the provisioning wizard for Oracle database launches.

Figure 6-68. Select and launch the Provision Oracle Database deployment procedure
When the Provision Database wizard starts, you can see that it is similar to many other wizards within Oracle Enterprise Manager. This wizard is a five-step process, with the first step enabling you to select the host where you want to provision a database. Here are the steps of the wizard:
- On the Select Host page, you have the option of using a provision profile. By default, this option is set to None. Because we are using installation media to provision a database, you do not need to select a provisioning profile.
- The next two sections on the Select Hosts page are important to provisioning a database. In the Select Tasks to Perform section, you choose a platform and a version, and whether to install Grid Infrastructure and deploy database software. The Version drop-down box provides all the versions of Oracle that are supported for provisioning (see Figure 6-69).
 Note Oracle Enterprise Manager Cloud Control 12c Bundle Patch 2 Update 1 contains the plug-ins and support for upcoming releases of Oracle products.
Figure 6-69. Selecting tasks to perform
- In the Select Destination Hosts section, you add one or more hosts to provision the database software to. The selection of destination hosts is driven by the platform that is selected in the preceding Select Tasks to Perform section. Figure 6-70 shows a host selected for destination. Once everything is selected, click Next.

Figure 6-70. Selection of destination hosts
Now you end up at step 2, where you have to provide configuration details for the provision process. Each one of these tasks needs to be completed and checked off before you can move to step 3 (see Figure 6-71).

Figure 6-71. Providing configuration details
The tasks outlined on the Configure page are required for provisioning a database to a host:
- The Setup Hosts task allows us to set normal and privileged usernames and passwords to be used against the host. These passwords can be set up in advance under Setup Security Named Credentials or created during the task. Once all the passwords are configured, a green check mark appears in the status column.
- The second task is to specify the software that you want to deploy. Click the Deploy Software link, and you are taken to a single-step wizard where you can specify the source, destination, and additional parameters for this deployment (see Figure 6-72). To deploy the database software, you need to select the software to deploy. Click the search tool in the Source section and then select the software from the Software Library. Next, provide the details for the deployment, such as destination and any additional parameters needed for deployment. Click Next.

Figure 6-72. Selecting software locations
- The third task in the configuration to provision a database is the Create Database task. Just as in the first two steps, you click Create Database to start the wizard. This six-step wizard is similar to the Oracle Database Configuration Assistant, but this one is inside Oracle Enterprise Manager. Click Next to walk through the wizard and configure many items such as SID and passwords, as shown in Figure 6-73.

Figure 6-73. Identification and placement
- The last of the four tasks is Compliance Standards. Click Compliance Standards to access its one-step wizard. Here you assign a compliance standard to the new database. This greatly speeds up the configuration of databases to internal compliance standards (see Figure 6-74). For this example, select None and click Next.
Note For more information on compliance configuration within the Oracle Enterprise Manager, please see the Oracle documentation.
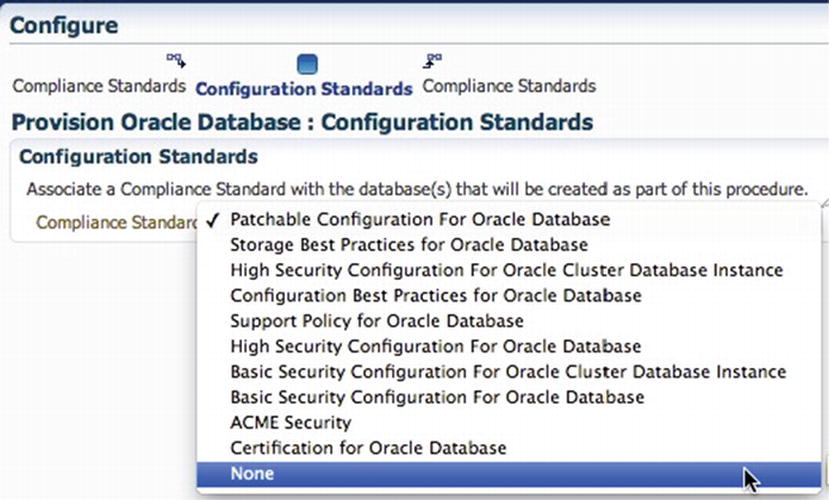
Figure 6-74. Setting configuration standards
- Once everything is configured, as shown in Figure 6-75, you can move on to the next steps in the wizard. Click Next.

Figure 6-75. Configuration is completed
The third step in the wizard is skipped because we are not using any custom properties. In step 4, the Oracle Enterprise Manager schedules the deployment of the software. You can schedule the deployment to happen immediately (which is the default) or at a later time. Additionally, you can specify whether notifications should be used to indicate any issues or concerns, or to indicate when it succeeds. If there is nothing to change on this page, click Next.
The final step in the provisioning of a database is step 5, the Review step (see Figure 6-76). From here you can see all the options that you configured and submit the job.
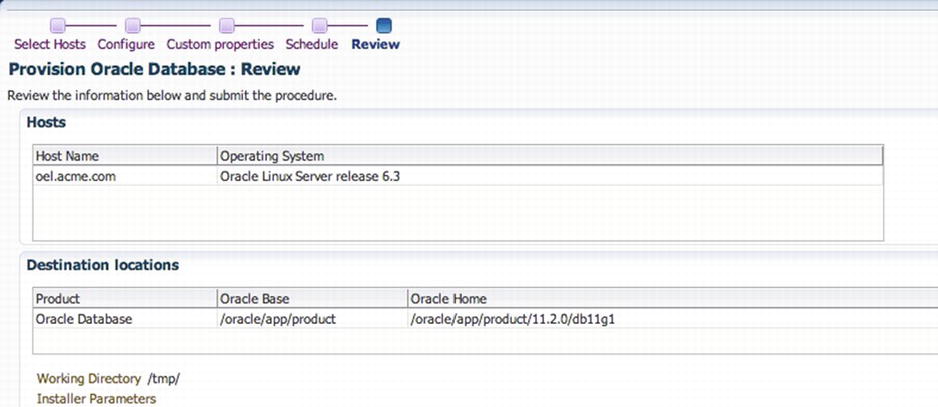
Figure 6-76. Reviewing options for provisioning the Oracle database (partial screen)
After submitting the job, you will be taken to the Provisioning page, where you can monitor the job. This page is loaded with a lot of valuable information. You can either stay on this page or move away and work on something else while the database is provisioned.
Summary
EM12c is a valuable tool for patching and provisioning within your environment. To be flexible and provide a lot of options, Oracle Enterprise Manager relies on the Software Library to be the central storage location for software such as patches, and to install software and gold images. Patching and provisioning are two valuable options within the lifecycle of Enterprise Manager. The options enable administrators to quickly patch old environments and provision new environments very quickly and securely.