
![]()
High Availability, Backup, and Recovery
by Leighton Nelson
This chapter explores three levels of architecture required for setting up a highly available Oracle Enterprise Manager Cloud Control 12c environment. It also covers backup and recovery methods for the components of the system, including the repository database, management service, and agents.
Enterprise Manager Cloud Control 12c provides a complete infrastructure management solution for databases, applications, and hardware. Having such a key component in the enterprise naturally leads to concerns about redundancy and high availability. If something does go wrong within the configuration, recovery should occur in the shortest possible time, thus minimizing disruptions to manageability and monitoring of the enterprise infrastructure. Maintenance will also be required to apply patches to the Enterprise Manager software components (that is, database, management service, agents, and operating systems). It is with these concerns in mind that Oracle Enterprise Manager has been designed to meet the desired service and operating levels by using different high-availability mechanisms.
High Availability
Each component within the Enterprise Manager architecture should be made highly available to enable a complete high-availability configuration. The main components to be considered, shown in Figure 13-1, are as follows:
- Management Agent: Runs on targets and communicates with and sends metrics to the OMS
- Management Server: The heart of the Enterprise Manager that provides Management Services
- Repository: Stores persistent data from the monitored targets in an Oracle database
- Software Library: Stores files for patching, provisioning, and agent and plug-in deployment

Figure 13-1 . Enterprise Manager Cloud Control 12c architecture
Different levels of high availability can be configured for each component with varying levels of complexity and cost. When considering your high-availability requirements, there should be minimal trade-offs in cost, complexity, performance, and data loss. Generally, the complexity and level of high availability are proportional to each other.
The Oracle Management Agent should be configured to start on boot. This ensures that no manual intervention will be required after a server reboots and quickly enables targets to be monitored after a service disruption. On Unix and Linux operating systems, a script called gcstartup is placed in /etc/init.d and made to run at certain runlevels. On Microsoft Windows, a service is created to start automatically on boot.
Oracle has defined four levels of high availability for Enterprise Manager Cloud Control. These are summarized in Table 13-1. Only levels 1 to 3 are covered in this chapter.
Table 13-1. Levels of Enterprise Manager High Availability

The Oracle Management Agent is responsible for sending metrics and pending alerts for hosts on which it is installed. To provide high availability, the following features should be enabled for the agent:
- Enable the agent to start automatically on OS boot up. This should be configured automatically after running the root.sh script.
- Install the agent on redundant storage. This includes a RAID-configured storage back end.
- Configure restart parameters for the agent watchdog process. The watchdog process is responsible for restarting the agents based on the following environment variables:
- EM_MAX_RETRIES indicates the maximum number of times the watchdog process will attempt to restart the agent within the EM_MAX_RETRY_WINDOW. The default is set to 3.
- EM_RETRY_WINDOW indicates the time interval that is used with EM_MAX_RETRIES before trying to start the management agent. The default is set to 600 seconds.
After installing the Enterprise Manager agent, the <AGENT_HOME>/root.sh script should be executed. This will create the following scripts on Linux and some Unix operating systems that control the startup of the management agent.
- /etc/init.d/gcstartup
- /etc/init/gcstartup
- /etc/rc.d/init.d/gcstartup
If these files are not present, make sure the <AGENT_HOME>/root.sh script has been executed.
Loss or corruption of the agent will result in loss of monitoring and metric data uploads for its associated targets. Likewise, if the agent is down, targets will not be able to communicate with the management server, resulting in loss of manageability.
The repository is the persistent store for monitoring data uploaded by agents. It stores metrics and configuration data from all monitored targets. Loss of the repository will result in management server failure. It is recommended to enable database high-availability features such as Real Application Clusters (RAC) or RAC One Node, Automatic Storage Management (ASM) for data file storage (depending on redundancy levels and back-end RAID configuration),and Data Guard for the repository. Additionally, the management service should be configured to use the Single Client Access Name (SCAN) and a nondefault RAC service name if the repository is configured as a RAC database. The following is an example of configuring the management service for use with a RAC database:
emctl config oms -store_repos_details -repos_conndesc "
(DESCRIPTION= (ADDRESS=(PROTOCOL=TCP)
(HOST=emrep-scan.example.com)(PORT=1521) )
(CONNECT_DATA=(SERVER=DEDICATED) (SERVICE_NAME = emrep)))"
-repos_user sysman
Figure 13-2 shows an example of an OMS configured with a RAC repository database using the SCAN name. For additional details on configuring SCAN, see the Oracle Clusterware Administration and Deployment Guide 11g Release 2 (11.2).
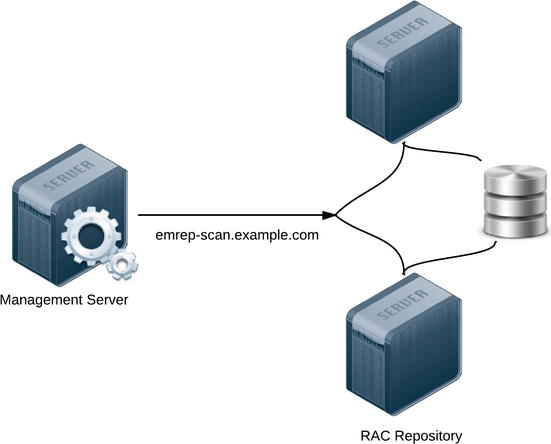
Figure 13-2 . Repository database configured using RAC database
Consider using the Maximum Availability Architecture1 (MAA) Advisor in Enterprise Manager Cloud Control 12c to configure additional HA components, including the following:
- Enable ARCHIVELOG mode so that consistent hot backups of the database can be performed.
- Enable block checksums to enable Oracle to detect corruption due to physical disks or storage systems. Set the DB_BLOCK_CHECKSUM parameter to TYPICAL or FULL.
- Configure the size of redo log files and groups appropriately. Optimize I/O throughput and performance of the database so that log switches do not occur too frequently. Use of the Redo Log Sizing Advisor (enabled by setting FAST_START_MTTR_TARGET) can help determine the optimal sizes.
- Use a Fast Recovery Area2 to store recovery-related files such as redo logs and archive logs. Oracle can then use suggested backup mechanisms that use the Fast Recovery Area.
- Enable Flashback Database to enable faster database recovery using flashback logs.
- Use fast-start fault recovery to control the instance-recovery time. Set the initialization parameter FAST_START_MTTR_TARGET to specify the number of seconds that instance recovery should take.
- Enable database block checking to enable early detection and prevention of data and memory corruption. Set DB_BLOCK_CHECKING to TRUE or FULL.
After configuring the components, you can monitor the status of each by using the High Availability Console, shown in Figure 13-3.

Figure 13-3 . Enterprise Manager Cloud Control 12c High Availability Console
![]() Note The management repository should be configured in its own database to ensure that operations on the repository do not affect other applications, and vice versa.
Note The management repository should be configured in its own database to ensure that operations on the repository do not affect other applications, and vice versa.
A physical standby database is recommended to provide disaster recovery in case of a failure at the primary site. Data on the primary repository will be kept in sync with the standby database. When configuring a physical standby for the repository database, use similar hardware and resources as the primary site so that there aren’t any performance implications in the event of a failover/switchover. Use Enterprise Manager to create a standby database from the primary database. Determine the network mode that you want to use to synchronize the standby database based on your network bandwidth and recovery objectives:
- Maximum Protection: Synchronous writes to standby
- Maximum Availability: Synchronous writes to standby
- Maximum Performance: Asynchronous writes to standby
![]() Note Enterprise Manager can create only a single-instance standby database. You can use the Convert to RAC feature in Enterprise Manager to convert the single-instance physical standby database to RAC.
Note Enterprise Manager can create only a single-instance standby database. You can use the Convert to RAC feature in Enterprise Manager to convert the single-instance physical standby database to RAC.
The management service, or OMS, provides a user interface via the Enterprise Manager console and processes data from agents. A loss of the OMS will result in a complete Enterprise Manager outage: agent uploads, jobs, incidents, and notifications will all stop to function. The Oracle WebLogic Node Manager and the Oracle Process Manager and Notification Server (OPMN) will attempt to restart the management service automatically if it is down. Although this provides some benefit, it will not protect the OMS if the host is down. At a minimum, the OMS and repository should be installed on separate hosts if possible. Multiple OMSs can be deployed behind a server load balancer to provide protection against a single host being down. Also, you can opt to install the OMS on a shared filesystem, which will provide passive failover in case of the loss of a single host. You will look at each of these options for protecting the OMS in further detail.
Level 1—Separate OMS and Repository Hosts/No Redundancy
A level 1 configuration is composed of a single OMS and repository, with each installed on its own host. This configuration provides the least protection, as failure of any host will result in a complete outage of the Enterprise Manager system. Consideration should be given to the proximity between the OMS and repository, as high network latency between the two can diminish performance. This configuration is recommended for all but the smallest of configurations.
Figure 13-4 is a diagram of a level 1 high-availability configuration. Agents upload directly to the management service host, while users interact with the OMS via the Enterprise Manager console or the command-line EMCLI directly to the physical OMS host. If either the management service or repository database hosts become unavailable, a complete outage will occur, resulting in loss of monitoring for targets. Keeping each component on its own server reduces the likelihood of their impacting each other due to resource overhead. For example, increasing the database parameters sga_max_size and sga_target could lessen the performance of the OMS because doing so reduces the amount of memory available to the operating system. In addition, it lays the basis for a scalable environment as business requirements dictate.
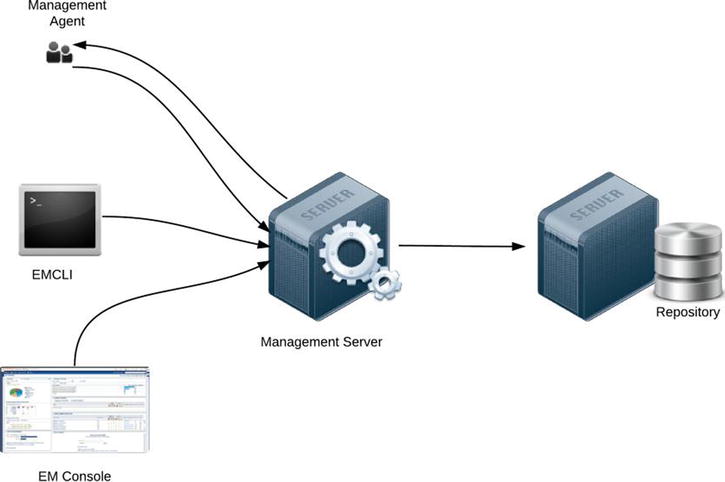
Figure 13-4 . Level 1 high-availability configuration with OMS and repository on separate servers
Level 2—Active/Passive OMS and Data Guard Repository
To reduce OMS downtime during a planned or unplanned outage, some redundancy should be introduced into the configuration. A level 2 configuration uses a shared filesystem for the management service to achieve an active/passive, or cold, failover cluster solution. The filesystem is shared between two or more hosts and is active on only one host at a time.
The following steps should be performed as a prerequisite to a level 2 high-availability configuration:
- The shared filesystem for the OMS can be installed on a general-purpose cluster file system including NFS, Oracle Cluster File System (OCFS2), and Oracle Automatic Storage Management Cluster File System (ACFS). If NFS is used as the shared storage, ensure that the correct mount options are set in /etc/fstab (/etc/filesystems on AIX) to prevent potential I/O issues. Specifically, rsize and wsize should be set.
The following example shows an entry in the /etc/fstab file on a Linux server; the NFS share is mounted on a filer named filer1 under the /vol1/oms_share directory.
filer:/vol1/oms_share /u01/app/oms_share nfs rw,bg,rsize=32768,wsize=32768,hard,nointr,tcp,noac,vers=3,timeo=600 0 0 - Install binaries for the OMS, along with the inventory, on the shared filesystem.
- Set up the virtual hostname and IP address (VIP) by using Oracle Clusterware or third-party software and hardware. Failover is achieved by using the virtual hostname for the OMS along with a unique IP address that resolves to the hostname.
- Configure the repository database by using a local physical standby with Data Guard (see Figure 13-5).

Figure 13-5 . Level 2 Enteprise Manager Cloud Control 12c high-availability configuration with active/passive OMS and local standby
In our example, we will use Oracle Clusterware to create and manage the virtual hostname as well as perform failover of the application. OCFS2 is chosen as the shared filesystem.
![]() Note OCFS v1 is not supported as shared storage for the OMS.
Note OCFS v1 is not supported as shared storage for the OMS.
You should configure the following prerequisites on all hosts before installing the management service:
- Ensure that the OS user ID is identical on each host where the OMS will be installed.
 Note For Red Hat Enterprise Linux and Oracle Linux operating systems, install the oracle-validated or oracle-preinstall-11gr2 package to enable consistent UIDs and GIDs.
[oracle@oms1 ∼]$ id -a
uid=1101(oracle) gid=1000(oinstall) groups=1000(oinstall),1021(asmdba),1032(dba) - Set environment variables.
- a. Operating System Time Zone variable, TZ:3
export TZ='America/New_York' - b. The PERL5LIB variable should be unset to avoid being associated with the incorrect PERL libraries.
- a. Operating System Time Zone variable, TZ:3
- Install Oracle Clusterware on both servers (see the Oracle Grid Infrastructure Installation Guide).
- Install and configure OCFS2.
- Prepare the database for use with OMS (see Chapter 2 for more information).
Before installing the OMS, a virtual hostname that maps to a unique static IP address should be available (which means an IP address that is currently not used, in the same subnet as the other Enterprise Manager components). A VIP is configured on the public subnet used for accessing the server. If the server that hosts the VIP goes down, it is relocated to an available member of the cluster by Oracle Clusterware. Likewise, if maintenance needs to be performed on a server hosting the VIP, it can be relocated to another server in the cluster.
A VIP can be created in the same way as any other Clusterware resource. However, Oracle recommends that you use the appvipcfg utility in Oracle Clusterware 11gR2 to create application VIPs. The VIP is created with a set of predefined settings suitable for an application VIP, such as a placement policy and failback4 option. See Oracle Clusterware Administration and Deployment Guide11gR2 documentation for details on using appvipcfg.
Using the following steps, create an application VIP for the OMS:
- After installing Oracle Clusterware 11gR2, log in as the ROOT user and issue the following command:
GRID_HOME/bin/appvipcfg create -network=1
       -ip=192.168.1.0
       -vipname=omsvip
       -user=root
An example output of running appvipcfg is as follows:
[root@oms1 bin]# /u01/app/11.2.0/grid/bin/appvipcfg create -network=1
-ip=192.168.1.0
-vipname=omsvip
-user=root
Production Copyright 2007, 2008, Oracle.All rights reserved
2012-10-28 03:30:29: Creating Resource Type
2012-10-28 03:30:29: Executing /u01/app/11.2.0/grid/bin/crsctl add type
app.appvip_net1.type -basetype ora.cluster_vip_net1.type -file
/u01/app/11.2.0/grid/crs/template/appvip.type
2012-10-28 03:30:29: Executing cmd: /u01/app/11.2.0/grid/bin/crsctl add type
app.appvip_net1.type -basetype ora.cluster_vip_net1.type -file
/u01/app/11.2.0/grid/crs/template/appvip.type
2012-10-28 03:30:37: Create the Resource
2012-10-28 03:30:37: Executing /u01/app/11.2.0/grid/bin/crsctl add resource
omsvip -type app.appvip_net1.type -attr
"USR_ORA_VIP=192.168.1.0,START_DEPENDENCIES=hard(ora.net1.network)
pullup(ora.net1.network),STOP_DEPENDENCIES=hard(ora.net1.network),
ACL='owner:root:rwx,pgrp:root:r-x,other::r--,user:root:r-x',
HOSTING_MEMBERS=oms1.example.com,APPSVIP_FAILBACK="
2012-10-28 03:30:37: Executing cmd: /u01/app/11.2.0/grid/bin/crsctl add
resource omsvip -type app.appvip_net1.type -attr
"USR_ORA_VIP=192.168.1.0,START_DEPENDENCIES=hard(ora.net1.network)
pullup(ora.net1.network),STOP_DEPENDENCIES=hard(ora.net1.network),
ACL='owner:root:rwx,pgrp:root:r-x,other::r--,user:root:r-x',
HOSTING_MEMBERS=oms1.example.com,APPSVIP_FAILBACK="
This creates a VIP on network 1, which is defined as IP address 192.168.1.0. The VIP name is omsvip and it is owned by the ROOT user.
- Next you need to allow the Oracle Grid Infrastructure software owner (for example, GRID) to run the script to start the VIP. As ROOT, execute the following:
GRID_HOME/bin/crsctl setperm resource omsvip -u user:grid:r-x - Start the VIP as the GRID user.
GRID_HOME/bin/crsctl start resource omsvipFor example:
[grid@oms1 ∼]$ $GRID_HOME/bin/crsctl start resource omsvip
CRS-2672: Attempting to start 'omsvip' on 'oms1'
CRS-2676: Start of 'omsvip' on 'oms1' succeeded - Check the status of the VIP.
GRID_HOME/bin/crsctl status resource omsvipThe status of the output should be similar to the following:
NAME=omsvip
TYPE=app.appvip_net1.type
TARGET=ONLINE
STATE=ONLINE on oms1 - The virtual hostname is defined in DNS, and should resolve to the application VIP address created using the preceding steps. Check whether the virtual hostname and VIP are resolvable by using nslookup or the dig command.
$ nslookup omsvipThis should resolve to a unique IP address of the virtual hostname on every node in the cluster.
- Also do a reverse lookup of the IP address.
$nslookup <virtual IP address> - Verify that the IP address returned from the nslookup output is running on the OMS host.
ifconfig –a|grep <virtual IP address> - After you have verified that the virtual hostname and VIP have been configured correctly, you can then proceed with the OMS installation. The following should be performed before starting the installer:
- a. Create a new ORACLE_HOME for the OMS on the shared storage on all nodes in the cluster:
$ mkdir –p /u01/app/oms_share - b. Create an Oracle inventory directory under the ORACLE_HOME for the OMS on all nodes:
$ mkdir /u01/app/oms_share/oraInventory - c. Create the inventory pointer in the oraInventory directory:
$ vi oraInst.locThe oraInst.loc file should contain the path to the inventory and the group of the software owner for the OMS. For example:
inventory_loc=/u01/app/oracle/oms_share/oraInventory
inst_group=oinstall
- a. Create a new ORACLE_HOME for the OMS on the shared storage on all nodes in the cluster:
- Next, you proceed with the installation by specifying the ORACLE_HOSTNAME environment variable as your virtual hostname and pointing to the shared inventory location.>
runInstaller -invPtrloc /u01/app/oms_share/oraInst.loc
ORACLE_HOSTNAME=omsvip.example.com –debug - Install the OMS on the first host by following the installation steps as described in the Oracle Enterprise Manager Cloud Control 12c Basic Installation Guide. You need to complete the installation only once. Because the location is shared, the binaries will be accessible from another host that shares the filesystem.
After the OMS has been successfully installed and is up and running, if the host were to go down, then the VIP would be automatically relocated to another node. The management service can then be manually started on any remaining node in the cluster on which the VIP is running.
- To manually relocate the VIP to another host in the cluster, issue the following command:
[grid@oms1 ∼]$ crsctl relocate res omsvip
CRS-2673: Attempting to stop 'omsvip' on 'oms1'
CRS-2677: Stop of 'omsvip' on 'oms1' succeeded
CRS-2672: Attempting to start 'omsvip' on 'oms2'
CRS-2676: Start of 'omsvip' on 'oms2' succeeded - Check whether the IP address associated with the VIP is running on the relocated host.
ifconfig –a|grep <vip>The repository database should be reachable from other hosts in the cluster, and the listener should be up and running.
- Set the ORACLE_HOSTNAME environment variable to the virtual hostname. Continuing with our example, we use the following command:
export ORACLE_HOSTNAME=omsvip.example.com - Start the OMS on the new node.
$OMS_HOME/bin/emctl start oms
Alternatively, Oracle Clusterware can be configured to fully manage the OMS by creating start, check, stop, clean, and abort routines that tell it how to operate on the OMS. Details on this configuration are outside the scope of this chapter. See the Oracle Clusterware Administration and Deployment Guide 11gR2 for details.
With a cold-failover solution in place for the OMS, you are protected from the failure of a single host. However, time to perform failover could range from a few minutes to hours, depending on whether it is done manually or automated via Oracle Clusterware or other methods. The repository also needs to be protected, as it is now a single point of failure. As mentioned earlier, a local Data Guard setup consisting of a single physical standby is highly recommended. The standby database should be configured on a separate host from the management servers and primary database. However, it may be possible to create both the primary and the physical standby on another OMS host to keep costs down. In the event of a planned or unplanned outage of the primary repository, the physical standby can be switched or failed over to the standby on a remaining host. Please note that the host will now become a single point of failure.
As a prerequisite to creating a standby database using Enterprise Manager, the destination host should have an Oracle Management Agent installed and should be monitored by Enterprise Manager. Also, if ASM is used as database storage, it should be monitored along with the listener.
To create a standby database using Enterprise Manager, use these steps:
- Navigate to the repository database home page and choose Availability ä Add Standby from the menu.
- Back up the primary database (see Figure 13-6). Data Guard uses RMAN to create the standby database based on either a new or existing backup. An online backup requires that the database be in ARCHIVELOG mode.

Figure 13-6 . Adding a standby database by using a RMAN online backup
If using the online method, perform the backup at a time outside peak hours so that performance of Enterprise Manager Cloud Control is not negatively impacted. When using this method, you can also decide to use RMAN’s feature to copy backups directly to the destination host using Oracle Net Services or stage the backups before copying. The latter option requires additional storage at both the primary and secondary sites. If there is an existing backup as a result of routine backup procedures or from a previous Add Standby Database operation, it may be used as well.
- Next you’ll select a backup option. As you can see in Figure 13-7, you provide the degree of parallelism RMAN will use, as well as the credentials for the primary host. The standby database will require standby redo logs for real-time apply. They will be created on the primary database as well in the event of a role transition. You may use OMF for the standby redo logs (default) or manually specify the log files. For databases using ASM, supply the disk group name.
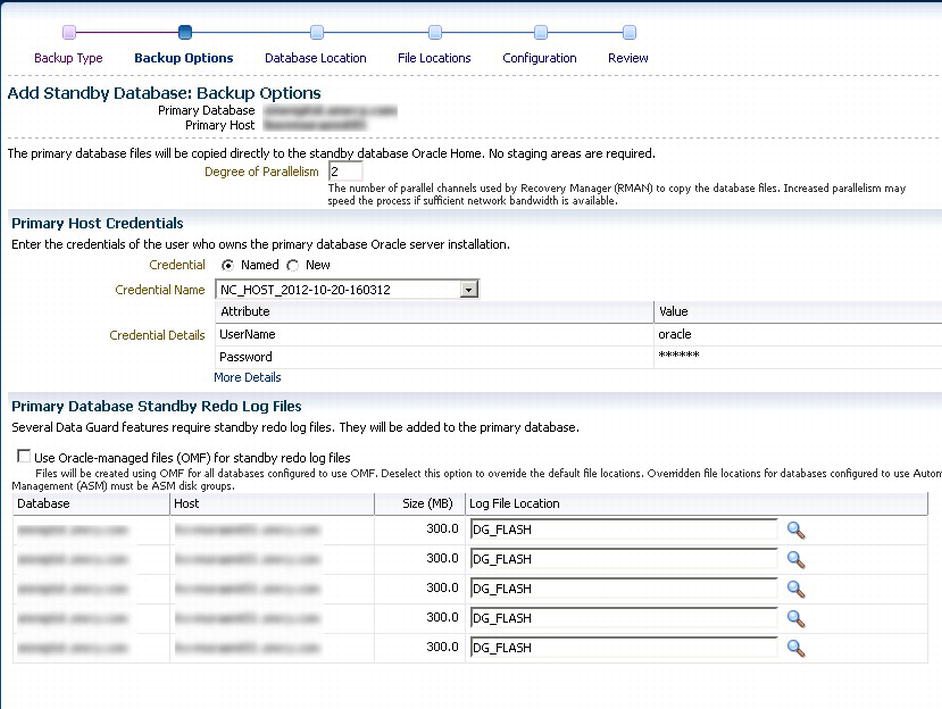
Figure 13-7 . Add Standby Database, Backup Options
- Add the file locations for storing database files and the Fast Recovery Area on the standby, as shown in Figure 13-8. If using ASM, specify the disk groups.
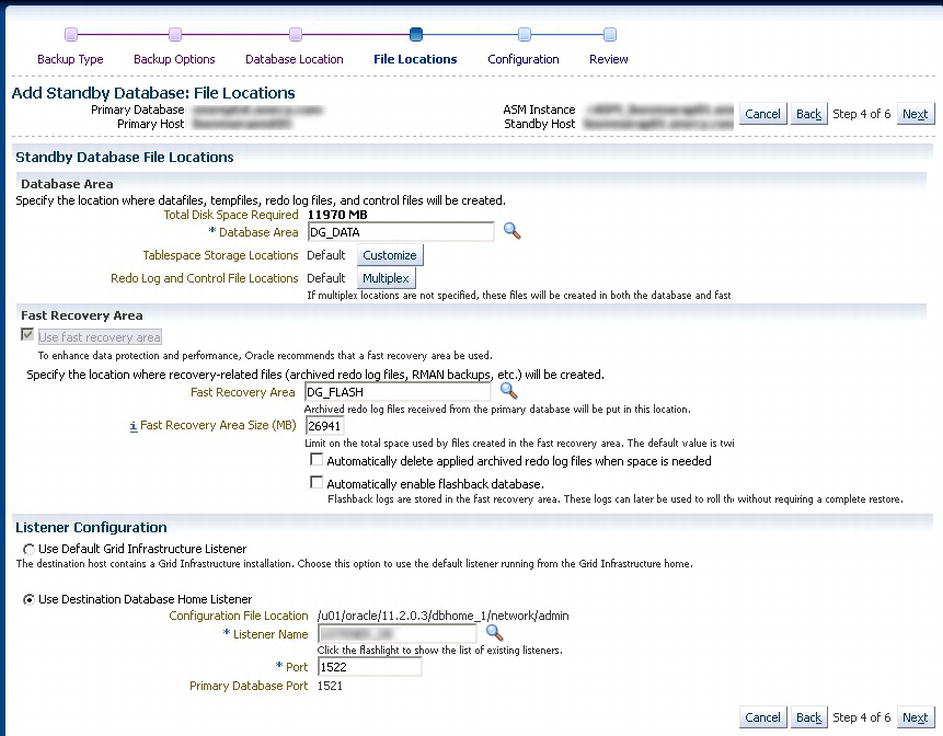
Figure 13-8 . Add Standby Database, File Locations
- Choose configuration properties of the standby database, as shown in Figure 13-9.

Figure 13-9 . Add Standby Database, Configuration
If Oracle Restart5 is configured on the standby server, enable it for the configuration:
- a. Provide a unique name for the standby database and a name for the target in Enterprise Manager.
- b. Specify the monitoring credentials to be used by Enterprise Manager by selecting the Use SYSDBA Monitoring Credentials check box. This is because the standby database will be in mounted state while the redo is being applied. Using the SYSDBA role will enable more monitoring information to become available.
- c. Select the Use Data Guard Broker check box to enable management of the primary and standby using the Data Guard Broker. It simplifies the management of primary and standby databases in a Data Guard configuration, including role transitions and health checks. A connect identifier is required by Data Guard for all communication with the primary and standby databases. Provide a connect descriptor to be used by Data Guard. Either the Enterprise Manager connect descriptor or an existing service name can be used.
- Review your options on the next screen, shown in Figure 13-10, and then click the Finish button.

Figure 13-10 . Add Standby Database, Review
- A job is created to build the standby database. Click the job name to view the steps and output, as shown in Figure 13-11.

Figure 13-11 . Data Guard job creation
After the standby database has been successfully created, you will be able to manage it via the Enterprise Manager console. From the repository database home page, choose Availability ![]() Data Guard Administration, as shown in Figure 13-12.
Data Guard Administration, as shown in Figure 13-12.

Figure 13-12 . Data Guard Administration option
The Data Guard screen presents an overview of the Data Guard status as well as configuration information about the primary and standby databases, as shown in Figure 13-13.
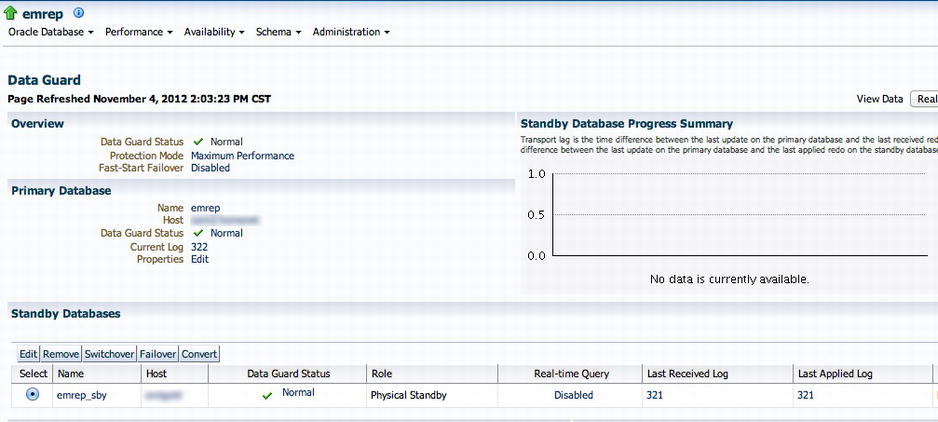
Figure 13-13 . Data Guard status
By default, the standby was created by using Maximum Performance protection mode.6 This mode ensures that if a network connectivity problem exists between the primary and the standby databases, it will not impact the primary database’s performance. However, this has the potential for data loss. Because we are using a local Data Guard, it may be feasible to enable Maximum Availability protection mode. This will also not impact the availability and performance of the primary database if a network connectivity issue arises, but provides a higher level of data protection. Change the protection mode to Maximum (see Figure 13-14).

Figure 13-14 . Changing the Data Guard protection mode
The protection mode changes will be reflected in the console, as seen in Figure 13-15. Changing from Maximum Performance to Maximum Availability will also change the redo transport mode from Asynchronous (ASYNC) to Synchronous (SYNC).
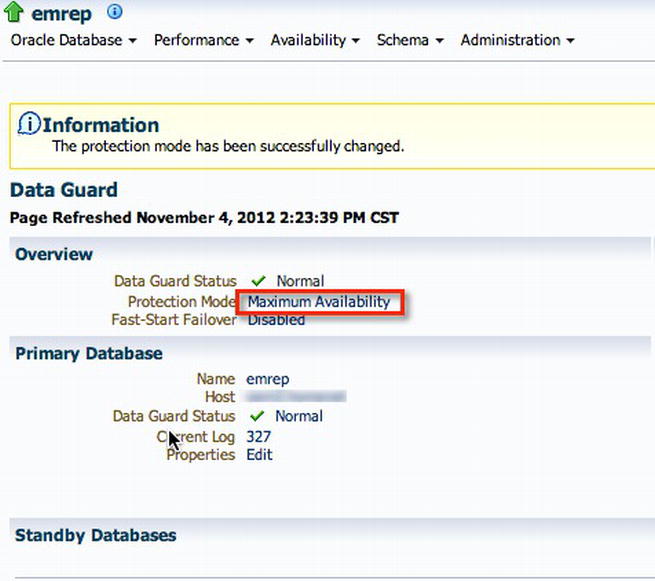
Figure 13-15 . Data Guard Maximum Availability protection mode
In addition, we recommend to use Data Guard Broker to manage the Data Guard operations such as failover, switchover, and health checks. The Data Guard Broker simplifies the management of databases in such a configuration by providing a GUI interface via Enterprise Manager or the command-line utility Data Guard Broker Line Manager, dgmgrl. A full discussion of Data Guard and Data Guard Broker is outside the scope of this chapter. See the Oracle Data Guard Concepts and Administration 11g Release 2 (11.2) documentation for details. In order to manage role-change operations for the Enterprise Manager repository, the latter method should be used, as the Enterprise Manager Cloud Control 12c system would not be available to complete the operations.
It is also possible to configure the management service so that no configuration changes are required after the repository database changes roles (that is, during switchover/failover). Using Oracle Database 11gR2, you can configure services by using the srvctl command-line utility that will be active only when the database is assuming the primary role. The following example illustrates the steps for configuring a database service in a Data Guard configuration for use with the OMS:
- Create a database service called emrepsrvc on the primary database emrepprim for use with OMS.
$ srvctl add service -d emrepprim -s emrepsrvc -l PRIMARY -q FALSE -e NONE -m NONE -w 0 -z 0 - Verify the configuration of the service.
$ srvctl config service -d emreptst -s emrepsrvc
Service name: emrepsrvc
Service is enabled
Cardinality: SINGLETON
Disconnect: false
Service role: PRIMARY
Management policy: AUTOMATIC
DTP transaction: false
AQ HA notifications: false
Failover type: NONE
Failover method: NONE
TAF failover retries: 0
TAF failover delay: 0
Connection Load Balancing Goal: LONG
Runtime Load Balancing Goal: NONE
TAF policy specification: NONE
Edition: - Start and check the status of the service on the primary.
$ srvctl start service -d emreptst -s emrepsrvc
$ srvctl status service -d emreptst -s emrepsrvc
Service emrepsrvc is running - Create the same service on the standby database for use when the role changes to a primary.
$ srvctl add service -d emrepsby -s emrepsrvc -l PRIMARY -q FALSE -e NONE -m BASIC -w 0 -z 0
$ srvctl config service -d emrepsby -s emrepsrvc
Service name: emrepsrvc
Service is enabled
Cardinality: SINGLETON
Disconnect: false
Service role: PRIMARY
Management policy: AUTOMATIC
DTP transaction: false
AQ HA notifications: false
Failover type: NONE
Failover method: BASIC
TAF failover retries: 0
TAF failover delay: 0
Connection Load Balancing Goal: LONG
Runtime Load Balancing Goal: NONE
TAF policy specification: NONE
Edition: - Reconfigure the OMS to use the new service in the connect descriptor.
$OMS_HOME/bin/emctl config oms -store_repos_details -repos_conndesc
'(DESCRIPTION=(FAILOVER=ON)(ADDRESS_LIST=(ADDRESS=(PROTOCOL=TCP)(HOST=oemhost1)(PORT=1521))
(ADDRESS=(PROTOCOL=TCP)(HOST=oemhost2)(PORT=1521)))(CONNECT_DATA=(SERVICE_NAME=emrepsrvc.
smrcy.com))(FAILOVER_MODE=(TYPE=select)(METHOD=basic)))' -repos_user sysman
Oracle Enterprise Manager Cloud Control 12c Release 2
Copyright (c) 1996, 2012 Oracle Corporation.  All rights reserved.
Enter Repository User's Password :
Successfully updated datasources and stored repository details in Credential Store.
If there are multiple OMSs in this environment, run this store_repos_details command on
all of them.
And finally, restart all the OMSs using 'emctl stop oms -all' and 'emctl start oms'. - Stop and Restart the OMS.
- a. To stop the OMS, use emctl stop oms -all:
$emctl stop oms -all
Oracle Enterprise Manager Cloud Control 12c Release 2
Copyright (c) 1996, 2012 Oracle Corporation.  All rights reserved.
Stopping WebTier...
WebTier Successfully Stopped
Stopping Oracle Management Server...
Oracle Management Server Successfully Stopped
AdminServer Successfully Stopped
Oracle Management Server is Down - b. To restart, use emctl start oms:
$emctl start oms
Oracle Enterprise Manager Cloud Control 12c Release 2
Copyright (c) 1996, 2012 Oracle Corporation.  All rights reserved.
Starting Oracle Management Server...
Starting WebTier...
WebTier Successfully Started
Oracle Management Server Successfully Started
Oracle Management Server is Up
Verify that the new DG connection string is in use
$emctl config oms -list_repos_details
Oracle Enterprise Manager Cloud Control 12c Release 2
Copyright (c) 1996, 2012 Oracle Corporation.  All rights reserved.
Repository Connect Descriptor : (DESCRIPTION=(FAILOVER=ON)(ADDRESS_LIST=(ADDRESS=(PROTOCOL=TCP)(HOST=oemhost1)(PORT=1521))
(ADDRESS=(PROTOCOL=TCP)(HOST=oemhost2)(PORT=1521)))(CONNECT_DATA=(SERVICE_NAME=emrepsrvc.
smrcy.com))(FAILOVER_MODE=(TYPE=select)(METHOD=basic)))
Repository User : sysman
- a. To stop the OMS, use emctl stop oms -all:
Level 3—Active/Active OMS with SLB and RAC Data Guard Repository
In the previous section, we determined that there would be some downtime while the OMS is failed over to another host. Some environments cannot tolerate such downtime, and so an increased level of availability is required. Fortunately, this can be achieved by using multiple management servers coupled with a RAC database as a repository. RAC provides both high availability and scalability for the database. You could also consider an active/passive RAC One Node7 configuration. Additionally, a local physical standby is used to protect the database in the event of a database storage failure. The management services are located behind a Server Load Balancer (SLB). The SLB then directs traffic from the Enterprise Manager console and management agents to an available OMS. Each management server can be installed on separate hosts from the RAC nodes (see Figure 13-16). However, you may need to balance the costs of having separate servers and the level of protection needed for such a configuration. The management servers and repository databases should be in close proximity to each other to reduce network latency. This may dictate that the management servers and RAC database instances coexist on the servers.
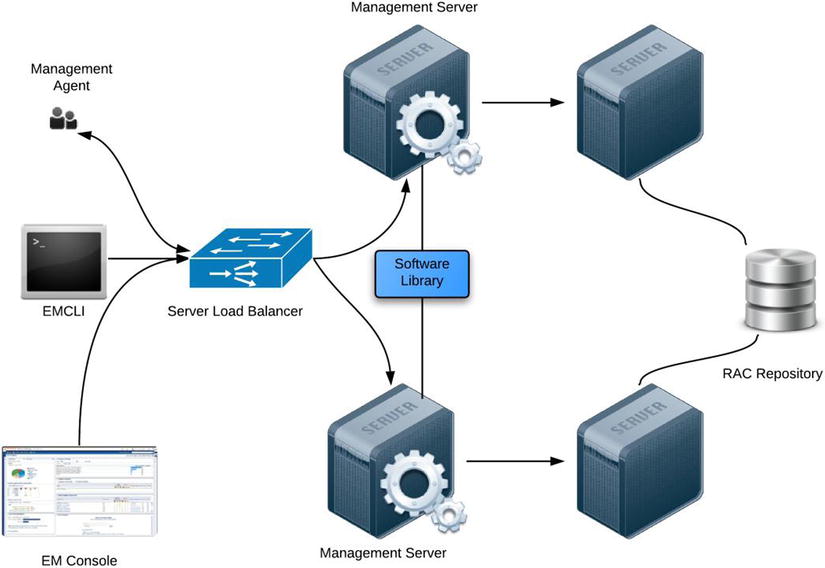
Figure 13-16 . Level 3 high availability with multiple OMSs configured behind a Server Load Balancer and a RAC database management repository
This level of availability also provides the ability to scale based on business requirements. More OMS servers can be added to scale out, while nodes can be added to the RAC database to scale the repository.
The steps required in setting up a level 3 high-availability configuration are listed here:
- Install the primary OMS.
- Configure the SLB.
- Add repository targets.
- Configure the Software Library.
- Add a second OMS.
- Create a standby database.
- Convert the standby database to RAC.
After an initial installation of the first OMS, the agents and users connect via the physical hostname:
$ $OMS_HOME/bin/emctl status oms -details
Oracle Enterprise Manager Cloud Control 12c Release 2  Copyright (c) 1996, 2012 Oracle
Corporation.  All rights reserved.
Enter Enterprise Manager Root (SYSMAN) Password :
Console Server Host        : oem1.example.com
HTTP Console Port          : 7790
HTTPS Console Port         : 7803
HTTP Upload Port           : 4890
HTTPS Upload Port          : 4904
EM Instance Home           : /u01/app/oracle/Middleware/gc_inst/em/EMGC_OMS1
OMS Log Directory Location : /u01/app/oracle/Middleware/gc_inst/em/EMGC_OMS1/sysman/log
OMS is not configured with SLB or virtual hostname
Agent Upload is locked.
OMS Console is locked.
Active CA ID: 1
Console URL: https://oem1.example.com:443/em
Upload URL: https://oem1.example.com:4904/empbs/upload

WLS Domain Information
Domain Name      : GCDomain
Admin Server Host: oem1.example.com

Managed Server Information
Managed Server Instance Name: EMGC_OMS1
Managed Server Instance Host: oem1.example.com
WebTier is Up
Oracle Management Server is Up
When a Server Load Balancer is configured, agent and console traffic is directed to multiple management services by the SLB. The SLB configuration should be done after the installation of the first OMS.
Server Load Balancer Configuration
The configuration of the SLB may vary depending on the manufacturer of the device. However, there are several requirements for the SLB, which are listed here:
- Virtual server ports: Four ports should be configured—Secure Upload, Agent Registration, Secure Console and Unsecure Console. If the OMS is configured for only secure upload and agent traffic, then only the Secure Upload and Secure Console virtual server ports are required.
- Persistence: HTTP and HTTPS traffic between the Enterprise Manager console and OMS require persistence or “stickiness” so that requests sent to one OMS don’t switch to another during the same session. Not having persistence could result in users constantly having to log in as their sessions are handled by different management services.
- Application monitoring: Checks the health of the management services so that requests aren’t sent to one that is either unavailable or degraded.
In addition to these requirements, some devices may also require additional settings such as F5 BIG-IP TCP Profiles. Table 13-2 shows an example management port configuration using only Secure Upload and Secure Console ports.
Table 13-2. Management Service Ports

The preceding configuration assumes that the Secure Upload port was configured using port 4899 and that the Secure Console port was configured using port 7803. The ports are configured during the OMS installation. Verify that you provide the same ports used during the Enterprise Manager Cloud Control 12c installation. A virtual hostname and IP address are also registered in DNS to allow clients to connect to the SLB.
Next you need to create the following items:
- Pools: Groups of two or more OMS servers that are load balanced, with each pool running a different management service
- Health monitors: Determines that the service is running and available to accept connections
- Virtual servers: A unique IP address and port that represents a pool of servers
After the SLB has been configured, the next step is to configure the OMS to use the SLB. To do this, you need to resecure the management service to regenerate the certificate.
emctl secure oms –sysman_pwd <sysman_password>
       -reg_pwd <agent_reg_password>
       -host <virtualhostname>
       -secure_port 4899
       -slb_port 4899
       -slb_console_port 443
       -console
       –lock_console
The following example illustrates securing the OMS with the SLB virtual hostname by using the HTTPS Upload using port 4904 and HTTPS Console port 443. The console is also locked to prevent non-HTTPS traffic from accessing it.
$OMS_HOME/bin/emctl secure oms -sysman_pass
-reg_pwd regpass
-host slb.example.com
-secure_port 4904
-slb_port 4904
-slb_console_port 443
-reset
-console
-lock_console
Oracle Enterprise Manager Cloud Control 12c Release 2
Copyright (c) 1996, 2012 Oracle Corporation.  All rights reserved.
Securing OMS... Started.
Securing OMS... Successful
Restart OMS
After running these commands, the OMS will need to be restarted.
emctl stop oms –all

emctl start oms
To verify that the OMS has been successfully secured, issue the following command:
emctl status oms –details
The output of this command should indicate that SLB or virtual hostname as well as the ports for the SLB HTTPS Upload and HTTPS Console.
$ $OMS_HOME/bin/emctl status oms -details
Oracle Enterprise Manager Cloud Control 12c Release 2  Copyright (c) 1996, 2012 Oracle
Corporation.  All rights reserved.
Enter Enterprise Manager Root (SYSMAN) Password :
Console Server Host        : oem1.example.com
HTTP Console Port          : 7790
HTTPS Console Port         : 7803
HTTP Upload Port           : 4890
HTTPS Upload Port          : 4904
EM Instance Home           : /u01/app/oracle/Middleware/gc_inst/em/EMGC_OMS1
OMS Log Directory Location : /u01/app/oracle/Middleware/gc_inst/em/EMGC_OMS1/sysman/log
SLB or virtual hostname: slb.example.com
HTTPS SLB Upload Port : 4904
HTTPS SLB Console Port : 443
Agent Upload is locked.
OMS Console is locked.
Active CA ID: 1
Console URL: https://slb.example.com:443/em
Upload URL: https://slb.example.com:4904/empbs/upload

WLS Domain Information
Domain Name      : GCDomain
Admin Server Host: oem1.example.com

Managed Server Information
Managed Server Instance Name: EMGC_OMS1
Managed Server Instance Host: oem1.example.com
WebTier is Up
Oracle Management Server is Up
Users can now access the server by using the virtual hostname https://slb.example.com. Port 443 is the default HTTPS port, so it is not necessary to specify the port number. If another port is selected as the secure port, it should be specified as part of the URL. Any agents that were previously deployed and configured to upload to the physical hostname of the OMS will be required to be resecured also. Use the following command to resecure the agents:
emctl secure agent –emdWalletSrcUrl
https://slb.example.com:4899/em
After securing the agent, check the status to verify that it is uploading to the SLB Upload port by checking the REPOSITORY_URL property.
$ $AGENT_HOME/core/12.1.0.2.0/bin/emctl status agent
Oracle Enterprise Manager Cloud Control 12c Release 2
Copyright (c) 1996, 2012 Oracle Corporation.  All rights reserved.
---------------------------------------------------------------
Agent Version     : 12.1.0.2.0
OMS Version       : 12.1.0.2.0
Protocol Version  : 12.1.0.1.0
Agent Home        : /u02/app/oracle/agent12c/agent_inst
Agent Binaries    : /u02/app/oracle/agent12c/core/12.1.0.2.0
Agent Process ID  : 19494
Parent Process ID : 19454
Agent URL         : https://oem1.example.com:3872/emd/main/
Repository URL    : https://slb.example.com:4904/empbs/upload
Started at        : 2012-11-03 12:44:10
Started by user   : oracle
Last Reload       : (none)
Last successful upload                       : 2012-11-03 12:47:04
Last attempted upload                        : 2012-11-03 12:47:05
Total Megabytes of XML files uploaded so far : 1.09
Number of XML files pending upload           : 44
Size of XML files pending upload(MB)         : 0.64
Available disk space on upload filesystem    : 44.63%
Collection Status                            : Collections enabled
Heartbeat Status                             : Ok
Last attempted heartbeat to OMS              : 2012-11-03 12:46:09
Last successful heartbeat to OMS             : 2012-11-03 12:46:09
Next scheduled heartbeat to OMS              : 2012-11-03 12:47:09

---------------------------------------------------------------
Agent is Running and Ready
Likewise, if EMCLI was previously configured, it also needs to be reconfigured to use the SLB:
emcli setup –url=
https://slb.example.com/em
–username=sysman
The next step is to install additional management services. This can be done by using either the Add Additional OMS Deployment Procedure (recommended) or Silent Mode. See the Oracle Enterprise Manager Cloud Control Advanced Installation and Configuration Guide for details on using Silent Mode installation.
The deployment procedure simplifies the process of deploying additional management servers to meet high-availability requirements. It automates the steps required to prepare and install additional management services by collecting input via a wizard-driven interface. It will clone the existing middleware home, including the OMS configuration based on the collected input. Any additional servers should also meet the same requirements for installing an OMS. See Chapter 8 of the Oracle Enterprise Manager Cloud Control Basic Installation Guide 12c Release 2 for prerequisites for the additional management service.
![]() Note Any new servers that are intended to be used as an OMS should already have the agent deployed. The deployment procedures will not clone an agent to the target.
Note Any new servers that are intended to be used as an OMS should already have the agent deployed. The deployment procedures will not clone an agent to the target.
Follow these steps to install an Additional OMS
- From the Enterprise Manager console, choose Enterprise
 Provisioning and Patching Procedure Library, as shown in Figure 13-17.

Figure 13-17 . Accessing the Procedure Library
- Select the Add Management Service radio button and click Launch (see Figure 13-18). You can sort the columns by the name of the Procedure by clicking if the procedure is not visible in the list.

Figure 13-18 . Add Management Service deployment procedure
- The next screen, shown in Figure 13-19, lists the prerequisites that should be met before continuing with the procedure. Select all the check boxes associated with the prerequisites already met. If any are not met, you should resolve them first before continuing with the processors. Click Next when you are finished.

Figure 13-19 . Add Oracle Management Service prerequisite checks
- On the Select Destination screen, choose a managed host that will be used as the additional OMS, as shown in Figure 13-20. The path for the Middleware home will be identical to that on the first OMS. Enter a path for the instance base location or accept the defaults. Choose or enter the credentials of the user who owns the software on both the source and destination (for example, oracle).

Figure 13-20 . Add OMS, Select Destination
- Next you will choose how to transfer the cloned home from the source OMS host to the destination host and select the staging locations (see Figure 13-21). The staging locations should have a minimum of 4GB free. If a shared filesystem such as NFS is selected, no staging locations are required. For FTP and HTTP(S) options, there also needs to be 8GB of free space in the operating system temporary location (/tmp in Unix or Linux or C:Temp in Windows). See Chapter 9 of the Oracle Enterprise Manager Cloud Control Basic Installation Guide 12c Release 2 for details on specifying the temporary location. In addition, you need to provide the ports to be used for the destination management service. They will default to the source management service ports. We recommend keeping the ports on all management services identical if possible.

Figure 13-21 . Add OMS, Options
- The Post Creation Steps screen, shown in Figure 13-22, lists the requirements for setting up the SLB to include the new OMS host if that has not been done. The root.sh script also must be executed. Optionally, you may provide an e-mail address to receive post-installation steps.
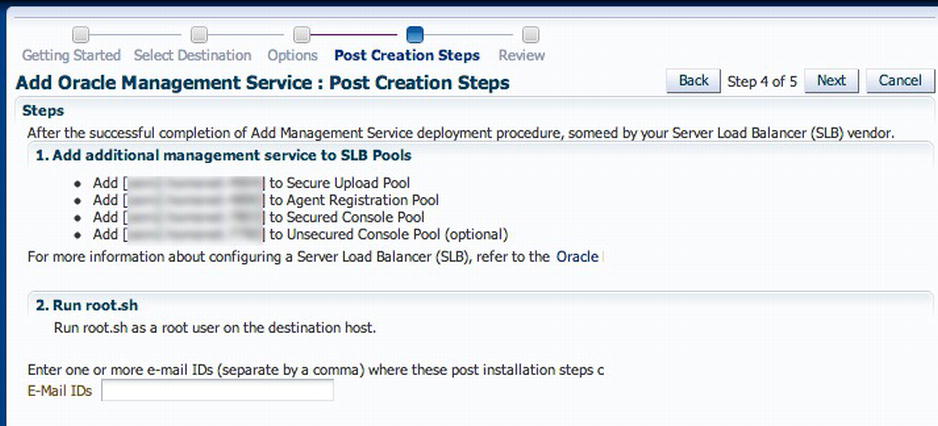
Figure 13-22 . Add OMS, Post Creation Steps
- Next you are presented with a summary screen, where you can review your inputs (see Figure 13-23). Click Finish to create the deployment procedure job. This could take a long time to run, depending on your hardware resources. You can view the progress of each step in the deployment procedure, as shown in Figure 13-24.

Figure 13-23 . Add OMS, Review

Figure 13-24 . Procedure Activity
If any step fails, you should review it and perform the necessary corrective actions before resuming or retrying. If you provided an e-mail address for the post-installation steps notification, you will be provided with steps to configure the SLB with the newly added OMS and to execute the root.sh script.
The following new targets are discovered automatically in the Enterprise Manager console:
- Oracle WebLogic Server
- Oracle Web Tier
- Application deployments
- Oracle Management Service
- Oracle Management Agent
- Enterprise Manager Cloud Control host
Any other existing targets on the host should be promoted via Add Manual Target or Auto Discovery Results.
After the additional management service has been configured, the next step in the high-availability configuration is to use Data Guard to create a local physical standby database for the repository. The Oracle MAA architecture recommends a RAC physical standby, but a single-instance standby can be used as well. The standby database will protect against storage, media corruption, or any incident that results in a loss of the primary database.
The standby database can be added by using the same procedure as described in the level 2 high-availability section of this chapter. Using Enterprise Manager Cloud Control, it is not possible to create a RAC standby. However, using deployment procedures, a single-instance standby database can be converted to a RAC standby database.
The previously described high-availability levels would provide protection for unplanned and planned downtime. Using an SLB with multiple Oracle Management Services will provide service in the event of a single OMS becoming unavailable. Using Real Application Clusters coupled with a local Data Guard provides the highest levels of availability for the repository with no downtime if a host is unavailable. If a failover or switchover operation is performed, minimal downtime will occur. However, if a complete site failure arises at the primary location, the entire Enterprise Manager Cloud Control environment will become unavailable, leading to potential disruptions in service for other applications that rely on the infrastructure.
Configuring a standby Enterprise Manager Cloud Control system at a separate site provides high availability and protects against site failures. This configuration includes multiple active/active OMS servers behind a SLB in addition to a RAC primary and standby database in a Data Guard at both the primary site and another off-site location. Prerequisites for standby management services are as follows:
- Configure the primary site by using MAA configuration, as described previously.
- Configure the standby site by using similar hardware and resources to ensure that no loss of performance occurs after switching to the standby site.
- Shared storage used for the Software Library should be replicated to the standby site. The path for the Software Library should also be identical at both locations. Consider using disk-based replication or software-based replication such as rsync8 or something similar.
- A second SLB should also be deployed at the standby site to ensure complete redundancy in a disaster recovery environment. Use vendor solutions that provide VIP failover from primary to standby sites.
After these prerequisites have been met, install and configure the standby management services by using instructions in the Oracle Enterprise Manager Cloud Control 12c Administrator’s Guide.
Standby Management Server Installation
To install a standby management server, you perform a software-only installation by using either a modified version of the Add Management Service deployment procedures from the Procedure Library or Oracle Universal Installer. The next example walks you through the steps used in the former method.
If a firewall exists between the primary and standby sites, it should be configured to allow communication for the HTTP Console, HTTPS Console, HTTP Agent Upload, and HTTPS Agent Upload ports as well as the Admin Server and Node Manager ports.
The following deployment procedure provides a step-by-step workflow for cloning the primary Enterprise Manager software including plug-ins and patches to another server:
- Copy the emkey to the management repository by running this command on the first management service (with the Admin Server running):
$ $OMS_HOME/bin/emctl config emkey -copy_to_repos
Oracle Enterprise Manager Cloud Control 12c Release 2
Copyright (c) 1996, 2012 Oracle Corporation.  All rights reserved.
Enter Enterprise Manager Root (SYSMAN) Password :
The EMKey has been copied to the Management Repository. This operation will cause the EMKey
to become unsecure.
After the required operation has been completed, secure the EMKey by running "emctl config
emkey -remove_from_repos". - Export the configuration from the first management service on the primary site. Use a shared filesystem if possible to eliminate transferring files remotely.
$ $OMS_HOME/bin/emctl exportconfig oms -sysman_pwd oracle12c -dir /u02/backup
Oracle Enterprise Manager Cloud Control 12c Release 2
Copyright (c) 1996, 2012 Oracle Corporation.  All rights reserved.
ExportConfig started...
Machine is Admin Server host. Performing Admin Server backup...
Exporting emoms properties...
Exporting secure properties...
Exporting configuration for pluggable modules...
Preparing archive file...
Backup has been written to file: /u02/backup/opf_ADMIN_20121227_131133.bka

The export file contains sensitive data.
Please ensure that it is kept secure.

ExportConfig completed successfully! - Install a management agent on the target standby host if one does not already exist.
- Perform a software-only installation of the Enterprise Manager software by using the modified Add Standby Management Service deployment procedure.
- a. From the menu, choose Enterprise Provisioning and Patching.
- b. Choose the Add Management Service procedure and click Create Like, as shown in Figure 13-25.
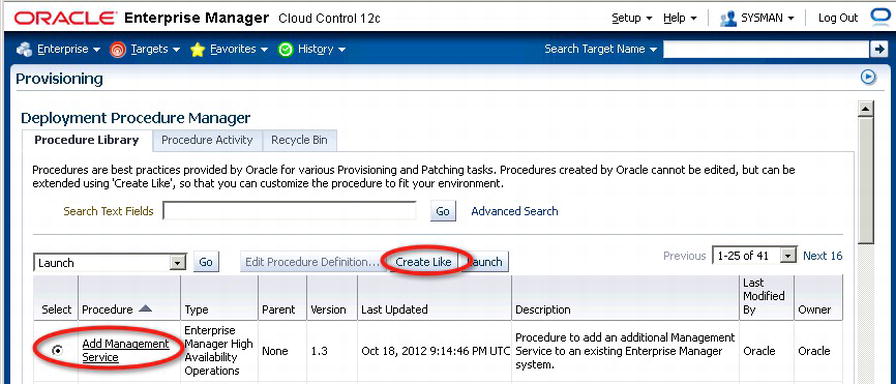
Figure 13-25 . Creating a deployment procedure for the standby management service
- c. Enter a new name for the procedure, such as Add Standby Management Service. See Figure 13-26.
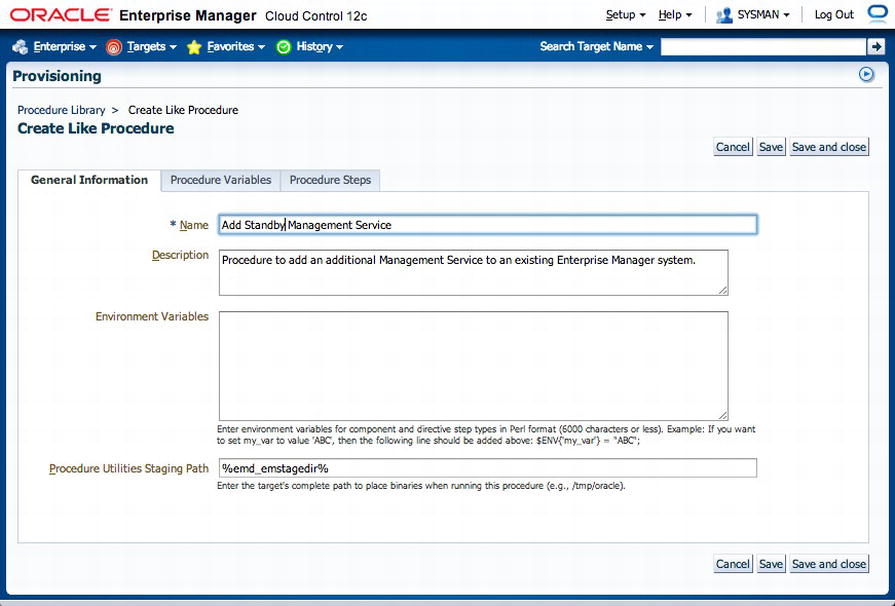
Figure 13-26 . Providing a new name for the deployment procedure
- d. Navigate to the Procedure Step tab and disable the steps (see Figure 13-27):
- Configure Management Service
- Targets Discovery
- Post Configuration Tasks

Figure 13-27 . Disabling the steps not required for the standby management service
- e. Save the deployment procedure. The new procedure should appear similar to Figure 13-28.

Figure 13-28 . Successful creation of the Add Standby Management Service deployment procedure
- f. Launch the procedure and follow the steps, which will be identical to the ones performed in adding an OMS.
- g. After the deployment completes, remove the following file from the standby host:
<OMS_HOME>/sysman/config/emInstanceMapping.properties Note Make sure that the /tmp filesystems on the primary and target standby hosts have at least 4GB free. If not, the OMS installation will fail. - a. From the menu, choose Enterprise
- Configure the standby management service by running omsca in standby mode on the standby host.
$ $OMS_HOME/bin/omsca standby -EM_DOMAIN_NAME GCDomainStby -NM_USER
nodemanager -AS_USERNAME weblogic -nostart
Oracle Enterprise Manager Cloud Control 12c Release 12.1.0.2.0
Copyright (c) 1996, 2012, Oracle. All rights reserved.

Enter Admin Server Host Name[oem3.example.com]:
Enter Admin Server HTTPS Port[7101]:
Enter Admin Server user password:
Confirm Password:
Enter EM instance host [oem3.example.com]:
Enter Upload HTTP PORT[4889]:
Enter Upload HTTPS PORT[4899]:
Enter location for OMS config files[/u01/oracle/gc_inst]:/u01/oracle/Middleware/gc_inst
Enter Node Manager Password:
Confirm Password:
Enter Repository database host name:oem.example.com
Enter Repository database listener port:1521
Enter Repository database SID:oemprd1
Enter Repository database user password:
Enter Agent Registration password:
Confirm Password:
Doing pre requisite checks ......
Pre requisite checks completed successfully

Doing infrastructure setup ......
Infrastructure setup of EM completed successfully.

Doing pre deployment operations ......
Pre deployment of EM completed successfully.

Deploying EM ......
Deployment of EM completed successfully.

Configuring webtier ......
Configuring webTier completed successfully.

Securing OMS ......
EM Key is secured and is backed up at /u01/oracle/Middleware/oms/sysman/config/emkey.ora
Adapter created successfully: emgc_USER
Adapter created successfully: emgc_GROUP
Post "Deploy and Repos Setup" operations completed successfully.

Performing Post deploy operations ....
Total 0 errors, 0 warnings. 0 entities imported.
pluginID:oracle.sysman.core
Done with csg import
pluginID:oracle.sysman.core
Done with csg import
Post deploy operations completed successfully.

EM configuration completed successfully.
EM URL is: https://oem.example.com:7799/em - Configure plug-ins by running this command:
pluginca -action deploy -isFirstOMS true -plugins <plugin-list> -oracleHome
<oms oracle home> -middlewareHome <wls middleware home>- The following query should be used to get the list of plug-ins:
SELECT epv.plugin_id, epv.version FROM em_plugin_version epv,
        em_current_deployed_plugin ecp
WHERE epv.plugin_type NOT IN ( 'BUILT_IN_TARGET_TYPE' , 'INSTALL_HOME')
        AND ecp.dest_type='2'
AND epv.plugin_version_id = ecp.plugin_version_id; - The plug-ins should be a comma-separated list of this format:
<plugin-id>=<plugin-version>,<plugin-id>=<plugin-version>,... - A query such as the following can be used to extract the plug-ins in the required format:
SELECT listagg(epv.plugin_id||'='||epv.version,',')
        within group (order by epv.plugin_id)
FROM em_plugin_version epv, em_current_deployed_plugin ecp
WHERE epv.plugin_type NOT IN ( 'BUILT_IN_TARGET_TYPE' , 'INSTALL_HOME')
        AND ecp.dest_type='2'
AND epv.plugin_version_id = ecp.plugin_version_id; - The results of the query can then be used as the plugins argument in pluginca:
$ $OMS_HOME/bin/pluginca -action deploy -isFirstOMS true -plugins "oracle.sysman.db=12.1.0.2.0,oracle.sysman.emas=12.1.0.3.0,oracle.sysman.mos=12.1.0.2.0,
oracle.sysman.xa=12.1.0.3.0" -oracleHome $OMS_HOME -middlewareHome $MW_HOME
pluginca - Plugin Configuration Tool
Oracle Enterprise Manager 12c Release 2 Grid Control
Copyright (c) 1996, 2012 Oracle Corporation. All rights reserved.
Log file: /u01/oracle/Middleware/oms/cfgtoollogs/pluginca/gcinstall/configplugin_deploy_
2013-01-02_14-42-39.log
Trace file: /u01/oracle/Middleware/oms/cfgtoollogs/pluginca/gcinstall/configplugin_deploy_
2013-01-02_14-42-39.trc
Initializing PluginCA.
Options passed: -loglevel debug -action deploy -isfirstoms true -plugins oracle.sysman.db=12.1.0.2.0,oracle.sysman.emas=12.1.0.3.0,oracle.sysman.mos=12.1.0.2.0,
oracle.sysman.xa=12.1.0.3.0 -oraclehome /u01/oracle/Middleware/oms –middlewarehome
/u01/oracle/Middleware
Starting Deployment
Invoking pre deploy callbacks.
OMS state could be found. It is down
Performing Midtier deconfig
Performing Midtier config
Performing Opss deconfig
Performing Opss config
Performing Post metadata registration
Performing Midtier update oh prop
Performing Post config module
Invoking post deploy callbacks.
Completed Deployment
- The following query should be used to get the list of plug-ins:
- Import the configuration exported from the primary management service in step 2. If the configuration was exported to a local filesystem, copy it over to the standby host first.
$OMS_HOME/bin/emctl importconfig oms -file /u02/backup/opf_ADMIN_20121227_131133.bka
Oracle Enterprise Manager Cloud Control 12c Release 2
Copyright (c) 1996, 2012 Oracle Corporation.  All rights reserved.
ImportConfig started...
Enter Enterprise Manager Root (SYSMAN) Password :
Enter Agent Registration Password:
Processing export file...
Checking OS and OMS Versions...
OS check passed.
OMS version check passed.
Proceed with oms import...
Backing up the OMS before import...
Pre-import backup of OMS failed...
Error: null

Do you wish to continue with import? (y/n)
y
Continuing with Importconfig...
Updating OMS properties...
Configuring emoms.properties...
Processing zipped files...

If you have software library configured
please make sure it is functional and accessible
from this OMS by visiting:
 Setup->Change Management->Software Library

Resecure the OMS...
OMS secured!
ImportConfig completed successfully! - Stop the standby OMS.
emctl stop oms - From the primary Enterprise Manager console, add the WebLogic Domain and associated targets by using the Add Manual Targets Guided Discovery to discover Fusion Middleware targets on the standby host.
- Configure Single Sign On on the standby if previously configured on the primary. This includes Active Directory authentication for Enterprise Manager Cloud Control administrators.
- Perform configuration of any additional components such as BI Publisher or Real User Experience Insight if configured on the primary.
Standby Management Server Post-Installation
One caveat of having a standby site is the additional administrative overhead required. The standby site has to be kept in sync with the primary site after the initial configuration. For the repository database, Data Guard handles synchronization automatically. Patches applied to the software homes on the primary also need to be applied at the standby site. Any database scripts executed on the primary as part of the patching process are handled by Data Guard and should not be executed again on the standby site. Plug-ins deployed or updated on the primary site are also required to be deployed and updated on the standby site. Failing to do so will cause the OMS to fail to start up if a switchover is attempted. See the Oracle Enterprise Manager Cloud Control Administrator’s Guide 12c Release 2 for details on plug-in deployment and upgrades on the standby site.
In addition to the preceding changes, the SYSMAN credentials should be kept in sync on the primary and standby sites. If this is not done, role transitions will fail on the standby OMS. To change the SYSMAN credentials on the primary and standby OMS, follow these steps:
- Change the SYSMAN password on the primary OMS.
$ emctl config oms -change_repos_pwd
Oracle Enterprise Manager Cloud Control 12c Release 2
Copyright (c) 1996, 2012 Oracle Corporation.  All rights reserved.
Enter Repository User's Current Password :
Enter Repository User's New Password :

Changing passwords in backend ...
Passwords changed in backend successfully.
Updating repository password in Credential Store...
Successfully updated Repository password in Credential Store.
Restart all the OMSs using 'emctl stop oms -all' and 'emctl start oms'.
Successfully changed repository password. - Stop the OMS, including Admin Server.
$ emctl stop oms -all
Oracle Enterprise Manager Cloud Control 12c Release 2
Copyright (c) 1996, 2012 Oracle Corporation.  All rights reserved.
Stopping WebTier...
WebTier Successfully Stopped
Stopping Oracle Management Server...
Oracle Management Server Already Stopped
AdminServer Successfully Stopped
Oracle Management Server is Down - Start the OMS.
$ emctl start oms
Oracle Enterprise Manager Cloud Control 12c Release 2
Copyright (c) 1996, 2012 Oracle Corporation.  All rights reserved.
Starting Oracle Management Server...
Starting WebTier...
WebTier Successfully Started
Oracle Management Server Successfully Started
Oracle Management Server is Up - Change the SYSMAN password on the standby OMS.
$ emctl config oms -change_repos_pwd -use_sys_pwd -sys_pwd <sys_password>
Oracle Enterprise Manager Cloud Control 12c Release 2
Copyright (c) 1996, 2012 Oracle Corporation.  All rights reserved.
Enter Repository User's New Password :

Changing passwords in backend ...
Passwords changed in backend successfully.
Updating repository password in Credential Store...
Successfully updated Repository password in Credential Store.
Restart all the OMSs using 'emctl stop oms -all' and 'emctl start oms'.
Successfully changed repository password. - Stop the OMS, including the Admin Server.
$ emctl stop oms -all
Oracle Enterprise Manager Cloud Control 12c Release 2
Copyright (c) 1996, 2012 Oracle Corporation.  All rights reserved.
Stopping WebTier...
WebTier Successfully Stopped
Stopping Oracle Management Server...
Error occurred while trying to stop Oracle Management Server
AdminServer Successfully Stopped
Oracle Management Server is Down - Start the Admin Server.
$ emctl start oms -admin_only
Oracle Enterprise Manager Cloud Control 12c Release 2
Copyright (c) 1996, 2012 Oracle Corporation.  All rights reserved.
Starting Admin Server only...
Admin Server Successfully Started
The Software Library is used for patching, agent deployment, provisioning, and self-updating. It should be installed on shared storage so that multiple management servers can access it. Any of the following options can be used for shared storage:
- NFS
- OCFS2
- DBFS
- ACFS
Because the Software Library is so critical, it should be located on a highly available file system. This means using a RAID (mirrored and striped) back-end storage system.
The Software Library can be configured by logging into the Enterprise Manager console and choosing Setup ![]() Provisioning and Patching
Provisioning and Patching ![]() Software Library. Choose a location on a shared filesystem that has been mounted on the OMS for the Software Library (see Figure 13-29). Multiple locations can also be added.
Software Library. Choose a location on a shared filesystem that has been mounted on the OMS for the Software Library (see Figure 13-29). Multiple locations can also be added.

Figure 13-29 . Software Library setup
Backup
In a highly available Enterprise Manager Cloud Control configuration, the three components—OMS, repository, and agent—are individually configured to reduce downtime. Although we recommend that the highest level of availability be implemented, the associated costs and required resources may be prohibitive. Also, in any IT framework, failure of components is likely to happen over time. As such, no high-availability architecture is complete without discussing backup and recovery strategies.
Backing up the Enterprise Manager ecosystem requires a solution that encompasses the repository, OMS, and agents. Each component is individually backed up based on its available methods. The management repository database stores metrics and data provided by agents. It should be backed up according to recommended backup strategies for Oracle databases using RMAN.
The first step in configuring a backup strategy for the repository database is to ensure that it is in ARCHIVELOG mode. This will allow consistent online backups to be taken and also facilitates point-in-time recovery of the database. Hot backups should be taken regularly using recommended backup strategies. Database high-availability features such as the Fast Recovery Area and flashback database should also be enabled to allow for faster recovery of the database in the event of a failure. Backups can be configured by using the Enterprise Manager Cloud Control console. Consider using Enterprise Manager’s Recommended Backup Strategy option to back up the repository database.
To schedule a database backup using Enterprise Manager, follow these steps:
- Go to the repository database home page and choose Availability Backup & Recovery Schedule Backup.
- Log in as a user with SYSDBA credentials.
- Click the Schedule Oracle-Suggested Backup button to create a fully automated backup strategy based on the destination for the backups (Disk, Tape, and so forth), as shown in Figure 13-30. The Oracle-suggested backup is based on an incrementally updated backup strategy. It will schedule a full backup first, after which incremental backups will be scheduled. Based on the backup, a recovery to any point in a day will be possible.

Figure 13-30 . Scheduling an Oracle-suggested backup
- Select the destination media for the backup, as shown in Figure 13-31.

Figure 13-31 . Scheduling a backup destination type
- Enter the location for the backup, as shown in Figure 13-32. In a disk-based backup strategy, the default is to use the Fast Recovery Area if it has been configured.

Figure 13-32 . Choose the Fast Recovery Area as the disk-based backup location
- Enter a schedule for the recurring backup, as shown in Figure 13-33.

Figure 13-33 . Oracle-suggested backup schedule
- Review the Backup Settings and generated RMAN script (see Figure 13-34). Click Submit Job to schedule the backup.
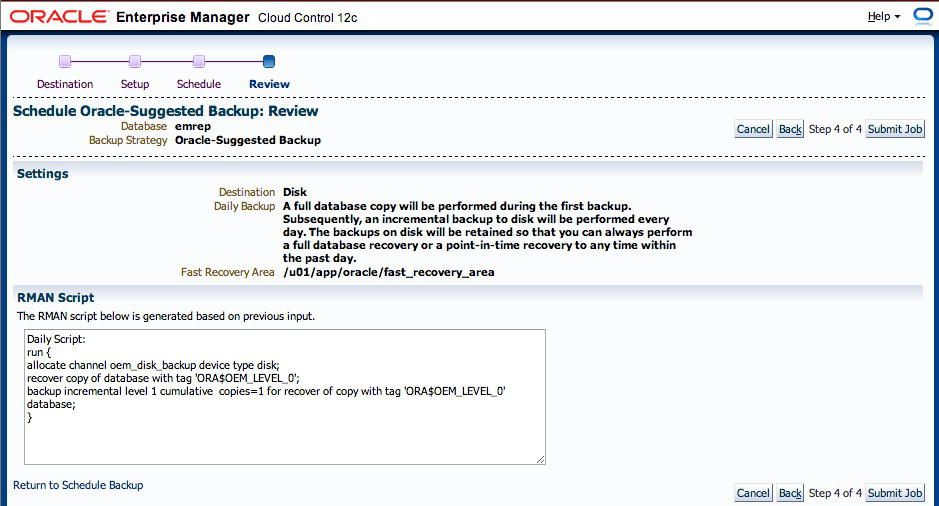
Figure 13-34 . Oracle-suggested backup settings
Using Oracle Enterprise Manager Cloud Control to schedule the backup job also enables you to receive notifications about the job status as well as view backup information including run times and time of last backup.
Oracle Management Service Backup
The Oracle Management Service is responsible for communicating with management agents and uploading data to the management repository. It includes the Oracle Fusion Middleware home, the OMS home, and the Web Tier (OHS) Oracle home in addition to plug-in homes. The OMS filesystem should be backed up periodically to preserve any changes such as patches, updates, or configuration changes. Use the exportconfig command to back up the OMS instance home (MW_HOME/gc_inst) including the WebLogic Server, Web Tier, and Administration Server. To create a backup of the instance and all subcomponents, use the following syntax:
emctl exportconfig oms [-sysman_pwd <sysman password>]
     [-dir <backup dir>]     Specify directory to store backup file
     [-oms_only]             Specify OMS-only backup on Admin Server host
     [-keep_host]            Specify to backup hostname if no slb defined
                             (Use this option only if recovery will be done
                              on machine that responds to this hostname)
The following example backs up the OMS configuration to a shared directory. An archive is created with a .bka extension.
$ $OMS_HOME/bin/emctl exportconfig oms -sysman_pwd oracle12c -dir /mnt/backup
Oracle Enterprise Manager Cloud Control 12c Release 2
Copyright (c) 1996, 2012 Oracle Corporation.  All rights reserved.
ExportConfig started...
Machine is Admin Server host. Performing Admin Server backup...
Exporting emoms properties...
Exporting secure properties...
Exporting configuration for pluggable modules...
Preparing archive file...
Backup has been written to file: /mnt/backup/opf_ADMIN_20121104_224806.bka

The export file contains sensitive data.
Please ensure that it is kept secure.

ExportConfig completed successfully!
In addition to backing up the OMS configuration, a backup of the Oracle inventory and output of the opatch lsinventory –detail command should also be performed.
The following example generates the opatch inventory output and writes it to a shared filesystem.
$OMS_HOME/OPatch/opatch lsinventory –detail > /mnt/backups/opatch_bkup.log
The backup of the OMS can either be done manually or scheduled via the Enterprise Manager Cloud Control Job System.
The management agents are stateless, so no backups are necessary. Instead, a reference gold image of the agent should be created for all platforms being monitored. Any patches and customizations should be included in the gold configuration. In the event that a management agent is lost, it should be installed from the reference gold image.
Recovery
Performing regular backups of each Enterprise Manager Cloud Control component is important. However, of even more significance is the ability to restore the components successfully if needed. Enterprise Manager recovery may require recovery of several components including the repository, management service, and agents depending on the nature of the problem. For example, recovering the management service in a scenario where the host is lost may require additional steps compared with restoring the management service to the original host. You will examine these scenarios in the following sections.
The Cloud Control console will be unavailable in the event that the OMS is down. To restore the repository database, the RMAN command-line utility should be used. With RMAN, you can restore the database by using either a full recovery or a point-in-time recovery (see the Oracle Database Backup and Recovery Guide). In the case of the latter, you may need to resynchronize agents that are out of sync with the repository. To resynchronize the agent by using EMCTL, use the following syntax:
emctl resync repos (-full|-agentlist "agent names")
[-name "resync name"]
[-sysman_pwd "sysman password"]
This command should be executed after the management repository has been restored and before starting the OMS.
The steps required to make Enterprise Manager Cloud Control operational after restoring the repository database will vary depending on whether a full or incomplete recovery is performed as well as whether the recovery was done on the same host or a different host. Table 13-3 summarizes the steps required for the different recovery scenarios. In each scenario, the repository database should be recovered after stopping the OMS.
Table 13-3. Recovery Scenarios for OMS, Repository, and Agent

OMS reconfiguration is required whenever the repository database is recovered on a different host. This stores the new database connection description in the OMS. We use the following command to reconfigure the repository database in the OMS:
emctl config oms -store_repos_details (-repos_host <host> -repos_port <port> -repos_sid
<sid> | -repos_conndesc <connect descriptor>) -repos_user <username> [-repos_pwd <pwd>]
Follow these steps to reconfigure the OMS:
- Stop all the OMSs.
emctl stop oms - Reconfigure the repository connection string on each of the OMSs.
emctl config oms -store_repos_details - Restart Admin Server and all the OMSs by using the following:
emctl stop oms -all
emctl start oms
Recovering the repository on a different host also requires relocating the management repository database target to a different agent running on the new host. This can be done only if an agent already exists on the host and no other database has been discovered by it. Use the following syntax to relocate the target to a new host:
emctl config repos [-sysman_pwd <sysman password>]
      [-agent <new agent>]    Specify new destination agent for repository target
      [-host <new host>]      Specify new hostname for repository target
      [-oh <new oracle home>] Specify new OracleHome for repository target
      [-conn_desc [<jdbc connect descriptor>]]
                              Update Connect Descriptor with value if specified,
                              else from value stored in emoms.properties
      [-ignore_timeskew]      ignores timeskew on agent
The monitoring configuration for the OMS and repository target should also be updated by using this command:
emctl config emrep [-sysman_pwd <sysman password>]
      [-agent <new agent>]    Specify new destination agent for emrep target
      [-conn_desc [<jdbc connect descriptor>]]
                              Update Connect Descriptor with value if specified,
                              else from value stored in emoms.properties
      [-ignore_timeskew]      ignores timeskew on agent
After the database has been recovered and reconfiguration performed, the next step would be to log in to the Enterprise Manager Cloud Control console and verify that all operations have been restored.
Oracle Management Service Recovery
Recovering an OMS requires recovery of both the software homes (Fusion Middleware) and the instance homes (gc_inst). The software homes can either be recovered from a filesystem backup or be reinstalled using the Install Software Only option on the same or a different host using the Enterprise Manager Cloud Control 12c installer. The OMS home must be in the same location as the OMS home being recovered.
All plug-ins that existed in the OMS are required to be installed for the recovery to succeed. The following SQL query should be run as the SYSMAN user:
SELECT epv.display_name, epv.plugin_id, epv.version, epv.rev_version,decode(su.aru_file,
null, 'Media/External', 'https://updates.oracle.com/Orion/Services/download/ '
||aru_file||'?aru='||aru_id||chr(38)||'patch_file='||aru_file) URL
FROM em_plugin_version epv, em_current_deployed_plugin ecp, em_su_entities su
WHERE epv.plugin_type NOT IN ('BUILT_IN_TARGET_TYPE', 'INSTALL_HOME')
AND ecp.dest_type='2'
AND epv.plugin_version_id = ecp.plugin_version_id
AND su.entity_id = epv.su_entity_id;
The following example output shows the plug-ins, versions, revisions, and URLs. The URL will display if downloaded via Self Update. Otherwise, the status will be Media/External.
SQL>

DISPLAY_NAME                    PLUGIN_ID           VERSION      REV_VERSION   URL
------------------------------  ------------------  -----------  ------------  ----------------
Oracle MOS (My Oracle Support)  oracle.sysman.mos   12.1.0.2.0              0  Media/External
Oracle Fusion Middleware        oracle.sysman.emas  12.1.0.3.0              0  Media/External
Oracle Database                 oracle.sysman.db    12.1.0.2.0       20120804  Media/External
Oracle Exadata                  oracle.sysman.xa    12.1.0.3.0              0  Media/External
If any additional plug-ins are listed, they should be downloaded into a single directory; then rename the extensions from .zip to .opar. Use the Install Software Only option to install the Middleware and OMS Oracle home components if not restoring from a filesystem backup. After the software has been reinstalled or restored, the next step is to install the additional plug-ins (if any). Execute the PluginInstall.sh script located in OMS_HOME/sysman/install by specifying the –PluginLocation flag to select the location where the downloaded plug-ins are kept. In the case of a Software Only installation, all patches previously applied will have to be redone.
After restoring the software homes, the next step would be to restore or re-create the OMS. This is done by using the omsca utility and specifying the path of the backup generated by the emctl exportconfig command.
omsca recover –as –ms -nostart –backup_file <exportconfig file>
The steps required to recover the OMS may vary depending on whether an SLB is in use or multiple management services are configured as well as whether recovery is done on the same host or a different host. The following steps are required for restoring a single OMS on the same host without an SLB. The OMS instance will be recovered by using the OMS configuration backup taken by emctl exportconfig.
- Clean up the failed host.
- Verify that the Software Library is available.
- Restore the software home by restoring a backup of the filesystem or run the installer’s Software Only option. (See the Oracle Enterprise Manager Cloud Control Advanced Installation and Configuration Guide Release 2).
- Execute omsca in recovery mode and specify the location of the backup file taken previously.
- Recover agents if necessary.
- Start the OMS.
- Verify that the OMS is working.
See the Oracle Enterprise Manager Cloud Control 12c Administrator’s Guide for details on other OMS recovery scenarios.
The recovery of the management agent requires reinstalling it, preferably from a reference install, or performing a filesystem restore from a previous backup. The agent should be cloned with the existing patches and customizations. The agent should also be installed by using the same port. After it has been reinstalled, a resynchronization should be performed from the Agent Resynchronization page in Enterprise Manager Cloud Control.
![]() Note The agent is blocked by the OMS after reinstallation to prevent targets from overwriting data from previous configurations. Use the Resynchronize Agent button to resynchronize and unblock the agent.
Note The agent is blocked by the OMS after reinstallation to prevent targets from overwriting data from previous configurations. Use the Resynchronize Agent button to resynchronize and unblock the agent.
Agent recovery in a typical scenario usually follows these steps:
- Remove the existing agent Oracle home by using the Oracle Universal Installer (OUI) to clean up the inventory.
- Install a new agent or clone from the reference install, using the same port and path. The filesystem can also be restored from a previous backup.
- Perform Agent Resynchronization from the Enterprise Manager Cloud Control Agent home page.
- Reconfigure user-defined metrics if necessary.
- Verify the status of the agent.
emctl status agent
emctl upload agent
Switchover and Failover
Both the management service and repository can be switched over and failed over independently when using level 2, 3, or 4 high-availability configurations. Switchover is usually done during planned maintenance, including operating system and software patching, while a failover normally occurs during unplanned maintenance such as hardware or software failure.
In a level 2 configuration, the switchover and failover of the management service follow the same procedure. As mentioned earlier, this requires relocating the OMS virtual hostname and VIP to another host and then starting the OMS manually or using Clusterware to automate the relocation. In level 2, 3, or 4 configurations that utilize a physical standby database for the Enterprise Manager repository, the database has to be switched over (planned) or failed over (unplanned). The OMS does not require any action in level 3 high availability because multiple management services are involved. The SLB will monitor the management services and detect when one has failed and route traffic to the available OMS.
To switch over the management repository using Data Guard, use the DGMRL command-line utility as the Enterprise Manager console will not be able to switch over the repository. Follow these steps to do a switchover of the management repository with a management service that has not been switched over:
- From the Enterprise console, choose Availability ä Data Guard Administration.
- Check that the Redo Apply process is up-to-date. Verify the ApplyLag status is zero as shown in Figure 13-35.

Figure 13-35 . Data Guard administration showing ApplyLag and TransportLag status
- Stop the management services on the primary site by running the following command. If multiple management services are being used, this should be done on each OMS.
emctl stop oms -all - Switch over to the standby database by using the DGMGRL command-line utility. This can be done on either the primary or standby site in the case of a switchover. Verify the Data Guard configuration and databases before doing a switchover. The following example illustrates these steps.
- a. Verify the Data Guard configuration and databases before doing a switchover:
$ dgmgrl
DGMGRL for Linux: Version 11.2.0.3.0 - 64bit Production

Copyright (c) 2000, 2009, Oracle. All rights reserved.

Welcome to DGMGRL, type "help" for information.
DGMGRL> connect sys/<password>
Connected.
DGMGRL> show configuration

Configuration - emrep

  Protection Mode: MaxPerformance
  Databases:
    emrep  - Primary database
    emrep2 - Physical standby database

Fast-Start Failover: DISABLED

Configuration Status:
SUCCESS

DGMGRL> show database emrep

Database - emrep

  Role:            PRIMARY
  Intended State:  TRANSPORT-ON
  Instance(s):
    emrep

Database Status:
SUCCESS

DGMGRL> show database emrep2

Database - emrep2

  Enterprise Manager Name: emrep_sby
  Role:                    PHYSICAL STANDBY
  Intended State:          APPLY-ON
  Transport Lag:           0 seconds
  Apply Lag:               0 seconds
  Real Time Query:         OFF
  Instance(s):
    emrep2

Database Status:
SUCCESS - b. Issue the SWITCHOVER command:
DGMGRL> switchover to emrep2;
Performing switchover NOW, please wait...
New primary database "emrep2" is opening...
Operation requires shutdown of instance "emrep" on database "emrep"
Shutting down instance "emrep"...
ORACLE instance shut down.
Operation requires startup of instance "emrep" on database "emrep"
Starting instance "emrep"...
Unable to connect to database
ORA-12514: TNS:listener does not currently know of service requested in connect descriptor

Failed.
Warning: You are no longer connected to ORACLE.

Please complete the following steps to finish switchover:
       start up and mount instance "emrep" of database "emrep"
Note Additional steps may be required after issuing the switchover command depending on the current state of the Data Guard configuration. In the example shown, the new standby database should be started and mounted manually. - c. Verify the status of the Data Guard configuration to see that the roles have been switched:
DGMGRL> connect sys/<password>
Connected.
DGMGRL> show configuration;

Configuration - emrep

  Protection Mode: MaxPerformance
  Databases:
    emrep2 - Primary database
    emrep  - Physical standby database

Fast-Start Failover: DISABLED

Configuration Status:
SUCCESS

DGMGRL> show database emrep2;

Database - emrep2

  Enterprise Manager Name: emrep_sby
  Role:                    PRIMARY
  Intended State:          TRANSPORT-ON
  Instance(s):
    emrep2

Database Status:
SUCCESS

DGMGRL> show database emrep;

Database - emrep

  Role:            PHYSICAL STANDBY
  Intended State:  APPLY-ON
  Transport Lag:   0 seconds
  Apply Lag:       0 seconds
  Real Time Query: OFF
  Instance(s):
    emrep

Database Status:
SUCCESS
Here you can see that the role of the database has been successfully changed. The next step is to reconfigure the OMS to use the new primary database.
- a. Verify the Data Guard configuration and databases before doing a switchover:
- Start the Admin Server if it is not already running.
emctl start oms –admin_only - Configure the OMS with the new primary database repository.
$OMS_HOME/bin/emctl config oms -store_repos_details -repos_conndesc "(DESCRIPTION=(ADDRESS_LIST=(ADDRESS=(PROTOCOL=TCP)(HOST=oem3)(PORT=1522)))
(CONNECT_DATA=(SID=emrep2)))" -repos_user sysman
Oracle Enterprise Manager Cloud Control 12c Release 2
Copyright (c) 1996, 2012 Oracle Corporation.  All rights reserved.
Enter Repository User's Password : - Start the OMS.
emctl start oms - Relocate the management repository target. The management agent on an OMS monitors the OMS and management repository targets. After the switchover, the repository target needs to be updated to reflect the switched-over repository database, which is the new primary.
emctl config emrep –agent <central_agent_name> -conn_desc <conn_desc_of_new_primary>
Failover of the management repository using Data Guard is similar to a switchover, except the command issued using DGMGRL would be failover to <standby_db_name>.
In addition to using the preceding manual steps, you can automate the failover of the OMS and management repository by using Data Guard fast-start failover:
- Fast-start failover determines when a failover to a standby is necessary by using an Observer process that runs on another host independent of both primary and standby servers. If the Observer cannot contact the primary site after a certain configurable period, it will automatically fail over to the standby database.
- After failover occurs, a database event called DB_ROLE_CHANGE is fired.
- The DB_ROLE_CHANGE event causes a trigger to be fired, which in turn starts up the Enterprise Manager Application tier.
A script can be created that will automate these steps. Using the sample script provided in the <OMS_HOME>/sysman/ha directory, create a script that will configure the OMS to point to a new primary database and start up all management services. Listing 13-1 is an example of a script that will start up the standby OMS and reconfigure the OMS with the new primary management repository database that has been switched over in a Data Guard configuration.
Listing 13-1. Sample Script to Start EM Tier on Standby Site
#!/bin/sh
LOGFILE="/oms_swlib/em/failover/em_failover.log"
OMS_ORACLE_HOME="/u01/app/oracle/Middleware/oms"
CENTRAL_AGENT="oem2.example.com:3872"
SYSMAN_PWD="oracle12c"

#log message
echo "###############################" >> $LOGFILE
date >> $LOGFILE
echo $OMS_ORACLE_HOME >> $LOGFILE
id >>  $LOGFILE 2>&1

#switch all OMS to point to new primary and startup all OMS
$OMS_ORACLE_HOME/bin/emctl config oms -store_repos_details -repos_conndesc "(DESCRIPTION=(ADDRESS_LIST=(ADDRESS=(PROTOCOL=TCP)(HOST=oem1)(PORT=1521)))
(CONNECT_DATA=(SID=emrep2)))"
-repos_user sysman –repos_pwd $SYSMAN_PWD >> $LOGFILE 2>&1
$OMS_ORACLE_HOME/bin/emctl sync_opss_policy_store
 -sysman_pwd oracle12c  >> $LOGFILE 2>&1
$OMS_ORACLE_HOME/bin/emctl stop oms >>  $LOGFILE 2>&1
$OMS_ORACLE_HOME/bin/emctl start oms >>  $LOGFILE 2>&1

#relocate Management Services and Repository target
#to be done only once in a multiple OMS setup
#allow time for OMS to be fully initialized
$OMS_ORACLE_HOME/bin/emctl config emrep -agent $CENTRAL_AGENT
-conn_desc -sysman_pwd $SYSMAN_PWD >> $LOGFILE 2>&1

#always return 0 so that dbms scheduler job completes successfully
exit 0
The sample script in Listing 13-2 creates a trigger that will be fired whenever the DB_ROLE_CHANGE event occurs during a switchover or failover operation. This trigger will then call the preceding script to start the Enterprise Manager tier.
Listing 13-2. Sample Database Role-Change Trigger
--
--
-- Sample database role change trigger
--
--
CREATE OR REPLACE TRIGGER FAILOVER_EM
AFTER DB_ROLE_CHANGE ON DATABASE
DECLARE
    v_db_unique_name varchar2(30);
    v_db_role varchar2(30);
BEGIN
    select upper(VALUE) into v_db_unique_name
    from v$parameter where NAME='db_unique_name';
    select database_role into v_db_role
    from v$database;

    if v_db_role = 'PRIMARY' then

      -- Submit job to Resync agents with repository
      -- Needed if running in maximum performance mode
      -- and there are chances of data-loss on failover
      -- Uncomment block below if required
      -- begin
      --  SYSMAN.setemusercontext('SYSMAN', SYSMAN.MGMT_USER.OP_SET_IDENTIFIER);
      --  SYSMAN.emd_maintenance.full_repository_resync('AUTO-FAILOVER to '||
          v_db_unique_name||'- '||systimestamp, true);
      --  SYSMAN.setemusercontext('SYSMAN', SYSMAN.MGMT_USER.OP_CLEAR_IDENTIFIER);
      -- end;

      -- Start the EM mid-tier
      dbms_scheduler.create_job(
          job_name=>'START_EM',
          job_type=>'executable',
          job_action=> '/oms_swlib/em/failover/' || v_db_unique_name|| '_start_oms.sh',
          enabled=>TRUE
      );
    end if;
EXCEPTION
WHEN OTHERS
THEN
    SYSMAN.mgmt_log.log_error('LOGGING', SYSMAN.MGMT_GLOBAL.UNEXPECTED_ERR,
SYSMAN.MGMT_GLOBAL.UNEXPECTED_ERR_M || 'EM_FAILOVER: ' ||SQLERRM);
END;
/
Summary
This chapter presented the main components of an Enterprise Manager Cloud Control system—Oracle Management Service, Oracle Management Repository, Oracle Management Agent, and Software Library—that need to be configured for high availability. Each of these components needs to be protected by using a different method.
Repository database high availability requires the use of database high-availability features including ASM, RAC, and Data Guard. Each should be configured using Oracle-recommended best practices where appropriate. RAC provides scalability and protects against the failure of a single host with seamless failover. Data Guard protects against host and storage failure with minimal downtime (typically less than a minute) during role changes. In its most highly configurable form, the repository database is deployed on a RAC database with a local RAC physical standby using Data Guard. A standby site with identical configuration is also available to provide services in the event of a loss of the primary site.
The Oracle Management Service can use various techniques to enable high availability, each differing in cost and complexity. The simplest technique involves separating the OMS host from the repository host. You also looked at an active/passive, or cold, failover solution in which multiple hosts share a single OMS on a shared filesystem, with only one active at any given point in time. This uses the concept of a VIP to enable failover in the event of the loss of one host in the cluster. Manual failover is required, and some downtime occurs as the OMS is restarted on another host. The next level sets up multiple management services behind a load balancer. This enables a seamless failover solution in the event of the loss of a single OMS. In an MAA configuration, a standby site is configured with a similar configuration as the primary site. This obviously costs the most. However, it not only offers single-site availability but also protects against disasters.
Management agents are made highly available by configuring reference images in the software library. This makes the agents easier to recover using deployment procedures.
A key aspect of highly available architecture is its backup and recovery strategy. Each component in the Enterprise Manager Cloud Control system should follow recommended best practices where appropriate to ensure recoverability to meet business recovery point and recovery time objectives thus causing minimal disruptions to the business.
In addition to the four levels of high availability discussed in this chapter, other technology solutions can provide varying levels of high availability. These include but are not limited to virtualization software such as Oracle VM Server, data replication technology including Oracle GoldenGate and Oracle Streams, and storage-level replication solutions. The choice of a solution hinges on business requirements, resources, and costs.
1 Maximum Availability Architecture (MAA) is a set of Oracle-recommended practices based on high-availability features. These recommendations are based on product development validations and experiences of customers running Oracle products.
2 The Fast Recovery Area was previously called Flash Recovery Area in pre-11.2 Oracle databases.
3 The format for the TZ environment variable will depend on your operating system. For more information on setting the TZ variable, see your operating system documentation.
4 The default value of the failback is set to 0, which means that the VIP and its dependent resources will not automatically fail back to the original node after it becomes available again.
5 Oracle Restart is the single-instance high-availability feature of Oracle Database 11gR2. It provides high availability by restarting database instances, services, and listeners in the event of a failure. It also restarts the database components on bootup of the server.
6 Protection mode refers to the accepted potential data loss in event of primary database failure. The three available modes are Maximum Performance, Maximum Availability, and Maximum Protection.
7 Oracle RAC One Node is a new option available with Oracle Database 11g Release 2. Oracle RAC One Node is a single instance of an Oracle RAC-enabled database running on one node in a cluster.
8 rsync is software that enables replication of files and directories from one system to another while minimizing data transfer through the use of deltas.