
![]()
Office 365 – Windows Intune Administration Guide
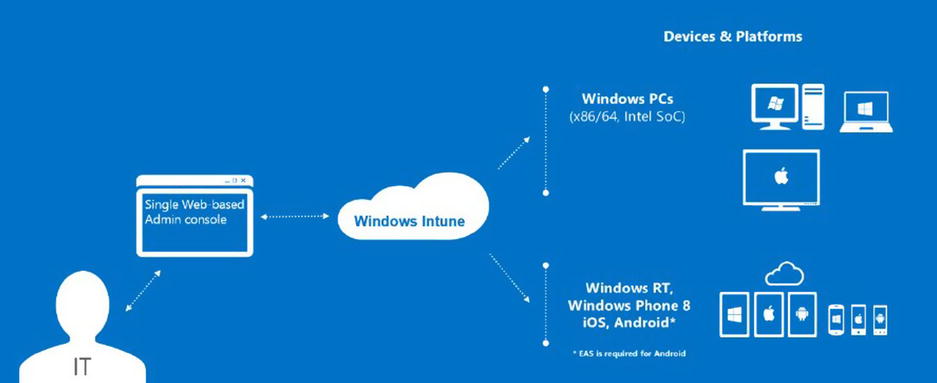
Office 365 is a suite of technologies delivered as a Software as a Service (SaaS) offering. Office 365 reduces the IT costs for businesses of any size and significantly reduces the need for an IT professional to manage the Office 365 services. Windows Intune is a desktop management SaaS offering, which complements Office 365. Office 365 deployments work better when Windows Intune is deployed for desktop and mobile device management. The change in desktop management has moved from device-centric management to user management (see Figure 7-1). Microsoft extended this management into Microsoft Systems Center and the standardization of a five (5) user licenses model for Windows Intune and Office 365 subscription services. Users can bring their own devices to Office 365, and have those devices managed by Windows Intune.

Why would you use Windows Intune to manage devices that use Office365? The simple answer – it just works. Devices that have Windows Intune deployed with Office 365 have less support calls and trouble tickets. Our own experience is that the Windows Intune reduces support calls by 50% when deployed with an Automatic upgrade management and integrated anti-virus scans.
Device management is no longer desktops, you are managing users, devices, applications, and data. Office 365 and Windows Intune are built with a self-service model providing user’s access to Microsoft Cloud Services - worldwide. Windows Intune provides consistent experiences for all users and the management of the devices. Users (and IT administrators) can add users to the local Active Directory; either through a workplace join or a traditional Active Directory Add User/Computer. Windows Intune provides consistency of device Management with:
- – Workplace join; allows you to dynamically add a device with second factor authentication
- – Domain joined systems — download and select Windows Intune
- – Consistent opt-in message across all environments
- – Consistent implementation of self-service portals across all environments
Office 365 self-service portal (allows users to install Professional Plus software on demand) is extended with Windows Intune. This trend is forcing the change to the management of devices: application distribution via a company owned application store. As new users enter the workforce, they want to use their own devices, and load the software that they need to use to improve their personal productivity. As an IT manager, you need to figure out how to supply these services, without adding additional support costs. This is where Windows Intune comes into play. Windows Intune solves these problems for users and IT Managers. IT Managers (see Figure 7-2) now have a single view to all the devices in the organization. – including Apple and Android devices. Device Management with integrated Office 365 support - is the power of Windows Intune.
Intune versus System Center
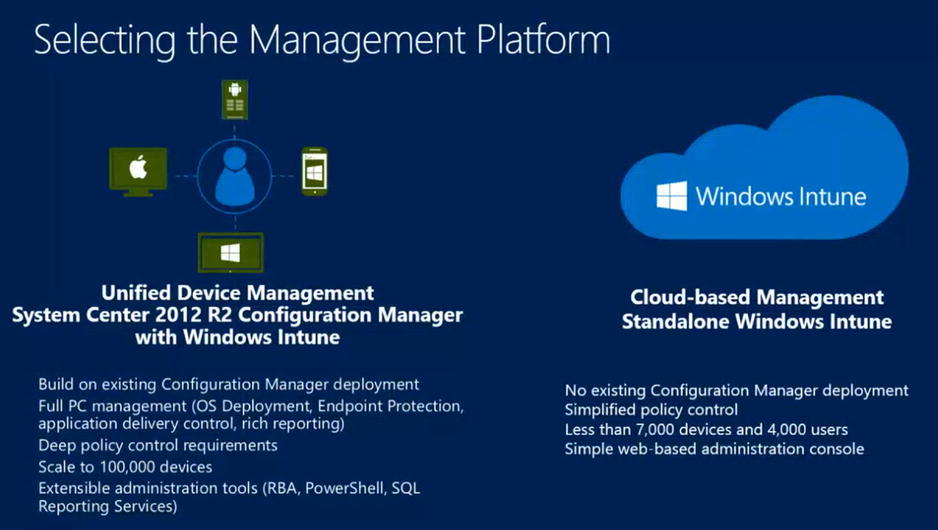
Windows Intune may operate with Microsoft Systems Center or as a standalone Cloud Service. Which service configuration do you use? It depends on the size of the organization. Larger Organization (100 users) use Microsoft Systems Center for desktop and server management. Smaller organization (less than 100 and no servers), use Windows Intune without Systems center. Windows Intune design is scalable for both environments, with the integration into Systems center using the Systems center Configuration Manger (see Figure 7-3). This scalability is a byproduct of Microsoft’s cloud services deployment and the security model deployed with Window’s Azure Active Directory federation. User’s accounts in Office 365, and Windows Intune are linked to a common active directory through Windows Azure Active directory.
As Microsoft deploys newer Operating Systems (OS) Software (a.k.a. recent Windows 8.1 and Windows Phone 8 and future releases), these operating systems are shipped with a lightweight management agent integrated into the OS. These management agents simplify the user access in enabling their own devices to be managed by Microsoft Management. These agents are:
- Mobile Device Management – Intune Management (lightweight management)
- Configuration Device Management – Systems Center (Corporate Management: allows download of full management agent from Systems Center)
The difference with the two approaches has to do with the management of the device. Microsoft introduces a new feature in System Center 2012R2 called workplace join. Workplace join allows the end user to enroll their smartphone, laptop, or desktop into a corporate network for secure access too business data. Corporate users who have deployed Microsoft Systems Center have two options: use the workplace join (if deployed Windows Server 2012R2) or use Windows Intune enrollment via the Company Portal. This allows users to self-enroll their devices using the Company Portal in the Window’s Intune Center (http://account.manage.microsoft.com).
If the organization has deployed Systems Center 2012 R2 or later, the device can be dually enrolled with both Windows Intune and Systems Center. When this happens, the IT department can supply additional services to the client device, and the user can download the company applications on demand form the company portal (Figure 7-4). This approach allows IT departments to permit users to bring their own devices into the company network while protecting the corporate data. When the user leaves the Company, the IT department can selectively wipe portions of the user device and remove all of the company’s information. This feature works on Windows devices, iOS devices, and Android devices.

As an administrator, you need to select the management approach (Microsoft Systems Center 2012 R2 or Windows Intune Administrative console) depending upon your organization. Microsoft Systems center 2012 R2 configuration can be very complex and entire books have been written on this. Our focus in this chapter is on the Windows Intune configuration with Office 365 and how to configure and deploy Windows Intune in your environment.
Windows Intune Purchase Process
The Windows Intune process is a separate purchase process, and it must be manually linked to Office 365. When you purchase Windows Intune, you must be logged out of Office 365. You start the purchase process for Windows Intune then link the subscription to Office 365 using your Office 365 global Administrator account. If you complete the purchase process and do not supply your existing Office 365 account, the Windows Intune site will not be linked to your Office 365 subscription. There is no workaround if you do this incorrectly. If you purchase the subscription incorrectly, your only option is to contact your partner and have them contact Microsoft Online services and have your newly created Windows Intune account canceled.
Step 1: Purchasing Intune
Select the purchase link (supplied by your partner) and verify the price and select the Delegated administration option (see Figure 7-5), and then click next. There are two types of access a partner has to an Office 365 (and Windows Intune subscription): a licenses advisor, or a Delegated Administrator. Licenses advisor only gives access to licenses information and no data. Delegated administrator gives your partner access to the Office 365/Windows Intune site as a Global administrator. If your Microsoft Partner is configuring your Windows Intune account, they will need access as a Delegated or a Global Administrator.

Why Only One License When I Have 50 users?
Different partners will have different approaches to the purchase process. At KAMIND our policy is to add the licenses based on the business needs, so we start all subscriptions with one user license. This way you can configure your Windows Intune site before you begin your deployment. You add the licenses based on your deployment schedule. It is easy to add licenses, but difficult to remove licenses.
What Is Delegated Administration?
Delegated administration is when you give permission to a partner (KAMIND) to administrate your Office 365 or Windows Intune accounts. A Delegated Administration Partner (DAP) can perform 99 percent of the administration tasks on your Office 365 Windows Intune account. However some tasks (such as content of email, documents, and certain PowerShell commands) require a locally licensed account.
Step 2 Linking Windows Intune to Office 365
If you have an Office 365 account, this is the step where you sign into that account and link the new Windows Intune subscription to your Office 365 account. When you link the accounts, you automatically populate “Windows Intune” with the users from your Office 365 account (this process is transparent and uses Windows Azure Active Directory federation to manage the user accounts).
In Figure 7-6, click “Sign in” and enter the Office 365 global administration account to link the subscription.

After you signed into Office 365, complete the payment process. At this point, you need to configure Windows Intune administrator center and begin your deployment.
Configuration of Windows Intune Administration Center
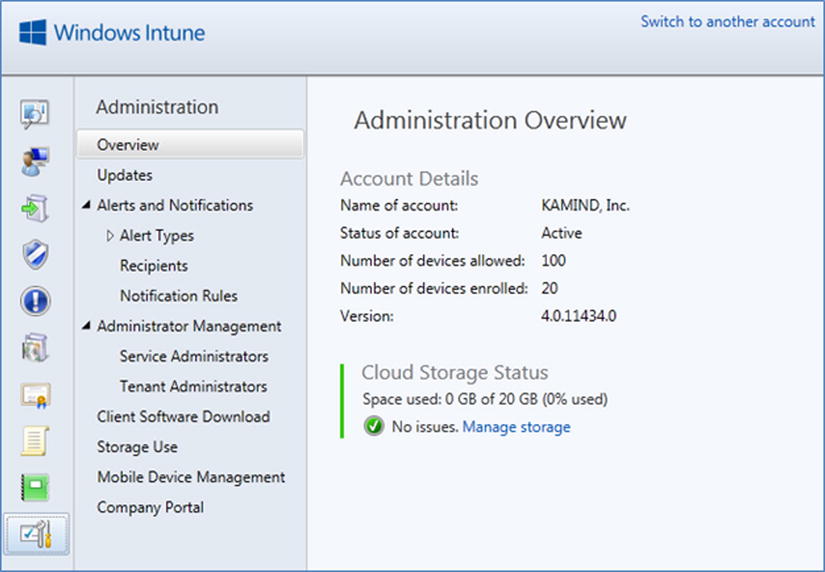
You have completed the purchase Windows Intune and you are ready to go! What do you do next? The first step is to configure the Windows Intune Administration center using the admin console. To access the administrator portal login to http://Accounts.manage.microsoft.com and use your Office 365 Global administrator account, select Admin Console (Figure 7-7).

The Windows Intune administration console (Figure 7-8) has four areas for management that need to be configured before you can use the service. These are the Windows Intune configuration for Agent (software that runs on a device), Mobile (governs how to manage mobile devices), Firewall (Windows firewall settings), and Intune Center Settings.
As an administrator, you have different options on the configuration of Windows Intune. As you become more experienced with Windows Intune, you can adjust the capabilities to meet your desired objectives.
Windows Intune Policy Management
Windows Intune manages devices and users by policy. Policies are applied to the groups and are pushed out to the clients. In the December 2013 release, there are four policies available for Windows Intune. There two different policy configuration options: default (Microsoft chooses) and custom (you choose). Our Windows Intune configuration will walk through the processes we use in the configuration of a Window’s Intune center. The Windows Intune policies are listed in Table 7-1 and are configured in the steps listed below.
Table 7-1. Window Intune Policy Settings
Policy Name |
Step |
Policy Description |
|---|---|---|
Agent Settings |
3 |
Controls the antivirus and Windows update settings. |
Mobile Security |
4 |
Allows the setting of password, encryption and other security features for mobile devices managed by Windows Intune. |
Firewall Settings |
5 |
Controls the setting of the Windows firewall on the device. |
Center Settings |
6 |
Publishes the support information to the desktop |
We have discovered a very interesting side effect as we have deployed Windows Intune. When we combine an Office 365 subscription with a Windows Intune subscription, our support call load has decreased. There are many different reasons this is the case, but what we have found is that Systems that are managed by Windows Intune with very aggressive updates – the Office 365 integration just works. Cloud solutions require that the desktop devices must have the latest security patches and fixes. Those clients that we have not deployed Windows Intune for have a higher support call load, either internally to their own IT organization or with our post-sales support.
Configuration of Window’s Intune consist of the following nine steps
- Add Administrator Notification
- Configure Auto Updates
- Configure Agent Policies
- Configure Mobile Policies
- Configure DNS changes for Mobile Devices
- Configure Device Firewall Policies
- Configure Intune center Policies
- Deploy Window’s Intune
- Linking users to Windows Intune Accounts
The nine-step process for deploying Windows Intune is outlined below. All of our initial Window’s Intune accounts are configured this way with very aggressive Windows Auto update configuration.
Step 1: Add Administrator Notification
Windows Intune notifies administrators when there is an error event on the device. This is used to inform the administrator list on the necessary corrective actions you need to take to resolve device issues. There are two steps in setting up notifications: adding the user to be notified and adding the notification that you wish the user to receive. When you add a user for notification, you define the rights for access to the Windows Intune Admin console.
- Login to Account.manage.microsoft.com.
- Select the Admin Console (see previous Figure 7-7).
- Select the Administration tab, select Recipients, and then Add. Enter the email address for notification, then click OK (see Figure 7-9).
- Select the notification rules, assign the recipient to the notification rules, and then click OK (see Figure 7-10).
- Select OK when completed.


Step 2: Configure Auto Updates
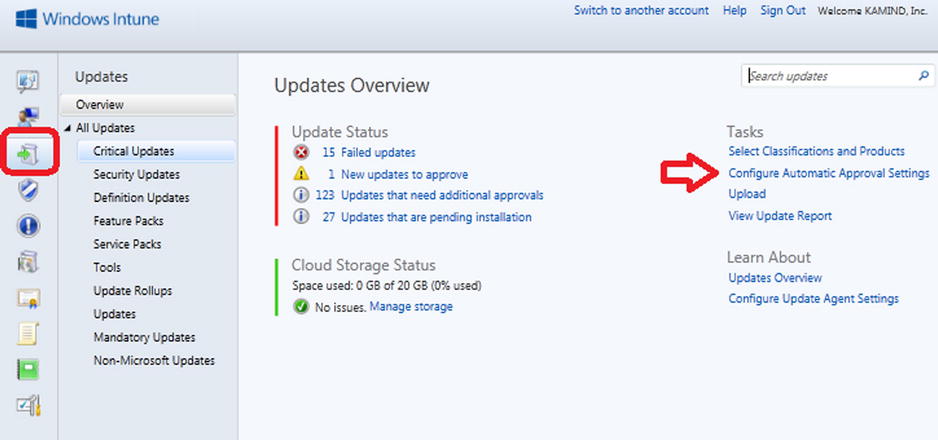
After you have set the notification rules, you need to configure the auto updates. There are two philosophies on updates: configure the minimum updates you need, or configure all updates (including optional ones). What we have discovered is that for the clients where we have configured all updates including optional ones), there are less support calls and the Windows desktop runs faster.
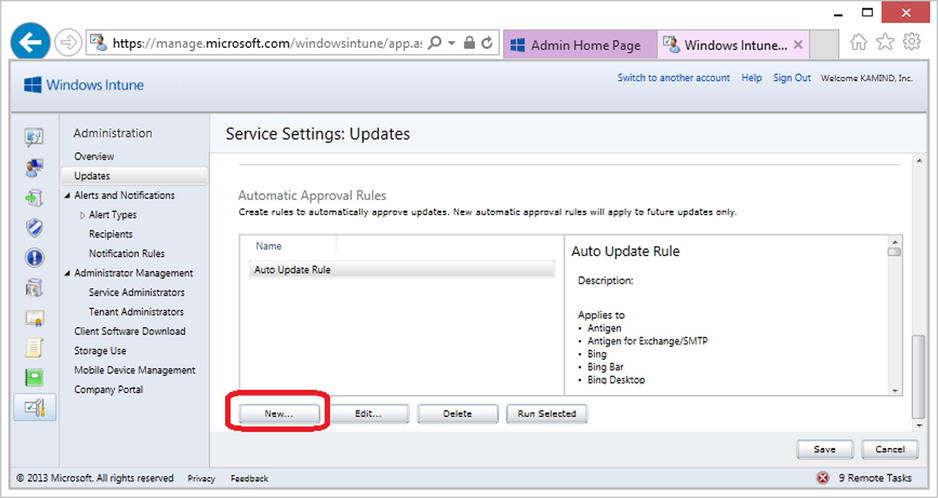
- Select the Update tab then click Configure Automatic Approval Settings (Figure 7-11).
- Scroll down until you see the Auto Update window and select New (Figure 7-12).
- Name the rule and fill in the description (Figure 7-13). Click “Next” when completed.
- Select All Categories (Intune works best if you apply all updates), as shown in Figure 7-14, and then select Next.
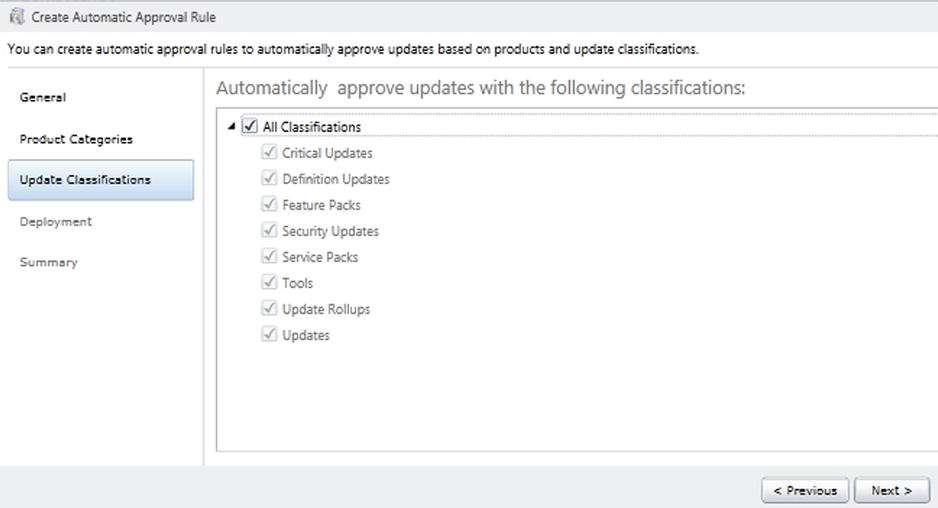
- Select All Classifications (Figure 7-15), and then select Next.
- Select the deployment. This is extremely important and this is where Windows Intune differs from other update products. Windows Intune will install updates if the user fails to install the update by required deployment date, Window’s Intune will install the update and force a systems reboot. Make sure you select All Computers to install updates (Figure 7-16).
- Select Next and then Finished. This creates the Automatic installation rule. The rule will execute and force updates to be installed three days after approval. The user can install updates early.


Step 3: Configure Agent Policies
Windows Intune manages desktop and mobile devices based upon Group Policies. There are four policy collections that you need to configure in Windows Intune. These policy collections enforce group policies on the clients that are enrolled in the Windows Intune service. The policy collections that you need to configure are the agent policy, mobile policy, firewall policy, and support policy. The first policy to configure is the agent policy. Select the policy icon (Figure 7-17), and then select Add Policy. Our configuration uses the “Custom Policy”. We do not recommend that you use the Default Policy.

Select the Windows Intune Agent Policy and Create and Deploy a Custom Policy (see Figure 7-18).

Each policy is different. Depending upon your business needs, you may need to modify the policy settings to meet certain business objectives. Our approach is to identify the policies that we used in our standard deployment. We do not use all policies in the Collection; only a few. The ones we have identified in the following configuration are the important policies for the Windows Intune Operation. Follow the configuration wizard and the item configuration listed below.
- Name the policy and supply a description (Figure 7-19).
- Configure the antivirus settings (Figure 7-20).
- Configure the daily and full scans (Figure 7-21). This is an important configuration. Office 365 will filter most viruses out of your environment, but you need to make sure you scan to eliminate the other problem areas.
- Configure the Quarantine settings (Figure 7-22).
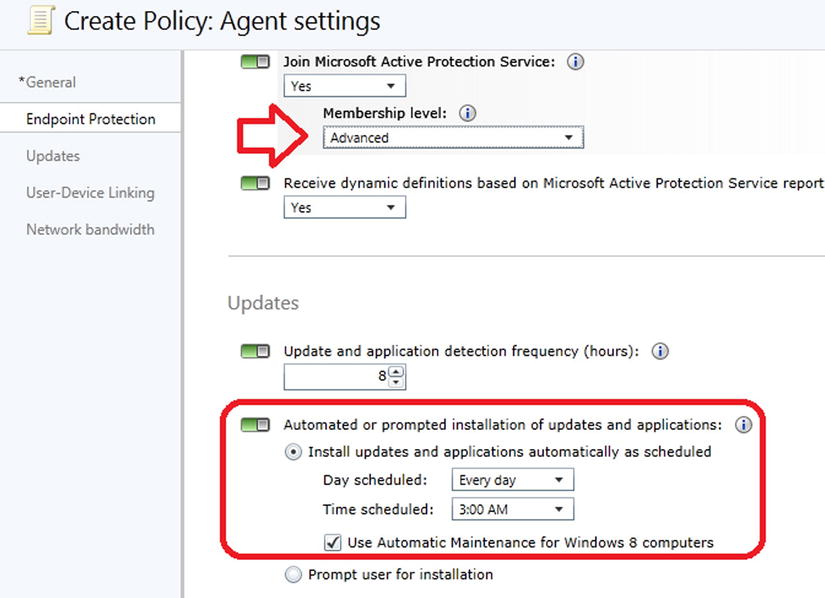
- Configure the update settings and membership in the active protection services. The active protection services coordinate information about known viruses to help the community to address threats (Figure 7-23).
- The final steps are the configuration of the data transfer to reduce bandwidth consumption during working hours (Figure 7-24).
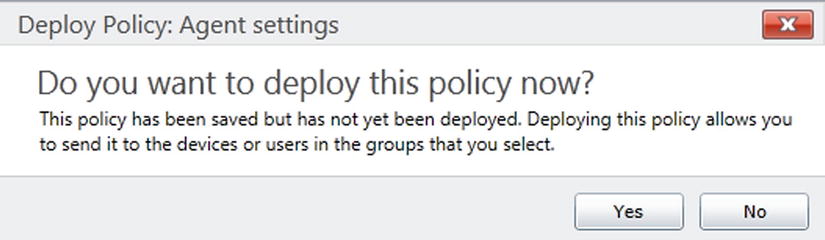
- Select Save Policy and you have created the first policy. Windows Intune will ask if you want to deploy the policy; select Yes to deploy the policy (Figure 7-25).
- Deploy the policies by selecting the group for deployment. The default group is either All Computers or Ungrouped Devices (see Figure 7-26). Just select the group, then click Add, and then click OK. The policy is deployed.


Step 4: Configure Mobile Policies
After you configure the policy for desktop, you need to configure the policies for Mobile Device Management. If the policies are not configured, then the mobile devices will not be allowed to enroll in the Windows Intune management service. Select the Policy icon, and then select Add Policy.
- Select Mobile Device Security Policy and select Create and Deploy a custom Policy (Figure 7-27).
- Enter a policy name for the mobile device policy.
- Define the password structure for the mobile device and enable the RT passwords (Figure 7-28).
- Configure the additional security policies for mobile devices that your organization supports. In this case, the organization does not allow the SharePoint documents to be backed on iCloud, so they are restricted (Figure 7-29).
- Select Save Policy and then deploy the policy. When you deploy the policy, you deploy it to users (Figure 7-30). The model is that users bring mobile devices, and are licensed according to Windows Intune. Each user can support up to five devices under one Windows Intune license.


Step 5: Configure Mobile Device DNS Enrollment
After you have configured the mobile device policies, you need to configure the DNS changes to allow the mobile devices (such as Windows Phone 8) to find the Windows Intune management service. There are two parts of this configuration: 1) DNS changes and 2) testing the changes with Windows Intune. These are outlined below.
- Add the following CNAME “enterpriseenrollment” to your DNS. If your domain name was “kamind.biz”, you would add the following CNAME shown in Figure 7-31.
If you have multiple domain names “verified” in Office 365, you will need to enter a CNAME for all domains in your DNS. Otherwise, the enrollment test validation will fail.
- Enable the Windows Intune device management. Do this only if you are not planning to use Microsoft Systems center 2012. Select the Mobile Device management Option (see Figure 7-32). Windows Intune will verify that you want to make this change. This change cannot be reversed.
- Verify the DNS changes in the Windows Intune Administration center. Under the Mobile Device Management Select the Windows management (Figure 7-33).
- Enter the domain name for verification (Figure 7-34). Click test and verify the domain.


The basic Windows Intune Mobile device management has been setup. There are different steps that you will need to follow to add the mobile device management support. These are company-specific changes. What we covered here was the basic enabling of the Mobile Device Manage services.
Step 6: Configure Firewall Policies
The firewall policies (Figure 7-35) are designed to set up and configure the desktop policies for a firewall: domain, public access, and private network. There are additional configuration parameters set up to manage the branch cache. The normal configuration for these policies is the default. If you have any predefined exceptions, then you enable all of the policies and define the exceptions. After you create the policy, save and deploy the policy.

Step 7: Configure Intune Center Policies
After you have created the base policies, you build the desktop support center to allow your user to contact your support services. This is the purpose of the Intune Center policies. Figure 7-36 and Figure 7-37 show the support center for Windows Intune.


To configure the support center, just select the Windows Intune Center and enter the organization support information and deploy the policy (Figure 7-38). The process is identical to the previous policy deployments.

At this point you are ready to deploy users to Windows Intune. There are two ways to deploy users: either through the administrative download (Figure 7-39), or by having the user self-enroll using the Company Portal (described later). The enrollment process for each of these steps is outlined in detail later and briefly described below. As an administrator, if you deploy Windows Intune, you need to link the user to the device in the administrative console.

After you have deployed Windows Intune using the administrative deployment, you need to link the user to the device that they use. Earlier we federated Office 365 into Windows Intune. In federation we link the user accounts so the user will have a seamless experience between different environments. This is extremely important, because Mobile devices are linked to user accounts. When you enable a user in Windows Intune, you are allowing the user to access the Windows Intune Company portal to download company applications and to self-enroll Windows Intune on the user’s device.
Follow these steps:
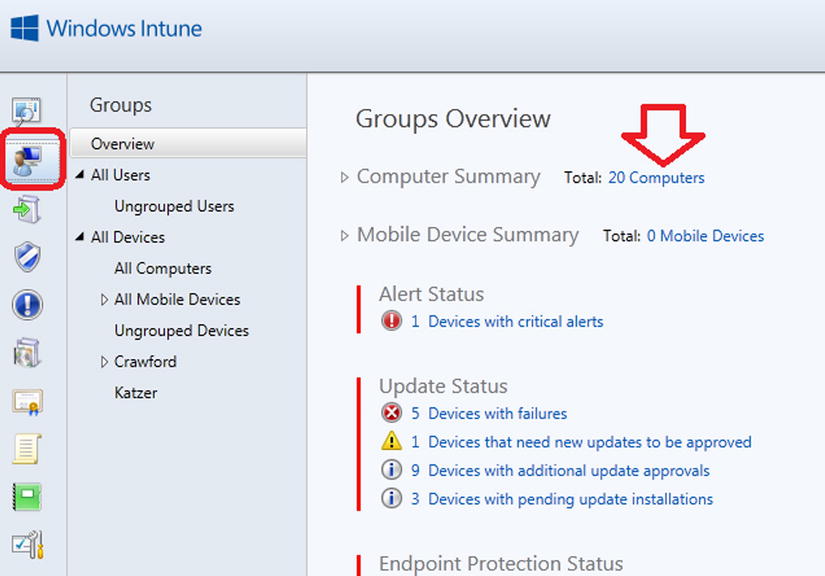
- Select the group icon and then select the number of computers enrolled (Figure 7-40).
- Select the computer and then select Link User (Figure 7-41).
- Select Link User and assign the user to the device. The users listed are those users that have been assigned a Windows Intune license in the administration center (Figure 7-42). After you link the user, then click OK. The user is now linked to the device.


If you deployed users via the self-enrollment of the Company Portal, the user accounts will automatically be assigned to the device.
You are finished with the configuration of Windows Intune. At this point you can use Windows Intune for the desktop, user, and device management. The Windows Mobile management, was a basic enablement. The configuration that we completed has set up the service so everything just works with the minimum of oversight. When you need to add users, just purchase licenses and assign the licenses to the appropriate user from your Office 365 account. Mobile device management is organized around line of Business application deployment. At this point, we wanted the Mobile device management enabled so you can proceed to work with your developer on the company application deployment for your smartphone. In the reference link section, we included number of links on how to add additional capabilities to Windows Intune for smartphone management.
Downloading Software from the Administration Center
There are two ways to download software to a desktop for management. The administrator can download the software to each desktop or the user can access the Windows Intune center and download the software. The Windows Intune admin center looks very similar to the Office 365 admin center. To log in to the center, enter the URL “http://account.manage.microsoft.com”, and use your Office 365 email address. All Office 365 administrators can access the portal (see Figure 7-43).

Select the Admin Console (Figure 7-43) to access the Windows Intune center and then select Administration (Figure 7-44) to access the client download software screen (Figure 7-45).


Once you have selected the Administration screen, just select Client Software Download to download the client software.
Earlier, we set up the Windows Intune center to generate notification of systems errors and problems. There is no additional configuration we need to do, except download the Window’s Intune management software and install it on the desktop devices.
When you download the Window’s Intune software from the administration center, make sure you do the following:
- Save the client software to a folder on your system and unzip it.
- Uninstall your existing antivirus software; Windows Intune replaces this function.
- Install the extracted software from the folder that you saved it in Step 1 above.
- Address any notices that you are informed form the Windows Intune center.
Accessing Windows Intune as a User
Windows Intune provides desktop management, software updates, and antivirus support for up to five devices under a single Office 365 user account. Windows Intune manages Windows desktop PCs and laptops, and smartphones (including Windows Phone 8, Apple iPhone, and iPad devices). To access the Windows Intune site go to http://account.manage.microsoft.com and use your Office 365 login. There are two ways to download the Intune client software to a device: using the Company Portal or the administrator console. If you are an administrator and are downloading the software for multiple devices, you must login to the Windows Administration center and link users to devices. If you are having the user self-deploy Windows Intune, follow these instructions below on the download process using the Company Portal.
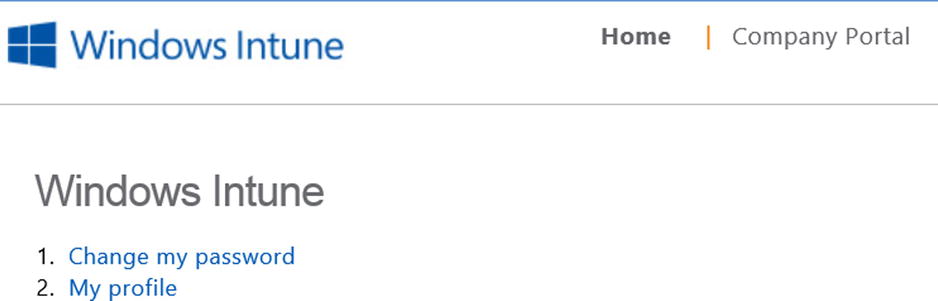
After you log in, select the Company Portal (Figure 7-46) and register your system. In the Company Portal, select All My Devices and add your system (see Figure 7-47). When you select All My Devices, the devices that you have enrolled in the service will be listed (see Figure 7-48). Select “Add a computer” to download the Windows Intune Management software to add your device.


When you add your computer to Windows Intune, follow these simple rules:
- Uninstall the current antivirus software on your device. Windows Intune provides all antivirus services.
- Download the software to a directory (not your desktop).
- Extract all files from the download.
After you download the software, install the software. That is all you need to do. Windows Intune will update your systems with the current updates and repair any system files that were corrupted. Your systems administrator has set up the management of the Windows Intune portal to provide all system updates, deployment of new applications, and antivirus protection.
Most systems do not have all of the updates deployed. Windows Intune will install updates aggressively when it discovers that any systems files on your device are corrupted. This will cause your systems to reboot as updates are applied. It is not uncommon that systems will be behind by 60–90 updates when Windows Intune is first applied or that multiple updates/restarts may be requested in a few hours (when updates are not in sync). Your Intune administrator will set a deadline for updates to be installed. Once the deadline is reached and you have not installed updates, Windows Intune will install the updates for you. If you have a laptop and it is plugged in, it is recommended that you turn off hibernation to allow the updates to be deployed.
Windows 8.1 Enterprise edition is supplied as part of the Windows Intune subscription. Windows 8 software may be downloaded from http://account.manage.microsoft.com. Log on to the Windows Intune center and download the DVD (ISO) image and serial number associated with your account (see Figure 7-49). You can burn the ISO image to a DVD or a USB memory stick. This document describes the process of making your own bootable memory stick with your Windows 8 image.

To create a bootable USB memory stick you will need to expand the ISO image from the Windows 8 download. The tools that you need to create a bootable device are as follows:
- The Windows Intune subscription software (downloaded as shown in Figure 7-45)
- A Windows 7 PC (or later) with a USB port
- A USB memory stick with a size greater than the ISO image (4 GB or 8 GB)
- An ISO unpack utility (downloadable from the web or can be found as part of any commercial DVD publishing package)
Any memory stick can be used, just make sure the size is larger than the ISO media. The memory sticks that we use are typically 8 GB. This allows us to build a USB stick with the Windows 8 software and have enough room to add the Office 365 and the Windows Intune client.
Preparing the USB Memory Stick
Preparing the memory stick is very straightforward. Follow these steps: Open up a CMD window in Windows 7 (64 bit) or Windows 8, and enter the following commands:
DISKPART (enter)
LIST DISK (enter)(this will list the disk devices, such as the USB stick)
SELECT DISK 5(in our case, the USB was listed as device 5)
CLEAN
CREATE PARTITION PRIMARY
SELECT PARTITION 1
ACTIVE
FORMAT FS=NTFS QUICK
ASSIGN
EXIT
At this point the USB memory stick has been prepared to install the Windows 8 software.
Unpacking the ISO Software
Once you have built the memory stick, you need to copy the files over to the USB device. Copy all files including hidden and system files. We use MagicISO to copy the files (see Figure 7-50) from the ISO image to the USB device.

Setting the UBS Memory Stick to be Bootable
Earlier, we copied the files to the USB device. At this point, we need to set the USB device to be bootable. You can do this from the USB device or the PC. The setting of the boot sector must be made from the boot directory (see Figure 7-46). To set the boot drive, do the following:
- Open up a CMD window.
- Change to the drive letter of the USB memory stick.
- Change directory to the “boot” directory on the memory stick.
- Run the command: BOOTSECT.EXE /NT60 ?: (where ? is the USB drive Letter).
Now boot the USB and test out the boot image and reboot your PC with the memory stick installed.
Windows Intune sometimes requires a manual key registration when you add Windows 8 bootable media. The error displayed on the desktop is a licenses activation error. There are two steps you need to follow to install the key: assignment of the license to the Windows Intune user and the manual activation of the key (if the key is not activated in 24 hours after Intune policies are applied).
Step 1: Retrieve the Key
Your Windows Intune subscription has an option to upgrade the local desktop (or laptop) to Microsoft Windows 8 Enterprise software. If you are using this software download, you will need to retrieve the key from the Windows Intune center. You retrieve the key from the software download section on account.manage.microsoft.com. You can only access the key if you have a local admin account in Windows Intune. Log in to the Intune center, select the Software tab (Figure 7-51), and then expand the product listing and select View as shown in Figure 7-52 to retrieve the Window’s 8 activation key.


Step 2: Assign an Intune License to the User
Assign the full Windows Intune license to the user account that requires them. Select the user account and assign the key (Figure 7-53 and Figure 7-54).


Step 3: Install the Key on the Local System
To install the key, you need to launch a command prompt as an administrator. In Windows 8, select the command prompt “CMD” icon (from the main Windows 8 screen), then right click, and select the “Run as an administrator” option from the menu bar. This will launch the CMD prompt on the Windows 8 desktop.
Enter the two commands to install the system key retrieved form the Windows Intune Console. In the new command window run the two commands listed below.
slmgr.vbs -ipk <your product key here>
Hit Enter on your keyboard then type:
slmgr.vbs –ato
An activation message will be displayed if the serial number is registered and activated correctly.
There is a lot of information about Office3 65 on the web — the issue is finding the right site. The information contained in this chapter is a combination of our experiences in doing deployments and support information that has been published by third parties.
Windows Intune TechNet home page
http://technet.microsoft.com/en-us/windows/intune.aspx
Windows Intune Getting Started Guide
http://www.microsoft.com/en-us/download/details.aspx?id=26706
Windows Intune website:
http://www.windowsintune.com
Windows Intune Online Help:
http://onlinehelp.microsoft.com/en-us/windowsintune.latest
Windows Intune Company Portal for Windows 8:
http://www.microsoft.com/en-us/download/details.aspx?id=40794
Windows Intune Support Tool for System Center 2012 and Phone 8:
http://www.microsoft.com/en-us/download/details.aspx?id=39079
Windows Intune Phone 8 Direct Management
http://www.microsoft.com/en-us/download/details.aspx?id=36174
Next steps
This chapter was focused on the configuration and set up of Windows Intune. Office 365 is interesting to explore and discover new capabilities and there is much more to do depending on your Office 365 configuration. The key chapters you need to review for your Office 365 deployment are:
- Chapter 5 – SharePoint Administration
- SharePoint administration and design can be simple or complex depending on your business needs. This chapter provides you with a basic overview of the configuration necessary to be up and running using Office 365 Team Site. This chapter describes Site Design and Construction issues as well as the full SharePoint Administration functions for Office 365.
- Chapter 6 – Building Your Website
- Office 365 includes a public facing website, and the necessary developer’s tools to build out the website. This chapter’s take you from the basic Office 365 site, to a fully functioning website. The Office 365 public facing websites fulfils the basic web needs for 90% of the businesses on Office 365. This chapter describes how to configure and build the public facing website for your business using the integrated Office 365 website tools and SharePoint Designer – a design tool that is included with your Office 365 subscription.
- Chapter 8 – Office 365 Administration
- This chapter describes the different administration centers in Office 365 and the most common tools that you would use to administer your Office 365 company. Depending on your Office 365 services, there are five possible administration tools. This chapter focuses on the Office 365, Exchange, and Lync administration centers. The SharePoint and Windows Intune administration centers are described in their own chapters. We close the chapter with using PowerShell to manage your Office 365 environment.
- Chapter 9 – Compliance and Data Loss Prevention
- Businesses must adapt their mail document storage systems to correctly process the electronic communication based on regulatory oversight. The Compliance and Data Loss Prevention (DLP) provides this capability to allow businesses to managed there communications, and protect the business from simple mistakes in its electronic communications. Office 365 includes integrated discovery, supports legal discovery, and assists with audit requirements.