
![]()
Office 365 Administration Guide Enterprise
In previous chapters we discussed how to move your business to Office 365. We spent a lot of time talking about the three different categories of Office 365 (e.g. Enterprise, Midsize and Professional) and pointed out that you should be looking at the Enterprise Suites as a solution. The main reason why we select the enterprise version is a simple one: you have the flexibility of deployment and your overall costs are reduced, compared with the other plan options.
This chapter is focused on the administration of the Enterprise subscriptions for Office 365. Time is money, and as an administrator, you are looking at the simplest way to accomplish a task. This chapter outlines the common tasks that administrators are asked to perform. These tasks range from renaming users to adding email aliases to creating shared mailboxes to changing the subscription type (see Table 8-1).
Table 8-1. Office 365 Enterprise Plan Options
Enterprise Suites |
Mix and Match Components |
Application and System Options |
|---|---|---|
Office 365 Enterprise E1 |
Exchange |
Office 365 ProPlus |
As an administrator, you’ll find that your company will need different components and applications to be added to your subscription. The process of adding components (or applications) is simple: you purchase the subscriptions that meet your needs and add the purchased licenses to the user. In the case of having too many licenses, you work with your Microsoft partner to have the extra licenses removed. What if you are on the other suites (Small Business or Mid-size Business)? You do not have the capabilities available to you in Table 1. If you need the capabilities, you must migrate your business to the Enterprise suite – just like you migrated your company to Office 365. The Enterprise family is a different service offering. Our focus in this chapter is on the administration of the Enterprise offering for Office 365.
The first account that is created when you sign up is the global Administrator. The Global administrator account has full access to all Office 365 resources. You can use the PowerShell environment to configure capabilities, or you can use the Graphical interfaces in the various admin centers (Exchange, Lync or the SharePoint) to manage Office 365 capabilities. The only rule to remember is this: to change features using PowerShell or in the administration graphical interfaces, you must have a license (such as Exchange, Lync, SharePoint or other centers) provision to the account to that is being used to change that feature. If a global administrator’s account is trying to change features on a subscription area that the account is not licensed to use, that action will not be permitted. PowerShell commands will not work and the Global administrator will be denied access to the GUI command options. Partners, with Delegated Administrator rights by design, do not have a license and cannot access data or have permissions to use PowerShell.
![]() Note Only selected Microsoft partners have the ability to offer delegated administrator services to their customers. The Global Administrator must approve the rights to a Microsoft partner to act as a delegated administrator. Microsoft Partners that have Delegated Administration capabilities have earned rights to use this service offering.
Note Only selected Microsoft partners have the ability to offer delegated administrator services to their customers. The Global Administrator must approve the rights to a Microsoft partner to act as a delegated administrator. Microsoft Partners that have Delegated Administration capabilities have earned rights to use this service offering.
A good example is using PowerShell to set up a shared mailbox for smart phones. If you do not have an Exchange license assigned to the global admin account, the Exchange PowerShell scripts will fail when they make a set-mailbox call. There are many different commands you can use to manage Office 365 with PowerShell.
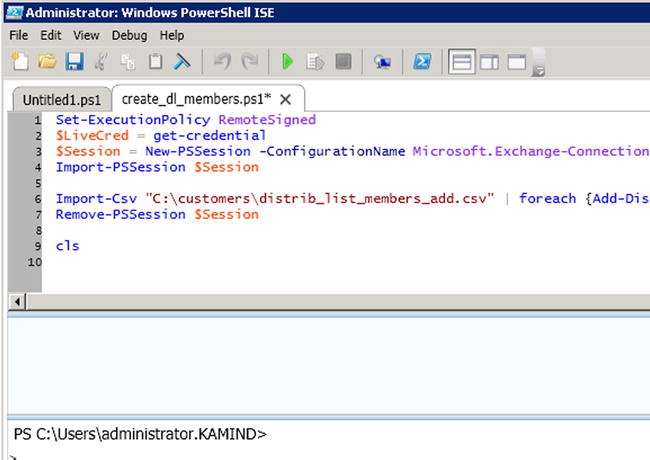
For example, you can use PowerShell to administer Office 365 (Figure 8-1 – creating a distribution list) or you can use the GUI interface (Figure 8-2). Both interfaces provide the same results; one is much more scalable than the other. As an administrator, you will use both interfaces. The only rule to remember, is that you must have a license assigned to the account that you are usingto grant permissions to the user accounts.

The objective of this chapter is to provide you with the tools and capabilities necessary so you can administer your own Office 365 site, and provide the best level of service to your organization.
![]() Note If you have directory synchronization enabled, you cannot edit some properties of the user’s mailbox, because it’s out of the current user’s write scope. This means that the user mailbox must be managed by the on premises active directory.
Note If you have directory synchronization enabled, you cannot edit some properties of the user’s mailbox, because it’s out of the current user’s write scope. This means that the user mailbox must be managed by the on premises active directory.
Preparing to Administrate Office 365
Once you have purchased Office 365, you can begin to administer the company. In Chapter 4, we showed you how to move your company to the cloud and configure your mail services. At the end of the migration steps, we included a check list to verify your Office 365 configuration. This administration section is based on the assumption that you have completed this step.
Final Check List
This information is reprinted from Chapter 4. If you have not verified your configuration, please do this now. These configuration options are discussed in each of the setup and migration steps.
- If you have a desktop Office 2007/2010, and are using Outlook 2007/2010 (and you are not using Office 2013), run the desktop upgrade for Outlook 2007/2010 from the office 365 software download. If you do not do this, Outlook 2007/2010 will stop working.
- Run the domain trouble shooting function in Office 365 (select more than 732 hours) and make sure you have all green check marks. (See Figure 4-15). Correct the areas where you do not have green checkmarks.
- Verify that your Office 365 domain is set to Authoritative and not shared (see Figure 4-31).
- Verify that you have placed a local DNS record in your on-premise DNS server. You will need to add an “AutoDiscover” CNAME to your internal DNS that points to autodiscover.outlook.com.
- Extend the 14-day delete holding time to 30-day delete holding time. Run the PowerShell command. See Chapter 8: Office 365 Administration Guide Enterprise (this one) for information on how to run this command.
- Extend 30-day delete for a mailbox
- Set-mailbox [email protected] –retaindeleteditemsfor 30
b. Extend 30-day delete for the Organization
- Get-mailbox | Set-mailbox –retaindeleteditemsfor 30
- Set-mailbox [email protected] –retaindeleteditemsfor 30
- Extend 30-day delete for a mailbox
- The default retention policies are not enabled until the archive is enabled. If you enable the archive on a user mailbox, the retention polices will begin to execute. Review the chapter on retention polices before you enable the archive.
- Verify that you configured Yammer to replace Office 365 newsfeeds for your company internal social site.
Common Office 365 Administration Tasks
Office 365 has four administration centers: Office 365, Exchange, Lync and SharePoint (see Figure 8-3) when you have an E3 subscription assigned. There are additional administration centers that are added based on the optional subscriptions. This chapter focuses on areas of administration in Office 365 using Exchange and Lync. The other administration centers (SharePoint, Compliance and Data Loss Prevention and Exchange Online Protection) are discussed as focus topics in their separate chapters. What we have included here are the most common questions that we have been asked about Office 365.

The Office 365 administration areas that we will address are: the Office 365 dashboard and licenses (Table 8-1), Exchange administration (Table 8-2) and Lync/Skype administration (Table 8-3). We wrap up this chapter with information on the configuration of PowerShell. PowerShell is used to configure some functions that are not in the Office 365 GUI.
Table 8-2. Office 365 Administration functions
Task |
Description |
|---|---|
Administration roles |
Office 365 supports five different administrator roles. These are Global administrator, Billing administrator, User administrator, Service administrator, Password administrator. |
Domain verification (and DNS review) |
Domain verification, DNS and service record management. |
Adding , deleting, and restoring users |
Account creation and user management. |
Renaming users (no Exchange mailbox) |
Simple steps to rename a user account and change the email address with little impact on the user. |
Adding/changing licenses |
Subscription/license management. |
Security Groups |
Domain Security groups management for federated services. |
Partner Delegated Administration |
Partner Administration management. |
Table 8-3. Exchange Administration Functions
Task |
Description |
|---|---|
Exchange administration roles |
Review of the different Exchange roles for managing Office 365. |
Default user role |
Explains the default user roles and permissions. |
Conference Room/Resource Room |
Explains how to set up and manage a conference room. |
Changing a user name and email address |
Changing an email is a two-step process. This is how you change the email address of the user accounts. |
Adding a user alias |
Adding an alias email or changing the default email address. |
Shared mailbox |
Explains how to create a shared mailbox for the smart phone or Outlook. |
Creating a distribution group |
Explains the different Office 365 distribution groups a distribution group. |
Sending email from an alias email address |
Allows the user to send an email form a different email address than the user’s own email address. |
Smartphone management |
User configuration options for Exchange. |
Troublingshooting: AutoDiscover |
Desktop configuration to ignore Exchange Server. |
There are two ways accounts can be created in Office 365: through a manual process (Single user load/Bulk load) or via Active Directory Synchronization Accounts, created through Active Directory process that can only be managed by on-premises Active Directory tools.
There are different types of administrative accounts on Office 365. The root account (first account that was created when you purchased office 365) is a global administrator account. You can create additional global administrator accounts to manage Office 365. Global administrator accounts do not need a license to perform global administration functions. However, the global administration account does require a license to perform administration functions at the functional level (such as Exchange and SharePoint). As an example, if you wish to configure Exchange services or Lync services, you need a Lync and Exchange license assigned to the account. The same is the case with SharePoint. If you do not have a license, or if you are running Active Directory Synchronization, you cannot configure the functions of the service, only the global access controls for the service. Table 8-3 shows a listing of the common exchange functions that you use to manage Office 365.
![]() Note If you are using Directory Synchronization, those Exchange functions are controlled by the On Premises Active Directory.
Note If you are using Directory Synchronization, those Exchange functions are controlled by the On Premises Active Directory.
Lync allows you to communicate internally without any configuration. The problem is external communication: The normal configuration is the enabling of communications with external users (Skype and smartphones). The administration topics included below are the configuration changes that are required to address these communications across different external domains. Table 8-4 lists the common Lync configurations that can be changed by a global administrator.
Table 8-4. Lync Administration Functions
Task |
Description |
|---|---|
Setting up Lync federation |
Enabling Lync to communicate with non-company users |
Configuration for conferencing add on |
Adding third party service using outside phone services such as InterCall |
Communicating with Skype users |
Step by step instructions to enable Lync to Skype integration |
Restricting Lync users capability |
Restricting Lync capabilities in the admin center |
In addition to the administration section, we have also included an overview and usage section on PowerShell. PowerShell is extremely useful if you have to implement unique functions, or have to repeat a set of tasks multiple times. This is not a complete list: There are many more Office 365 commands you can use. Our objective in this chapter is to show you the various options you can use in managing Office 365.
Office 365 Administration Center
The Office 365 Administration consoles are integrated into the top menu bar (Figure 8-4). This menu bar contains the menus of the license functions for the user and the different administration panels that the user account has licenses for. As an example, if the Lync licenses are not assigned, there will be no access to the Lync Administration center. The Office 365 admin center is the main dashboard for the management of Office 365. The Office 365 admin center is used to administrate global functions. These oversee permissions, security groups, domain management, and support and system health. However, Office 365 administration center is also limited if Directory Synchronization is enabled. When Directory Synchronization is enabled, Office 365 acts as a backup to the On-Premises Active directory. In this case, only those functions that are not on the on-premises servers can be modified by Office 365.

Accessing the Office 365 admin center is simple: just login to Office 365. If you have the permissions, you will land at the administrative dashboard (Figure 8-4). If your permissions are limited, your menu option will be limited to reflect your privileges. The admin center access is based on the permission settings for that user.
Administrator Roles
There are different permission structures in Office 365 depending on which console that you are given permissions to use. The basic permissions of Office 365 are shown in Figure 8-5. There are five different global permissions that may be assigned to user accounts on Office 365. The only account that is assigned a global permissions by default is the first account. This account was created when you purchased the service. All other accounts that are created are assigned user-level permissions. Depending on the size of the organization, it may make sense to assigned different roles for different job functions.

These roles are used to manage large organizations. Small organizations typically assign three roles: Global administrator, Billing administrator and Password administrator. Step back and look at your company, and look at the different roles you can assign to personnel in your company. Microsoft’s security model is to assign the minimum role as possible, and grant basic permissions that are required to complete the job. When you assign roles, look at Figures 8-6 and 8-7 and verify that you are providing access at the appropriate level needed to execute the administrative task.
Table 8-5. Offfice 365 Role Descriptions
Role |
Description |
|---|---|
Global Administrator |
This is the Company administrator. Users in this role have access to everything or the permission to add them to a dedicated role where they do not have permission (such as discovery management). |
Billing Administrator |
Access to all financial transactions. Delegated partners do not have access to this information. |
Password Administrator |
They can reset only passwords of users and other administrators at the same level of permissions. |
Service Support Administrator |
This is a limited administration role. Users in this rule can only view the portal and assign support tickets. Typically users that are assigned this role have a different role assigned to the different subsystems, such as Exchange (see Figure 8-7). |
User Management Administrator |
These users can assign licenses and passwords but cannot make changes to other admin accounts that have more privileges than they do. |

The typical Office 365 configuration leaves one account (usually the root account – the initial Office 365 account) as a Global Admin user without any user licenses. Some organizations will leave this a global admin account and in others this account will be a user account. Regardless of what you do, the first account is the root account. The root account should never be used as a user account. The root account in Office 365 is the base account that is used to create all of the different services that are linked to the Office 365 tenant. As Microsoft has deployed new versions of Office 365, the dependence of the root account has been minimized. We recommend that you do not delete or use this account as a user account.
Microsoft worked around the dependency of the first account bycreating a new internal Office 365 group known as the “Company Administrators.” All global admins are members of the Company Administrator group. This group is where the base permissions are assigned in Office 365. This internal account reduces the criticality of using the root account as a user account.
Domains
There are no practical limits on the number of domains that can be verified to Office 365 Enterprise. The rules are simple: you need to verify a domain, and you need to assign the domain based on the needs (or Domain Intent). Domain Intent is what the domain services will be configured as; there are three different types of services for Domain Intent. These are listed in Table 8-6 below.
Table 8-6. Domain Intent
Domain Intent |
Can Mix with |
Purpose |
|---|---|---|
Exchange |
Lync |
Used for Mail services integration. |
Lync |
Exchange |
Used for video and enterprise voice. |
SharePoint |
- |
Used for dedicated SharePoint public site. |
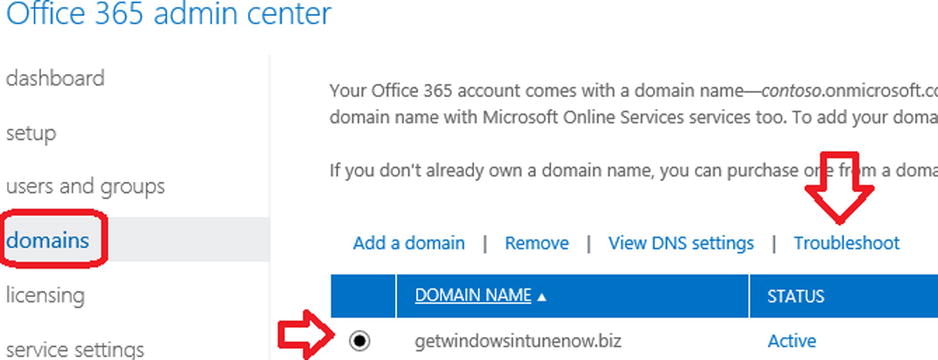
When you add a domain, the first step is to verify the domain (see Chapter 4, Setup and Migration). After you verify the domain, add the necessary DNS changes. The DNS changes are standard, so you can add the domain information at the verification step, or after. The key to adding domains is to use the DNS troubleshooter (see Figure 8-7) and to select more than 72 hours (see Figure 8-8).

Once you select the domain and the troubleshooter and the more-than-72-hours options, verify the domain. If the domain is not configured correctly, the domain will show red “X”s and the DNS parameters that need to be changed. Make the changes indicated and re-run the domain troubleshooting tool. Verify the correction has been made and processed by Office 365.
Domains: Standard DNS records
The DNS records (Figure 8-9) are standard for all domains. In this case, we are using the getwindowsintunenow.biz domain. The domain intent is set for Exchange and Lync.

Adding, Deleting and Restoring Users
Office 365 supports many features that you can configure through the Office 365 user interface. Some actions (such as setting Shared Mailboxes) are only available using PowerShell. If you are running a Federation service (large organizations) you can use your On Premise tools for Exchange 2010/2013 and Active Directory to configure online services. Changes on user configuration for federated accounts will need to be completed on the on-site servers. Our focus in this chapter is on the user configuration of Office 365 using the Office 365 interface.
There are four primary user operations that you will use for administration:
- Adding single users via the user interface
- Bulk adding using a CSV file and the GUI interface
- Deleting users
- Restoring users
If you need to assign user passwords, you will need to use the PowerShell commands. Typically we load the users using the bulk load options, then we assign the passwords using PowerShell. If you have a federated server (using DirSync or ADFS) you will need to assign those passwords using the on-premises active directory server.
Users: Adding Users via the User Interface
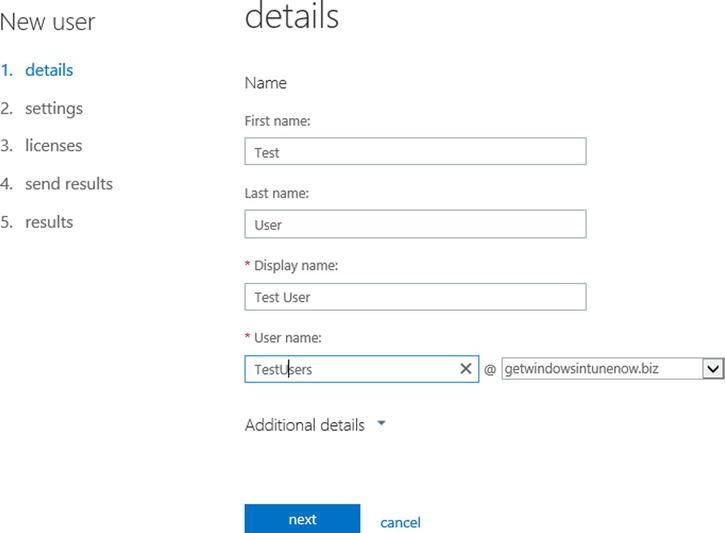
Log in as an Administrator (at www.office365.com or http://portal.microsoftonline.com) as shown in Figure 8-10. Click “Admin” (at the top-right). Next, click “users and groups,” then select the “+” sign to add a new user.

After you select the “+”, follow the steps below to add a user.
Step 1 – Add the user information
You must have a first, last, and display name to create a user.
Step 2 – Assign the user rights and location
When you add the user, you can assign the role for the user. Only global administrators can assign administrator roles. If you assign a user admin rights, you will need to supply an email address that is not part of Office 365. All administrator users will need to have a cell phone that receives text messages.

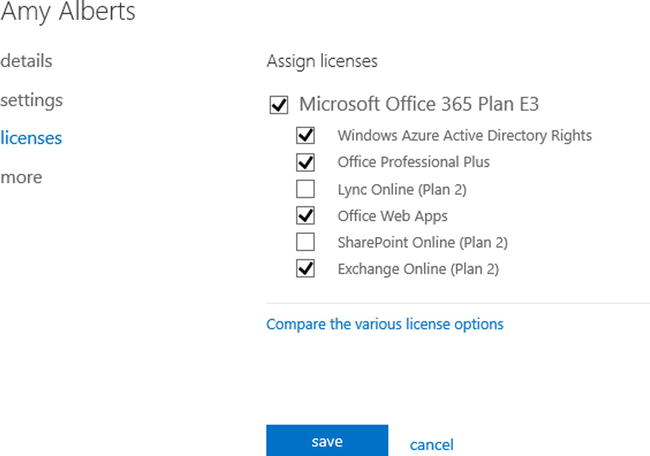
Step 3 – Assign the Licenses to the user
You can assign any valid license to the user. You can also selectivity assign access to the various Office 365 services (see Figure 8-13). Select next after your assignment.
Step 4 – Setting the password
Once you have created the user, enter the email address (Figure 8-14) for where to send the password for the new user.

After you have set the password, select save to create the user account.
Users: Using the Bulk Loading Interface
You can also add users using the bulk loading option. Bulk loading users requires that you build a CSV file that contains all of the information for all users. The bulk loading tool reads the CSV file and loads all user accounts. To add a group of users to Office 365, select the people icon (see Figure 8-15).

When you start the wizard (Figure 8-16), select the download “sample CSV file” to retrieve the bulk loading template. Fill in the information for a csv file and load the template to load the users. Bulk loading users is a simple process, but you will require licenses to add users to Office 365. If you do not have enough licenses to add users, those new accounts will not be created during the bulk loading process.

Deleting users is as simple as selecting the user, then selecting Delete (see Figure 8-17). If the “delete user” trashcan is not present, then the user has been blocked from deletion in Office 365 and you will need to use the PowerShell command to remove the user account. A blocked user account usually happens when a user is placed on legal hold, or when an account was not deleted properly. To remove users that are on litigation hold, you need to remove the in-place hold or the legacy litigation, using PowerShell or the Exchange Admin center. Once the in-place or Litigation hold is cleaned up, you can delete the user. When you delete an account, we recommend that you follow these steps:
- Remove any legal hold on the account
- Disable the archive on the account (if you have this feature)
- Set the user account to the onmicrosoft.com name as the primary address
- Remove any email alias assigned to the account
- Remove all licenses from the account
- Delete the account

Deleted users can be recovered up to 30 days and are located in the “deleted users” folder. If you wish to remove the user from the Office 365 “deleted users” folder, run the following PowerShell command to purge the user account. If you have not setup PowerShell, see the PowerShell section at the end of this chapter. These PowerShell examples are code snippets and require the necessary credentials to execute (see PowerShell section for detailed setup).
PowerShell commands to return the list of deleted Office 365 users. This PowerShell command returns all the deleted user accounts in the recycle bin with the GUID for the user.
Get-MsolUser –ReturnDeletedUsers
PowerShell commands to remove the user account from the deleted user folder, using the user GUID:
Remove-MsolUser -ObjectId 1b8927dd-1998-4fd9-aefb-7c949351ec9f –RemoveFromRecycleBin
To restore deleted users, select “users and groups”, then select “deleted users”. You can then select the user account that you wish to restore. Deleted users will remain in your Office 365 deleted user recycle bin for 14–30 days, depending on the configuration of Office 365. The default retention period is 14 days. Figure 8-18 shows the deleted users restoration option. Just select the user, then restore.

Users: Renaming (no exchange mailbox)
Renaming a user display name is a simple process: You select the user account from the Office 365 administration center and you rename the user account (Figure 8-19).
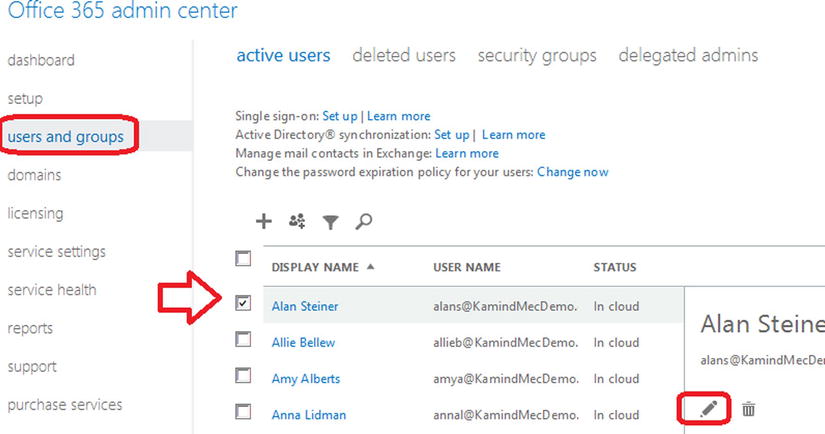
Once you select the edit function, then select the area that you wish to change. As an example, you can select the details and change the user name or domain as the primary login address (Figure 8-20) of the user.

![]() Note If you wish to change the user email address to a different alias, you can do that in the Office 365 admin center – if the alias email address exists in the user account. If the email alias does not exist, any change you make will fail.
Note If you wish to change the user email address to a different alias, you can do that in the Office 365 admin center – if the alias email address exists in the user account. If the email alias does not exist, any change you make will fail.
If you wish to change the user names and email address, it is a two-step process and requires that the new email address has already been added as an alias before you can change it.
- Change the user name in the Office 365 admin panel (Figure 8-20)
- Add the user alias to the user mailbox (see Exchange admin center, Figure 8-40, later in this chapter, for a visual reference)
- Set the user email address as the primary SMTP address in the Exchange admin center (see Figure 8-41, later in this chapter, for a visual reference)
![]() Note To change a user email address, you do not do this from the Exchange admin panel; you perform this function from the Exchange Admin Center. (See Figure 8-32)
Note To change a user email address, you do not do this from the Exchange admin panel; you perform this function from the Exchange Admin Center. (See Figure 8-32)
Changing licenses is simple in the Office 365 enterprise version. Edit the user in the Office 365 Admin Center, and select the license option (see Figure 8-21). When you select a new license, always select the new licenses first, then unselect the old license and save.

Before you change the license, make sure you have enough licenses. You can check the license status in the subscription settings (see Figure 8-22).

Security groups are used to manage permissions globally in Office 365. There are different ways to use security groups: You can use security groups to filter users and administrator permissions (useful in large organizations), and you can also use security groups to manage permissions for different services. SharePoint (as an example), can either use security groups to grant permissions to various site libraries for users, or you can use SharePoint security permissions to restrict access to different libraries in SharePoint. As an example, in large organizations, you can create a security group to isolate users from each other, as well as using security groups to manage access to different federated services (such as Windows Intune and Azure services). There are different ways to use security groups depending on your business needs: Some organizations use security groups to manage SharePoint services. As an example, a SharePoint site is designed, and security groups are created to assign permissions to different areas. The global administrator adds accounts to the different security groups depending on the business requirements. The users added to the security groups inherit the permissions necessary to access the functional areas in SharePoint.
Creating security groups is easy: Sign in as an Administrator; click Admin/Office 365; click “sers and groups/security groups” (see Figure 8-23). Click the “+” to add a new group, or select a group, and edit the group to add an account to an existing group (Figure 8-24). Be sure to click “Save and Close.”


The security group wizard shows the account members that are in the security group, and those members that can be added to the security group. Click Members to see the list. Check accounts to add. Click Add to add the account to the list. Be sure to “Save and Close” (at the bottom of the screen) after you have added account(s) to the group.
If you see the error message (Figure 8-25) when you are adding to an existing group, then this group is a mail-enabled distribution group; you can only make changes to mail-enabled groups in the Exchange Admin center.

One of the other functions that administrators are required to perform is to make bulk license assignments. You can make bulk user license assignments through the graphical interface by selecting all of the users you wish to change the licenses for, then select “edit” (see Figure 8-26).

Once you select the user to change, step through the wizard until you come to the screen that needs to change, then select the new license you wish to add (see Figure 8-27). Select “Submit” when completed.

Delegated Administrators
Delegated administrators are trusted advisors. There are two types of delegated administrators: Microsoft and Microsoft partners. When an Office 365 site is created, no administration rights are granted to any external parties. Microsoft does not have the ability to access user data, unless that right is granted by the account owner.
The account owner (global admin) can add or delete delegated administrator partner (DAP) access in Office 365 as needed (see Figure 8-28). Deleting access is simple: select the account and select delete. The only way you can add a delegated administrator is if the partner sends you a delegated administrator link. Not all Microsoft partners can be delegated administrators: A delegated administrator is a class of partner that has achieved a level of service (as determined by Microsoft) in using Office 365.

Yammer
Yammer is a service that is included with Office 365 Enterprise subscriptions. Yammer acts as an internal social media site or discussion board; Yammer content is owned by the company deploying Office 365. This allows an organization to own the social content (and not use a public site - like Facebook) for internal company issues. Yammer is a replacement for SharePoint newsfeed. Access to Yammer is simple: if the user access has been “licensed”, the user selects the Yammer link from the Office 365 web interface; Yammer user accounts are then sync’d from Office 365 to Yammer. Once you select the link, you can either invite users to join the Yammer network, or let each user join on their own initiative. Once your users have joined Yammer, the operation is similar to Facebook, except the data is internal to your company and is owned by the company and not in the public domain (see Figure 8-29).

We have only touched on a few areas that are most common on the configuration of an Office 365 company. There are many more issues that you may run into. We only touch the surface of the configuration options of Office 365. The options we explored are the most common options that you use in managing Office 365.
Exchange Administration Center
Office 365 administration sites are added based on licensed features. Exchange (email services in Office 365) is a licensed subscription option. At the beginning of this chapter, we discussed the different Office 365 services (subscription options). Exchange mail services is a subscription option. The global administrator has access by default, but global administrator access is enabled (or disabled) by the roles in the organization. Role-based permissions are controlled in the Office 365 Exchange Administration Center. The Exchange Administration Center (EAC) is located under Admin-> Exchange (see Figure 8-30) below. All of the commands in the following section assume that you are operating in the Exchange administration section.

Exchange Administration Roles
The Exchange Administration Center includes a number of administration roles. These roles are used to assign various subtasks to users. The Office 365 global administrator is an organization administrator. The Global administrator may not have permission in some Exchange roles, however the Global administrator can add be added to that role, but that action is audited. In large organizations, the Global administrator accounts are controlled, and user accounts are modified with administrator permissions based on the job roles. As an example, a large company may create a security group of users from one location, and the Exchange administrator is a user in that security group. The Exchange administrator functions are limited to that location as defined in the security group. This is in contrast to a global administrator who has access to all accounts.
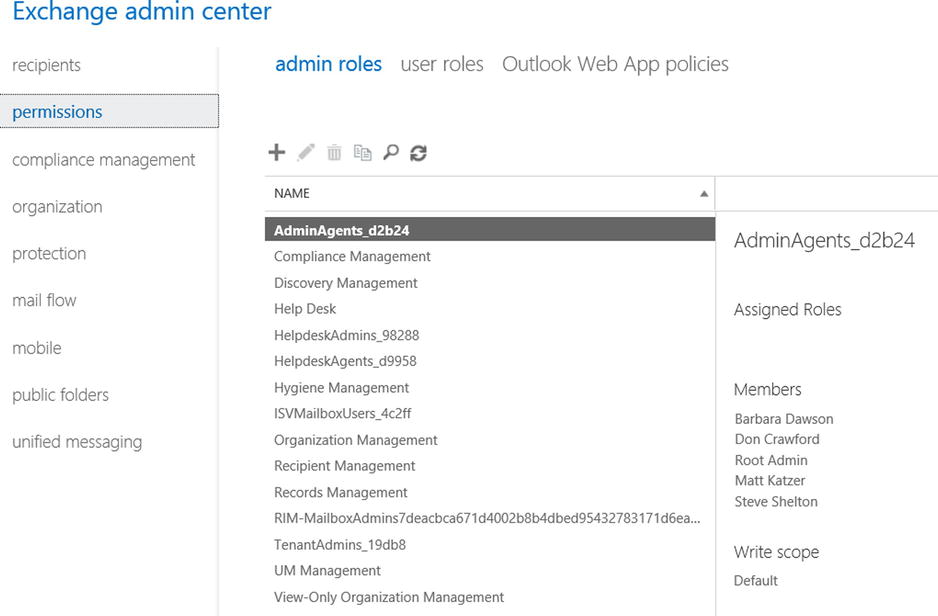
In larger organizations, there will be different roles assigned for Exchange, but in small organizations there will only be two roles that are commonly used: the company Administrator role (global admin via the AdminAgent role) and Discovery Management role. Discovery management is discussed in Chapter 9. The Global admin does not have access to discovery management unless that role is granted, and permission has been granted in the discovery SharePoint center.
You can assign any of the administrator roles in table 8-7 to the user mailbox. Our recommendation for assignment of user permissions follows this model:
- Build a security group for the accounts that will be managed. The user who will manage these accounts should be in the security group.
- Assign the user Exchange administration permission to the selected account in the newly created security group (Figure 8-31).
Table 8-7. Exchange Administrator role description
Exchange Server Role |
Description |
|---|---|
AdminAgents |
Administration agents contain all of the administrators in Office 365 and any other users that are added by the admin. This is where the base Exchange administration permissions are granted. |
Compliance Management |
Users in this role can configure Exchange compliance policies, such as Data Loss Prevention, as well other Exchange policies or compliance issues (see compliance function in Exchange Admin center). |
Discovery Management |
This role manages the discovery process. In order to access discovery information, you must be a member of this role. |
Help desk |
This manages view-only operations and password resets. |
HelpdeskAdmins |
Manages the help desk. |
Helpdesk Agents |
Agent that operates the help desk. |
Hygiene Management |
Manages the Exchange transport services. |
ISVMailboxUsers |
Third-party application developer mailbox role. |
Organization Management |
Allows full access to all user mailboxes for any administrative role except for discovery management. |
Recipient Management |
Role required to move mailboxes in hybrid deployment. |
Records Management |
Users in this role can configure compliance features such as retention tags and policies. |
Rim-MailBxAdmins |
Blackberry Mailbox access for BlackBerry messaging servers (only valid if BlackBerry service is enabled on Office 365). |
TenantAdmins |
Legacy admin role for management of Exchange tenants. |
UM Management |
Universal messaging management role to integrate necessary functions for Enterprise Voice with Lync. |
View-Only Organization Management |
View-only privileges for Exchange organzation. Users in this role cannot modify any Exchange properties. |
Once you have assigned the permission to the user to manage the Exchange users, you can create necessary user roles (if needed) to manage the group.
All users have a default role assigned to them when they are added to Office 365. The default user role defines the characteristics that the user has in accessing the Exchange mail system. As an example, Outlook web access is defined as a user role. If you don’t want to have users access the web mail, you can remove these privileges. The user roles that you can change are listed in Table 8-8 below.
Table 8-8. Default user role assignments
Role Assignment |
Description |
|---|---|
Contact Information |
Allows the user to change their personal contact information. |
Profile Information |
Allows users to modify their name. |
Distribution Groups |
Allows user to create Distribution Groups. |
Distribution Group Membership |
Allows users to modify their distribution group memberships. |
Base Options |
Allows users to modify basic operations associated with their mailboxes. |
Subscriptions |
Allows users to change their email subscription options (such as notification of changes to SharePoint etc.) |
Retention Policies |
Allows users to change the retention policies associated with their email account. |
Text Message |
Allows users to change their text message (IM) settings. |
Marketplace Access |
Allows users to change the marketplace access to modify or add remote applications. |
Team Mailboxes |
Allow users to create their own team mailboxes with other users. |
Either create a new role, or modify the existing role, and change the permissions associated with the role (see Figure 8-32). If you modify the default role, you change the role for all users. It is recommended that you create a new role, then apply that roll to the user account (or accounts); to create a new role, select permission, then user roles. Either create a new role (plus sign), or modify the existing role (pencil) (see Figure 8-33).


If you create a new role for a user account that is different the other default role, you will need to apply the new role to the user account. Select the “recipients” – “Mailboxes”, then the user account. Edit the account and assign the role (see Figure 8-34 below).

Conference Room: Configuration
Office 365 provides a resource called “meeting room”. =Meeting rooms are used to control resources that are limited and need to be managed through scheduling. To set up a meeting resource, log in to Office 365 as an administrator, and select the Exchange (see Figure 8-30, in preceding pages) to access the Exchange Admin Center (EAC).
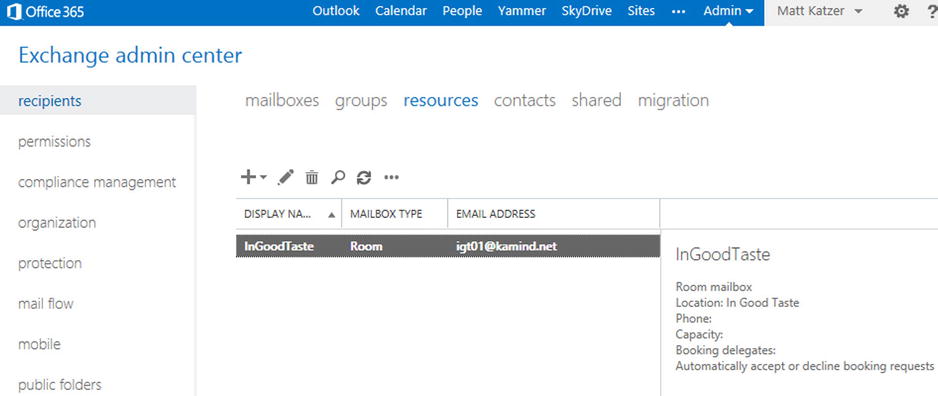
Creating a conference room is simple: After you have selected the EAC, select Recipient – Mailboxes (in the drop down dialog box in Figure 8-35), and select Meeting Room. This will set up the meeting room with a default configuration (if the meeting room is being used, it will show a busy status). There are additional configuration changes that can be made on conference rooms, but there is no GUI interface. These changes would need to be made using PowerShell.

When you create the meeting room, the first order of business is to assign users that have permission to book the meeting room. These users are called delegate users. You have two options on meeting rooms: allow all users to book meeting rooms (default), or allow restricted users to book meeting rooms. Provide the name of the meeting room and select the appropriate option, then click OK (see Figure 8-36).

The room has been configured with the default setting showing only a busy status. Meeting rooms are very versatile: You can use this function to reserve any type of resource, such as equipment. Remember, meeting rooms are a single device, and having a meeting room resource manages multiple objects. To use meeting rooms to manage multiple objects, you need to create a meeting room for each device. After you have created the room, you can modify the capabilities of the room based on your needs (see Figure 8-37 below).
Conference Room: PowerShell Modification
Conference and resource rooms provide the basic configuration for use, but there are additional configuration options that can only be done using PowerShell. As an example, the default configuration hides the meeting status and ownership. If you want to make those available, you will need to run the following PowerShell commands (see PowerShell setup at end of this chapter).
Set full details of a conference room using PowerShell:
Set-CalendarProcessing –Identity ingoodtaste1 –AddOrganizerToSubject $true –DeleteComments $false –DeleteSubject $false
Set limited details of a conference room using PowerShell:
Set-MailboxFolderPermission –AccessRights LimitDetails –Identity ingoodtaste1:calendar –User default
Changing a User’s Name / Changing an Email Address
Earlier, we showed how to change the user account properties in Office 365, but you were limited on what you could change based on if there was an alias email address in place. You change the user name in Office 365 administration center (see Figure 8-19 in preceding pages), then you change the user email address in the Exchange center. To change the user email address, click open, select the Office 365 dashboard, then the Exchange admin center (see Figure 8-30 in preceding pages) and follow the steps below.
- Verify that you have changed the name of the user. If the name is different, change the name in the Office 365 admin center. Do not change the name of the user in Exchange Admin Center.
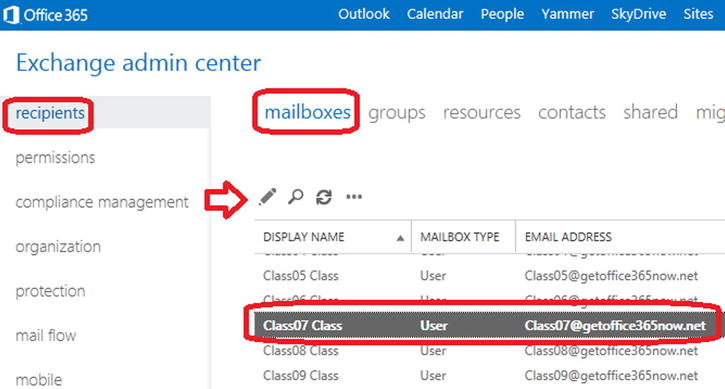
- Select Recipients, then Mailboxes and the mailbox of the user you wish to change (see Figure 8-38), then select edit (pencil icon).
- Select “email address” and then the “plus” sign to add the new email address (Figure 39).
- To make the address the primary address (the login and reply address), select “Make this the reply” address (see Figure 8-40). The domain on the email must be verified to add the user account.


![]() Note When the reply email address is changed, the Outlook user will be requested to log in with new credentials. Outlook recognizes that the user profile is the same, and will link the existing Outlook mailbox to the corrected email address.
Note When the reply email address is changed, the Outlook user will be requested to log in with new credentials. Outlook recognizes that the user profile is the same, and will link the existing Outlook mailbox to the corrected email address.
Adding an Alias Email Address to a User
It is simple to add an alias email address: Just select the Exchange Admin center, highlight the user account, click edit, then select email address (Figure 8-41). Enter the new email “alias” address for the user. The domain must be verified in Office 365, otherwise the alias will not be added.

Changing a User Email Account Primary Domain
Office 365 supports multiple different domains and multiple user email aliases per an account. In some cases, an Office 365 organization may need to change to a new domain (e.g. after a company merger or branding change). To make the change for all users is not difficult: all that is required is to verify the domain (set the MX records and Lync records), add the domain to the existing users, and set the reply address to the new email alias. What you cannot do is change the xxx.onmicrosoft.com domain. If you need to change the xxx.onmicrosoft.com domain, you will need to migrate to a new Office 365 organization. To make this change, follow the steps outlined below.
Step 1 – Validate the new domain
Complete a domain validation for the new domain with the domain intent set to Exchange and Lync. Follow the instructions discussed in Chapter 4 and discussed early in this chapter’s “Domain” section.
Step 2 – Add the user alias and set the reply address
Add the new email alias to all of the users that will have a domain change. If the user’s primary email address is changing, then select the “make this the reply address” option (see Figure 8-42). This will change the user’s primary login address to the new domain. This step is no different than changing the user email address to a new address (as discussed earlier).

![]() Note When the reply email address is changed, the Outlook user will be requested to log in with new credentials. Outlook recognizes that the user profile is the same, and will link the existing Outlook mailbox to corrected email address.
Note When the reply email address is changed, the Outlook user will be requested to log in with new credentials. Outlook recognizes that the user profile is the same, and will link the existing Outlook mailbox to corrected email address.
There are two methods for adding a shared Exchange mailbox. The approach you use depends on the capabilities that you want the mailbox to have: In you need to receive information on a mobile device, or of you require the mailbox as an archive for long term storage, then you will need to use a licensed mailbox. If you do not need these features and only want to have access via Outlook, then the mailbox does not need to have a license. We have outlined the choices in Table 8-9 (below).
Table 8-9. Shared mailbox options

The key decision factor for most users is to receive the information on smartphones. This requirement dictates that you need to use an Office license, rather than a free shared mailbox.
Shared Mailbox: Using with a Smartphone and Outlook
Smartphone devices require active sync connection. You add a shared mailbox the same way you add a mailbox to Office 365. The only issue is that you must assign delegated rights to the users who wish to use the mailbox. This is the same for all user mailboxes. Once a mailbox has been created, you need to assign share rights to the mailbox.
To add a shared mailbox, follow these steps:
- Purchase an Exchange Plan 1 (or Plan 2) mailbox.
- Assign a user account to the Exchange email account.
- Assign user-delegated rights to the mailbox.
Just select the Exchange Admin center, highlight the user account, click “edit”, then “select email address” (see Figure 8-43) to be changed (use the pencil). Select “mailbox delegation”, then add the user for both “Full Access” and “Send on behalf”. Click “ok”, when completed, and the mailbox is modified.
Shared Mailbox: Using Only with Outlook
If you need to add a shared mailbox for use only with Outlook (and you do not want to use a license), you can create a shared mailbox in the Exchange administration center, then add the user as delegated user to the mailbox (like we just did in Figure 8-43).
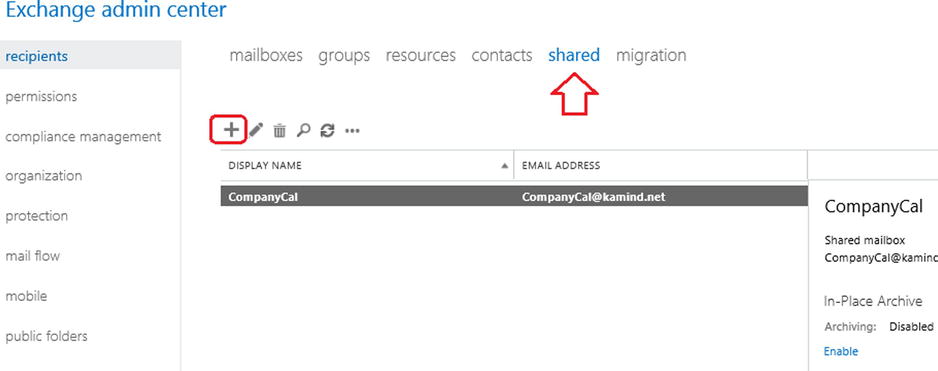
Select the Exchange Admin center, select “Shared”, then create a shared mailbox. In this case, we created a mailbox called CalCompany (see Figure 8-44). Select the mailbox, then “mailbox delegation” and add the users who will access the shared mailbox (as we did earlier – see Figure 8-43). Click “OK” when completed. The shared mailbox will appear in each user’s Outlook that was added as a delegated user.

Shared Mailbox: Using PowerShell
In some cases, you will need to use PowerShell to set up and configure a shared mailbox. You need to run two PowerShell commands: one to set the permission and the other to set the behavior of the shared mailbox. Once you have modified the shared mailbox, the configuration will be updated in the Outlook client at the next login. In this example, “Identity” is the shared mailbox, and “User” and “Trustee” are the person who has access to the shared mailbox.
Step 1: Add the recipient permissions
Add-RecipientPermission -Identity [email protected] -Trustee [email protected] -AccessRights SendAs
Step 2: Add mailbox access permissions
Add-MailboxPermission -Identity [email protected] -User [email protected] -AccessRights FullAccess -InheritanceType All
There are three different types of distribution groups: “Distribution groups”, mail enabled “Security groups”, and “Dynamic distribution groups”. When you add a group (see Figure 8-44), you select a group based on the business role that you wish the group to perform.
There are different views types of group to add, and which group you use comes down to management view. In general, Security groups are not mail-enabled and are managed externally to the Exchange Admin center. Security groups are created in the Office 365 administration center and are managed from Office 365 and not the Exchange Admin center. Typically you will create either a “distribution group” or, if you are a large organization, you create a Dynamic distribution group.
Table 8-10. Distribution Group Types
Group Type |
Description |
|---|---|
Distribution Group |
Distribution groups are mail-enabled groups. An email that is sent to the distribution group is sent to all members. |
Security Group |
Security groups are groups that are used to grant permissions. In some cases, these may be mail enabled. It is recommended that you do not use mail-enabled security groups. |
Dynamic Distribution Group |
A distribution group that has a variable number of members based on filters and conditions in active directory. |
Step 1: Create the Distribution group
In the Exchange Admin center, select “recipients”, then select “groups” (see Figure 8-45), add the group (“+” sign), then select the distribution group to be added.

Step 2: Define the Distribution group
Fill in the information about the Distribution group. When you first create the group, leave the defaults in place. You must specify an owner of the group and any initial members that you wish to add (see Figure 8-46).

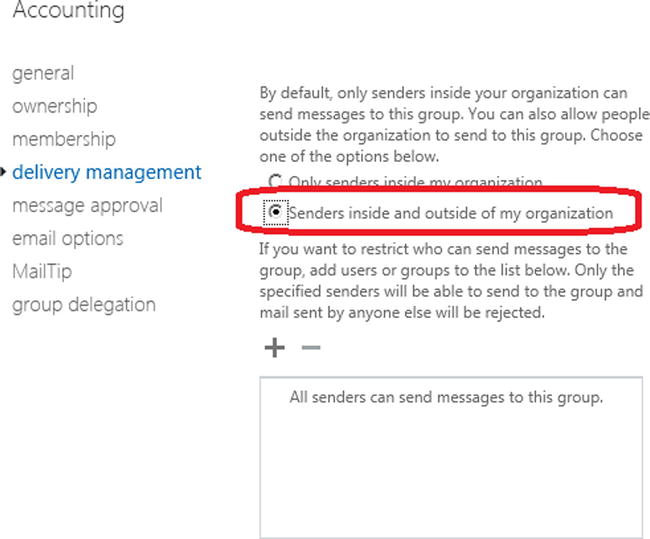
Step 3: Enabling the Group for External Access
After you have created the group and saved it, the group is set up for internal access. If you wish to enable the group for external access, you must edit the group and enable the external access options (see Figure 8-47). Select the group, select “edit”, and select the “delivery management” option. This is a two-step process: You must create an internal distribution group (and save it) before you can enable it for external access.
Using Alias to Send/Receive from Email
You may want to use a different email address to send and receive email. Office 365 is designed to allow only one email address to be used: your primary email address. The way to work around this is to use a distribution list and to grant a user account full permission to use that distribution list using PowerShell. Log in to the Office 365 administration center and under the admin tab, select “Exchange” and follow the steps outlined below.
Step 1: Create the Distribution group
In the Exchange Admin center, select “recipients”, then select “groups”, and click on the “+” sign to add the Distribution group. Use the email alias as the Distribution group name.
Step 2: Configure the Group to be Added
In the Exchange Admin center, select “recipients”, then select “groups”, and click on the “+” sign to add the distribution. Since this is a personal alias, add a description and complete the additional steps for the configuration of the group (see Figure 8-48).

Add the user, and select the membership options. Since this is an email alias (i.e. an internal group) it is recommended that you restrict it to the individual that is using the group (see Figure 8-49).

Step 3: Enable the Group for External Access
In the Exchange Admin Center, select “group”, then “edit” (pencil icon). Select “delivery management”, and then enable the mail option (internal only is default) and enable the user for outside of the organization. This is identical for external distribution groups that we discussed earlier.

Step 4: Grant the Permission to the User
The final step is to grant the permission to the user. There are two ways to do this: either through PowerShell, or by using the Exchange admin center. Select the “In the Exchange Admin center” option, select “group”, than “edit” (pencil icon), and select “group delegation”. You will need to enter the user account for both Send As and Send on Behalf (see Figure 8-51). Select “OK”, and the user will now be able to use the “From” address in Outlook or in the Outlook Web App to send emails using the alias email address.

You can also grant theses permissions using the PowerShell commands for a shared mailbox. In this case you are using a distribution list and granting full access for its use. Execute the PowerShell command, and give access rights to the user mailbox. The shared mailbox PowerShell command is as follows:
Add-RecipientPermission -Identity [email protected] -Trustee [email protected] -AccessRights SendAs
Step 5: Verifying Outlook Configuration
The final step is to send an email from Outlook to verify that you can send a message from an alias. In order for this to work, you must select the email distribution group you created earlier. In our example, we used “Get365”. Select “get365” from the group email address book. (If you manually type the email address in, this will fail.) To send an email alias from Outlook, follow the steps outlined below:
- Open up Outlook, select the “From” drop down, and select the “Other email address” (see Figure 8-52).
- In the “From” box, select “From” and find the distribution alias (see Figure 8-53).
- Click “OK”, and send the email.


In Figure 8-52, we select “Other email addresses”, then select the distribution group (see Figure 8-53); you cannot enter the distribution group name in the address bar. The email will not be sent.
Smartphone Management from Exchange
Smartphone devices are controlled with Exchange active sync. The default configuration is to allow users to control their smartphone using Outlook Web App – Options. If you desire to control these options at an administration level, you access this information via the Exchange admin center (EAC), under the mobile option (see Figure 8-54).

You can also enable detailed control options on the mobile devices, such as password requirements, password complexity and encryption options. These options are in addition to the Windows Intune Mobile device management policies.
Many organizations wish to limit what users can do with smart devices. In some cases, you may restrict all users from using mobile devices; this is a business planning process issue. It is best to define the business polices and implement them during deployment; The important point here is that you can control the mobile device access to information, if needed.
Autodiscover is the ability of an Outlook client (including your laptop and your smart phone) to discover the location of the Office 365 Exchange Email Server, and to automatically connect to that server (see Figure 8-55). You need to insert the Autodiscover record in the external DNS and the internal DNS. Both records should point to outlook.com (see Figure 8-56).


The Autodiscover process is outlined in Figure 8-57. When an internal client looks up an Autodiscover record, it first determines the Autodiscover record through active directory. If the client is external, it looks up the Autodiscover record from the DNS.
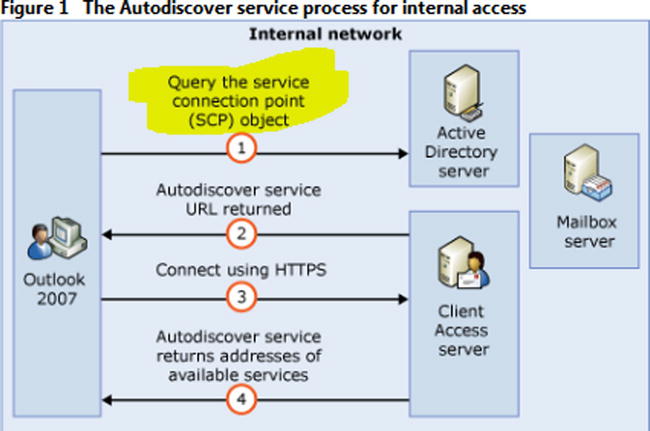
If you are on site and you are trying to connect to the Office 365 Exchange Server, the Outlook client will use the Exchange Service Control Point connection object to attach to the local Exchange Server and bypass the external auto discover look up. If you have chosen not to use Microsoft migration tools, you will need to block the local clients from finding the on-site Exchange Server in the auto discovery process, or convert the mailboxes to a Mail enabled user (MEU). The registry entries that must be modified for the clients are listed below (see Microsoft KB article – 2612922).
Equation 8-1. Registry entries to block Service Control Point (SCP) look up.
1. Navigate to the following registry key:
HKEY_CURRENT_USERSoftwareMicrosoftOffice12.0OutlookAutoDiscover

2. Set the following values for the Value Names listed below:
"PreferLocalXML"=dword:1
"ExcludeHttpRedirect"=dword:0
"ExcludeHttpsAutodiscoverDomain"=dword:1
"ExcludeHttpsRootDomain"=dword:1
"ExcludeScpLookup"=dword:1
"ExcludeSrvLookup"=dword:1
"ExcludeSrvRecord"=dword:1
Lync Administration
Lync is a full featureed communications tool that supports file sharing, web conferencing, voice communications, and many other features (very similar to Skype, but with many more features). Lync integrates into Microsoft Exchange and acts as a phone switch for incoming voice calls. Large organizations use Lync as desktop phone replacements, and allow their users to deploy Lync clients on any mobile or desktop device. Smaller organizations use third-party services such as Connect Solution (www.coso.com) to handle incoming phone calls; Lync supports Enterprise voice (both people can talk at the same time). There are many different characteristics of Lync; it is a powerful and popular business communication tool, and the data it accesses is encrypted between parties.
In Chapter 4, we configured Lync to be federated to communicate to external users. The process is simple (see Figure 8-58). Select the “Lync Admin” center from the Office 365 dashboard (under the Admin tab), select “organization” and “external communications”, and eLync federation takes one to four weeks to be provisioned for the service. Once the service is provisioned, you are enabled for external communications.

![]() Note It is recommended that you have verified the domain prior to enabling federation. If you enable the onmicrosoft.com domain, there may be some service downtime when you switch over to the verified domain.
Note It is recommended that you have verified the domain prior to enabling federation. If you enable the onmicrosoft.com domain, there may be some service downtime when you switch over to the verified domain.
Configuration for Conferencing Add-on
There are several different conferencing suppliers for Lync. To find all of the providers, select “Lync administration center”, then select the “provider” tab (see Figure 8-60). This will display the list of providers that are certified by Microsoft to work on Office 365. You can contact them directly, or ask your Microsoft partner to do so.
Once you have selected a teleconferencing provider partner, just enter the dial-in information for the user account under “dial-in users” (see menu item in Figure 8-59). Your teleconferencing bridge number will be enabled and will automatically be generated with an Outlook calendar invite, as long as Lync is installed and running on your desktop.

Microsoft is adding additional features to Lync; as they add more capabilities, the Lync admin center will be extended with new features.
Using PowerShell
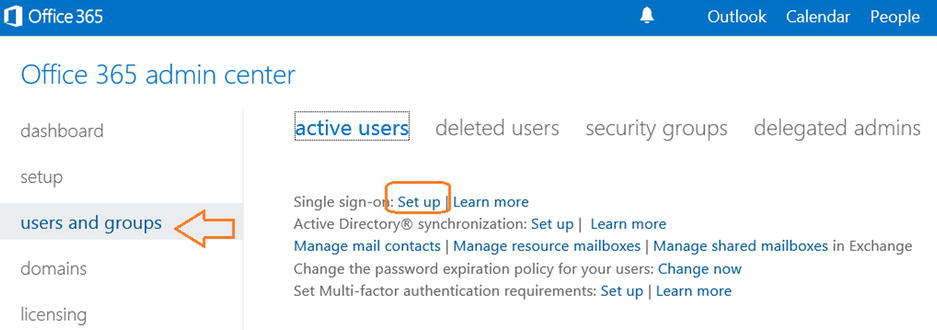
Earlier we briefly discussed PowerShell and the capabilities that it provides you. PowerShell is required for any bulk changes you need to perform, or for special commands that are not part of the Office 365 admin console. Typically we recommend that if your organization has more than 10 accounts then you may find it more convenient to use PowerShell. The account that you will use for PowerShell management is the Global Administrative user account, and the account must have a license in the area that the PowerShell command is executing. As an example, if you are using Exchange PowerShell commands, the global admin account must have an exchange license assigned. If the license is not assigned, then the PowerShell command will fail. The simplest way to install the latest version of PowerShell is to select the “Single sign-on” option (see Figure 8-60). This is the same process that we used in Chapter 4.
Select step 3, “Install PowerShell” (See Figure 8-61). The PowerShell installation will verify the updates required to support the Windows Azure PowerShell. The only option we are interested in is the installation of PowerShell on your desktop systems. Select the correct version (32-bit or 64-bit) for your system.

Once you have installed Office 365 PowerShell, launch the PowerShell module and enter the following commands.
Set-ExecutionPolicy RemoteSigned
$LiveCred = Get-Credential
Import-module msonline
Connect-MSOLService –Credential $LiveCred –Verbose
Get-MsolGroup
The results of running theses commands should be similar to Figure 8-62.

You have completed the base PowerShell set up; now use the above command to validate the installation. If the command above does not work, you have either installed the PowerShell GUI incorrectly, there is a lack of permissions, or you have not installed the desktop connector for Office 365. Using PowerShell requires administrative privileges and a license to be assigned to the account that is using PowerShell commands.
PowerShell: Using the Standard Header
Most Office 365 features can be changed within Office 365 using the service Admin centers (Exchange, CRM, SharePoint, and Lync). Sometimes you cannot make the necessary changes, however, and will need to make changes using Windows PowerShell.
PowerShell can be complex for any user. When using PowerShell with Office 365, you need to use a standard PowerShell header. This standard header will allow you to connect directly to the Office 365 administration interface and make the necessary changes. However, if you do not set up the commands correctly with the remote interface execution parameters, the PowerShell command will fail. The only issue is that the user account that you log in to (for Office 365) must have a license assigned to it. The licensed user can only execute the PowerShell commands for the Office 365 that the user admin account is licensed to use, otherwise it will fail.
We use a standard PowerShell interface that allows the command to run in a PowerShell command prompt, or the integrated systems editor (ISE). The standard command interface (or PowerShell header) can be invoked with this script:
Set-ExecutionPolicy RemoteSigned
$LiveCred = Get-Credential
Import-module msonline
Connect-MSOLService –Credential $LiveCred –Verbose

$Session = New-PSSession -ConfigurationName Microsoft.Exchange-ConnectionUri https://ps.outlook.com/powershell/ -Credential $LiveCred -Authentication Basic –AllowRedirection

Import-PSSession $Session –Allow Clobber

# Insert Other Power shell commands before remove PSSession
#*********
# PowerShell Commands go here
#*********

#Clean up and close the session
Remove-PSSession $Session
Once you have verified the functionality of the header script, you are now ready to make the necessary changes in Office 365. This section of the administration maintenance manual lists the type of problems encountered and the PowerShell solution. All that is needed for the user to execute these commands is to use an acocunt--with global administrator rights--that has been licensed with an appropriate subscription (such as Exchange, SharePoint, etc.).
PowerShell: Not Remotely Sign Error
The first time you run PowerShell, you may get an error not remotely signed. To correct this error, you need to enable PowerShell on your system:
- Start Windows PowerShell as an administrator by right-clicking the Windows PowerShell shortcut and selecting Run as Administrator.
- The WinRM service is configured for manual startup by default. You must change the startup type to Automatic and start the service on each computer you want to work with. At the PowerShell prompt, you can verify that the WinRM service is running using the following command:
get-service winrm
the value of the Status property in the output should be “Running”.
- If the value is not running; you can start the service from the command prompt
sc config winrm start= auto
start winrm - To configure Windows PowerShell for remoting, type the following command:
Enable-PSRemoting –force
- If the value is not running; you can start the service from the command prompt
Mail flow should resume in the next two to four hours.
PowerShell: Winmail.dat Problem
Let’s say the email is being sent externally to users in an RTF mime format, and the users cannot read the email and see a “winmail.dat” file. The winmail.dat file appears on a client email because Outlook (on the sender) is not installed correctly or there is another Outlook Add-In (on the sender) that is preventing the email form being converted to text. To resolve this issue, either disable the Outlook Add-ins (on the sending device) or uninstall and re-install Office 2007/2010.
If this fails, then as a last resort you can force the Office 365 Exchange server to send only pure text email. This command will force the emails to be sent out as pure text format.
Set-MailContact <ExternalEmailAddress or GUID> -UseMapiRichTextFormat Never
Verify that the mail format was applied:
Get-MailContact | Select <ExternalEmailAddress or GUID> | Select UseMapiRichTextFormat
The above command will only display the user email address if it supports RTf format, otherwise, it will display other options.
The Audit command turns on full tracking for any access to a mailbox. To change the audit state on a mailbox, run this command:
Set-Mailbox <Identity> -AuditEnabled $true
Set multiple mailboxes for audit:
$UserMailboxes = Get-mailbox -Filter {(RecipientTypeDetails -eq 'UserMailbox')}
$UserMailboxes | ForEach {Set-Mailbox $_.Identity -AuditEnabled $true}
PowerShell: Verification of Audit Logs
Run the following command to verify the audit log configuration and the time limit configuration. Administrator audit log is on by default, mailbox logs are off by default. Audit logs are enabled for 15 days.
Get-AdminAuditLogConfig
PowerShell: Mailbox Audit Log search
To perform an audit log search in PowerShell, use the following command. This requires that auditing has been enabled on the mailbox in question:
New-mailboxAuditLogSearch -Mailboxes [email protected] –Startdate 1/1/2010 –EndDate 12/31/2013 –StatusMailRecipients [email protected]
Passwords can be set from the user interface. However, when you reset a password, all passwords revert back to the 90-daypassword reset.
Get-MSOLUser | Set-MsolUser -PasswordNeverExpires $true
![]() Note If the user’s password is reset, the policy changes back to 90 days. If you want the forever policy applied, you need to set it again with PowerShell, and every time you reset a password. The Office 365 interface allows passwords to be fixed for up to 720 days.
Note If the user’s password is reset, the policy changes back to 90 days. If you want the forever policy applied, you need to set it again with PowerShell, and every time you reset a password. The Office 365 interface allows passwords to be fixed for up to 720 days.
PowerShell: Get Mailbox Statistics
This command retrieves all of the usage data about the user Get-Mailbox | Get-MailboxStatistics | Select-Object DisplayName,StorageLimitStatus,TotalItemSize
PowerShell: Enable Litigation Hold – No Notice
There are different legal holds – with notice and without notice. This command places a mailbox on legal hold with no notice given to the end user.
Get-Mailbox -ResultSize unlimited | Set-mailbox -LitigationHoldEnabled $true
PowerShell: Review Permission Assigned to a Mailbox
This command retrieves all of the permission information about the user:
Get-MailboxPermission -Identity [email protected]
PowerShell: Review the Management Role Assignment to a User Account
This command retrieves all of the permissions assigned to different roles in Office 365.
Get-ManagementRoleAssignment- -Enabled $True -Delegating $True
PowerShell: Display All Mailbox Forwarders
This commands retrieves information about the Mailbox forwards and allows you to turn them on or off.
Display al Mailbox forwarders:
Get-Mailbox | Where {$_.ForwardingSMTPAddress -ne $null} | Select Name, ForwardingSMTPAddress, DeliverToMailboxAndForward

Turn off all milbox forwarders:
Get-Mailbox | Where {$_.ForwardingAddress -ne $null} | Set-Mailbox -ForwardingAddress $null

Turn off a single mailbox forwarder:
Set-Mailbox <emailaddress>  -ForwardingSmtpAddress $null
PowerShell: Change Mailbox Permissions
The mailbox permission command is very useful; you can use this on any email-enabled item (such as distribution groups):
Add-MailboxPermission -Identity [email protected] -User [email protected] -AccessRights FullAccess -InheritanceType All

Add-RecipientPermission -Identity [email protected] -Trustee [email protected] -AccessRights SendAs
PowerShell: Assign License to a User Account
After you directory-sync an account, there may be a need to bulk-assign licenses via PowerShell. To complete this, you need to execute the two PowerShell commands listed below. There are additional PowerShell commands you will also need to run in order to to retrieve the subscription SKUS to use this command. The licenses types must be active.
Set-MSOLUser -UserPrincipalName [email protected] -UsageLocation US
Set-MSOLUserLicense -UserPrincipalName [email protected] -AddLicenses {tenantid}:ENTERPRISEPACK
PowerShell: Bypass SPAM Filtering for Email
Allow all mail to be sent to a mailbox without filtering email using Exchange Spam Confidence Level (SCL) for email processing. This command accepts all email that is incoming that is processed by Office 365 Exchange server Transport Role:
Set-ContentFilteringConfig –Bypassedrecipients [email protected]
PowerShell: Extend the Purges Folder to Greater Than 14 Days
Email in Office 365 will be deleted form the purges folder after 14 days, once the user has selected the item in the delete folder. The item is moved from the delete folder to the purges folder. The default configuration is 14 days. You can extend this to 30 days with the following commands
- Extend 30 days delete for a mailbox
Set-mailbox [email protected] –retaindeleteditemsfor 30
- Extend 30 days delete for the Organization
Get-mailbox | Set-mailbox –retaindeleteditemsfor 30
PowerShell: Meeting Room Configuration
To make meeting rooms more useful, you need to add additional user information about the meeting room. The only way to add additional capabilities is to use PowerShell to extend the meeting room options. This example uses the meeting room “ingoodtaste1”.
Set Conference room to show “limited details – free & busy”
Set-MailboxFolderPermission –AccessRights LimitDetails –Identity ingoodtaste1:calendar –User default
Reference Links
There is a lot of information about Office 365 on the web; the issue is finding the right site. The information contained in this chapter is a combination of our experiences in doing deployments, and support information that has been published by third parties.
Updating Federation certificates on Office 365
http://support.microsoft.com/kb/2523494
How to set up a certificate on IIS 7.0
http://www.iis.net/learn/manage/configuring-security/how-to-set-up-ssl-on-iis
Office 365 Service level permissions
http://community.office365.com/en-us/wikis/manage/535.aspx
Exchange 2013 Role Overview
http://help.outlook.com/en-us/exchangelabshelp/ee441216
Exchange 2013 Built in Roles
http://technet.microsoft.com/en-us/library/dd351266(v=exchg.150).aspx
Next Steps
Your basic Office 365 system has--hopefully by now--been set up and configured. At this point you are 100% functional and ready to move to the next steps. However, your work is not yet complete. There is much more to do depending on your Office 365 configuration. The key chapters that you need to review for your Office 365 deployment are:
- Chapter 5 – SharePoint Administration
- SharePoint administration and design can be simple or complex, depending on your business needs. This chapter provides you with a basic overview of the configuration necessary to be up and running using Office 365 Team Site. This chapter describes site design and construction issues as well as the full SharePoint Administration functions for Office 365.
- Chapter 7 – Windows Intune Administration
- The secret to an optimal Office 365 site is the management of the desktop to ensure that updates are current and the user antivirus is functioning. Windows Intune is a desktop management tool that addresses these issues and reduces the administrator’s effort in desktop management while improving the user’s experience.
- Chapter 9 – Compliance and Data Loss Prevention
- Business must adapt their mail document storage systems to correctly process their electronic communications based on regulatory oversight. The Compliance and Data Loss Prevention (DLP) features of Office 365 provide the capability for businesses to manage their communications. Office 365 includes integrated discovery and supports legal discovery and audit requirements.
- Chapter 10 – Exchange Online Protection Administration
- Office 365 is composed of a set of services. The Exchange Online Protection (EOP) service is the front end of Office 365 and handles all of the external email front end processing and filtering. If you have smart devices that email to Office 365, you will use EOP to manage the interaction.
- Chapter 11 – DirSync, ADFS, Single Sign-On and Exchange Federation
- Active Directory Federation Services and Single Sign-On is the integration of the Office 365 Active Directory with on-premises Active Directory. This allows one sign on (controlled by on-premises servers) to give access to both cloud resources and on-premises resources. Password Sync can be a simpler implementation that meets many requirements. Federation allows on-premises and cloud Exchange servers to work together.