
![]()
Office 365 Exchange Online Protection Administration Guide
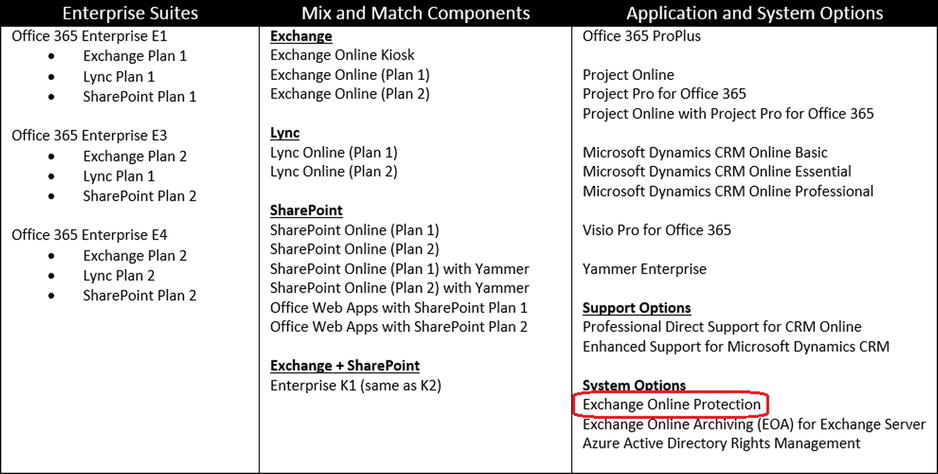
Office 365 version 2013 is a suite of software products: Software as a Service (SaaS). Customers can purchase Office 365 in many ways, depending on the needs of the organization. Exchange Online Protection (EOP) is one of the service offerings that is included with all of the e-mail services and suites, but it may be purchased separately. EOP is the hosted spam/virus service that processes e-mail communication before it is received by Office 365 mailboxes or on-premise servers, and it is the focus of this chapter.
As shown in previous chapters, the Enterprise version of Office 365 is composed of various services and applications (see Figure 10-1).
The best way to show the flexibility of EOP is to look at a live example on how EOP was used to link two different mail systems together during a migration to Office 365. This situation involved linking Office 365 and Google Docs for a test group evaluation and a migration.
In this example, a client purchases EOP as a filter for two reasons 1) to replace the current solution and 2) as a possible transition to Office 365. However, the client was not sure, and wanted to evaluate the solution. This client had Google Docs users (∼150 users). They need to move their mail services before Sept 23, 2013 (The 563-page Omnibus HIPAA rule that was released on March 16, 2013 by the Department of Health and Human Services did not extend the grandfather clause on meeting HIPAA compliance for data services.) All data suppliers must be HIPAA-complaint and supply a Business Associates Agreement (BAA). Google Docs were not compliant, so a BAA was not issued for companies that use Google Docs services.
The solution proposed to the client was to use Office 365 as a replacement for the Google spam/virus scanning solution. The proposed cloud solution was architected as a stepping stone to Office 365. This allowed the company to 1) solve the current need (replace postini) and 2) leverage the EOP integration to evaluate Office 365. This customer purchased test licenses on Office 365, along with the 150 production licenses for EOP. The filtering model (see Figure 10-2) allowed e-mail to run through Office 365, and relayed the e-mail addresses that were not on Office 365 to Google for processing. The customer created an Office 365 test group (following the steps outlined in Chapter 4) and continued to evaluate the business reason for moving to Microsoft Office 365. The business issues were evaluated and the test group voted to move to Office 365, with no downtime before the Sept 23, 2013 deadline.

How EOP Works
The client was able to use EOP in this manner because EOP is designed with flexibility (see Figure 10-3). EOP works with Office 365 and third-party mail solutions. The focus of this chapter is to expand on the configuration of EOP, which gives you the flexibility to build filtering solutions that will work with your business and Office 365.
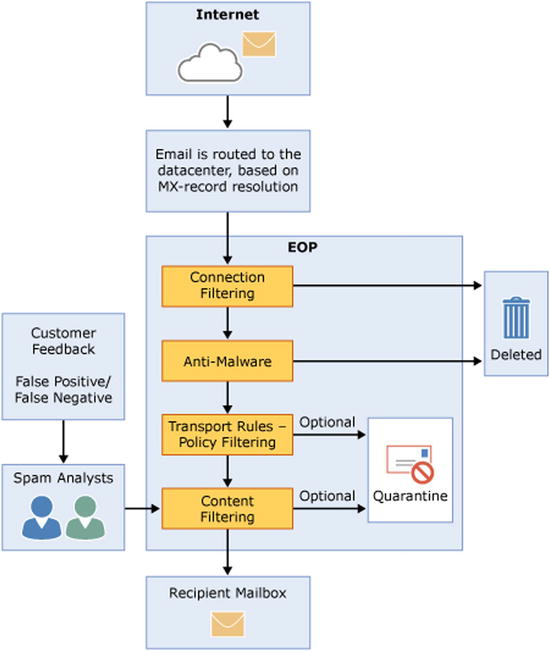
EOP filters spam and checks for viruses before the transport rules and content filtering are checked. This flexibility allows you to add the necessary connectors to third-party services. Earlier you looked at the Google filter case, since this is how we linked the services together. Chapter 9 discussed compliance and Data Loss Prevention (DLP), which will be important here.
The EOP filtering architecture is configurable. The global administrator can configure the following options by using the mail flow connectors and the protection policies (see Figure 10-4). Some of the policies that can be configured are listed here:
- Send an e-mail notification to a manager upon receipt of an e-mail from a specific sender
- Journal all e-mails to an external archive server
- Copy all e-mails sent to specific users
- Send e-mails to the user junk mailbox or hosted quarantine filters
- Send e-mail through dynamic endpoint encryption (meeting HIPAA requirements)
- Route incoming and outgoing e-mails to a specific destination (via transport rules)

The complete list of features is Table 10-1. There are some differences between the EOP for on-premises systems versus EOP for Office 365. The configuration in this chapter is a hybrid one, where there is at least one or more mailboxes on the premises or in Office 365.
Table 10-1. Exchange Online Protection Features
EOP Features |
||
|---|---|---|
Mailbox Location |
Role-Based Permissions |
Role Groups |
Domain Management |
Transport Rules |
Auditing Reports |
Built-In Anti-Spam Protection |
Customize Anti-Spam Policies |
Quarantine: Admin Management |
Quarantine: End User Access |
Outlook Junk E-Mail Reporting Tool |
Outbound Mail Routing |
Secure Messaging with Partner |
Safe Listing a Partner’s IP Address |
Conditional Mail Routing |
Hybrid Deployments |
Office 365 Admin Center Reports |
Excel Application Reports |
Message Trace |
Delivery Reports |
Office 365 Admin Center Access |
Exchange Admin Center Access |
Data Loss Prevention (DLP) |
DLP Policy Tips |
Remote PowerShell |
There is very little that the administrator needs to do to configure EOP. The default configuration just works. The Office 365 administrator can configure the EOP to meet the business polices of the organization. This chapter is designed in three parts: setting up EOP for a hybrid organization; configuring EOP spam filters (user and administrator) and customizing the EOP. The majority of Office 365 clients will leave the EOP configuration in its default setup, simply because EOP just works as designed.
Getting Started with EOP: Hybrid or Standalone
If you have already implemented Office 365, you can skip this section. This section is about setting up Exchange Online Protection for the first time and using this as a front-end filter for the on-premises mailboxes (or a replacement for postini on Google Docs). If you have an Office 365 environment setup, the Exchange Online Protection is already configured for you. EOP licenses are contained as part of Office 365 suites and any Office 365-hosted exchange.
Best Practices for EOP Management
Let’s get started:
- Users must be in Office 365. If there is a user mailbox on Office 365, the domain must be set up as a relay.
- Domains must be listed in accepted domains
- After you configure EOP, wait 72 hours before you restrict port 25 access
- Restrict firewall to addresses of the Microsoft Data Center
Steps to Set Up EOP for the First Time
The process of setting up EOP is very similar to that of Office 365. You purchase the necessary subscription. Our recommendation is that any EOP installation should have at least one E3 subscription so the necessary infrastructure is set up for easy migration to Office 365. There are nine steps to set up Office 365, EOP. These are as follows:
- Sign up for the EOP service.
- Validate the domain.
- Load the users.
- Build the Outbound Connector.
- Build the Inbound Connector.
- Change the MX records.
- Point the on-premise mail connector to the Office 365 smart host.
- Restrict the IP addresses to Office 365 only.
- Change the Spam Confidence Level (SCL).
EOP is included with Office 365, but can easily be added to any subscription. The assumption that this configuration is making is that you have a hybrid configuration. Some mailboxes are on Office 365 and the majority of the other mailboxes on different mail services.
Step 1: Sign Up for Exchange Online Protection
Exchange Online Protection is standard on all Office 365 subscriptions. If you have an Office 365 subscription, you do not need to sign up for the service (see Figure 10-5).

If you are new to Office 365 or have an existing trial account and wish to add Exchange Online Protection, you need to link the subscription to your account (see Figure 10-6). To link the EOP to an existing subscription, select the blue “sign in” (by the red arrow in Figure 10-4) to link the Office 365 or Windows Intune account. If you do not have an account, complete the sign-up process to create your first account, and select create and account.

Step 2: Validate the Domain and Retrieve the MX Records
The first step is to validate the domain name and show proof of ownership. After you show proof of ownership, select Cancel to return to the domain screen (see Figure 10-7) and retrieve the complete DNS records.

![]() Note If you have an on-premise exchange server, and are planning an Exchange hybrid implementation, follow the instructions in Chapter 11 for adfs and federation. ADFS is a complex migration. Do not proceed with the rest of this chapter.
Note If you have an on-premise exchange server, and are planning an Exchange hybrid implementation, follow the instructions in Chapter 11 for adfs and federation. ADFS is a complex migration. Do not proceed with the rest of this chapter.
If you have validated the DNS records, then select Cancel (see Figure 10-8), and retrieve the remaining DNS records to validate them. This will allow you to configure a Hybrid Office 365 configuration.

After you have validated the records, you can load the users into Office 365. The users will automatically be assigned as EOP users. When you have a hybrid version, with some users in the cloud and some users on-premise, those cloud users need to have the license manually assigned. The EOP trial subscription is set for 5,000 users.
Step 4: Build the Outbound Connector
There are two connectors to build—the outbound connector and the inbound connector. The outbound connector will route e-mail from Office 365 to the on-site mail server. The inbound connector will route e-mail to the Internet using the Office 365 smart host. The process of making the connectors is to ensure mail flow to the on-site server. This allows an orderly transition of e-mail without any lost traffic. Figure 10-9 shows the mail flow without the on-site server using the inbound connector.

To set up the outbound connector, select the Exchange Administration Center (EAC). You access the EAC by selecting the Office 365 admin panel, then service settings. At the bottom of the page, select the Exchange Admin Center link located under the heading “Don’t See What You’re Looking For?” Once you have selected the EAC, select the mail flow and connector (see the red arrows in Figure 10-10).
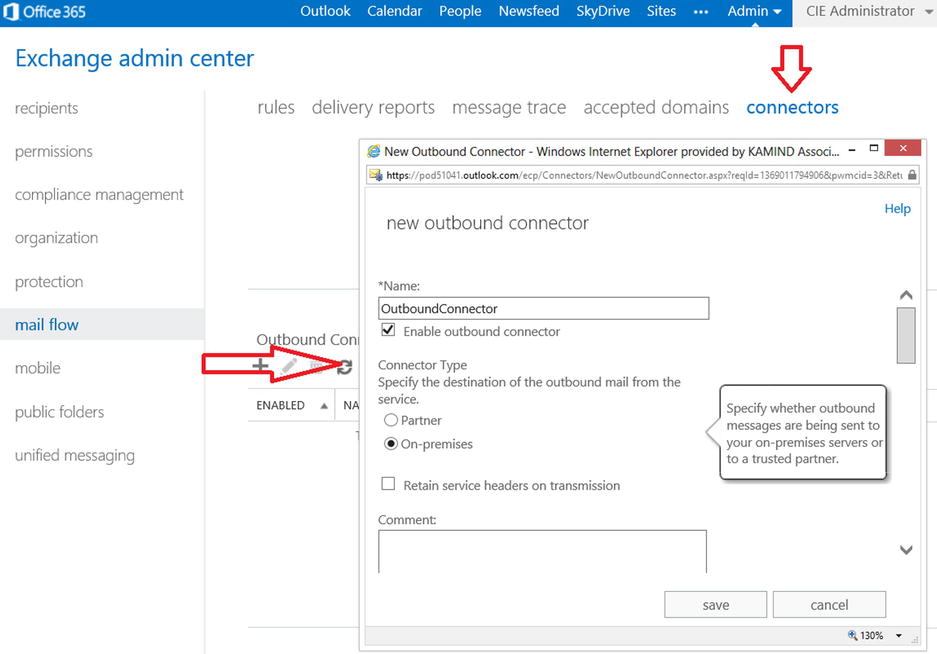
To add an outbound connector, select the + and add the connector. Set the outbound connector values with the following information:
- Connector name: <Choose a descriptive connector name>.
- Connector type: <Choose On-Premises>.
- Connection security: <Choose Opportunistic TLS>.
- Outbound delivery: <enter the IP address of the on-site server>.
- Domains : <Add the domains you have validated>.
After you have selected the outbound connector you are ready to receive e-mail and process the e-mail for spam and virus protection. The Office 365 Spam processing needs to run for a seven-day period to learn the mail flow. It is recommended that you do not modify the spam filters for a period of seven days after you have enabled the inbound connector.
Step 5: Build the Inbound Connector
The inbound connector sends mail to the Office 365 smart host. Office 365 processes the mail for spam and virus and then delivers to the destination. There are two steps for configuring the inbound smart host:
- Configuration and validation of the connector (on-site servers send to Office 365).
- Locking down the on-site server to only accept e-mail from Office 365 (Step 9).
To add an inbound connector, select the + and add the connector. Set the inbound connector values with the following information:
- Name: <Choose a unique name for the inbound connector>.
- Connector type: <Choose on-premises>.
- Connection security: <Choose Force TLS, and specify the certificate subject name of the certificate from your on-premises environment>.
- Scope - Domains: <Under Domains, click Add. In the resulting Add Domain window, enter the domain name or leave it blank>.
- Scope - IP address: <Enter the IP address of the sending on-site server>.

The inbound is set up to route e-mail from the on-premise server to Office 365. Routing e-mail through Office 365 will help manage the spam configuration.
Step 6: Change the MX Records and Switch to Shared (Optional)
At this point, the mail flow is being configured similar to Figure 10-10. Mail is flowing from Office 365 and to Office 365. At this point, you need to configure the MX records so they point to Office 365. If you have cloud-based mailboxes (in a cut-over test), you will also need to change the domain to Shared mode or non-authoritative (not the primary address for e-mail). You must change the MX records so that they point to Office 365 instead of to the on-premise server.
Once you have changed the MX records to point to Office 365, run the domain setup wizard and select Step 3 (see Figure 10-7). After the domain validation, set the domain intent (see Figure 10-12). Notice that with EOP, there is an option for hybrid mail flow.

When you set the domain intent, if you have a domain that is both in the cloud and on-site, you need to also set the mail domain configuration. If this is not set, mail will not flow into the Office 365 account. This is an optional step. Set the domain only if you have cloud mailboxes; otherwise, e-mail may not route to the on-site servers.
If you have mailboxes on Office 365, set the Office 365 mail control to be an internal relay (see Figure 10-13). What this does is sends e-mail to Office 365, then relays what e-mail is not resolved to the on-premise server. Keep in mind the configuration that is normally used is some type of federated account. A federated account will allow calendars to be shared. If the account is not federated, calendars cannot be shared.

Step 7: Route On-Premise E-Mail Through EOP
After you set up the inbound and outbound connectors, you need to change the mail flow to use Office 365. This is a configuration of the on-premise servers so they point to Office 365. See Figure 10-14.

Step 8: Restrict Incoming On-Premise Mail to Office 365
After you have configured the on-site server to send and receive e-mail from Office 365, the next step is to restrict the incoming IP address to accept e-mail only from Office 365 (see Table 10-2). Typically, you’d wait 24 hours after the change to the MX records to point to Office 365. This allows the Internet names servers to make the necessary corrections in the redirection of e-mail to the new server location.
Table 10-2. IP Address Restrictions for Office 365 (as of 12/2013)
CIR Routing |
IP Address Range |
|---|---|
65.55.88.0/24 |
65.55.88.0/24 = 65.55.88.1 - 65.55.88.254 |
Select the IP addresses and restrict the incoming server to receive e-mail only from Office 365 and to send to Office 365.
Step 9: Adjust the Spam Confidence Level (After Seven or More Days)
The default spam confidence level is set to level 6. To change the level (increase or decrease in EOP), you will need to run a PowerShell command and set the Spam Confidence Level (SCL) to a different value. The SCL affects the default anti-spam action, which is to move spam messages to the recipient’s junk e-mail folder. In the following example, we have waited seven days and decided to adjust the spam confidence level to level 5 (see Figure 10-15). See the section later in this chapter on adding the spam confidence rule and enabling end user spam quarantine.

At this point you have configured Office 365 EOP filters for spam processing. The filters that you set up and configure will handle incoming and outgoing filtering using Office 365 Exchange Online Transport. You can add to the basic setup and adjust the filters as needed.
Modification of Spam Processing
The EOP spam engine can be fully modified by the global administrator. But before you modify the EOP properties, let the default rules handle the spam for at least a seven-day period. This will give the EOP filtering engine time to learn your organization’s spam characteristics. To understand how the Office 365 organization is processing spam, just select the Mail Protection link after you log in to the admin center (see Figure 10-16).

The default settings will address the majority of the spam issues, and the administrator should let EOP process the spam using the default filters for a few days before you begin to tune the filters. The mail protection dashboard (see Figure 10-16) shows the status of the different filters and what is trapping the spam. As an example, we have transport rules enabled, so this is filtering the messages for the quarantine or the junk mail folder. The areas that you can adjust are listed in Table 10-3.
Table 10-3. Spam Processing Options
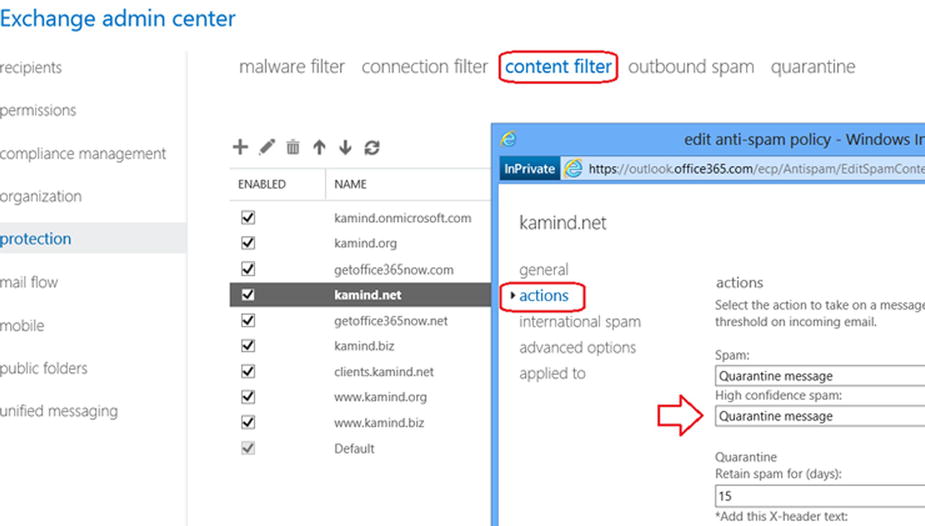
The spam settings are accessed from the Exchange Administration Panel. To access the panel, return the Office 365 administration dashboard, and select the Admin menu link to access the Exchange admin center (see Figure 10-17), then select protection to tune the spam filters.

The administrator can tune any of these filters to reflect the needs of the organization. The filters are set up to cascade on the previous filter (see Figure 10-18). The typical changes after installation involve moving the spam from the junk folder to the web-based quarantine. To change the behavior, you modify the appropriate spam area. In this case of the junk filer, you modify the Content Filter behavior.

Spam is a growing issue for all users, and to best police spam for your organization, you need to report it to Office 365 technicians. The spam reporting tool is used to report behavior and you can download the tool from Microsoft.com (http://www.microsoft.com/en-us/download/details.aspx?id=18275). The reporting tool supports Outlook 2003, 2007, 2010, and 2013. Download the corresponding tool for your Outlook client. Once the tool is installed, you can report junk mail on messages simply by right-clicking the message (see Figure 10-19).

When you report junk mail, three things happen 1) the e-mail content is sent to Microsoft for analysis and 2) your organization’s spam content ratings are adjusted based on message content type and 3) the message is tagged and is reported as a community reported spam. The community reported spam is the most interesting. E-mail may not be from a true spammer, but if enough people tag and e-mail it as spam in a peer review, that sender’s “trust” is lowered. To have a better feel of the spam processing, let’s walk through the different configuration options available to the Administrator when managing the Office 365 organization.
Once you have selected the Anti-Spam Connection Filter policies, there are five areas that you can modify to change the spam headings. These are malware filter, connection filter, content filter, outbound spam, and quarantine (see Figure 10-20).

The Filter property that will have the most impact to you is the content filter. It’s the customize filter that is used to define what is spam to your organization.
Typical Changes on a New Configuration
The default spam filter configuration meets the needs of most organizations. The configuration is used for all Office 365 customers, and is open for customization by the administrator. The typical customizations are in the connection filter. This is where you can add trusted senders. As an example, if your voice mail messages are coming from an external server, add the IP address as a trusted sender.
Connection Filter
The connection filters (see Figure 10-21) handle the IP address filters. Typically, three are configured: 1 IP allow list, 2 IP block list, and 3 Safe list. These connection properties are domain in scope. In the voice mail example, this is where you add the connection filter.

- IP Allow list: This is the IP address list that will be allowed to connect to Office 365. These are trusted senders.
- IP Block list: These are the IP address that are being blocked from Office 365 (not trusted).
- Enable Safe list: Microsoft subscribes to various third-party sources of trusted senders. Addresses and domains that are on this list bypass spam processing. The normal configuration is off and needs to be enabled by the administrator.
![]() Note IP addresses must be specified in IP4 format. You can also specify the subnet range using a subnet mask nnn.nnn.nnn.nnn/rr. IPV6 addresses cannot be filtered at this time.
Note IP addresses must be specified in IP4 format. You can also specify the subnet range using a subnet mask nnn.nnn.nnn.nnn/rr. IPV6 addresses cannot be filtered at this time.
Adding Transport Rules for E-Mail Processing
Office 365 EAC has direct access to the transport rules. You can create additional processing rules that run after the spam. A typical rule would be if you don’t want your IP Allow List entry to apply to all your domains, you can create a transport rule that applies to specific domains. To change the transport rules, select Mail Flow and Rules. Select New Rules, and then More Options (after you select a new rule to display the advance configuration). Build the rule based on your needs (see Figure 10-22).

The Content filter options govern how e-mail is processed and messages are retained. There are six actions for spam. These actions are:
- Move messages to junk e-mail folder (the default)
- Add X-header
- Prepend subject line with text
- Redirect message to e-mail address
- Delete message
- Quarantine message (not available for individuals at this time)
The default configuration will send all spam to the junk e-mail folder with a default 15 days for deletion (see Figure 10-23).

There are two additional options that the administrator can enable on content filtering. These are the international spam option (foreign language detection) and the advance option. The advance options enable the administrator to block certain message types. As an example, one of the message types is an empty message. A partial list is shown in Figure 10-24.

There are two areas that you can adjust to have an immediate effect on spam processing. This is in changing the Advance Filtering options (see Figure 10-24 earlier) and adding a filter rule to send the spam to quarantine (instead of the user’s junk folder). The typical changes that you would make in the spam configuration are highlighted in Figure 10-25.

Moving Mail to Quarantine (Instead of to the Junk Mail Folder)
The default configuration for the spam quarantine is to have the e-mail message delivered to the junk mail folder. The question that is raised is how do you direct the junk mail to the quarantine and bypass the desktop? This is done by setting a new spam confidence rule to be processed at the transport layer. To enable this configuration, you must set up the spam confidence level and the user default profile.
In this example, we set the spam confidence level to 5, so that any e-mail that has a SCL greater than 5 will go to quarantine. Every business is different, and the default configuration of Office 365 EOP is an SCL of 6. To set a new SCL level, go to the Exchange admin center and select mail control. You are going to create a new rule (see Figure 10-26).

In Figure 10-26, select the + to create a new rule and select the Message Rule (see Figure 10-27). Then select message properties (see Figure 10-28) and set the spam confidence level.


After you set up the message filter (modify properties), select the message properties and set the SCL level. (see Figure 10-28).
The last step is to set up the final rules to send the spam to quarantine (see Figure 10-29). In this case, you want to have all spam over SCL level 5 delivered to quarantine. This is the last configuration change you’ll make. At this point, all spam mail is going to quarantine.

User Access to Spam Quarantine
The default configuration for the spam quarantine is to have the e-mail message delivered to the user’s junk mail folder after spam processing. As a global administrator, you can have the spam delivered to quarantine or to the global administrator. See Figure 10-30.
Once you set up the spam quarantine option, you can also set up the individual users to receive notification when to check the spam filter (Figure 10-31). To do this, select the domain, then on the right side, scroll down until you see the hyperlink to set the notification days.

As an administrator, you have full access to the spam quarantine so you can verify the contents of the filter. To look at the quarantine, select the Quarantine tab from the Mail Flow filter (see Figure 10-32).

EOP is being continually extended, and new features are always being added to the service to enhance the operation of Office 365.
Outbound spam policy is how you manage notifications that are sent out to third-parties about the spam that you receive (see Figure 10-33). There are two policies—send a copy of suspicious e-mails to an address and send a notice when a sender is blocked from sending out e-mails.
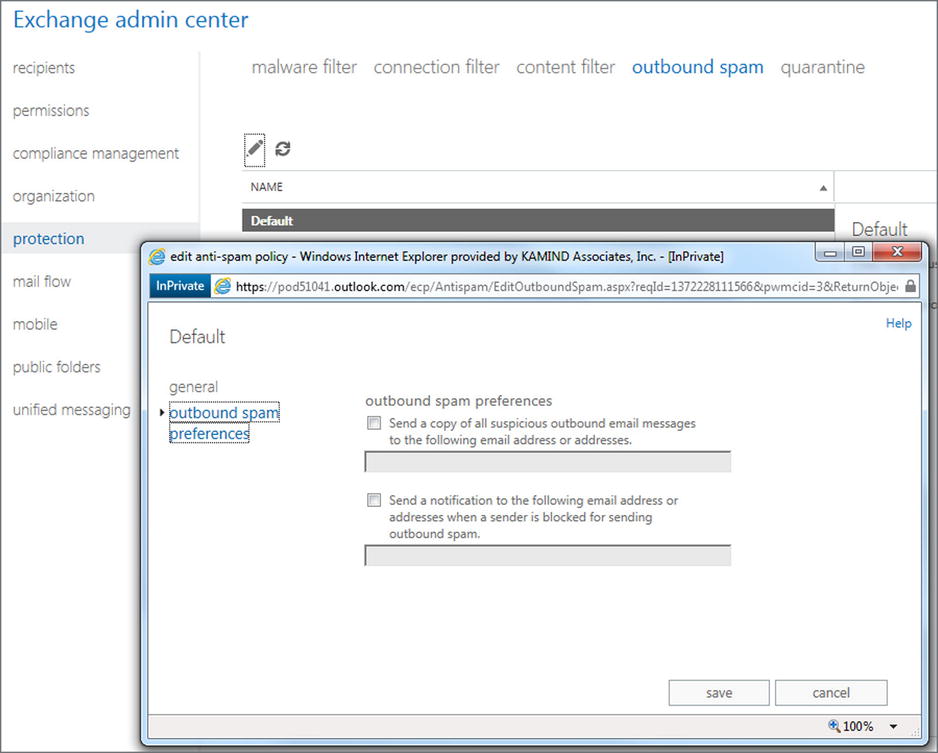
- Send a copy of all suspicious outbound e-mail messages to the following e-mail address or addresses. These are messages that are marked as spam by the filter (regardless of the SCL rating), and are routed through a risk pool.
- Send a notification to the following e-mail address when a sender is blocked sending outbound spam. When a significant amount of spam is originating from a particular mailbox, the mailbox is disabled from sending e-mail messages. The administrator is notified and takes action to resolve the issue.
Sending E-mail from a Device to Office 365
There are different ways to send e-mail from a device to Office 365. The complexity of sending depends upon the devices you are sending the e-mail to. Some devices do not have an embedded SMTP server. They can only perform relay functions. Other devices support a SMTP sender and can directly send to Office 365 (or any other e-mail address on the Internet). All of theses approaches have interesting problems and side effects. The question is which one to use. These four options are listed in Table 10-4.
Table 10-4. Device Sending Options for Office 365
Option |
Description |
Requirements |
|---|---|---|
1 |
Direct sending form a device using DNS |
Sending device supports an SMTP server |
2 |
Sending through IIS to Office 365 internal users |
Dedicated Public IP address as a trusted sender |
3 |
Send as permissions need to be granted to sender |
|
4 |
Sending through office 365 to External Users using a certificate |
Dedicated Public IP address as a trusted sender |
Which approach do you use? It depends on what you are trying to accomplish. Most people use the direct send method if they have an on-site Windows server or some other SMTP server. The configuration that always works is when there is an Office 365 integration module present or Directory Synchronization running. These environments with an Office 365 administrator connection always work, provided that you follow these rules:
- If the e-mail destination is external, the sender address must be a valid Office 365 account.
- If the e-mail destination is internal, the sender can be any e-mail address, but the sender must be from the same domain (such as [email protected]).
Office 365 has undergone some significant changes in how on-site devices relay e-mails. This change revolves around the trusted sender. Referring back to Table 10-4, there are four different scenarios for on-site devices to send e-mail to Office 365. We will look at each of these methods.
Preparing Office 365 to Act as an SMTP Relay
There are two mail destinations you can use to send e-mail. The secured destination (requires a login and using port 587) and data is sent via port 587. If you use the unsecured destination, information is sent in clear text, and you use the MX record. When you use either of these records, you add the IP address of the sender so the connection that you are sending from is a trusted sender.
Step 1: Retrieve the Secured SMTP Settings from Your Office 365 Site
Log in to Office 365 and select the settings (gear symbol). Then select options (see Figures 10-34 and 10-35). Write down the SMTP settings for future reference.


Step 2: Retrieve the MX Record Destination from Your Domain Settings
Log in to Office 365, and select domains. Then choose the domain that you are using for e-mail. Finally, view the DNS settings (see Figure 10-36).

After you select View, DNS Settings, copy the MX record for future use (see Figure 10-37). In some cases, it is simpler to send to the mail server directly versus using the smart host. However, this works only if the source domain is from the same domain on Office 365 and the destination address is internal.

Step 3: Determine Your Public IP Address for the Send Connector
If you have a static IP address that the on-site devices uses for Internet access, you need to record that information to be used later as the trusted sender. The trusted sender address needs to be entered into the Exchange Online Protection interface. If you do not have a static IP address, you will need to use an account sent to Office 365. The static IP address will be used as a trusted connector to Office 365.
Step 4: Construct Your New SPF Record
After you have determined the static IP address, you need to build the new SPF record. The static IP address will look like the following (replace the 10.10.10.10 with your static IP address). You will use this information later when you add the trusted connector to Office 365:
v=spf1 include:spf.protection.outlook.com ipv4: 10.10.10.10-all
Configuring the Device to Send to Office 365
Once you have collected the basic information about Office 365, you are now ready to configure the e-mail for the on-site devices. Table 10-4 contained four different methods to send to Office 365. These methods are:
- Sending from a device using DNS.
- Sending through IIS to Office 365 internal users.
- Sending through IIS and Office 365 to external users.
- Sending through IIS and Office 365 to external users using a certificate.
Which approach works the best? It depends. The best approach is to try the simplest first (the first option), and go to the more complex approach that makes business sense.
Option 1: Sending from a Device Using DNS
This is the simplest approach. Usually the device has a SMTP server built into the device. All you need to do is supply a destination e-mail address, and add the IP address of the sending device as a trusted sender. Follow the steps outlined in the following sections.
Step 1: Configure the Sending Device
Add the destination addresses in the sending device. No special login is required as long as the sending device is only sending to Office 365 and is not using Office 365 as a relay.
Step 2: Configure the Office 365 Inbound Connector
You are using an anonymous connection as a trusted relay, so you need to add the IP address (see Figure 10-38) to Office 365 EOP Inbound connector and the new SPF record to DNS (see the earlier information you collected from Office 365).

To add the Office 365 inbound connector, log into Office 365, and select Service Settings. Then select Custom Mail Rules (see Figure 10-38). In Figure 10-39, select Connectors, and then add a new inbound connector. Enter the static IP address.

Step 3: Configure a Bypass Spam Filter
After you have built the inbound connector, you need to add a “bypass spam” rule so the e-mail traffic will skip the spam filter and connection filtering. To add the Office 365 custom rule, log in to Office 365 and select Service Settings. Then select Custom Mail Rules (see Figure 10-40). Select Rules and then select Bypass spam Filter.

Once you have selected the bypass spam filter options, select “IP Addresses in Any of These Ranges” (see Figure 10-41).

Enter the selected IP addresses (see Figure 10-42) and save the rule. At this point, any e-mail message that is sent from the device should arrive at the destination e-mail in Office 365.

If you do not have a device that can relay e-mail to Office 365, then you’ll have to add the SMTP server feature to a Windows server in your network (this is option 2). This approach does not require an Office 365 account.
Option 2: Relaying Through a Windows SMTP Server
Relay through an on-site mail sender (such as the SMTP server in IIS) to send mail to an Office 365 account or to the Internet. An example is an on-site copier that has an interface to send directly to an e-mail address. In some cases, you may have a Microsoft Window server on-site, and you can easily add the SMTP mail servicer to this server. The SMTP server is standard with all Microsoft servers and is detailed in this knowledge-based article (see http://support.microsoft.com/kb/2600912) and at the end of this chapter.
If you do not have a device that can relay e-mail to Office 365, add the SMTP server feature to a Windows server in your network. This approach does not require an Office 365 account.
Step 1: Add IIS SMTP Server to Your Windows Server
If you are using a Windows server as a relay, you will need to install the SMTP service; otherwise, you will use the device SMTP service (see Figure 10-43).

Once you have added the SMTP server, you need to configure it to send e-mails to Office 365. If you have a new domain, you will want to configure this as a new “remote” SMTP domain (see Figure 10-44). Once you have configured the remote domain, select the domain and right-click on properties (see Figure 10-45). Configure the basic services.


Step 3: Add Access Information
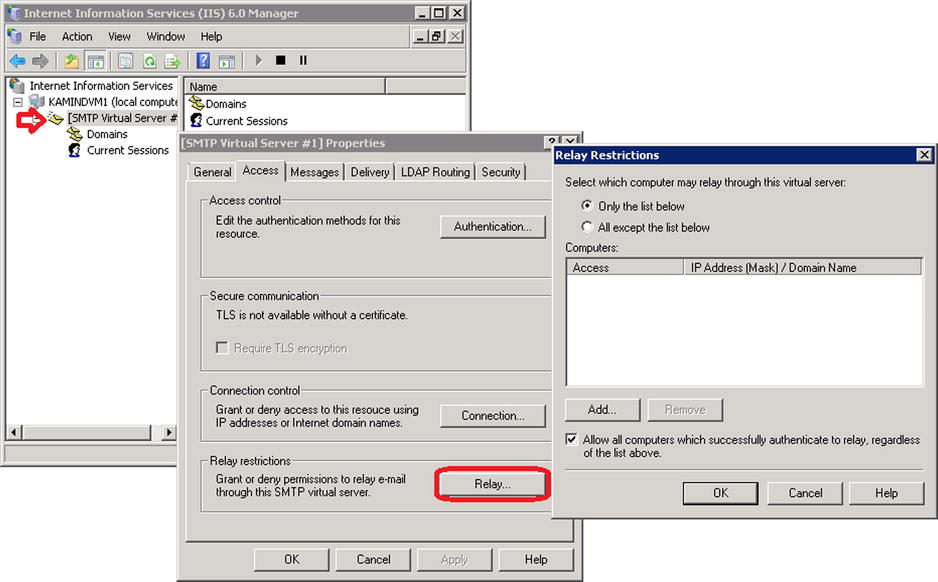
After you have set up the domain, right-click and select the properties of the virtual server (SMTP Virtual Server #1). Then select the Access tab and then click Relay. Select the computers that can access this relay server. As an example, enter the IP address of all of the devices (copiers and so on) that are using this service to relay to Office 365. Only enter the IP addresses of the devices that you trust—see Figures 10-46 and 10-47.


On the Access tab, select authentication, then verify that anonymous is selected, then select OK (see Figure 10-48). You are using anonymous because you are going to restrict the relay in Office 365 to only allow e-mail relay from a specific IP address.


Select the Outbound connection and specify the port, as shown in Figure 10-50.

Step 6: Configure the Office 365 Inbound Connector
Since you are using anonymous connection as a trusted relay, you need to add the IP address to the Office 365 EOP inbound connector and set the new SPF record to DNS (refer back to the earlier information you collected from Office 365).
To add the Office 365 inbound connector, log into Office 365, select Service Settings, and then choose Custom Mail Rules (see Figure 10-51). In Figure 10-52, select Connectors, then add a “new inbound” connector. Enter the static IP address.


Step 7: Configure a Bypass to the Spam Filter
After you have built the inbound connector, you need to add a “bypass spam” rule so the e-mail traffic will skip the spam filter and connection filtering. To add the Office 365 custom rule, log in to Office 365 and select Service Settings. Then choose Custom Mail Rules (see Figure 10-53). Select Rules, and then select Bypass Spam Filter.

Once you have selected the bypass spam filter options, select “IP Addresses in Any of These Ranges” (see Figure 10-54).

Enter the selected IP addresses (see Figure 10-55) and save the rule. At this point, any e-mail message that is sent from the device should arrive at the destination e-mail account in Office 365.

You have completed the configuration of a custom sender, set up the SPF record, and added the IP address to bypass the spam processing. There are some additional rules you need to remember about the sending device:
- The sending device must be from the same domain as the Office 365 destination.
- When you send to an external user, you will bypass Office 365 (see Figure 10-56).

Option 3: Sending to Office 365 Using an Authenticated Office 365 User
This configuration is very similar to the Option 1, except that you are going to use an account to send mail to other internal and external users. Why would you use this approach instead of Option 1? There are two possible answers:
- You want to have a log of the content that is being sent to the Office 365.
- You have a dynamic IP address assigned.
There may be other reasons, but 90 percent of the users fall into these two categories.
Step 1: Create an Office Account
Create an Office 365 account in Office 365, or create an account local active directory. Depending on the requirements, if you need to record information for compliance needs, then choose exchange plan 2.
Step 2: Configure the Default SMTP Server
In Option 1, you used the remote domain to relay e-mail to Office 365. In this case, you are going to configure the default server. Select the IIS manager, and right-click on the default domain (see Figure 10-56). Select Access, and then select Relay. Add the local IP address of the machines that are authorized to use this sender.
Step 3: Configure the Default SMTP Server
Configure the Access control to allow all authorized senders to anonymous connect to this SMTP virtual server and relay e-mail through the server. Select the Access tab, and then select the Authentication button. Make sure the anonymous checkbox is selected.
Step 4: Configure the SMTP Smart Host
At the beginning of this section you looked up the user account that you were going to use to act a secured relay, and determine the address. The smart host is at smtp.office365.com. Enter the smart host (see Figure 10-57.)

Step 5: Configure the Outbound Connection
The smtp.office365.com is not at the standard port. It is located at port 587. In this case, configure the outbound security to use port 587 (see Figure 10-58).

Step 6: Add the Trusted User Account to Send
The next step is to add the trusted user account that will be used to log in to Office 365 and to send messages to internal and external users (see Figure 10-59). This is a trusted user account, so allow only trusted senders to use this relay. Make sure the TLS encryption is checked.

Step 7: Optional SPF Record and Inbound Connector
If the IP address of the Internet gateway is not a dynamic IP address, you can add an inbound connector to Office 365. You will use the same process discussed in Option 1, Step 7. Do not forget to add the SPF record for the connection into your DNS zone file.
Step 8: Grant Send as Permissions to the IIS Account
If you are sending to Office 365 and external users (or sending on behalf of another users), you need to grant permission to the sending account (in the SMTP IIS relay server) send as permission. To accomplish this, you need to run the PowerShell command listed here:
$LiveCred = Get-Credential
Import-module msonline
Connect-MSOLService –Credential $LiveCred –Verbose

$Session = New-PSSession -ConfigurationName Microsoft.Exchange-ConnectionUri https://ps.outlook.com/powershell/-Credential $LiveCred -Authentication Basic –AllowRedirection

Import-PSSession $Session –Allow Clobber

# Add the permissions to sender to send to the recipient
Get-Mailbox | add-recipientpermission –trustee "IIS user account" – Accessrights sendas –confirm:$false

#Clean up and close the session
Remove-PSSession $Session
Option 4: Sending Through Office 365 to External Users Using a Certificate
Exchange Online Protection uses either IIS or a device sender. If you require encryption you will need to import the public certificate to the device that is sending the e-mail. As an example, if you are using IIS SMTP server discussed in Options 2 and 3, you need to manually import the domain certificate, public certificate. It is recommended that it be a wildcard certificate. You can use a device-specific one, but this adds to the complexity of the task. If you do not use a public certificate for encryption, the e-mail will be sent to Office 365 in clear text, unencrypted.
Step 1: Import the Pubic Certificate
If you choose to use IIS and the SMTP server, you will need to import the certificate into the private store of the computer account. If you are using a custom device, you can import the certificate into the custom sender. Figure 10-40 shows you how to import the certificate into a Windows server using the certificate management (MMC option). When you import the certificate, you import the certificate into the personal certificate store, as shown in Figure 10-60.

Step 2: Configure the Default SMTP Server
In Option 1, you used the remote domain to relay e-mail to Office 365. In this case, you are going to configure the default server. Select the IIS manager and right-click on the default domain (see Figure 10-61). Select Access and then Relay. Add the local IP address of the machines that are authorized to use this sender.
Step 3: Configure the Default SMTP Server
Configure the Access control to allow all authorized senders to anonymously connect to this SMTP virtual server and relay e-mail through the server. Select the Access tab, and then select the Authentication button (see the button in Figure 10-61). Make sure the anonymous checkbox is selected.
Step 4: Configure the SMTP Smart Host
At the beginning of this section you looked up the user account that you were going to use to act a secured relay, and determine the address. There are two possible endpoints that you can use. In Option 2, you used the exchange server endpoint. In Option 3, you used the EOP endpoint. The difference in using this approach is that you no longer require an Office 365 account. You can send directly to Office 365.

Step 5: Configure the Outbound Connection and TLS Encryption
The SMTP port is the default port 25. With the certificate installed in Step 1, you enable TLS encryption (see Figure 10-63).

Step 6: Configure the Office 365 Inbound Connector
The EOP connector is configured with a trusted inbound connector that uses the public certificate. To access the admin center, log in to Office 365 and select Custom Mail Rules. See Figure 10-64. Then select the connectors and add an inbound connector (see Figure 10-65).


To add the Office 365 inbound connector, log in to Office 365 and select Service Settings. Then choose Custom Mail Rules (see Figure 10-66). In Figure 10-67, select Connectors, and then add a “new inbound” connector. Set the following parameters:
- Select a name for the connector
- Select on-premise
- Select force TLS
- Enter the public certificate name
- Enter the static IP address of the external connector


Step 7: Configure a Bypass to the Spam Filter
After you have built the inbound connector, you need to add a “bypass spam” rule so the e-mail traffic will skip the spam filter and connection filtering. To add the Office 365 custom rule, log in to Office 365, and select Service Settings. Then choose Custom Mail Rules. As shown in Figure 10-68, select Rules. Finally, select Bypass Spam Filter.

Once you have selected the bypass Spam Filter options, select “IP Addresses in Any of These Ranges” (see Figure 10-69).

Enter the selected IP addresses (see Figure 10-70) and save the rule. At this point, the any e-mail message that is sent from the device should arrive at the destination e-mail in Office 365.

Step 8: Optional SPF Record and Inbound Connector
Add the SPF record to your DNS zone file. This will ensure that the messages received in the EOP connector are processed as coming from a trusted sender.
Step 9: Grant Send as Permissions to the IIS Account
If you are sending to Office 365 external users (or sending on behalf of another users), you need to grant permission to the sending account (in the SMTP IIS relay server), send as permission. To accomplish this, you need to run the PowerShell command listed here:
$LiveCred = Get-Credential
Import-module msonline
Connect-MSOLService –Credential $LiveCred –Verbose

$Session = New-PSSession -ConfigurationName Microsoft.Exchange-ConnectionUri https://ps.outlook.com/powershell/-Credential $LiveCred -Authentication Basic –AllowRedirection
Reference Links
There is a lot of information about Office 365 on the Web; the issue is finding the right site. The information contained in this chapter is a combination of our experiences in doing deployments and support information that has been published by third parties.
Exchange Online Protection – Overview
http://technet.microsoft.com/en-us/library/jj723119(v=exchg.150).aspx
Exchange Online Protection – Capabilities
http://technet.microsoft.com/en-us/library/jj723115(v=exchg.150).aspx
Exchange Online Protection – Setting up mail flow
http://technet.microsoft.com/en-us/library/jj723133(v=exchg.150).aspx
Setting content-filtering policies
http://technet.microsoft.com/en-us/library/jj200684.aspx
Spam filter junk mail reporting tool
http://www.microsoft.com/en-us/download/details.aspx?id=18275
Adding the SMTP sender to a Windows Server (2008R2, 2012)
http://support.microsoft.com/kb/2600912
http://support.microsoft.com/kb/2799338
Setting up an SMTP mail relay in Office 365
http://community.office365.com/en-us/wikis/exchange/how-to-setup-an-smtp-relay-in-office-365.aspx
How to set up a certificate on IIS 7.0
http://www.iis.net/learn/manage/configuring-security/how-to-set-up-ssl-on-iis
Next Steps
This chapter focused on the configuration and set up of Exchange Online Protection spam filers. Office 365 is interesting to explore. There is much more to do depending on your Office 365 configuration. The key chapters you need to review for your Office 365 deployment are as follows:
- Chapter 5 —SharePoint Administration
- SharePoint administration and design can be simple or complex, depending on your business needs. This chapter provides you with a basic overview of the configuration necessary to be up and running using the Office 365 team site. This chapter describes site design and construction issues as well as the full SharePoint Administration functions for Office 365.
- Chapter 7—Windows Intune Administration
- The secret to an optimal Office 365 site is the management of the desktop to ensure that updates are current, and the user antivirus is functioning. Windows Intune is a desktop management tool that addresses these issues and reduces the administrator’s effort in desktop management, and improves the user’s experience.
- Chapter 8—Office 365 Administration
- This chapter describes the different administration centers in Office 365 and the most common tools that you would use to administrate your Office 365 company. Depending on your Office 365 services, there are five possible administration tools. This chapter focuses on the Office 365, Exchange, and Lync administration centers. The SharePoint and Windows Intune administration centers are described in their own chapters. We close the chapter with using PowerShell to manage your Office 365 environment.
- Chapter 9—Compliance and Data Loss Prevention
- Business must adapt their mail document storage systems to correctly process the electronic communication based on regulatory oversight. The Compliance and Data Loss Prevention (DLP) provides this capability to allow business to manage their communications, and protect the business against simple mistakes in its electronic communications. Office 365 includes integrated discovery, and supports legal discovery and audit requirements.