
![]()
Office 365 DirSync, ADFS, Single Sign On and Exchange Federation
An Office 365 site is an organizational unit complete with its own security components and e-mail domain: @<company name>onmicrosoft.com or @<company name>.microsoftonline.com. The Office 365 combination of services and administration is an Active Directory organization. Your onsite equipment may be organized as a Windows Active Directory structure. If you have a large organization, you will have a local security login (Active Directory if you are using Windows Server) to access all of your services and other network equipment. This chapter focuses on the integration of the local Active Directory to the Office 365 Active Directory. There are many different ways to integrate the two different Active Directory structures, depending upon the business requirements. The driving force for integration is Single Sign on (SSO), but SSO has a price with the complexity of the IT infrastructure. Most organizations only need Directory Synchronization with password integration. Table 11-1 lists the different options of Active Directory integration.
Table 11-1. Active Directory Integration
Active Directory Integration |
Capabilities |
Requirements |
|---|---|---|
No Integration |
Two separate logins Office 365 and local system |
n/a |
Sync local AD to Office 365 |
Integrates Active Directory using sync tool |
Requires Directory Synchronization server |
Sync local AD and Synchronize passwords to Office 365 |
Integrates Active Directory using sync tool and enable password write back |
Requires Directory Synchronization server with write back configuration |
Federate AD to Office 365 |
Onsite server controls security |
Requires a ADFS and Proxy server |
Federate Exchange to Office 365 |
Allows mailbox moves from local to cloud and back |
Requires the purchase of Exchange server |
The method you choose depends upon the end user experience. Most companies with less than 500 employees choose Directory Synchronization with password integration. The deciding point on Directory Synchronization versus Active Directory is based upon security concerns.
No integration of Active Directory is the simplest form of all integration. The Office 365 security structure is independent of the local On-site servers. There is no limit to the size of the organization that uses this model. We have deployed large and small customers with no integration to local services.
Directory Sync with local AD to Office 365
The sync tool for the local Active directly to Office 365 is known as Directory Synchronization or DirSync. This tool is used to replicate the Active Directory to the Office 365 site (see Figure 11-1). The users Active Directory objects are replicated to Office 365. When you assign a license to the user account, the local mailbox is created unless the user account has a local Exchange mailbox. The local user mailbox must be removed from the on premises exchange server before the Office365 user account mailbox is created in Office 365.

Active Directory information is synced from the server to the Office 365 tenant. Users that are not synced are represented by a different icon, as shown in Figure 11-1 (see admin user), versus the other users with a sync symbol.
When you set up Directory Synchronization, you are syncing the Active Directory security structure, rules and objects, but you are not syncing the passwords of the local users to the Office 365. Password synchronization requires a separate tool or the implementation of Federation services, known as Active Directory Federation Services or ADFS.
Microsoft Directory Sync is designed to work with the on-site Active Directory. Your on-site Active Directory user’s accounts are synced to the cloud. If the account is synced as a “Mail Enabled Users” or “MEUs,” you can create a cloud mailbox. If the user account is not a MEU, you cannot create a cloud mailbox when a license is assigned. By default, if there is an On Premises Exchange server, with a mailbox for the user account, that account is synced as a non- MEU’s user account (cannot create a mailbox). If the mailbox does not exist in the cloud, then the e-mail cannot be migrated to the Office 365.
When you use DirSync, you are required to use Microsoft tools to move user information from the local Exchange server to Office 365. At the final step in a Microsoft mailbox move, the AD values of the account are changed to reflect a MEU. These values are:
- mail: The primary SMTP of the cloud mailbox.
- proxyAddresses: Values from both the On Premises mailbox and the cloud mailbox.
- targetAddress: Read from the On Premises mailbox; the value is the primary SMTP of the cloud mailbox. This is converted to a contact when the mailbox is moved.
Once the MS tools (Exchange Server remote move or a cutover move) are used to move a mailbox, the Microsoft tools delete the On Premises mailbox, and convert the user exchange account to contact. If you choose to use external tools (such as Migration Wiz), you will need to manually convert the mailbox. Usually the conversion is the deletion of the mailbox and removing of the exchange server. When the proper MEU AD parameters are set and synced to Office 365, the Office 365 mailbox is created (once a license is assigned of the object).
Directory Synchronization (DirSync)
DirSync can be enabled or disabled. However, once you enable DirSync (see Figure 11-2) you are committed to the Microsoft migration process; if you have an On Premises Exchange Server. Even if you choose to disable DirSync, the Cloud AD has already been changed, and it does not revert back. If DirSync is enabled, you are committed to follow through with the Microsoft Migration process. When you disable DirSync, the sync objects revert back to local control, however the AD does not revert to “clean” pre-DirSync state.

To disable DirSync, just select the deactivate option (next to the “Active Directory Synchronization”) on the Directory Synchronization interface. Once DirSync is deactivated, a message will be displayed that takes up to 72 hours for the object to be connected.
Using PowerShell to Stop/Start DirSync
You can also accomplish the same activity by using PowerShell. In this case, you would use the following commands:
- Turn off the DirSync by running the cmdlet: Set-MsolDirSyncEnabled -EnableDirSync $false
- Assign licenses, create Office 365 mailboxes, and migrate e-mail
- Turn on the DirSync by running the cmdlet: Set-MsolDirSyncEnabled -EnableDirSync $true
Remember, the Office 365 site will stabilize in four hours, and you cannot enable DirSync until the site has stabilized.
Server Types required for DirSync and Active Directory Federation Services
The installation server needs to be 64 bits, and either a 2008R2 or a Server 2012 member server. Directory Sync can be installed on a domain controller (but this is not recommended). ADFS federation servers can be installed on either a Doman Controller C or a member server. The proxy servers can be installed on any server (except domain controllers).
Using DirSync with Password Synchronization
If you desire to synchronize the local Active Directory with Office 365, you can enable password synchronization. The local password is “synced” with Office 365, and the process is encrypted. There are some cautions if this is enabled.
- This password synchronization model is not as strong as a federated security discussed later in this chapter.
- The password can be changed on site and in the cloud (optional).
- If the password is changed in the cloud and the write back is enabled (off by default), this is written back to the on-site Active Directory (AD). Any global administrator can changed the cloud password.
If Directory Synchronization is enabled, the administrator needs to be aware of the limitation on password reset and the impact to it on site security policies. If a strong method of security is required, Active Directory Federation services should be deployed.
Federation to Office 365 uses ADFS and DirSync to provide a Single Sign-On password integration. The problem with this approach is that it requires a minimum of four servers to have the necessary robustness to handle Office 365 integration. The security servers are robust and are integrated tightly with Office 365. If the local service that is running the ADFS servers go offline, users will not be able to log in to Office 365 services. The reason for this is simple. The primary domain security control is on site. The Office 365 Active Directory services must validate access with the local domain controller. If the local AD is not online (through ADFS), access cannot be authenticated.
Federate Exchange to Office 365
Federate Exchange to Office 365 allows the local Exchange administrator to use “mailbox move” to move the mailbox from the local server to the Office 365 server. This approach is called a remote mailbox move. Federated Exchange builds upon Directory Synchronization and ADFS.
Next Steps
As you can see there are many different steps you can take, depending upon your need and your overall objective. Regardless of the approach that you take, there are some critical steps for integrating to Office 365:
- Speed of Conversion
- Directory Synchronization – cutover or Federation
- Single Sign On?
- Exchange Migration strategy – Federation?
These different issues and approaches will determine the migration approach you decide to take. In the previous sections, we discussed different cutover migrations. In the following section we will review the steps necessary for Exchange Federation. The first step in this process is to implement Single Sign On.
This Chapter assumes that you want to implement full Active Directory (AD) Federation Services, with Exchange Federation. If you are only going to implement a portion of the integration to Office 365, follow these steps outlined in Table 11-2. The steps are additive. If you choose to implement Exchange Federation, you need to implement all of the previous steps.
Table 11-2. Implementing the Integration to Office 365
Deployment Goal |
Steps to deploy |
End Results |
|---|---|---|
AD Synchronization |
Step 1, 2, 3 |
Onsite AD is synced to Office 365 |
AD Synchronization with Password |
Step 4 |
On site AD passwords are sync to Office 365 |
Enable AD Single Sign On |
Step 5, 6, 7 |
AD integrated to Office 365, single login and password |
Exchange Federation 2010 |
Step 8 |
Exchange integration to Office 365 |
Steps to Implement AD Sync, Single Sign On and Exchange Federation
Moving toward Exchange Server is a two-step process. The first step is to implement Active Directory Federation services (ADFS) with Directory Synchronization. The second step is to implement Exchange Server (if you desire to have an integrated Exchange service on site). If you choose to only implement ADFS, then skip the Exchange Server section.
Step 1: Verify Active Directory – Exchange Server Status
When you implement DirSync, the mailboxes in the Office 365 mailbox will not be created if there is an Exchange Server installed and active on your network. If you do not have an Exchange Server, and you are planning to configure DirSync, then verify that the Exchange Server is not present in Active Directory. To verify the Exchange Server status, select “Sites and Services” from the Administrator menu. In the Site and services control panel (Figure 11-3), select “Show Services Node.” Expand the Active Directory and look for the Exchange Services.

If the Exchange Server is not present, then the Active Directory will look like Figure 11-4.
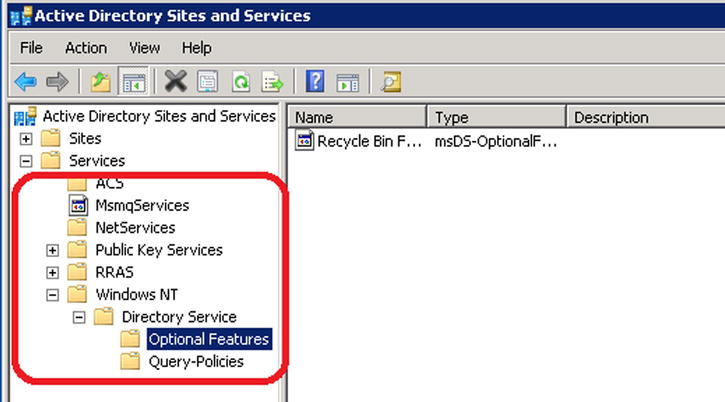
If the Exchange Server was present on your network, then the Active Directory will look like Figure 11-5. If you do not have an Exchange Server and the information is present in Active Directory, the server was not uninstalled. You will need to engage your Microsoft partner or submit a service request to Microsoft to assist you in the cleanup of the improperly uninstalled Exchange Server.

Step 2: Installation of the 3.5 .NET Framework and 4.0 .NET Framework
The Directory Sync and ADFS Integration tool requires that you install the .NET framework 3.5 and 4.0. The .NET Framework is required for access into the compliance monitoring center for Office 365. The .Net 3.5 framework is a server feature (See Figure 11-6) and the .NET 4.0 and 4.5 frameworks are downloaded directly from the Microsoft download centers.
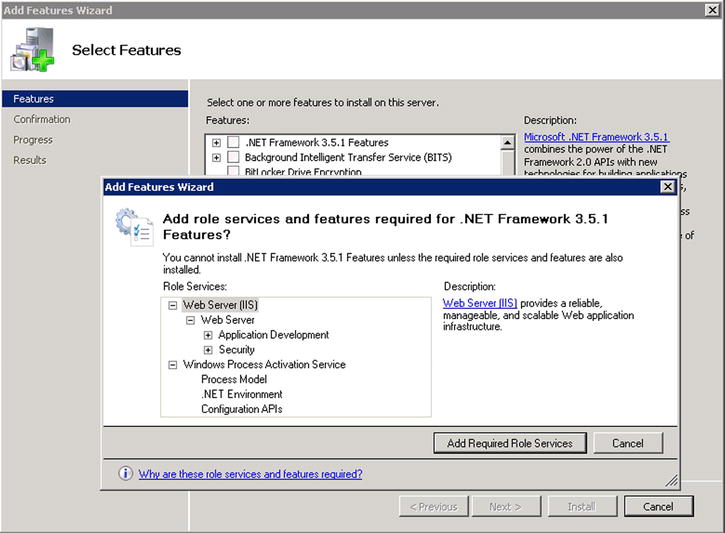
To install the .NET 3.5 Framework, go to your Server Manager, and select “features.” Find the .NET 3.51 features and install all of the default features requested (Figure 11-6).
![]() Note If you have versions of the .NET framework newer then 3.5, you will need to uninstall the new versions to install the older versions.
Note If you have versions of the .NET framework newer then 3.5, you will need to uninstall the new versions to install the older versions.
To install the .NET 4.0 Framework, go to Microsoft Downloads (see Figure 11-7) and search for “.Net 4 full web install” and download and save the version of the framework that you wish to use (either standalone or web installer).

Step 3: Create the Admin Accounts
DirSync (and ADFS) will require an Office 365 Global Admin account and an On-Site Domain admin, as well as a member of the Enterprise Admins group. Create these two accounts.
![]() Note When you install DirSync or ADFS services, follow these two steps: (1) login as this on-site domain admin account to install the software and (2) download the software, right click and run as an administrator. This account needs to be explicitly added as an Administrator on the local machine administrator group (where DirSync is installed), and as a member of the Domain Enterprise Admin group.
Note When you install DirSync or ADFS services, follow these two steps: (1) login as this on-site domain admin account to install the software and (2) download the software, right click and run as an administrator. This account needs to be explicitly added as an Administrator on the local machine administrator group (where DirSync is installed), and as a member of the Domain Enterprise Admin group.
Step 4: Clean Up Active Directory
Before you can install either Directory Synchronization Services or Active Directory Federation Services, you need to clean up your Active Directory. The most important step is the validation of the Active Directory and the correction of any Active Directory object. The detailed steps to run this tool are described later in this Chapter under “Active Directory Cleanup – Check.” It is worthwhile to run the check because the online tool requires all of the necessary system updates required to make DirSync run. One note of caution: before you run Directory Sync, inform your users that the password cannot have any part of the login name, otherwise DirSync will fail. To run the test tool, use the link: https://onramp.office365.com/ and verify Active Directory configuration. The results of the check will look like Figure 11-8.

![]() Note User passwords that have the same name as the users will not sync to the cloud and will fail with the Directory Sync tool.
Note User passwords that have the same name as the users will not sync to the cloud and will fail with the Directory Sync tool.
The Onramp tool will analyze the Active Directory and make recommend changes. You do not need to implement all of the changes before you run DirSync. However, review them and understand why you want to change (or delay) them. The user objects that have errors will not replicate to Office 365. These should be addressed before you implement DirSync and Active Directory Federation Services.
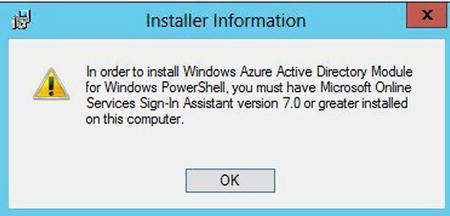
The most common error that you could run into is the “you must have Microsoft online services sign-in assistant version 7.0 or greater" error. If you run into this error, please review the “DirSync: Installation error – Missing Online service Sign in” section later in this chapter.
Step 5: Optional - Extended Active Directory
In some cases, you may wish to have access to the extended Active Directory Object information for Exchange. If you wish to add this to your current environment, then install the exchange server Scheme and Forest extensions. These extensions are installed from the Exchange server installation DVD. You only install the extensions, and not the Exchange Server software.
If you are running Exchange server 2003, then upgrade the scheme to Exchange 2007. If you are running Exchange 2007 or later, there is no need to extend the Scheme, unless you are planning to install a new exchange server. The Exchange 2007 DVD is located on the MSDN Site for download. If you do not have access to the Exchange Server 2007 DVD, use the Exchange 2010 DVD. To find necessary information on Scheme extensions search for “Exchange 2007 forestprep” and follow the instructions from TechNet. The Scheme extensions can be installed from a production or trial DVD.
Step 6: Install Directory Synchronization
There are four steps required to set up Active Directory Synchronization, the most important step is the validation of the Active Directory and the correction of any Active Directory object. This should have already been completed when you validated the Active Directory.

![]() Note Make sure you login as an user for the admin service account that will be used to configure the on premises DirSync service. The DirSync service may not install correctly if the service account is configured incorrectly.
Note Make sure you login as an user for the admin service account that will be used to configure the on premises DirSync service. The DirSync service may not install correctly if the service account is configured incorrectly.
To start up synchronization, select users and select setup Active Directory Synchronization (see Figure 11-9). Once you have the setup screen (Figure 11-10), follow the steps indicated. On step 3, select “Activate.” This will allow the Directory Synchronization to start on Office 365.

Review steps 1 – 2, and verify your configuration before you activate and install the Directory Synchronization. The Onramp tool that we ran earlier will also check this configuration. If you are satisfied that you have made the changes in Office 365 and your onsite Active Directory, then activate the Directory Synchronization, and download the Directory Sync tool.
We recommend that for the account you use a unique Office 365 synchronization account (no licenses needs to be assigned). Typically we use the onmicrosoft.com account. It takes four hours before the Office 365 is synchronized with Active Directory the first time (depends upon the number of objects).
![]() Note The Directory Sync tool must be installed by a domain administrator (see Figure 11-11). Directory Sync reads active directory. The tool permission must be installed by the domain administrator. Make sure you “right click” and run as an administrator to install the Directory Sync tool. Do not download and run!
Note The Directory Sync tool must be installed by a domain administrator (see Figure 11-11). Directory Sync reads active directory. The tool permission must be installed by the domain administrator. Make sure you “right click” and run as an administrator to install the Directory Sync tool. Do not download and run!

You cannot reverse DirSync. So if you decide to move ahead with DirSync, your options will be limited. As an example, if you have an on-site Exchange server, the mailbox will not be created in Office 365 and your only choice for migration tools are the ones supplied by Microsoft.
![]() Note If Directory Synchronization does not install and returns the error ”… you must have Microsoft online services sign-in assistant version 7.0 or greater.” See the trouble shooting section later in this chapter on how to resolve the issue.
Note If Directory Synchronization does not install and returns the error ”… you must have Microsoft online services sign-in assistant version 7.0 or greater.” See the trouble shooting section later in this chapter on how to resolve the issue.
The first step in the installation is the installation of the software and setup of the permission. If the Directory Sync tools do not install correctly, you will need to uninstall and correct the problem. Always download the Directory Sync software and run the installer as an administrator; right click on the download and select run as administrator. If the software correctly installs, the installation will prompt you to start the configuration wizard (see Figure 11-12).

![]() Note If you are installing Directory Synchronization on a domain controller, do not start the wizard during the installation. Un-check “Start Configuration Wizard” and click “finish.” Reboot the server, and restart the wizard to complete the Directory Synchronization setup.
Note If you are installing Directory Synchronization on a domain controller, do not start the wizard during the installation. Un-check “Start Configuration Wizard” and click “finish.” Reboot the server, and restart the wizard to complete the Directory Synchronization setup.
After the DirSync software is installed, start the configuration wizard. You will need two accounts (we created theses earlier). The Office 365 is a global admin account and the on-site account is a domain admin that is a member of the enterprise Admin group (see Figure 11-13).

The account to use for DirSync is the original admin account that was created when you started your Office 365 site. This account is a super admin account. The login should be the login address (@<domain>.onmicrosoft.com), not the vanity domain (short e-mail address).
The DirSync wizard allows you to enable write back if you have (or are going to have) an exchange hybrid server in place. If you do not have a server that has the capabilities of exchange federation, then this will be grayed out typical Directory Synchronization enablement takes four hours for the initial sync and for larger organizations 24 hours to sync. If there is no exchange server, Figure 11-14 is grayed out.

The Office 365 password synchronization is part of Office 365. To enable the password option, run the wizard and select the password synchronization option (see Figure 11-15). At this point the password changes in the on-site AD will be replicated to Office 365. The password policies will be those from the on-site Active Directory and not Office 365.
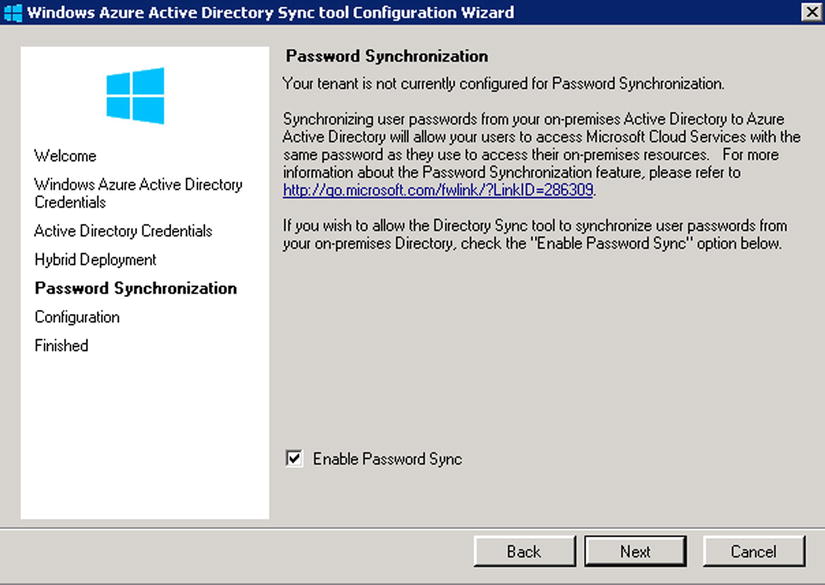
Select the password option for synchronization (Figure 11-15), then select “Next.” This will begin the final configuration (Figure 11-16) of the Directory Synchronization tool.

If the configuration is successful, you should see Figure 11-17.

If you are running Directory Synchronization, you will notice that some Office 365 fields are grayed out. The user information that is matched to the On-Premises Active Directory, is controlled by the On-Premises servers. As an example, the primary e-mail address and the alias (Proxy addresses) must be set in the On-Premisess Active Directory. The tool to change these items is either the Active Directory add users and computers, or the Exchange management console. In our troubleshooting section we described how to change the values of theses parameters using the Active Directory tool “Add Users and Computers.” These tools are located on the Domain Controller.
Step 7: Installation of the Directory Sync Tool
Once you have installed the Directory Synchronization tool, the next step is to install the synchronization client. The synchronization client is useful to see the status of the Active Directory replication to the cloud and to force a replication.
Figure 11-18, shows the path and location of the Miisclient.exe. This is the behind-the-scene tool that manages the Active Directory Synchronization to Office 365.
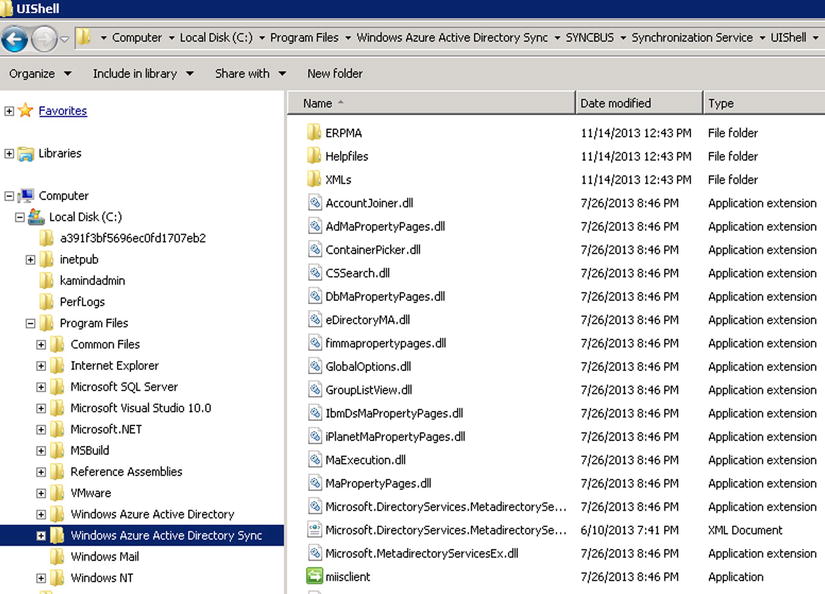
Search for the client, and install a shortcut to the desktop. Click on the desktop Miisclient tool, and examine the hyperlinks with the status (see Figure 11-19). The Tools menu has the option to start a full or partial synchronization to/from Office 365. The Miisclient allows you to perform, import, and export object sync.

Force DirSync with PowerShell
You can also use PowerShell to force Directory Synchronization. To use PowerShell, login to the server where the DirSync software was installed, and navigate to the directory C:Program FilesWindows Azure Active Directory Sync. Right-click on “DirSyncInstallShell” and select send to desktop. This will create a shortcut on your desktop so you can run the PowerShell command “Start-OnlineCoexistenceSync.”
Step 8: Verify Active Directory
Active Directory is syncing to Office 365. At this point, you need to verify that the accounts that are syncing are the correct account address. As an example, if the account are online the onmicrosoft.com name, this is one of two issues; 1) the account does not have an internet-routable domain name or 2) there is another account with the same name, and Office 365 could not create the account.
The solution to (1) is to change the account e-mail address in the On Premises sever and in (2) verify that the account is not in the delete users account list. If these users are in the delete user account list, you need to remove it using a PowerShell command discussed in Chapter 8. There may be additional DirSync errors.
Directory Synchronization errors do happen (Figure 11-20). These errors appear because incorrect Active Directory data. Before you install DirSync, you need to complete an AD review to check for improper names, and data organization. The DirSync errors will be sent to the admin user account. Once the error is corrected, the error messages will go away.

Installing Active Directory Federation Services
Directory Synchronization provides the first level integration required for federation services integrating. There are two types of federation: Active Directory federation and Exchange federation. Most business will install DirSync services to address the password to local Active Directory Synchronization. However, some businesses will install full federation services. Before you begin to install federation services, make sure you have the correct server infrastructure in place for single sign-on. The bare minimum configuration is two proxy servers and two federation services. This will provide you the necessary backup when federation services are installed.
![]() Note ADFS integration tightly integrates Office 365 with the on-site equipment. If there is a failure of the “on site” equipment, access to Office 365 will be denied for all users. This is why there are a minimum of four servers.
Note ADFS integration tightly integrates Office 365 with the on-site equipment. If there is a failure of the “on site” equipment, access to Office 365 will be denied for all users. This is why there are a minimum of four servers.
Step 1: Install Active Directory Federation Services
ADFS allows the integration of the On Premises Active Directory to Office 365 (Figure 11-21). In an ADFS environment, the integration is accomplished via relaying party trust. When the domains are federated, the user has a single login environment across both environments (Office 365 and the local Active Directory environment).

The user experience is one of “sameness.” The user logs into the local Active Directory or Office 365, and the user passwords are processed by the local on-site security servers. If the user tries to login to Office 365, and the account has not been created in the local Active Directory, then the user will see a screen similar to Figure 11-22.

ADFS requires that the UPN suffix changes to an internet routable address (your e-mail address). The first step in creating the UPN is to change the way the user accounts are logged into in the local Active Directory. Typically, local AD setup for the local domain is company.local or company.lan. The user login accounts are set up as [email protected]. This will need to change to [email protected] . This is the new UPN suffix that will need to add into the AD.
The following steps listed will set up ADFS integration between the Office 365 and your onsite AD. This is a pretty straightforward process. At the end of this section we address different troubleshooting tools for the testing of ADFS with Office 365.
- Add UPN Suffix to AD and configure for each user
- domain.com was used for the UPN in this example
- UPNs used for identity Federation can only contain letters, numbers, periods, dashes and underscores.
- Open AD Domains and Trusts tool.
- Right-click AD Domains and Trusts and click Properties
- On the UPN suffixes tab, type the alternative UPN (Figure 11-23) suffix for the forest and then click Add.

- Select Active- Directory user and computers
- Open user properties, navigate to Account Tab
- Select the external namespace UPN for the “User logon name” (Figure 11-24).

Creating a service account for ADFS
Create a service account for ADFS. This can be a regular domain user, no special permissions needed.
Installing ADFS on a server
- Add internal ADFS server to AD forest
- Install ADFS on a domain controller
- Download ADFS 2.0. During the install process, the following Windows components will be automatically installed:
- Windows PowerShell
- .NET Framework 3.5 SP1
- Internet Information Services (IIS)
- Windows Identity Foundation
- Installation
- On the Server Role Option screen, select Federation Server (Figure 11-25)
- Finish the rest of the wizard, this will install any necessary prerequisites
- At the end of the wizard, uncheck box to Start the ADFS 2.0 Management Snap-in

- Adding IIS certificate (Figure 11-26)
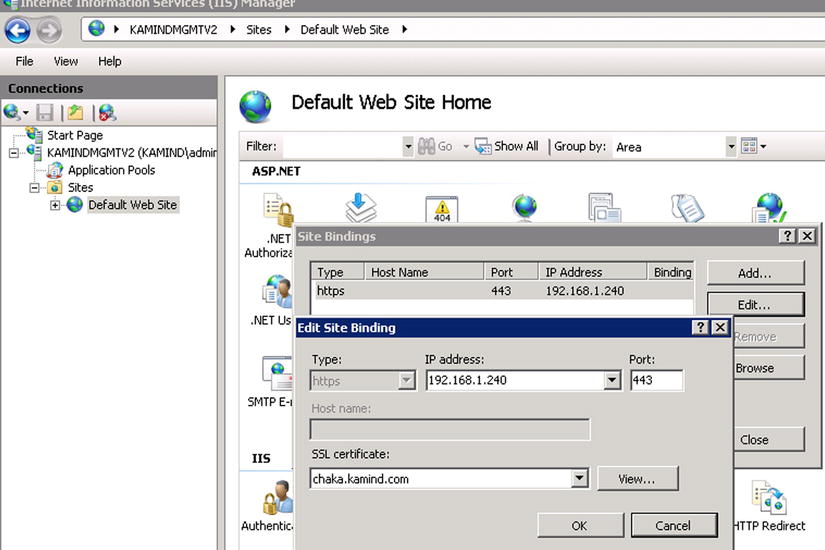
- Request and provision public certificate through Entrust
- Bind certificate to IIS on port 443 (remove binding for port 80)
Validate the IIS server and bind the certificate to port 443, removing the port 80 binding (see Figure 11-27).

Configure the ADFS management
Run the ADFS wizard and create a new federation service (see Figure 11-28).

When you install ADFS, the first server installed is a new federation server (see Figure 11-29).

Follow the wizard and install the public name of the federation server or proxy server (see Figure 11-30). Add the local administrator account (see Figure 11-31) when prompted by the wizard.


ADFS server installation will add SQL Express to your server. Make sure you verify the server components added in case of conflicts (see Figure 11-33). If you have a large number of objects, you will need to use SQL Server to manage the objects.

If you see any item that comes up with a red X, you will need to troubleshoot the issue before you can enable the Federation operation.
Verify Federation configuration
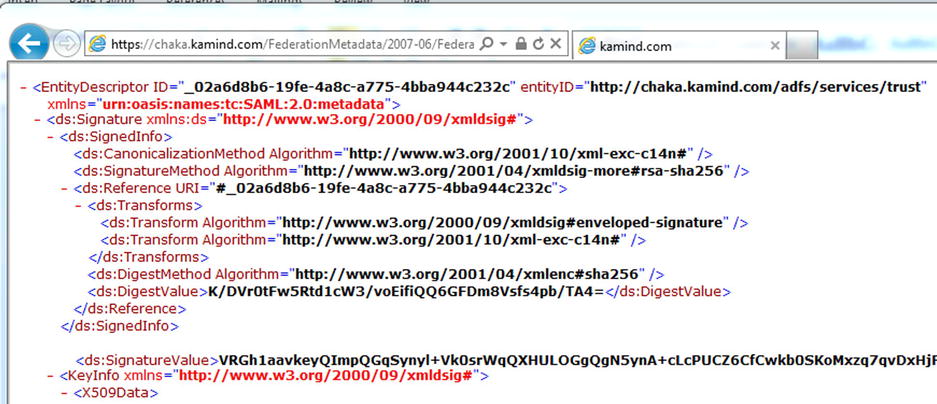
To verify the domain configuration, just launch the ADFS server in a browser with the URL (https://<ADFS domain name>/FederationMetadata/2007-06/FederationMetadata.xml). If the system is configured correctly, then the XML script will be displayed as shown below (see Figure 11-34). Our domain is chaka.kamind.com.
You can also verify the two endpoints to ensure that the ADFS server is configured:
- https://{your_federation_service_name}/adfs/fs/federationserverservice.asmx
- https://{your_federation_service_name}/adfs/services/trust/mex
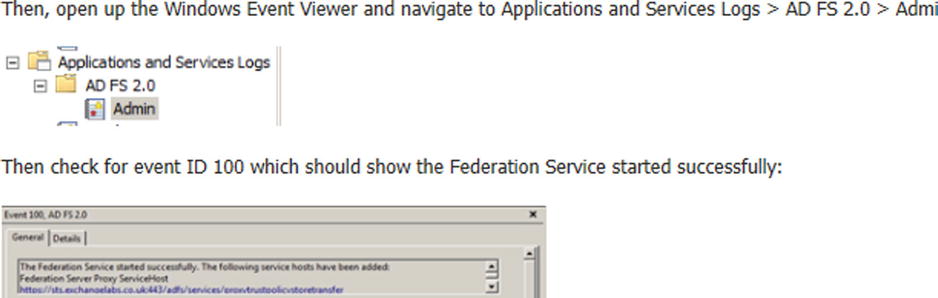
The second test to make is ensuring that the event log has the correct event record in place. Check the applications and services logs for the event 100. This will show if the Federation services started correctly. After you have validated the ADFS server, then the next step is to install the Federation proxy server. Make sure you verify the event log (Figure 11-35) and address any errors.
Step 2: Adding Federation Proxy servers
If you are running a test environment, you do not need to implement a Federation proxy. However, if you are running a production environment, you need to deploy the Federation proxy’s. Start by verifying the Federation proxy servers (if you are using them), and make sure you can execute the command, shown in Figure 11-36, from each of the Federation proxy servers. Federation proxy servers can be added at any time; you can add them as part of the deployment steps, or add them after you have implemented single sign-on. From a firewall perspective, all that you are doing is exposing the proxy address to the Internet; versus the federated server proxy address. Figure 11-36 provides an overview of the Federation proxy server deployment.

To install ADFS proxy server, you will need to add the public certificate to the proxy server - IIS interface, and have the internal Proxy Servers point to the internal Federation Servers. In Figure 11-36, there is an example with a pair of proxy servers that are load balanced on the network. These proxy servers provide external interface to respond to service request for the internal Federation server. The stumbling block for most ADFS implementation is when you attempt to lock down the Federation interface before testing is completed the proxy servers are blocked and cannot communicate to the Federation Servers. The solution is to add a local host name to the proxy servers to resolve the internal address of the Federation Servers. In Figure 11-36, we have the external servers, and the internal Federation farm. The steps below are necessary to add a pair of Federation proxy servers.
- Export a public certificate from the ADFS internal server and copy it to the proxy server
- Add a HOST file entry for ADFS.domain.com to point to the internal ADFS server
- Validating the DNS resolution of ADFS.domain.com resolves to the external A record from an internet connected PC
- Double-click ADFSSetup.exe (this is the ADFS 2.0 download)
- Click Next on the Welcome Screen and Accept the License Agreement
- On the Server Role Option screen, select “Federation Server Proxy”
- Finish the rest of the wizard; this will install any necessary prerequisites
- At the end of the wizard, uncheck the box to Start the ADFS 2.0 Management Snap-in
- Import the certificate in IIS and bind the certificate to the Default Web Site (ADFS.domain.com)
- Configure the ADFS proxy by selecting the ADFS 2.0 Federation Server Proxy Configuration Wizard
- Enter the Federation namespace (ex. ADFS.domain.com)
- Click the Test connection button
- Enter the service account credentials
- Select a long name (adminservice@<domain>.onmicrosoft.com) as a service account
- Make sure the service account has the SPN set correctly
- Finish the Wizard
- Log into the portal with UPN credentials. Note that once the UPN login is entered, the password field is grayed out and a link activates to log into the ADFS server
It is not possible to test out Single Sign On. Once it is on, it is on. The best way to test Single Sign On is to test the various connectivity points around Office 365 with an account. You are basically checking connectivity internally and externally and verify access to OWA and Outlook connectivity.
![]() Note If you turn on Federation, this is the point of no return. You are committed at this point.
Note If you turn on Federation, this is the point of no return. You are committed at this point.
Once you are ready to turn on Single Sign On, all that is needed is to run the scripts listed below. This will enable Single Sign On for the domain:
Note: domain: kamind.com, internal server kamindmgmtv2.kamind.com
Account:  need to use the onmicrosoft.com account as the admin account for livecred

Set-ExecutionPolicy RemoteSigned
$LiveCred = Get-Credential
Connect-MsolService -Credential $LiveCred.
Set-MsolADFScontext -Computer kamindmgmtv2.kamind.com

# - use if new domain
#New-MsolFederatedDomain -DomainName kamind.com
# - use if existign domain
#Add-MSOLDFederatedDomain -domainame kamind.com
Convert-MsolDomainToFederated -domainame kamind.com

#Get Status of federated domain
Get-MsolFederationProperty -DomainName kamind.com

#if the domain does not match Federation
Update-MsolFederatedDomain -DomainName kamind.com
The sample output of this command on the domain kamind.com is shown in Figure 11-37.

After you run these commands, it should look like Figure 11-38.

Add the auto update token certificate
Office 365 tokens update every 20 days. To make sure that the ADFS servers are in sync with Office 365, you need to download the Office 365 meta-data and sync the server prior to the first event (seeFigure 11-39).

- Download and save the meta data update http://gallery.technet.microsoft.com/scriptcenter/Office-365-Federation-27410bdc
- On the ADFS server, open an Office 365 power shell prompt and enter the command O365-Fed-MetaData-Update-Task-Installation.ps1
After you have completed the server update, then start the ADFS tool. This will show you that the trust has been installed on the server, as shown in Figure 11-40.

Step 3: Federation - Exchange 2010 Integration
After you have configured and tested Active Directory Federation Services, the next step is to federate the Exchange server. Exchange Server allows the movement mailboxes from On Premises to Off Premises using the Exchange Server’s remote mailbox move. In Figure 11-41, you can see the Federated Exchange Server (Exchange 2010 ), with the hub transport setting already created to handle the mail routing in the cloud. The Exchange Management console should look similar to Figure 11-41, if the hub transports are configured correctly.

Before you begin to federate the domains, it is crucial that your Single Sign On is working, and that your Federated Proxy Servers are in place. Once those are in place and stabilized, you can federate the Exchange Servers. To get ready for Exchange Federation, review these four checklist items, and you are ready to begin Exchange Server deployment:
- Do you have Exchange 2010 installed?
- Exchange 2010 Validation – verify your Exchange configuration.
- Mail flow – How will you route mail (Cloud or onsite)?
- Compliance and retention – What are your business requirements?
Exchange Server is more about planning than it is implementation. The major change for the users will be the changes for Single Sign On (discussed in the preceding section). Once your users have implemented the changes necessary in Single Sign On, Federation is transparent.
Exchange Server 2010 Installed?
If you currently do not have Exchange 2010 installed, then stop at this point. This document assumes that you have a working Exchange 2010 installation supporting OWA and Outlook anywhere (SSL with RPOC tunnel access).
If you have Exchange 2003, or 2007, you will need to refer back to Chapter 2 if you want to install Exchange 2010, and the steps necessary to accomplish this. This document does not address any Exchange to Exchange upgrades, and assumes that you have a working Exchange 2010 server in production.
To proceed to Step 3, if you have not already upgraded your Exchange 2010 servers to Exchange Server version 2010 service pack 3, please do so. This is required to run Exchange Federation.
Exchange Validation – Steps to check prior to deployment
Before you can begin to implement Exchange Federation, please verify the following:
- Validate the exchange Connectivity
- Run the Exchange connectivity test tool on the Exchange Server web services and RPC. Fix any errors reported (see https://www.testExchangeconnectivity.com/).
- Run the Remote Connectivity test tool on the Office 365 Single Sign On Tab. Fix any errors reported.
- Verify the external connectivity of Exchange external Url for Web Services, OAB and Active Sync using Exchange PowerShell.
It is import that each of these steps are completed in the planning and testing process before you go on to implement Federation. In some cases, you may decide for business reasons not to correct a problem that was raised by the connectivity/testing tool. In these cases, make sure you understand what the problem is and why you are not going to correct it.
Validate the exchange Connectivity
The best way to ensure your organization is ready for Federation is to run the remote connectivity Federation testing tool. There are three “Exchange Server” tests that we need to execute on this tool. This is on the “Exchange Server tab”. (Use a Windows 7 based system for testing.)
- Microsoft Exchange ActiveSync Connectivity Test
- Microsoft Exchange Web services Connectivity Test
- Microsoft Office Outlook Connectivity Test
Each of these tests will validate your Exchange server organization to make sure that your certificates are in place, and any previous deployment issues have been resolved. Typically when we run the tool in a deployment scenario, we do not specific the remote access server. Once you have made changes to your DNS for Federation, you will need to manually specify the server address. In our case, our CAS server is chaka.kamind.com.
The first test is the Exchange ActiveSync Connectivity test. This test verifies your active sync configuration and your certificate configuration (Figure 11-42). Both are needed to allow the Exchange Server remote to move.

In running our connectivity test, our connection failed with the following error message (see Figure 11-43).

Looking in detail on this error message (in Figure 11-43), we discovered that the accounts we had in our Exchange Server were not set up for RPC and OWA access. So in this case, we need to enable the accounts that were going to the cloud. If the OWA or RPC is not enabled, the account cannot be migrated. Run the second test and verify the Exchange ActiveSync AutoDiscover. (This test will fail once we change the external and internal DNS records).
The other two tests will verify the web services connectivity and the RPC connectivity. The accounts that you are planning to move to Office 365, must be enabled for ActiveSync and RPC access. Later on you can restrict services using the Office 365 Exchange Management panel.
Step 4: Mail Flow – Decide on how mail will route
Migration can be complex or simple. One of the changes introduced with Exchange Service Pack 3, was the introduction of the integrated Forefront Configuration as part of the Hybrid Federation wizard.
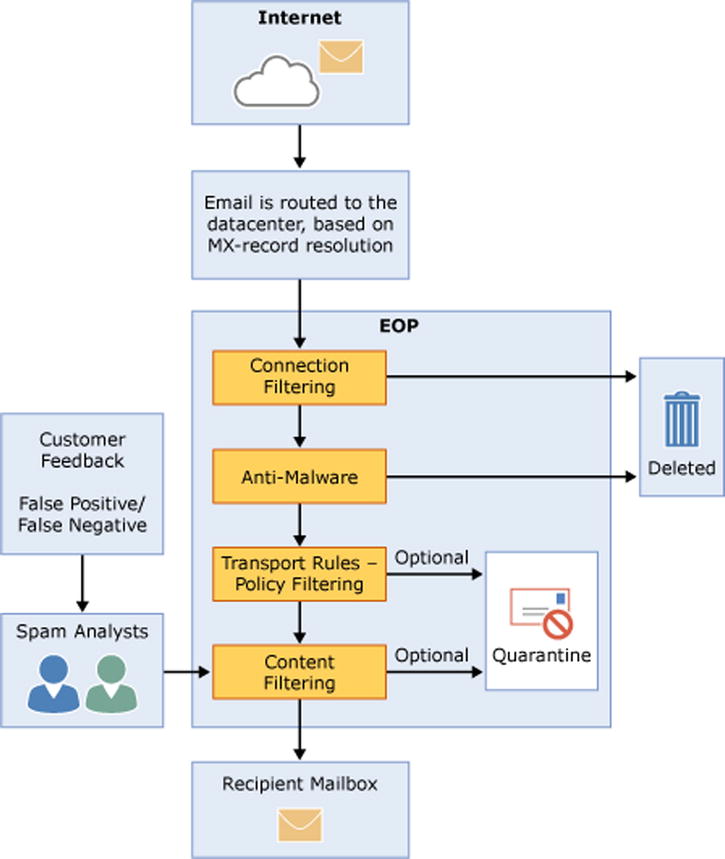
At this point, you will need to decide on your mail flow configuration, based upon your business needs In Figure 11-44, if we select displayed option, Office 365 Exchange Online Protection (EOP), assumes that you will redirect the MX records to Office 365, and EOP will deliver mail to your On Premises server for compliance based upon the transport rules (see Figure 11-45). The transport rules are used to deliver mail to the appropriate destination if there is a On Premises need for compliance logging. EOP configuration is discussed in detail in Chapter 10.

Step 5: Compliance – What is your email and document retention policy
Compliance is covered in detail in Chapter 9, but to understand how to configure retention policy you need to understand how the Office 365 archive and compliance structure works as compared to traditional journaling. When you think of journaling, such as GFI (or some other service), it is writing out all electronic communication to a third party information store. This happens to all communications that flow into the company from the cloud. The purpose of this model is to ensure that the data that is written to the third party archive is immutable (not subject to change or deleted by the user).
The Office 365 model is different (Figure 11-46). Instead of journaling all communications, you are performing the journal function on a per mailbox basis, and to do this you use a concept of retention rules to control the user mailbox information. Retention rules specify what happens to the mail in a user mailbox if the email is too old, or the user deletes an email. Typically these retention rules move the mail from the user mailbox into the archive. These rules can be systems level (user has no control), or can be local level, user has complete control.

Litigation hold is an action that is placed on a mailbox to meet compliance requirements for future discovery and searching. What litigation hold does is to ensure that the data in a user mailbox is immutable; and cannot be change. As an example, if the user tries to delete an email, the email is deleted (or purged) for the users view, but the litigation hold function block the email from being deleted in the system and is fully discoverable by the administrator (or compliance officer).
In Figure 11-46, we see the life of an email in a user mailbox. When there is compliance in place, the user only sees the message in steps 1 – 3. The compliance officer has access to all transactions in steps 1 – 6. When a discovery action – a search – is executed, all information is displayed in the search request.
In our hybrid example, we are not changing mail flow to the compliance engine. We are maintaining the mail flow as it is currently define. Later after we migrate to Office 365, we will move the compliance archive to Office 365. To ensure that the mail flow is not change, we adjust the mail flow using the EOP transport rules.
Step 6: Federation – Implementing Exchange Server (2010)
Exchange Server Is not like Single Sign On and Directory Synchronization. You can add Exchange Server after you migrate to Office 365. Likewise, you can remove it if you are 100% cloud based. To use these installation steps, you must install Exchange 2010 Service pack 3 or later. To Set up Exchange Federation, use the following the steps:
- Open up the Exchange 2010 management console (See Figure 11-47).
- At the top most node, right-click and select add Exchange Forest.
- Enter the following information for the new Exchange forest (see Figure 11-48).
- Enter the name for the Forest (in this case, we selected Office 365).
- Select Exchange Online; this will configure the correct PowerShell extension for Office 365.
- Select “Logon with default credential.” When you are prompted, enter the Office 365 credentials for login. The credentials supplied must have a license assigned to the account. If a license is not assigned, some PowerShell commands will fail.
- Once you have configured the Exchange Forest you will need to verify the commands. To verify the commands, open the Windows PowerShell command prompt (not an online services one).
- Run the PowerShell commands to verify the Exchange configuration:
#Create an Office 365 remote PowerShell Session
$O365 = Get-Credential
$session = New-PSSession -ConfigurationName Microsoft.Exchange -ConnectionUri https://ps.outlook.com/PowerShell/-Credential $O365Cred -Authentication Basic -AllowRedirection
Import-PSSession $Session

#Clean up and close the session
Remove-PSSession $Session- After you enter the above commands, the output should look similar to Figure 11-49, displaying the status of the remote interface. The purpose of the preceding command is to make sure that the command sequence is valid and that the Exchange 2010 console has the necessary components installed.
- The next step is the configuration of the Exchange server certificate. You will need to have either a wild card or a server specific certificate. If you do not have a server specific, please refer to the section on creating a new Exchange certificate. At this point you have run the Exchange connectivity test and have installed a server certificate, as well as install the necessary certificates on the CAS server. Once the certificates are installed, they should appear similar to Figure 11-50.
- Open up the Exchange management console and verify that the Exchange certificates are assigned to the SMTP, and IIS service (see Figure 11-51).
- Select the certificate that is used on the external interface (these services should already be assigned as part of the troubleshooting process with the connectivity wizard).
- When you run the wizard, select the servers that the certificate is installed and apply all services that you will use. You must select at least IIS and SMTP. If you are prompted to overwrite the default certificate, select NO (see Figure 11-52).
- After you have updated the certificate with the services, the next step is to verify the service. To do this, you will run Exchange PowerShell and enter the command “Get-ExchangeCertificate | fl”. Verify that the service attributes include “IIS and SMTP”, Status is “Valid” and the RootCA Type is “thirdparty” as shown in Figure 11-53.
- After the certificate has been verified, the next step is to verify the external URL end points are installed correctly on the Client Access Server. To accomplish this, run three different PowerShell scripts. The endpoints should already have been resolved in the TestConnectivity verification that we completed earlier. Run the following scripts (see Figure 11-54).
- Get-WebServicesVirtualDirectory "EWS (Default Web Site)" | Fromat-Table Name, ExternalUrl
- Get-OabVirtualDirectory "OAB (Default Web Site)" | Fromat-Table Name, ExternalUrl
- Get-ActiveSyncVirtualDirectory "EWS (Default Web Site)" | Fromat-Table Name, ExternalUrl
In the example shown in Figure 11-55, the web services virtual directory returns a blank (no value). To correct this, you need to either add the external URL using either the management console or PowerShell. In this case, the External URL was not set correctly on the internal CAS server kamindmsgv2 (see Figure 11-55).
- Configure the DNS for Auto discover and SPF txt records
- On the Office 365 Admin console select “Domains,” then select the domain for the mail records, view DNS settings then View DNS records for the UPN domain (see Figure 11-56).
- Set the External AutoDiscover record
- Set the TXT spf records
- On the Office 365 Admin console select “Domains,” then select the domain for the mail records, view DNS settings then View DNS records for the UPN domain (see Figure 11-56).
- Run the Hybrid Configuration Wizard. The wizard will verify the Federation configuration, validate the domain for Federation services, and install the EOP connector.
- On the Exchange Management Console, select the Organizational Configuration node, then select the Hybrid configuration tab, then the New Hybrid Configuration (see Figure 11-57).
- The hybrid configuration will require two accounts to integrate into Office 365; both of these accounts needs to be a member of the “Organization management Role” group for the On Premises server and the Office 365 server.
- The Office 365 account should be unique. We typically recommend that the account be part of the onmicrosoft.com domain (see Figure 11-58).
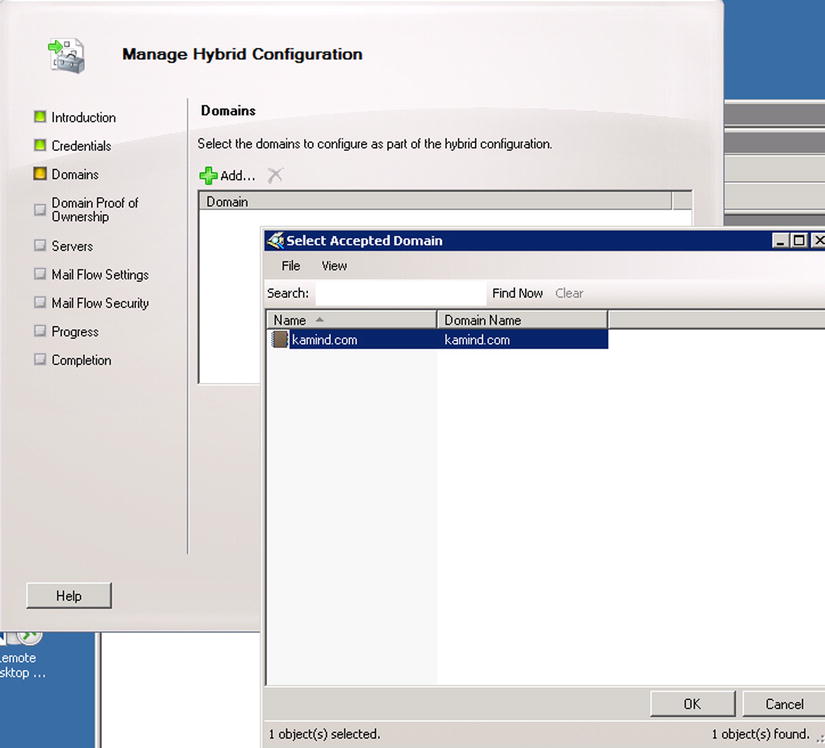
- Add the domain to be federated (see Figure 11-59).
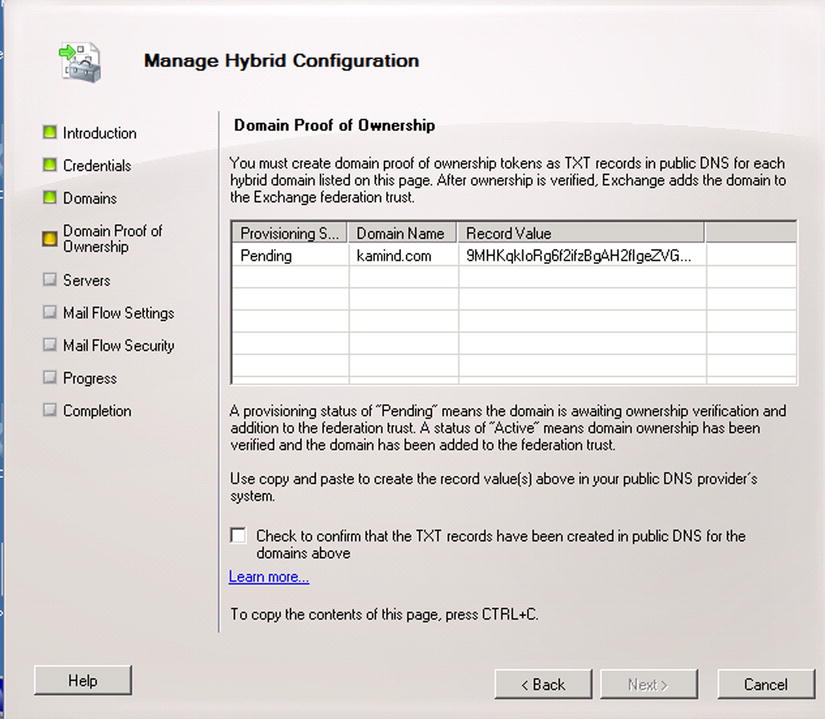
- Create the validation text record for DNS verification. The text record needs to be copied and installed in the DNS server, so select the check box once the record is entered (see Figure 11-60).
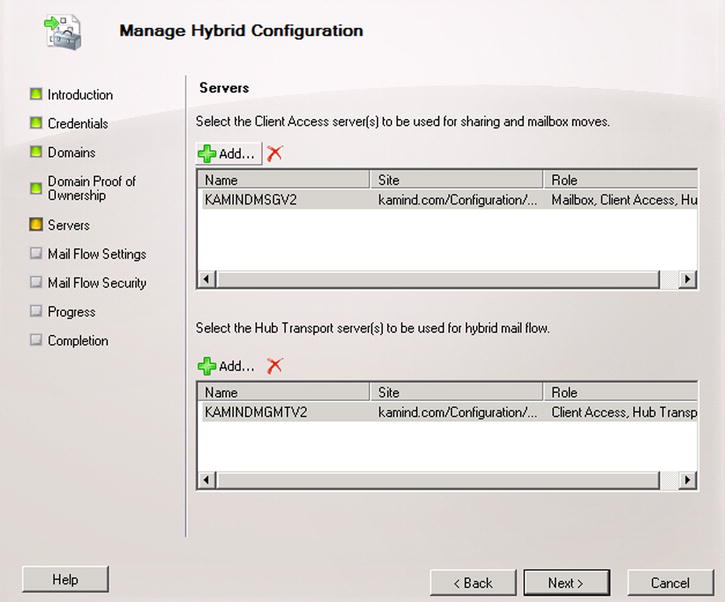
- Add the primary mailbox/CAS server and the hub transport server (Figure 11-61).
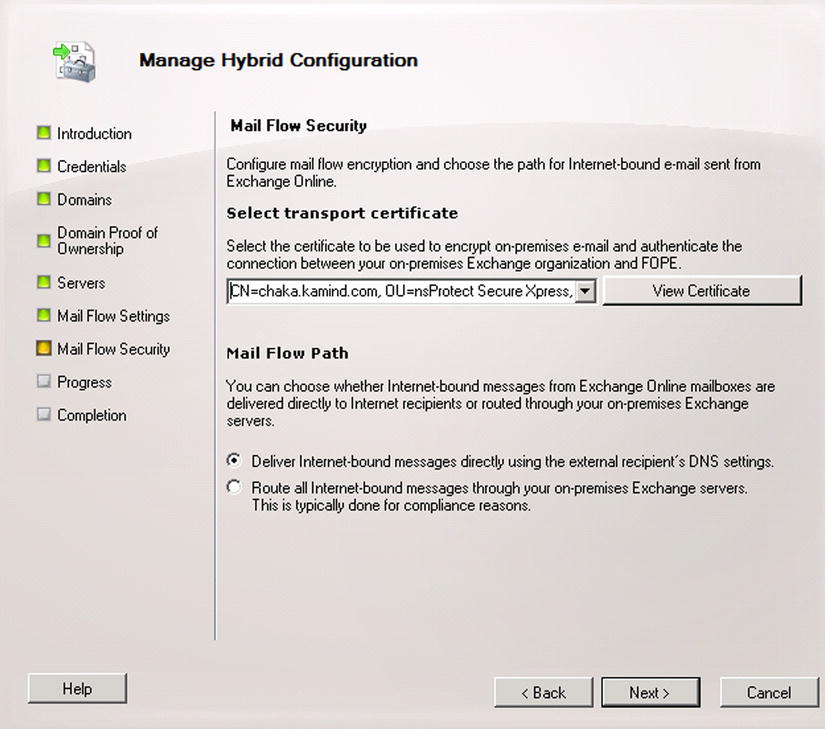
- Add the IP address of the external gateway for the EOP send connector to access for the on-site hub transport server (SMTP gateway – Figure 11-62).
- Select the EOP mail flow; either Cloud or On Premises.
- The Current MX (Mail exchange) records still point to the original location of the On Premises server (Figure 11-63). There are two ways to route mail in a hybrid organization: through EOP or through the existing On Premises server. After you complete the wizard, you will need to add the IP addresses of the EOP send connector to your hub transport server (or firewall).
- Complete the wizard by selecting “Manage” (see Figure 11-64).
- The Hybrid wizard is extremely verbose. All information is logged in the directory C:Program FilesMicrosoftExchange ServerV14LoggingUpdate-HybridConfiguration.
- Once you have resolved any errors, the Hybrid Federation connector is created (see Figure 11-65), so click Finish. Once the connector is in place, you can modify the connector as needed.
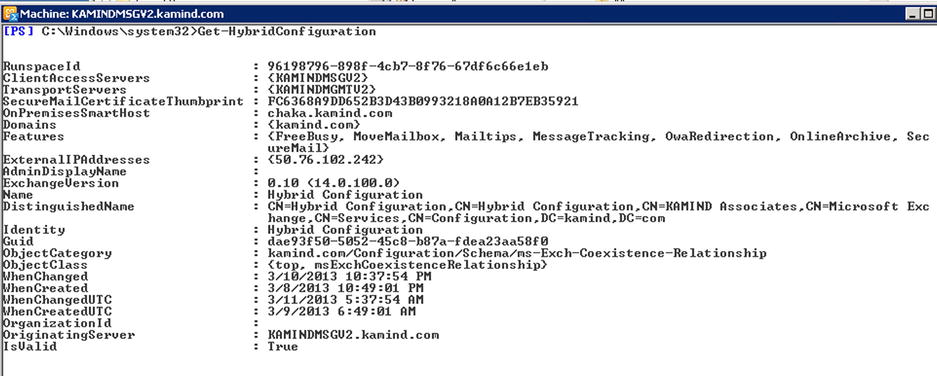
- To verify your configuration, execute the command Get-HybridConfiguration (see Figure 11-66).
- After you have completed the hybrid wizard, you need to add the IP addresses of the EOP gateway to your On Premises firewall to allow the email connectivity. Go to http://technet.microsoft.com/en-us/library/dn163583(v=exchg.150).aspx.


The Hybrid Federation configuration is completed. At this point there are only two steps left for full Federation: testing out mailbox moves and moving the MX records to point to Office 365.
Step 7: Post Federation Testing
Post Federation testing is the verification that the Hybrid deployment is working, and if so the following is true:
- You can create a remote Mailbox in Office 365 from the On Premises server
- You can move a mailbox to Office 365
- You can verify free Busy calendar sharing with the cloud
- You can verify mail flow by sending a message from Office 365 to premise server
- You can change the MX records and point the DNS records to Office 365
Change the MX records
After you have completed all of the testing to ensure mail flow is correct, you need to move the MX records from pointing to the On Premises server to Office 365. Once you have competed this step, you will be ready for production deployment using the remote mailbox move. The MX record will look similar to Figure 11-67. Once you have completed the record move, verify the records in Office 365 and then you have completed the Federation configuration.

At this point your Office 365 federation is completed. You can move mailboxes to the offsite server and back to the On Site server. Mail migration at this point is completed by using the remote mailbox move from the On Site server to Office 365.
Troubleshooting
ADFS and Directory Synchronization work well, but you need to address problems when they happen. ADFS problems will lead to the users not being able to login into Office 365 or access any emails. Directory sync issues end up having password mismatches. Most of the issues you run into are at the initial deployment stages. The most common issues that you run into on Office 365 follow:
Active Directory Readiness Check
DirSync: Installation error – Need Online Service Sign in
DirSync: Active Directory Required user fields
DirSync: Adding Alias Proxy (exchange server not present)
ADFS: Remote Connectivity Analyzer
ADFS: Database errors
ADFS: Hybrid Federation Certificate Problems
There are other issues that you may run into. These are the most common issues that we have seen on Office 365 when you deploy Directory Synchronization or Active Directory Federation Services. Detailed information about the various troubleshooting steps are listed below.
Active Directory Readiness Check
If your Active Directory has gone through a number of upgrades, you should review the Active Directory for readiness – Verification of the structure to make sure it will work with directory sync. The objective here is to validate and repair any Active Directory issues, and to check for other issues that can be addressed later.
- Select a domain joined workstation or server (preferably the server that you will run DirSync on) and login to start the tool.
- Follow the steps outlined below (this tool will not work if you have run DirSync).
- Repair issues as found (through the first four checks: credentials, network, domains and users and groups); any other issues (Lync, mail, sites, user software) can be addressed later.
Step 1 – Sign In with your Office 365 Admin account
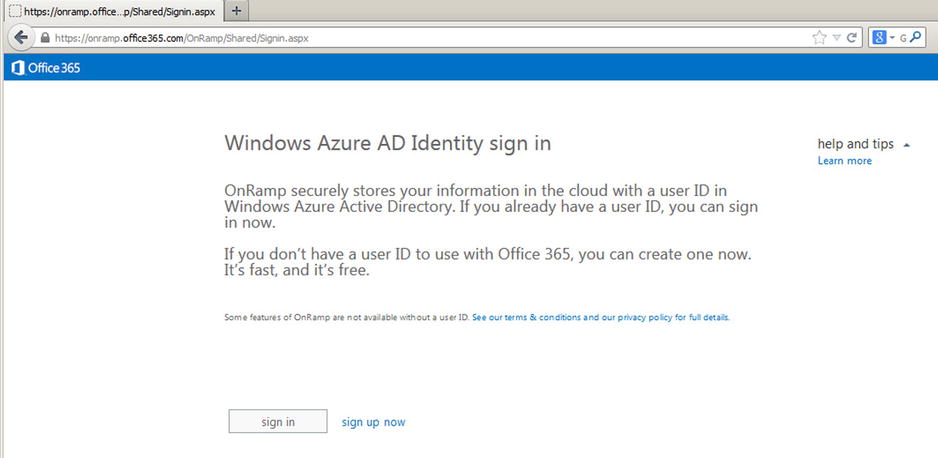
Select a domain joined server (used to install this set of check tools). Start a web browser and navigate to: https://onramp.office365.com/. Click the arrow by ‘Liberate’ and Sign in (Figure 11-68) with your Office 365 Administrator account.
Click through the screens and make selections as required. Select “We’ll synchronize our On Premises’ Active Directory with Office 365” (unless you have a different plan). See Figure 11-69.
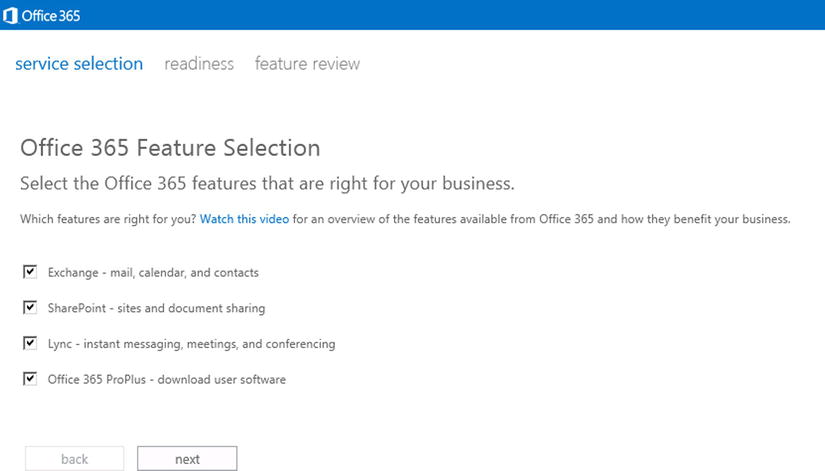
Select the exchange migration type (see Figure 11-70). Make sure you check “We’ll synchronize our on premises Active Directory with Office 365”. This will force the onramp tool to validate your local Active Directory for errors. If you are prompted with a screen on the Migration help, select “I am an IT professional.” This will begin the test (see Figure 11-71).


Step 2 – Install required Software updates
During the readiness test, you will see an analysis of the current environment. To address the issues, click on the necessary software downloads and install the updates. In some cases, you may see an error: “Microsoft online services sign-in assistant version 7.0 or greater” must be installed. If this is the case, refer to the “Troubleshooting” section. You will need to install the Directory Sync tool and re-run the readiness checks (see Figure 11-72).

Run the tests: re-check computer/Check again. For Active Directory we are only concerned about the first four sections (credentials, network, domains and users and groups). You can click on view details to review issues (see Figure 11-73). There are several screen shots of the sections below. DO NOT INSTALL DIRSYNC YET!

After you run the test, you should see a summary on the readiness checks (see Figure 11-74). If you view the details, this action will show you how to correct the problems you may discover.

Step 4 – Research and Repair issues
You can check each failed requirement. The two areas to focus on are the network configuration and the User and groups Active Directory objects.
Lync issues are network related (see Figure 11-75 and Figure 11-76)


Active Directory user issues (see Figure 11-77)

Review the details of this check on Active Directory and repair the objects that need to be repaired. In Figure 11-77 (see yellow), view the details of the check and take corrective action. The errors you fix at this stage will save you hours later on once you have implemented Directory Synchronization.
DirSync: Installation error – Missing Online service Sign in
One of the common errors that you may run into is the “you must have Microsoft online services sign-in assistant version 7.0 or greater” error (see Figure 11-78). The only way to address this is to manually install the Active Directory Sign On component.
To install this component:
- Go to the microsoft download center and search for “Microsoft Online Services Sign-In Assistant for IT Professionals” (http://www.microsoft.com/en-us/download/details.aspx?id=28177)
- Download and install the desktop sign tool
- Restart the Directory Synchronization installation.
The DirSync tool should install correctly.
DirSync: Required Active Directory User fields
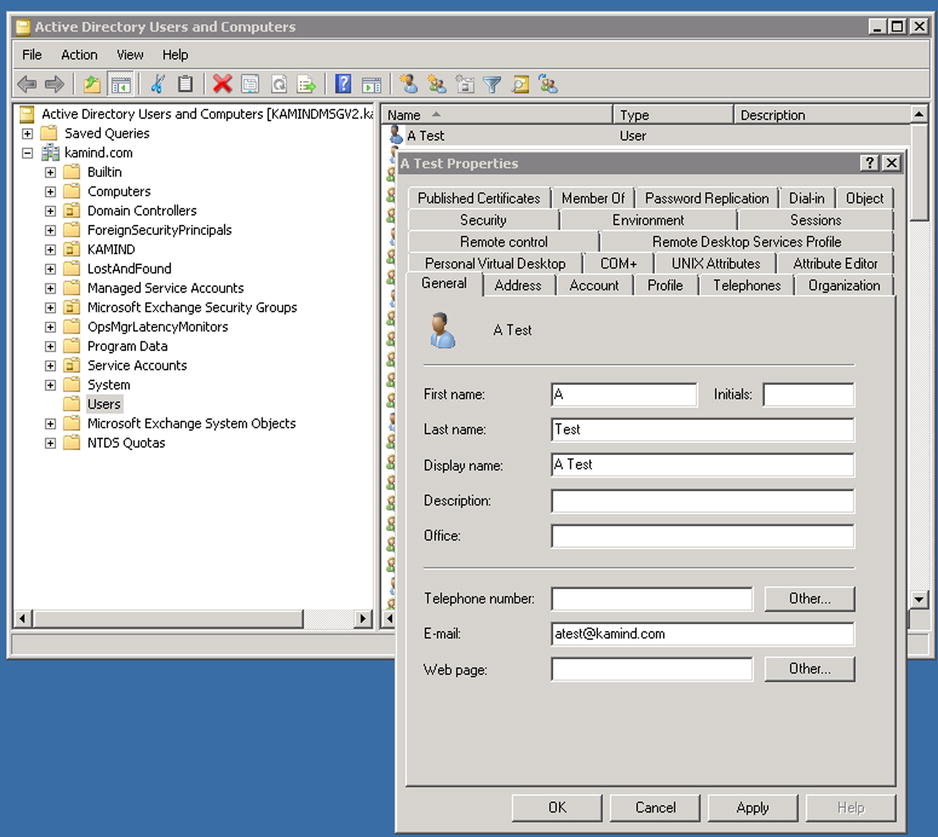
Once you have identified all of the errors in Active Directory and cleaned the object up, you will also need to verify the user data. Directory Sync requires certain attributes to be configured correctly for the object to be replicated to Office 365. Active Directory Directory Sync requires that the user account must have the following attributes filled out (First Name, Last name, Display name and Email Address).
To set these parameters, go to Active Directory Users and Computers, select the user object, and then change the properties of the user above with the required information. All Active Directory objects that are being replicated must have this change, otherwise the mailbox will be replicated as <company>onmicrosoft.com (see Figure 11-79).
DirSync: Adding email Proxy Addresses
Active Directory organizes email address and proxy addresses in the format “smtp:[email protected]”. Remember that case is important in the smtp header. A “SMTP:” in uppercase is the primary email address and the “smtp” in lower case is the alias address. In Figure 11-82, an e-mail address was added. This is the primary e-mail address so it will be replicated at “SMTP:[email protected]”.
If you do not have an Exchange Server, how do you add or modify the smtp proxy addresses (or alias)? There are two ways to do this; use the Exchange Server MMC client to modify the Active Directory, or use ADSIEDIT (located in the domain controller administrator tools group)to make the changes. You can also use the Active Directory User and Computers, and make the changes in the attribute editor. ADSIEDIT works the same way, just select the user object and make the changes.
To use Active Directory User and Computers, you must enable the Advance Features (under view, select “Advance Features”). The property dialog should look similar to Figure 11-80. Select the “Attribute Editor” tab, then select “Filter” and “Show only attributes that have value” (see Figure 11-81).


Select the “proxy addresses” and select Edit (see Figure 11-81). Remember, you can only enter the alias. Do not change the primary address in the attribute filed. The primary address can only be changed in the user properties. When you change the user properties, additional fields in Active Directory are updated. Once you make the changes, save them and DirSync will replicate them, or you can manually replicate the changes.
DirSync: Using PowerShell Licensing Scripts
Microsoft Online Services has released a number of PowerShell scripts that assist users in the migration to Office 365 while using DirSync. These scripts provide detailed information on the usage of Office 365, and allow you to assign licenses and other parameters to users in bulk (see Figure 11-81).
To add licenses, you need to collect information about your Office 365 organization. The script, GetMsolTenantSku generates a report (see Figure 11-82) on the usage of the licenses, and the Office 365 organization name that use the license. To add a license to a DirSync object is a two step process: 1) determine the license that is being used, and 2) assign the license to the DirSync object.

ADFS – Remote Connectivity Analyzer
ADFS issues are usually based on permissions, passwords or wrong UPN parameters. When you are using ADFS, you are changing from using a “non-routable domain” to a routable domain. If you have this problem, what you will see is a login prompt on the Federation server. Your account credentials will be rejected. If you have this message, how do you fix the Single Sign On? The first step is to run the Remote Connectivity Analyzer to verify connectivity (see Figure 11-83). This section reviews some of the common ADFS errors and troubleshooting steps to correct the ADFS error.

Figure 11-83. Connectivity Test Tool (https://www.testExchangeconnectivity.com/)
If the ADFS services has a synchronization error, or the SSO stops working, you may need to recreate the ADFS integration database. To create a new database, you will need to run the wizard. The wizard is located on the server where ADFS is installed:
<drive:>Program FilesActive Directory Federation Services 2.0 FsConfigWizard.
When you run the wizard, you are following the same steps, with the exception of the need to delete the existing ADFS database. Here are the steps to follow:
- Select “New Federation Server farm”
- Select next – the SSL certificate should still be valid
- If prompted, delete the data base
- Enter the service account
- Select next and correct and errors `d
You will receive an error message because the existing ADFS website is in place (see Figure 11-84).

For the final step, you will need to reconnect Office 365 to the local server by running the following PowerShell scripts:
Note: domain: kamind.com, internal server kamindmgmtv2.kamind.com
Account:  need to use the onmicrosoft.com account as the admin account for livecred

Set-ExecutionPolicy RemoteSigned
$LiveCred = Get-Credential
Connect-MsolService -Credential $LiveCred.

#Get Status of federated domain
Get-MsolFederationProperty -DomainName kamind.com

#if the domain does not match Federation
Update-MsolFederatedDomain -DomainName kamind.com
After you have run the scripts, start up the ADFS configuration tool and it should connect up to the Office 365 services (see Figure 11-85). If you have an error, check the proxies and rerun the PowerShell scripts.

ADFS: Hybrid Federation Certificate Problems
A common error when the Hybrid wizard does not complete is a failure of the certificate (see Figure 11-86). The wizard looks for all names to be on the certificate, so you can have a failure if you are using a third party certificate that is not complete.

To verify that this is a certificate error, use “Get-FederationInformation –Domanname <enter domain>” (see Figure 11-87).

The PowerShell command returns the Federation error for the SSL certificate. There is only one way to address this and that is to purchase a new SSL certificate with the appropriate name on the certificate. In general, wildcard certificates are used hybrid domains.
ADFS: Single Sign On (SSO) User experience
The SSO experience for the user is a seamless integration that assumes that the user has a system that is integrated into a Windows Active Directory. When the user logs on to the local system and authenticates with Active Directory, the user login credentials are passed through to the Office 365 side (see Figure 11-88).
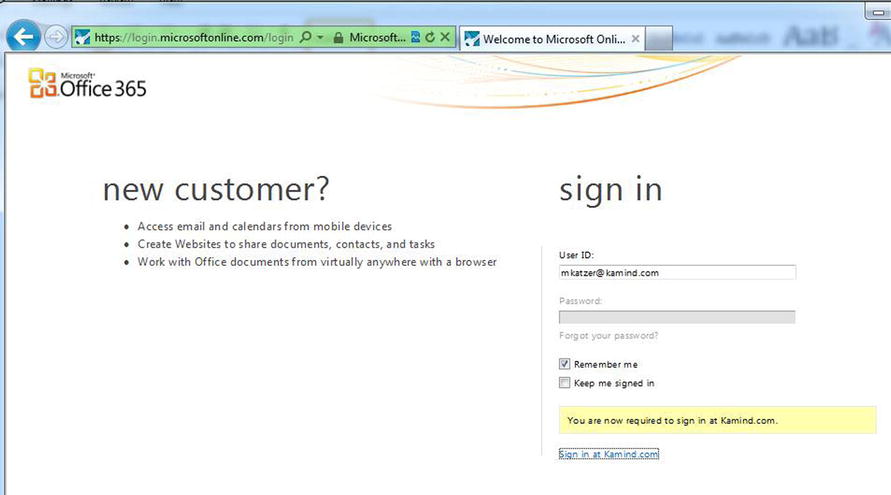
Non Domain login
All logins to the cloud are authenticated by the local domain controller. When a user logins to www.Office365.com, the login credentials are sent to the On Premises Federated Domain Controller (via ADFS) to login. The user will see the preceding response. If the user systems is configured correctly, the user login will be automatic (see Figure 11-88); if not the user will be required to authenticate (see Figure 11-89).

Domain login overrides Web login
The local systems login overrides the Office 365 account login. In the preceding case, if we login as one user on our local computer, and we try to login as a different user in Office 365, the Office 365 login will override with the current Active Directory account. As a practice example, in Figure 11-47, we used the web login [email protected], but the client login to the Active Directory was [email protected].
When the security credentials are checked with the local server and system, the user account that is connected to the cloud is the account that the user is logged into locally. The caution here is that you will need to use devices that are not attached to a domain in order to migrate between different Office 365 accounts (in the same domain).
There is a lot of information about Office 365 on the web, the issue is finding the right site. The information contained in this chapter is a combination of our experiences in doing deployments along with support information that we have assembled along the way.
Microsoft Office 365 blog – Latest news about Office 365
http://blogs.office.com/b/microsoft_office_365_blog/
Exchange Deployment Assistant (2010) – Q/A on deployment of Office 365
http://technet.microsoft.com/en-us/exdeploy2010/default(EXCHG.150).aspx#Index
Benoit’s Corner – Useful tips and tricks on Exchange and SharePoint
http://blog.hametbenoit.info/default.aspx
Directory Synchronization Tool Update
http://technet.microsoft.com/en-us/library/jj151800.aspx
Troubleshooting Free and Busy
http://support.microsoft.com/kb/2555008
Windows Azure Active Directory – validation (http://support.microsoft.com/kb/)
2461873- (http://support.microsoft.com/kb/2461873/)
You can’t open the Windows Azure Active Directory Module for Windows PowerShell
2494043 - (http://support.microsoft.com/kb/2494043/)
You can’t connect by using the Windows Azure Active Directory Module for Windows PowerShell
2587730- (http://support.microsoft.com/kb/2587730/)
Authentication error when you use the Set-MsolADFSContext cmdlet in the Windows Azure Active Directory Module for Windows PowerShell
2279117 - An administrator cannot add a domain to an Office 365 account
2515404- (http://support.microsoft.com/kb/2515404/)
Troubleshoot domain verification issues in Office 365.
2618887(http://support.microsoft.com/kb/2618887/) - Error when you try to configure a second federated domain in Office 365: "Federation service identifier specified in the AD FS 2.0 server is already in use."
2578667- (http://support.microsoft.com/kb/2578667/) "Your organization could not sign you in to this service" error and "80045C06" error code when a federated user tries to sign in to Office 365
Exchange server 2013 – extending Active Directory Attributes with forestprep and domainprep
http://technet.microsoft.com/en-us/library/bb125224(v=exchg.150).aspx
Next steps
Your basic Office 365 systems has been set up and configured. At this point you are 100% functional and ready to move to the next steps. However, your work is not complete at this time; there is much more to do. Depending on your Office 365 configuration, the key chapters you need to review for your Office 365 deployment are as follows:
- Chapter 7 – Administration of Windows Intune
- The secret to an optimal Office 365 site is the management of the desktop to ensure that updates are current, and the user antivirus is functioning. Windows Intune is a desktop management tool that addresses these issues and reduces the administrators’ effort in desktop management, and improves the user’s experience.
- Chapter 8 –Administration
- The administrator’s job is never completed. This chapter contains the useful information for common task such as configuration of SharePoint permission, using different types of PowerShell scripts for configuration of the Office 365 sites and other tips and track that we used to make Office 365 work without any support calls
- Chapter 9 – Compliance, Discovery and Rights Management
- Securing our data is critical to all businesses. How do you keep data, where is it kept and how to you deal with discovery issues assorted with compliance. The new Data Loss Prevention (DLP) features (and encryption options) provides the necessary tools to meet the regulatory needs of today’s business. This chapter reviews the different approach to control data loss, data retention and compliance.
- Chapter 10 – Administration of Exchange Online Protection
- Mail routing and configuration of the Office 365 SPAM filters is not easily understood. This chapter contains useful information on setting up EOP, adding policies to the message filters, using Encryption and controlling mail flow. If you are doing any migrations where you need to cut over 100% to Office 365 and redirect mail to the old email servers, this chapter addresses those and other Forefront Online protection issues.