
LibreOffice has the ability to take data from a Calc spreadsheet and use it to create a mass mailing (often called a mail merge). That works well if your list contains 1 to 1,000 people. But what if it grows larger? Say 100,000 recipients?
LibreOffice comes with a database comparable to the Microsoft Access “database”1 and SQL Server, called LibreOffice Base. It does a good job until your list starts to reach the 1,000,000 mark. At that point, you’re going to need a more professional database such as PostgreSQL .
In this chapter, we’ll keep things simple. You’ll learn the following:
How to import data into Calc
How to use Calc and Writer to perform a mail merge
How to create an empty database in Base and populate it with Calc data
How to create a quick custom query in Base
How to create a form letter using the results of your query
Importing Data into Calc
Let’s start with a list of names. You can get this list from a nice web site called www.generatedata.com . Save the list of names in a file called addr.csv. Although the extension stands for “comma-separated values,” the fields are really separated by a vertical bar (|). Also, the first row contains the column names, which we later call field names just to be consistent. These field names and the name of the file are all one word and lowercase. This makes it easy to use them later.
The first thing you need to do is start LibreOffice and open the file (select File ➤ Open). If you just open it using the defaults, the file will be opened in LibreOffice Writer. You need to go to the file type pull-down and select Text CSV (*.csv) . It sounds simple, but the pull-down contains a lot of file types, and it takes a bit of scrolling and treasure hunting to find the right one. Figure 7-1 shows the hidden treasure: Text CSV (*.csv).

Figure 7-1 Opening the file
When you click Open, LibreOffice opens the Text Import dialog , as shown in Figure 7-2. As mentioned, the fields in the file are separated by a vertical bar (|). So, you need to deselect the Tab, Comma, Semicolon, and Space options. Then select Other and put a vertical bar (|) in the blank field. The preview panel at the bottom gives you some idea of how your data will be processed. Clicking OK brings up the spreadsheet.

Figure 7-2 Import dialog
Let’s save the spreadsheet as the file addr.ods. Don’t forget to set the file type , as shown in Figure 7-3.

Figure 7-3 Saving the file
Creating the Form Letter
Now let’s create a form letter as a LibreOffice Word document. Select File ➤ New Text Document. You’ll enter your name and address, and then it’s time for the addressee.
You need to connect the spreadsheet you are using to LibreOffice as a data source or database. Select Edit ➤ Exchange Database , as shown in Figure 7-4.

Figure 7-4 Making a database connection
Let’s address some terminology before we go any further, specifically, the terms spreadsheet and database. LibreOffice lets you use a nicely formatted spreadsheet as a small database. Therefore, in many dialogs where you are asked to select a database, you are actually selecting a spreadsheet. You can think of the terms as the same in LibreOffice. In addition, the first row of the example spreadsheet contains column names. In a database, they are called field names. Finally, a spreadsheet sheet is the same as a database table (see Table 7-1) .
Table 7-1 Spreadsheet/Database Translation Table
Spreadsheet Term | Database Term |
|---|---|
Spreadsheet | Database |
Column name | Field |
Sheet | Table |
After you select Edit ➤ Exchange Database, the Exchange Databases dialog appears. The database (spreadsheet) you want is not there, so click Browse, as shown in Figure 7-5.

Figure 7-5 Exchange databases
Using the file open dialog, you can find the spreadsheet file (addr.ods) and open it. LibreOffice returns to the Exchange Databases dialog only now the “addr” database will appear in the Available Databases column, as shown in Figure 7-6.

Figure 7-6 Database list now includes “addr”
Click Close to finish the dialog. Now you need to insert data from the database into the form letter. This is done through fields. A field is something in the document that will be replaced by real data. For example, the field Page Number is replaced by the current page number.
In this case, you want to get fields from the database. So, start by selecting Insert ➤ Field ➤ More Fields to bring up the field list, as shown in Figure 7-7.

Figure 7-7 Inserting a field
In the Fields dialog, select the Database tab. The “addr” database is listed on the right. Click the plus (+) sign to expand it, and you’ll see a data section.
On the left, select “Mail merge fields.” On the right, click the plus (+) sign next to data to expand the list. Select “first ,” which is the first name of the person you are writing to, as shown in Figure 7-8.

Figure 7-8 Selecting fields
Click Insert to insert the field in the document. As you can see in Figure 7-9, a gray “<first>” was inserted in the document. This indicates that the program will take an entry from the column “first” and insert it here.

Figure 7-9 Field inserted
Now type a space and insert the rest of the fields: last, address, city, state, and zip. Add a “Dear” line with another “first” field, and you get Figure 7-10.

Figure 7-10 Letter with fields
Now you have to type the rest of the text. Figure 7-11 shows the final form letter.

Figure 7-11 Finished letter
Let’s save the letter and then select File ➤ Print. LibreOffice notices that this is a mail merge document and displays the dialog in Figure 7-12, which asks you if you want to print a form letter.
Of course, you do—that’s why you’re reading this chapter. Click Yes.

Figure 7-12 Form letter dialog
The Mail Merge dialog appears, as shown in Figure 7-13. This dialog allows you to print to a physical printer or a file. You want to print a big PDF file that you can take down to the school’s office and let them print some copies on the fast printer.
If you select Print to File, the only file formats you can print to are document formats such as LibreOffice or Microsoft Word. It’s not obvious, but to save the result to PDF file, you need to select Printer.

Figure 7-13 Mail Merge dialog
When you click OK, LibreOffice will go through a frenzy of computation creating your 100 form letters all the while displaying the progress dialog shown in Figure 7-14.

Figure 7-14 Telling you the program is busy making letters
This screen will eventually disappear and be replaced by the Print dialog in Figure 7-15.

Figure 7-15 Print dialog
Select the printer called Microsoft Print to PDF to save the file as a PDF and then click OK to bring up a dialog asking you what file you want to save the results to. The final file will be 100 pages long, with one page for each name in your list.
Using LibreOffice Base
A spreadsheet is fine for saving 100 names. In fact, it’s not too bad for 1,000. For 10,000 names, though, it gets a little difficult to use, and at 100,000 names, forget about it. For that many names, you need a database. LibreOffice has one called LibreOffice Base. It’s a decent small database that can handle pretty much anything a person can throw at it.
Java
Before you can use LibreOffice Base, you must install Java. You can download it from www.java.com . Again, install it by selecting all the defaults except when the “Get the best…” dialog, as shown in Figure 7-16, appears.

Figure 7-16 “Can I take over your browser?”
Click “Do not update browser settings” and then Next. After you finish installing Java, exit LibreOffice and restart it.
Creating a Database
To create a database, select File ➤ New ➤ Database, as shown in Figure 7-17.
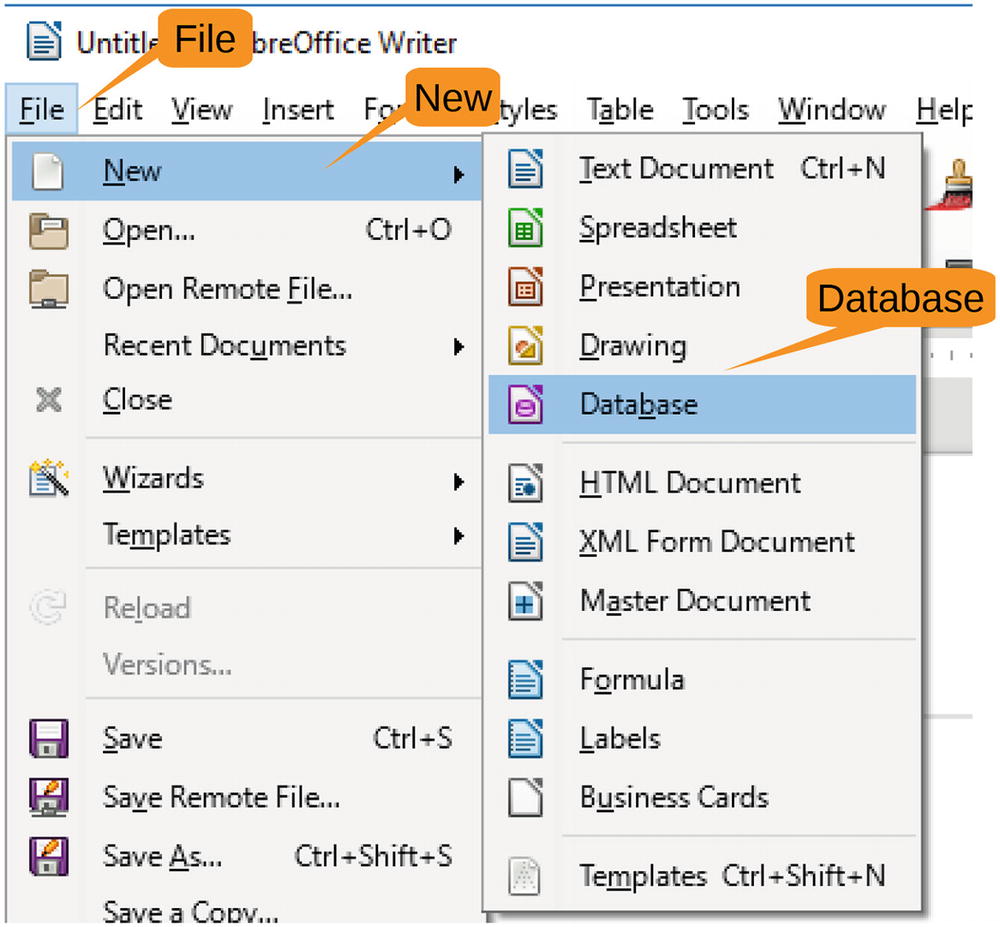
Figure 7-17 Creating a database
The Database Wizard , as shown in Figure 7-18, will appear. LibreOffice has the ability to act as the front end for a variety of databases. You can create a new connection between LibreOffice by opening the file or connecting to a database server. You want a new database, so select “Create a new database.” Leave the Embedded Database type alone, especially since there is only one choice.
Finally, click Next.

Figure 7-18 Database Wizard
The next screen gives you a chance to register the database (make it available for mail merge) and specify whether you want to open the new database (you do). Click Finish to create the database, as shown in Figure 7-19.

Figure 7-19 Creating the database
LibreOffice prompts for the name of the new database so it can save it. In this case, let’s enter address_database. LibreOffice will display a window like Figure 7-20, which contains the empty database .

Figure 7-20 Blank database
Let’s go back to your spreadsheet. You need to copy the data from the spreadsheet into the database. First select all the data with Edit ➤ Select All and then copy it with Edit ➤ Copy , as shown in Figure 7-21.

Figure 7-21 Copying the database
Now go back to the database window. Select Edit ➤ Paste , as shown in Figure 7-22.

Figure 7-22 Pasting in the new table
The Copy Table dialog will appear, as shown in Figure 7-23. For the table name , enter address_table (it makes queries easier if the name is all lowercase and has no spaces in it). Leave “Use first list as column names” selected, select “Create new field as primary key” to number each row, and then click Create.

Figure 7-23 Creating the table
The new table appears in the database window, as shown in Figure 7-24.

Figure 7-24 New table
You can use the Exchange Database feature of your form letter to get its data from this table. But you have a database, so let’s use it. Getting information out of a database is done through something called a query. Let’s see whether you can create a query that returns just those people whose first name begins with A. Start by clicking the Queries icon , as illustrated in Figure 7-25.

Figure 7-25 Starting the query
Next select Create Query in Design View. This opens the Add Table or Query dialog , as shown in Figure 7-26.

Figure 7-26 Add Table or Query dialog
Since you have only one table, called “address_table,” let’s select that. Clicking Add will add it to list of tables in the Design View window , as shown in Figure 7-27.

Figure 7-27 Design View
You now need to enter the column values.
First Column
For Field, enter *. The asterisk (*) means all fields of the table. To make sure the database knows which table you are referring to, it will add the name “address_table.” at the beginning. (You are using only one table for this query, but you could use more.)
The Table value will be filled in automatically.
Next select Visible to indicate that the results are to be displayed in the query.
Second Column
The field is “first.” You are going to use the entries where the first name starts with A, so under Criterion enter LIKE ‘A%’. (The A% is enclosed in straight single quotes.) The LIKE operation is one that’s special to database queries and says to match the string on the right side, assuming that % matches any number of characters.
Do not select Visibility. The column is already brought in by *, and you don’t need it a second time.
Third Column
For this column, the field is “last.” Select Ascending for the Sort item. Again, make sure Visible is deselected.
You’ll sort by last name. This column tells the database to do just that.
Fourth Column
For this column, the field is “first,” the sort is Ascending, and it is not visible. If two names are the same, then the sort order will look at this field second. So, “Smith, Bob” will come before “Smith, Yani.”
The completed form should look like Figure 7-28.
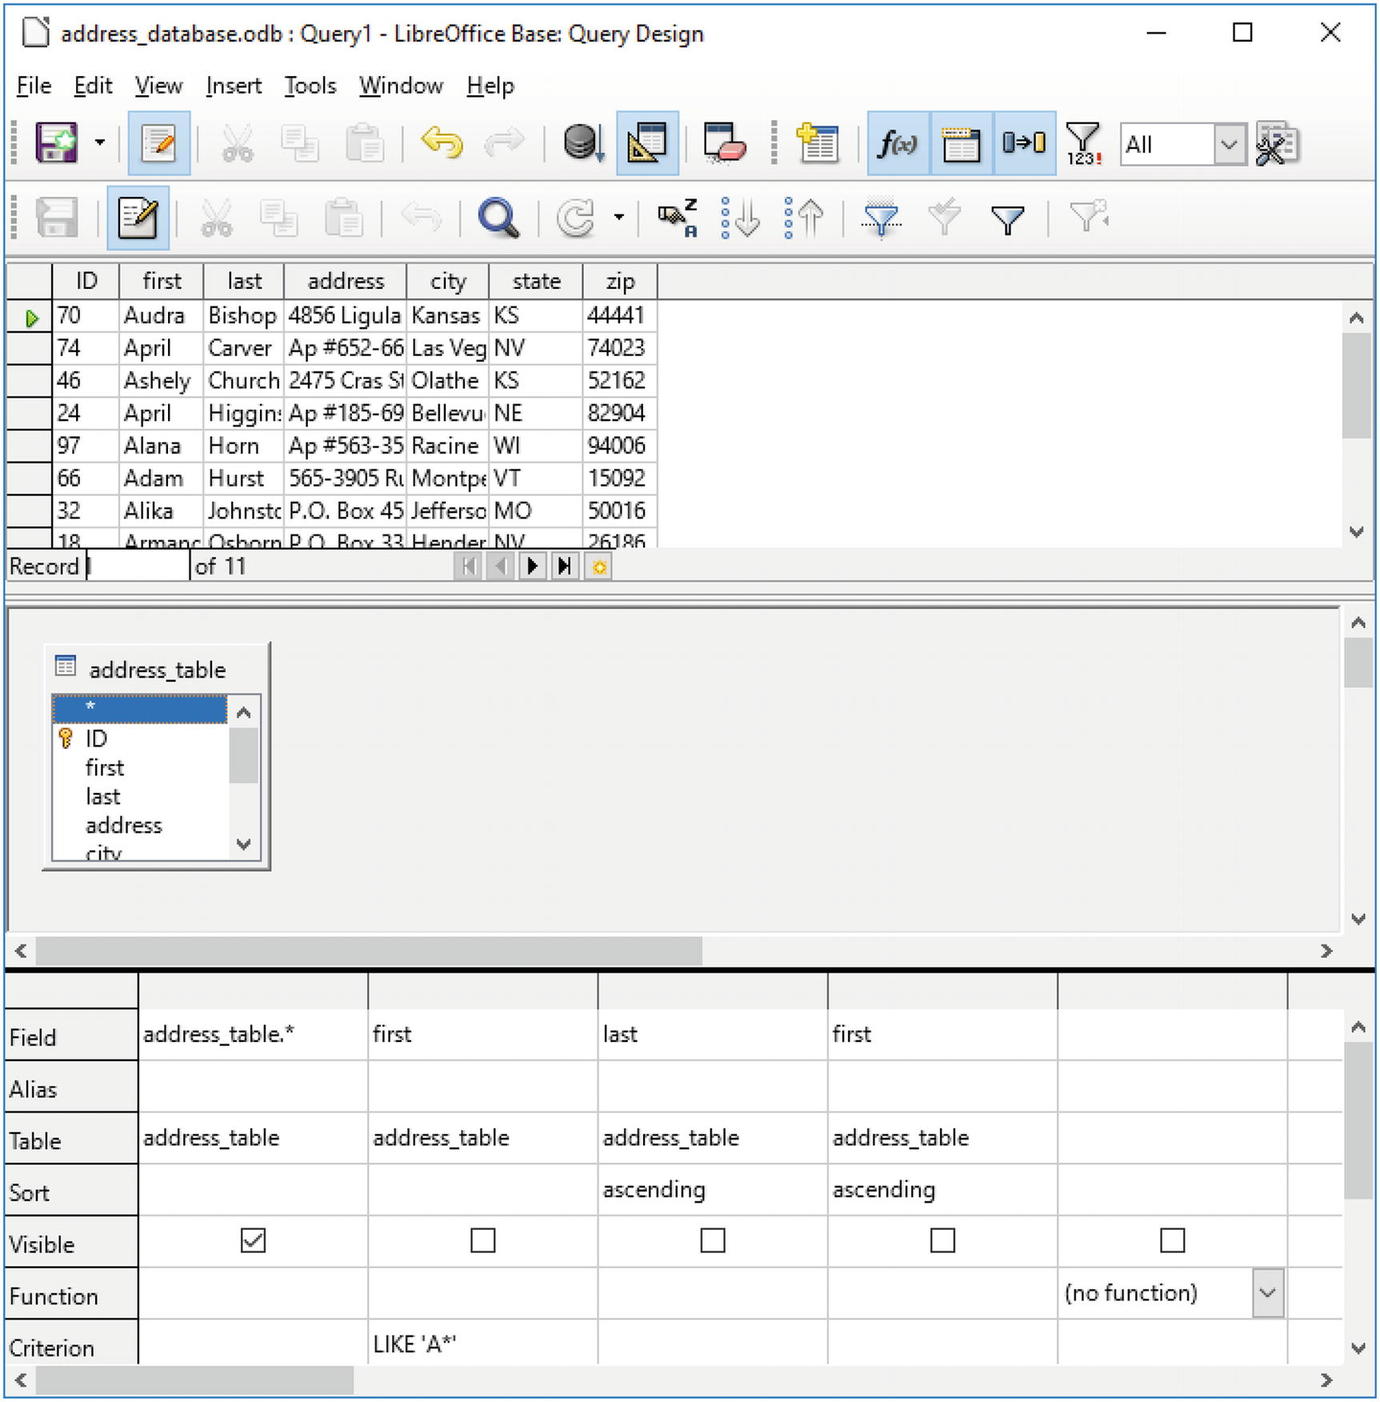
Figure 7-28 Completed query design
Now let’s select File ➤ Save. Figure 7-29 shows the Save As dialog that appears. Let’s save this query under the name A list.
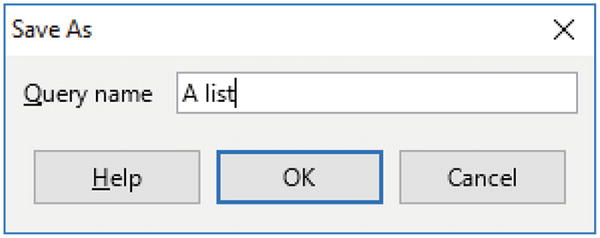
Figure 7-29 Saving the query
Let’s go back to the form letter and select Edit ➤ Exchange Databases. As Figure 7-30 shows, the query is now one of the data sources you can select.

Figure 7-30 Using a query as a data source
Now when you run the form letter using the procedure described, you’ll get just the names that begin with A.
Summary
LibreOffice is an adequate light database, but it does take a little getting used to before it is truly easy to use.
In this chapter, you saw how to connect the database to LibreOffice Writer to produce form letters. Unlike most commercial software, LibreOffice does not try to lock you into its proprietary system. You can, with a little work, interface to stronger and more professional databases such as PostgreSQL, MariaDB, and the big commercial one whose name we won’t mention.
The key here is that there are people out there who want nice office tools, and they are willing to write them or pay to get them written. The result is software like LibreOffice, which has all the useful features you find in Microsoft Office without the bloat and vendor lock-in.
Footnotes
1 Every database professional we know puts Microsoft Access in the quote marks when talking about it. They don’t consider it a real database.